Certificate Security Administration
Understanding Digital Certificate Security
Ivanti Connect Secure uses Public Key Infrastructure (PKI) to secure the data sent to clients over the Internet. PKI is a security method that uses public and private keys to encrypt and decrypt information. These keys are enabled and stored through digital certificates. A digital certificate is an encrypted electronic file issued by a certificate authority (CA) that establishes credentials for client/server transactions.
In public key cryptography, a public/private key pair is used to encrypt and decrypt data. Data encrypted with a public key, which the owner makes available to the public, can be decrypted with the corresponding private key only, which the owner keeps secret and protected. For example, if User1 wants to send User2 an encrypted message, User1 can encrypt it with User2's public key and send it. User2 then decrypts the message with the private key. The reverse process is also useful: encrypting data with a private key and decrypting it with the corresponding public key. This process is known as creating a digital signature. For example, if User1 wants to present User1's own identity as the sender of a message, User1 can encrypt the message with User1's private key and send the message to User2. User2 then decrypts the message with User1's public key, thus verifying that User1 is indeed the sender.
Ivanti Connect Secure systems use the following types of digital certificates to establish credentials and secure session transactions:
•Device certificates-A device certificate helps to secure network traffic to and from the Ivanti Secure Access Client service using elements such as company name, a copy of your company's public key, the digital signature of the CA that issued the certificate, a serial number, and expiration date.
•Trusted client CAs-A trusted client CA is a CA that issues client-side certificates. You can use trusted client CAs in the access management framework realm and role configurations to require certificates or certificates with specific attributes. For example, you may specify that users must present a valid client-side certificate with the OU attribute set to "yourcompany.com" to sign into the Users authentication realm.
•Trusted server CAs-A trusted server CA is a CA which issues certificates for web server. You can install a trusted server CA to validate the credentials of the web sites that users access through the Ivanti Secure Access Client service.
•Code-signing certificates-A code-signing certificate (also called an applet certificate) is a certificate that re-signs Java applets that are intermediated by Ivanti Connect Secure. You can use the self-signed code-signing certificate that comes pre-loaded, or you can install your own code-signing certificate.
•Client auth certificates-In this context, the client auth certificate is used when backend SSL servers require Ivanti Connect Secure to present a client certificate for authentication.
- The system can verify certificates that use SHA2 as the message digest.
- DSA certificates are not supported.
Using Device Certificates
This topic describes how to use device certificates.
Understanding Device Certificates
A device certificate helps to secure network traffic to and from the Ivanti Secure Access Client service using elements such as your company name, a copy of your company's public key, the digital signature of the Certificate Authority (CA) that issued the certificate, a serial number, and an expiration date.
When receiving the device certificate from the system, the client's browser first verifies whether the device certificate is valid and whether the user trusts the CA that issued the certificate. If the user has not already indicated that they trust the certificate issuer, the Web browser prompts the user with a warning saying connection is untrusted or there is a problem with the websites security certificate.
The system supports X.509 device certificates in DER and PEM encode formats (file extensions include .cer, .crt, .der, and .pem) as well as PKCS #12 (file extensions include .pfx and .p12). The system also supports the following features:
•Intermediate device CA certificates-Within a certificate hierarchy, one or more intermediate certificates are branched off a single root certificate.
•Multiple device certificates-When using multiple device certificates, each certificate handles validation for a separate hostname or fully qualified domain name (FQDN) and can be issued by a different CA.
Understanding Self-Signed Certificates
When you initialize the system with the serial console, the system creates a self-signed certificate that enables you to immediately begin setting up the system. Users are prompted with a security alert each time they sign in because the certificate is not issued by a trusted CA. Figure 193 shows the security alert.
The following figure depicts the Security Alert When the Device Certificate Is Not Issued by a Trusted CA:
Before promoting the system to production use, we recommend you replace the self-signed certificate with a certificate issued by a trusted CA.
Importing a Device Certificate and Private Key
The system uses certificates to verify itself to other network devices. A digital certificate is an electronic means of verifying your identity through a trusted third party, known as a Certificate Authority (CA). Your company might use its own enterprise CA server, or it might use a reputable third-party CA.
To import an enterprise root server certificate and private key:
1.Select System > Configuration > Certificates > Device Certificates.
2.Click Import Certificate & Key to display the configuration page.
3.One of the following options to complete the import procedure:
•If certificate file includes private key-When the certificate and key are contained in one file.
•If certificate and private key are separate files-When the certificate and key are in separate files.
•Import via System Configuration file-When the certificate and key are contained in a system configuration file. With this option, the system imports all of the certificates specified (including private keys and pending CSRs, but not the corresponding port mappings).
In the appropriate form, browse to the certificate and key files. If the file is password-protected, enter the password key.
4.Click Import.
Creating a Certificate Signing Request
If your company does not own a digital certificate for its Web servers, you can create a certificate signing request (CSR) and then send the request to a CA for processing. When you create a CSR, a private key is created locally that corresponds to the CSR. If you delete the CSR at any point, this file is also deleted, prohibiting you from installing a signed certificate generated from the CSR.
To create a certificate signing request:
1.Select System > Configuration > Certificates > Device Certificates.
2.Click New CSR to display the configuration page.
3.Complete the required information and click Create CSR.
4.Follow the onscreen instructions, which explain what information to send to the CA and how to send it.
When you submit a CSR to a CA authority, you might be asked to specify either the type of Web server on which the certificate was created or the type of Web server the certificate is for. Select apache (if more than one option with apache is available, select any). If you are prompted for the certificate format to download, select the standard format.
Do not send more than one CSR to a CA at one time. Doing so can result in duplicate charges.
- To view details of any pending requests that you previously submitted, click the Certificate Signing Request Details link.
- While generating a CSR, an apostrophe string is required, prefix it by an escape character. For example, "Children's" should be "Children\'s".
Importing a Signed Certificate Created from a CSR
When you receive the signed certificate from the CA, import it.
To import a signed device certificate created from a CSR:
1.Select System > Configuration > Certificates > Device Certificates.
2.Under Certificate Signing Requests, click the Pending CSR link that corresponds to the signed certificate.
3.Under Import signed certificate, browse and select the certificate file you received from the CA, and then click Import.
Understanding Intermediate Certificates
Within a certificate hierarchy, one or more intermediate certificates are branched off a single root certificate. The root certificate is issued by a root CA and is self-signed. Each intermediate certificate is issued by the certificate preceding it in the chain.
To use chained certificates in your deployment, you must ensure that the server (Ivanti Connect Secure) and client (Web browser) together contain the entire certificate chain. For example, you can secure traffic using a chain that stems from a VeriSign root certificate. If your users' browsers come preloaded with VeriSign root certificates, you need to install only the lower-level certificates in the chain. When your users sign in, the system presents any required certificates within the chain to the browser to secure the transaction. The system creates the proper links in the chain using the root certificate's IssuerDN. If the system and browser together do not contain the entire chain, the user's browser does not recognize or trust the device certificate because it is issued by another certificate instead of by a trusted CA.
You can upload one or more intermediate CAs in a PEM file. The entire chain must be sent to the client in descending order, starting with the root certificate.
Within a certificate hierarchy, one or more intermediate certificates are branched off a single root certificate. The root certificate is issued by a root CA and is self-signed. Each intermediate certificate is issued by the certificate preceding it in the chain.
To use chained certificates in your deployment, you must install the appropriate client-side certificates in each user's Web browser and then upload the corresponding CA certificates to Ivanti gateway's Intermediate CA store. Use one of the following methods to upload the certificate chain:
•Import the entire certificate chain in one file. The file must contain the root certificate and any subcertificates whose parents are in the file or already imported. You can include certificates in any order in the import file.
•Import the certificates one at a time in descending order. You must install the root certificate first, and then install the remaining chained certificates in descending order.
If you follow one of these methods, the system automatically chains the certificates together in the correct order and displays them hierarchically in the admin console.
If you install multiple certificates in a user's Web browser, the browser prompts the user to choose which certificate to use when signing in.
Importing Intermediate CA Certificates
To import an intermediate CA certificate:
1.Select System > Configuration > Certificates > Device Certificates.
2.Click the Intermediate Device CAs link to display the management page.
3.Click Import CA certificate.
4.Browse to the certificate file, select it, and click Import Certificate to complete the import operation.
Importing a Renewed Certificate That Uses the Existing Private Key
You can renew a device certificate in two ways:
•Submit a new CSR to a CA-This process is more secure because the CA generates a new certificate and private key and retires the older private key. To use this renewal method, you must first create a CSR through the admin console.
•Request renewal based on the CSR previously submitted to the CA-This process is less secure, because the CA generates a certificate that uses the existing private key.
When you order a renewed certificate, you must either resubmit your original CSR or ensure that the CA has a record of the CSR that you submitted for your current certificate.
To import a renewed device certificate that uses the existing private key:
1.Follow your CA's instructions for renewing a certificate that you previously purchased through them. Be sure to specify the same information you used in the original CSR. Your CA uses this information to create a new certificate that corresponds to the existing key.
Even though you specify the same information used in the original CSR, your root CA might have different serial numbers and keys from the original. You might need to support both new client and old client certificates during the transition period, which also requires that you maintain two root CA certificates (your existing certificate and the renewed certificate), at least temporarily
2.Select System > Configuration > Certificates > Device Certificates.
3.Click the link that corresponds to the certificate you want to renew.
4.Click Renew Certificate to display the page.
5.In the Renew the Certificate form, browse to the renewed certificate file, enter the password for the certificate key, and click Import.
Downloading a Device Certificate
You download the device certificate to your local host so that you can import it into other network devices as needed.
To download a device certificate:
1.Select System > Configuration > Certificates > Device Certificates.
2.Click the link of the device certificate you want to download to display the configuration page.
3.Click the Download link.
4.Save the file to the desired location.
Using Device Certificates with Virtual Ports
Virtual ports can be used to create multiple fully qualified domain names for user sign-in.
When a user tries to sign in using the IP address defined in a virtual port, the system uses the certificate associated with the virtual port to initiate the SSL transaction.
You can implement digital certificate security with virtual ports in either of the following ways:
•Associate all hostnames with a single certificate-With this method, you use a single wildcard certificate to validate the identity of all system hostnames, regardless of which hostname is used to sign into. A wildcard certificate includes a variable element in the domain name, making it possible for users who sign in from multiple hosts to map to the "same" domain. For example, if you create a wildcard certificate for *.yourcompany.com, the system uses the same certificate to validate its identity to users who sign in to employees.yourcompany.com as it does to users who sign into partners.yourcompany.com.
•Associate each hostname with its own certificate-With this method, you associate different hostnames with different certificates. Create a virtual port for each hostname. A virtual port activates an IP alias on a physical port. For example, you can create two virtual ports on a single appliance, mapping the first virtual port to the IP address 10.10.10.1 (sales.yourcompany.com) and the second virtual port to the IP address 10.10.10.2 (partners.yourcompany.com). Then you can associate each of these virtual ports with its own certificate, ensuring that users authenticate through different certificates.
To associate certificates with virtual ports:
1.Create the virtual ports.
2.Import the device certificates.
3.Associate the device certificates with the virtual ports:
1.Select System > Configuration > Certificates > Device Certificates.
2.Click the link of the device certificate you want to configure to display the configuration page.
3.Use the controls in the "Present certificate on these ports" section to associate ports with the certificate.
You can assign only one device certificate to the Management Port. If you assign a certificate other than the default device certificate to the Management Port, the default device certificate is automatically deselected as the default. If you do not select a device certificate for the Management Port, the system uses the default device certificate that is presented on the Internal port. You cannot assign certificates to Management Port VIPs.
Enabling Certificate Revocation Check for Device Certificate
To enable the CRL for Device Certificates:
1.Go to System > Configuration > Certificates > Device Certificates.
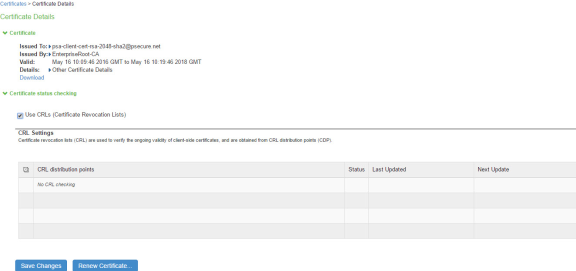
2.Click on the certificate from the list to go to the certificate details.
3.In the Certificate Details page, go to Certificate Status Checking and enable the Use CRLs (Certificate Revocation Lists) check box.
The following figure depicts the Enabling Certificate Revocation Check for Device Certificate : 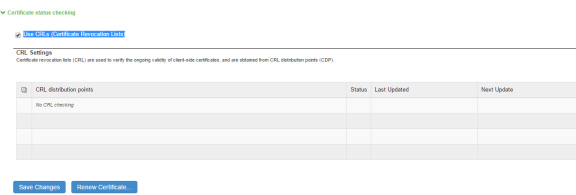
4.Click on Save Changes.
5.Import the CA or CA Chain that issued the Device Certificate to System > Configuration > Trusted Server CAs.
6.Once the CRL is successfully downloaded for Device Certificate, it is listed in the CRL distribution points.
The following figure depicts the Successful CRL Download for Device Certificate: 
This version of the Ivanti Connect Secure supports the 3072 bit key length for Device Certificates.
The following figure depicts the 3072-bit Key Length for Device Certificates:

Using Trusted Client CAs
This topic describes how to use trusted client Certificate Authorities (CAs).
Understanding Trusted Client CAs
A trusted client CA is a CA that you deem trusted by adding it to the trusted client CA store. The system trusts any certificate issued by that CA. To use client CA certificates, you must install and enable the proper certificates. Additionally, you must install the corresponding client-side certificates in your users' Web browsers, or you must use the MMC snap-in in your users' computer accounts (machine certificate). When validating a client-side CA certificate, the system verifies that the certificate is not expired or corrupt and that the certificate is signed by a CA that the system has been configured to recognize. If the CA certificate is chained, the system also follows the chain of issuers until it reaches the root CA, validating each issuer in turn. The system supports X.509 CA certificates in DER and PEM encode formats.
When you install a client-side certificate, you must determine whether to use the certificate to identify individual users or individual machines. To use the certificate to identify individual users, you must install the certificate in each user's individual certificate store. Then you must enable authentication using a certificate server, or you must enable authorization using realm, role, and/or resource policy settings. To use the certificate to identify individual machines, you must install the certificate in each computer's certificate store. Then you must configure a Host Checker policy that checks for the machine certificate and authorizes access to realms, roles, or resource policies based on the certificate's validity.
The system supports using the following additional features with CA certificates:
•Certificate servers-A certificate server is a type of local authentication server that allows you to authenticate users based solely on their certificate attributes rather than authenticating them against a standard authentication server (such as LDAP or RADIUS), and it requires specific certificates or certificate attributes.
•Certificate hierarchies-Within a certificate hierarchy, one or more subordinate certificates (called intermediate certificates) are branched off a root certificate to create a certificate chain. Each intermediate certificate (also called a chained certificate) handles requests for a part of the root CA domain. For example, you can create a root certificate that handles all requests to the yourcompany.com domain and then branch off intermediate certificates that handle requests to partners.yourcompany.com and employees.yourcompany.com. When you install a chained certificate, the system confirms that the chain is valid and allows users to authenticate using the leaf certificate (that is, the lowest certificate in the chain).
•Certificate revocation lists-Certificate revocation is a mechanism by which a CA invalidates a certificate before its expiration date. The CA publishes a certificate revocation list (CRL) which is a list of revoked certificates. Within CRLs, each entry contains the serial number of the revoked certificate, the date that the certificate was revoked, and the reason the certificate was revoked. The CA can invalidate a certificate for various reasons such as when the employee to whom the certificate is issued leaves the company, the certificate's private key is compromised, or the client-side certificate is lost or stolen. When the CA revokes a certificate, the system can appropriately deny access to users who present a revoked certificate.
Trusted Client CA Implementation Notes
Uploading a trusted client CA certificate does not enable client-side SSL authentication or authorization. To do so, you must use a certificate server, or enable certificate restrictions at the realm, role, or resource policy level, or create a Host Checker policy that verifies a machine certificate.
With client-side certificates, we strongly recommend that you advise users to close their Web browsers after signing out. If they do not, other users might be able to use their open browser sessions to access certificate-protected resources without reauthentication. After loading a client-side certificate, Internet Explorer caches the certificate's credentials and private key. The browser keeps this information cached until the user closes the browser (or, in some cases, until the user reboots the workstation). For details, see http://support.microsoft.com/?kbid=290345. To remind users to close their browsers, you can modify the sign out message on the Sign-in Pages tab.
Certificate authentication does not work on Internet Explorer 8, 9, and 11 if SSL 2.0 is enabled with other SSL and TLS versions. For details, see http://support.microsoft.com/kb/2851628.
Understanding CRLs
A certificate revocation list (CRL) is a mechanism for canceling a client-side certificate. As the name implies, a CRL is a list of revoked certificates published by a CA or a delegated CRL issuer. The system supports base CRLs, which include all of the company's revoked certificates in a single, unified list.
The system determines the correct CRL to use by checking the client's certificate. (When it issues a certificate, the CA includes CRL information for the certificate in the certificate itself.) To ensure that it receives the most up-to-date CRL information, the system periodically contacts a CRL distribution point to get an updated list of CRLs. A CRL distribution point (CDP) is a location on an LDAP directory server or Web server where a CA publishes CRLs. The system downloads CRL information from the CDP at the interval specified in the CRL, at the interval that you specify during CRL configuration, and when you manually download the CRL. The system also supports CRL partitioning. CRL partitioning enables you to verify portions of very large CRLs without spending the time and bandwidth necessary to access and validate a very large CRL or collection of large CRLs. CRL partitioning is only enabled when you employ the Specify the CDP(s) in the client certificates method (described below). In this case, the system validates the user by verifying only the CRL specified in the client certificate.
Although CAs include CRL information in client-side certificates, they do not always include CDP information as well. A CA can use any of the following methods to notify the system of a certificate's CDP location:
•Specify the CDP(s) in the CA certificate-When the CA issues a CA certificate, it might include an attribute specifying the location of the CDPs that the system should contact. If more than one CDP is specified, the system chooses the first one listed in the certificate and then fails over to subsequent CDPs, if necessary.
•Specify the CDP(s) in the client certificates-When the CA issues a client-side certificate, it might include an attribute specifying the location of the CDPs that the system must contact. If more than one CDP is specified, it chooses the first one listed in the certificate and then fails over to subsequent CDPs, if necessary. When the system employs CRL partitioning and the client certificate specifies only one CRL, it performs verification using only that CRL.
If you choose this method, the user receives an error on the first sign-in attempt because no CRL information is available. Once the system recognizes the client's certificate and extracts the CRL location, it can start downloading the CRL and subsequently validate the user's certificate. In order to successfully sign in, the user must try to reconnect after a few seconds.
•Require the administrator to manually enter the CDP location-If the CA does not include the CDP location in the client or CA certificates, you must manually specify how to download the entire CRL object. You can specify a primary and backup CDP. (Manually entering the CDP location provides the greatest flexibility because you do not need to reissue certificates if you change the CDP location.)
The system compares the user's certificate against the appropriate CRL during authentication. If it determines that the user's certificate is valid, the system caches the certificate attributes and applies them, if necessary, during role and resource policy checks. If it determines that the user's certificate is invalid, if it cannot contact the appropriate CRL, or if the CRL is expired, it denies the user access.
- The system supports only CRLs that are in a PEM or DER format and that are signed by the CA for which the revocations apply.
- The system only saves the first CRL in a PEM file.
Understanding OCSP
The Online Certification Status Protocol (OCSP) is a service that enables you to verify client certificates. When OCSP is enabled, the system becomes a client of an OCSP responder and forwards validation requests for users based on client certificates. The OCSP responder maintains a store of CA-published certificate revocation lists (CRLs) and maintains an up-to-date list of valid and invalid client certificates. After the OCSP responder receives a validation request, it validates the status of the certificate using its own authentication database, or it calls upon the OCSP responder that originally issued the certificate to validate the request. After formulating a response, the OCSP responder returns the signed response, and the original certificate is either approved or rejected.
Importing a Trusted Client CA Certificate
If you require users to provide a client-side certificate to sign in, you must upload the corresponding CA certificate. You can upload CA certificates manually, or you can configure the system to upload CA certificates automatically. The system uses the uploaded certificate to verify that the browser-submitted certificate is valid. In addition, you can specify whether or not to automatically import CA certificates for validation, and you can specify a CRL or OCSP retrieval method to use to automatically import CA certificates.
To import a trusted client CA certificate:
1.Select System > Configuration > Certificates > Trusted Client CAs to display the configuration page.
2.Click Import CA Certificate to display the configuration page.
3.Browse to the certificate file, select it, and click Import Certificate to complete the import operation.
Renewing a Certificate
To renew a certificate:
1.Select System > Configuration > Certificates > Trusted Client CAs.
2.Click the link for the certificate you want to renew.
3.Click Renew Certificate to display the import certificate page.
4.Browse to the certificate file, select it, and click Import Certificate to complete the import operation.
Configuring Auto-Importing of Client Certificates
To enable auto-importing:
1.Select System > Configuration > Certificates > Trusted Client CAs.
2.Click the Auto-Import Options button to display the options.
3.Complete the configuration described in the following table.
4.Save your changes.
The following table lists the Auto-Import Options Settings:
|
Settings |
Guidelines |
|
Auto-import trusted CAs |
Select this option to enable auto-import and display its configuration settings. |
|
Client Certificate Status Checking |
Select a method to validate the trusted client certificate: None-Do not validate. Use OCSP-Use the OCSP method, validating the client certificate in real-time, as needed. After you select this option, you can specify options for OCSP. Use CRLs-Use CRLs to validate the client certificate. After you select this option, you can specify options for CRL. Use OCSP with CRL fallback-Use the OCSP validation method when possible, but attempt to validate client certificates using CRLs if the OCSP method fails (for example, if the link to the OCSP responder fails). After you select this option, you can specify options for OCSP and CRL. Inherit from root CA-Use the method configured for the device certificate. |
|
CDP(s)/OCSP responder |
Select the location of the responder value: None-Do not use the responder. From client certificate-Use the responder value configured in the client certificate. From trusted CA certificate-Use the responder value configured in the trusted CA certificate that has been uploaded to the system. |
|
Verify imported CA certificates |
Select this option to verify that this trusted client CA is valid. Enabling this will check the CRL of this certificate's issuer, and repeat up the chain until reaching the root trusted client CA. |
|
Skip Revocation check when OCSP/CDP server is not available |
Select this option to instruct Ivanti Connect Secure to skip revocation check and accept end user certificates when either OCSP server or CDP server is not accessible over the network. This option is applicable to digital certificates used for end user authentication. The OCSP Timeout, applicable only for OCSP, is used as the maximum timeout for a network connection or data transfer operation while connecting to an OCSP Responder. An internal timeout will be used for CDP. Ivanti Connect Secure skips the revocation check in the following conditions: Server IP is not reachable Server Hostname is either not resolvable or resolving to non OCSP/CRL Server IP Proxy IP is either not reachable or not resolving Downloaded CRL has expired OCSP/CRL service in Server is not responding |
Configuring Options for Trusted Client CA Certificates
To configure options for the trusted client CA certificate:
1.Select System > Configuration > Certificates > Trusted Client CAs.
2.Click the certificate you want to configure.
3.Complete the configuration described in the following table.
The following table lists the Trusted Client CA Settings:
|
Settings |
Guidelines |
|
Certificate |
Use the expander buttons to display the following details: Issued To-Name and attributes of the entity to whom the certificate is issued. Issued By-Name and attributes of the entity that issued the certificate. Note that the value of this field must match either the Issued To field (for root certificates) or the Issued To field of the next highest certificate in the chain (for intermediate certificates). Valid Dates-Time range for which the certificate is valid. Details-Various certificate details, including its version, serial number, signature algorithm, CRL distribution points, public key algorithm type, and public key. |
|
Client Certificate Status Checking |
Select a method to validate the trusted client certificate: None-Do not validate. Use OCSP-Use the OCSP method, validating the client certificate in real-time, as needed. After you have selected this option and saved the configuration, you can specify options for OCSP. Use CRLs-Use CRLs to validate the client certificate. After you have selected this option and saved the configuration, you can specify options for CRL. Use OCSP with CRL fallback-Use the OCSP validation method when possible, but attempt to validate client certificates using CRLs if the OCSP method fails (for example, if the link to the OCSP responder fails). After you have selected this option and saved the configuration, can specify options for OCSP and CRL. Inherit from root CA- Use the method configured in Root CA. This Option is only applicable for Intermediate CA. |
|
Verify Trusted Client CA |
Select this option to verify that this trusted client CA is valid. Enabling this will check the CRL of this certificate's issuer, and repeat up the chain until reaching the root trusted client CA. |
|
Trusted for Client Authentication |
Clear this check box to exclude the CA from being trusted for client certificate authentication. You might want to do this if this CA was added for another trusting purpose, such as SAML signature verification or machine certificate validation. |
|
Participate in Client Certificate Negotiation |
This option is available only on Ivanti Connect Secure. Select this option to include the CA participation in client certificate selection for authentication. In client certificate authentication or restriction, the device sends a list of all trusted client CAs configured in the trusted client CA store with this flag enabled to the user's browser for user certificate selection. The browser prompts the client certificates whose issuer CA and/or root CA is in that list. This option allows you to control which client certificate(s) are prompted for selection. Clearing this option for all certificates in a CA chain results in those certificates not being prompted. |
|
Skip Revocation check when OCSP/CDP server is not available |
Select this option to instruct Ivanti Connect Secure to skip revocation check and accept end user certificates when either OCSP server or CDP server is not accessible over the network. This option is applicable to digital certificates used for end user authentication. The OCSP Timeout, applicable only for OCSP, is used as the maximum timeout for a network connection or data transfer operation while connecting to an OCSP Responder. An internal timeout will be used for CDP. Ivanti Connect Secure skips the revocation check in the following conditions: Server IP is not reachable Server Hostname is either not resolvable or resolving to non OCSP/CRL Server IP Proxy IP is either not reachable or not resolving Downloaded CRL has expired OCSP/CRL service in Server is not responding |
4.Save your changes.
5.If you have enabled CRL Checking, click CRL Checking Options.
6.If you have enabled OCSP options:
1. Click OCSP Options.
2. Complete the configuration described in following table.
The following table lists the OCSP Options Settings:
|
Settings |
Guidelines |
|
Use |
Select the type of OCSP responder to validate trusted client CAs: None-The system does not use OCSP to verify the status of certificates issued by this CA. Responder(s) specified in the CA certificate-The system uses OCSP responders specified in the imported client CA to perform verification. When you select this option, the system displays a list of OCSP responders specified in the imported CA (if any) and the last time they were used. Responder(s) specified in the client certificates-The system uses responders specified during client authentication to perform verification. When you select this option, the system displays a list of known OCSP responders (if any) and the last time they were used. Manually configured responders-The system uses primary and secondary OCSP responders at the addresses you specify. |
|
Device Certificate to sign the request |
Select the appropriate device certificate or leave the default (unsigned). |
|
Signature Hash Algorithm |
Select SHA-1 or SHA-2. |
|
Use Nonce |
A nonce is random data the system includes in an OCSP request and the OCSP responder returns in the OCSP response. The system compares the nonce in the request and response to ensure that the response is generated by the OCSP responder. If the two do not match, the system disregards the response and sends a new request. Nonces are a common way of preventing replay attacks. |
7.Save the configuration.
8.After you have added an OCSP responder to the list, you can click its link to display the page.
9.Complete the configuration described in Table 127.
The following table lists the Responder Signer Certificate Settings:
|
Settings |
Guidelines |
|
Responder Signer Certificate |
Browse to the network path or local directory location of a Responder Signer Certificate. This is the certificate the OCSP responder uses to sign the response. You must specify the Responder Signer Certificate if the signer certificate is not included in the response. |
|
Trust Responder Certificate |
Select this option to allow an OCSP responder certificate that matches the responder signer certificate. |
|
Revocation Checking |
Select this option to ensure that the certificate has not recently been revoked. This option has implications only if you specified the Use OCSP with CRL fallback option. |
|
Allow clock discrepancy |
Use this option to account for possible mismatches in timestamps between the system clock and the OCSP responder clock. If the mismatch is significant, the system disregards the response from the OCSP responder as out of date or expired. |
10.Save the configuration.
Configuring a Proxy Server for CRL Downloads and OCSP Status Checks
You can configure the system to send CRL download requests and OCSP status checks to the proxy server and collect the response. You might want to do this if you deploy proxy server to control access to the Internet.
The following types of CRL downloads can use the proxy server:
•CRL distribution points (CDPs) specified in the trusted client CAs
•CDPs specified in client certificates
•Manually configured CDPs
Similarly, the system can send OCSP requests to the OCSP responder through the proxy server. The OCSP responses are also received through the proxy server. This feature is useful when you deploy a large number of Ivanti access systems and the OCSP responders are located outside the network.
To configure a proxy server:
1.Select System > Configuration > Certificates > Trusted Client CAs.
2.Click Proxy Settings to display the page.
3.Complete the configuration described in Table 128.
4.Save the configuration.
The following table lists the Proxy Settings:
|
Settings |
Guidelines |
|
Use Proxy Server for HTTP-based CRL download |
Select to enable the CRL operations to use a proxy server. You can configure a proxy server for web-based URLs, not LDAP URLs. |
|
Use Proxy Server for HTTP-based OCSP status checking |
Select to enable the OCSP operations to use a proxy server. |
|
Host Address |
Specify either an IP address or a fully qualified domain name. |
|
Port |
Enter the proxy server port number if it is different from the default value of 80. |
|
Username/password |
If your proxy server required authentication, enter a username and password to log in to the proxy server. |
Using Trusted Server CAs
This topic describes trusted server certificate authorities (CAs).
Understanding Trusted Server CAs
All of the trusted root CAs for the Web certificates installed in Internet Explorer are preinstalled. You might need to install a trusted server CA for additional Web servers in the following situations:
•If you are using third-party integrity measurement verifiers (IMVs) that are installed on a remote server, you must upload the trusted root certificate of the CA that signed the remote server's server certificate.
•If you are using virus signature version monitoring with your own staging site for storing the current virus signatures list, you must upload the trusted root certificate of the CA that signed the staging server certificate.
You can install the trusted root CA certificate on the endpoint in any of the following ways:
•Use a CA certificate that is chained to a root certificate that is already installed on the endpoint, such as VeriSign.
•Upload the CA certificate and any intermediate CA certificates to the Ivanti Secure Access Client system. During client installation, the system automatically installs the trusted root device CA certificates on the endpoint. When prompted during installation, the user must allow the installation of the CA certificate(s).
•Prompt users to import the CA certificates on the endpoint using Internet Explorer or other Microsoft Windows tools. In other words, you can use common methods organizations use to distribute root certificates.
You cannot use CRL revocation checks for trusted server CA certificates.
Uploading Trusted Server CA Certificates
You can use the Trusted Server CAs page to upload the trusted root certificate of the CA that signed the Ivanti Secure Access Client service device certificate. If you upload a certificate chain, you must install the certificates one at a time in descending order starting with the root certificate (DER or PEM files), or you must upload a single file that contains the entire certificate chain (PEM files only). The system supports X.509 CA certificates in PEM (Base 64) and DER (binary) encode formats.
To upload CA certificates:
1.Select System > Configuration > Certificates > Trusted Server CAs to display the page.
2.Click Import Trusted Server CA to display the page.
3.Browse to the certificate file, select it, and click Import Certificate to complete the import operation.
Restoring the Prepopulated Group of Trusted Server CA Certificates
The System > Configuration > Certificates > Trusted Server CAs page is prepopulated with some of the trusted root CAs for the Web certificates installed in Internet Explorer and Windows. You can use the delete functionality on this page to delete CAs and the reset functionality to restore the list to the set that was installed during the upgrade. The reset operation clears all manually imported certificates.
To restore the prepopulated group of trusted CA certificates:
1.Select System > Configuration > Certificates > Trusted Server CAs.
2.Click Reset Trusted Server CAs.
3.Confirm that you want to restore the set of trusted server CAs that was installed when you upgraded.
Ivanti Connect Secure restores the group of prepopulated trusted server CAs that were installed upon upgrade. This operation clears all manually imported certificates.
Renewing a Trusted Server CA Certificate
If a trusted CA renews its certificate, you must upload the renewed CA certificate.
To import a renewed CA certificate:
1.Select System > Configuration > Certificates > Trusted Server CAs.
2.Click the link that corresponds to the certificate that you want to renew to display the page.
3.Click Renew Certificate.
4.Browse to the certificate file, select it, and click Import Certificate to complete the import operation.
Deleting a Trusted Server CA Certificate
You can delete any trusted server CA certificate, including preinstalled certificates.
To delete a trusted server CA certificate:
1.Select System > Configuration > Certificates > Trusted Server CAs.
2.Select the check box for the certificate you want to delete.
3.Click Delete, and then confirm that you want to delete the certificate.
Using Code-Signing CAs
•This topic describes how to use code-signing Certificate Authorities (CAs).
Understanding Code-Signing CAs
In a basic setup, the only required certificates are a device certificate and a code-signing certificate. Ivanti Connect Secure can use a single code-signing certificate to resign all Java applets and a single device certificate to intermediate all other PKI-based interactions. If the basic certificates do not meet your needs, however, you may install multiple device and applet certificates on Ivanti Connect Secure or use trusted CA certificates to validate users.
When Ivanti Connect Secure intermediates a signed Java applet, it re-signs the applet with a self-signed certificate by default. This certificate is issued by a nonstandard trusted root CA. As a result, if a user requests a potentially high-risk applet (such as an applet that accesses network servers), the user's Web browser alerts him that the root is untrusted.
If you import a code-signing certificate, Ivanti Connect Secure uses the imported certificate to re-sign applets instead of the default self-signed certificate. As a result, if a user requests a potentially high-risk applet, the user's Web browser displays an informational message instead of a warning. The message informs the user that the applet is signed by a trusted authority.
The system supports the following types of code-signing certificates:
•Microsoft Authenticode Certificate-The system uses this certificate to sign applets that run on either Microsoft JVM or Oracle JVM. Note that we only support Microsoft Authenticode Certificates issued by Verisign.
•JavaSoft Certificate-The system uses this certificate to sign applets that run on Oracle JVM. Note that we only support JavaSoft Certificates issued by Verisign and Thawte.
When deciding which code-signing certificate to import, consider the following browser dependencies:
•Internet Explorer-Internet Explorer running on new computers shipped with Windows pre-installed typically runs the Oracle JVM, which means that Ivanti Connect Secure needs to re-sign applets using the JavaSoft certificate.
Internet Explorer running on an older version of Windows that has been upgraded may run the Microsoft JVM, which means that Ivanti Connect Secure needs to re-sign applets using the Authenticode certificate.
•Netscape, Firefox, and Safari-These browsers only support the Oracle JVM, which means that Ivanti Connect Secure needs to re-sign applets using the JavaSoft certificate.
Additional Considerations for Oracle JVM Users
By default, the Java Plug-in caches an applet along with the code-signing certificate presented when a user accesses the applet. This behavior means that even after importing a code-signing certificate to Ivanti Connect Secure, the browser continues to present applets with the original certificate. To ensure that JVM users are not prompted with an untrusted certificate for applets accessed prior to importing a code-signing certificate, users need to flush the Java Plug-in cache. Alternatively, users can disable the cache, but this option may impact performance since the applet needs to be fetched each time the user accesses it.
The Java Plug-in maintains its own list of trusted Web server certificates that is different from the browser's list of trusted certificates. When a user accesses an applet, the JVM makes its own connection (in addition to the browser) to the Web server on which the applet resides. The user is then presented with the option to accept the Web server certificate in addition to the code-signing certificate. In these cases, the user needs to select the Always Trust button for the Web server certificate. Due to a built-in timeout in the Java Plug-in, if the user waits too long to select this button for the Web server certificate, the applet does not load.
Importing a Code-Signing CA Certificate
To import a code-signing certificate:
1.Select System > Configuration > Certificates > Code-Signing Certificates to display the configuration page.
2.Click Import Certificates to display the configuration page.
3.Complete the configuration described in teh following table.
The following table lists the Import Certificates Configuration Guidelines:
|
Settings |
Guidelines |
|
Microsoft Authenticode or Multipurpose Certificate for Internet Explorer (Microsoft JVM) |
|
|
Certificate File |
Browse to the network path or local directory location of your certificate key file. |
|
Private Key File |
Browse to the network path or local directory location of your private key file. |
|
Password Key |
Enter the password key. |
|
Javasoft Certificate for Internet Explorer & Netscape (Sun JVM) |
|
|
Keystore File |
Browse to the network path or local directory location of the keystore file. |
|
Password key |
Enter the password key. |
4.Click Import to complete the import operation.
5.When you have successfully imported a certificate, the system displays the Sign Ivanti Web Controls With dialog box. Specify the signing option:
•Default Ivanti Certificate-Select this option to sign all ActiveX and Java applets originating from Ivanti Connect Secure using the default Ivanti certificate. If you have previously selected an imported code-signing certificate and are reverting back to this option, after you click Save, a process icon appears indicating that the system is processing the request and re-signing all of the relevant code. This process can take several minutes to complete.
•Authenticode Certificate- For <Imported Certificate Name>-Select this option to sign all ActiveX and Java applets using the certificate or certificates imported in the previous step. When you click Save, a process icon appears indicating that the system is processing the request and signing all of the relevant code. This process can take several minutes to complete.
6.Use settings in the following tabs to specify which resources are signed or re-signed by the applet certificate:
•Users > Resource Policies > Web > Java > Code Signing
Using Code-Signing Certificates for Java Applets
To use code-signing certificates with Java applets:
1.Install the Java code-signing certificates. Use the System > Configuration > Certificates > Code-Signing Certificates page.
2.Use any of the following methods:
•Create code-signing policies specifying which applets to re-sign. Use the Users > Resource Policies > Web > Java > Code Signing page or the Users > Resource Profiles > Web Application Resource Profiles > Profile page. The policies must specify the hostnames from which the applets originate.
•Upload your own Java applets to Ivanti Connect Secure and configure the system to sign or re-sign the applets.
Using Client Auth Certificates
This topic describes how to use client auth certificates.
Understanding Client Auth Certificates
In certain corporate environments, servers on the LAN are protected with two-way SSL authentication. These servers require the client to authenticate by presenting a valid certificate.
In the remote access scenario, Ivanti Connect Secure is a client of these servers. You can configure Ivanti Connect Secure to present client authentication certificates to servers whenever it communicates over SSL. Note that Ivanti Connect Secure will present client certificates only when the SSL handshake requires it.
This feature authenticates Ivanti Connect Secure (as a client) to back-end servers. It also authenticates end users or end-user machines to servers on the corporate LAN.
The SSL protocol provides for mutual authentication of server and client at the time of session initiation. The client part of the authentication is optional. For enhanced security, some deployments may require that the client also authenticate itself with a certificate. Normally, when setting up an SSL connection with a server on behalf of the end user, Ivanti Connect Secure does not present any certificate to the server. It needs to be explicitly configured to present such certificate. This section explains how such configuration may be performed.
The basic idea is to upload a certificate, private key pair to the Ivanti access management framework and configure a mapping between this pair and a server resource. Subsequently, when an end user attempts to establish a connection with that server, Ivanti Connect Secure presents the associated certificate to the server. If no certificate is associated with the server in Ivanti Connect Secure's certificate store, then it is assumed that the server does not demand client certificate.
If, during the SSL handshake, the back-end server requests a client certificate but Ivanti Connect Secure doesn't send a certificate, the end user sees an "access denied" error message. Similarly, if the back-end server rejects the Ivanti Connect Secure certificate, the end user sees an "access denied" error message. If a certificate is configured, is successfully retrieved and no error is encountered during handshake, the user is granted access to the server.
The Ivanti access management framework allows client authentication certificates to be uploaded to the device in two ways: generate a CSR and upload the signed certificate returned by the CA, or directly import the certificate if one is available.
Importing a Client Auth Certificate
The Ivanti access management framework allows certificates that include the private key and for instances where the private key is in a separate file from the certificate. In addition, if your certificates have been exported into a system configuration file, you can import the system configuration file to upload the certificates.
To import the client auth certificates files:
1.Select System > Configuration > Certificates > Client Auth Certificates.
2.Click Import Certificate & Key to display the configuration page.
3.Complete the configuration described in Table 130.
4.Click Import.
The following table lists the Import Certificate and Key Settings:
|
Settings |
Guidelines |
|
If certificate file includes private key |
|
|
Certificate File |
Browse to the network path or local directory location of your private key file. |
|
Password Key |
Enter the password key. |
|
If certificate and private file are separate keys |
|
|
Certificate File |
Browse to the network path or local directory location of your certificate key file. |
|
Private Key File |
Browse to the network path or local directory location of your private key file. |
|
Password Key |
Enter the password key. |
|
Import via System Configuration file |
|
|
System Configuration File |
Browse to the network path or local directory location of the system configuration file. |
|
Password |
Enter the password. |
Renewing a Client Auth Certificate
To renew a certificate:
1.Select System > Configuration > Certificates > Client Auth Certificates.
2.Click the link that corresponds to the certificate you want to renew.
3.Click Renew Certificate to display the configuration page.
4.In the Renew the Certificate form, browse to the renewed certificate file, enter the password for the certificate key, and click Import.
Configuring Two-Way SSL Authentication
To configure two-way SSL authentication:
1.Import the certificates used for two-way SSL handshake in the System > Configuration > Certificates > Client Auth Certificates window.
2.Define the back-end resource and assign a certificate to be presented when accessing it using the Users > Resource Policies > Web > Client Authentication window.
Enabling Certificate Revocation Check for Client Auth Certificate
Client Auth Certificate Revocation Check is only applicable for TLS Syslog Backend Server. It is not applicable for any other backend server configured to ask Client Certificate.
To enable the CRL for Client Auth Certificate:
1.Go to System > Configuration > Certificates > Client Auth Certificates.
2.Click on the certificate from the list to go to the certificate details.
3.In the Certificate Details page, go to Certificate Status Checking and enable the Use CRLs (Certificate Revocation Lists) check box.
The following figure depicts Enabling Certificate Revocation Check for Client Auth Certificate:
4.Click on Save Changes.
5.Import the CA or CA Chain that issued the Client Auth Certificate to System -> Configuration -> Trusted Client CAs.
6.Once the CRL is successfully downloaded for Client Auth Certificate, it is listed in the CRL distribution points. See Figure.
The following figure depicts Successful CRL Download for Client Auth Certificate: 
This version of the Ivanti Connect Secure supports the 3072-bit key length for Client Auth Certificates. See following figure.
The following figure depicts the 3072-bit Key Length for Client Auth Certificates:

CRL Download for Device Certificate and Client Auth Certificate using LDAP based URL won't work due to dependency of LDAP Username and Password. In some cases, CDP LDAP URL hostname field is also required which is also not supported.
Mapping Resource Policies to the Certificate
Once the certificates have been uploaded, you can map resources to the certificates and the roles to which they apply.
1.Select Users > Resource Policies > Web > Client Authentication.
2.If you do not see the Client Authentication menu item, select Users > Resource Policies > Web.
1.Click the Customize button in the upper right corner of the console.
2.In the Customize View dialog box, select Client Authentication.
3.Click OK.
4.Click the Client Authentication tab.
5.Click New Policy.
6.On the New Policy page:
•Enter a name to label this source interface policy.
•Enter an optional description.
7.In the Resources section, specify the back-end servers to which this policy applies. Valid values/formats are: hostnames, IP addresses, IP Address:Port and Hostname:Port.
If you specify * as the resource, one certificate is used for all resources requesting a back-end certificate authentication. This certificate becomes the default certificate. Defining a default certificate is not required.
8.In the Roles section, select one of the following options:
•Policy applies to ALL roles-To apply this policy to all users.
•Policy applies to SELECTED roles-To apply this policy only to users who are mapped to roles in the Selected roles list. Make sure to add roles to this list from the Available roles list.
•Policy applies to all roles OTHER THAN those selected below-To apply this policy to all users except for those who map to the roles in the Selected roles list. Make sure to add roles to this list from the Available roles list.
9.In the Action section, select one of the following options:
•Use the Client Authentication Certificate Below-Select this option to associate this policy with a client authentication certificate. Select the certificate to use from the Certificate menu.
•If the Certificates menu is blank, no certificates have been uploaded to the System > Configuration > Certificates > Client Auth Certificates window.
•Do not use Client Authentication-If this option is selected, the system does not perform client authentication for the configured resource.
•Use Detailed Rules-Select this option to specify one or more detailed rules for this policy.
10.Click Save Changes.
Mapping a Client Authentication Auto-Policy
A client authentication auto-policy option is available on the Users > Resource Profiles > Web page. If the back-end server requires two-way SSL authentication, this auto-policy lets you configure a certificate to be presented during the SSL handshake.
1.Select Users > Resource Profiles > Web.
2.Follow the process as a regular resource profile for defining the name and type.
3.Select the Autopolicy: Client Authentication check box.
4.In the Resource field, specify the back-end server. Valid formats/values are: hostnames, IP addresses, IP Address:Port, and HostName: Port.
If you specify * as the resource, one certificate is used for all resources requesting a back-end certificate authentication. This certificate becomes the default certificate. Defining a default certificate is not required.
5.Click Save Changes.
Checking Certificate Expiry
Every time a certificate is added to Ivanti Connect Secure (through manual import, XML import, or upgrade), its expiration date is stored in the cache. A background process checks all certification expiration dates once in every 7 days. If any certificate is about to expire soon, the administrator is notified. Notifications to administrators include a banner message in the adminUI upon login, SNMP trap, and log messages in the event log. The administrator can configure how soon he or she wishes to be notified of the expiration. The default is 60 days in advance. It can be configured to a value starting from 7 days in advance to 999 days in advance of the expiration of the certificate. The expiration warning window is common to all types of certificates. However, the administrator can choose to enable or disable this feature for each certificate category in the user interface.
Features of Certificate Expiry Warning
An administrator can know about certificates that are going to expire in the near future and avoid any unexpected downtime due to certificate expiry. Administrators can take corrective actions whenever a certificate is about to expire in order to ensure there is no service disruption.
•An administrator can enable/disable this feature for each category of certificates.
•An administrator can set how many days in advance I should be notified about certificate expiry. This is common to all certificate types.
•Read only administrators are not allowed to change these values.
•This feature is enabled by default just after upgrade or a Binary/XML import.
•When an administrator logs in to a cluster, the certificate expiration warning messages is seen for both nodes.
To check validity of certificates:
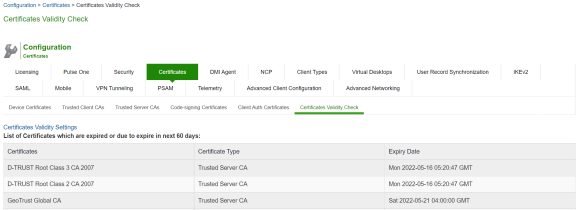
1.Click on Configuration-> Certificates -> Certificates Validity Check.
2.The page displays the Certificate Expiry Notification Duration and the Certificate Types.
3.Enter the number of days before which the warning must be displayed.
4.Select the type of certificate for which the expiry notification is required. By default, all types of certificates will be selected if no selection is made.
The following figure shows certificates validity check page.:

5.Click on Check Now. The Certificate Category, DN name and date of expiry are displayed as seen in the following figure.
The following figure depicts the Certificate Expiration Page:
6.When an administrator logs in, a warning sign is displayed, if there are any certificates that expire within the configured number of days.
The following figure depicts the Warning Signal Displayed (System > Status > System Status Overview): 
7.To check if the certificate expiry warning is logged, click on log monitoring. The certificate expiry warning logs are displayed.
The following figure depicts the Certificate Expiry Warning Logs (On Main Menu bar: System):

8.Already expired certificates under the tabs Device Certificates, Trusted client CAs, Trusted Server CAs and Client auth certificates are displayed in red color.
9.For code signing certificates, if it has expired, a string "EXPIRED" is displayed in red color. The image below displays code signing certificates that have expired.