Single Sign-On
About Single Sign-On
Single sign-on (SSO) is a process that allows pre-authenticated Ivanti Connect Secure users to access other applications or resources that are protected by another access management system without having to re-enter their credentials.
The system provides several integration mechanisms that allow you to configure SSO connections from the system to other servers, applications, and resources. SSO mechanisms include:
•Remote SSO-The system provides loose integration with any application that uses a static POST action within an HTML form to sign in users. You can configure the system to post system credentials, LDAP attributes, and certificate attributes to a Web-enabled application, as well as set cookies and headers, allowing users to access the application without re-authenticating.
•SAML-The system provides loose integration with selected access management systems that use the Security Assertion Markup Language (SAML) to communicate with other systems. You can enable users to sign in to the system and then sign in to and access resources protected by the access management system without re-authenticating. You can also enable users to sign in to another access management system and then access resources protected by the system, without re-authenticating.
•Basic authentication and NTLM intermediation to Intranet sites-The system allows you to automatically submit user credentials to other web sites and proxies within the same Intranet zone. When you enable basic authentication intermediation through the Users > Resource Profiles > Web Applications/Pages page of the admin console, the system submits the cached credentials to Intranet web sites whose hostnames end in the DNS suffix configured in the System > Network > Overview page. To maximize security, you may also configure the system to use base-64 encoding to protect the cached credentials.
•Active Directory server-The system allows you to automatically submit Active Directory SSO credentials to other web sites and Windows file shares within the same Intranet zone that are protected by native NTLM authentication. When you enable this option, the system submits cached credentials to NTLM-protected web sites whose hostnames end in the DNS suffix configured in the System > Network > Overview page of the admin console.
•Terminal Sessions-When you enable the Terminal Services feature for a role, you allow users to connect to applications that are running on a Windows terminal server or Citrix MetaFrame server without re-authenticating.
The system determines which credentials to submit to the SSO-enabled server, application, or resource based on the mechanism you use to connect. Most mechanisms allow you to collect user credentials for up to two authentication servers in the system sign-in page and then submit those credentials during SSO.
The remaining mechanisms use unique methods for enabling SSO from Ivanti Connect Secure to the supported application.
About Multiple Sign-In Credentials
When configuring an authentication realm, you can enable up to two authentication servers for the realm. Enabling two authentication servers allows you to require two different sets of credentials-one for Ivanti Connect Secure and another for your SSO-enabled resource-without requiring the user to enter the second set of credentials when accessing the resource. It also allows you to require two-factor authentication in order to access the device.
Task Summary: Configuring Multiple Authentication Servers
To enable multiple authentication servers:
1.Create authentication server instances through the Authentication > Auth. Servers page of the admin console.
2.Associate the authentication servers with a realm using settings in the following pages of the admin console:
•Users > User Realms > Select Realm> General
•Administrators > Admin Realms > Select Realm > General
3.(Optional) Specify password length restrictions for the secondary authentication server using settings in the following pages of the admin console:
•Users > User Realms > Select Realm > Authentication Policy > Password
•Administrators > Admin Realms > Select Realm > Authentication Policy > Password
Task Summary: Enabling SSO to Resources Protected by Basic Authentication
To enable single sign-on to Web servers and Web proxies that are protected by basic authentication, you must:
1.Specify a hostname that ends with the same prefix as your protected resource using settings in the System > Network > Overview page of the admin console. (The system checks the hostnames to ensure that it is only enabling SSO to sites within the same Intranet.)
2.Enable users to access Web resources, specify the sites to which you want the system to submit credentials, create autopolicies that enable basic authentication intermediation single sign-on, and create bookmarks to the selected resources using settings in the Users > Resource Profiles > Web Application/Pages > [Profile] page of the admin console.
3.If you want users to access Web servers through a proxy, configure the system to recognize the appropriate servers and proxies using settings in the following pages of the admin console:
•Use settings in Users > Resource Policies > Web > Web proxy > Servers page to specify which Web servers you want to protect with the proxy.
•Use settings in the Users > Resource Policies > Web > Web proxy > Policies page to specify which proxies you want to use and which servers (above) you want the proxies to protect. You may specify individual resources on the server or the entire server.
Enabling SSO to Resources Protected by NTLM
The system supports web proxies that perform NTLM authentication. However, the following case is not supported: a proxy exists between the system and the back-end server and the back-end server performs the NTLM authentication.
To enable single sign-on to Web servers, Windows file servers, and Web proxies that are protected by NTLM, you must:
1.Specify a hostname that ends with the same suffix as your protected resource using settings in the System > Network > Overview page of the admin console. (The system checks the hostnames to ensure that it is only enabling SSO to sites within the same Intranet.)
2.Enable users to access the appropriate type of resource (Web or file), specify the sites or servers to which you want the system to submit credentials, create autopolicies that enable NTLM single sign-on, and create bookmarks to the selected resources using settings in the following pages of the admin console:
•Users > Resource Profiles > Web Application/Pages > [Profile]
•Users > Resource Profiles > File Browsing Resource Profiles> [Profile]
3.If you want users to access Web servers through a proxy, configure the system to recognize the appropriate servers and proxies using settings in the following pages of the admin console:
4.Use settings in Users > Resource Policies > Web > Web proxy > Servers page to specify which Web servers you want to protect with the proxy.
5.Use settings in the Users > Resource Policies > Web > Web proxy > Policies page to specify which proxies you want to use and which servers (above) you want the proxies to protect. You may specify individual resources on the server or the entire server.
Multiple Sign-In Credentials Execution
The following diagram illustrates the process that the system uses to collect and authenticate multiple user credentials and submit them to SSO-enabled resources. Each of the steps in the diagram are described in further detail in the sections that follow.
The following figure depicts Collecting and Submitting Credentials from Multiple Servers:
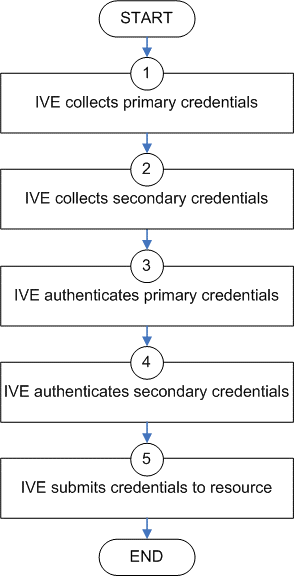
Step 1: Collect the User's Primary Credentials
When the user signs in to a device, the system prompts him to enter his primary server credentials. The system saves these credentials to submit to the SSO resource later, if necessary. Note that the system saves the credentials exactly as the user enters them-it does not pre-pend or append them with additional information such as the user's domain.
Step 2: Collect or Generate the User's Secondary Credentials
You may configure the system to either manually collect or automatically generate the user's secondary set of credentials. If you configure the system to:
•Manually collect the user's secondary credentials-The user must enter his secondary credentials directly after entering his primary credentials.
•Automatically generate the user's credentials-The system submits the values you specified in the administration console during setup. By default, the system uses the <username> and <password> variables, which hold the username and password entered by the user for the primary authentication server.
For example, you may configure an LDAP server as your primary authentication server and an Active Directory server as your secondary authentication server. Then, you may configure the system to infer the user's Active Directory username but require the user to manually enter his Active Directory password. When the system infers the Active Directory username, it simply takes the name entered for the LDAP server (for example, JDoe@LDAPServer) and resubmits it to the Active Directory (for example, JDoe@ActiveDirectoryServer).
Step 3: Authenticate the Primary Credentials
After the system collects all required credentials, it authenticates the user's first set of credentials against the primary authentication server. Then:
•If the credentials successfully authenticate, the system stores them in the <username> and <password> session variables and continues on to authenticate the secondary credentials.
If you authenticate against a RADIUS server that accepts dynamic, time-sensitive passwords, you may choose to not store user passwords using the system session variable.
•If the credentials do not successfully authenticate, the system denies the user access to the device.
Step 4: Authenticate the Secondary Credentials
After authenticating the primary credentials, the system authenticates the secondary credentials. Then:
•If the credentials successfully authenticate, the system stores them in the <username[2]> and <password[2]> session variables and allows the user access to the device. You may also access these variables using the syntax <username@SecondaryServer> and <password@SecondaryServer>.
If you authenticate against a RADIUS server that accepts dynamic, time-sensitive passwords, you may choose to not store user passwords using the system session variable.
•If the credentials do not successfully authenticate, the system does not save them. Depending on how you configure your authentication realm, the system may allow or deny the user access to a device if his secondary credentials do not successfully authenticate.
Step 5: Submit Credentials to an SSO-Enabled Resource
After the user successfully signs in to a device, he may try to access an SSO-enabled resource using a pre-configured bookmark or other access mechanism. Then, depending on which type of resource the user is trying to access, the system submits different credentials. If the user is trying to access a:
•Web SSO or Terminal Services resource-The system submits the credentials that you specify through the admin console, such as <username> (which submits the user's primary credentials to the resource) or <username[2]> (which submits the user's secondary credentials to the resource). Or, if the user has entered a different username and password through the end user console, the system submits the user-specified credentials.
The system does not support submitting ACE server, or certificate server credentials to a Web SSO or terminal services resource. If you configure the system to submit credentials from one of these types of primary authentication servers, it submits credentials from the user's secondary authentication server instead. If these credentials fail, the system prompts the user to manually enter his username and password.
•Resource protected by a Web server, Windows server, or Web proxy that is using NTLM authentication-The system submits credentials to the backend server or proxy that is protecting the Web or file resource. Note that you cannot disable NTLM authentication through the system-If a user tries to access a resource that is protected by NTLM, the system automatically intermediates the authentication challenge and submits credentials in the following order:
1.(Windows file resources only) Administrator-specified credentials-If you create a resource profile that specifies credentials for a Windows file resource and the user then accesses the specified resource, the system submits the specified credentials.
2.Cached credentials-If the system does not submit administrator-specified credentials or the credentials fail, it determines whether it has stored credentials for the specified user and resource in its cache. (See below for information about when the system caches credentials.) If available, the system submits its stored credentials.
3.Primary credentials-If the system does not submit cached credentials or the credentials fail, it submits the user's primary system credentials provided that following conditions are true:
•The resource is in the same Intranet zone as the device (that is, the resource's hostname ends in the DNS suffix configured in the System > Network > Overview page of the admin console).
•(Web proxies only) You have configured the system to recognize the Web proxy through settings in the Users > Resource Policies > Web > Web Proxy pages of the admin console.
•The credentials are not ACE credentials.
•(RADIUS credentials only) You specify in the RADIUS configuration page that the RADIUS server does not accept one-time passwords.
4.Secondary credentials-If the primary credentials fail, the system determines whether it has secondary credentials for the user. If available, the system submits the user's secondary credentials provided that the conditions described for primary credentials are true.
5.Last-entered credentials-If the system does not submit secondary credentials or if the credentials fail, it determines whether it has stored credentials for the specified user and a different resource in its cache. (See below for information about when the system caches credentials.) If available, the system submits its stored credentials provided the conditions described for primary credentials are true.
6.User-specified credentials (prompt)-If the system does not submit last-entered credentials or if the credentials fail, it prompts the user to manually enter his credentials in the intermediate sign-in page. If the user selects the "Remember password?" check box, the system caches the user-specified credentials and, if necessary, resubmits them when the user tries to access the same resource again. Note that when the system caches these credentials, it remembers the specific user and resource, even after the user signs out of the device.
•Resource protected by a Web server or Web proxy using basic authentication-The system submits credentials in the following order to the backend server or proxy that is protecting the Web resource:
1.Cached credentials-If the system does not submit administrator-specified credentials or the credentials fail, it determines whether it has stored credentials for the specified user and resource in its cache. If available, the system submits its stored credentials.
2.Primary credentials-If the system does not submit cached credentials or the credentials fail, it submits the user's primary system credentials provided that following conditions are true:
•The resource is in the same Intranet zone as the device (that is, the resource's hostname ends in the DNS suffix configured in the System > Network > Overview page of the admin console).
•(Web proxies only) You have configured the system to recognize the Web proxy through settings in the Users > Resource Policies > Web > Web Proxy pages of the admin console.
•The credentials are not ACE credentials.
•(RADIUS credentials only) You specify in the RADIUS configuration page that the RADIUS server does not accept one-time passwords.
3.Secondary credentials-If the primary credentials fail, the system determines whether it has secondary credentials for the user. If available, it submits the user's secondary system credentials provided that the conditions described for primary credentials are true.
4.Last-entered credentials-If the system does not submit secondary credentials or if the credentials fail, it determines whether it has stored credentials for the specified user and a different resource in its cache. If available, the system submits its stored credentials provided the conditions described for primary credentials are true.
5.User-specified credentials (prompt)-If the system does not submit last-entered credentials or if the credentials fail, it prompts the user to manually enter his credentials in the intermediate sign-in page. If the user selects the "Remember password?" check box, the system caches the user-specified credentials and, if necessary, resubmits them when the user tries to access the same resource again. Note that when the system caches these credentials, it remembers the specific user and resource, even after the user signs out of the device.
The system does not support the multiple credential authentication mechanism described in this section with the SAML SSO mechanisms.
You cannot define a certificate server, or SAML server as a secondary authentication server.
The system supports basic authentication and NTLM challenge/response scheme for HTTP when accessing web applications, but does not support HTTP-based cross-platform authentication via the negotiate protocol.