Customizable Admin and End-User UIs
Customizable Admin and End-User UIs
The Ivanti Connect Secure enables you to customize a variety of elements in both the admin console and the end-user interface. This section contains information about which elements you can customize and where you can find the appropriate configuration options.
You can customize the look and feel of the following user interface elements in the admin console:
•Sign-in pages (default and custom)-You can customize the page that administrators see when they sign into the admin console using settings in the Authentication > Signing In > Sign-in Pages page. Using settings in this page, you can create welcome messages, sign out messages and other instructions, control page headers, customize select error messages, and create a link to a custom help page within the default system sign-in page. Or, you can upload your own custom sign-in page.
•UI look and feel-You can customize the header, background color, and logo displayed in the admin console using settings in the Administrators > Admin Roles > Select Role > General > UI Options page. You can also use settings in this page to enable or disable the "fly out" hierarchical menus that appear when you mouse over one of the menus in the left panel of the admin console.
•System utilization graphs-You can choose which system utilization graphs to display on the opening page of the admin console using settings in the System > Status > Overview page. You can also use settings in this page to fine-tune the look and data within each of the graphs.
•Show auto-allow options-You can show or hide the auto-allow option from yourself or other administrators who create new bookmarks for roles using settings in the Maintenance > System > Options page.
•User role views-You can use customization options on the Users > User Roles page to quickly view the settings that are associated with a specific role or set of roles.
•User realm views-You can use customization options on the Users > User Realms page to quickly view the settings that are associated with a specific user realm or set of user realms.
•Resource policy views-You can limit which resource policies to display on any given resource policy page based on user roles. For instance, you can configure the Users > Resource Policies > Web page of the admin console to only display those resource policies that are assigned to the "Sales" user role. You can customize these using settings in the Users > Resource Policies > Select Policy Type page of the admin console.
•Web resource policy views-You can limit which Web resource policy configuration pages to display using settings in Users > Resource Policies > Web > Policy Type of the admin console.
•Administrator roles-You can delegate select responsibilities to other administrators using settings in the Administrators > Admin Roles section of the admin console. In doing so, you can restrict the visibility of certain options and capabilities to other administrators.
Customizable End-User Interface Elements Overview
The Ivanti Connect Secure enables you to customize the look and feel of the following elements in the end-user interface:
•Sign-in pages (default and custom)-You can customize the page that users see when they sign into the admin console using settings in the Authentication > Signing In > Sign-in Pages page. Using settings in this page, you can create welcome messages, sign out messages and other instructions, control page headers, customize select error messages, and create a link to a custom help page within the default system sign-in page. Or, you can upload your own custom sign-in page.
•UI look and feel-You can customize the header, background color, and logo displayed in the admin console using settings in the Users > User Roles > Select Role > General > UI Options page. You can also use settings in this page to specify the first page the users see after they sign in, the order in which to display bookmarks, the help system to display to users, and various toolbar settings.
•Default messages and UI look and feel-You can specify what the default look and feel should be for all user roles using settings in Users > User Roles > [Default Options] pages of the admin console. You can also use settings in these pages to define the default errors that users see when they try to access a blocked site, SSO fails, or SSL is disabled.
REST Support for Ivanti Connect Secure
The REST API provides a standardized method for Next-Gen firewalls, NAC devices, and third-party systems to interact with Ivanti Connect Secure. Representational state transfer (REST) or RESTful Web services are one way of providing interoperability between computer systems on the Internet. REST-compliant Web services allow requesting systems to access and manipulate textual representations of Web resources using a uniform and predefined set of stateless operations. In a RESTful Web service, requests made to a resource's URI will elicit a response that may be in XML, HTML, JSON or some other defined format. Ivanti Connect Secure supports JSON format only.
REST methods determine the HTTP method for manipulating the resources defined in the service operation. The kind of operations available include those predefined by the HTTP verbs GET, POST, PUT, DELETE and so on. The response may confirm that some alteration has been made to the stored resource, and it may provide hypertext links to other related resources or collections of resources. By making use of a stateless protocol and standard operations, REST systems aim for fast performance, reliability, and the ability to grow, by re-using components that can be managed and updated without affecting the system as a whole, even while it is running.
REST API Support for Ivanti Connect Secure involves only Configuration APIs. Also, Ivanti Connect Secure supports only the GET, POST, PUT and DELETE APIs.
Authentication for REST APIs
Basic authentication using the HTTP authorization header is used to authenticate username/password on the Administrators auth. server. It is expected that the user is already configured in the Administrators auth. server. On a successful login, a random token (api_key) is generated once and sent back as a JSON response. Further access to APIs can use this api_key in their Authorization header for access.
A new random api_key is generated on a successful login. The user can continue to use this key till the administrator:
•Enables/disables the user account
•Enables/disables the Allow REST API feature for that user
The entire communication is over TLS. An example is explained below:
REQUEST
GET /api/v1/auth HTTP/1.1
Host: 10.209.112.106
Authorization: Basic YWRtaW5kYjpkYW5hMTIz
Content-Type: application/json
RESPONSE
HTTP/1.1 200 OK
Cache-Control: no-store
Connection: Keep-Alive
Content-Type: application/json
Expires: -1
Keep-Alive: timeout=15
{ "api_key": "p5mMlc7RQu81R2NvssLCCZhP05kf0N2ONFeYeLXX6aU=" }
Authorization header for all future request should perform Basic Auth using above api_key value as username and password as empty.
REQUEST
GET /api/v1/configuration HTTP/1.1
Host: 10.209.112.106
Authorization: Basic cDVtTWxjN1JRdTgxUjJOdnNzTENDWmhQMDVrZjBOMk9ORmVZZUxYWDZhVT06
RESPONSE
HTTP/1.1 200 OK
Content-Length ?283
Content-Type ?application/json
{
"administrators":
{ "href": "/api/v1/configuration/administrators" }
,
"authentication":
{ "href": "/api/v1/configuration/authentication" }
,
"system":
{ "href": "/api/v1/configuration/system" }
,
"users":
{ "href": "/api/v1/configuration/users" }
}
Configuration of REST APIs
The configuration of Ivanti Connect Secure can be accessed using REST APIs. The Ivanti Connect Secure configuration is represented in a json form when accessed using REST APIs. The structure of the JSON representation is very similar to the structure of Ivanti Connect Secure XML configuration.
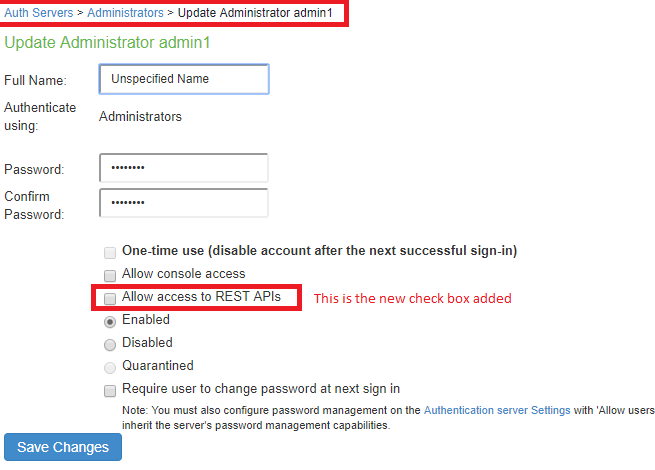
A new admin UI option for users under "Administrators" authserver has been added. REST API authentication would be successful only for those users who have this option enabled.
To enable this checkbox:
1.Go to Authentication > Auth. Servers >Administrators > Update Administrator admin1.
2.Select the Allow access to REST APIs checkbox. See REST API Configuration
3.Click on Save Changes.
Enabling REST API Access for an Administrator from the Console
REST API access for an administrator user can be enabled during initial configuration and while creating a new administrator user.
During initial provisioning, there are no administrator accounts configured and the system prompts to create a new administrator user. For the option "Do you want to enable REST API access for this administrator (y/n):", enter y. Note that any characters other than "y" or "n" are invalid responses.
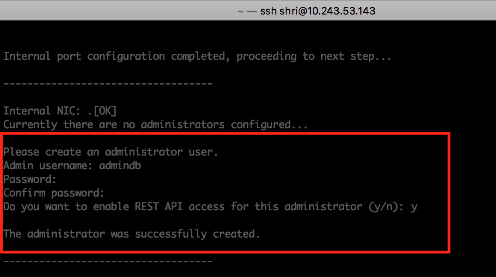
When creating a new administrator user from the console using the option "2. Create admin username and password", for the option "Do you want to enable REST API access for this administrator (y/n):", enter y.

Sample GET/POST/PUT/DELETE Request and Responses
Below is a sample of GET/POST/PUT/DELETE request and responses:
POST API Call: Create User for Existing Local Authentication Server
REQUEST
POST /api/v1/configuration/authentication/auth-servers/auth-server/Sys-Local/local/users/user HTTP/1.1
Host: 10.209.112.106
Authorization: Basic cDVtTWxjN1JRdTgxUjJOdnNzTENDWmhQMDVrZjBOMk9ORmVZZUxYWDZhVT06
Content-Type: application/json
{
"change-password-at-signin": "false",
"console-access": "false",
"enabled": "true",
"fullname": "user0001",
"one-time-use": "false",
"password-encrypted": "3u+UR6n8AgABAAAATjgR31G4neKag2hxI+wjaNsRRZGD6wMQVkLEQv+DPQZdUrQi5IWPuihJf8tnrsBV0XCQly6WgZ79Jv1fyzmssg==",
"username": "user0001"
}
RESPONSE
200 OK
Content-Length: 122
Content-Type: application/json
{
"result": {
"info": [
{
"message": "Operation succeed without warning or error!"
}
]
}
}
Representing Configuration Resources Using Links
When performing a GET request on a configuration resource, the json response may have "href" attributes to represent smaller resources within.
As an example, "GET /api/v1/configuration" returns:
{
"users": {
"href": "/api/v1/configuration/users"
},
"system": {
"href": "/api/v1/configuration/system"
},
"authentication": {
"href": "/api/v1/configuration/authentication"
},
"administrators": {
"href": "/api/v1/configuration/administrators"
}
}
The href values can be used to access smaller resources.
GET API Call: Fetch the specific User under Local Authentication Server
REQUEST
GET /api/v1/configuration/authentication/auth-servers/auth-server/Sys-Local/local/users/user/user0001 HTTP/1.1
Host: 10.209.112.106
Authorization: Basic cDVtTWxjN1JRdTgxUjJOdnNzTENDWmhQMDVrZjBOMk9ORmVZZUxYWDZhVT06
Content-Type: application/json
RESPONSE
200 OK
Content-Length: 309
Content-Type: application/json
{
"change-password-at-signin": "false",
"console-access": "false",
"enabled": "true",
"fullname": "user0001",
"one-time-use": "false",
"password-encrypted": "3u+UR6n8AgABAAAATjgR31G4neKag2hxI+wjaNsRRZGD6wMQVkLEQv+DPQZdUrQi5IWPuihJf8tnrsBV0XCQly6WgZ79Jv1fyzmssg==",
"username": "user0001"
}
PUT API Call: Update Fullname field of Specific user
REQUEST
PUT /api/v1/configuration/authentication/auth-servers/auth-server/Sys-Local/local/users/user/user0001/fullname HTTP/1.1
Host: 10.209.112.106
Authorization: Basic cDVtTWxjN1JRdTgxUjJOdnNzTENDWmhQMDVrZjBOMk9ORmVZZUxYWDZhVT06
Content-Type: application/json
Cache-Control: no-cache
Postman-Token: 1ca1c683-4cb4-f629-53d9-cdabb9d6f092
{
"fullname":"REST API test for user0001"
}
RESPONSE
200 OK
Content-Length: 122
Content-Type: application/json
{
"result": {
"info": [
{
"message": "Operation succeed without warning or error!"
}
]
}
}
After Updation fetch the User details and observe the fullname field updated:
REQUEST
GET /api/v1/configuration/authentication/auth-servers/auth-server/Sys-Local/local/users/user/user0001 HTTP/1.1
Host: 10.209.112.106
Authorization: Basic cDVtTWxjN1JRdTgxUjJOdnNzTENDWmhQMDVrZjBOMk9ORmVZZUxYWDZhVT06
Content-Type: application/json
RESPONSE
200 OK
Content-Length ?327
Content-Type ?application/json
{
"change-password-at-signin": "false",
"console-access": "false",
"enabled": "true",
"fullname": "REST API test for user0001",
"one-time-use": "false",
"password-encrypted": "3u+UR6n8AgABAAAATjgR31G4neKag2hxI+wjaNsRRZGD6wMQVkLEQv+DPQZdUrQi5IWPuihJf8tnrsBV0XCQly6WgZ79Jv1fyzmssg==",
"username": "user0001"
}
DELETE API Call: DELETE Specific User
REQUEST
DELETE /api/v1/configuration/authentication/auth-servers/auth-server/Sys-Local/local/users/user/user0001 HTTP/1.1
Host: 10.209.112.106
Authorization: Basic cDVtTWxjN1JRdTgxUjJOdnNzTENDWmhQMDVrZjBOMk9ORmVZZUxYWDZhVT06
Content-Type: application/json
RESPONSE
200 OK
Content-Length ?122
Content-Type ?application/json
{
"result": {
"info": [
{
"message": "Operation succeed without warning or error!"
}
]
}
}
After deleting Try to fetch the resource and you would observe 404 response
REQUEST
GET /api/v1/configuration/authentication/auth-servers/auth-server/Sys-Local/local/users/user/user0001 HTTP/1.1
Host: 10.209.112.106
Authorization: Basic cDVtTWxjN1JRdTgxUjJOdnNzTENDWmhQMDVrZjBOMk9ORmVZZUxYWDZhVT06
Content-Type: application/json
Cache-Control: no-cache
Postman-Token: c94a2f29-2b52-4ed1-3987-302cbce96a30
RESPONSE
404 NOT FOUND
Content-Length: 105
Content-Type: application/json
{
"result": {
"errors": [
{
"message": "Resource does not exist."
}
]
}
}