Network Configuration
IP Address Assignment for Internal, External and Management Interfaces
Each interface in AWS can have private and public IP addresses. Sample CloudFormation Templates provided by Ivanti Connect Secure creates the Ivanti Connect Secure Virtual Appliance with public and private IP addresses for external and management interfaces and only private IP address for internal interface. More details about IP address types on AWS can be seen at: https://docs.aws.amazon.com/AmazonVPC/latest/UserGuide/vpc-ip-addressing.html
IP Addressing Modes
When Ivanti Connect Secure gets deployed by using the sample templates provided by Ivanti, Ivanti Connect Secure comes up with multiple interfaces. If you take an example of a template “pulsesecure-ICS-3-nics.zip” provided by Ivanti, you notice the following things.
ICS external interface and ICS management interface have both Elastic and Private IP addresses.
Modifying Network Parameters After Deployment
Since Networking Infrastructure is provided by AWS, a ICS admin cannot change Networking configuration after deployment. Hence, both admin UI and ssh do not support changing network configuration.
Controlling the Selection of Internal, External and Management Interfaces
Sample CloudFormation template, provided by Ivanti, requests AWS fabric to create three Network Interfaces. While running this template, AWS fabric creates interfaces named eth0, eth1 and eth2 and attaches them to ICS Virtual Interface.
So, the question is, among eth0, eth1 and eth2 which network interface will become external, internal or management interface? Below table answers this question.
|
Interface Name |
ICS Interface |
|
eth0 |
internal interface |
|
eth1 |
external interface |
|
eth2 |
management interface |
Then, question is how you can control the order of network interfaces named eth0, eth1 and eth2 created through CloudFormation template?
The Ivanti Connect Secure Virtual Appliance is qualified with internal interface as primary and other two are secondary. In the following code snippet, three network interfaces get assigned to VM. These three NICs with ID “nic1”, “nic2” and “nic3” are internally mapped to ‘eth0’, ‘eth1’, and ‘eth2’ respectively.
"EC2Instance": {
"Type": "AWS::EC2::Instance",
"DependsOn": [
"EIPAssoc0",
"EIPAssoc1"
],
"Properties": {
"ImageId": {
"Fn::FindInMap": [
"ICSAMI",
{
"Ref": "AWS::Region"
},
"img"
]
},
"KeyName": {
"Ref": "KeyName"
},
"InstanceType": {
"Ref": "InstanceType"
},
"NetworkInterfaces": [
{
"NetworkInterfaceId": {
"Ref": "Eth0"
},
"DeviceIndex": "0"
},
{
"NetworkInterfaceId": {
"Ref": "Eth1"
},
"DeviceIndex": "1"
}
],
ICS converts eth0 to int0, eth1 to ext0 and eth2 to mgmt0. This means, the network interface with ID nic1 will be internal interface, nic2 will be external interface and nic3 will be management interface.
The below table depicts this scenario well:
|
Interface Name |
ICS Interface |
Network ID |
|
eth0 |
internal interface |
nic1 |
|
eth1 |
external interface |
nic2 |
|
eth2 |
management interface |
nic3 |
Seamless Migration of ICS configuration on AWS
Overview
This section describes the seamless migration of the ICS configuration on Amazon Web Services.
Process
The process for seamless migration of the ICS configuration on AWS marketplace is as follows:
1.Setting up and deploying a new VM, refer Ivanti Connect Secure on Amazon Web Services.
2.ICS configuration migration, refer Provisioning Ivanti Connect Secure with Predefined Configuration.
3.License migration, refer Configuring Licenses on the Ivanti Connect Secure Appliance.
4.Network IP address migration.
Before You Begin
1.Deploy a ICS in AWS environment with new software version, possibly with existing Virtual Private Cloud instance. Note down the private and public IP addresses.
2.Check the reachability of the ICS using public IP address for newly deployed ICS.
3.Perform a cleanup of the appliance before exporting the user.cfg to reduce the size of the user configuration file.
•Disable any debug logging
•Delete logs
•Delete any old snapshots
•Clear event logs
•Delete old ESAP
•Delete old Ivanti Clients
•Clean up external user records
Network IP address Migration
To change IP address of the ICS instance on AWS for internal and external ports:
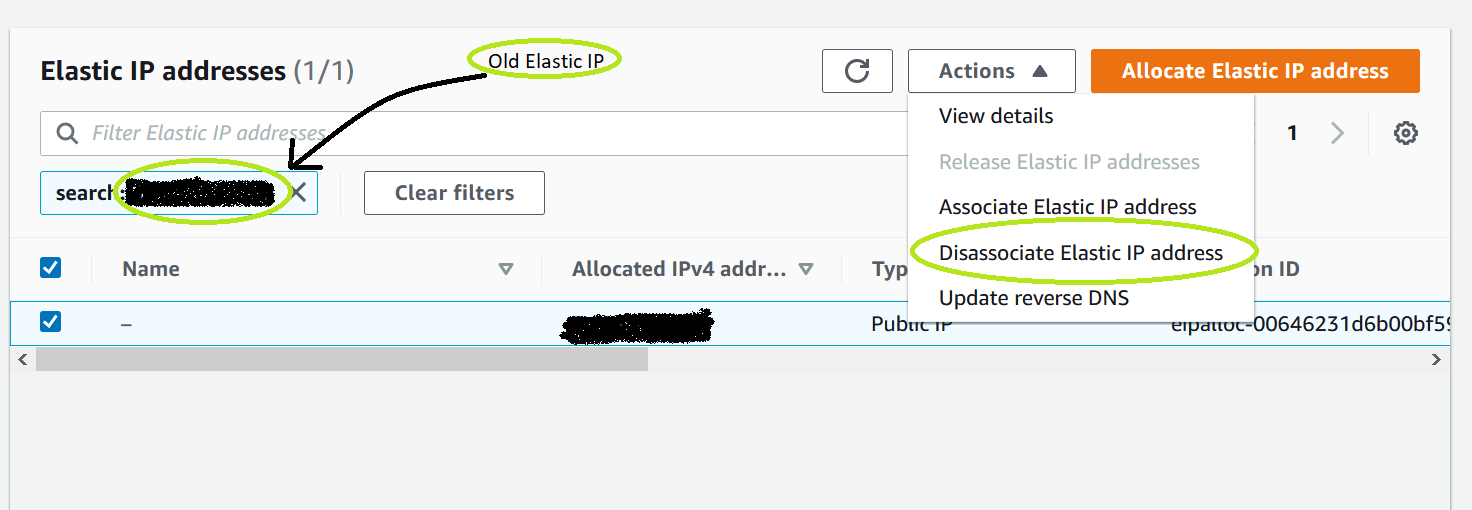
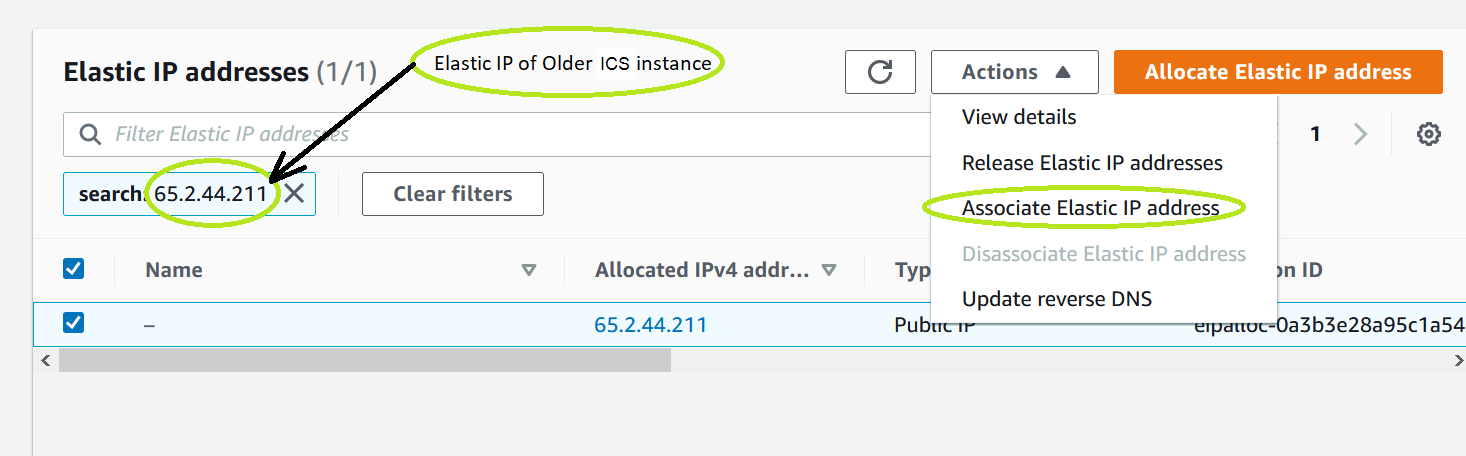
1.In the AWS environment, navigate to Elastic IP dashboard of port network settings. Select the public IP address entry and select Disassociate Elastic IP address under Actions.
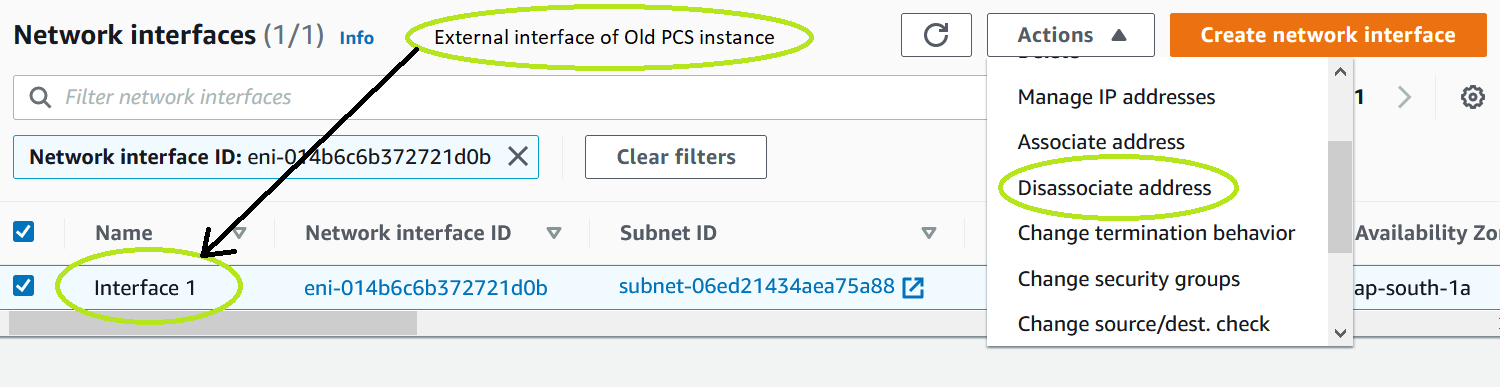
2.Select the private IP address entry and select Disassociate address under Actions.
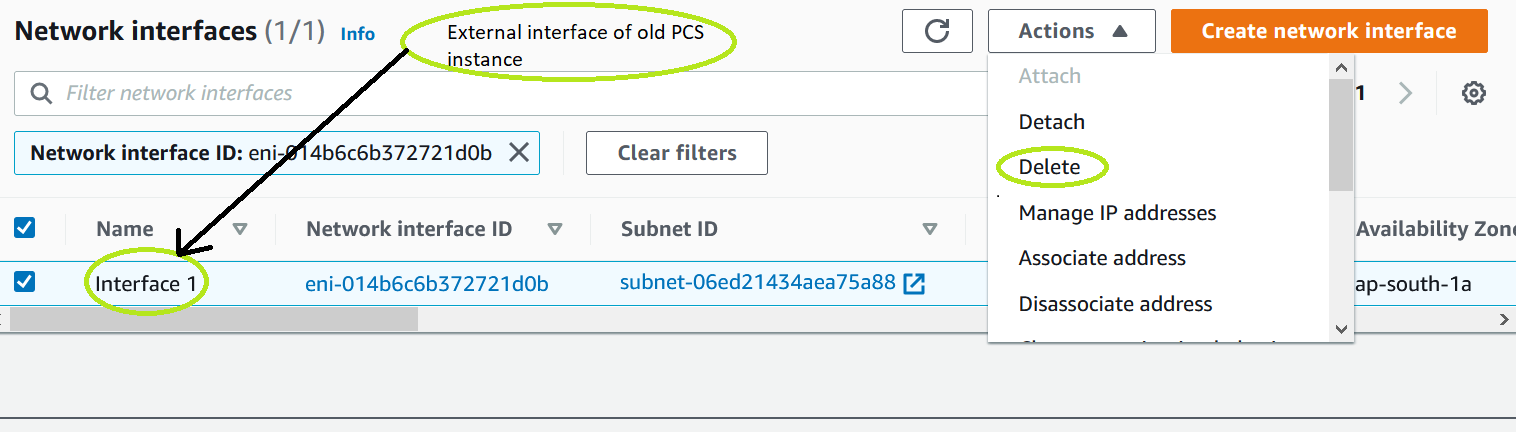
3.For external port interface, select the entry and select Delete under Actions.
Internal port is associated as primary interface of the ICS deployed earlier. For internal port IP address migration, AWS console does not allow to delete the specific interface. Admin needs to delete the instance and then associate the internal port.
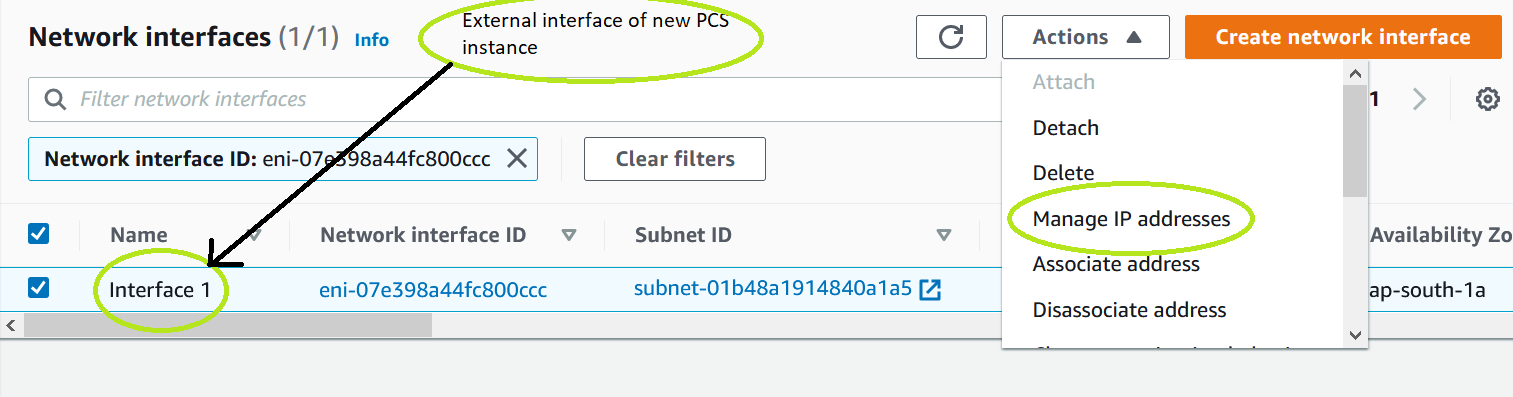
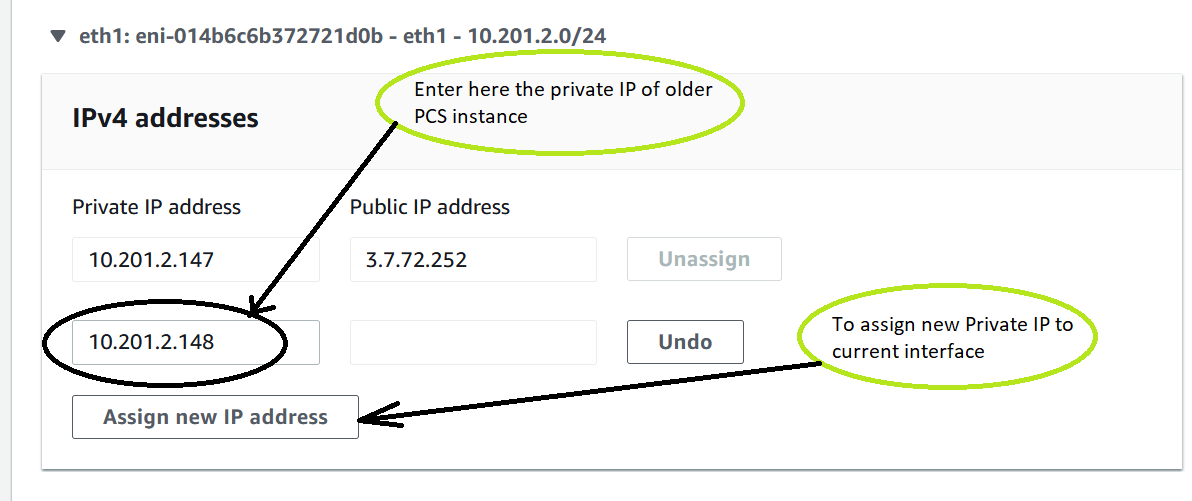
4.Navigate to the port interface of the newly deployed ICS, click Actions and select Manage IP addresses.
5.Enter the IP address of the ICS instance and select Assign new IP address.
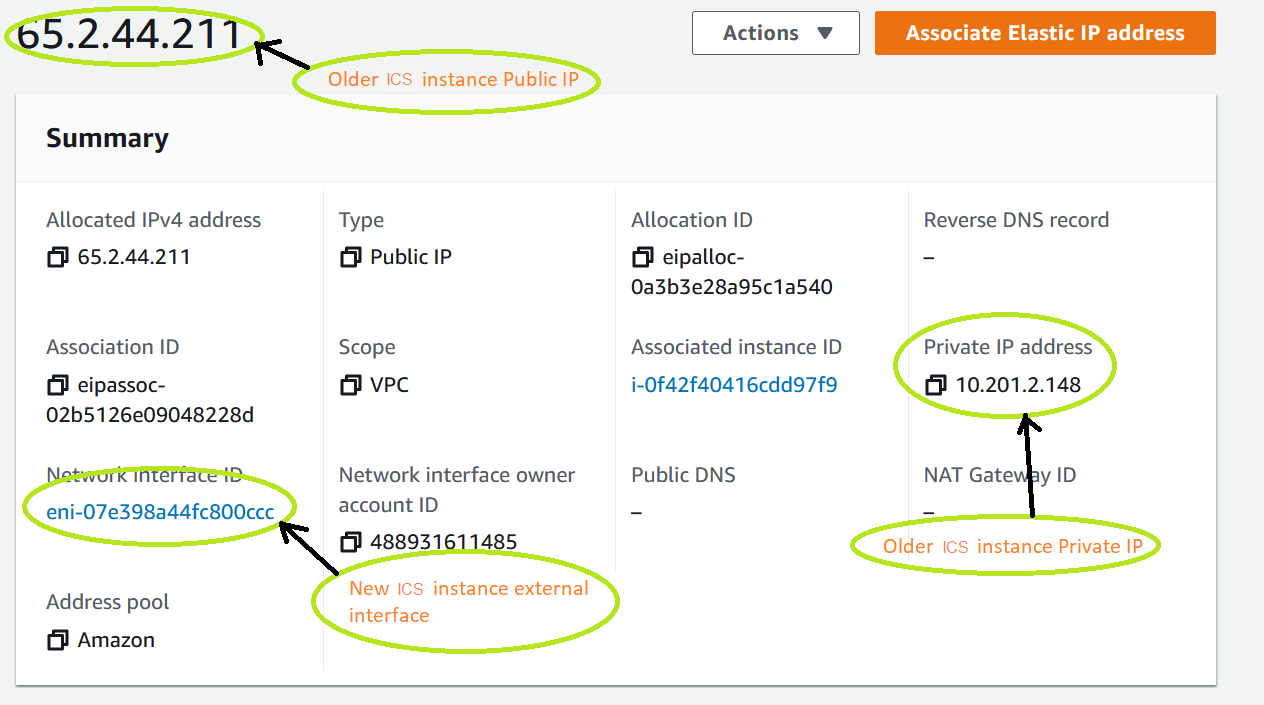
6.Select the public IP entry again and select Associate Elastic IP address under Actions.
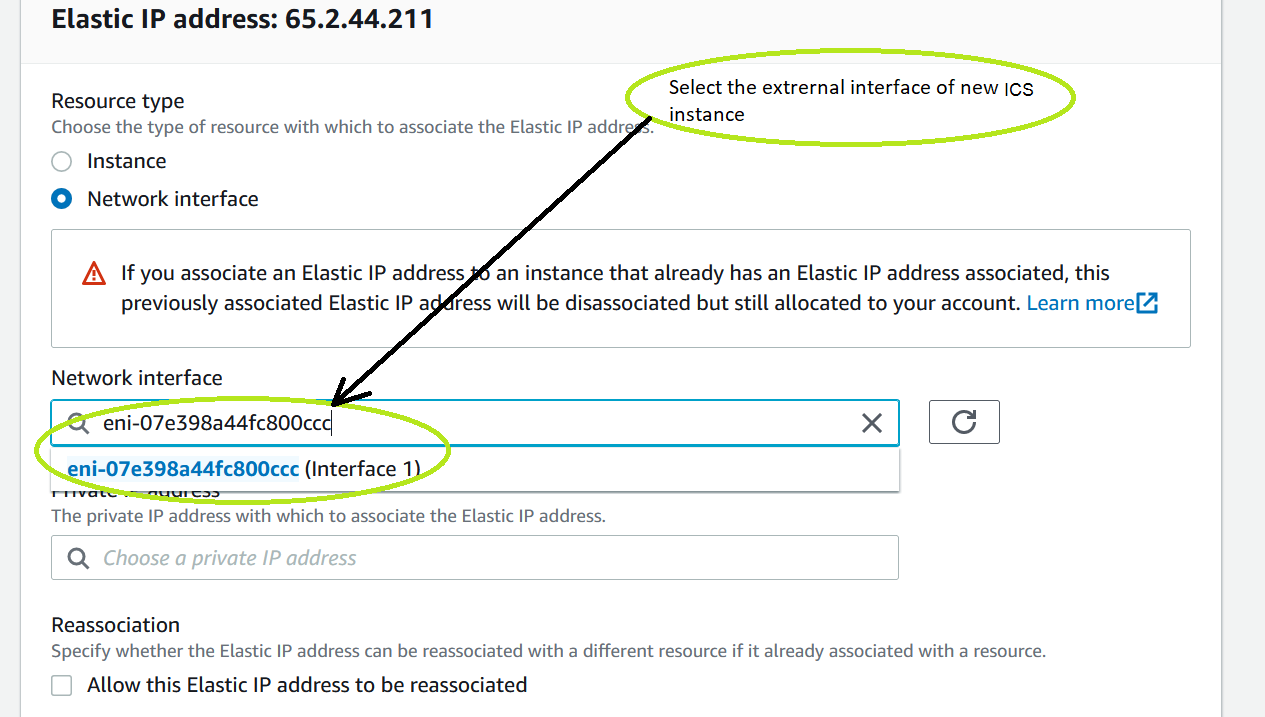
7.Select the private IP address of the newly deployed ICS. Select Network interface, enter the interface ID in Network Interface field.
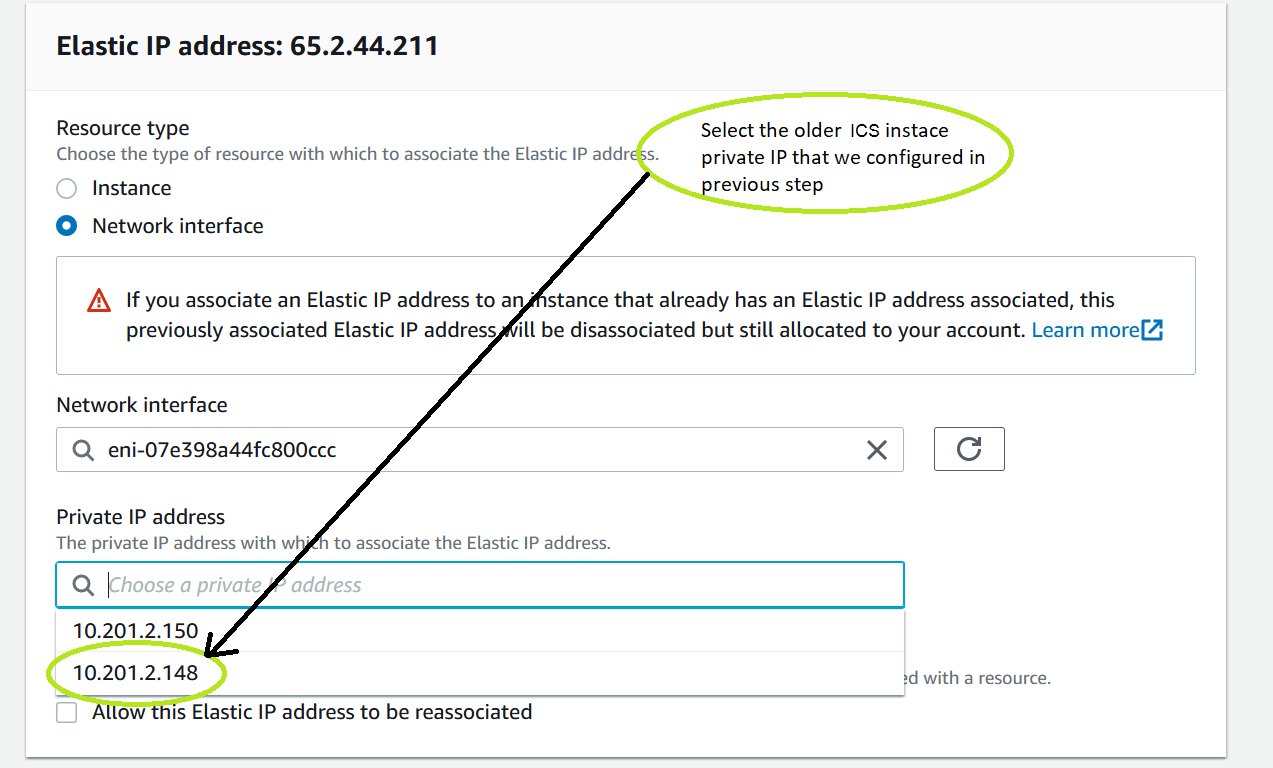
8.The list of configured IPs automatically populates under Private IP address field. Select the IP address as configured in ICS and click Associate.
9.In the port network interface for the newly deployed ICS, select the Elastic IP address and navigate to Actions View Details. View and verify the elastic IP address associated to the secondary IP address.
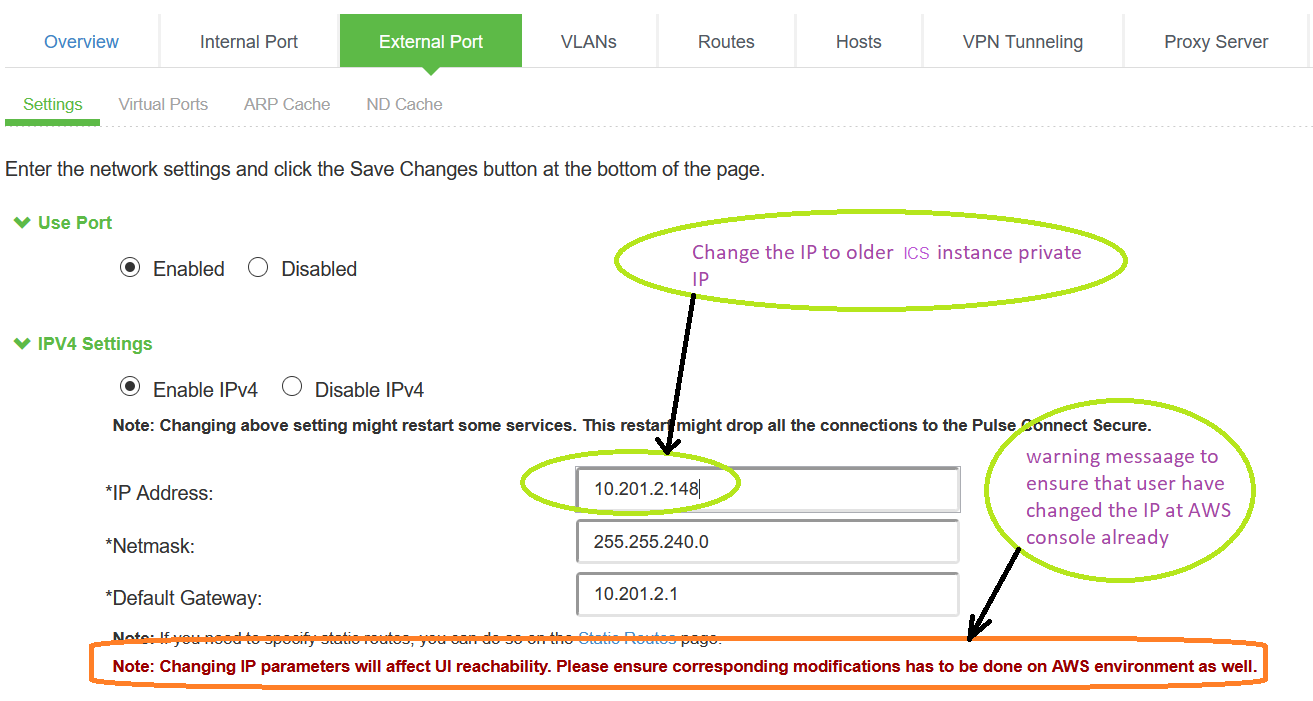
10. Login to newly deployed ICS and modify the external port IP address to older ICS external port address.
11.Login as end user using the elastic IP address (assigned for secondary private IP address) and verify that end user login is successful.