Configuring Host Checker Policy
Ensure that user endpoints have signed ActiveX components or signed Java applets enabled or PSAL downloaded within their browsers to permit Host Checker to download, install, and launch.
Due to the end of ActiveX and Java support on many browsers, an alternate solution is provided for launching of client applications such as Host Checker or Ivanti Secure Access Client called Pulse Secure Application Launcher (PSAL).
For a new user, launching the Host Checker for the first time, it involves following steps:
1.Download and install Pulse Secure Application Launcher for the first time from Ivanti Connect Secure.
2.Launch Host Checker Using Pulse Secure Application Launcher.
To configure a Host Checker policy, perform these tasks:
1.Create and enable Host Checker policies through the Authentication > Endpoint Security > Host Checker page of the admin console.
2.In the admin console, select Authentication > Endpoint Security > Host Checker.
3.Under Policies, click New.
4.Enter a name in the Policy Name field and then click Continue. (Users see this name on the Host Checker remediation page if you enable custom instructions for this policy.)
5.Create one or more rules to associate with the policy.
6.Configure additional system-level options on the Authentication > Endpoint Security > Host Checker page of the admin console as necessary:
•If you want to display remediation information to users if they fail to meet the requirements of a Host Checker policy, configure remediation options through the Authentication > Endpoint Security > Host Checker page of the admin console.
•For Windows clients, determine whether you need to use a pre-authentication access tunnel between the clients and policy server(s) or resources. If necessary, create a manifest.hcif file with the tunnel definition and upload it through the Authentication > Endpoint Security > Host Checker page of the admin console.
•To change default Host Checker settings, configure settings through the Authentication > Endpoint Security > Host Checker page of the admin console.
7.Determine the level you that you want to enforce Host Checker policies:
•To enforce Host Checker policies when the user initially accesses the device, the policy at the realm level by selecting the policy at the Users > User Realms > Select Realm > Authentication Policy > Host Checker page of the admin console.
•To allow or deny users access to specific roles based on compliance with Host Checker policies, implement the policies at the role level by using the Users > User Roles > Select Role > General > Restrictions > Host Checker page of the admin console.
•To map users to roles based on their compliance with Host Checker policies, use custom expressions in the Users > User Realms > Select Realm > Role Mapping page of the admin console.
•To allow or deny users access to individual resources based on their compliance with Host Checker policies, use conditions in the Users > Resource Policies > Select Resource > Select Policy > Detailed Rules > Select|Create Rule page of the admin console.
8.Specify how users can access the Host Checker client-side agent that enforces the policies you define:
•To enable automatic installation of the Host Checker client-side agent on all platforms, use the Administrators > Admin Realms > Select Realm > Authentication Policy > Host Checker page or the Users > User Realms > Select Realm > Authentication Policy > Host Checker page of the admin console.
•To download the Host Checker installer and manually install it on your Windows users' systems, use the Maintenance > System > Installers page of the admin console.
9.Determine whether you want to create client-side logs. If you enable client-side logging through the System > Log/Monitoring > Client Logs page of the admin console, the system creates log files on your users' systems and writes to the file whenever Host Checker runs.
If more than one valid session exists from the same system, and Host Checker is used in those sessions, all of the valid sessions are terminated if a user signs out from any of the sessions. To prevent this, turn off Host Checker for those sessions that do not need Host Checker.
Creating Global Host Checker Policies
To use Host Checker as a policy enforcement tool for managing endpoints, you create Host Checker policies through the Authentication > Endpoint Security > Host Checker page of the admin console, and then implement the policies at the realm, role, and resource policy levels.
The system provides many options that you can use to enable, create, and configure Host Checker policies:
•Predefined policies (prevent in-network attacks or downloads malware detection software)-The system comes equipped with a predefined client-side Host Checker policy that you simply need to enable. The Connection Control policy prevents attacks on Windows client computers from other infected computers on the same network.
•Predefined rules (check for third party applications)-Host Checker contains a wide array of predefined rules that check for antivirus software, firewalls, malware, spyware, and specific operating systems from a variety of industry leaders. You can enable one or more of these rules within a Host Checker client-side policy to ensure that the integrated third-party applications that you specify are running on your users' computers.
•Custom rules (check for additional requirements)-In addition to Predefined rules, you can create custom rules within a Host Checker policy to define requirements that user endpoints must meet. Using custom rules, you can:
•Configure Host Checker to check for custom third-party DLLs that perform customized client-side checks.
•Verify that certain ports are open or closed on the user's computer.
•Confirm that certain processes are or are not running on the user's computer.
•Check that certain files are or are not present on the client machine.
•Evaluate the age and content of required files through MD5 checksums.
•Confirm that registry keys are set on the client machine (Windows only).
•Check the NetBIOS name, MAC addresses, or certificate of the client machine (Windows only).
•Assess the client operating system and application service packs to ensure they are up to date (Windows only).
•Perform application and version checks to ensure that endpoints are running the correct software (Windows only).
•Custom integrated applications (implement through server API)-For Windows clients, you can upload a third-party J.E.D.I. DLL to the system.
•Within a single policy, you can create different Host Checker requirements for Windows, Macintosh and Linux, checking for different files, processes, and products on each operating system. You can also can combine any number of host check types within a single policy and check for alternative sets of rules.
Enabling Connection Control Host Checker Policies
The predefined connection control Host Checker policy prevents attacks on Windows client computers from other infected computers on the same physical network.
The Host Checker connection control policy is not supported on Windows Vista or Windows 7.
The Host Checker connection control policy blocks all incoming TCP, UDP and ICMP connections. This policy allows all outgoing TCP and VPN Tunneling traffic, as well as all connections to DNS servers, WINS servers, DHCP servers, proxy servers, and the system.
Users must have administrator privileges in order for Host Checker to enforce the connection control policy on the client computer.
To enable the predefined Host Checker connection control policy:
1.In the admin console, choose Authentication > Endpoint Security > Host Checker.
2.Under Options, select the Create Host Checker Connection Control Policy check box.
3.Click Save Changes. The system enables the Host Checker connection control policy.
Note that you cannot modify this policy-only enable or disable it. Also note that since you cannot modify this policy, the system does not display it in the Policies section of the Authentication > Endpoint Security > Host Checker page with other configurable policies.
4.Implement the Host Checker connection control policy at the realm, role, or resource policy levels.
You must evaluate or enforce the connection control policy at the realm level to make the policy effective on client computers.
Creating and Configuring New Client-side Host Checker Policies
You can create a variety of policies through the Host Checker client that check for antivirus software, firewalls, malware, spyware, and specific operating systems from a wide variety of industry leaders. You can also create checks for custom third-party DLLs, ports, processes, files, registry keys and the NetBIOS name, MAC addresses, or certificate of the client machine.
We recommend you check for multiple MAC addresses in a single policy instead of creating a policy for each MAC address. If you create policies for each MAC address, unexpected results may occur if there are more than 100 policies due to browser cookie size limitations.
When creating the policies, you must define the policy name, and either enable predefined rules, or create custom rules that run the specified checks. Optionally, you can specify how Host Checker should evaluate multiple rules within a single policy.
To create a standard client-side policy:
1.In the admin console, choose Authentication > Endpoint Security > Host Checker.
2.Under Policies, click New.
3.Enter a name in the Policy Name field and then click Continue. (Users see this name on the Host Checker remediation page if you enable custom instructions for this policy.)
4.Create one or more rules to associate with the policy.
5.Specify how Host Checker should evaluate multiple rules within the policy.
6.(Recommended) Specify remediation options for users whose computers do not meet the requirements specified in the policy. (If you do not create remediation instructions and the policy fails, your users will not know why they cannot access their resources.)
7.Implement the policy at the realm, role, or resource policy levels.
Checking for Third-Party Applications Using Predefined Rules
Host Checker comes pre-equipped with a vast array of predefined rules that check for antivirus software, firewalls, malware, spyware, and specific operating systems from a wide variety of industry leaders. You can enable one or more of these rules within a Host Checker client-side policy to ensure that the integrated third-party applications that you specify are running on your users' computers in accordance with your specifications. For firewall and antivirus rules, you can specify remediation actions to automatically bring the endpoint into compliance.
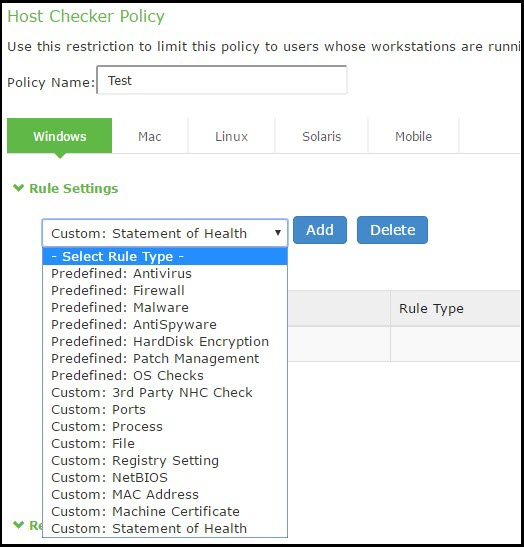
To view the currently supported applications, go to Authentication > Endpoint Security > Host Checker and create a new policy. You can choose predefined rule types from the Select Rule Type drop down list box to see a list of the supported applications within that category. The lists of applications can be quite extensive and are updated at each support release, so it is useful to check the list periodically.
The following predefined rule types are available:
•Predefined: AntiVirus-Select this option to create a rule that checks for the antivirus software that you specify, and to specify remediation options.
•Predefined: Firewall-Select this option to create a rule that checks for the firewall software that you specify, and to specify remediation options.
•Predefined: AntiSpyware-Select this option to create a rule that checks for the anti-spyware protection software that you specify.
•Predefined: Hard Disk encryption-- Select this option to create a rule that checks for the encryption software that you specify and check for the specified drives being encrypted or not using this encryption software.
•Predefined: Patch Management-- Select this option to create a rule that checks for the patch Management software that you specify
•Predefined: OS Checks-Select this option to create a rule that checks for the Windows operating systems and minimum service pack versions that you specify. (Any service pack, whose version is greater than or equal to the version you specify satisfies the policy.)
•Predefined: CVE Checks-Select this option to create a rule that helps in identifying the endpoints which are vulnerable using the OPSWAT library.
•Predefined: System Integrity Protection-Select this option to create a rule that helps in restricting various actions that root user can perform on the client machine.
If the underlying TNCC service is killed or stopped, the endpoint can remain on the network, potentially out of compliance, until the next Host Checker policy refresh.
This section details Predefined Malware and Predefined OS check. Predefined Antivirus, Firewall and Malware checks, Hard Disk Encryption and Patch management are defined in sections that follow.
To create a Host Checker rule using Predefined Malware or Predefined OS Check rules:
1.In the admin console, select Authentication > Endpoint Security > Host Checker.
2.Create a new policy or click on an existing policy in the Policies section of the page.
3.Under Rule Settings, choose one of the following options and click Add:
•Predefined Malware
•Predefined OS Checks
The predefined rule page opens.
1.In the Rule Name field, enter an identifier for the rule.
2.Under Criteria, select the specific malware or operating systems that you want to check for and click Add. (When checking for an operating system, you may also specify a service pack version.)
When you select more than one type of software within a predefined rule, Host Checker considers the rule satisfied if any of the selected software applications are present on the user's machine.
3.Under Optional, select Monitor this rule for change in result to continuously monitor the policy compliance of endpoints. If this check box is selected, and a change in compliance status on an endpoint that has successfully logged in occurs, the system initiates a new handshake to re-evaluate realm or role assignments.
- Use this option only for dynamic rules, such as checking whether Real Time Protection is enabled on the antivirus software. Use the host checker update frequency to monitor other rules periodically.
- Monitor this rule for change in result for port check is applicable only for Windows and not for Linux or MAC machines.
4. (Optional) Select Enable Custom Instructions, to provide detailed instructions or description in the form of HTML. or plaint text.
5.Click Save Changes.
6.Optionally add additional rules to the policy, specify how Host Checker should evaluate multiple rules within the policy, and define remediation options.
Configuring a Predefined Antivirus Rule with Remediation Options
You can configure antivirus remediation actions with Host Checker. You can specify a requirement for the age (in days) of the last successful virus scan, and you can specify that virus signatures installed on client machines should not be older than a specified number of updates.
You can also monitor policies to ensure that logged-in endpoints maintain compliance status, and remediate the endpoint to another role or realm depending on the current status.
If a client attempts to log in, and the client machine does not meet the requirements you specify, Host Checker can attempt to correct the deficiencies to allow the client to successfully log in. With Host Checker antivirus remediation, you can prompt the endpoint to download the latest virus signature files, turn on antivirus protection, and initiate an antivirus scan.
All of the remediation options are not supported for all antivirus software vendors' products. All available vendors and products that are supported are displayed when you select the Require any supported product option button.
Alternately, you can select the Require specific products/vendors option button and select either the Require any supported product from a specific vendor or Require specific products check boxes, then add an available type to Selected Types. The remediation options appear, and you can determine which remediation options are available for specific products or vendors
To configure a Predefined Antivirus rule:
1.In the admin console, select Authentication > Endpoint Security > Host Checker.
2.Create a new policy or click on an existing policy in the Policies section of the page.
3.Under Rule Settings, choose Predefined: Antivirus and click Add.
4.Enter the Rule Name for this antivirus rule.
5.To determine if your software vendor's product is supported for the System Scan check, click these Antivirus products. A new window will open with a list of all of the products that support the feature.
6.Select or clear the check box next to Successful System Scan must have been performed in the last _ days, and enter the number of days in the field.
If you select this check box, a new option appears. If the remediation action to start an antivirus scan has been successfully begun, you can override the previous check.
7.Select or clear the check box next to Consider this rule as passed if 'Full System Scan' was started successfully as remediation.
8.Select or clear the check box next to Virus definition files should not be older than _ updates. Enter a number between 1 and 20. If you enter 1, the client must have the latest update. You must import the virus signature list for the supported vendor.
9.Select your antivirus vendor(s) and product(s) by using either the Require any supported product or Require specific products/vendors option buttons.
Require any supported product allows you to check for any product (rather than requiring you to select every product separately). This option button reveals a list of products in the remediation section to allow you to enable remediation options which are product specific.
Require specific products/vendors allows you to define compliance by allowing any product by a specific vendor (for example, any Symantec product).
Require specific products provides functionality that allows you to select individual products to define compliance.
After you select your vendor(s) and product(s), remediation options will appear on the page.
For each of the following remediation actions:
•Download latest virus definition files-obtains the latest available file for the specified vendor from the vendor's web site
•Turn on Real Time Protection-launches the virus scanning mechanism for the specified vendor
•Start Antivirus Scan-performs a real-time virus scan for the specified vendor
The check box is active (clickable) if the action is supported for your product.
If your antivirus product is not supported, you can click the remediation column headers to determine what vendors and products are supported.
10.If your product is supported, select the check box for any or all of the remediation actions that you want to apply.
11.Under Optional, select Monitor this rule for change in result to continuously monitor the policy compliance of endpoints. If this check box is selected, and a change in compliance status on an endpoint that has successfully logged in occurs, the system initiates a new handshake to re-evaluate realm or role assignments.
- Use this option only for dynamic rules, such as checking whether Real Time Protection is enabled on the antivirus software. Use the host checker update frequency to monitor other rules periodically.
- Monitor this rule for change in result for port check is applicable only for Windows and not for Linux or MAC machines.
-
(Optional) Select Enable Custom Instructions, to provide detailed instructions or description in the form of HTML or plaint text.
12.Click Save Changes to save the antivirus rule and enforce antivirus remediation.
13.Optionally add additional rules to the policy, specify how Host Checker should evaluate multiple rules within the policy, and define remediation options.
Configuring a Predefined Firewall Rule with Remediation Options
You can configure firewall remediation actions with Host Checker after you create a Host Checker firewall rule that requires the endpoint to have a specific firewall installed and running prior to connecting to the network.
After you enforce the Host Checker rule with firewall remediation actions, if an endpoint attempts to log in without the required firewall running, Host Checker can attempt to enable the firewall on the client machine.
The remediation option is not supported for all firewall products. All available products are displayed by using the Require any supported product or Require specific products/vendors option buttons.
To configure a Host Checker Predefined Firewall rule:
1.In the admin console, choose Authentication > Endpoint Security > Host Checker.
2.Create a new policy or click an existing policy in the Policies section of the page.
3.Under Rule Settings, choose Predefined: Firewall and click Add.
4.Enter a Rule Name for the firewall rule.
5.Select your firewall vendor(s) and product(s) by using either the Require any supported product or Require specific products/vendors option buttons.
Require any supported product allows you to check for any product (rather than requiring you to select every product separately). This option button reveals a list of products in the remediation section to allow you to enable remediation options which are product specific.
When you add an available product to Selected Products, the remediation option appears, and you can determine if the remediation option is available for your selected firewall.
Require specific products/vendors allows you to define compliance by allowing any product by a specific vendor (for example, any Symantec product).
Require specific products provides functionality that allows you to select individual products to define compliance.
After you select your vendor(s) and product(s), the remediation options will appear on the page. The Turn on Firewall check box is active (clickable) if the action is supported for your product.
6.If your firewall is supported, select the check box to Turn on Firewall.
7.Under Optional, select Monitor this rule for change in result to continuously monitor the policy compliance of endpoints. If this check box is selected, and a change in compliance status on an endpoint that has successfully logged in occurs, the system initiates a new handshake to re-evaluate realm or role assignments.
Monitor this rule for change in result for port check is applicable only for Windows and not for Linux or MAC machines.
8. (Optional) Select Enable Custom Instructions, to provide detailed instructions or description in the form of HTML or plaint text.
9.Click Save Changes to save the firewall rule and enforce firewall remediation.
10.Optionally add additional rules to the policy, specify how Host Checker should evaluate multiple rules within the policy, and define remediation options.
Configuring a Predefined AntiSpyware Rule
You can configure Host Checker to check for installed antispyware on endpoints.
After you enforce the Host Checker rule, if an endpoint attempts to log in without the required spyware, the Host Checker rule will fail.
The option is not supported for all spyware products. All available products are displayed by using the Require any supported product or Require specific products/vendors option buttons.
To configure a Host Checker Predefined Spyware rule:
1.In the admin console, select Authentication > Endpoint Security > Host Checker.
2.Create a new policy or click an existing policy in the Policies section of the page.
3.Under Rule Settings, choose Predefined: AntiSpyware and click Add.
4.Enter a Rule Name for the firewall rule.
5.Select one of the following options:
•Select the Require any supported product option button to check for any product (rather than requiring you to select every product separately).
•Select the Require specific products/vendors option button to specify the spyware that you want to check for.
•Choose either Require any supported product from a specific vendor or Require specific products to specify spyware.
•Add antispyware from Available Products to Selected Products.
6.Under Optional, select Monitor this rule for change in result to continuously monitor the policy compliance of endpoints. If this check box is selected, and a change in compliance status on an endpoint that has successfully logged in occurs, the system initiates a new handshake to re-evaluate realm or role assignments.
Monitor this rule for change in result for port check is applicable only for Windows and not for Linux or MAC machines.
7. (Optional) Select Enable Custom Instructions, to provide detailed instructions or description in the form of HTML or plaint text.
8.Click Save Changes.
9.Optionally add additional rules to the policy, specify how Host Checker should evaluate multiple rules within the policy, and define remediation options.
Configuring a Predefined Hard Disk Encryption Rule
You can configure Host Checker to check for installed Hard Disk Encryption on endpoints and specify the drives which needs to be encrypted using these software
After you enforce the Host Checker rule, if an endpoint attempts to log in without the required encryption software and the drives not encrypted, the Host Checker rule will fail.
The option is not supported for all Hard Disk Encryption products. All available products are displayed by using the Require any supported product or Require specific products/vendors option buttons.
To configure a predefined hard disk encryption rule:
1.In the admin console, select Authentication > Endpoint Security > Host Checker.
2.Create a new policy, or click an existing policy in the Policies section of the page.
3.Under Rule Settings, select Predefined: HardDisk Encryption.
4.Enter a Rule Name for the Hard Disk Encryption rule.
5.Select one of the following options:
•Select the Require any supported product option button to check for any product (rather than requiring you to select every product separately).
•Select the Require specific products/vendors option button to specify the spyware that you want to check for.
•Choose either Require any supported product from a specific vendor or Require specific products to specify spyware.
•Add Hard Disk Encryption Software from Available Products to Selected Products.
6.Under Drive Configuration, select the required option
•All Drives - (Default) Select this option to check if all the drives on the client machine are encrypted.
•Specific Drives - Select this option to check if only specific drives on the client machine are encrypted.
•Drive Letters - Enter the drive name. For example, C, D, E.
•Consider policy as passed if the drives are not detected - Select this option to consider policy as passed if the drives are not detected.
•Consider policy as passed if the drive Encryption is in progress – Select this option to allow the Host Checker policy to pass if the encryption process is in progress and the drive is not fully encrypted. The drive encryption process takes time to complete depending up on the drive size and contents. For multiple drives, the HC policy passes only if the encryption process is in progress in all the drives.
7.Click Save Changes.
Configuring Predefined Patch Management Rules
You can configure Host Checker to check for installed Patch management Software on endpoints
After you enforce the Host Checker rule, if an endpoint attempts to log in without the required Patch Management Software, the Host Checker rule will fail.
The option is not supported for all Patch Management Software. All available products are under the Criteria Section.
Customers need to have their own patch management solution. Administrator is given option to configure the patch management software that needs to be verified on the endpoint.
On the client machine, Patch management software detects patch status based on the configured rules on corresponding patch management server. Detection of patches status on the client machine depends on the support provided by the 3rd party patch management solution that customer is using Hence different patch management software on the same client can report the status differently. To avoid conflicts, administrator is allowed to configure only one patch management software product on policy configuration page.
It provides options to configure various Severity and Category options that administrator is interested in. These additional details are used during policy evaluation such that only the missing patches that belongs to configured "Severity" and "Category" are considered. Any other patches that does not belong to configured "Severity" and "Category" are not considered during policy evaluation.
Default "Severity" options selected in policy are Critical, Important.
Default "Category" options selected in policy are Security Update, Critical Update, Regular Update, Driver Update.
To configure a predefined patch management rule:
1.In the admin console, select Authentication > Endpoint Security > Host Checker.
2.Create a new policy, or click an existing policy in the Policies section of the page.
3.Click the Windows/Mac tab.
- The remediation support for patch management rule is not supported for Mac platform. If any missing patch is found, the endpoint will not be triggered to automatically install the missing patches. Currently, this is possible in Windows platform using SCCM client.
- Patch management on Mac OS is qualified only with one product that is Software Update on Mac 10.11, 10.12 and 10.13. You can use V4 SDK for Patch management on Mac platform.
4.Under Rule Settings, select Predefined: Patch Management.
The following figure shows the rule settings page for host checker.
5.Under Rule Settings, click Add. The Add Predefined Rule:Patch Management page is displayed.
Configuring Host Checker Policy shows the configuration page to add a patch management rule to the Host Checker policy.
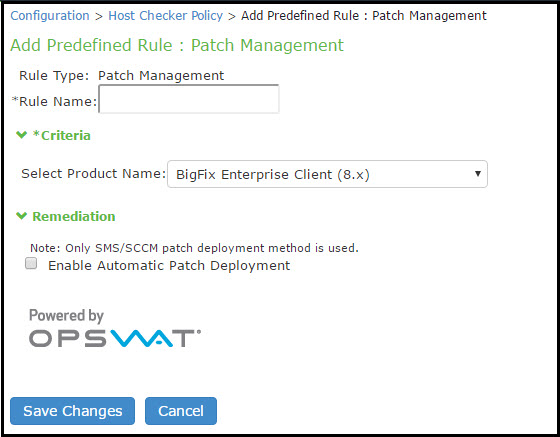
6.In the Rule Name box, enter a name for the integrity measurement rule.
If a policy includes a selection that does not apply (for example, if the target software application is not installed on the endpoint), the check for that selection is not performed.
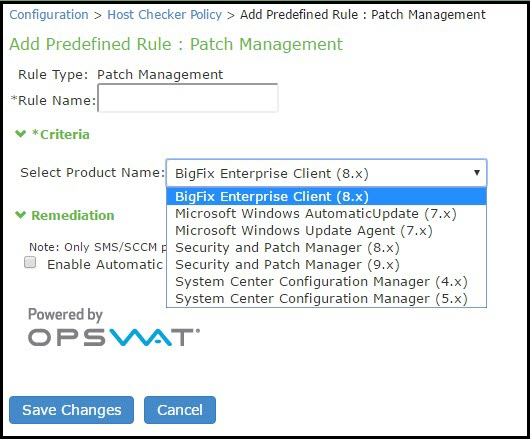
7.Under Criteria, select the product name.
The following figure shows the different product names that you can select.
8.To automatically enable patch deployment, select Enable Automatic Patch Deployment.
Only the SMS/SCCM patch deployment method is used.
9.Click Save Changes.
Configuring Predefined Common Vulnerability and Exposure (CVE) Check Rules
Host Checker is used for analyzing the health of the endpoint before providing access to the network. As endpoints are vulnerable to many types of new attacks such as Ransomware attack. It becomes extremely important to identify such endpoints, which are vulnerable to any attacks. The CVE lists some of these attacks along with the required software patches to prevent from such attacks. Ivanti Connect Secure provides the CVE check rule, which helps in identifying the endpoints which are vulnerable using the OPSWAT library. If the endpoint is vulnerable appropriate action is taken based on the rule configuration. For example, the user can be denied from accessing the network.
- CVE check rule is supported with active OPSWAT SDK version V4.
- OPSWAT version 3 does not support CVE rules. These rules will always be evaluated as failed and may cause the host checker policy to fail. We recommend to either delete CVE rules or use OPSWAT V4 SDK for CVE rules support.
To configure a predefined CVE check rule:
1.Select Authentication > Endpoint Security > Host Checker.
2.Create a new policy, or click an existing policy in the Policies section of the page.
3.Click the Windows tab.
4.Under Rule Settings, select Predefined: CVE Checks and click Add.
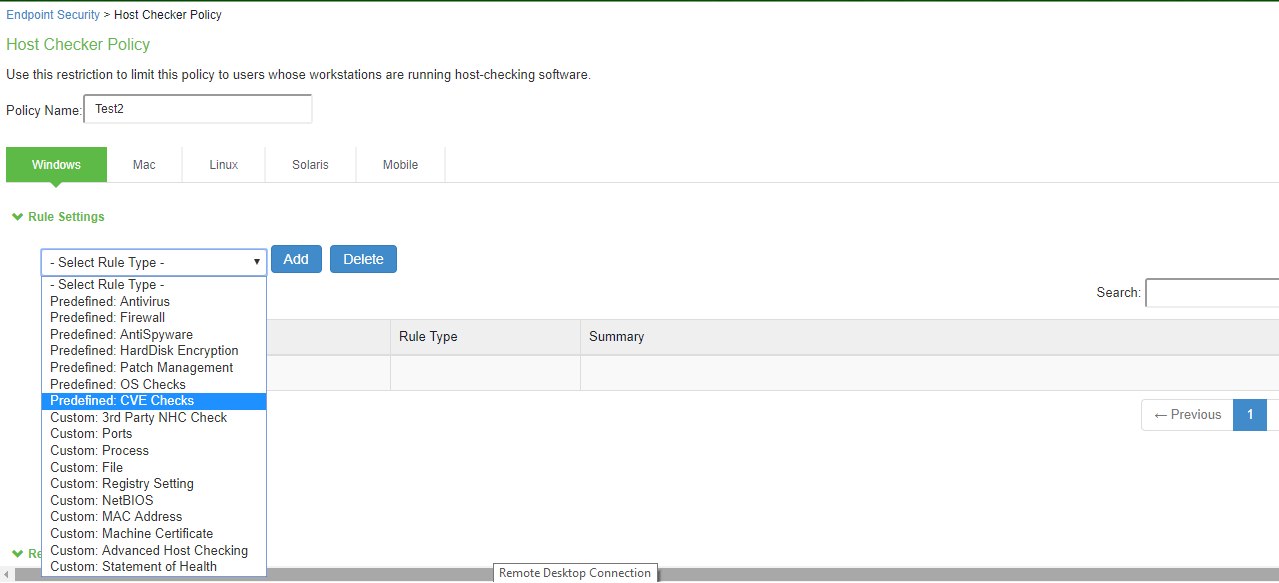
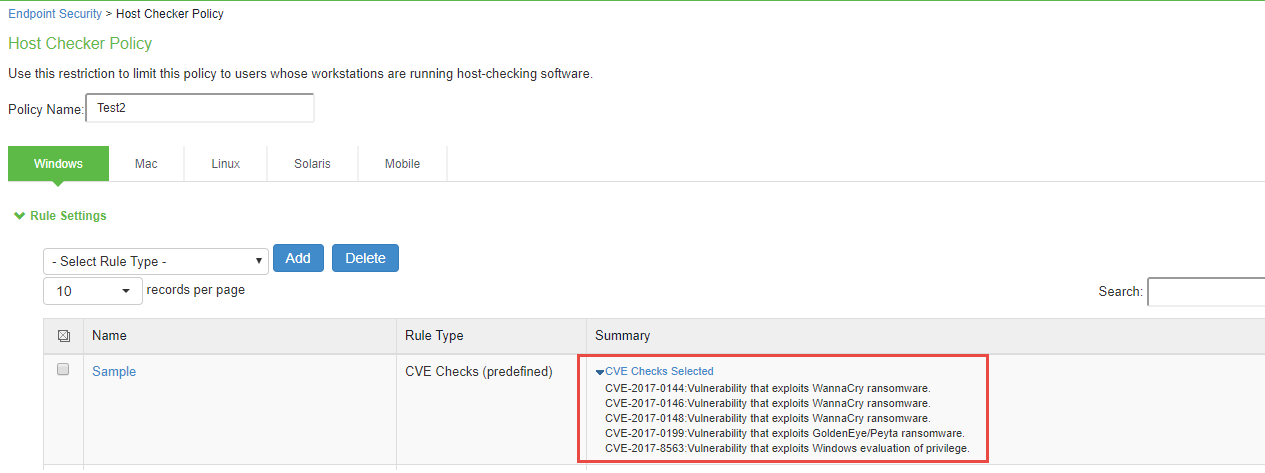
5.Enter a Rule Name for the CVE Check rule. For example, you can configure a check for WannyCry vulnerability.
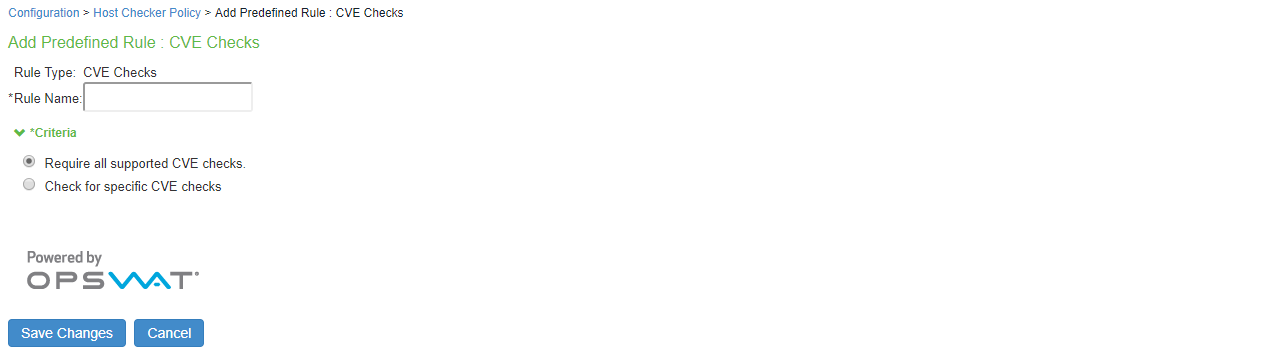
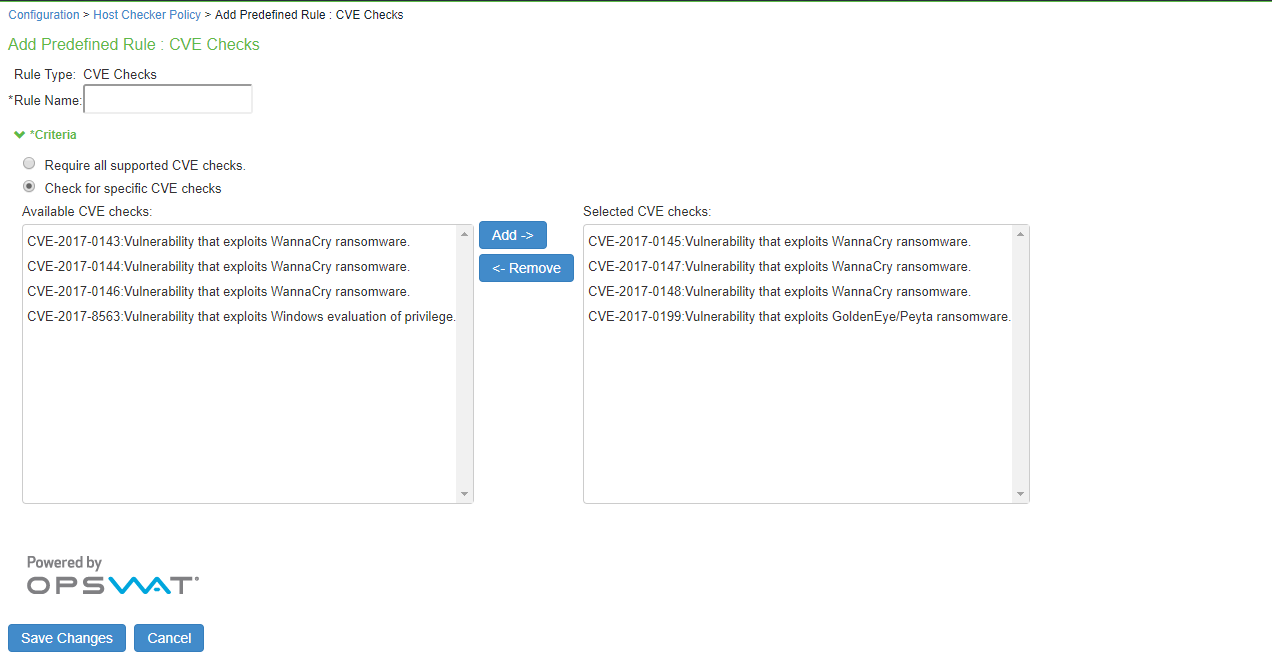
6.From the Criteria, select if you require all the CVE checks from OPSWAT or choose the specific CVE checks from the available CVE checks list.
7.Click Save Changes.
Configuring Predefined System Integrity Protection Rule
System Integrity Protection (SIP) is a security feature introduced in Mac OS X El Capitan. It provides security by restricting various actions that root user can perform on the client machine. System Integrity Protection is enabled by default but can be disabled.
Ivanti Connect Secure supports System Integrity Protection policy to check the status of System Integrity Protection (SIP) on the Mac OS endpoints. Using this, the administrators can provide different access level to the end points based on the status of "System Integrity Protection" on the client machines.
To configure a Host Checker Predefined SIP rule:
1.Select Authentication > Endpoint Security > Host Checker.
2.Create a new or click an existing policy in the Policies section of the page.
3.Select the Mac tab.
4.Under Rule Settings, select Predefined: System Integrity Protection Rule and click Add.
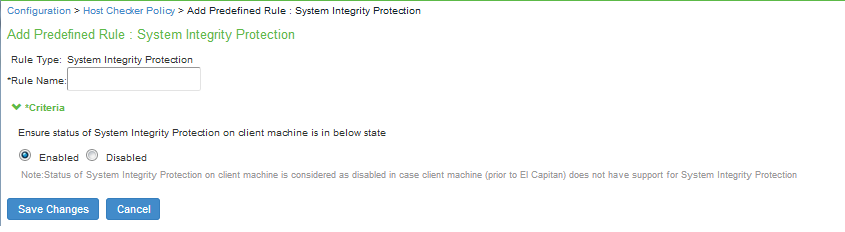
5.Enter the rule name.
6.Under Criteria, select Enabled to ensure that the System Integrity Protection on the client machine is enabled.
7.Click Save Changes.
Configuring Virus Signature Version Monitoring
You can configure Host Checker to monitor and verify that the virus signatures, operating systems, software versions, and patches installed on client computers are up-to-date, and remediate those endpoints that do not meet the specified criteria. Host Checker uses the current virus signatures from the vendor(s) you specify for predefined rules in a Host Checker policy.
You can automatically import the current Virus signature version monitoring lists from the Ivanti staging site at a specified interval, or you can download the files from Ivanti and use your own staging server.
You can also configure a proxy server as a staging site between the system and the Ivanti site. To use a proxy server, you enter the servers network address, port and authentication credentials, if applicable.
To access the Ivanti staging site for updates, you must enter the credentials for your Pulse Secure Support account.
To configure the system automatically import the current virus signature version monitoring list(s) from the Ivanti staging site:
1.Choose Authentication > Endpoint Security > Host Checker.
2.Click Virus signature version monitoring.
3.Select Auto-update virus signatures list.
4.For Download path, leave the existing URL(s) of the staging site(s) where the current list(s) are stored. The default URLs are the paths to the Ivanti staging site: https://download.pulsesecure.net/software/av/uac/epupdate_hist.xml) (for auto-update virus signatures list)
5.For Download interval, specify how often you want the system to automatically import the current list(s).
6.For Username and Password, enter your Pulse Secure Support credentials.
7.Click Save Changes.
To manually import the current virus signature version monitoring and patch management version monitoring list(s):
1.Choose Authentication > Endpoint Security > Host Checker.
2.Click Virus signature version monitoring.
3.Download the list(s) from the Ivanti staging site to a network server or local drive on your computer by entering the Ivanti URLs in a browser window. https://download.pulsesecure.net/software/av/uac/epupdate_hist.xml)
4.Under Manually import virus signatures list, click Browse, select the list, and then click OK.
5.Click Save Changes.
If you use your own staging site for storing the current list(s), you must upload the trusted root certificate of the CA that signed the staging's server certificate to the system.
To use a proxy server as the auto-update server:
1.Choose Authentication > Endpoint Security > Host Checker.
2.Click Virus signature version monitoring.
3.Select Auto-update virus signatures list.
4.For Download path, leave the existing URL(s) of the staging site(s) where the current list(s) are stored. The default URLs are the paths to the Ivanti staging site: https://download.pulsesecure.net/software/av/uac/epupdate_hist.xml) (for auto-update virus signatures list)
5.For Download interval, specify how often you want the system to automatically import the current list(s).
6.For Username and Password, enter your Pulse Secure Support credentials.
7.Select the check box for Use Proxy Server.
8.Enter the IP Address of your proxy server.
9.Enter the Port that the Pulse Secure Support site will use to communicate with your proxy server.
10.If your proxy server is password protected, type the Username and Password of the proxy server.
11.Click Save Changes.
Host Checker Statement of Health for Ivanti Connect Secure
You can use the open standard Statement of Health (SoH) rule in a Host Checker policy for the Ivanti Secure Access Client and for the Windows in-box Ivanti Secure Access Client. SoH components evaluate an endpoint's state of health and make policy decisions for network access based on the result of the health check. To use SoH with the Windows in-box Ivanti Secure Access Client, you must also enable the SoH functionality on the endpoint.
You can use the SoH health state validation to determine which roles or realms can be accessed by endpoints. If an endpoint fails the SoH check, or if the SoH cannot be negotiated successfully, the Host Checker policy fails.
You can check the following system health indicators:
•Antivirus is enabled.
•Antivirus is up to date.
•Antispyware is enabled.
•Antispyware is up to date.
•Firewall is enabled.
•Automatic updating is enabled
Configuring a Statement of Health Host Checker Policy for Ivanti Connect Secure
You can use the open standard Statement of Health rule in a Host Checker policy for both the Ivanti Secure Access Client and the Windows in-box Ivanti Secure Access Client.
To configure a Statement of Health rule in a Host Checker policy:
1.In the admin console, select Authentication > Endpoint Security > Host Checker.
2.In the Policies section, click New to create a new policy, or click an existing policy.
3.For a new policy, specify a name for the policy and then click Continue.
4.Click the Windows tab. Statement of Health is available for Windows endpoints only.
5.Under Rule Settings, select Custom: Statement of Health, and then click Add.
6.Type a Rule Name for this rule.
To configure the SoH rule, you must select one or more of the Statement of Health parameters.
1.Under Criteria, enter a Label for the selected SoH parameter, or accept the default.
2.Select an SoH policy option from the Parameter menu, and then click Add for the following types:
•Antivirus Enabled
•Antivirus up to date
•Antispyware enabled
•Antispyware up to date
•Firewall Enabled
•Automatic Updating Enabled
3.Select additional options from the Parameter list to add additional SoH parameters.
4.(Optional) For each rule, select the Enable automatic remediation check box. If you select this option for a rule, the user receives a remediation message from the SoH agent, and appropriate remediation is performed, if possible. If the box is not selected, the user receives a remediation message, but no remediation action is performed.
Automatic remediation works for the Ivanti Secure Access Client Windows only. The Windows in-box Ivanti Secure Access Client does not support automatic remediation.
5.Click Save Changes.
Specifying Customized Requirements Using Custom Rules
In addition to the predefined policies and rules that come with the system, you can create custom rules within a Host Checker policy to define requirements that your users' computers must meet. Using custom rules, you can:
•Configure remote integrity measurement verifiers (IMVs) to perform customized client-side checks.
•Configure Host Checker to check for custom DLLs that perform customized client-side checks.
•Verify that certain ports are open or closed on the user's computer.
•Confirm that certain processes are or are not running on the user's computer.
•Check that certain files are or are not present on the client machine.
•Evaluate the age and content of required files through MD5 checksums.
•Confirm that registry keys are set on the client machine.
•Confirm the NETBIOS name of the client machine.
•Confirm the MAC addresses of the client machine.
•Check the validity of the machine certificate that is installed on the user's computer.
You can only check for registry keys, third-party DLLs, NETBIOS names, MAC addresses, and machine certificates on Windows computers.
To create a client-side Host Checker policy:
1.In the admin console, select Authentication > Endpoint Security > Host Checker.
2.Create a new policy or click an existing policy in the Policies section of the page.
3.Click the tab that corresponds to the operating system for which you want to specify Host Checker options-Windows, Mac, Linux or Solaris. In the same policy, you can specify different Host Checker requirements on each operating system. For example, you can create one policy that checks for different files or processes on each operating system.
You must explicitly create policies for each operating system you want to allow. For example, if you create a Windows Host Checker policy, but don't create one for Mac or Linux, users who sign into the device from a Mac or Linux machine will not comply with the Host Checker policy and therefore will not be able to access the realm, role, or resource on which you enforce Host Checker.
4.Under Rule Settings, choose the options in the following sections and click Add. The Add Custom Rule page for the rule type appears.
•Custom: Remote IMV - Use this rule type to configure integrity measurement software that a client must run to verify a particular aspect of the client's integrity, such as the client's operating system, patch level, or virus protection.
•3rd Party NHC Check - Use this rule type to specify the location of a custom DLL (Windows only). Host Checker calls the DLL to perform customized client-side checks. If the DLL returns a success value to Host Checker, then the system considers the rule met. In the 3rd Party NHC Check configuration page:
5.Enter a name and vendor for the 3rd Party NHC Check rule
6.Enter the location of the DLL on client machines (path and file name).
7.Click Save Changes.
The 3rd Party NHC Check feature is primarily provided for backwards compatibility. We recommend that you use IMCs and IMVs instead
•Ports - Use this rule type to control the network connections that a client can generate during a session. This rule type ensures that certain ports are open or closed on the client machine before the user can access the device. In the Ports configuration page:
•Enter a name for the port rule.
•Enter a comma delimited list (without spaces) of ports or port ranges, such as: 1234,11000-11999,1235.
•Select Required to require that these ports are open on the client machine or Deny to require that they are closed.
•Under Optional, select Monitor this rule for change in result to continuously monitor the policy compliance of endpoints. If this check box is selected, and a change in compliance status on an endpoint that has successfully logged in occurs, the system initiates a new handshake to re-evaluate realm or role assignments.
Monitor this rule for change in result for port check is applicable only for Windows and not for Linux or MAC machines.
•Click Save Changes.
•Process - Use this rule type to control the software that a client may run during a session. This rule type ensures that certain processes are running or not running on the client machine before the user can access resources protected by the system. In the Processes configuration page:
•Enter a name for the process rule.
•Enter the name of a process (executable file), such as: good-app.exe.
For Linux, Macintosh and Solaris systems, the process that is being detected must be started using an absolute path.
You can use a wildcard character to specify the process name.
For example: good*.exe
•Select Required to require that this process is running or Deny to require that this process is not running.
•Specify the MD5 checksum value of each executable file to which you want the policy to apply (optional). For example, an executable may have different MD5 checksum values on a desktop, laptop, or different operating systems. On a system with OpenSSL installed-many Macintosh, Linux and Solaris systems have OpenSSL installed by default-you can determine the MD5 checksum by using this command: openssl md5 <processFilePath>
•Click Save Changes.
•File - Use this rule type to ensure that certain files are present or not present on the client machine before the user can access the device. You may also use file checks to evaluate the age and content (through MD5 checksums) of required files and allow or deny access accordingly. In the Files configuration page:
•Enter a name for the file rule.
•Enter the name of a file (any file type), such as: c:\temp\bad-file.txt or /temp/bad-file.txt.
You can use a wildcard character to specify the file name. For example:
*.txt
You can also use an environment variable to specify the directory path to the file. (You cannot use a wildcard character in the directory path.) Enclose the variable between the <% and %> characters. For example:
<%windir%>\bad-file.txt
•Select Required to require that this file is present on the client machine or Deny to require that this file is not present.
•Specify the minimum version of the file (optional). For example, if you require notepad.exe to be present on the client, you can enter 5.0 in the field. Host Checker accepts version 5.0 and later, of notepad.exe.
•Specify the maximum age (File modified less than n days) (in days) for a file (optional). If the file is older than the specified number of days, then the client does not meet the attribute check requirement.
You can use the maximum age option to check the age of virus signatures. Make sure you specify the path to a file in the File Name field whose timestamp indicates when virus signatures were last updated, such as a virus signature database or log file that updates each time the database updates. For example, if you use TrendMicro, you may specify:
C:\Program Files\Trend Micro\OfficeScan Client\TmUpdate.ini.
•Specify the MD5 checksum value of each file to which you want the policy to apply (optional). On Macintosh, Linux and Solaris, you can determine the MD5 checksum by using this command: openssl md5<filePath>
•Select Monitor this rule for change in result to continuously monitor the policy compliance of endpoints. If this check box is selected, and a change in compliance status on an endpoint that has successfully logged in occurs, the system initiates a new handshake to re-evaluate realm or role assignments.
Monitor this rule for change in result for port check is applicable only for Windows and not for Linux or MAC machines.
•Click Save Changes.
•Registry Setting - Use this rule type to control the corporate PC images, system configurations, and software settings that a client must have to access the device (Windows only). This rule type ensures that certain registry keys are set on the client machine before the user can access the device. You may also use registry checks to evaluate the age of required files and allow or deny access accordingly. In the Registry Settings configuration page:
•Enter a name for the registry setting rule.
•Select a root key from the drop-down list.
•Enter the path to the application folder for the registry subkey.
•Enter the name of the key's value that you want to require. This name appears in the Name column of the Registry Editor.
•Select the key value's type (String, Binary, or DWORD) from the dropdown list (optional). This type appears in the Type column of the Registry Editor.
•Specify the required registry key value (optional). This information appears in the Data column of the Registry Editor.
If the key value represents an application version, select Minimum version to allow the specified version or newer versions of the application. For example, you can use this option to specify version information for an antivirus application to make sure that the client antivirus software is current. The system uses lexical sorting to determine if the client contains the specified version and later. For example:
3.3.3 is newer than 3.3
4.0 is newer than 3.3
4.0a is newer than 4.0b
4.1 is newer than 3.3.1
If you specify only the key and subkey, Host Checker simply verifies the existence of the subkey folder in the registry.
•Under Optional, select Monitor this rule for change in result to continuously monitor the policy compliance of endpoints. If this check box is selected, and a change in compliance status on an endpoint that has successfully logged in occurs, the system initiates a new handshake to re-evaluate realm or role assignments.
Monitor this rule for change in result for port check is applicable only for Windows and not for Linux or MAC machines.
You can configure registry setting remediation actions with Host Checker. If a client attempts to log in, and the client machine does not meet the requirements you specify, Host Checker can attempt to correct the discrepancies to allow the client to log in.
•Select the check box for Set Registry value specified in criteria.
•Click Save Changes.
•NetBIOS (Windows only, does not include Windows Phone) - Use this rule type to check the NetBIOS name of the client machine before the user can access the device. In the NetBIOS configuration page:
•Enter a name for the NetBIOS rule.
•Enter a comma-delimited list (without spaces) of NetBIOS names. The name can be up to 15 characters in length. You can use wildcard characters in the name and it is not case-sensitive. For example, md*, m*xp and *xp all match MDXP.
•Select Required to require that NETBIOS name of the client machine match one of the names you specify, or Deny to require that the name does not match any name.
•Click Save Changes.
•MAC Address (Windows only) - Use this rule type to check the MAC addresses of the client machine before the user can access the device. In the MAC Address configuration page:
•Enter a name for the MAC address rule.
•Enter a comma-delimited list (without spaces) of MAC addresses in the form XX:XX:XX:XX:XX:XX where the X's are hexadecimal numbers. For example:
00:0e:1b:04:40:29
You can use a * wildcard character to represent a two-character section of the address. For example, you can use a * to represent the "04", "40", and "29" sections of the previous example address:
00:0e:1b:*:*:*
But you cannot use a * to represent a single character. For example, the * in the following address is not allowed:
00:0e:1b:04:40:*9
•Select Required to require that a MAC address of the client machine matches any of the addresses you specify, or Deny to require that the all addresses do not match. A client machine will have at least one MAC address for each network connection, such as Ethernet, wireless, and VPN. This rule's requirement is met if there is a match between any of the addresses you specify and any MAC address on the client machine.
•Click Save Changes.
Since the MAC address is changeable on some network cards, this check may not guarantee that a client machine meets the requirements of your Host Checker policy.
•Machine Certificate (Windows only) - Use this rule type to check that the client machine is permitted access by validating the machine certificate stored on the client machine. In the Machine Certificate configuration page:
•Enter a name for the machine certificate rule.
•From the Select Issuer Certificate list, select the certificate that you want to retrieve from the user's machine and validate. Or, select Any Certificate to skip the issuer check and only validate the machine certificate based on the optional criteria that you specify below.
•(Optional) Select the Consider policy as passed even if certificate expired but not for other cases (like invalid/missing/revoked etc) to make host checker policy pass even if the user certificate is expired. Using this option the Admin can assign endpoints to have remediation roles, so that users can renew certificate with remediation roles. This option is disabled by default.
•From the Optional fields (Certificate field and Expected value), specify any additional criteria that Host Checker should use when verifying the machine certificate.
•Click Save Changes.
If more than one certificate is installed on the client machine that matches the specified criteria, The Host Checker client passes the first certificate it finds to the system for validation.
•Optionally add additional rules to the policy, specify how Host Checker should evaluate multiple rules within the policy, and define remediation options.
Using a Wildcard or Environment Variable in a Host Checker Rule
You can use the following wildcards to specify a file name in a Custom File rule or a process name in a Custom Process rule:
Wildcard Characters for Specifying a File Name or Process Name
|
Wildcard Character |
Description |
Example |
|
* |
Matches any character |
*.txt |
|
? |
Matches exactly one character |
app-?.exe |
In a Custom File rule for Windows, you can use the following environment variables to specify the directory path to a file:
Environment Variables for Specifying a Directory Path on Windows|
Environment variable |
Example Windows Value |
|
<%APPDATA%> |
C:\Documents and Settings\jdoe\Application Data |
|
<%windir%> |
C:\WINDOWS |
|
<%ProgramFiles%> |
C:\Program Files |
|
<%CommonProgramFiles%> |
C:\Program Files\Common Files |
|
<%USERPROFILE%> |
C:\Documents and Settings\jdoe |
|
<%HOMEDRIVE%> |
C: |
|
<%Temp%> |
C:\Documents and Settings \<username>\Local Settings\Temp |
In a Custom File rule for Linux and Solaris, you can use the following environment variables to specify the directory path to a file:
Environment Variables for Specifying a Directory Path on Linux and Solaris|
Environment variable |
Example Linux and Solaris Values |
|
<%java.home%> |
/local/local/java/j2sdk1.4.1_02/jre |
|
<%java.io.tmpdir%> |
/tmp |
|
<%user.dir%> |
/home-shared/cknouse |
|
<%user.home%> |
/home/cknouse |
In a Custom File rule for Macintosh, you can use the following environment variables to specify the directory path to a file.
Environment Variables for Specifying a Directory Path on Macintosh|
Environment variable |
Example Macintosh Value |
|
<%HOME%> |
/Users/admin where admin is the logged in username |
|
<%USER%> |
Maps to the login name of the MAC machine |
Although environment variables are formatted in the same way as Toolkit Template directives, they are not interchangeable and you should not confuse them.
Configuring Patch Management Policies
You can configure, Hostchecker policies that checks for patch management software installed on the client machines. Customers need to have their own patch management solution. Administrator is given option to configure the patch management software that needs to be verified on the endpoint.
On the client machine, Patch management software detects patch status based on the configured rules on corresponding patch management server. Detection of patches status on the client machine depends on the support provided by the 3rd party patch management solution that customer is using Hence different patch management software on the same client can report the status differently. To avoid conflicts, administrator is allowed to configure only one patch management software product on policy configuration page.
Patch remediation support is provided only using Microsoft's SMS/SCCM clients.
- In non-English installations, the English version of local patches is displayed.
- The patch management policy cannot be used in L2 case with some products when they require internet connectivity to get the latest patch status.
Using Microsoft System Management Server or Microsoft System Center Configuration Manager (SMS/SCCM)
For Windows clients, you can use Microsoft System Management Server or Microsoft System Center Configuration Manager (SMS/SCCM) to provide a method for automatic updates to non-compliant software.
Using the SMS/SCCM remediation feature, you can force the client to initiate the software update immediately after the Patch Management check.
To have SMS/SCCM update the client when notified, set the advertisement time on the SMS/SCCM to As soon as possible.
•The Patch Management policy specifies the required software.
•When an endpoint attempts to authenticate, Host Checker evaluates the client and sends the results obtained from the patch management software back to the system.
•The system evaluates the results and sends reason strings and remediation information to the client .and initiates remediation action if enabled.
•If the endpoint has SMS/SCCM client, the SMS/SCCM client queries the SMS/SCCM server for software advertisements.
•The server identifies what patches should be advertised to the client. This information is configured on the server, Host Checker does not interact with the server.
•The SMS/SCCM client receives the advertisement and applies the required patch(es).
You assign clients to a particular group or collection on the server, then SMS/SCCM can advertise patches for that collection. You can configure roles that correspond to collections, and SMS/SCCM can send the appropriate patches for a particular role.
You must have the SMS/SCCM client installed and configured correctly on endpoints, and the SMS/SCCM server must be reachable. In a Layer 2 network, Host Checker is performed before the endpoint is connected to the network. Host Checker can obtain the IP address of the SMS/SCCM server configured for the client. If the endpoint is out of compliance and remediation is necessary, Host Checker pings the server IP address every 15 seconds until the server can be notified to update the client.
It is important as an administrator to inform users of the expected behavior if this feature is enabled, as there is no notification to the user until SMS sends back the advertisement.
Configuring Custom Command Rule
Command rule enables administrators to check for the versions of the installed applications on the Mac OS endpoints.
To configure a Host Checker: Custom Command rule:
1.Select Authentication > Endpoint Security > Host Checker.
2.Create a new or click an existing policy in the Policies section of the page.
3.Select the Mac tab.
4.Under Rule Settings, select Custom: Command and click Add.

5.Enter the rule name.
6.Under Criteria, complete the following configuration:
•Select the command type as default read (Read Settings)
•Specify the path of the property list file of the required application on the client machine.
•Enter the key name used in the property list file for obtaining the version of the application.
•Enter the expected version that needs to be present on the client machine
• From 22.6R1, select Minimum version required to allow the specified version or newer versions of the application.
7.Click Save Changes.
Ensure that the required ESAP package (which has support for Command Rule) is installed and activated on the server.
Configuring Custom Advanced Host Checking Rule
- Use this rule type to combine multiple policies for performing advanced host checking. The supported policy types are ports, process, file, registry setting, NETBIOS, MAC address and machine certificate. It allows Administrator to dynamically configure the expected values from registry locations on the endpoint for evaluating the policies.
- This feature is supported only on Windows platform.
To configure an advanced host checking rule:
1.Select Authentication > Endpoint Security > Host Checker.
2.Create a new policy, or click an existing policy in the Policies section of the page.
3.Under Rule Settings, select Custom: Advanced Host Checking and then click Add.
4.Enter a name for the rule.
5.Select the check to be performed from the Rule Type list.
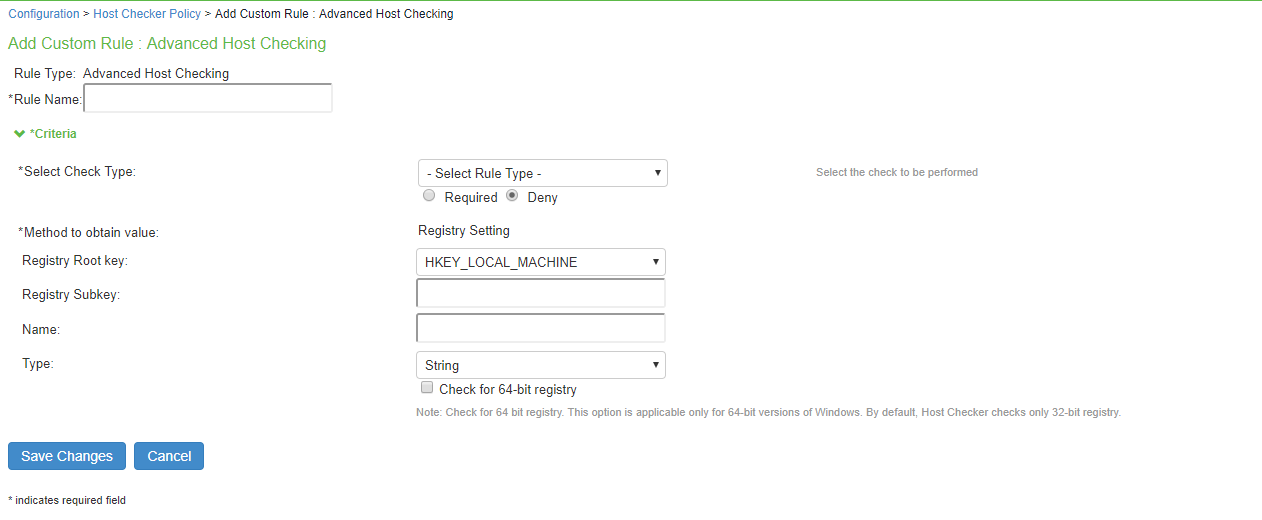
6.Under Criteria, Select Rule Type list.
•Select Ports to check whether a specific port number is opened or closed on the endpoint.
•Enable Required/Deny to check if the specified port is open/closed.
•Select the registry root key- HKEY_LOCAL_MACHINE, HKEY_USERS, HKEY_CURRENT_USER, HKEY_CURRENT_CONFIG, or HKEY_CLASSES_ROOT.
•Enter the registry subkey.
•Enter the name of the registry.
•Select the type of the registry- String, Binary, or DWORD.
•Select Check for 64-bit registry to check the 64-bit registry on Windows. The default is 32-bit registry
You can similarly add the check type for Process/File/NETBIOS/MAC Address. The port number/process name/file path/NETBIOS name/MAC address is obtained from the Registry setting. Advanced Host Check- Ports
•Select Registry Setting to verify the specific registry values on the endpoint. You can define only the registry location in the policy and define another registry location, which provides the expected registry value.
•Select the registry root key- HKEY_LOCAL_MACHINE, HKEY_USERS, HKEY_CURRENT_USER, HKEY_CURRENT_CONFIG, or HKEY_CLASSES_ROOT.
•Enter the registry subkey.
•Enter the name.
•Select the type of the registry- String, Binary, or DWORD.
•Configure another registry setting to fetch the expected registry value. Select the registry subkey, name, and type.
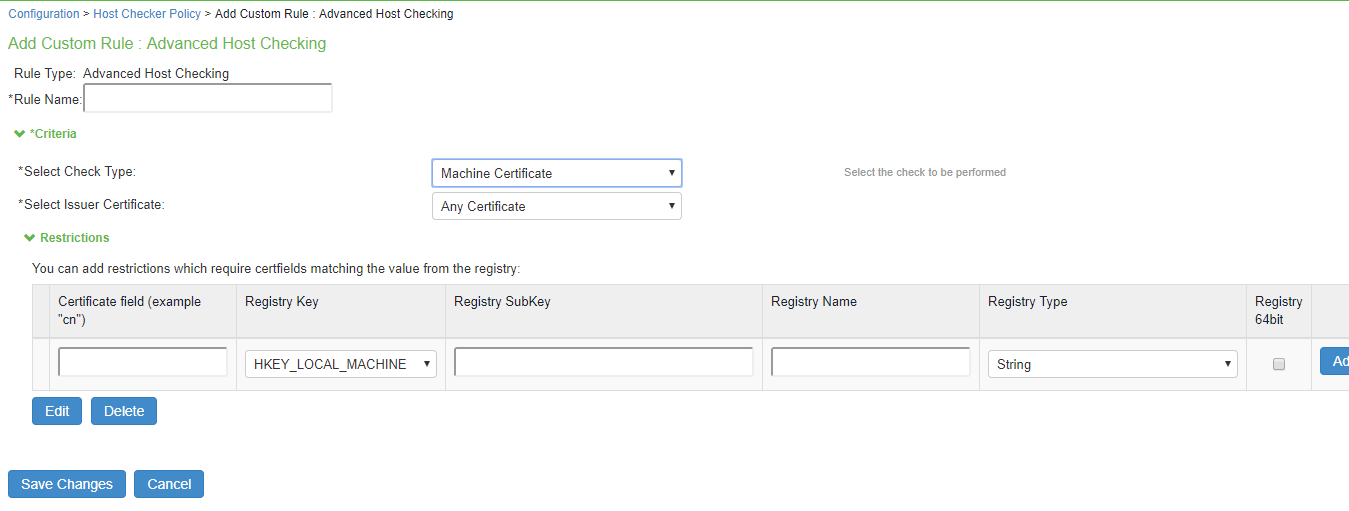
•Select Machine Certificate to verify the required certificate is installed on the client machine certificate store.
•Select the issuer certificate from the list.
•Specify any additional criteria that Host Checker must use while verifying the certificate.
•Enter the certificate field name. For example, cn.
•Select the registry key.
•Enter the registry subkey.
•Enter the registry name.
•Select the registry type.
•Click Add.
7.Click Save Changes.
Using Third-party Integrity Measurement Verifiers
The Trusted Network Connect (TNC) standard enables the enforcement of security requirements for endpoints connecting to networks. The client-side components of the TNC are the IMCs and the TNC-client (TNCC). The TNCC compiles the IMC measurements and sends them to the server. At the server, there is a corresponding set of components: the TNC-server (TNCS) and the IMVs. The TNCS manages the messages between the IMVs and the IMCs and sends the recommendations, based on the IMVs, to the policy engine. This type of rule is available for Host Checker policies on all platforms.
Ivanti Connect Secure and Host Checker comply with the standards produced by the TNC. For more information about the TNC, IMVs and IMCs, see www.trustedcomputinggroup.org.
You can configure Host Checker to monitor third-party TNC-compliant IMCs installed on client computers. To do so, you must:
1.Run the Third-party Integrity Measurement Verifier (IMV) Server installer on the system designated as the remote IMV server. Install the third-party IMVs and create the server certificates.
2.Specify the remote IMV server so that the system can communicate with it.
3.Implement the Host Checker policy.
Configuring a Remote IMV Server
- In an Active/Passive cluster, the Active/Passive nodes' individual IP addresses must be added to the RIMV as the system IP addresses.
- The successful addition of remote IMV server is not logged in the event log.
- When Host Checker fails, custom instructions are not displayed. There is no user access log on the system about Host Checker failure.
During this step, you install third-party IMVs. Third-party IMVs are installed on the remote IMV server, not on the device.
During this step, you also obtain a server certificate for the remote IMV server. You import the trusted root CA certificate of the CA that generated the server certificate onto the device. The system then authenticates with the remote IMV server through the certificate. If you do not have a certificate authority, install and use OpenSSL to generate a CA certificate.
To install, configure, and implement the server software:
1.In the system admin console, choose Maintenance > System > Installers and download the Third-party Integrity Measurement Verifier (IMV) Server installer.
2.Run the installer on the system designated as the remote IMV server.
3.Install the third-party IMVs on the remote IMV server and the corresponding IMCs on the client systems.
4.Generate a server certificate from a certificate authority for the remote IMV server. The server's certificate Subject CN value must contain the actual hostname or IP address of the remote IMV server.
The server certificate and the private key must be combined into a single PKCS#12 file and encrypted with a password.
If you do not have a certificate authority, you can use the following steps to create a CA and then create a server certificate for the remote IMV server.
Install the full version of OpenSSL. The "light" version of OpenSSL will not work.
Follow the steps below to set up OpenSSL:
1.Download and install OpenSSL from this site: http://www.slproweb.com/products/Win32OpenSSL.html
2.At the Windows command prompt, type the following commands:
cd \opensslmd certs
cd certs
md demoCA
md demoCA\newcerts
edit demoCA\index.txt
3.Press the ALT-F keys and then the S key to save the file.
4.Press the ALT-F keys and then the X key to exit the editor.
5.At the Windows command prompt, type the following commands:
edit demoCA\serial
6.Type the following in the document window: 01
7.Press the ALT-F keys and then the S key to save the file.
8.Press the ALT-F keys and then the X key to exit the editor.
9.At the Windows command prompt, type the following commands:
set path=c:\openssl\bin;%path%
Follow the steps below to create a CA key:
1.To create a CA key, type the following command at the Windows command prompt in the c:\openssl\certs directory:
openssl genrsa -out ca.key 1024
The following output should appear:
Loading 'screen' into random state - done
Generating RSA private key, 1024 bit long modulus
........++++++
.++++++
e is 65537 (0x10001
Follow the steps below to create a CA Certificate:
1.Type the following command at the Windows command prompt in the c:\openssl\certs directory:
openssl req -new -x509 -days 365 -key ca.key -out
demoCA/cacert.pem
2.Enter the appropriate Distinguished Name (DN) information for the CA certificate. You can leave some fields blank by entering a period.
For example:
Country Name: USState or Province Name: CA
Locality Name: Sunnyvale
Organization Name: XYZ
Org. Unit Name: IT
Common Name: ic.xyz.com
Email Address: [email protected]
3.To set up the CA, type the following command at the Windows command prompt in the directory c:\openssl\certs:
copy ca.key demoCA
notepad demoCA.cnf
4.When prompted to create a new file, press the yes button.
5.Type the following lines in the document, pressing the Enter key at the end of each line.
[ca]
default_ca = demoCA
[demoCA]
dir = ./demoCA
database = $dir/index.txt
new_certs_dir = $dir/newcerts
certificate = $dir/cacert.pem
serial = $dir/serial
private_key = $dir/ca.key
default_days = 365
default_md = md5
policy = policy_any
email_in_dn = no
name_opt = ca_default
name_opt = ca_default
copy_extensions = none
[ policy_any ]
countryName = supplied
stateOrProvinceName = optional
organizationName = optional
organizationalUnitName = optional
commonName = supplied
emailAddress = optional
6.Save the file and close notepad.
7.Type the following command to generate an RSA private key for the remote IMV server:
openssl genrsa -out rimvs_key.pem 1024
8.Type the following command to generate a CSR for the remote IMV server:
openssl req -new -key rimvs_key.pem -out rimvs_csr.pem
9.Type the following lines:
Country Name:State or Province Name:
Locality Name:
Organization Name:
Organizational Unit Name:
Common Name: [IPAddress]
Email Address:
A challenge password:
An optional company name:
You may enter any value you like for most fields, but the Common Name field must contain the IP address of the machine running the remote IMV server. This machine should have a static IP address.
10.Type the following command to generate a certificate for the remote IMV server:
openssl ca -config demoCA.cnf -in rimvs_csr.pem -out rimvs_cert.pem
11.Type 'y' twice when prompted to generate the certificate. This certificate is valid for 365 days by default. If you want a different certificate lifetime, change the default_days parameter in the demoCA.cnf file, or use the - days parameter to the openssl ca command to specify a different lifetime.
12.Type the following command to place the remote IMV server key and certificate in a PKCS#12 file (substitute your password):
openssl pkcs12 -export -in rimvs_cert.pem -inkey rimvs_key.pem -passout pass:<password>-out rimvs_p12.pem
13.On the remote IMV server, choose Programs > Ivanti Connect Secure > Remote IMV Server > Remote IMV Server Configurator from the Start menu.
14.Under Client Info, click Add.
15.Configure the port to service SOAP requests.
16.Enter the client's IP address, the number of addresses to use, and the shared secret used by both the system and the remote IMV server.
17.Change logging settings if you choose (log is generated in the install directory).
18.Browse and find the PKCS#12 file you generated in the filesystem.
19.Specify the password associated with the certificate.
20.In the Ivanti Connect Secure admin console, use the System > Configuration > Certificates > Trusted Server CAs tab to import the trusted root CA certificate of the CA that issued the certificate for the remote IMV server.
If you used OpenSSL to generate the Remote IMV Server's server certificate is: demoCA\cacert.pem.
If you did not use OpenSSL to generate this certificate, ensure that the file you import has the CA certificate (not the root certificate).
21.Click Import Trusted Server CA and browse for the server certificate used on the remote IMV server.
22.Add the new remote IMV server:
To specify the remote IMV server so that Ivanti Connect Secure can communicate with it:
•In the admin console, choose Authentication > Endpoint Security > Host Checker.
•Under Remote IMV, click New Server.
•In the New Server page:
•Create a label for the server using the Name and (optional) Description fields.
•In the Hostname field, enter either the IP address or hostname as defined in the server certificate.
•In the Port field, enter the unique port number the system uses to communicate with the remote IMV server. Ensure that no other service is using this port number.
The default port number is the same as the default https port number. If you are running a web server on the same system as the Remote IMV Server, enter a new port number in the Port field.
•In the Shared Secret field, enter the same shared secret used in the client information entry on the remote IMV server.
• Click Save Changes.
•Under Remote IMV, click New IMV to specify the third-party IMV.
•In the New IMV page:
•Create a label for the IMV using the Name and (optional) Description fields.
•In the IMV Name field, enter the name of the IMV. This name must match the "human readable name" in the IMV's well-known registry key on the remote IMV server. For more information about human readable names and the well-known registry key, see www.trustedcomputinggroup.org.
•From the Primary Server pop-up menu, select the remote IMV server where this IMV is installed.
•(Optional) From the Secondary Server pop-up menu, select the secondary remote IMV server where this IMV is installed. The secondary server acts as a failover in case the primary server becomes unavailable.
The system continues to try to re-establish connection to the primary remote IMV Server, and uses the primary Remote IMV Server on subsequent handshakes once it becomes available.
•Click Save Changes.
•Click Save Changes.
Implementing the Third-Party IMV Policy
To use Host Checker as a policy enforcement tool for managing endpoints, you must create global Host Checker policies at the system level through the Authentication > Endpoint Security > Host Checker page of the admin console, and then implement the policies at the realm and role levels.
The Custom: Remote IMV option does not appear until you add the Remote IMV New Server and New IMV on the main Host Checker page.
To implement the third-party IMV policy:
1.In the admin console, select Authentication > Endpoint Security > Host Checker.
2.Under Policies, click New.
3.Enter a name in the Policy Name field and then click Continue. (Users see this name on the Host Checker remediation page if you enable custom instructions for this policy.)
4.Under Rule Settings, choose Custom: Remote IMV and click Add.
5.In the Add Custom Rule: Remote IMV page:
•In the Rule Name field, enter an identifier for the rule.
•Under Criteria, select the third-party IMV to be associated with this rule.
•Click Save Changes.
6.Specify how Host Checker should evaluate multiple rules within the policy.
7.(Recommended) Specify remediation options for users whose computers do not meet the requirements specified in the policy
8.Click Save Changes.
9.Implement the policy at the realm or role level.
Implementing Host Checker Policies
After you create global policies through the Authentication > Endpoint Security > Host Checker page of the admin console, you can restrict the system and resource access by requiring Host Checker in a:
•Realm authentication policy-When administrators or users try to sign in to the device or launch a Virtual Workspace session, the system evaluates the specified realm's authentication policy to determine if the pre-authentication requirements include Host Checker. You can configure a realm authentication policy to download Host Checker, launch Host Checker and enforce Host Checker policies specified for the realm, or not require Host Checker. The user must sign in using a computer that adheres to the Host Checker requirements specified for the realm. If the user's computer does not meet the requirements, the system denies access to the user unless you configure remediation actions to help the user bring his computer into compliance. You can configure realm-level restrictions through the Administrators > Admin Realms > SelectRealm > Authentication Policy > Host Checker page or the Users > User Realms > SelectRealm > Authentication Policy > Host Checker page of the admin console.
•Role-When the system determines the list of eligible roles to which it can map an administrator or user, it evaluates each role's restrictions to determine if the role requires that the user's computer adheres to certain Host Checker policies. If it does and the user's computer does not follow the specified Host Checker policies, then the system does not map the user to that role unless you configure remediation actions to help the user bring his computer into compliance. You can configure role-mapping using settings in the Users > User Realms > SelectRealm > Role Mapping page. You can configure role-level restrictions through the Administrators > Admin Roles > SelectRole > General > Restrictions > Host Checker page of the admin console or the Users > User Roles> SelectRole > General > Restrictions > Host Checker page. If you have enabled Advanced Endpoint Defense Malware Protection, you can select to implement this feature for any role.
•Resource policy-When a user requests a resource, the system evaluates the resource policy's detailed rules to determine if the resource requires that the user's computer adheres to certain Host Checker policies. The system denies access to the resource if the user's computer does not follow the specified Host Checker policies unless you configure remediation actions to help the user bring his computer into compliance. To implement Host Checker restrictions at the resource policy level, use settings in the Users > Resource Policies > SelectResource > SelectPolicy > Detailed Rules page.
You may specify that the system evaluate your Host Checker policies only when the user first tries to access the realm, role, or resource that references the Host Checker policy. Or, you may specify that the system periodically re-evaluate the policies throughout the user's session. If you choose to periodically evaluate Host Checker policies, the system dynamically maps users to roles and allows users access to new resources based on the most recent evaluation.
Executing Host Checker Policies
When the user tries to access the system, Host Checker evaluates its policies in the following order:
1.Initial evaluation-When a user first tries to access the system sign-in page, Host Checker performs an initial evaluation. Using the rules you specify in your policies, Host Checker verifies that the client meets your endpoint requirements and returns its results to the system. Host Checker performs an initial evaluation regardless of whether you have implemented Host Checker policies at the realm, role, or resource policy level.
If the user navigates away from the system sign-in page after Host Checker starts running but before signing in, Host Checker continues to run on the user's machine until the Host Checker process times out.
If the system does not receive a result from Host Checker for any reason (including because the user manually terminated Host Checker), it displays an error and directs the user back to the sign-in page.
Otherwise, if the Host Checker process returns a result, the system goes on to evaluate the realm level policies.
2.Realm-level policies-The system uses the results from Host Checker's initial evaluation to determine which realms the user may access. Then, the system displays or hides realms from the, only allowing the user to sign into those realms that you enable for the sign-in page, and if the Host Checker requirements for each realm are met. If the user cannot meet the Host Checker conditions required by any of the available realms, the system does not display the sign-in page. Instead, it displays an error stating the user has no access unless you have configured remediation actions to help the user bring the endpoint into compliance.
Note that Host Checker only performs realm-level checks when the user first signs in. If the state of the user's system changes during his session, the system does not remove him from the current realm or allow him access to a new realm based on his new system state.
3.Role-level policies-After the user signs into a realm, the system evaluates role-level policies and maps the user to the role or roles if he meets the Host Checker requirements for those role(s). Then, the system displays the homepage to the user and enables those options that the mapped role(s) allow.
If Host Checker returns a different status during a periodic evaluation, the system dynamically remaps the user to roles based on the new results. If the user loses rights to all available roles during one of the periodic evaluations, the system disconnects the user's session unless you have configured remediation actions to help the user bring the endpoint into compliance.
4.Resource-level policies-After allowing the user to access the homepage, the user may try to access a resource that is controlled by a resource policy. When he does, the system determines whether or not to perform the action specified in the resource policy based on the last status returned by Host Checker.
If Host Checker returns a different status during a periodic evaluation, the new status only impacts new resources that the user tries to access. For example, if the user successfully initiates a VPN Tunneling session and then fails his next resource-level host check, he may continue to access the open VPN Tunneling session. The system only denies him access if he tries to open a new VPN Tunneling session. The system checks the last status returned by Host Checker whenever the user tries to access a new Web resource or open a new Secure Application Manager, VPN Tunneling, or Secure Terminal Access session.
With either a success or fail result, Host Checker remains on the client. Windows users may manually uninstall the agent by running uninstall.exe in the directory where Host Checker is installed. If you enable client-side logging through the System > Log/Monitoring > Client Logs page, this directory also contains a log file, which the system rewrites each time Host Checker runs.
If you enable dynamic policy evaluation for Host Checker, the system evaluates resource policies implemented at the realm level whenever a user's Host Checker status changes. If you do not enable dynamic policy evaluation for Host Checker, it does not evaluate resource policies but it does evaluate the authentication policy, role mapping rules, and role restrictions whenever a user's Host Checker status changes.
Configuring Host Checker Restrictions
To specify Host Checker restrictions:
1.Navigate to: Authentication > Endpoint Security > Host Checker and specify global options for Host Checker to apply to any user for whom Host Checker is required in an authentication policy, a role mapping rule, or a resource policy.
2.If you want to implement Host Checker at the realm level:
•Navigate to:
•Administrators > Admin Realms > Select Realm > General > Restrictions > Host Checker.
•Users > User Realms > Select Realm > General > Restrictions > Host Checker.
•Choose one of the following options for either all available policies or for individual policies listed in the Available Policies column:
•Evaluate Policies-Evaluates without enforcing the policy on the client and allows user-access. This option does not require Host Checker to be installed during the evaluation process; however, Host Checker is installed once the user signs in to the system.
•Require and Enforce-Requires and enforces the policy on the client in order for the user to log in to the specified realm. Requires that Host Checker is running the specified Host Checker policies in order for the user to meet the access requirement. This option requires the system to download Host Checker to the client machine. If you choose this option for a realm's authentication policy, then the system downloads Host Checker to the client machine after the user is authenticated and before the user is mapped to any roles in the system. Selecting this option automatically enables the Evaluate Policies option.
•Select the Allow access to realm if any ONE of the selected "Require and Enforce" policies is passed check box if you do not want to require users to meet all of the requirements in all of the selected policies. Instead, the user can access the realm if he meets the requirements of any one of the selected Host Checker policies. Note that Cache Cleaner policies are not part of the "requirement" decision process. Users can access the realm as long as they meet the other requirements regardless of whether they meet the Cache Cleaner policy.
3.If you want to implement Host Checker at the role level:
•Navigate to:
•Administrators > Admin Roles > Select Role > General > Restrictions > Host Checker.
• Users > User Roles > Select Role > General > Restrictions > Host Checker.
•Choose one of the following options:
•Allow all users - Does not require Host Checker to be installed in order for the user to meet the access requirement.
•Allow only users whose workstations meet the requirements specified by these Host Checker policies - Requires that Host Checker is running the specified Host Checker policies in order for the user to meet the access requirement.
•Select the Allow access to role if any ONE of the selected "Require and Enforce" policies is passed check box if you do not want to require users to meet all of the requirements in all of the selected policies. Instead, the user can access the role if he meets the requirements of any one of the selected Host Checker policies.
4.If you want to create role-mapping rules based on a user's Host Checker status:
•Navigate to: Users > User Realms > Select Realm >Role Mapping.
•Click New Rule, select Custom Expressions from the Rule based on list, and click Update. Or, to update an existing rule, select it from the When users meet these conditions list.
•Click Expressions.
•Write a custom expression for the role mapping rule to evaluate Host Checker's status using the hostCheckerPolicy variable. For help writing the custom expressions, use tips in the Expressions Dictionary.
•In the ...then assign these roles section, select the roles to map users to when they meet the requirements specified in the custom expression and click Add.
•Select the Stop processing rules when this rule matches if you want to stop evaluating role mapping rules if the user successfully meets the requirements defined in this rule.
5.If you want to implement Host Checker at the resource policy level:
•Navigate to: Users > Resource Policies > Select Resource > Select Policy > Detailed Rules.
•Click New Rule or select an existing rule from the Detailed Rules list.
•Write a custom expression for the detailed rule to evaluate Host Checker's status using the hostCheckerPolicy variable.
These options allow you to control which version of an application or service runs on client machines.
Remediating Host Checker Policies
You can specify general remediation actions that you want Host Checker to take if an endpoint does not meet the requirements of a policy. For example, you can display a remediation page to the user that contains specific instructions and links to resources to help the user bring their endpoint into compliance with Host Checker policy requirements.
You can also choose to include a message to users (called a reason string) that is returned by Host Checker or an integrity measurement verifier (IMV) and explains why the client machine does not meet the Host Checker policy requirements.
For example, the user may see a remediation page that contains the following custom instructions, a link to resources, and reason strings:
Your computer's security is unsatisfactory.
Your computer does not meet the following security requirements. Please follow the instructions below to fix these problems. When you are done click Try Again. If you choose to Continue without fixing these problems, you may not have access to all of your intranet servers.
Symantec
Instructions: You do not have the latest signature files. Click here to download the latest signature files. Reasons: The AntiVirus Product Version is too low.
The age of the Virus Definitions is not acceptable.
For each Host Checker policy, you can configure two types of remediation actions:
•User-driven-Using custom instructions, you can inform the user about the failed policy and how to make his computer conform. The user must take action to successfully re-evaluate the failed policy. For instance, you can create a custom page that is linked to a policy server or Web page and enables the user to bring his computer into compliance.
•Automatic (system-driven)-You can configure Host Checker to automatically remediate the user's computer. For example, when the initial policy fails, you can kill processes, delete files, or allow automatic remediation by an IMV. On Windows, you can also call the HCIF_Module.Remediate () API function as part of a third-party J.E.D.I. DLL. Host Checker does not inform users when performing automatic actions. (You could, however, include information in your custom instructions about the automatic actions.)
General Host Checker Remediation User Experience
Users may see the remediation page in the following situations:
•Before the user signs in:
•If you enable custom instructions for a policy that fails, the system displays the remediation page to the user. The user has two choices:
•Take the appropriate actions to make the endpoint conform to the policy and then click the Try Again button on the remediation page. Host Checker checks the user's computer again for compliance with the policy.
•Leave the endpoint in its current state and click the Continue button to sign in. The user cannot access the realm, role, or resource that requires compliance with the failed policy.
If you do not configure the system with at least one realm that allows access without enforcing a Host Checker policy, the user must bring the endpoint into compliance before signing in.
•If you do not enable custom instructions for a policy that fails, Host Checker does not display the remediation page to the user. Instead, the system displays the sign-in page but does not allow the user to access any realms, roles, or resources that have a failed Host Checker policy.
•After the user signs in:
•(Windows only) During a session, if a user's Windows computer becomes non-compliant with the requirements of a Host Checker policy, an icon appears in the system tray along with a pop-up message that informs the user of the non-compliance. The user can then click the pop-up message to display the remediation page.
•(Macintosh or Linux) During a session, if a user's Macintosh or Linux computer becomes non-compliant with the requirements of a Host Checker policy, the system displays the remediation page to inform the user of the non-compliance.
If the user hides the remediation page by setting a user preference, he may only continue using the secure gateway if you configure other realms and roles that do not enforce a Host Checker policy.
Configuring General Host Checker Remediation
To specify remediation actions for a Host Checker policy:
1.In the admin console, select Authentication > Endpoint Security > Host Checker.
2.Create or enable Host Checker policies.
3.Specify the remediation actions that you want Host Checker to perform if a user's computer does not meet the requirements of the current policy:
•Enable Custom Instructions-Enter the instructions you want to display to the user on the Host Checker remediation page. You can use the following HTML tags to format text and add links to resources such as policy servers or web sites: <i>, <b>, <br>, <font>, and <a href>. For example:
You do not have the latest signature files.
<a href="www.company.com">Click here to download the latest signature files.</a>
For Windows clients, if you include in the instructions a link to a system-protected policy server, define a pre-authentication access tunnel.
•Enable Custom Actions-You can select one or more alternate policies that you want Host Checker to evaluate if the user's computer does not meet the current policy requirements. The alternate policy must be a third-party policy that uses a J.E.D.I. package. For example, you can use a J.E.D.I. package to launch an application if the user's computer does not meet the current policy requirements. Select the alternate policy in the HC Policies list and then click Add.
•Remediate-(Third party DLLs only) You can select this option to perform remediation actions specified by means of the Remediate () API function in a third-party J.E.D.I. DLL.
The Remediate feature is primarily provided for backwards compatibility. We recommend that you use IMCs and IMVs instead.
•Kill Processes-On each line, enter the name of one or more processes you want to kill if the user's computer does not meet the policy requirements. You can include an optional MD5 checksum for the process. (You cannot use wildcards in the process name.) For example:
keylogger.exe
MD5: 6A7DFAF12C3183B56C44E89B12DBEF56
•Delete Files-Enter the names of files you want to delete if the user's computer does not meet the policy requirements. (You cannot use wildcards in the file name.) Enter one file name per line. For example:
c:\temp\bad-file.txt
/temp/bad-file.txt
•Send reason strings-Select this option to display a message to users (called a reason string) that is returned by Host Checker or integrity measurement verifier (IMV) and explains why the client machine does not meet the Host Checker policy requirements. This option applies to predefined rules, custom rules, and to third-party IMVs that use extensions in the Ivanti TNC SDK. For example, an antivirus IMV might display the following reason string:
The AntiVirus Product Version is too low. The age of the Virus Definitions is not acceptable.
By sending reason strings, you are disclosing to users what the IMV is checking on the client machine.
4.Click Save Changes.
Store and Reuse Host Checker Policy Results
The Host Checker configuration page enables you to store and reuse the host checker evaluation results. The admin can configure the time interval in days for not performing the host check on the endpoint. When the user connects for the first time the Host Checker runs and the results are saved in Ivanti Policy Secure. However, for the subsequent logins from the same endpoint, the host checking is not performed and the saved host check result is reused till the expiration of the admin defined time interval.
The first connection from the endpoint never reuses the cached results. The subsequent logins from the same endpoint uses the cached host checker results.
This feature saves the Host Check results for clients connecting from Windows and Mac desktop operating systems. This feature helps in providing faster connection or access to the network.
The Host Checker saved/cached results will be cleared in the following scenarios:
•Change in HC policy configuration such as addition, deletion and modifications.
•Change in Active ESAP version.
•Change in HC configuration such as periodic interval, disabling the caching feature and role configuration under caching feature.
•Server reboot.
Limitations
•Periodic host checking, rule monitoring, and remediation are supported only for the first connection when the results are not cached.
•Change in Compliance status of the device is not detected if cached results are used for the connection.
To configure caching on Host Checker:
1.Select Authentication > Endpoint Security > Host Checker.
2.Under Options, Store host checking evaluation results enable Store Host Checking evaluation results and enter the number of days for not performing the Host Check. The default number of days for storing HC results is 7 days. The supported range is between 1- 30 days.
3.The Admin can also choose to cache results based on the roles assigned:
•Any role is assigned - If you select this option, the HC results are cached irrespective of the role assigned.
•Any of the selected roles is assigned - If you select this option, the HC results are cached only when the selected role is assigned.
It is recommended to not enable caching for remediation roles because the subsequent logins will be in the remediation role as cached results are used.

4.Click Save Changes.