Using Licenses with a License Server >
Configuring the License Server
When using a license server in your environment, you must configure a device as the server and then configure the handshake between each client and that server. This section describes the procedures for setting up a license server.
License Allocations
Before a device can lease licenses from the license server, you must first allocate licenses to that particular device. License allocation information consists of the following:
•License client ID—You must assign a unique ID to each license client to identify that client. The client identifies itself with the license server using the client ID.
•User count license properties—
•Reserved user count (RUC)—The number of user count licenses reserved for this client. A license leased to this client cannot be less than the RUC number.
•Maximum user count (MUC)—The maximum number of user count licenses this client is allowed to request. This number must be greater than or equal to the RUC. Requests for licenses greater than the RUC are granted only if the license server has additional licenses available at the time of the request.
•Incremental lease quantum (ILQ)—Clients can request an increase or decrease to its user count lease only in multiples of this number. The ILQ must be at least 25 unless the difference between the MUC and the RUC is less than 25. The ILQ must also be at least 10% of the difference between the MUC and the RUC. This restriction eases excessive protocol traffic.
•Expiration date—The date when the client configuration expires. When the client configuration expires, the server no longer accepts lease requests from the client. You can use this, for example, to define a two-year service to a customer.
As you allocate licenses, the license server does not allow the sum total of the reserved user count to exceed the total license count installed on the license server.
Configuring a Device as a License Server
The following outlines the steps to configure a device as a license server. These steps assume that you have already performed the license key generation and activation steps.
After you download or receive your license keys by using email:
1.In the admin console of the license server, choose System > Configuration > Licensing > Licensing Summary.
2.Click on the license agreement link. Read the license agreement and, if you agree to the terms, continue to the next step.
3.Enter your license key(s) and click Add.
4.Click the Configure Clients tab.
5.Select the Enable Licensing server check box.
6.(optional) Click Advanced Settings and enter the following values:
•Incremental Lease Duration
•Lease Renewal Interval
7.Click Save Changes.
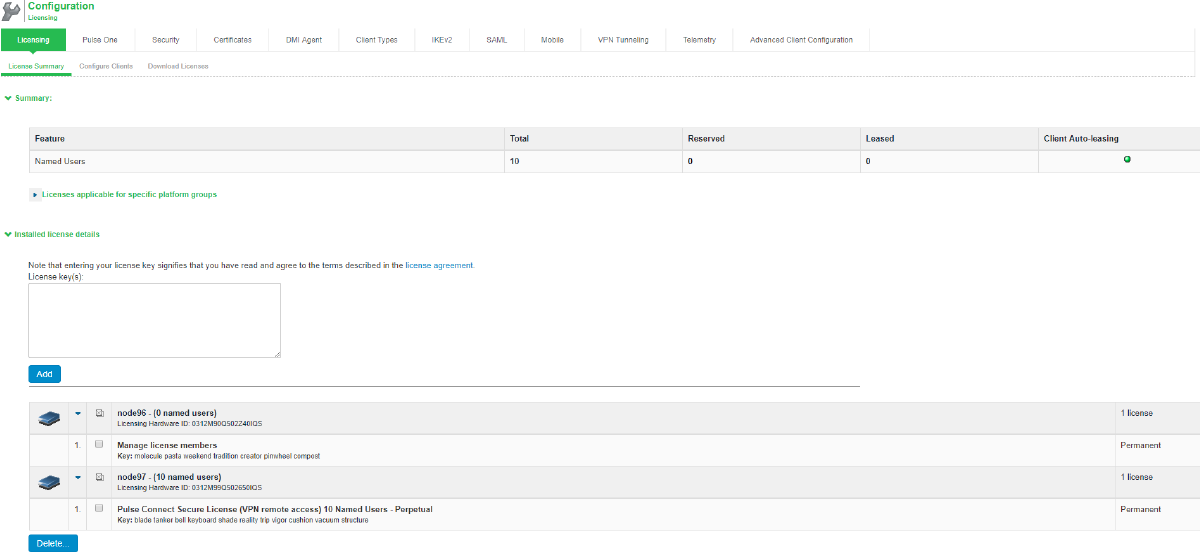
An example of the summary section after you configure your clients is shown in the following figure.
The following figure depicts a Configured License Server with No Clients
Then:
8.In the admin console of the license server, choose System > Configuration > Licensing > Configure Clients.
9.Click New Client.
10.Enter the Client ID. The ID is defined on the client device under System > Configuration > Licensing > Configure Server.
11.Enter the client password and confirm it. The password is defined on the client device under System > Configuration > Licensing > Configure Server.
12.(optional) Enter the client configuration expiration date.
13.Select the client’s platform from the list. The list includes the latest ICS hardware devices like PSA 7000.
14.Select the product type to be configured to (ICS or IPS).
15.For each feature you want to lease to this client, enter:
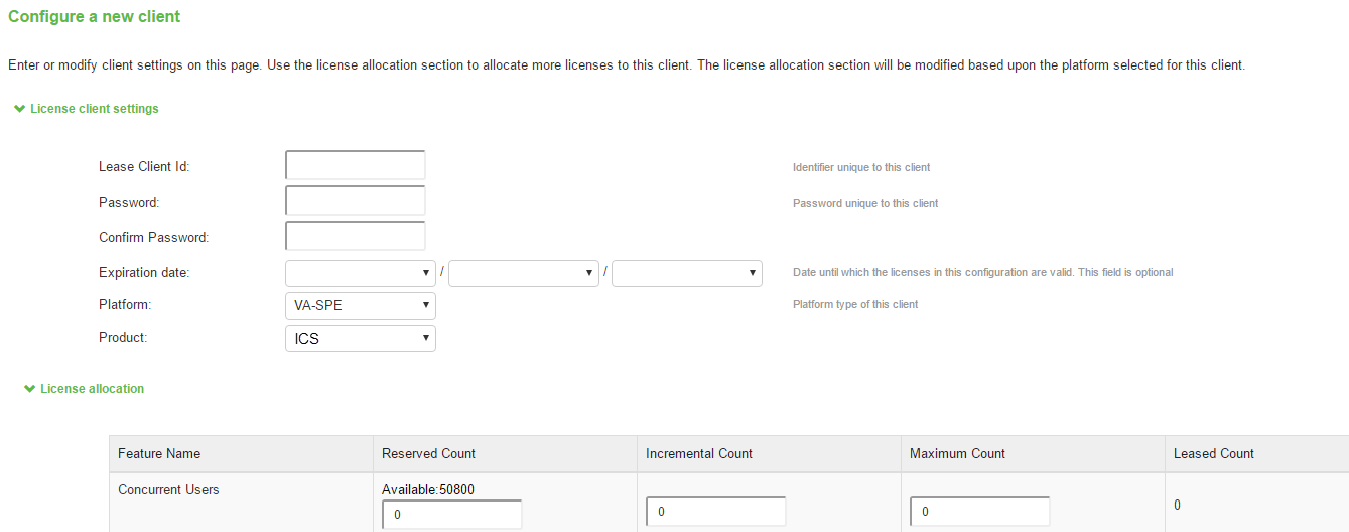
•Reserved Count— the number of licenses to reserve for this client. The reserve count must be less than the available amount displayed.
•Incremental Count— the incremental number of licenses to grant when the client requests more licenses. If the number of licenses on the client plus this incremental value is greater than the maximum count, no additional licenses are granted.
•Maximum Count— the maximum number of licenses a client can receive for this feature. This value must be equal to or greater than the reserved count.
Available counts are updated as you configure the client. For example, see the following figure.
16.Click Save Changes.
The License clients table displays the client information you entered. If the client is a member of a cluster, the cluster name is also displayed after the client contacts the server.
The following figure depicts the Available Counts are Updated as Clients are Configured
Backing Up and Restoring License Server
License server can be deployed only in an Active-Passive mode, but cloud environments do not support Active-Passive cluster. Hence, license server has to be deployed in a Standalone mode.
Assumption:
Primary Virtual License Server (VLS) is deployed with the following:
•Licenses are installed using valid authorization codes.
•License clients are configured with the host name of the license server, and leasing is working.
For details, see Configuring a Virtual Appliance as a VLS.
An administrator should have the disaster recovery plan and must follow the below steps:
1.Export binary system and user configurations from the primary VLS.
2.Deploy a fresh secondary VLS.
3.Import the system configuration (except network settings and licenses) and user configuration (without downloading the licenses) to secondary VLS.
4.When the primary VLS goes down, immediately replace it with the secondary VLS.
Backing Up Configurations
To back up the binary system configurations:
1.In the primary VLS, navigate to Maintenance > Import/Export > Import/Export Configuration.
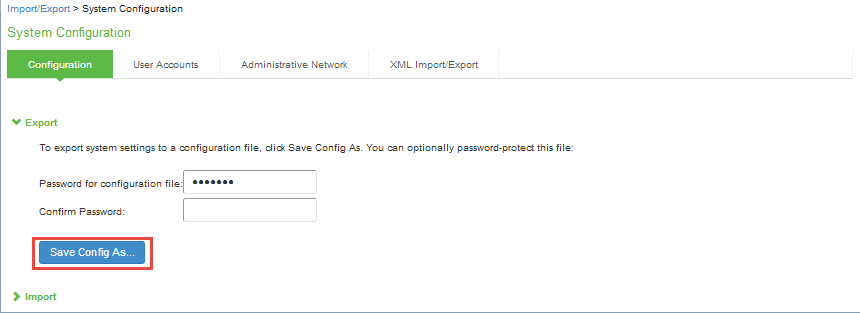
2.In the Export section, click Save Config As to export binary system configuration to a file.
3.You can optionally password-protect this file.
To back up the user configurations:
1.In the primary VLS, navigate to Maintenance > Import/Export > Import/Export Users.
2.In the Export section, click Save Config As to export users’ configuration to a file.
3.You can optionally password-protect this file.

Restoring Configurations
If the primary VLS goes down, deploy a fresh secondary VLS; for details, see Configuring a Virtual Appliance as a VLS. And restore the system and user configurations from the exported files generated in the backup configurations steps.
Recommendation 1: Import everything but the IP address
If the authentication codes installed on primary license server are not readily available with the administrator, then follow the below procedure steps.
Use this option only if the exported configuration file is from a standalone node.
To restore the exported binary system configurations:
1.In the secondary VLS, navigate to Maintenance > Import/Export > Import/Export Configuration.
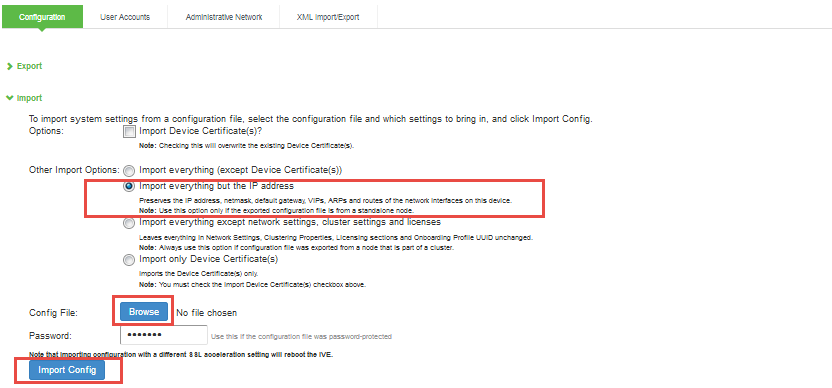
2.In the Import section, select the Import everything but the IP address option.
3.Click Browse and select the system configuration file, and then click Import Config.
To restore the exported user configurations:
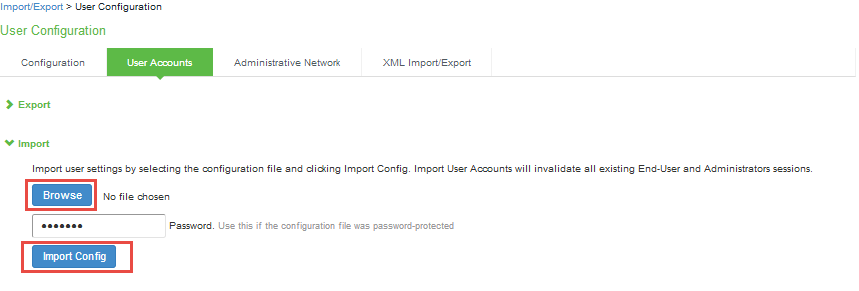
1.In the secondary VLS, navigate to Maintenance > Import/Export > Import/Export Users.
2.In the Import section, click Browse and select the users’ configuration file, and then click Import Config.
3.Ensure DNS is updated so that license server hostname used on license clients resolves to secondary VLS.
The secondary VLS will be used henceforth, and this has a 90-day grace period from the day of importing of license.
4.Once primary VLS is back online, if needed, administrator can repeat the above steps to restore and use primary VLS for leasing.

Recommendation 2: Import everything except network settings, cluster settings and licenses
If the authentication codes installed on primary license server are readily available with the administrator, then follow the below procedure steps.
To restore the exported binary system configurations:
1.In the secondary VLS, navigate to Maintenance > Import/Export > Import/Export Configuration.
2.In the Import section, select the Import everything except network settings, cluster settings and licenses option.
3.Click Browse and select the system configuration file, and then click Import Config.

To restore the exported user configurations:
1.In the secondary VLS, navigate to Maintenance > Import/Export > Import/Export Users.
2.In the Import section, click Browse and select the users’ configuration file, and then click Import Config.

3.Once binary system and users’ configuration import is successful, re-install all licenses that were installed on primary VLS onto secondary VLS by re-using the same authentication codes that were used for installing licenses on primary VLS.
- Before re-using authentication codes, ensure primary VLS is unreachable. Otherwise, violations would be raised to Cloud Licensing Server.
- The secondary VLS will be used henceforth, and the 90-day grace period is not applicable here.
4.Ensure DNS is updated so that license server hostname used on license clients resolves to secondary VLS.
5.Once primary VLS is back online, if needed, administrator can repeat the above steps to restore and use primary VLS for leasing.