FIPS Level 1 Support
Once you enable FIPS level 1 support, your browser is restricted to specific custom cipher strengths. A list of supported ciphers is shown during the enabling process.
When you enable FIPS level 1 support, the following events occur on the system:
- The Web server restarts and turns on FIPS level 1 support. The Web server now allows only TLSv1.0, TLSv1.1 and TLSv1.2 protocols that include FIPS approved cryptographic algorithms which include Suite B cipher suites.
Once FIPS level 1 support is enabled, new client sessions will use FIPS if the client supports FIPS. Existing client sessions may not be using FIPS. To ensure FIPS capable clients are in FIPS level 1 support, all client sessions should be terminated after the FIPS level 1 support is enabled. Administrators can use the System > Status > Active Users page to terminate client sessions.
- If the platform features hardware acceleration, when FIPS level 1 support is enabled SSL processing does not utilize the hardware acceleration. IPsec hardware acceleration is not affected.
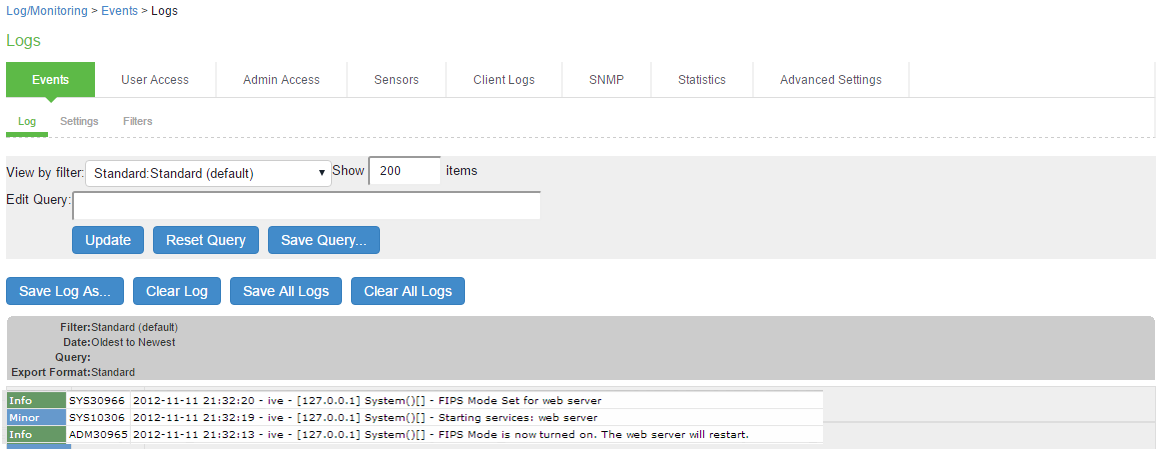
The following event logs are generated for FIPS level 1 support:
- SYS30966 when the web server turns FIPS level 1 support on.
- ADM30965 when the administrator turns FIPS level 1 support on or off.
- ERR30967 when the web server fails to turn on FIPS level 1 support.
To enable FIPS level 1 support:
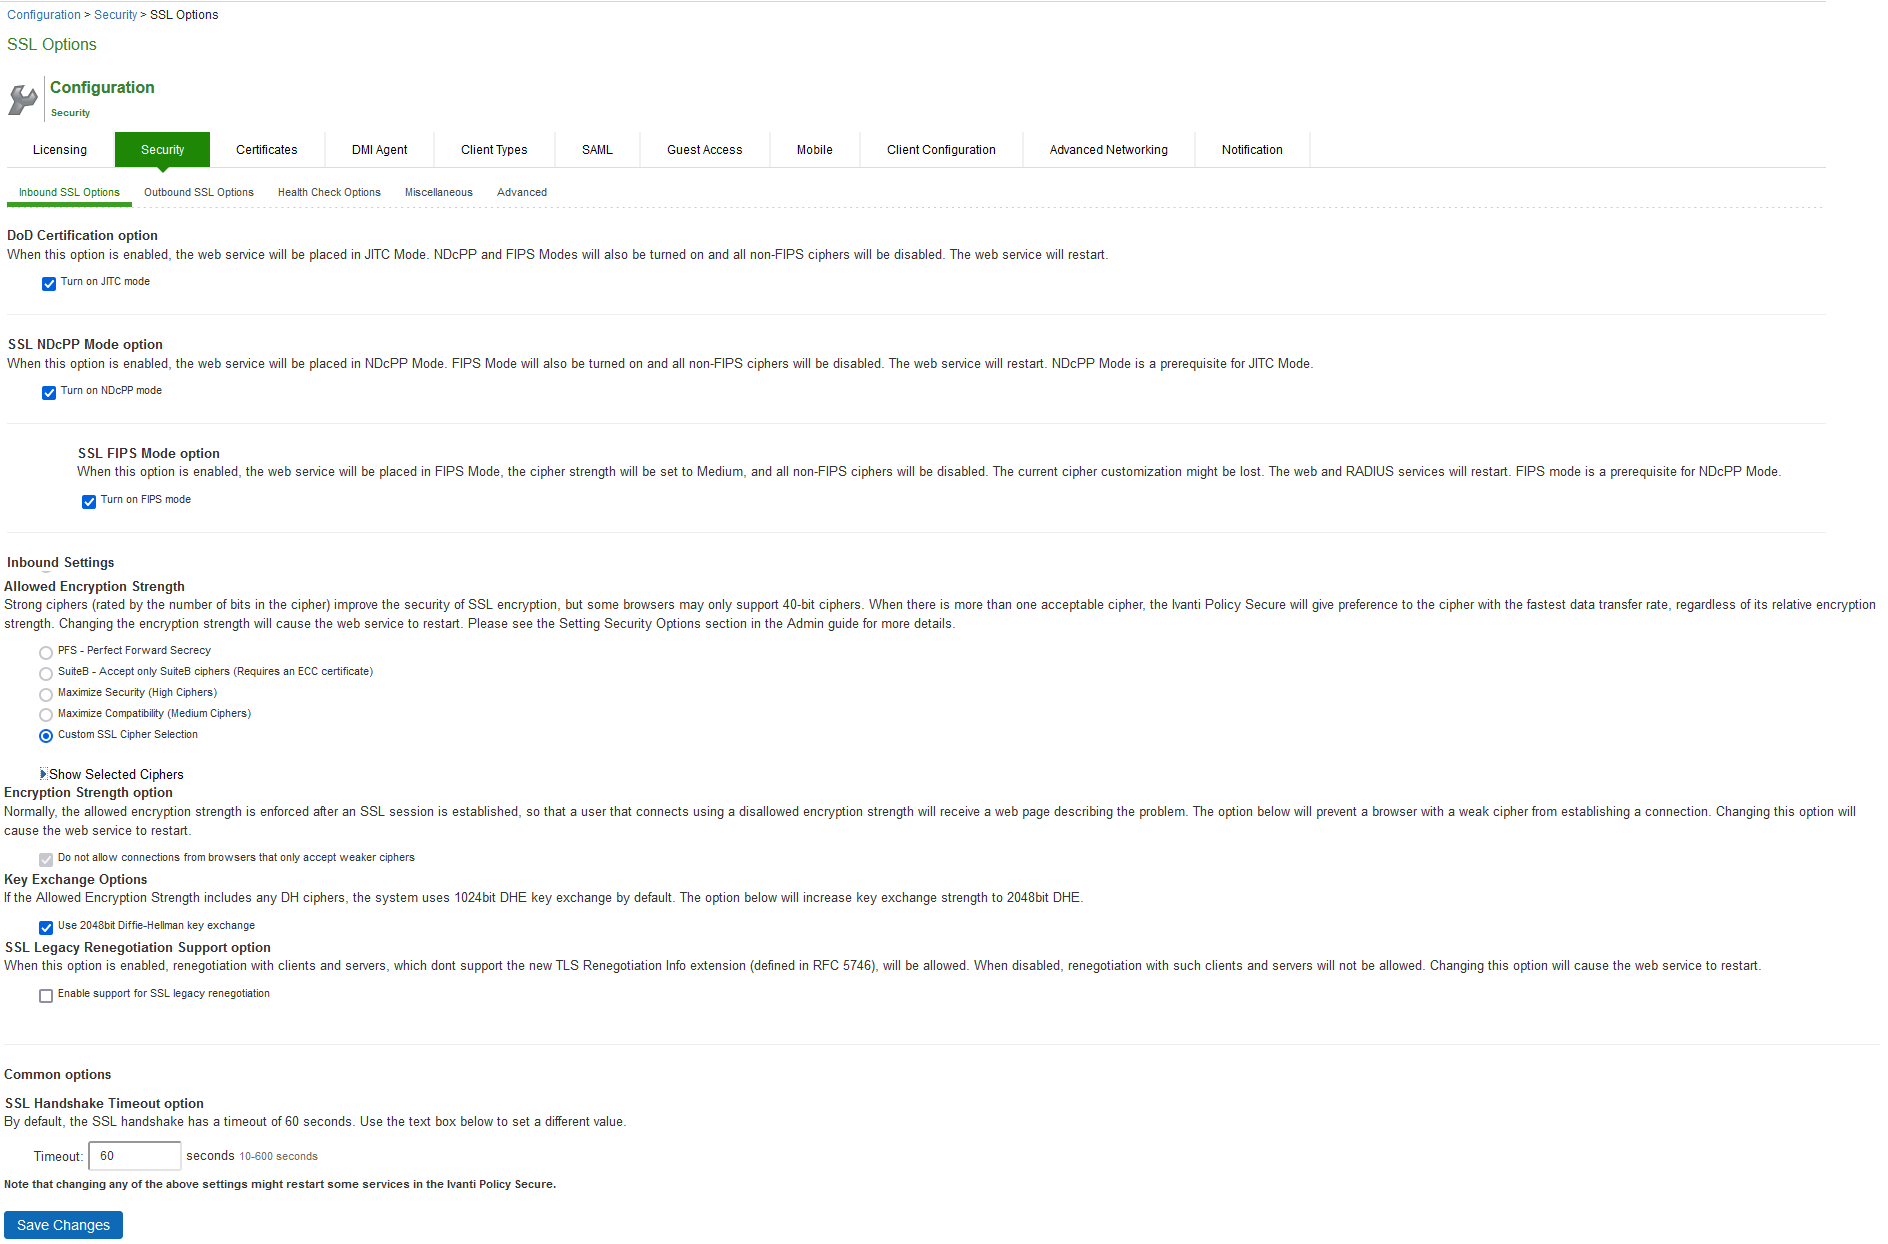
- Select System > Configuration > Inbound SSL Options.
- Under SSL FIPS Mode option, select Turn on FIPS mode.
- Under Allowed SSL and TLS Version, the Accept only TLS option is selected.
- Under Allowed Encryption Strength, Maximize Compatibility (Medium Ciphers) is set. Only FIPS approved ciphers are selected. See Supported Cipher Suites when FIPS Level 1 Support is Enabled and Disabled
- Under Encryption Strength, the Do not allow connections from browsers that only accept weaker ciphers option is selected.
- Click Save Changes.
Once you turn on FIPS level 1 support, the following changes are made:
FIPS Level 1 support is now enabled on the device. If your browser does not support any of the listed ciphers, you will not be able to log in to the device.
When enabling FIPS mode on IPS, only the following protocols are FIPS compliant:
- EAP-TTLS
- EAP-PEAP
- EAP-TLS
A warning is displayed if non-FIPS protocols are configured on an IPS FIPS enabled device. However, these protocols are not disabled as they may be required for other use cases such as for the MAC authentication bridge.
Entries are made in the Events logs to show that FIPS level 1 support is enabled.
SSL FIPS Mode option
Enabling Inbound SSL Options
Only when FIPS mode is turned on, the FIPS compliant ciphers are available to be chosen from the Supported Ciphers panel. FIPS mode is editable only on the inbound option page.
To set the security options with Inbound SSL Options:
1. In the admin console, select System > Configuration > Security > Inbound SSL Options.
2. Under Allowed Encryption Strength choose Custom SSL Cipher Selection. See the following figure.
The following figure depicts the Setting Custom SSL Cipher Selections:

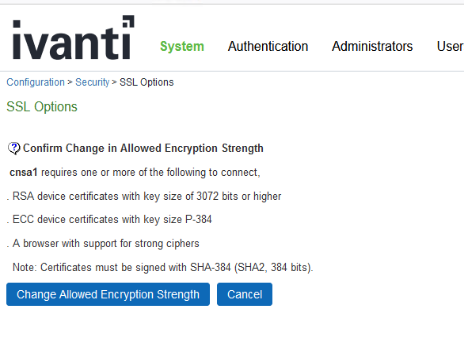
CNSA1.0 Requirements
For CNSA1.0 you need to consider following requirements and click Change Allowed Encryption Strength.
The ciphers selected for CNSA1.0 are relatively stronger than SuiteB due to restrictions on key sizes of ciphers/security algorithms.
-
P-384 for Elliptic curves
-
Minimum of 3072 bits for DHE and RSA algorithms.
-
256 bits for AES encryption
-
384 bits for SHA (hashing/compression)
CNSA1.0. complies the below ciphers.
-
TLS_AES_256_GCM_SHA384 (TLSv1.3 only)
-
TLS_ECDHE_ECDSA_WITH_AES_256_GCM_SHA384
-
TLS_RSA_WITH_AES_256_GCM_SHA384
-
TLS_DHE_RSA_WITH_AES_256_GCM_SHA384
For using EC algorithms, the device certificate has to be generated with P-384 key and signed with SHA-384 by the CA (Certifying Authority).
For using RSA certs, the device certificate has to be generated with a key size of 3072 bits or higher and signed with SHA-384 by the CA (Certifying Authority).
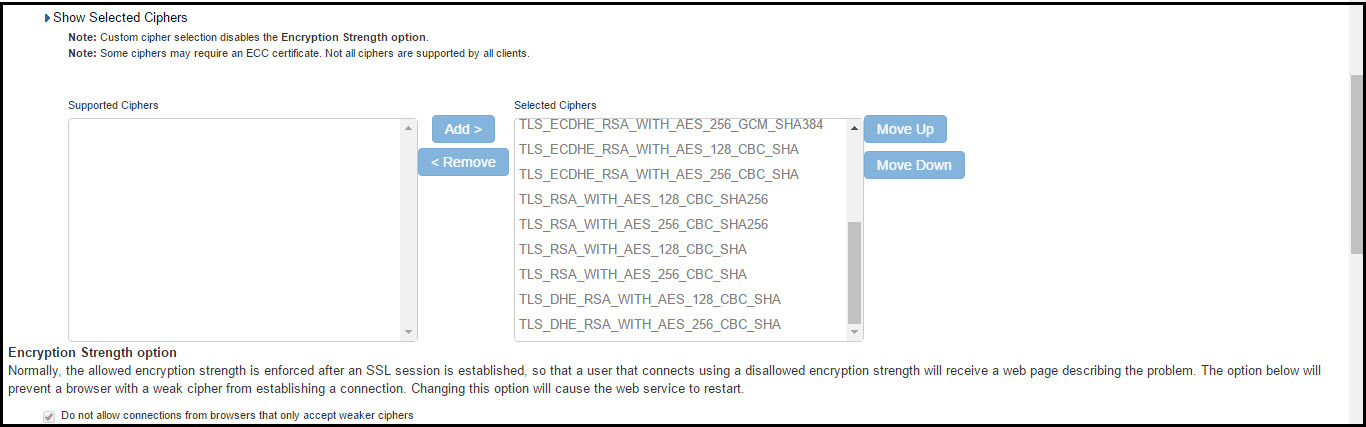
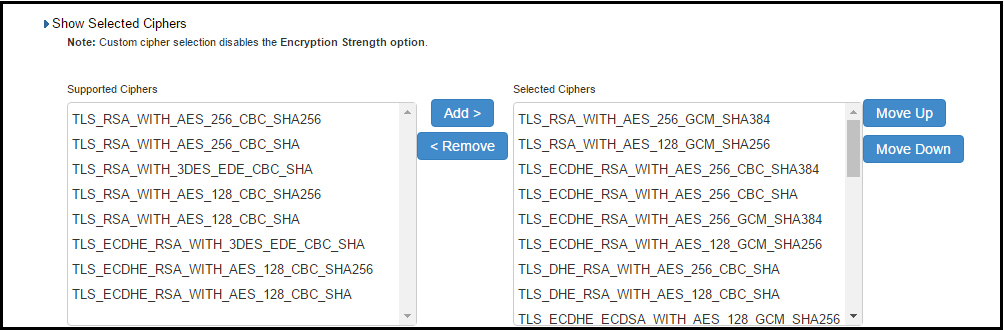
1. The two panels of Supported Ciphers and Selected Ciphers are displayed. Supported ciphers has the entire list of ciphers supported for the selected SSL or TLS version. Selected ciphers list the currently selected ciphers list. The following figure shows the two panels (Supported Ciphers and Selected Ciphers). Note that the Selected Ciphers and Supported Ciphers List will also be displayed for all Preset like PFS or SuiteB or Medium or High.
The following figure depicts the Supported Ciphers and Selected Ciphers Panels:
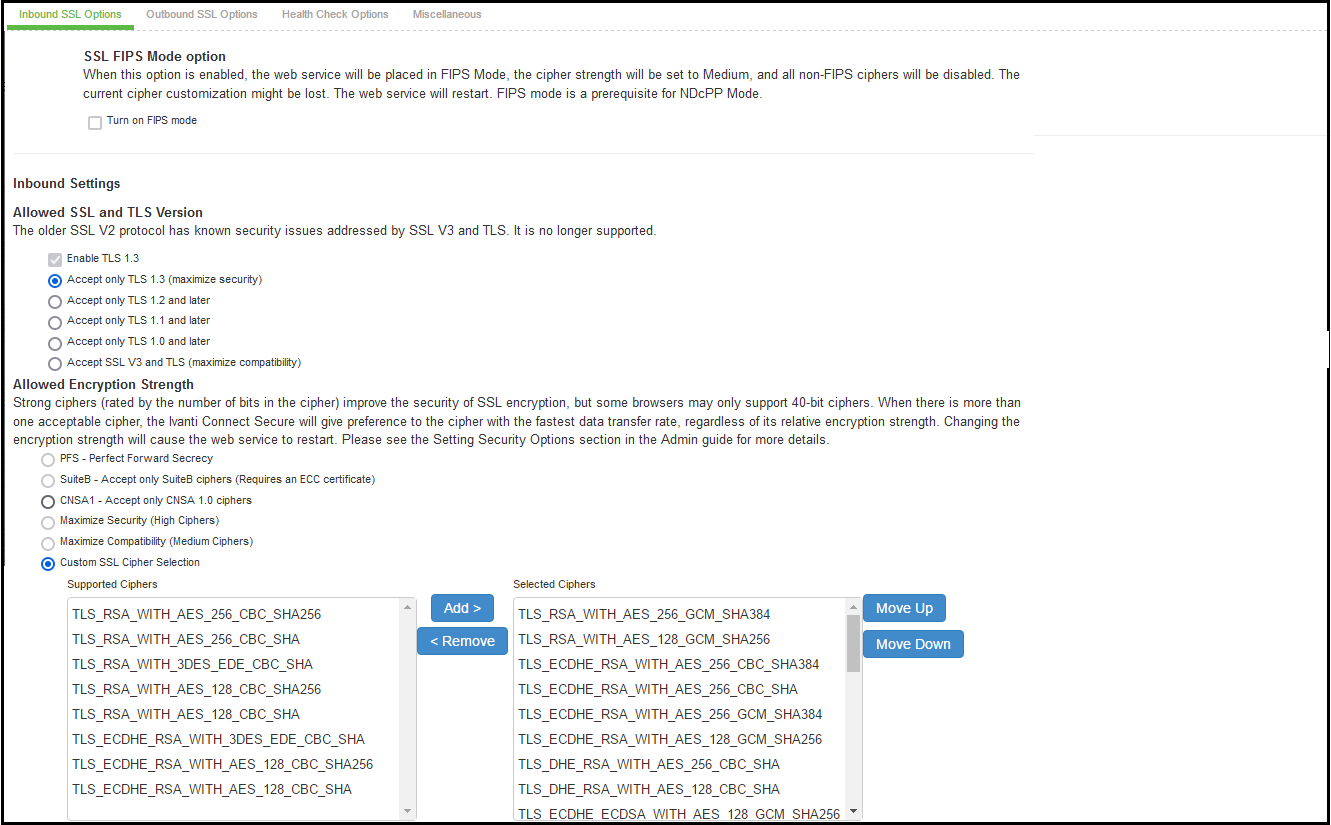
2. To add a cipher to be used in order to secure a connection, click on the cipher string on the left panel and then click on the Add> or double click on the cipher name in the left panel. See the following figure.
3. To remove the cipher, click on the cipher name on the right panel and then click on the <Remove button or double click on the cipher name on the right side. See the following figure.
4. The selected ciphers on the right are listed in order of their priority from top to bottom. To change the priority of the ciphers, click on the cipher name and then click on Move Up to increase priority or the Move Down button to decrease the priority. See the following figure.
The following figure depicts the Setting Custom SSL Cipher Selections:
5. Select Key Exchange to increase the key exchange strength, default is 2048 bit key, you can increase the strength till 8129. The selected key size is the minimum key size supported in Ivanti Connect Secure. This works if following ciphers are selected:
-
TLS_DHE_RSA_WITH_AES_128_CBC_SHA
-
TLS_DHE_RSA_WITH_AES_256_CBC_SHA
-
DHE-RSA-AES256-GCM-SHA384 (in openssl-3.0)

6.Select Enable port redirection for TLSv1.3 certificate authentication to allow client-certificate authentication over TLSv1.3 connections for browsers/clients that do not support Post Handshake Authentication (PHA). Changes to network configuration might be required so that the specified port is accessible to the client..

7. Select Allow legacy certificates for end to end communications to enable legacy certificates without certain attributes to be allowed with OpenSSL-3.
9. Click Save Changes.
A list of the custom ciphers to be used on the device's port is displayed in the order the web server will select them. Note that Suite B ciphers are listed on top. See the following table that depicts end users who now log in to external virtual port p_ecdsa256 must have at least one of the listed ciphers installed on their browser or else they cannot log in to the server.
The following figure depicts Confirming Custom Ciphers:
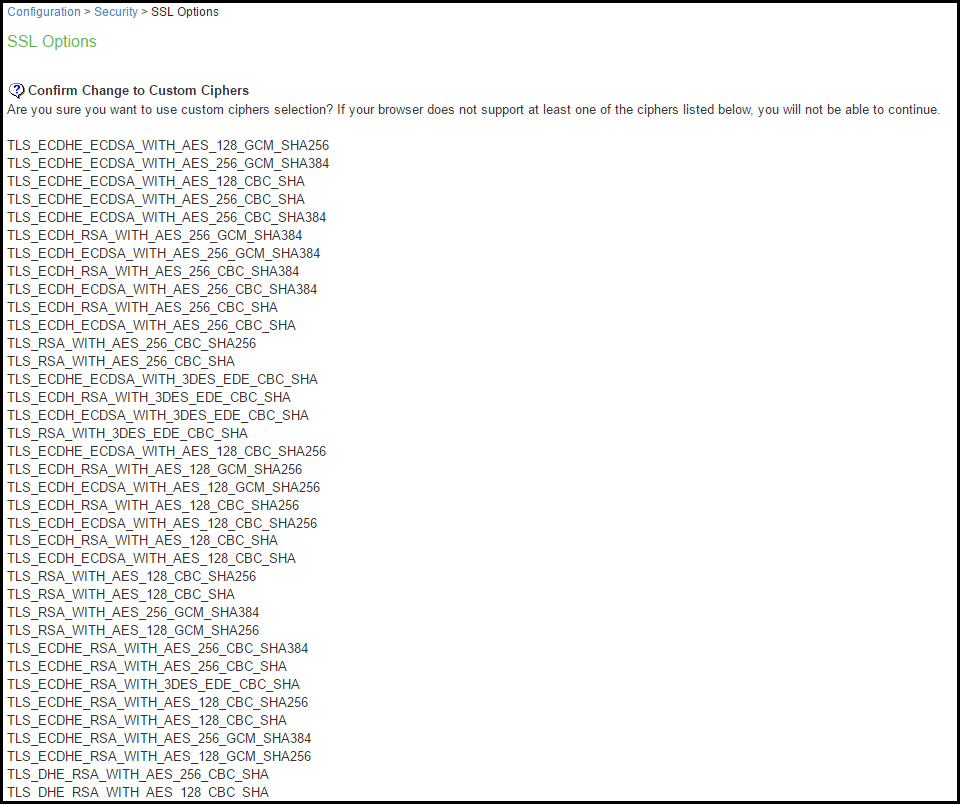
10. Click Change Allowed Encryption Strength.
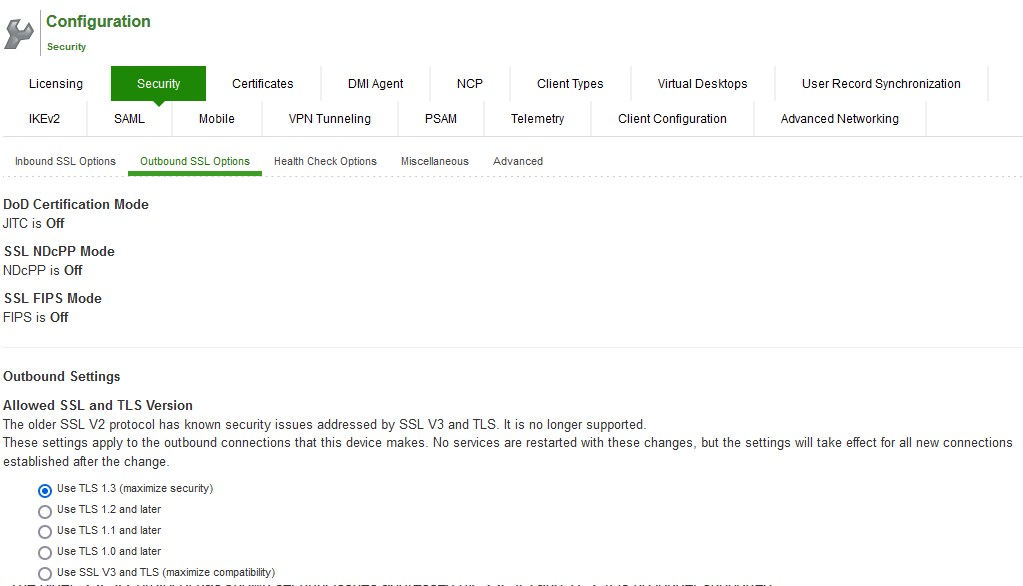
Enabling Outbound SSL Options
Only for Outbound SSL Settings, we can configure Non FIPS Ciphers when FIPS is Enabled using Custom Cipher Selection Option. Now, there are options to change different SSL/TLS versions and different encryptions in the Outbound SSL Settings. The following figure shows the Outbound SSL Settings.
Outbound SSL Settings
The following table lists the SSL Options Configuration Guidelines:
| Settings | Guidelines |
| SSL FIPS Mode option | Enable FIPS mode. See the Connect Secure FIPS Level 1 Feature Guide |
| Allowed SSL and TLS Version | Specify encryption requirements for clients. By default, the system requires SSL version 3 and TLS. The system honors this setting for all Web server traffic and all types of clients. You can require users who have older browsers that use SSL version 2 to update their browsers, or you can change this setting to allow SSL version 2, SSL version 3, and TLS. |
| Allowed Encryption Strength | Accept only 128-bit and greater-The default. The system gives preference to RC4 ciphers. You can require users to have this level of encryption strength or change this default to an option compatible with the user base. Accept only 168-bit and greater-The system gives preference to 256-bit AES over 3DES. Accept 40-bit and greater-The system gives preference to RC4 ciphers. Older browsers that predate the change in the U.S. export law in year 2000 that required 40-bit cipher encryption for international export, can still use 40-bit encryption. Custom SSL Cipher Selection-Specify a combination of cipher suites for the incoming connection from the user's browser. If you select the AES/3DES option, the system gives preference to 256-bit AES over 3DES. When using 168-bit encryption, some Web browsers may still show 128-bit encryption (the gold lock on the browser status bar) even though the connection is 168-bit. This is typically a limitation of the browser's capability. If you are using the IC6500 FIPS version, you can choose High, Medium, or Low security cipher suites. AES/3DES High and AES Medium are recommended for FIPS deployment. |
| Encryption Strength option | Normally, the allowed encryption strength is enforced after an SSL session is established, so that a user connecting with a disallowed encryption strength receives a Web page describing the problem. Enable this option to prevent a browser with a weak cipher from establishing a connection. |
| SSL Handshake Timeout option | Determines how many seconds elapse before the SSL handshake times out. The default is 60 seconds. |
| SSL Legacy Renegotiation Support option | SSL and Transport Layer Security (TLS) renegotiations can be subjected to man-in-the-middle (MITM) attacks that can lead to abuse. A new TLS extension (defined in RFC 5746) ties renegotiations to the TLS connections they are being performed over to prevent these kinds of attacks. The SSL Legacy Renegotiation Support option is enabled by default and allows renegotiation between clients and servers even if they do not support the new TLS extension. Disable this option to not allow renegotiations between clients and servers that do not support the new TLS extension. A web server restart is required when you change the value of this option. |
| ActiveSync Client Certificate Configuration | Use these controls to enforce client certificate requirement for activesync access on the selected ports, including virtual ports. When enabled, all ActiveSync clients must present a client authentication certificate to the system to be able to connect using ActiveSync. Non-ActiveSync access (like web browser-based access to the host, NC, JSAM, PSAM, Ivanti, WTS, IKEv2 and so forth) on the port/interface on which the ActiveSync client certificate is required might not work properly. We recommend you use a separate port or interface exclusively for ActiveSync access and then enable client certificate requirement for the port intended for ActiveSync access. |
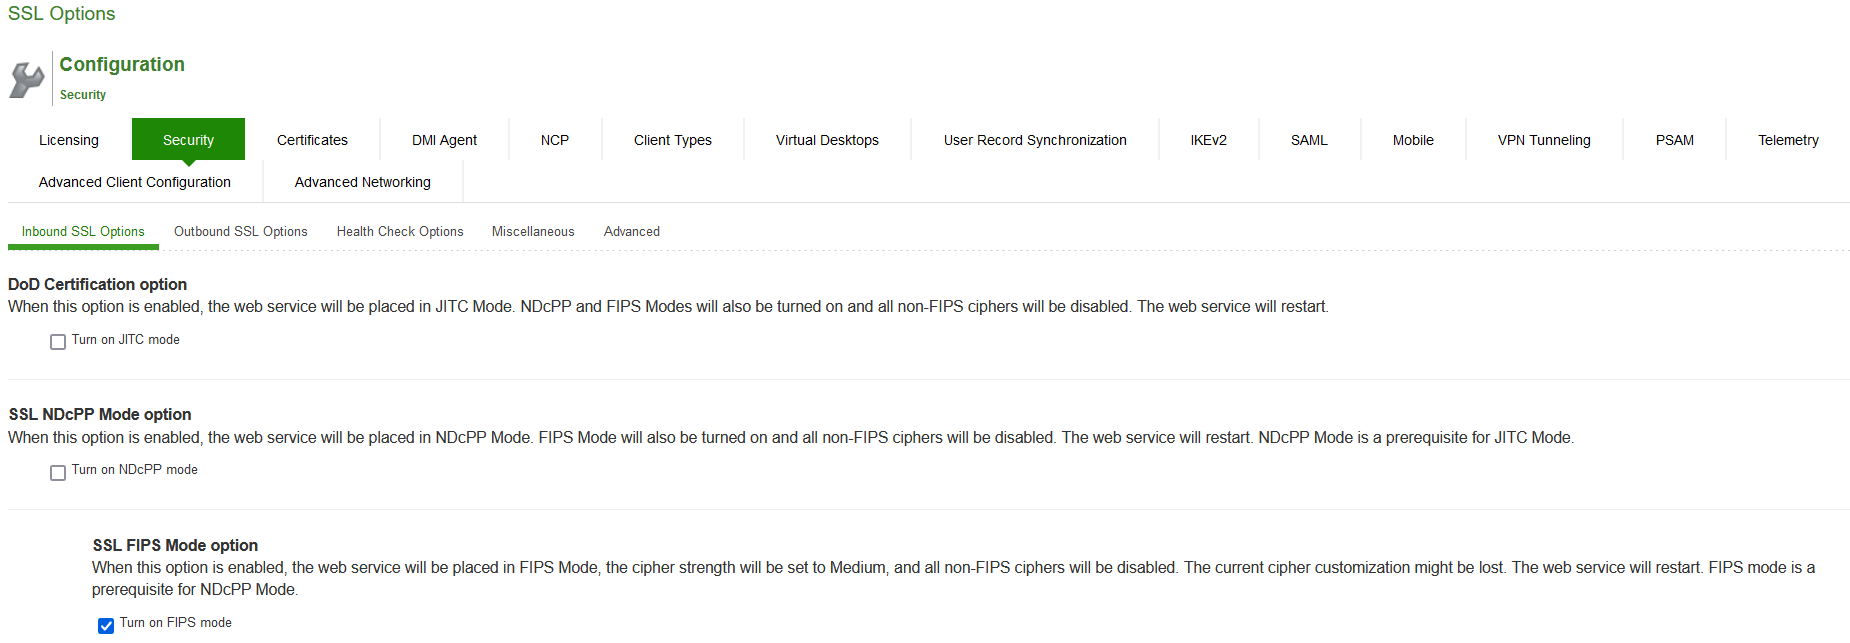
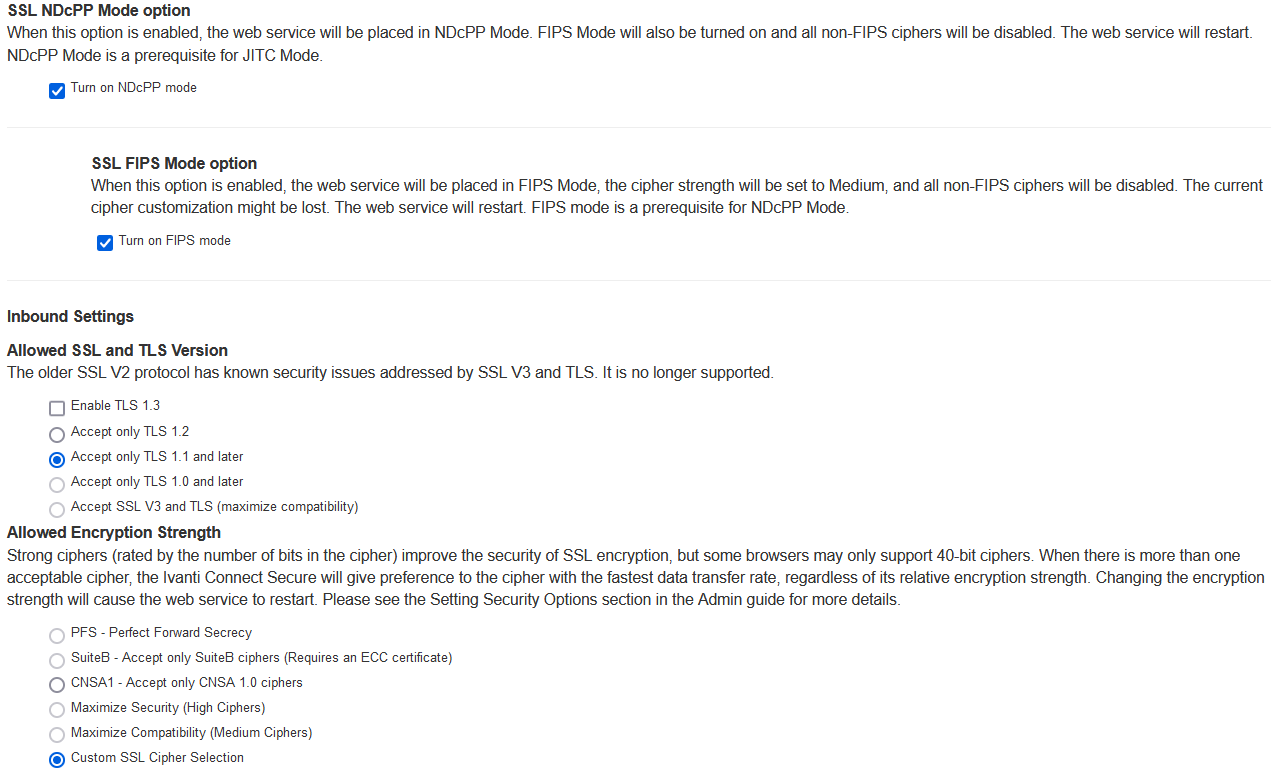
SSL NDcPP Mode Option
NDcPP mode can be enabled in the Inbound tab with a check box. This status is also applied over to the Outbound tab. Turning on NDcPP automatically turns on FIPS mode and disables SSL/TLS Version TLS1.0 and below. Also, NDcPP Mode allows to choose only 16 Ciphers under Custom Encryption Strength. Turning on the NDcPP check box selects all the NDcPP ciphers by default on both, the Inbound and Outbound sides.
When the NDcPP Mode i s enabled, backend server like Windows 2008 R2 which supports the SSL/TLS Version only till TLS1.0 cannot be connected via Rewriter.
syslog-ng server
•Connection to syslog-ng server does NOT get established, since syslog-ng does not support TLSv1.1 and TLSv1.2.
rsyslog
•Supports only till TLSv1.1. So, connection would not get established, if Outbound SSL Options is set to use TLSv1.2.
The following figure depicts the SSL NDcPP Mode Option:
Admin Password Storage
NDcPP mandates that admin passwords needs to be scrambled with SHA2 algorithm. So, current SHA1 password scrambling is no longer supported. Password migration is done through double hashing. Existing scrambled passwords stored in the cache are scrambled again with SHA 512.
New passwords will be hashed twice: first with SHA1 and then with SHA512 and then, stored in the cache.
Inbound Settings
When the NDcPP mode is enabled, the following settings appear by default in the Inbound SSL Options page:
•The Accept only TLS 1.1 and later is enabled by default in the Allowed SSL and TLS Version settings. Only the Accept only TLS 1.1 and Accept only TLS 1.2 options can be chosen. The Accept only TLS 1.0 and later and the Accept SSL V3 and TLS (maximize compatibility) are disabled. See the following figure.
•With regards to the Allowed Encryption Strength settings the Custom SSL Cipher Selection is enabled by default with NDcPP Ciphers. All other options are disabled.
The following figure depicts the NDcPP Inbound Settings Page:
The following is a list of Selected Ciphers in the Inbound Settings with the NDcPP mode enabled:
•TLS_RSA_WITH_AES_128_CBC_SHA
•TLS_RSA_WITH_AES_256_CBC_SHA
•TLS_DHE_RSA_WITH_AES_128_CBC_SHA
•TLS_DHE_RSA_WITH_AES_256_CBC_SHA
•TLS_ECDHE_RSA_WITH_AES_128_CBC_SHA
•TLS_ECDHE_RSA_WITH_AES_256_CBC_SHA
•TLS_ECDHE_ECDSA_WITH_AES_128_CBC_SHA
•TLS_ECDHE_ECDSA_WITH_AES_256_CBC_SHA
•TLS_RSA_WITH_AES_128_CBC_SHA256
•TLS_RSA_WITH_AES_256_CBC_ SHA256
•TLS_ECDHE_ECDSA_WITH_AES_128_CBC_SHA256
•TLS_ECDHE_ECDSA_WITH_AES_256_CBC_SHA384
•TLS_ECDHE_ECDSA_WITH_AES_128_GCM_SHA256
•TLS_ECDHE_ECDSA_WITH_AES_256_GCM_SHA384
•TLS_ECDHE_RSA_WITH_AES_128_GCM_SHA256
•TLS_ECDHE_RSA_WITH_AES_256_GCM_SHA384
The following figure depicts the Selected Ciphers in the Inbound Settings with the NDcPP Mode:

Outbound Settings
When the NDcPP mode is enabled, the following settings appear by default in the Outbound SSL Options page:
•The Accept only TLS 1.1 and later is enabled by default in the Allowed SSL and TLS Version settings. Only the Accept only TLS 1.1 and Accept only TLS 1.2 are editable. The Accept only TLS 1.0 and later and the Accept SSL V3 and TLS (maximize compatibility) are disabled.
•With regards to the Allowed Encryption Strength settings the Custom SSL Cipher Selection is enabled by default. All other options are disabled.
•Only the NDcPP ciphers configured in the Outbound SSL options settings are sent in the Outbound connections (PCS -> backend SSL).
The following figure depicts the NDcPP Outbound Settings Page:
The following is a list of Selected Ciphers in the Outbound Settings with the NDcPP mode enabled:
•TLS_RSA_WITH_AES_128_CBC_SHA
•TLS_RSA_WITH_AES_256_CBC_SHA
•TLS_DHE_RSA_WITH_AES_128_CBC_SHA
•TLS_DHE_RSA_WITH_AES_256_CBC_SHA
•TLS_ECDHE_RSA_WITH_AES_128_CBC_SHA
•TLS_ECDHE_RSA_WITH_AES_256_CBC_SHA
•TLS_ECDHE_ECDSA_WITH_AES_128_CBC_SHA
•TLS_ECDHE_ECDSA_WITH_AES_256_CBC_SHA
•TLS_RSA_WITH_AES_128_CBC_SHA256
•TLS_RSA_WITH_AES_256_CBC_ SHA256
•TLS_ECDHE_ECDSA_WITH_AES_128_CBC_SHA256
•TLS_ECDHE_ECDSA_WITH_AES_256_CBC_SHA384
•TLS_ECDHE_ECDSA_WITH_AES_128_GCM_SHA256
•TLS_ECDHE_ECDSA_WITH_AES_256_GCM_SHA384
•TLS_ECDHE_RSA_WITH_AES_128_GCM_SHA256
•TLS_ECDHE_RSA_WITH_AES_256_GCM_SHA384
The following figure depicts the Selected Ciphers in the Outbound Settings with the NDcPP Mode: