Guest User Administration
Creating Guest User Accounts
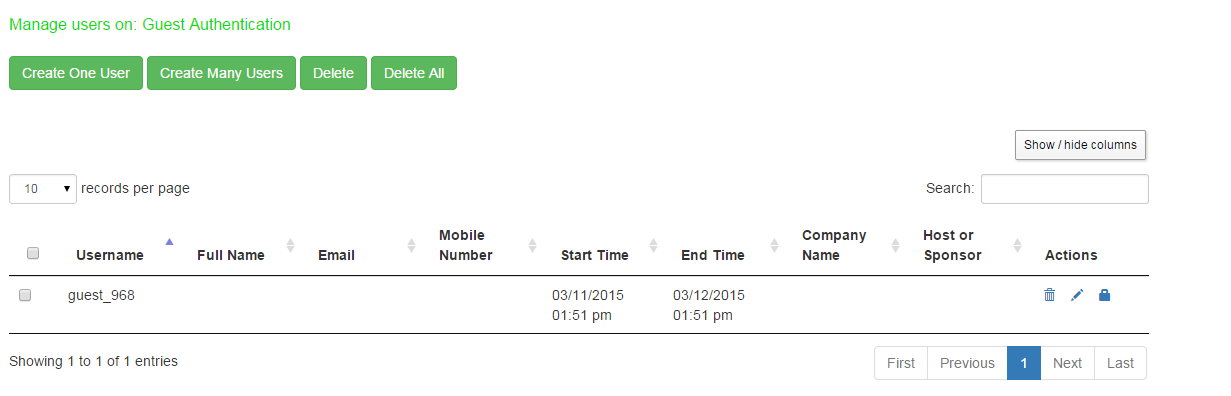
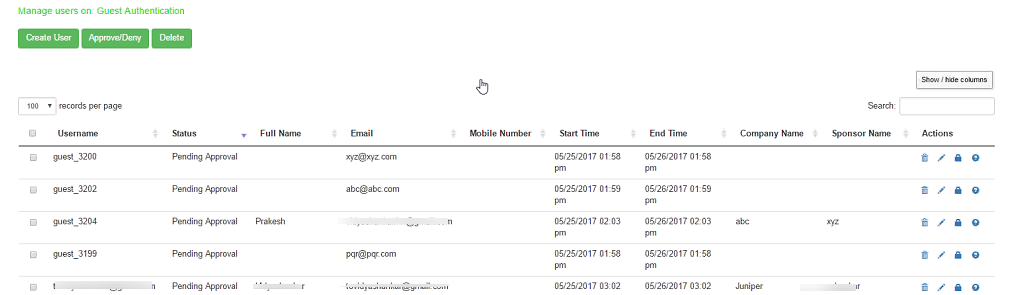
When the guest user account manager (GUAM) logs in through the sign-in page for the guest realm, an interface is presented for creating accounts as shown in the following figure. The GUAM can view all the guest users created by the GUAM, self registered, and sponsor created users.
|
Settings |
Guidelines |
|---|---|
|
Create One User |
Creates one user |
|
Create Many Users |
Creates multiple users |
|
Delete |
Deletes the selected users |
|
Delete All |
Deletes all the users on the page. |
|
Show / hide columns |
Select the option to hide or show specific columns. |
|
Delete |
Deletes the record of the guest user. |
|
Reset |
Resets the password of the guest user. |
|
Edit |
Edits the details of the guest user. |
|
Search |
Searches for guest/s with specific names. |
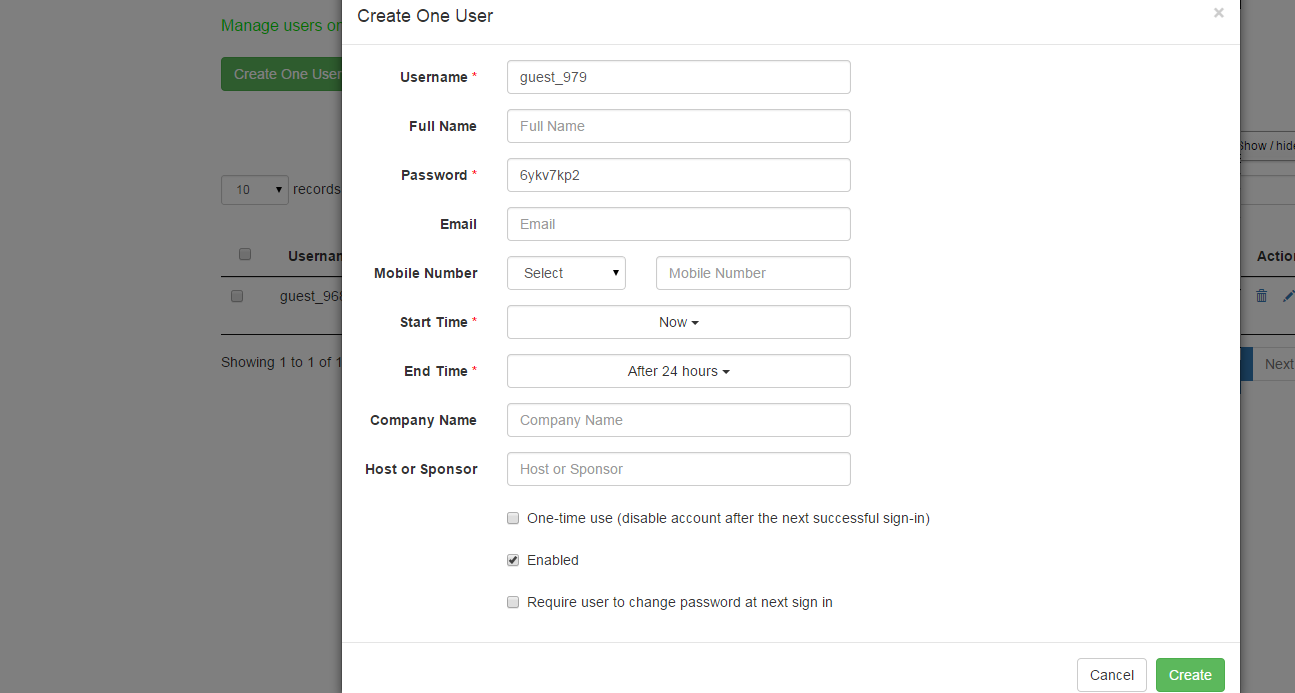
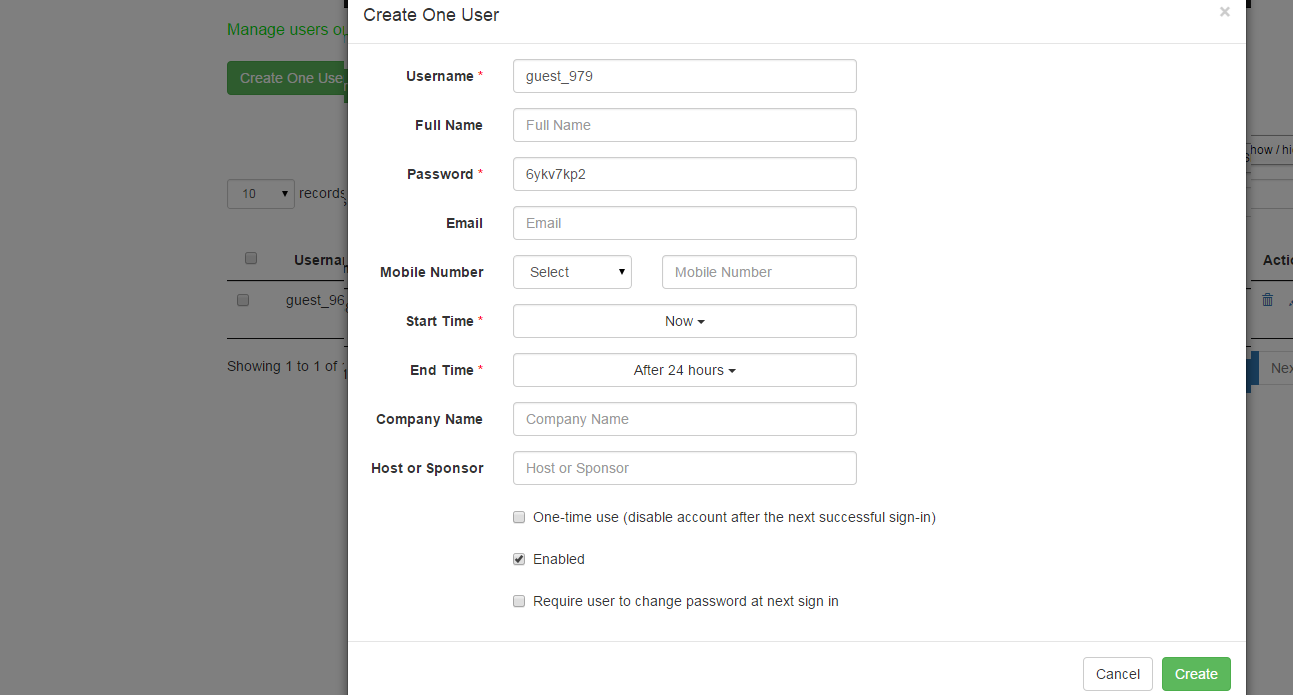
The following figure shows the page for adding a single guest user.
|
Settings |
Guidelines |
|---|---|
|
Username |
Specify an account username. If the local authentication server has been configured with a prefix for guest accounts, the username box is populated with the next username in the prefix-based sequence. We recommend you retain the guest_ prefix so that you can rely on the naming convention in your role mapping rules. |
|
Full Name |
Specify the name of the guest. |
|
Password |
A strong password is generated automatically, or you can specify a different password. After you have saved the configuration, the system displays the password characters as asterisks (*) instead of blanks or cleartext. The password cannot be decrypted later unless the appropriate option is set when you create a local authentication server. |
|
Mobile Number |
Select the country name and then specify a valid phone number of the guest user. The IPS sends the login credentials to this mobile number through SMS. |
|
|
Specify an email address you can use to contact the guest if necessary. |
|
Start Time |
By default, the ‘Now’ option is displayed. You can specify a start time for the account activity period by clicking on the drop-down and selecting from the calendar menu. |
|
End Time |
By default, ‘After 24 hours is displayed. You can specify an end of the account activity period. Click on the drop-down menu and select from the calendar menu. Once a user account has expired, it is deleted from the system. The process that deletes the guest user account runs every ten minutes. There may be a delay of some minutes before the account is purged. Even if the time or date on the system is moved ahead past the expiration time, the account could still be valid until the purge process runs. One-time user accounts are not affected by the ten-minute delay: one-time accounts are deleted immediately after the user exits. |
|
Company Name |
Enter the name of the company of the guest. |
|
Host or Sponsor |
Enter whether the guest is a Host or Sponsor. |
|
One-time use |
Select this option if you want the account deleted immediately after the guest user exits the browser or signs out. |
|
Enabled |
Select this option to enable the account |
|
Require user to change password at next sign in |
Select this option to prompt the user to change the configured password. This option will not be supported in GUAM for WLC case. This option should not be enabled. Even if enabled, it will not have any effect. |
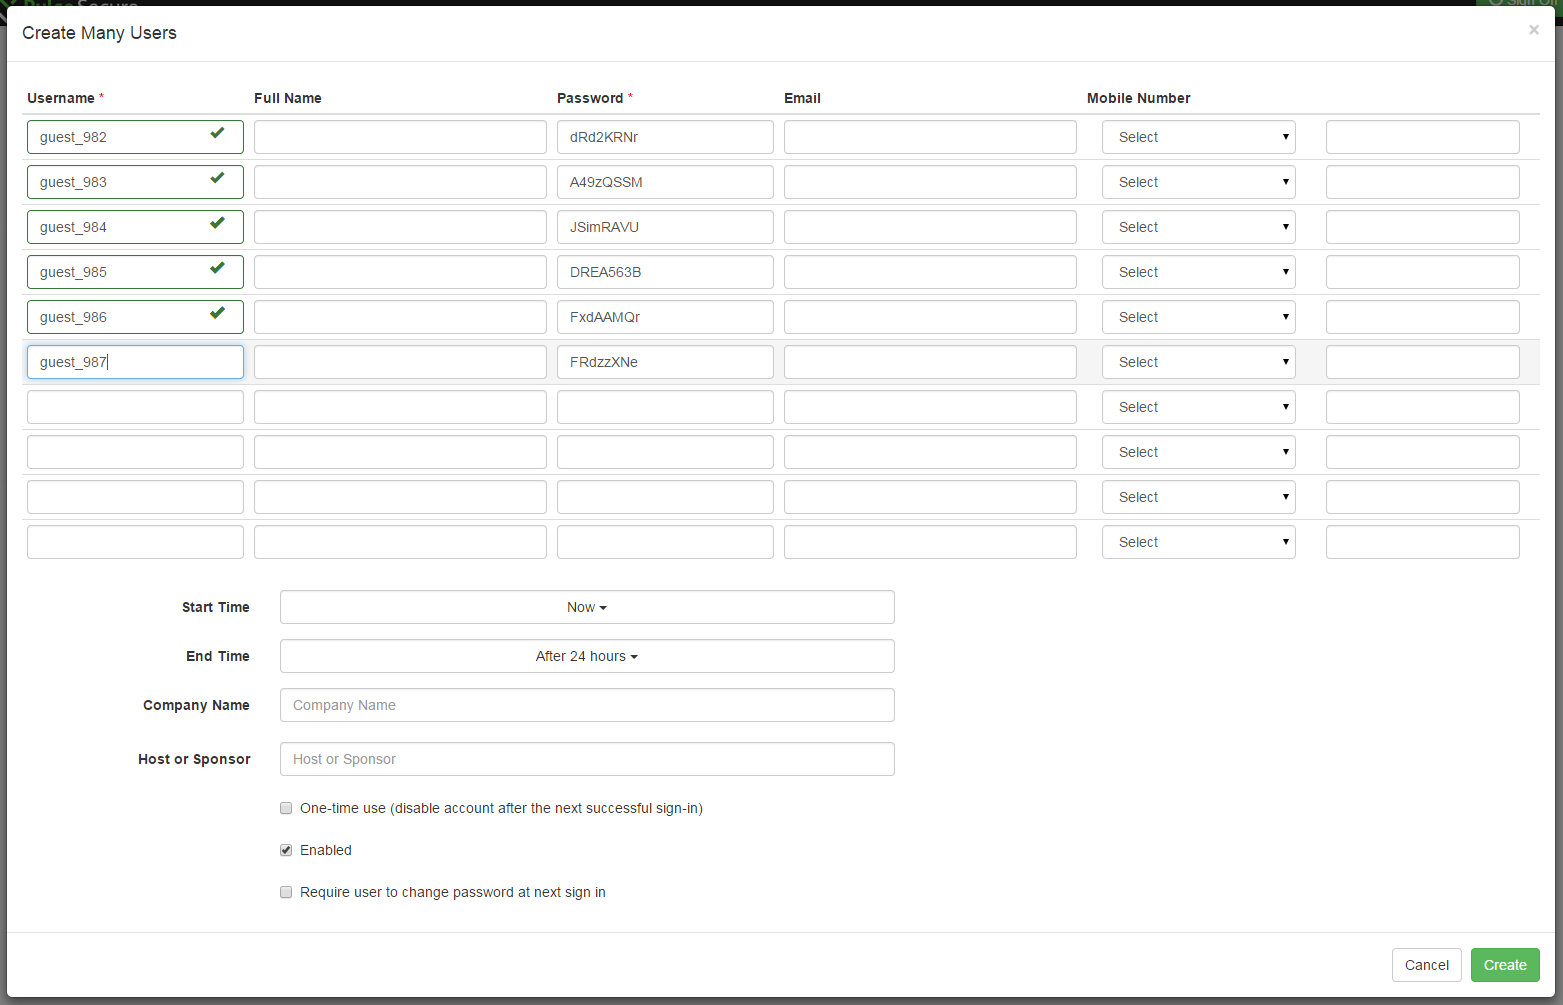
The following figure shows the page for adding many users and table describes the user configuration.
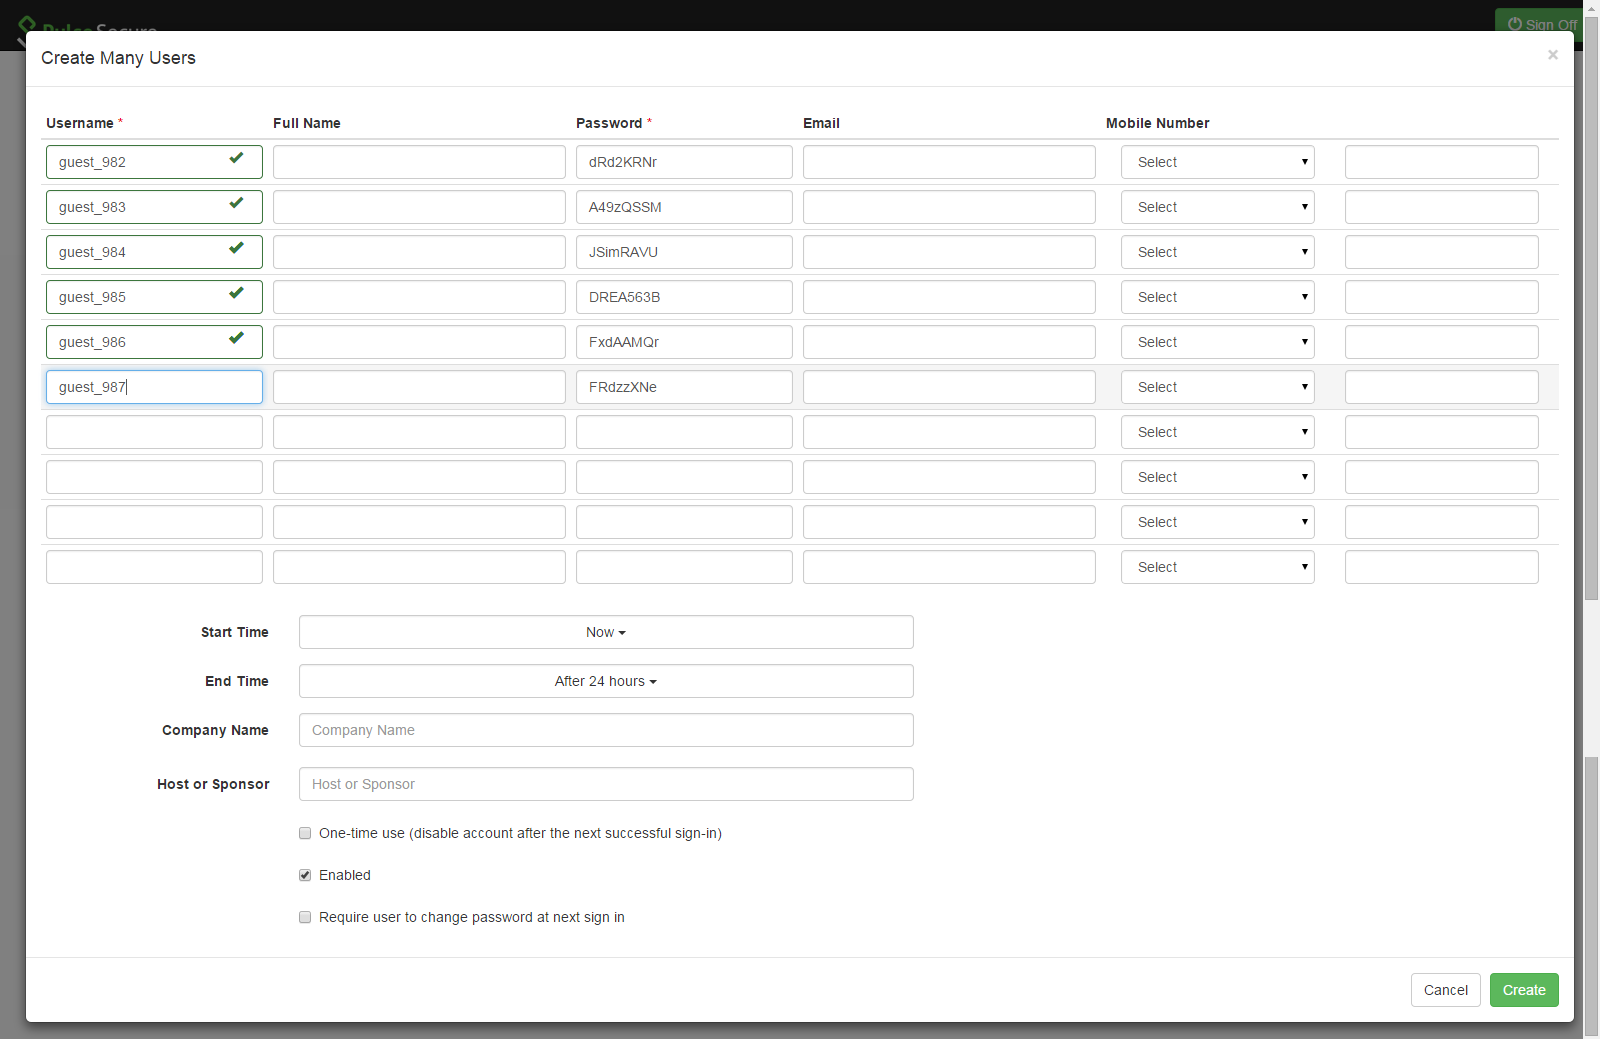
The guest usernames and passwords are created by the system as you click in the Username text box.
|
Settings |
Guidelines |
|---|---|
|
Username |
Specify the prefix to be used for the multiple accounts you are creating. |
|
Full Name |
Enter the full name of the guest. |
|
Password |
A strong password is generated automatically, or you can specify a different password. After you have saved the configuration, the system displays the password characters as asterisks (*) instead of blanks or cleartext. |
|
Start Time |
You can specify a start time for the account activity period by clicking on the drop-down and selecting from the calendar menu |
|
End Time |
You can specify an end of the account activity period. Click on the drop-down menu and select from the calendar menu. Once a user account has expired, it is deleted from the system. The process that deletes the guest user account runs every ten minutes. There may be a delay of some minutes before the account is purged. Even if the time or date on the system is moved ahead past the expiration time, the account could still be valid until the purge process runs. One-time user accounts are not affected by the ten-minute delay: one-time accounts are deleted immediately after the user exits. |
|
Company Name |
Enter the name of the company of the guest. (Optional) |
|
Host or Sponsor |
Enter whether the guest is a Host or Sponsor. (Optional) |
|
One-time use |
Select this option if you want the account deleted immediately after the guest user exits the browser or signs out |
|
Enabled |
Select this option to enable the account. |
|
Require user to change password at next sign in |
Select this option to prompt the user to change the configured password This option will not be supported in GUAM for WLC case. This option should not be enabled. Even if enabled, it will not have any effect. |
After the GUAM user clicks the Create button the following popup is displayed.
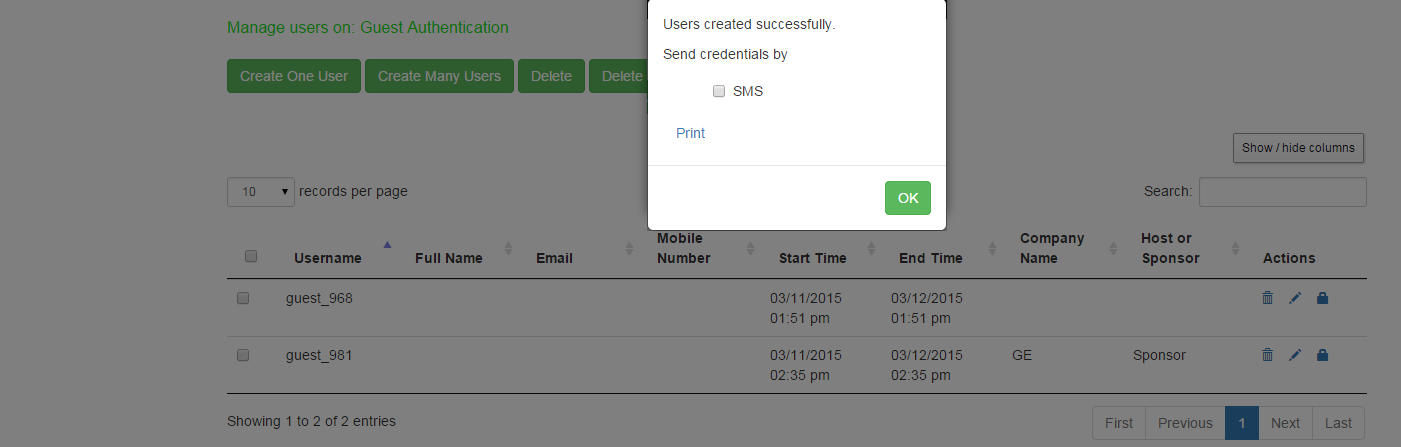
- Select SMS and click OK to send the credentials to the guests’ mobiles.
- Click Print to generate a printout of the credentials.
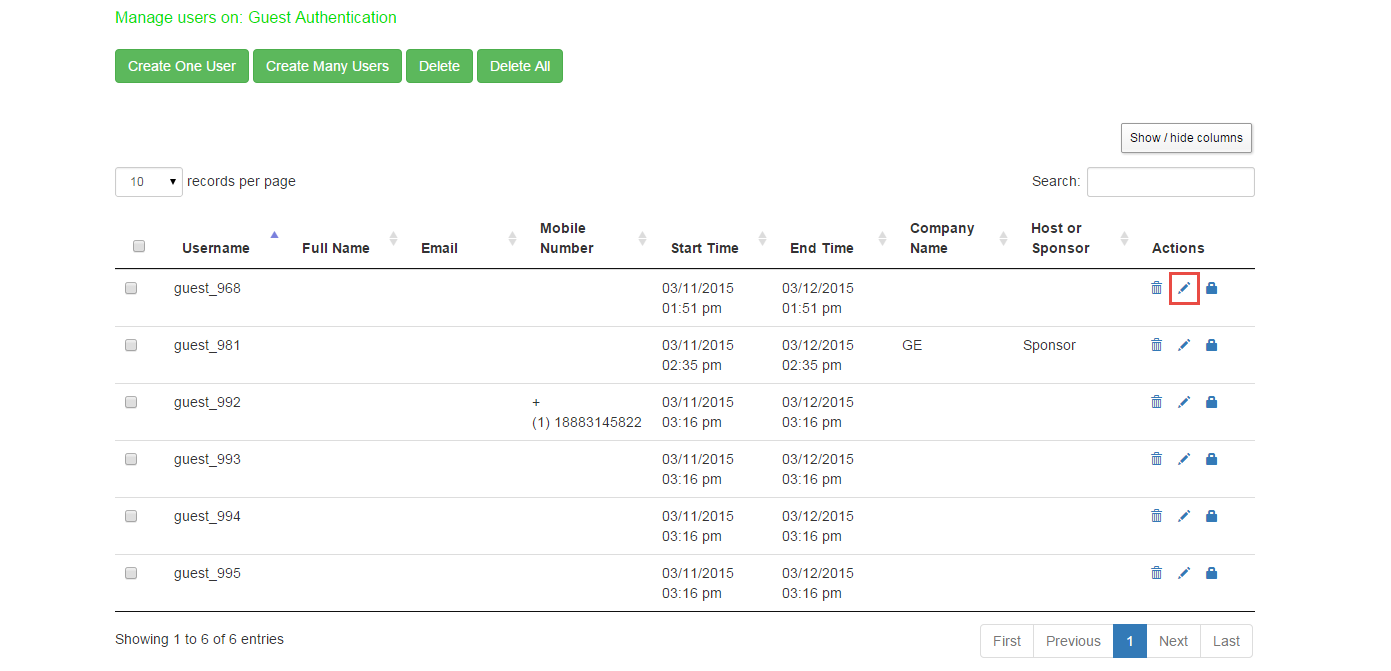
From the GUAM page, the GUAM user can click Edit icon of a guest user account to modify the guest user account details. Table shows the Edit User window.
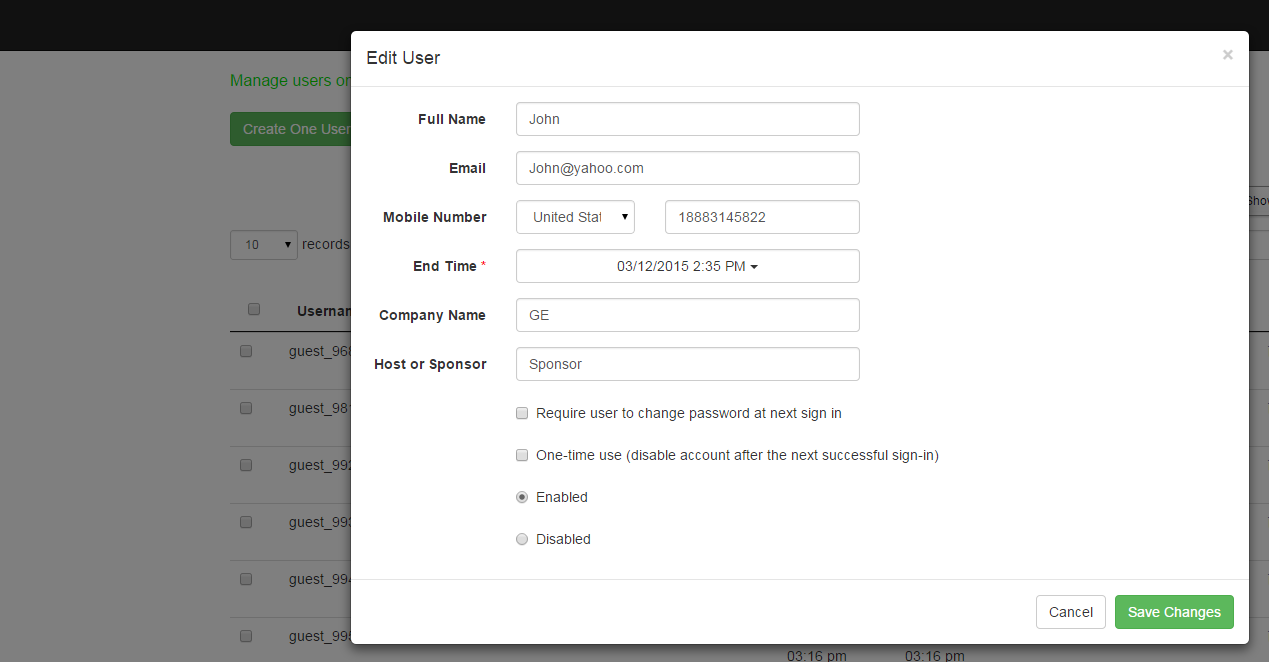
After clicking Save Changes the following popup appears.

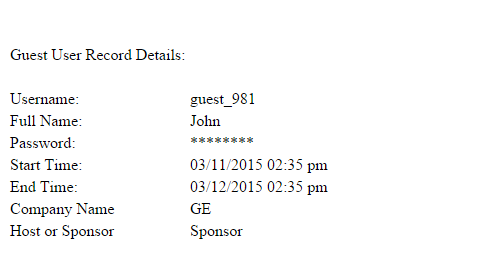
From the GUAM page, the GUAM user can click Print to generate a printable record of the guest user account. Figure shows the print details page.
Creating Guest Sponsor Portal
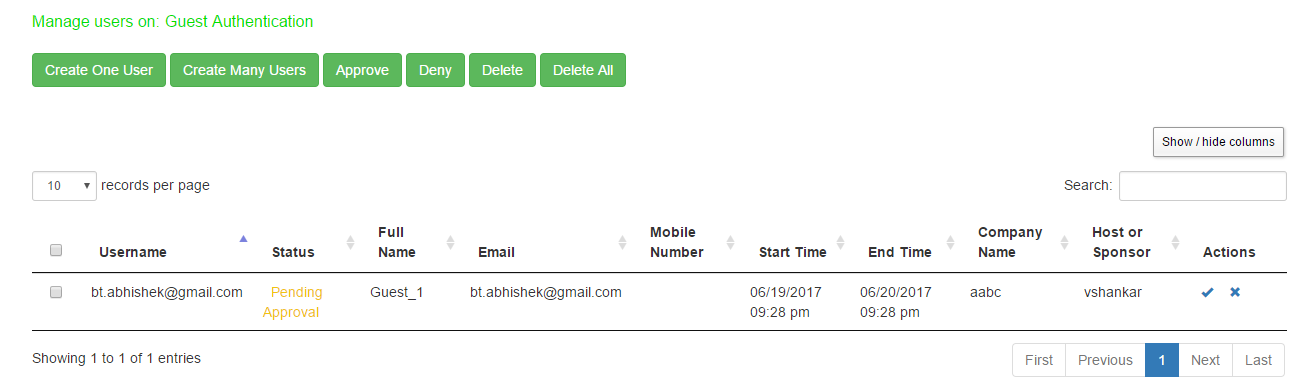
The Sponsor page is similar to GUAM page, where the Sponsor can see the list of guest users who marked the Sponsor while creating the guest user account. When the guest sponsor logs in through the sign-in page for the guest sponsor realm the following page is displayed for creating accounts. The Sponsor can see only the guest users created by the Sponsor and the Guest users who have marked someone as a Sponsor while creating guest user account.
The following table describes the various fields on the Sponsor user page.
|
Settings |
Guidelines |
|---|---|
|
Create One User |
Creates one user |
|
Create Many Users |
Creates multiple users |
|
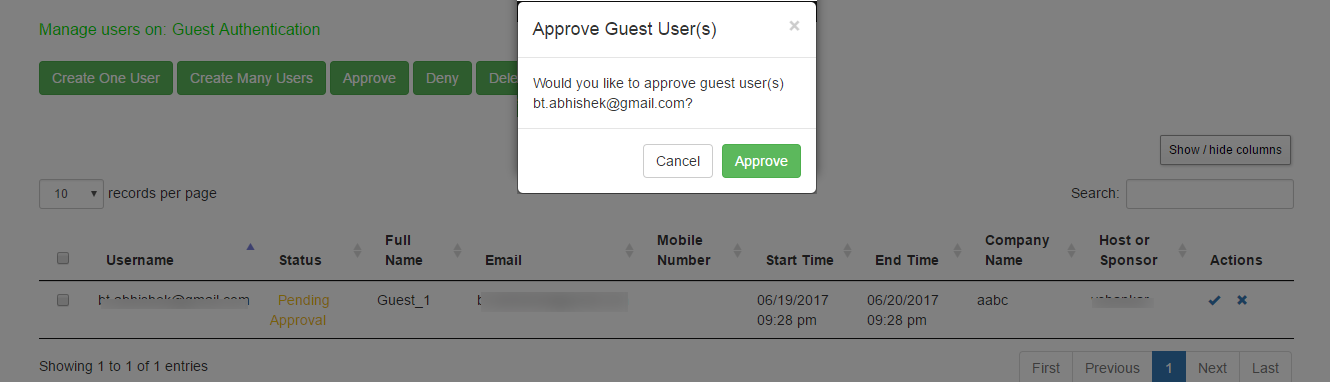
Approve |
Approves the guest user access. |
|
Deny |
Denies the guest user access. |
|
Delete |
Deletes the selected users |
|
Delete All |
Deletes all the users on the page. |
|
Show / hide columns |
Select the option to hide or show specific columns. |
|
Delete |
Deletes the record of the guest user. |
|
Reset |
Resets the password of the guest user. |
|
Edit |
Edits the details of the guest user. |
|
Search |
Searches for guest/s with specific names. |
The following figure shows the page for adding a single guest user.
|
Settings |
Guidelines |
|---|---|
|
Username |
Specify an account username. If the local authentication server has been configured with a prefix for guest accounts, the username box is populated with the next username in the prefix-based sequence. We recommend you retain the guest_ prefix so that you can rely on the naming convention in your role mapping rules. |
|
Full Name |
Specify the name of the guest. |
|
Password |
A strong password is generated automatically, or you can specify a different password. After you have saved the configuration, the system displays the password characters as asterisks (*) instead of blanks or cleartext. The password cannot be decrypted later unless the appropriate option is set when you create a local authentication server. |
|
Mobile Number |
Select the country name and then specify a valid phone number of the guest user. The IPS sends the login credentials to this mobile number through SMS. |
|
|
Specify an email address you can use to contact the guest if necessary. |
|
Start Time |
By default, the ‘Now’ option is displayed. You can specify a start time for the account activity period by clicking on the drop-down and selecting from the calendar menu. |
|
End Time |
By default, ‘After 24 hours is displayed. You can specify an end of the account activity period. Click on the drop-down menu and select from the calendar menu. Once a user account has expired, it is deleted from the system. The process that deletes the guest user account runs every ten minutes. There may be a delay of some minutes before the account is purged. Even if the time or date on the system is moved ahead past the expiration time, the account could still be valid until the purge process runs. One-time user accounts are not affected by the ten-minute delay: one-time accounts are deleted immediately after the user exits. |
|
Company Name |
Enter the name of the company of the guest. |
|
Host or Sponsor |
Enter whether the guest is a Host or Sponsor. |
|
One-time use |
Select this option if you want the account deleted immediately after the guest user exits the browser or signs out. |
|
Enabled |
Select this option to enable the account |
|
Require user to change password at next sign in |
Select this option to prompt the user to change the configured password. This option will not be supported in GUAM for WLC case. This option should not be enabled. Even if enabled, it will not have any effect. |
The following figure shows the page for adding many users and table describes the user configuration.
The guest usernames and passwords are created by the system as you click in the Username text box.
|
Settings |
Guidelines |
|---|---|
|
Username |
Specify the prefix to be used for the multiple accounts you are creating. |
|
Full Name |
Enter the full name of the guest. |
|
Password |
A strong password is generated automatically, or you can specify a different password. After you have saved the configuration, the system displays the password characters as asterisks (*) instead of blanks or cleartext. |
|
Start Time |
You can specify a start time for the account activity period by clicking on the drop-down and selecting from the calendar menu |
|
End Time |
You can specify an end of the account activity period. Click on the drop-down menu and select from the calendar menu. Once a user account has expired, it is deleted from the system. The process that deletes the guest user account runs every ten minutes. There may be a delay of some minutes before the account is purged. Even if the time or date on the system is moved ahead past the expiration time, the account could still be valid until the purge process runs. One-time user accounts are not affected by the ten-minute delay: one-time accounts are deleted immediately after the user exits. |
|
Company Name |
Enter the name of the company of the guest. (Optional) |
|
Host or Sponsor |
Enter whether the guest is a Host or Sponsor. (Optional) |
|
One-time use |
Select this option if you want the account deleted immediately after the guest user exits the browser or signs out |
|
Enabled |
Select this option to enable the account. |
|
Require user to change password at next sign in |
Select this option to prompt the user to change the configured password This option will not be supported in GUAM for WLC case. This option should not be enabled. Even if enabled, it will not have any effect. |
After the GUAM user clicks the Create button the following popup is displayed.

- Select SMS and click OK to send the credentials to the guests’ mobiles.
- Click Print to generate a printout of the credentials.
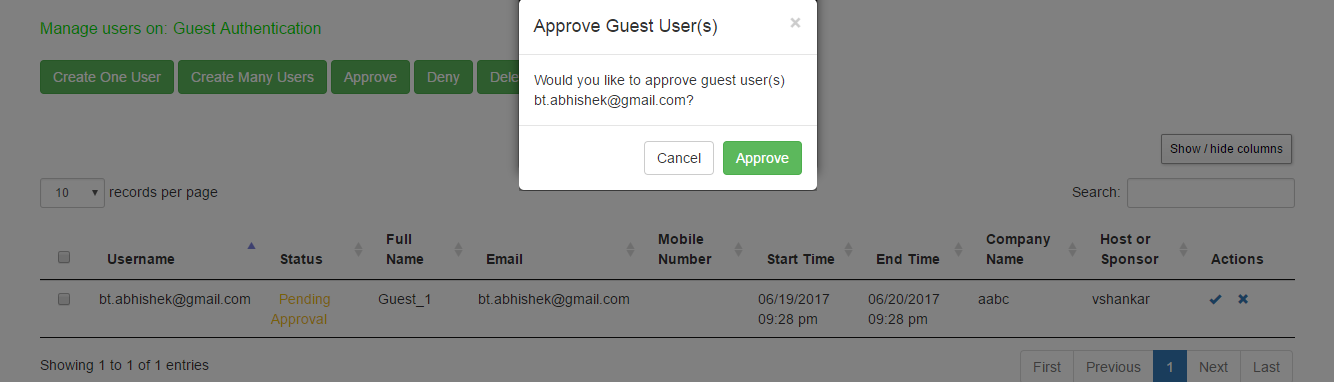
From the Sponsor page, the Sponsor user can click Approve icon of a guest user account to approve the guest user account details. The following figure shows the Approve window.
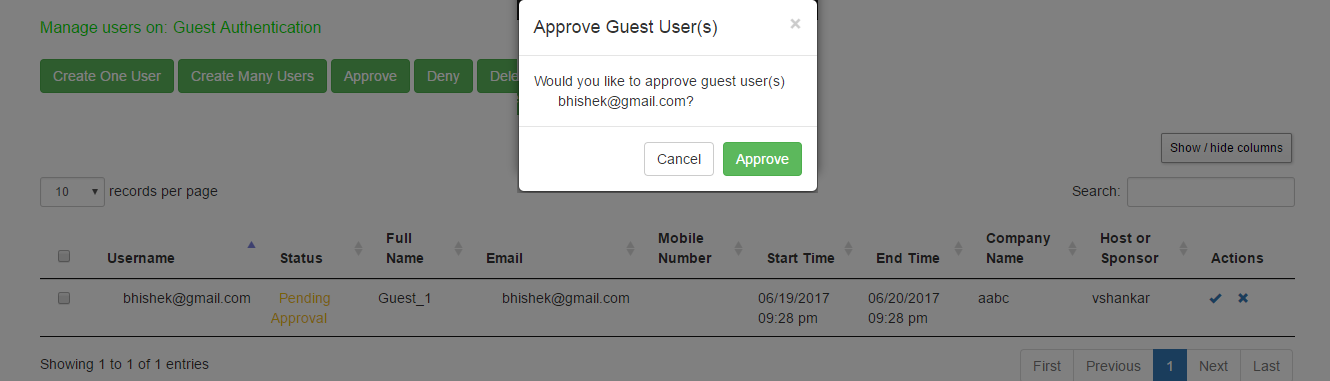
- Click Approve. The Guest User receives a notification email describing that the access is approved.
The Sponsor has the flexibility to edit the user details as shown below.
The following page is displayed if the Sponsor chooses to deny access to the Guest User. A notification email is sent to the Guest User describing that the access is denied.