User Roles
The user can be assigned to one or more roles during the sign-in process. A role is an entity which defines user session settings, role restrictions, appearance of the welcome page, and type of access methods (Ivanti Secure Access Client or agentless).
Creating Roles
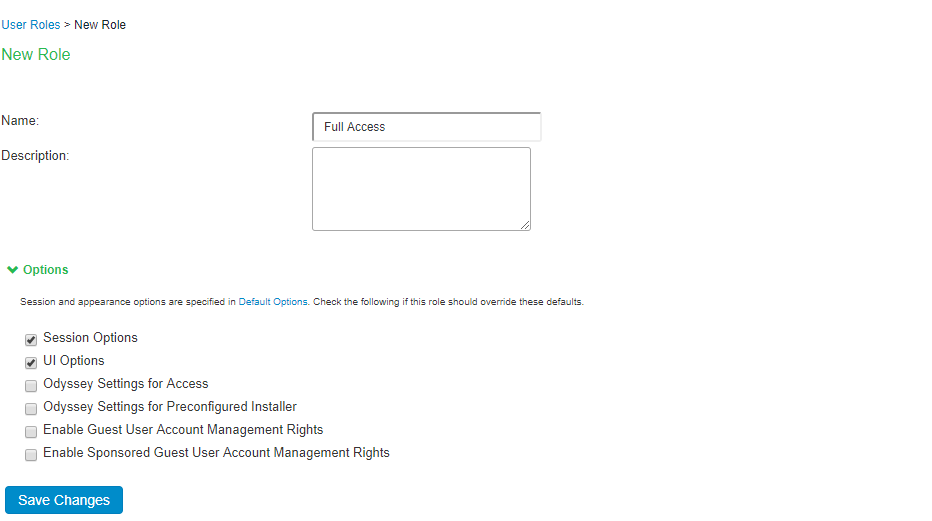
To create a user role:
- Select Users > User Roles. For creating Administrator role, select Administrators > Admin Role.
An administrator role specifies system management functions and session properties for administrators who map to the role. You can customize an administrator role by selecting the feature sets and user roles that members of the administrator role can view and manage. - Click New Role and then enter a name and, optionally, a description. This name is displayed in the list of Roles on the Roles page.
- Under Options, specify the session and appearance details.
- Session Options—Sets timeouts and user permissions that apply to each session established through the role.
- UI Options—Sets the appearance of agentless log in pages.
- Guest User Account Management—Provides limited permissions to allow users assigned to this role to create guest accounts
Configuring User Access Options
IPS supports connection through an agent (software) installed on the client device. The supported agent type is Ivanti Secure Access Client. The Administrator can configure what agent to install on the client device and the corresponding settings to push during the installation.
To configure the user access options:
- Select Users > User Roles > Role Name > Agent.
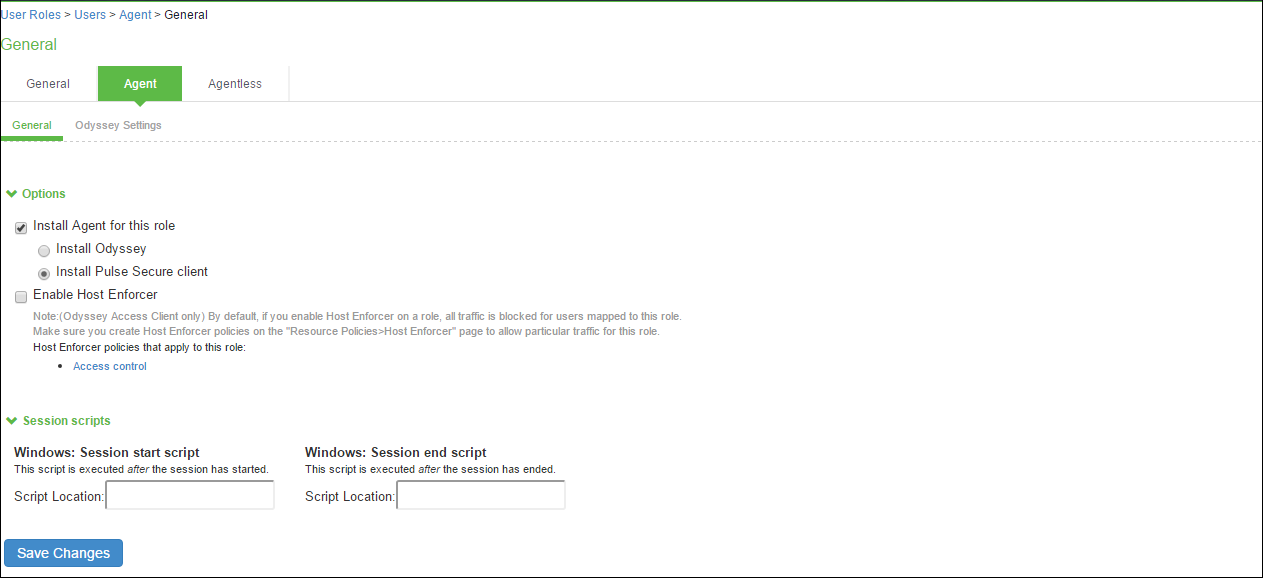
- To allow Ivanti to download automatically on Windows endpoints, select Install Agent for this role, and then select the Install Ivanti secure Accessoption.
- Under Session Scripts, specify scripts to run on Windows endpoints for users assigned to a role. For example, you can specify a script that maps network drives on an endpoint as a session start script, and you can specify another script that disconnects the mapped network drives as session end script.
Customizing UI Options
IPS provides options to administrators in customizing the page that gets displayed to the end users during sign-in process. These customization options are applied based on the list of user roles that are getting assigned to the end user. Using these options, administrators can change the logo, background and the welcome message that gets displayed to the end users during the sign-in process.
To customize the welcome page:
- Select Users > User Roles > Role Name > General > UI Options.
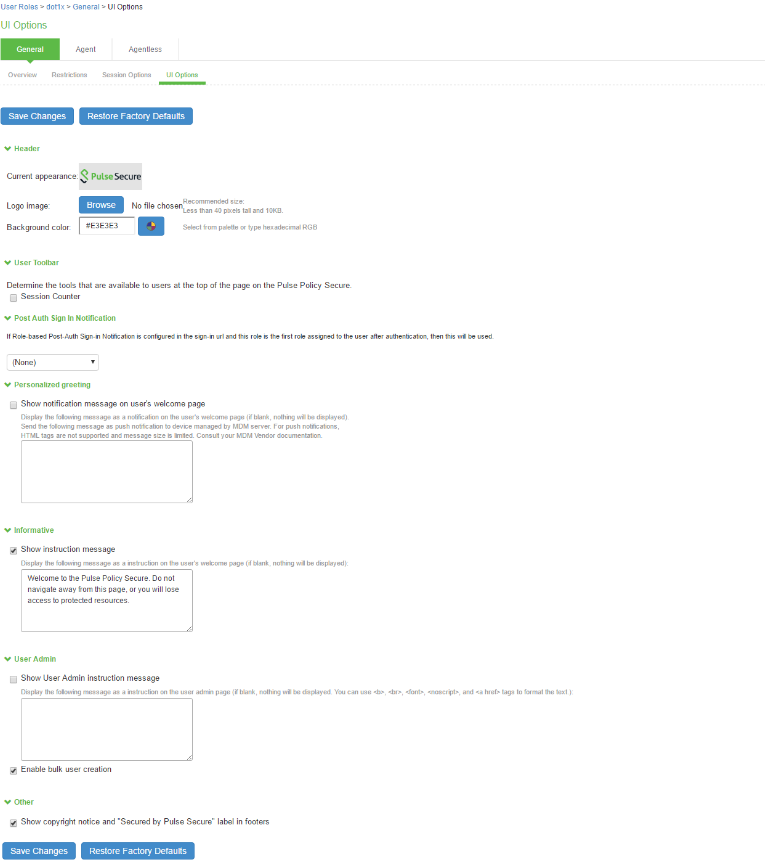
- (Optional) Under Header, specify a custom logo and alternate background color for the header area of the welcome page:
- Click Browse and locate your custom image file. The new logo is displayed in the Current appearance box only after you save your changes.
- Type the hexadecimal number for the background color, or click the Color Palette icon and select a color. The Current appearance box updates immediately.
- Under User Toolbar, select the Session Counter check box to display both a session countdown timer and an Extend button that allows agentless users to extend their session time to the maximum session length if the Enable Session Extension option is selected.
- (Optional) Under Post-Auth Sign-In Notification, select a post authentication message that you configured earlier. If you select this option, the user receives an information page (for example, an end-user license agreement [EULA]) that you have created.
- (Optional) Under Personalized greeting, select the Show notification message check box, and enter a message in the associated text box.The message is displayed as a header on the welcome page after the user is authenticated. You can format text and add links using the following HTML tags: <i>, <b>, <br>, <font>, and <a href>. This information does not appear on the initial sign-in page that is displayed prior to authentication. You can also use system variables and attributes in this field.The length of the personalized greeting cannot exceed 12K, (12288 characters).If you use unsupported HTML tags in your custom message, the system might display the user’s home page incorrectly.
- (Optional) Under Informative, select the Show instruction message check box and specify any instructions to appear on the welcome page. For example, you could advise users of company privacy notices or usage restrictions, or you can link to another site for more information.
- If you include a link to an external website, a warning message appears informing the user of loss of access privileges if they leave the current page. To avoid this, add a tag for opening links in a new browser window.
For example: <a href=”http://www.google.com” target=”_blank”>Google</a> displays the linked text “Google,” and the link opens in a new browser window.
The instruction message supports non-English languages.
- (Optional) Under User Admin, select the Show User Admin instruction message checkbox and specify any instructions to appear on the user admin page. Select Enable bulk user creation to create bulk user accounts for numerous users.
- (Optional) Under Other, specify whether to display the copyright notice and label in the footer. This setting applies only to users whose license permits disabling the copyright notice. For more information about this feature, call Ivanti Support.
- (Optional) Click Restore Factory Defaults to reset all user-interface options back to factory defaults.
- Click Save Changes.
- If a user maps to more than one role, then the system displays the user interface settings that correspond to the first role to which the user is mapped.
- Sign-in pages can also be customized using the Custom Sign-In page functionality. For more information, see Configuring Custom Sign-In Pages
Customizing the Session Options
IPS provides option to administrators for configuring the maximum session length and heartbeat interval for the end user sessions. Using these options Administrator can control how long the user sessions are allowed and the interval within which server should receive heartbeat from client device.
IPS also provides option to enable session roaming so that mobile users can continue to have the connection with server while roaming.
To specify general session options:
- Select Users > User Roles > RoleName > General > Session Options.
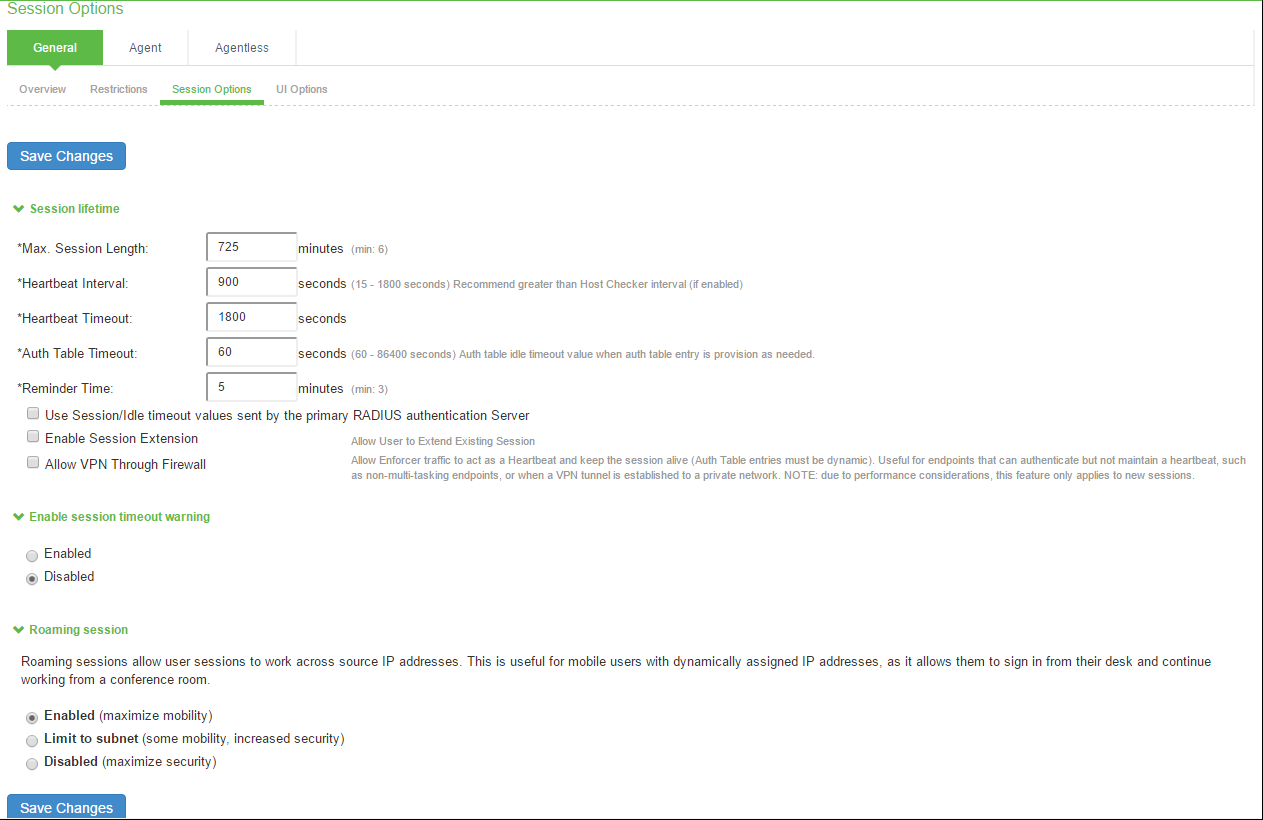
- For Max. Session Length, specify the number of minutes an active non-administrative user session can remain open before ending. The minimum is 6 minutes. The maximum is 725 minutes. During a user session, prior to the expiration of the maximum session length, the system prompts the user to reenter authentication credentials, thereby avoiding the unexpected termination of the user session.
- For Heartbeat Interval, set the frequency at which the endpoint sends out a heartbeat to IPS to keep the session alive. For agentless access, the browser refreshes the page with every heartbeat. Users must not the browser, because this will interrupt the heartbeat and end the session. Ivanti Secure Access Client and the Java agent provide the heartbeat. You should ensure that the heartbeat interval of the agent is greater than the Host Checker interval. If it is not, performance could be affected. In general, set the heartbeat interval to 50% more than the Host Checker interval.
- For Heartbeat Timeout, specify the amount of time the system should “wait” before terminating a session when the endpoint does not send a heartbeat response.
- For Auth Table Timeout, enter a timeout value for the auth table entry to be provisioned as needed. This parameter allows you to specify how long a user with no activity (for example, a user reading a static web page), can remain in the auth table before the auth table entry is cleared by the Infranet Enforcer.
- Enter the reminder time in minutes.
- Guest users (users created by guest user account managers) can log in with their guest account, and then tunnel into their corporate Virtual Private Network (VPN). In this case, the heartbeat connection to IPS is lost, and the user is disconnected after the heartbeat timeout expires. To prevent this, use firewall traffic as the heartbeat by selecting the Allow VPN Through Firewall check box.
When the "Disable use of Allow VPN Through Firewall check box is not checked (the default setting), AJAX requests are sent to the IPS at the configured interval. If the Use Traffic as Heartbeats option is enabled, AJAX heartbeat errors are masked.
If a guest user is assigned two roles, and one of the roles has a Host Checker policy and one doesn't, the user loses the role with the Host Checker policy if the Host Checker policy expires while the user is accessing a VPN through a tunnel. The user will lose access to the resources associated with the Host Checker role.
- For agentless users, you can select the Enable Session Extension check box to allow users with a Layer 2 or Layer 3 connection to continue a session beyond the maximum session length.
If this feature is enabled, users with agentless access can be reauthenticated and extend their current session without interruption.
When the user session nears the end of maximum session length, a pop up a new sign-in page for agentless. When the user enters credentials, Host Checker verifies that the user is still compliant and the session continues.
When the user extends the session before its expiration, the session time is restored to the original maximum session length time that you have specified for the role, and the log indicates the new session time. If the user fails to extend the session before session time expires, the session is terminated.
For agentless access, you must select the Session Counter option on the UI Options tab to enable the session timer.
- Under Enable Session timeout warning, specify:
- Enabled-To enable expiration warning for users using Ivanti Secure Access Client.
- Disabled-To disable expiration warning message.
- Under Roaming session, specify:
- Enabled-To enable roaming user sessions for users mapped to this role. A roaming user session works across source IP addresses, which allows mobile users (laptop users) with dynamic IP addresses to sign in from one location and continue working from another. Disable this feature to prevent users from accessing a previously established session from a new source IP address. This prevents the spoofing attack on the user's session.
- Limit to subnet-To limit the roaming session to the local subnet specified in the Netmask box. Users may sign in from one IP address and continue using their sessions with another IP address if the new IP address is within the same subnet.
- Disabled-To disable roaming user sessions for users mapped to this role. Users who sign in from one IP address may not continue an active session from another IP address. User sessions are tied to the initial source IP address.
You must enable roaming for roles that are created for security policies that classify sessions into VLANs, for example, VLANs that have been provisioned for Users or Remediation. A session stores the client IP address. If the session gets placed in a different VLAN transition, the control channel is re-established, and a new IP address is sent to the server. If the remediation role does not have roaming enabled, the server terminates the session. This can lead to repeated problems. When the session is terminated, it causes a new log on, which reconnects to the same session, resulting in the same roaming problem. The Ivanti Secure Access Client sets a connection roaming error and logs the server FATAL_ERROR message.
- Click Save Changes.
Configuring Role Restrictions
The role restrictions allow only a valid user to access the network and prevents unauthorized access. You can specify security requirements based on source IP address, password, certificate, browser type, and Host Checker policies. If the user does not meet the requirements specified in the restriction, then the user is not allowed to access the protected resource.
Source IP Access Restriction
Use a source IP restriction at the role to control from which IP addresses users can access a sign-in page. You must specify one or more IP addresses otherwise; no IP address restriction applies.
To enable Source IP access restriction:
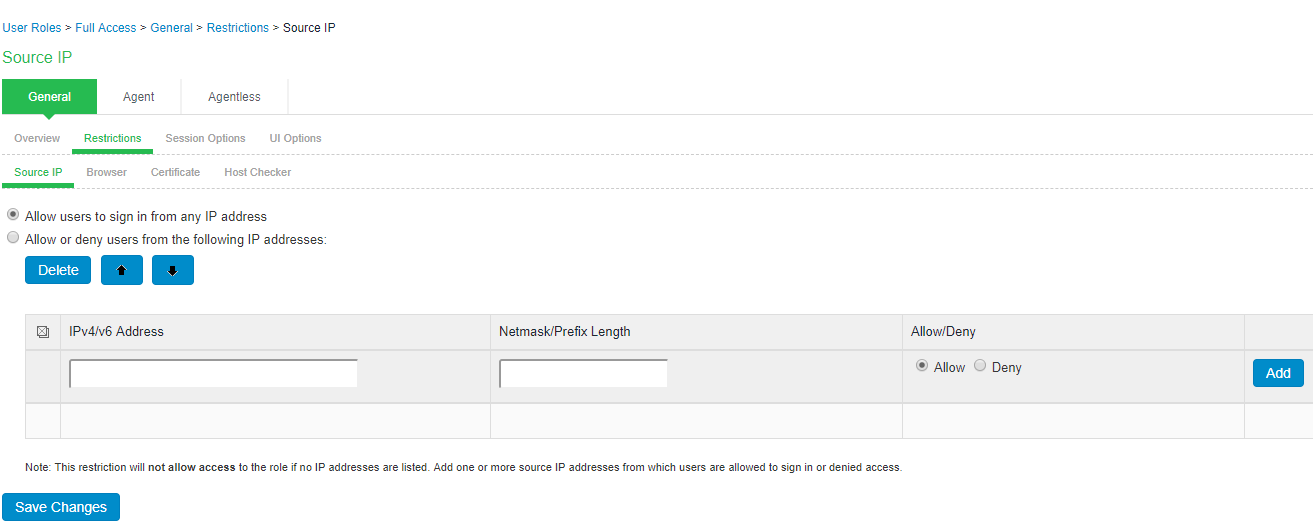
- Select Users > User Roles > Select Role > General > Restrictions > Source IP.
- Assign the Source IP restrictions on roles.
- Allow users to sign-in from any IP address- You can allow or deny access to any IP address/netmask combination. For example, you can deny access to all users on a wireless network (10.64.4.100), or you can allow access to all other network users (0.0.0.0).
- Allow or deny users from following IP address- Enter the IPv4/IPv6 address, network/prefix length and choose whether to allow or deny access. Click Add.
- Click Save Changes.
Certificate Access Restriction
Certificate access restriction restricts access only to clients that have a client-side certificates. You can further restrict access using specific certificate attribute and value pairs.
To enable certificate access restriction:
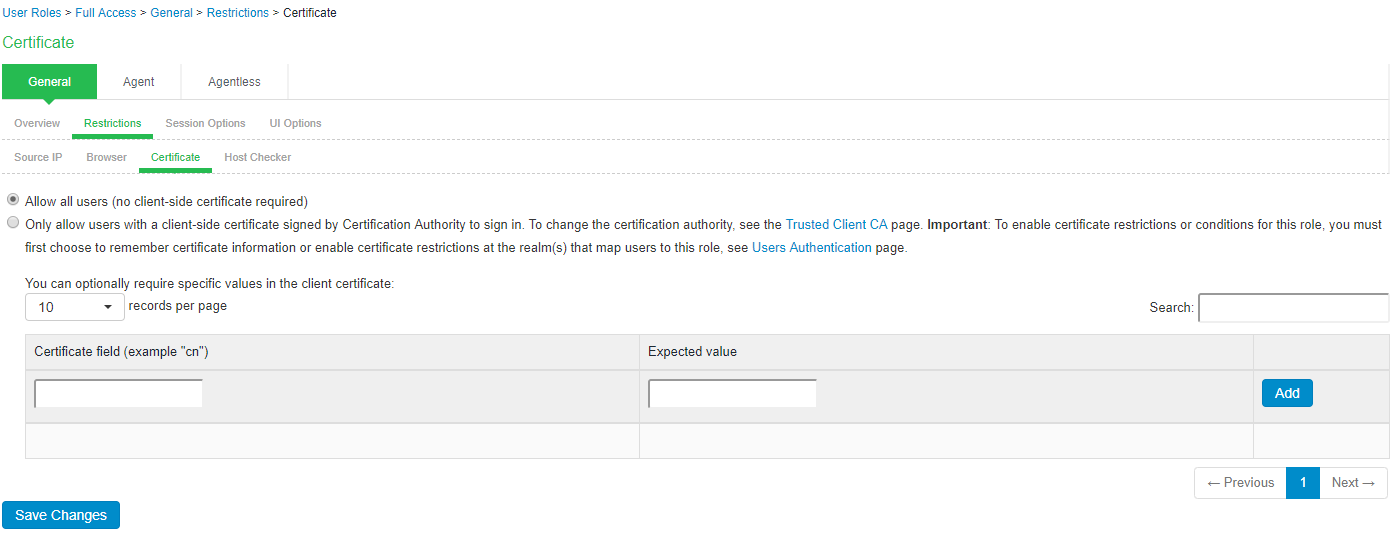
- Select Users > User Roles > Select Role > General > Restrictions > Certificate.
- Select the Only allow users with a client certificate signed by Certificate Authority (CA).
- Create a field/value pair check based on attributes within the client certificates. Enter the "Certificate field" and the expected value. Click Add. The value in the field depends on the naming attributes in the Relative Distinguished Name(RDN) in the subject DN of the certificate.
For example, if the subject DN is cn=user1, uid=uid1, sn=lastname, [email protected], OU=QA, O=company, C=US, you can use 'cn', 'uid', 'sn', 'E', 'ou', 'o', 'c'.
- Click Save Changes.
Host Checker Restrictions
To specify Host Checker restrictions:
- Select Users > User Roles > Select Role > General > Restrictions > Host Checker.
- Select Allow only users whose workstations meet the requirements specified by these Host Checker policies to apply HC restrictions.
- Select the Host Checker policy from the Available Policies list and click Add.
- Select the Allow access to role if any ONE of the selected policies is passed check box if you do not want to require users to meet all of the requirements in all of the selected policies.
- Click Save Changes.

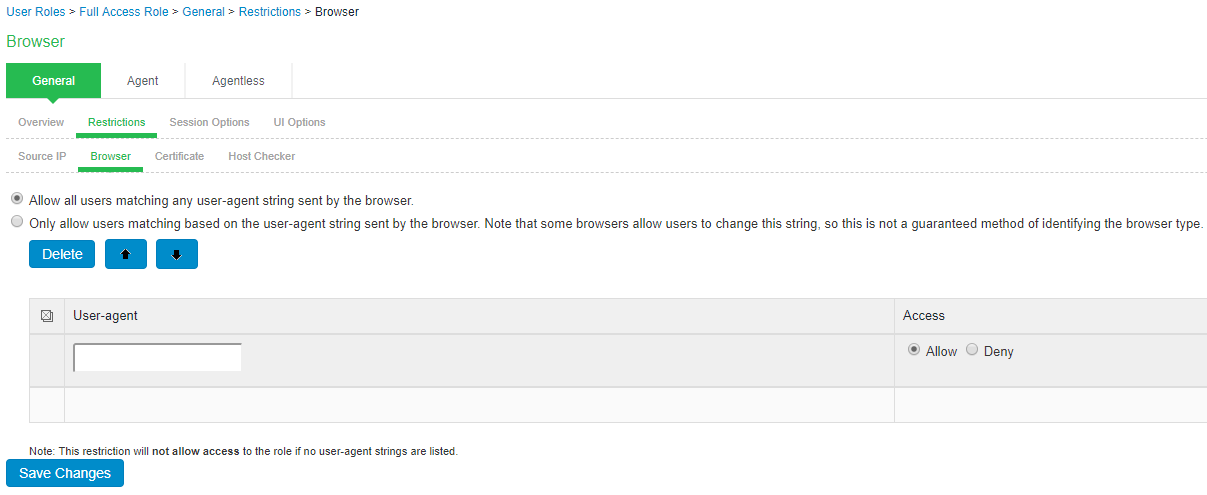
Browser Restriction
To specify browser restrictions:
- Select Users > User Roles > Select Role > General > Restrictions > Browser.
- Select Only allow users matching the following user-agent policy to define browser access control rules.
- To create a rule:
- For the user-agent string pattern, enter a string in the format
*<browser_string>*
where asterisk (*) is an optional character used to match any character and <browser_string> is a case-sensitive pattern that must match a substring in the user-agent header sent by the browser. You cannot include escape characters
(\) in browser restrictions. - Select either:
- Allow to allow users to use a browser that has a user-agent header containing the <browser_string> substring.
- Deny to prevent users from using a browser that has a user-agent header containing the <browser_string> substring.
- Click Add.
- For the user-agent string pattern, enter a string in the format
- Click Save Changes.
Rules are applied in order, so the first matched rule applies. Literal characters in rules are case sensitive, and spaces are allowed as literal characters. For example, the string *Opera* matches any user-agent string that contains the substring Opera.