Using an ACE Server
This topic describes integration with an ACE Server (now named RSA Authentication Manager).
RSA Authentication Manager Overview
This section describes support for using IPS with an ACE Server (now named RSA Authentication Manager).
Understanding RSA Authentication Manager
RSA Authentication Manage (formerly known as ACE/Server) is an authentication and authorization server that allows user authentication based on credentials from the RSA SecurID® product from RSA Security Inc.
When you use RSA Authentication Manager as the authentication and authorization service for your access management framework, users can sign in to IPS using the same username and password stored in the backend server.
Table describes RSA SecurID hardware token and software token user sign-in methods.
|
Method |
Action |
|---|---|
|
Using a hardware token and the standard system sign-in page |
The user browses to the standard system sign-in page, and then enters the username and password (consisting of the concatenation of the PIN and the RSA SecurID hardware token’s current value). The system then forwards the user’s credentials to the authentication server. |
|
Using a software token and the custom SoftID system sign-in page |
The user browses to the SoftID custom sign-in page. Then, using the SoftID plug-in, the user enters the username and PIN. The SoftID plug-in generates a passphrase by concatenating the user’s PIN and token and passes the passphrase to the authentication server. |
If the RSA Authentication Manager positively authenticates the user, the user gains access to the system. Otherwise, the RSA Authentication Manager:
- Denies the user access to the system.
- Prompts the user to generate a new PIN (New PIN mode) if the user is signing in to the system for the first time. Users see different prompts depending on the method they use to sign in.
- If the user signs in using the SoftID plug-in, then the RSA prompts the user to create a new pin; otherwise IPS prompts the user to create a new PIN.
- Prompts the user to enter the next token (Next Token mode) if the token entered by the user is out of sync with the token expected by RSA Authentication Manager. Next Token mode is transparent to users signing in using a SoftID token. The RSA SecurID software passes the token through the system to RSA Authentication Manager without user interaction.
- ·Redirects the user to the standard system sign-in page (SoftID only) if the user tries to sign-in to the RSA SecurID Authentication page on a computer that does not have the SecurID software installed.
Feature Support
Access management framework supports the following RSA Authentication Manager features:
- New PIN mode
- Next-token mode
- Data Encryption Standard (DES)/ Secure Dial-In (SDI) encryption
- Advanced Encryption Standard (AES) encryption
- Slave Authentication Manager support
- Name locking
- Clustering
Interoperability Requirements and Limitations
The following limitations apply when defining and monitoring an RSA Authentication Manager instance:
- You can only add one RSA Authentication Manager configuration to the system, but you can use that configuration to authenticate any number of realms.
- You cannot customize the load balancing algorithm.
- When you enter the New PIN or Next Token mode, enter the required information within three minutes. Otherwise, the system cancels the transaction and notifies the user to reenter the credentials.
- The system can handle a maximum of 200 RSA Authentication Manager transactions at any given time. A transaction only lasts as long as is required to authenticate against the RSA Authentication Manager.
For example, when a user signs into the system, the RSA Authentication Manager transaction is initiated when the user submits the request for authentication and ends once the RSA Authentication Manager has finished processing the request. The user may then keep his or her session open, even though the RSA Authentication Manager transaction is closed.
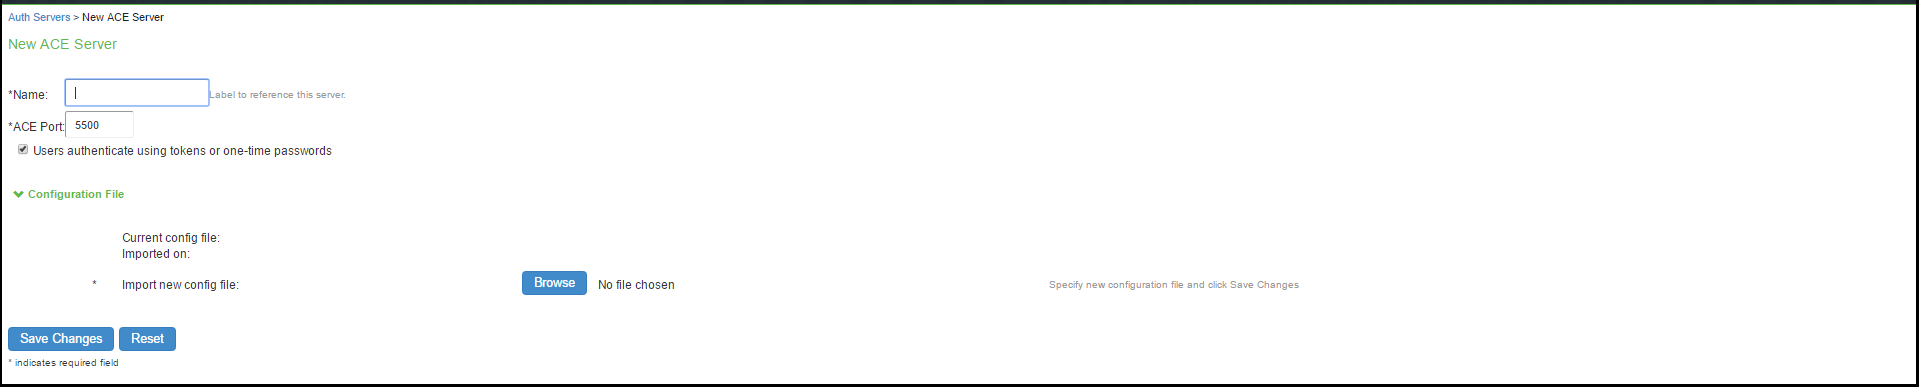
Configuring Authentication with RSA Authentication Manager
To configure authentication with an ACE server:
- Select Authentication > Auth. Servers.
- Select ACE Server and click New Server to display the configuration page.
- Complete the configuration as described in table.
- Save the configuration.
|
Settings |
Guidelines |
|---|---|
|
Name |
Specify a name to identify the server within the system. |
|
ACE Port |
Specify the default port of the authentication server. If no port is specified in the sdconf.rec file, the default port is used. |
|
Configuration File |
|
|
Current config file |
Specify the RSA Authentication Manager configuration file. You must update this file on the device anytime you make changes to the source file. |
|
Imported on |
Display the date on which the config file is imported. |
|
Import new config file |
Use the Choose File button to upload the sdconf.rec configuration file. |
|
Node Verification File |
|
|
Node |
Save the configuration to redisplay the configuration page. The updated page includes a section that lists a timestamp for the negotiation of the node secret between the system and the backend RSA server. The negotiation and verification automatically occurs after first successful log in. Do not expect entries in the table until at least one user has authenticated successfully. |
Displaying the User Accounts Table
- To display user accounts:
- Select Authentication > Auth. Servers.
- Click the link for the authentication server you want to manage.
- Click the Users tab to display the user accounts table.
The user accounts table includes entries for the accounts that have been created. The Last Sign-in Statistic column shows the last successful sign-in date and time for each user, the user’s IP address, and the agent or browser type and version.
Use the controls to search for users and manage user accounts:
- To search for a specific user, enter a username in the Show users named box and click Update.
You can use an asterisk (*) as a wildcard, where * represents any number of zero or more characters. For example, to search for all usernames that contain the letters jo, enter *jo*. The search is case-sensitive. To display the entire list of accounts again, type * or delete the field’s contents and click Update.
- To limit the number of users displayed on the page, enter a number in the Show N users box and click Update.
- To terminate the user session and delete the account, select the check box next to the user account record and click Delete.