Using the Local Authentication Server
This topic describes the local authentication server.
Local Authentication Server Overview
The local authentication server is an authentication database that is built in to IPS. Therefore, it is considered a “local” server in contrast to a third-party enterprise AAA server that is connected over the network.
Typically, you create local user accounts for temporary users who do not have accounts on your enterprise AAA servers. Temporary users include lab users or guests, but you might find the local authentication server useful to create temporary accounts for users who are normally verified by an enterprise AAA server that you plan to disable.
You also use the local authentication server to create accounts for administrator users, such as system administrators and guest user access managers (GUAM).
Although it is common practice to use the local authentication server for administrator accounts, it does not preclude you from using any of the supported third-party enterprise AAA servers in your administrator access management framework.
The following authentication protocol sets can be used with the local authentication server:
- By default, the system uses hashing to store passwords. When using the default, the protocols available are PAP and MS-CHAP v1 with or without EAP.
- You can enable an option to store passwords as clear text. If you enable this option, CHAP and MD5-Challenge are also available.
Configuring the Local Authentication Server
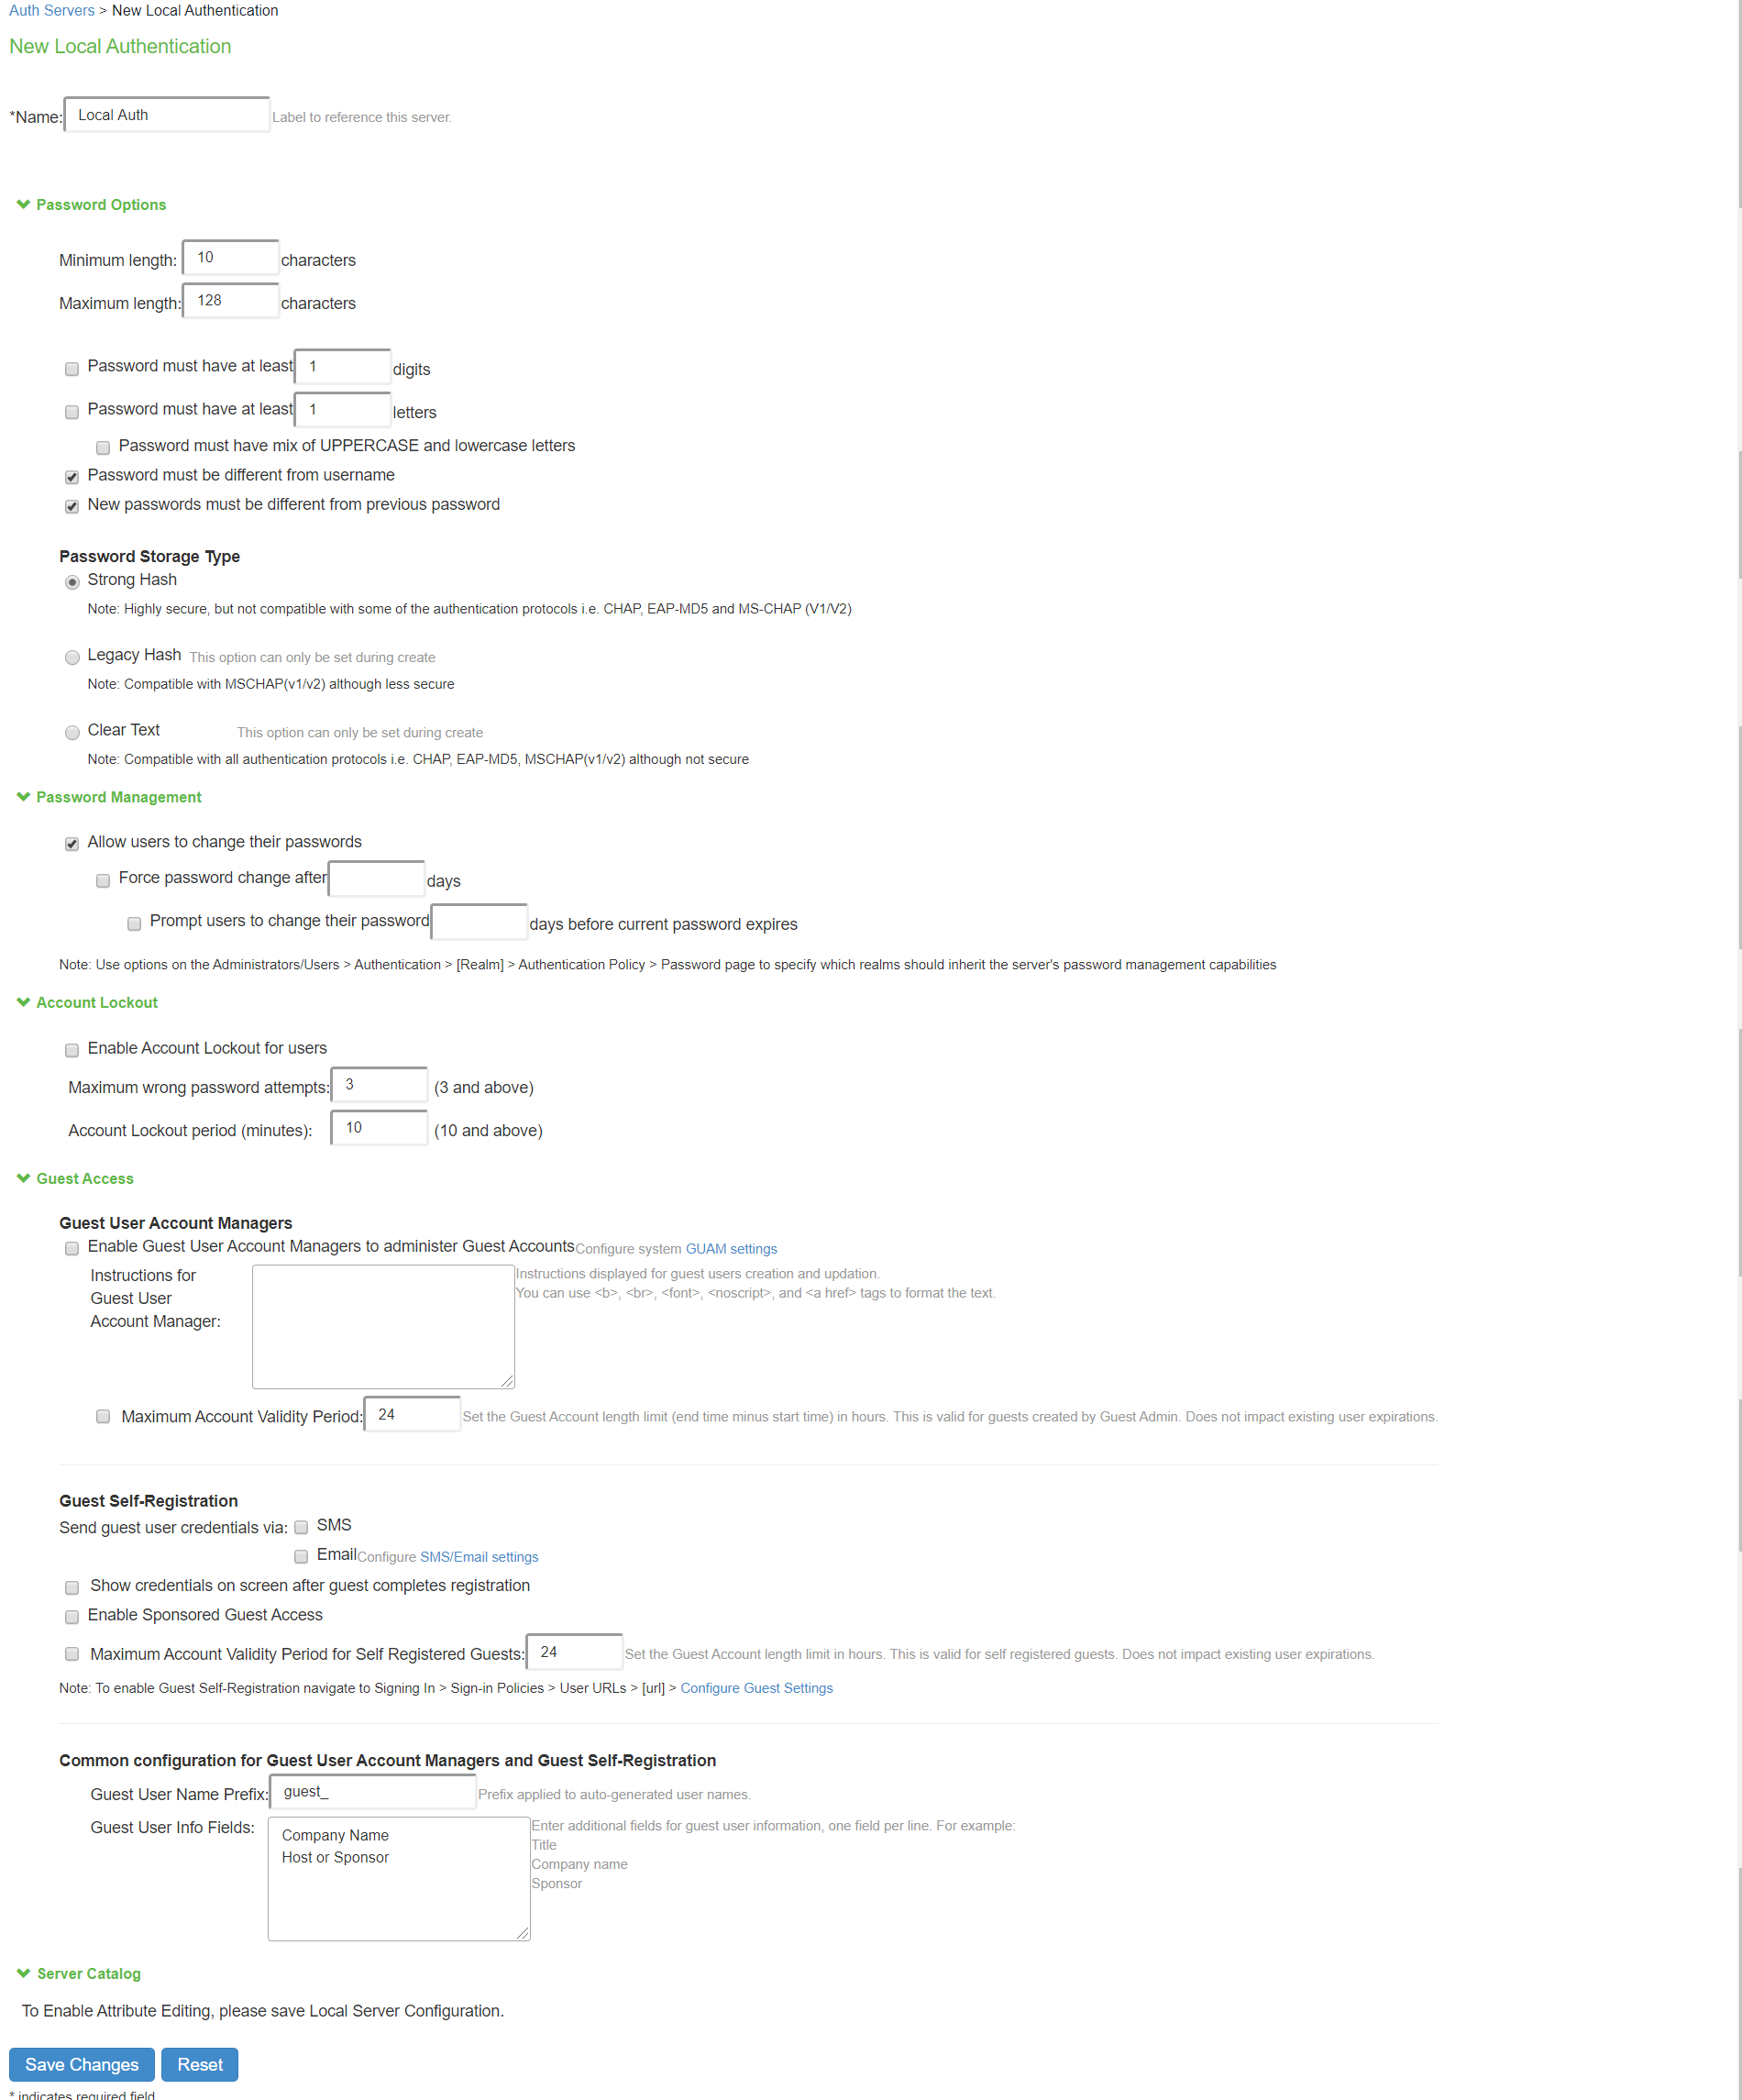
You can create multiple local authentication server instances. When you define a new local authentication server, you must give the server a unique name and configure options for passwords and guest users.
To create a local authentication server:
- Select Authentication > Auth. Servers.
- Select Local Authentication and click New Server to display the configuration page.
- The Local Authentication Server configuration page.
- Complete the configuration as described in table.
- Save the configuration.
|
Guidelines |
|
|---|---|
|
Name |
Specify a name that is useful to you. |
|
Password Options |
|
|
Minimum length |
Specify a number of characters. The valid range is 0-99. 6 is the default. |
|
Maximum length |
Specify a number of characters. The valid range is 0-99. 8 is the default. The maximum length cannot be less than the minimum length. |
|
Minimum digits |
Specify the number of digits required in a password. Do not require more digits than the value of the maximum length option. |
|
Minimum letters |
Specify the number of letters required in a password. Do not require more letters than the value of the maximum length option. If you enable the previous option, the combined total of the two options cannot exceed that of the value specified in the maximum length option. |
|
Uppercase and lowercase required |
Select this option if you want all passwords to contain a mixture of uppercase and lowercase letters. Require passwords to contain at least two letters if you also require a mix of uppercase and lowercase letters. |
|
Special Characters |
Select this option if you want password should contain any special characters |
|
Password Position |
Select this option to validate the new password with old password based on password position. Default is 8 positions, example: If previous password is test12345678, then change password cannot be aeph2345. The matched characters based on position are highlighted. |
|
Different from username |
Select this option if the password cannot equal the username. |
|
Different from previous password |
Select this option if a new password cannot equal the previous password. |
|
Password Storage Hash |
|
|
Strong Hash |
Select this option to protect passwords using stronger hash algorithm for high security. This option is not compatible with some of the protocols such as CHAP, EAP-MD5 and MS-CHAP (V1/V2). For Native Supplicant this option is supported only with PAP protocol. On upgrading IPS from previous version to 9.1R4 version there is no change in the password storage type and all the local authentication servers from previous release will be moved to newer release with same password storage type. After upgrading IPS to newer version, administrator has an option to switch to Strong hash if the previous password storage type is Legacy hash.
|
|
Legacy Hash |
Select this option to protect passwords using MS-CHAP (V1/V2). |
|
Clear text |
Select this option if you are using open authentication protocol sets. CHAP and EAP-MD5-Challenge work with local authentication servers only if you select this option. Be aware of the security implications of storing passwords as clear text. |
|
Password Management |
|
|
Allow users to change passwords |
Select this option if you want users to be able to change their passwords. In addition to selecting local authentication password management options, you must select the Enable Password Management option for the associated realm authentication policy. |
|
Force password change |
Select this option to specify the number of days after which a password expires. The default is 64 days. |
|
Prompt users to change password |
Select this option to specify when to prompt the user to change passwords. |
|
Guest Access Configurations |
|
|
Enable Guest User Account Managers |
Select this option to allow guest user account managers to create guest user accounts on the local authentication server. In some businesses, you might want to delegate responsibility for temporary or guest users to a guest user access manager (GUAM) who can use the local authentication server to provision accounts for guests. |
|
Guest User Name Prefix |
Specify the prefix to be used in auto generated guest usernames. We recommend you retain the default guest_ so that you can rely on the naming convention in your role mapping rules. |
|
Guest User Info Fields |
(Optional) Add line items to represent fields that you want to appear on the configuration page for creating guest user accounts. For example, you can create fields for Company Name, Host Person, Meal Preference, and so on. |
|
Instructions for Guest User Account Manager |
(Optional) Add instructions to the GUAM that appear on the GUAM sign-in page. You can use the following HTML tags to format the text: <b>, <br>, <font>, <noscript>, and <a href>. |
|
Maximum Account Validity Period |
Specify the number of hours the account is valid. The default is 12 hours. |
|
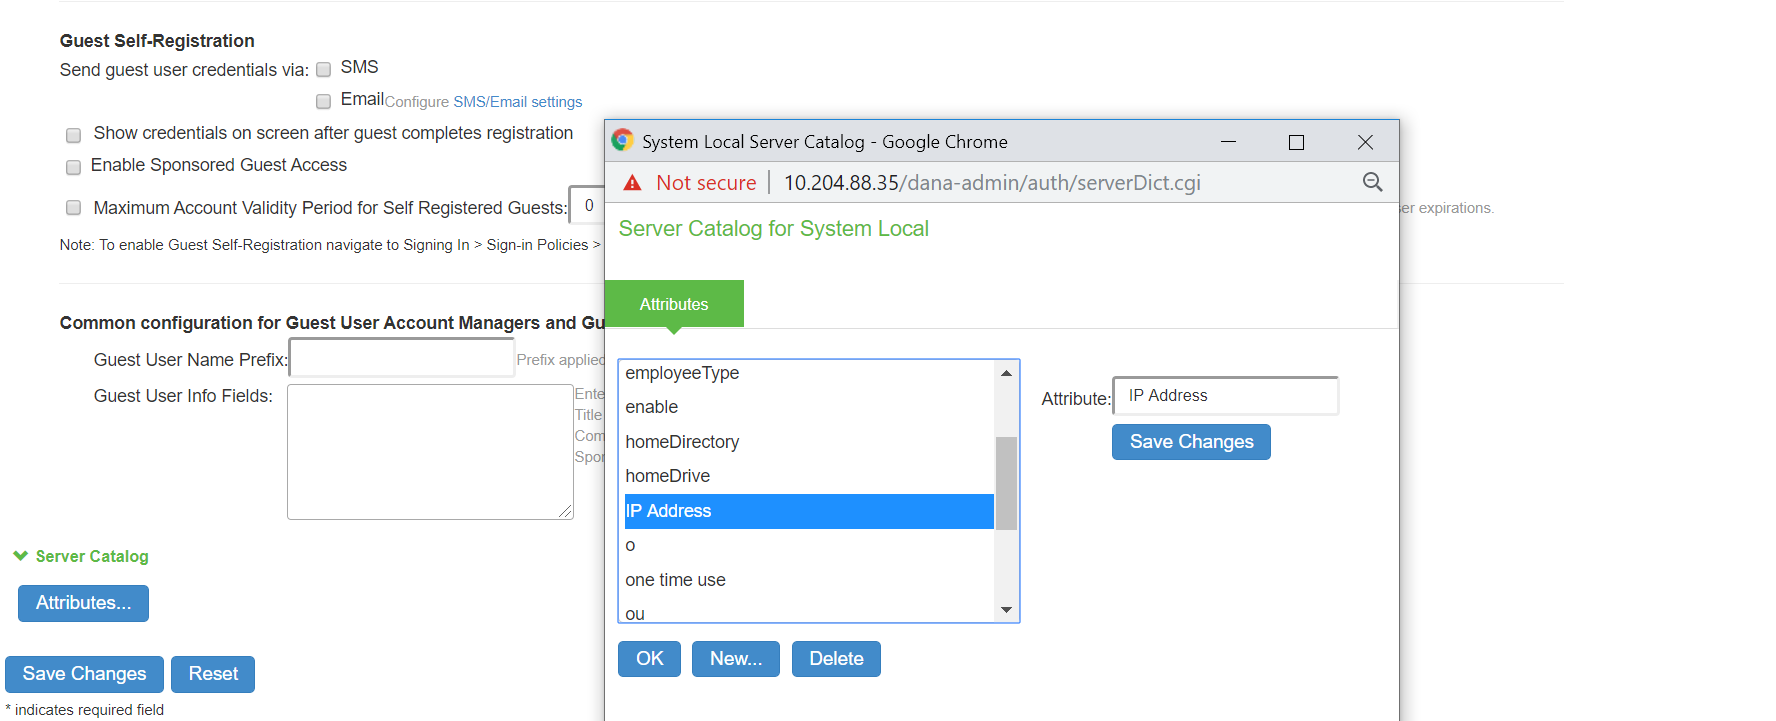
Server Catalog |
|
|
Attributes |
The Attributes button appears after you have saved the server information. Click the Attributes button to display the server catalog. Configure the attribute value. |
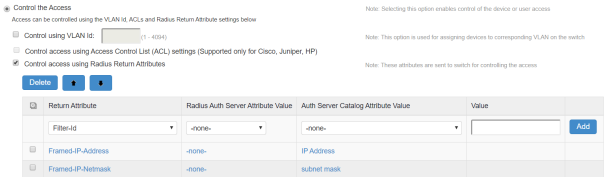
Defining Framed-IP Address
The Framed-IP attribute can be used in usecases, such as Access Point Name (APN), which manages the modems in broadband service provider network.
APN is added as a RADIUS client and it can authenticate the modem MAC addresses with Ivanti Policy Secure and assign IP Addresses associated with respective IP address configured on IPS.
To define Framed-IP attribute:
- Select Authentication > Auth.Servers and select the local authentication server.
- Under Server Catalog, Click Attributes and create the attributes. For example, IP Address.
- Navigate to the users page, create new user and set attribute values.
- Navigate to Endpoint > Network Access > Radius Attributes > RADIUS Return Attributes.
- Set the Auth Server Catalog Attribute Value (userAttr.Framed-IP).
- Click Save Changes.
Creating User Accounts
You use the Users page to create local authentication server user accounts. A user account includes a username and password to be used for authentication, as well as other information used for records and account management.
To create a local user account:
- Select Authentication > Auth. Servers.
- Select the local authentication server to which you want to add a user account.
- Click the Users tab.
- Click New to display the configuration page.
- Complete the configuration as described in table.
- Save the configuration.
|
Settings |
Guidelines |
|---|---|
|
Username |
Do not include “~~” in a username. You cannot change a username after you create the account. |
|
Full Name |
Specify the user’s full name. |
|
Password |
Specify a password. Make sure that the password you enter conforms to the password options specified on the local authentication server configuration page. |
|
Confirm password |
Confirm the password. |
|
Start Time |
(Optional) Specify a start and end time for the account. The system process that deletes expired user accounts runs every 10 minutes. There might be a delay of some minutes before the account is purged. Even if the system time or date is moved ahead past the expiration time, the account could still be valid until the purge process runs. One-time user accounts are not deleted by the purge process; they are deleted immediately after the user exits. |
|
End Time |
|
|
Company Name |
(Optional) Specify the company with which the user is associated. |
|
Host or Sponsor |
(Optional) Specify the host or sponsor—for example, the person at your company who requested that you create the account. |
|
One-time use |
Select this option to limit the user to one log in. After one successful log in, the user’s log in state is set to disabled, and the user receives an error message when attempting subsequent sign-ins. However, you can manually reset this option to allow the same user to log in again. If you do not select this option, the user account is subject to the specified start and end time for the account. |
|
Enabled |
Select this check box if it is not already selected. If the one-time use option has been implemented, this option is listed as Disabled after the user has logged in successfully. If a permanent or one-time user is logged in and you disable this option, the user is immediately logged out of the system and receives an error message. |
|
Require user to change password |
Select this option to force users to change their passwords at the next log in. If you force the user to change passwords, you must also enable the local authentication password management options. |
|
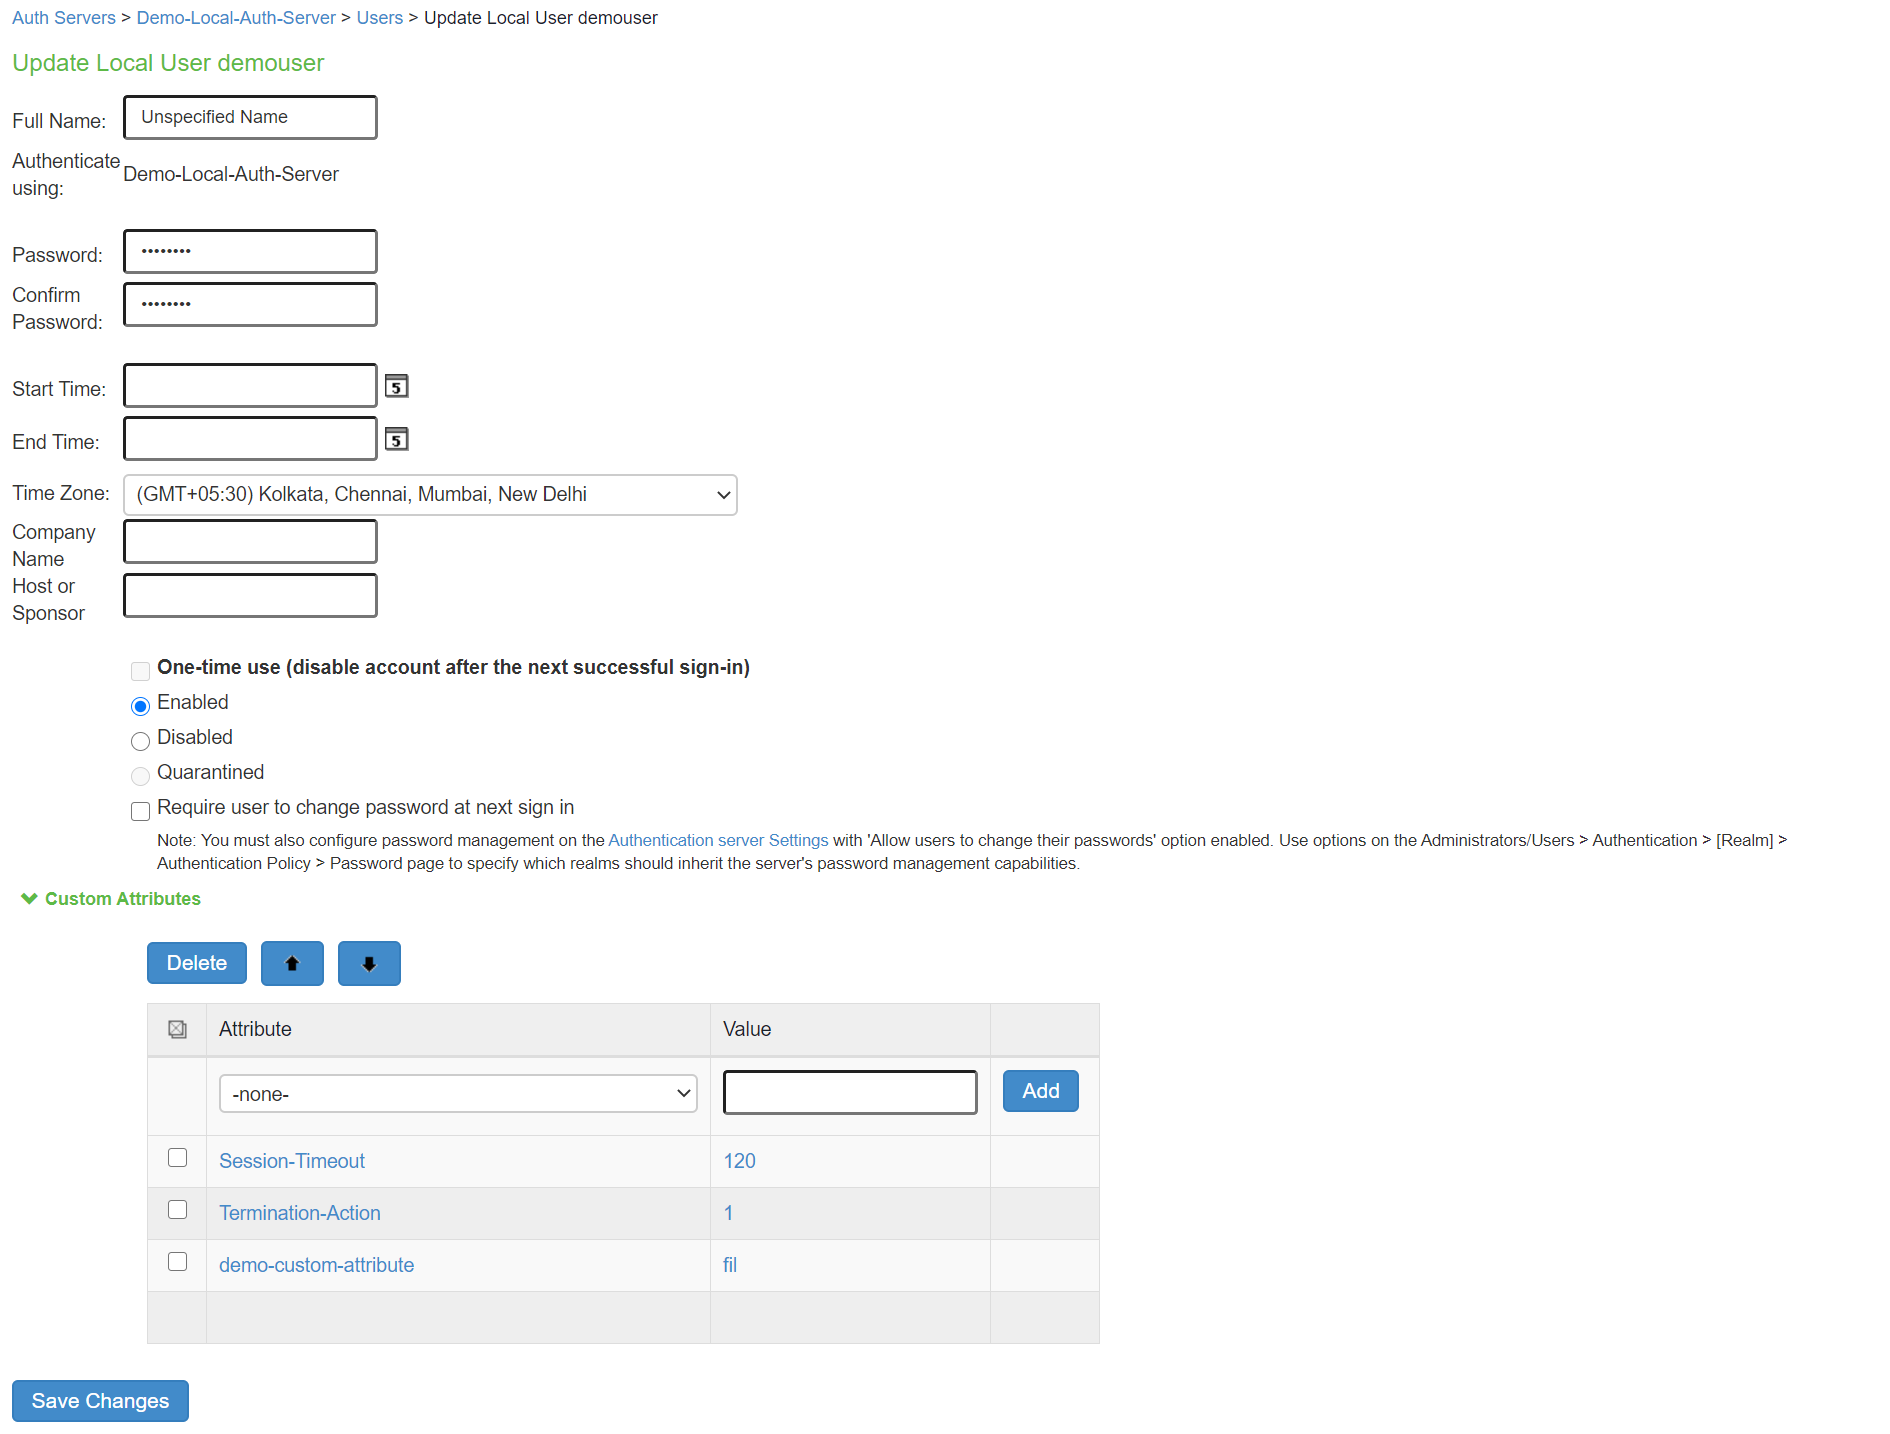
Custom Attributes |
Select the custom attribute created and specify the value. Radius Return Attributes from the dictionaries is pre-populated to the Server Catalog of Local Auth server so that they are available under the custom attributes for a specific user. |
Managing User Accounts
You use the Users page to list, modify, and delete local authentication server user accounts.
To manage a user account:
- Select Authentication > Auth. Servers.
- Click the link for the authentication server you want to manage.
- Click the Users tab to display the user accounts table.
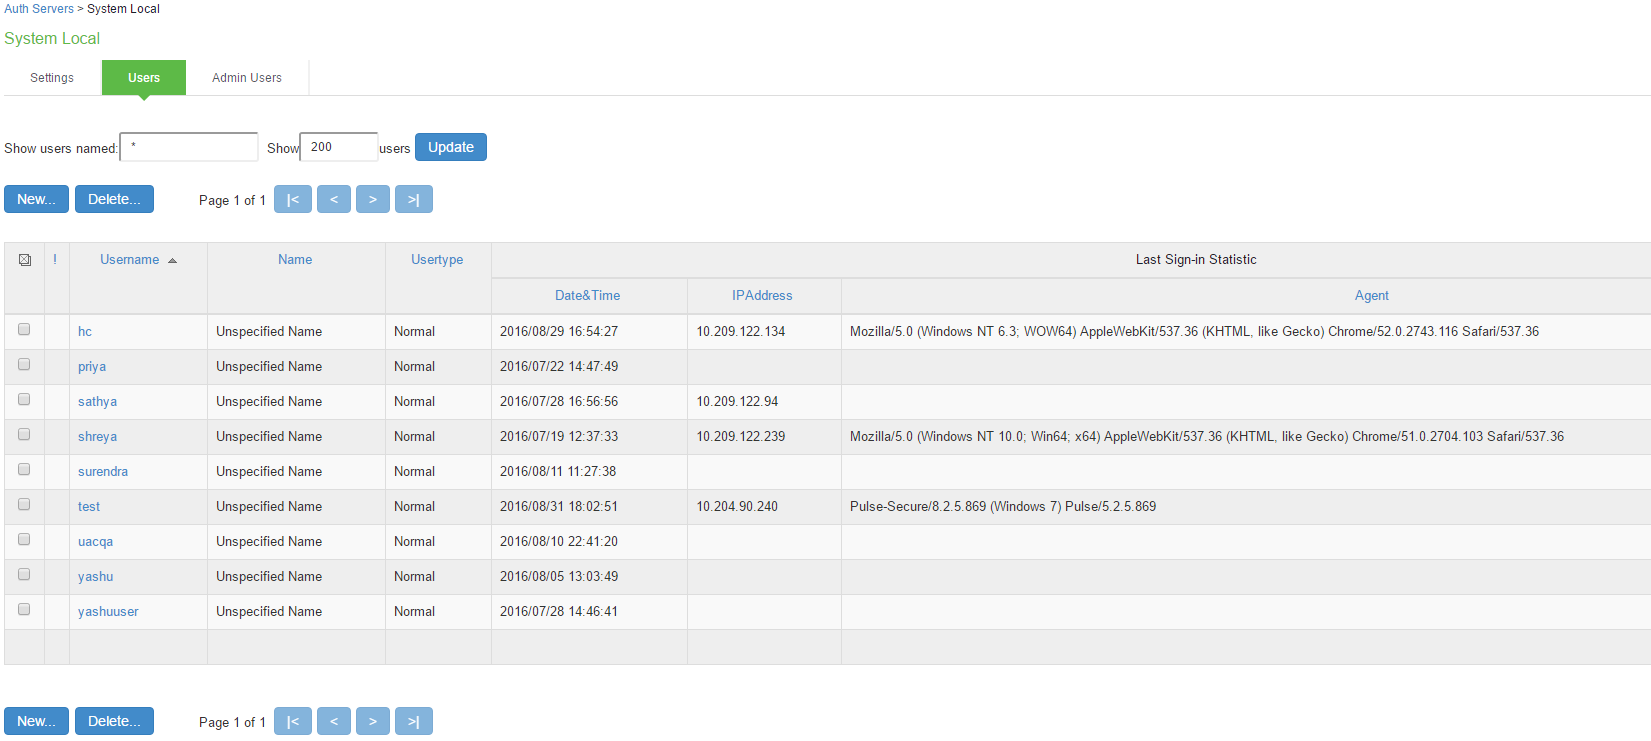
The user accounts table includes entries for the accounts that have been created. The Last Sign-in Statistic column shows the last successful sign-in date and time for each user, the user’s IP address, and the agent or browser type and version.
Use the controls to search for users and manage user accounts:
- To search for a specific user, enter a username in the Show users named box and click Update.
You can use an asterisk (*) as a wildcard, where * represents any number of zero or more characters. For example, to search for all usernames that contain the letters jo, enter *jo*. The search is case-sensitive. To display the entire list of accounts again, type * or delete the field’s contents and click Update.
- To limit the number of users displayed on the page, enter a number in the Show N users box and click Update.
- To edit the user account configuration, click the link in the Username column to display the Update Local User Account page.
- To terminate the user session and delete the account, select the box next to the user account record and click Delete.
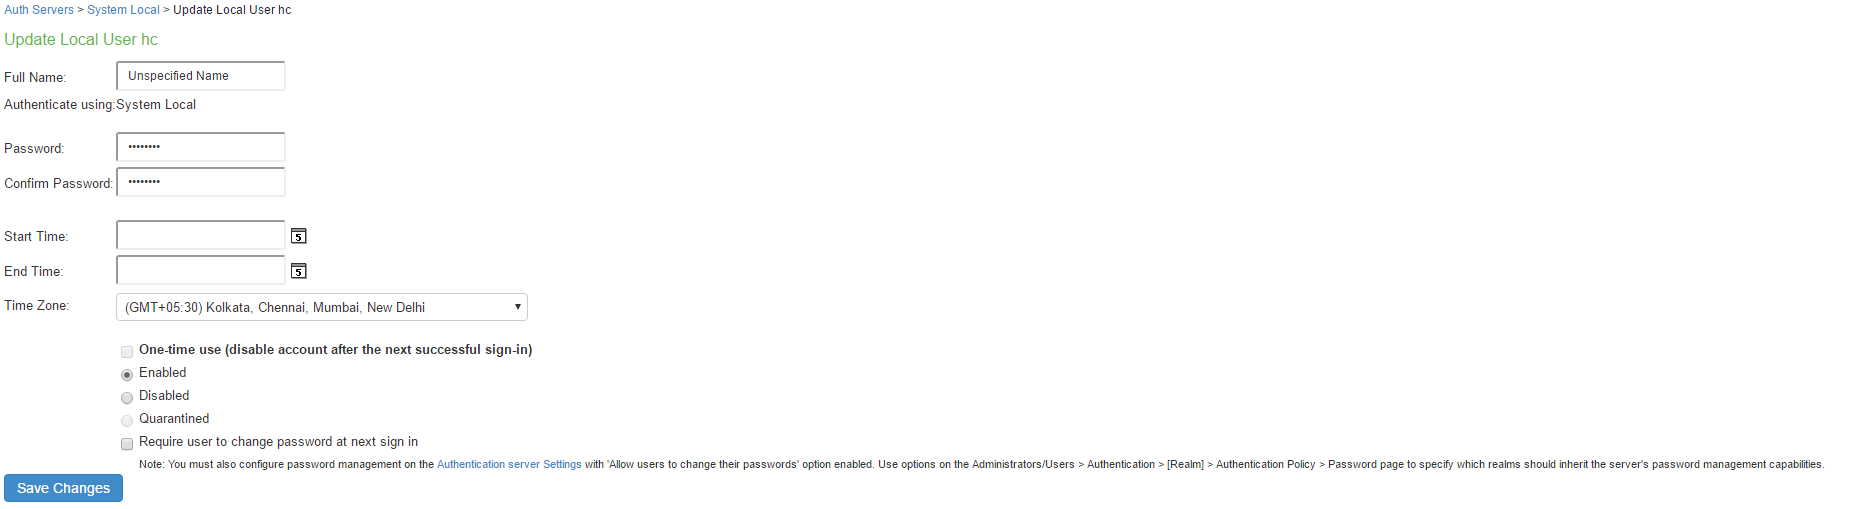
The following figure shows the user account configuration page. You can use this page to modify the account settings, or to disable or quarantine the account.
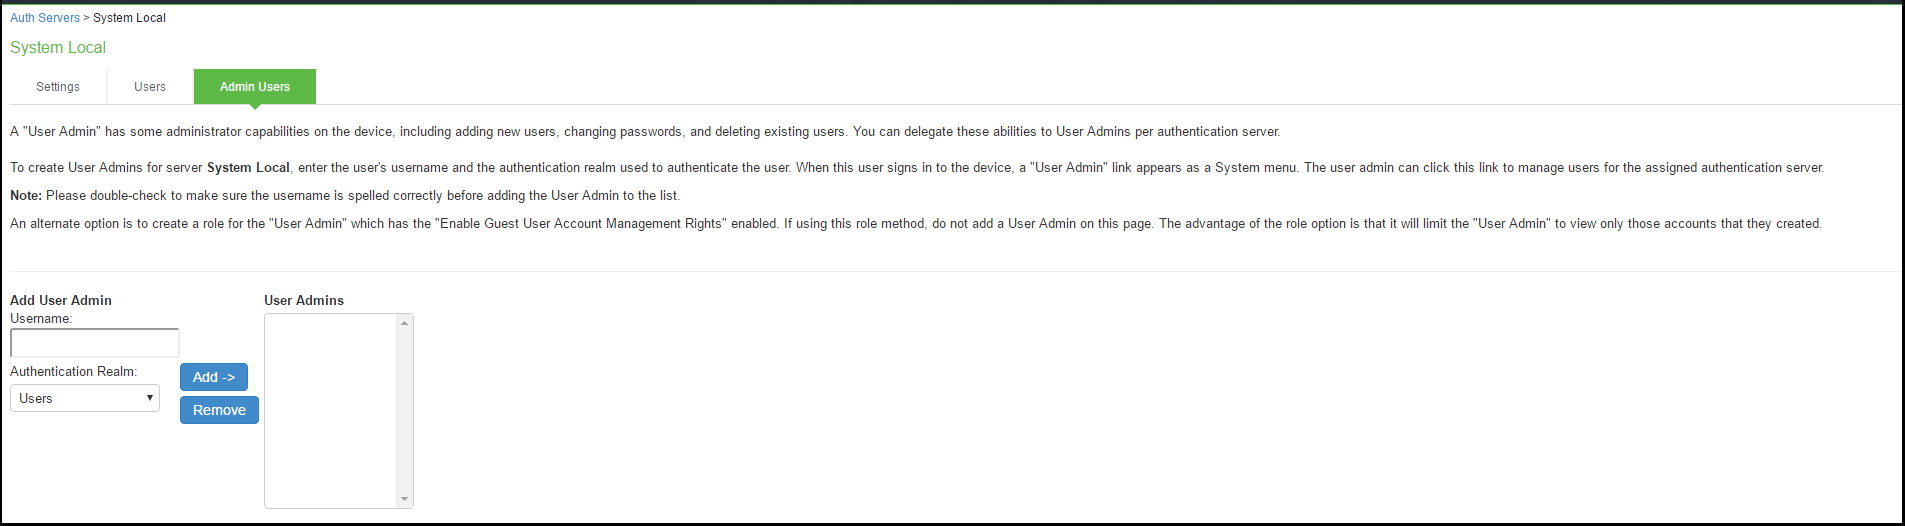
Creating Administrator User Accounts
You use the Admin Users page to create accounts for local authentication server administrators. An administrator user can create, modify, and delete user accounts.
The admin users you create on the Admin Users page can view and manage all users that have been added to the local authentication server. In contrast, admin users you create by assigning the GUAM role capability can view and manage only the user accounts they created.
To create an administrator user account:
- Select Authentication > Auth. Servers.
- Click the link for the Guest Authentication Server you want to manage.
- Click the Admin Users tab to display the configuration page.
- Specify a username, select an authentication realm, and click Add to create the administrator user.
- Save the configuration.
Importing Users from CSV File
To bulk import users, or to add/change information about your users, you can use CSV Import feature.
Prepare a CSV for import. The mandatory required field's in the CSV is Username, password, you can choose to include additional user information if possible. View our available import fields and their as-sociated formatting requirements in the CSV Import Fields table below.
- Select Auth Servers > System Local (Administrators, System Local, Guest Authentication) > Users.
- Click the Browse button to select the CSV file.
- Enable Overwrite users to overwrite users with the same username if required. If the username exists in the local database before importing, enabling the overwrite opton will delete the old entry and re-place with the newer entry present in the CSV file.
The CSV import allows you to import users in bulk with the following fields. Note that the header fields in your CSV must precisely match as shown in the CSV Fields column below in order for your import to be successful.
CSV Import Fields
|
CSV Fields |
Description |
Formatting Requirements |
Character Limitations |
|---|---|---|---|
|
Username |
User name This is the mandatory field for a CSV import. |
Username should be not present in the Local database. If the Overwrite option is enabled the users with the same name in the local database will be overwritten. |
Username should not contain "~~" character. |
|
Password |
Password of the user |
|
|
|
This is the mandatory field for a CSV import. |
Password should be based on the settings done in the password management/options for the specific local Auth server. |
Password field should be in plaintext format. |
|
|
Full Name |
Full Name (Optional field) |
Only ASCII characters are accepted. |
|
|
Start Time |
Start time (Optional field) |
MM/DD/YYYY HH:MM:SS AM/PM |
n/a |
|
End Time |
End time (Optional field) |
MM/DD/YYYY HH:MM:SS AM/PM |
n/a |
|
Time Zone |
Time Zone (Optional field) |
To see the sample TimeZones in IPS: |
|
|
Navigate to System > Status > Overview > Date and Time. |
|
|
|
|
If the time zone is not mentioned in the CSV file, the default IPS timezone is considered. |
|
|
|
|
Use this format (including parentheses): (GMT+12:00) Alaska |
|
|
|
|
One Time Use |
(Optional field) |
|
|
|
Disables the account after the next successful sign-in. |
Only Binary values are accepted |
|
|
|
|
"Disable- 0 |
|
|
|
|
"Enable- 1 |
|
|
|
Enabled |
(Optional field) |
|
|
|
Enable/Disable the user ID. |
Only Binary values are accepted. |
|
|
|
|
"Disable- 0 |
|
|
|
|
"Enable- 1 |
|
|
|
Change Password at next sign in |
(Optional field) |
|
|
|
Option to change the password for next sign-in |
Only Binary values are accepted. |
|
|
|
|
"Disable- 0 |
|
|
|
|
"Enable- 1 |
|
|