Using the Management Port
This topic describes how to configure the management port. It includes the following information:
Management Port Overview
You connect the management port to an Ethernet switch or router that is part of your internal local area network (LAN) and that can connect to your network management infrastructure. When the management port is enabled, the following traffic is directed out the management port: archiving (FTP/SCP), NTP, push config, SNMP, syslog. When the management port is not enabled, that traffic uses the internal port.
Supported Platforms
The following hardware platforms are equipped with a management port: ISA Series
Configuring the Management Port
To configure the management port:
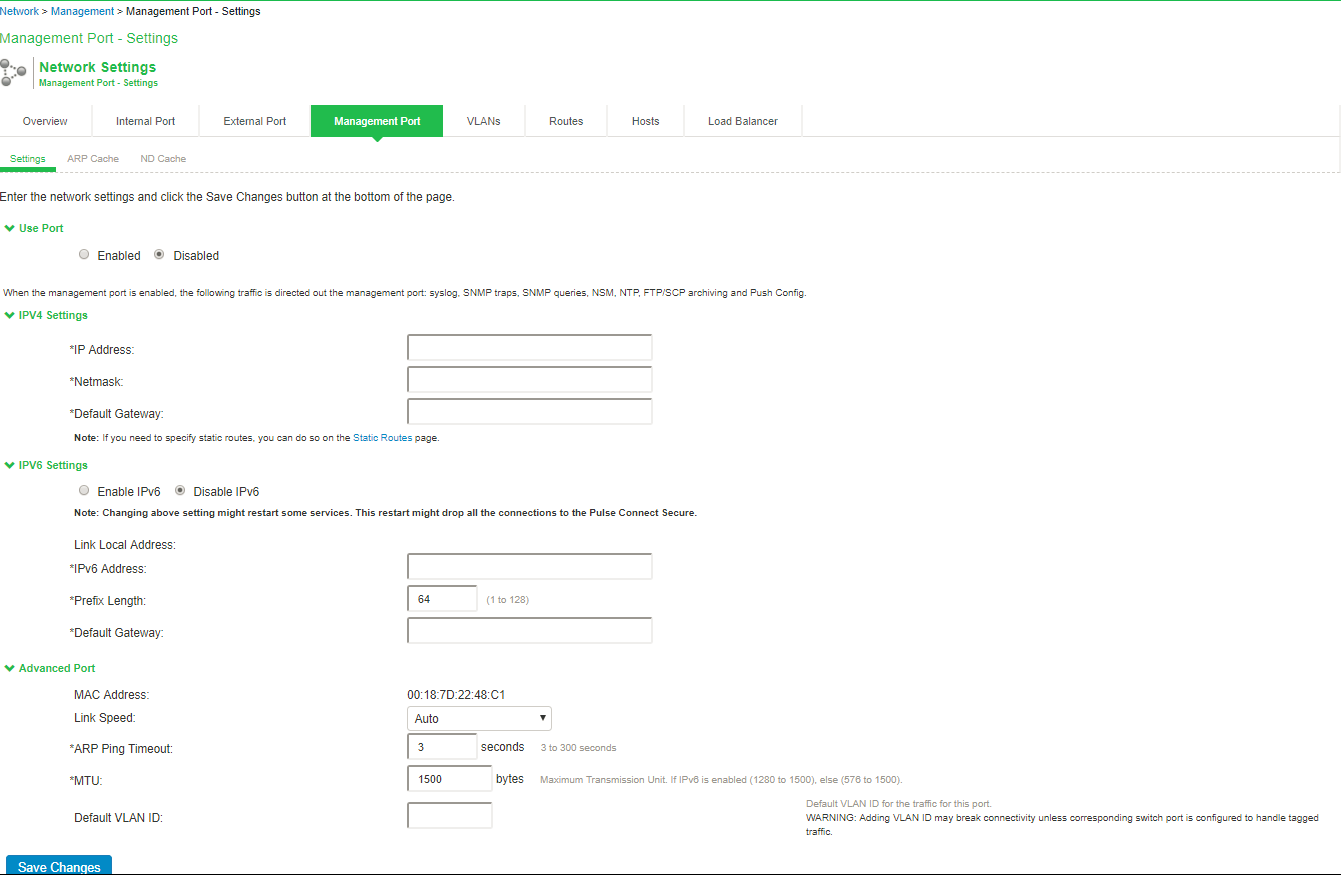
- Select System > Network > Management Port > Settings to display the configuration page.
- Complete the configuration as described in table.
- Save your changes.

|
Settings |
Guidelines |
|---|---|
|
Use Port? |
|
|
Use Port? |
Select Enabled to use the port; otherwise, select Disabled. |
|
IPv4 Settings |
|
|
IP Address |
Specify an IP address. An IP address is an identifier for a computer or device on a TCP/IP network. Networks using the TCP/IP protocol route messages based on the IP address of the destination. The format of an IPv4 address is a 32-bit numeric address written as four numbers separated by periods. Each number can be 0 to 255. |
|
Netmask |
A netmask indicates which part of an IP address indicates network identification and which part indicates the host identification. For example, the IP address and netmask 10.20.30.1 255.255.255.0 (or 10.20.30.1/24) refer to all the hosts in the 10.20.30.0 subnet. The IP address and netmask 10.20.30.1 255.255.255.255 (or 10.20.30.1/32) refer to a single host. |
|
Default Gateway |
Specify the IPv4 address for the default gateway for the routing domain to which the device belongs. A gateway is the router that resides at the point of entry to the current routing domain, often called the default gateway. |
|
IPv6 Settings |
|
|
Enable IPv6 / Disable IPv6 |
Disabled by default. Enable to support network management traffic over IPv6 networks. When you enable IPv6, the system acquires a link local address. If you switch from enabled to disabled, the system clears the link local address. |
|
Link Local Address |
Display the auto configured link local address (after you have enabled and saved the IPv6 configuration). |
|
IPv6 Address |
Specify a routable IPv6 address, such as a global unicast address that your network plan has provisioned for this host and interface. Automatic configuration methods are not supported. You must specify the appropriate address manually. |
|
Prefix Length |
Specify how many of the higher-order contiguous bits of the IPv6 address comprise the prefix (the network portion of the IPv6 address). The default is 64. |
|
Gateway |
Specify the IPv6 address for the default gateway for the routing domain to which the device belongs. A gateway is the router that resides at the point of entry to the current routing domain, often called the default gateway. |
|
Advanced Settings |
|
|
MAC Address |
Display the MAC address for the interface. |
|
Link Speed |
Specify the speed and duplex combination for the interface. If you run SNMP_GET and then change the Link Speed value, you must wait at least 5 minutes after submitting the change before running SNMP_GET again. |
|
ARP Ping Timeout |
(IPv4 only.) Specify how long the system should wait for responses to Address Resolution Protocol (ARP) requests before timing out. Cluster nodes send ARP requests to the gateways of other nodes to determine if they are properly communicating with one another. If you have not deployed a cluster, the system does not use this setting. If the node belongs to a cluster, the timeout interval that you specify is synchronized across the cluster. In multisite clusters, you can override this setting for the individual nodes in the cluster using options in the System > Clustering page. Use caution when changing this setting in active/passive clusters, however, because the system also uses the ARP Ping Timeout setting on the Internal tab as a failover timer for the VIP. |
|
MTU |
Specify the maximum transmission unit. If IPv6 is enabled, the valid range is 1280 to 1500. If IPv6 is not enabled, the valid range is 576 to 1500. We recommend you retain the default MTU setting (1500) unless you must change the setting for troubleshooting purposes. |
|
Default VLAN ID |
(Optional) Specify the default VLAN ID for the traffic of this port. When this parameter is set, all the traffic on this interface is subsequently tagged with the set VLAN ID and also accepts only incoming traffic with the same tag. Necessary changes are required on the connected switch port to handle bi-directional tagged traffic. - If default VLAN ID is set incorrectly or the connected switch port is not configured accordingly, the interface can become unreachable. |
Using the Serial Console to Configure the Management Port
To configure management port network settings from the serial console:
- Start a serial console session.
- Select item 1, System Settings and Tools.
- Select item 10, Configure Management port. The text indicates if the option is enabled or disabled.
- Enter the network settings for the Management Port, as prompted.
If you enable the Management Port but neglect to configure the IP address and netmask, the port reverts to a disabled state. Also, you cannot clear Management Port settings from the serial console when the port is disabled, though you can clear them from within the admin console.
- When prompted to accept the changes, if they are correct, enter y. Otherwise, repeat the process to correct the settings.
- Close the serial console.
Configuring Administrator Access
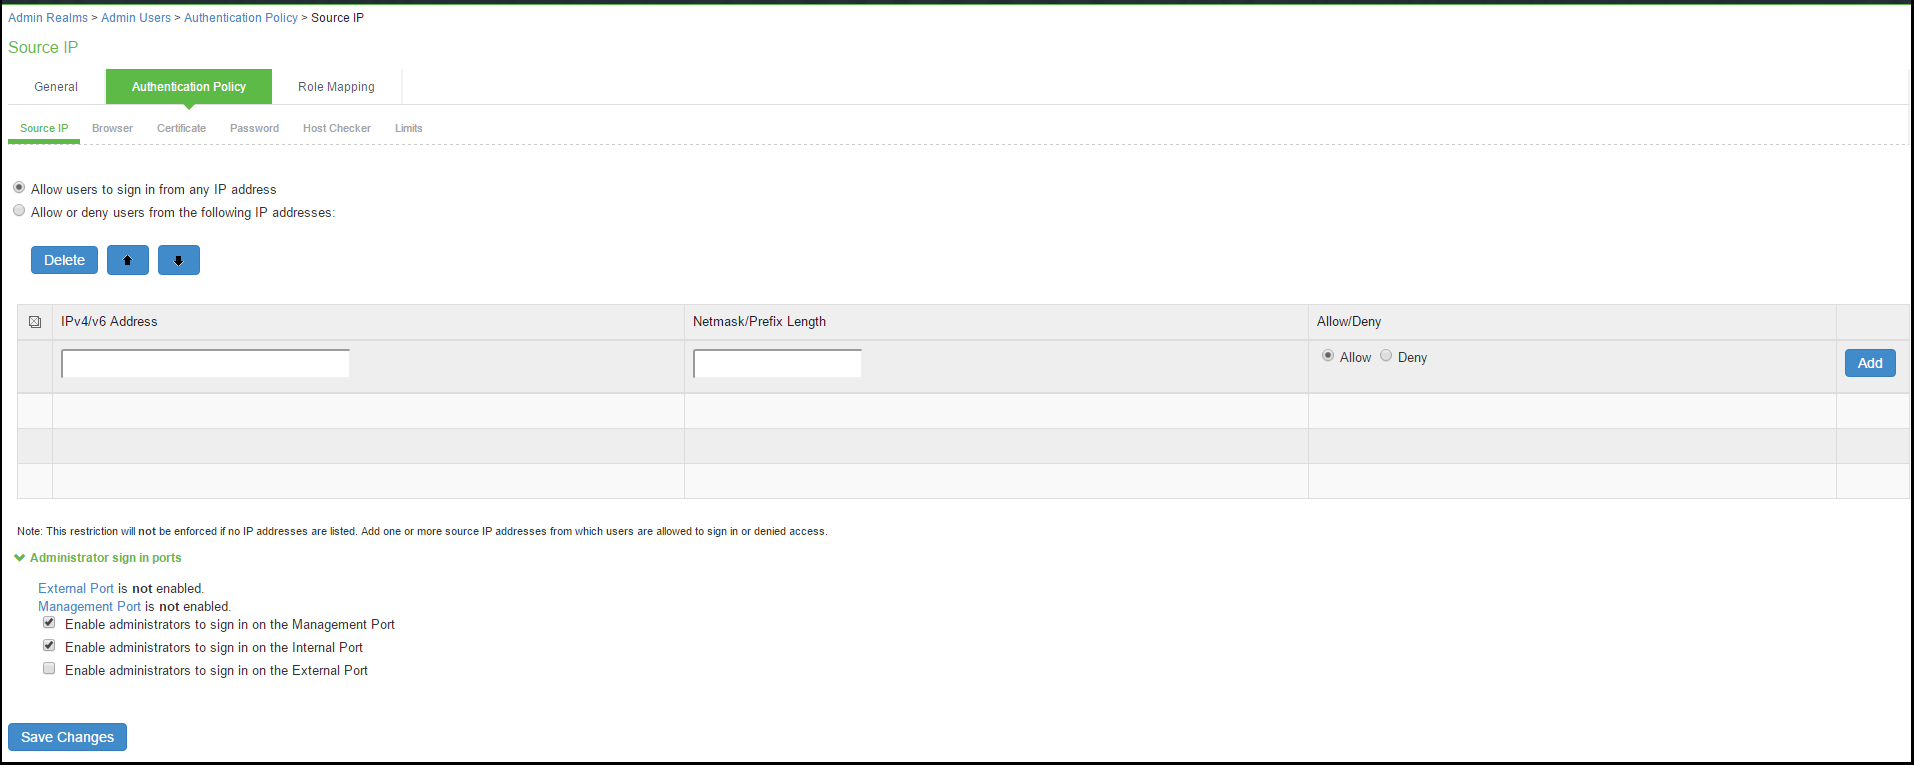
You can configure the Administrators > Admin Realm > Authentication Policy > Source IP restrictions configuration to enable administrator sign-in through the management port.
You can use Administrator realms to control administrator access to system ports, including the management port.
To control administrator access to the management port:
Enable the management port.
- Perform one of the following steps:
- Select Administrators > Admin Realms > Admin Users to modify the default admin users realm.
- Select Administrators > Admin Realms, then click New, to create a new administrator realm.
- Select the Authentication Policy > Source IP.
- Select one of the following options:
- Allow users to sign in from any IP address—Allows users to sign in from any IP address to satisfy the access management requirement.
- Allow or deny users from the following IP addresses—Specifies whether to allow or deny users access from all the listed IP addresses, based on their settings.
To specify access from an IP address:
- Enter the IP address and netmask.
- Select either Allow to allow users to sign in from the specified IP address, or Deny to prevent users from signing in from the specified IP address.
- Select the available options to allow administrators to sign in to all available ports, to the management port or the internal port only, or to restrict them from signing in to any of the ports. In some cases, you may inadvertently limit administrative access completely. If this occurs, you can reconfigure the ports by way of the serial console.
- Select from the following available options:
- Enable administrators to sign in on the management port.
- Enable administrators to sign in on the internal port.
- Enable administrators to sign in on the external port.
