Deploying Virtual Appliances on VMware ESXi Through vCenter Using OVF File
VMware OVF packages are specifically offered for only Major releases, which are distinguished by version like 22.x. For minor releases naming convention is 22.xRx.x are subsequent updates within the same series. The key distinction between Major and Minor releases lies in the initial release of the series being categorized as Major, while subsequent updates are classified as Minor within the same
Follow these steps to deploy the virtual machine in the VMware inventory using an OVF template. Before beginning the procedure, ensure you download the zip file for the Ivanti Pulse Secure Server from https://portal.ivanti.com/customer/product-downloads.
-
Right-click VMware Client inventory and select deploy OVF Template.
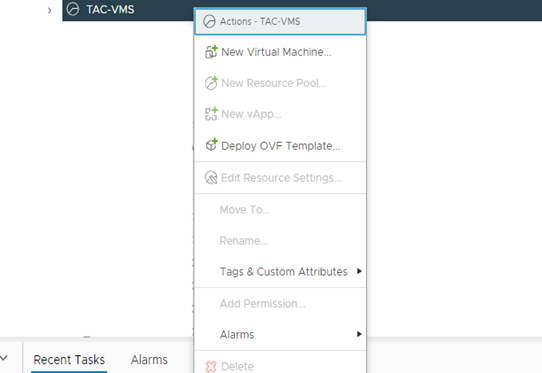
-
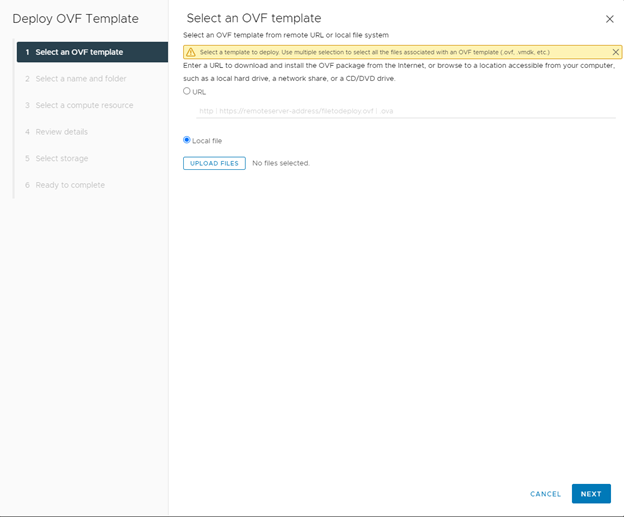
Select Local file and click on Upload Files.
-
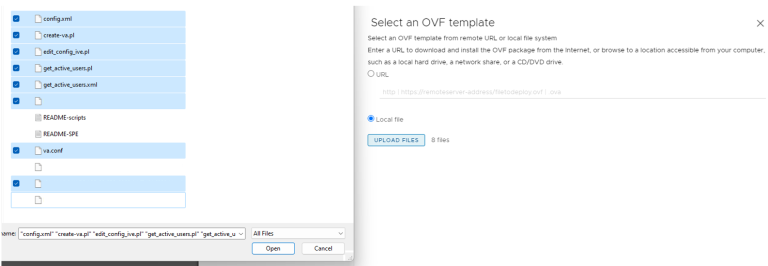
Select the files as shown below from the downloaded zip file and click Next.
-
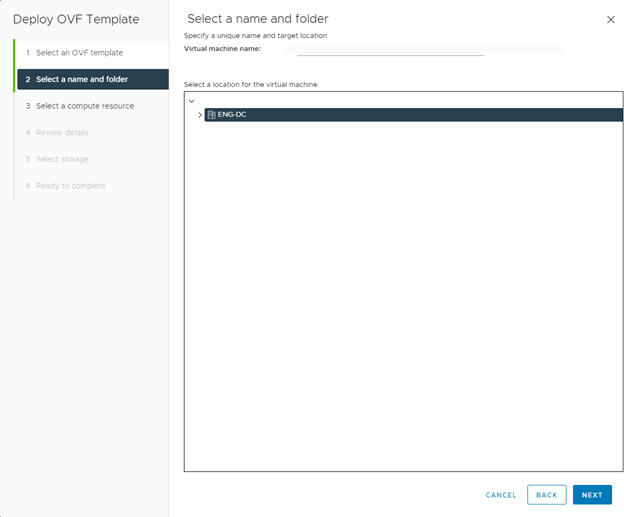
Provide a unique name for the virtual machine and select the desired folder and click Next.
-
Select the compute resource in which virtual machine needs to install. Click Next
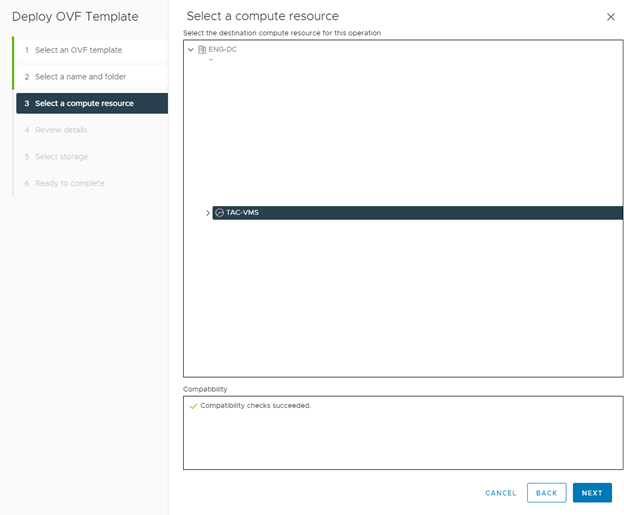
-
Review the details and click Next.
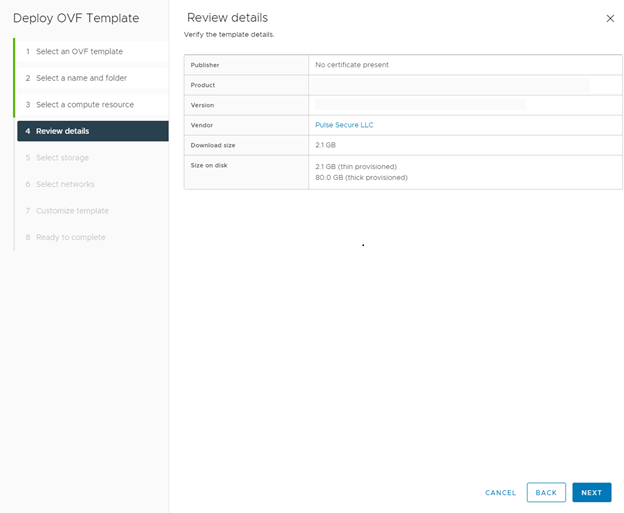
-
Select the storage for the virtual machine to work properly and click Next.
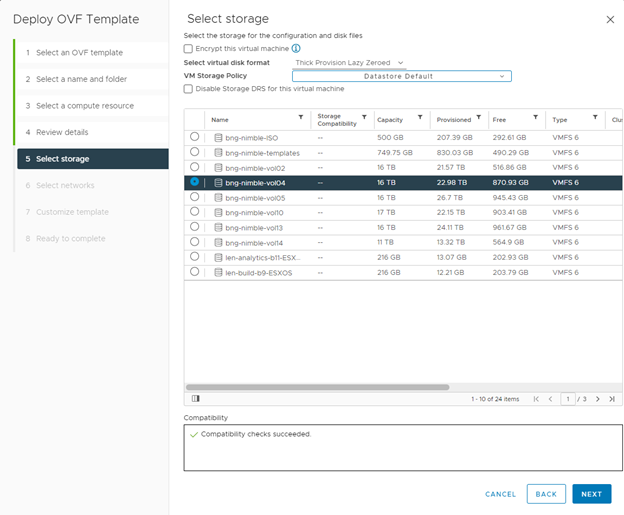
-
Select the Networks configured for the connectivity and click Next.
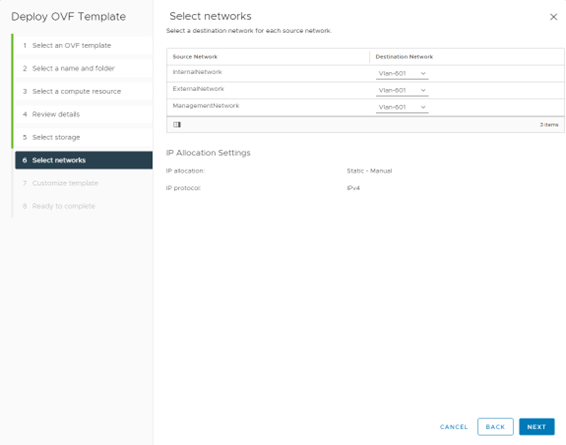
-
These are the sample values, and we will be able to setup the network settings in Step 11.

-
Verify the details and click Next.
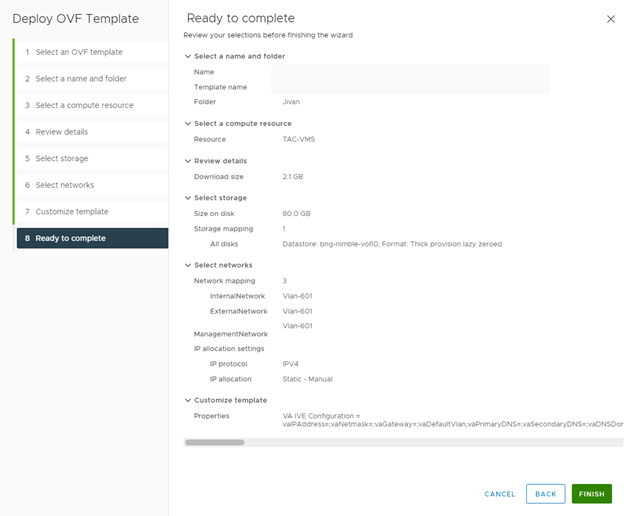
After clicking on Finish the Virtual machine installation will be carried out. After successful installation virtual machine will be available to access under selected inventory.
-
Click Launch Web Console and configure the network settings and username and password to login to IPS Server.
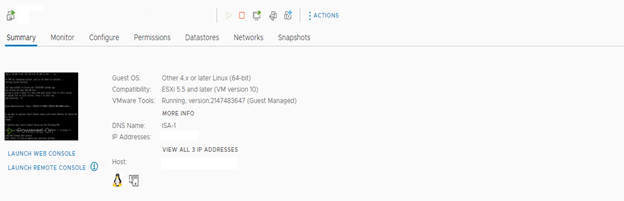
Once the setup is completed, you should be able to access the Ivanti Pulse Secure server with the configured IP address.
Deploying Virtual Appliances on VMware ESXi Through vCenter Using OVF Properties
Overview of Deploying Virtual Appliances on VMware ESXi
VMware ESXi, like VMware ESXi, is a hypervisor that installs on top of a physical server and partitions it into multiple virtual machines. VMware ESXi does not contain the ESXi’s service console and thus is a smaller footprint.
When first powering on the Ivanti Policy Secure, an administrator must wait for the serial console to appear and manually configure the initial settings. In the case of multiple virtual machines, this process becomes too tedious and time-consuming.
When deploying on a VMware ESXi, the dependencies on a serial console and service console are removed. Ivanti Secure lets the administrator set up all initial configuration settings in one pass using a process based on the VMware Guest Customization feature.
With this approach:
1.You use a deployment script and OVF Tools to set up the initial configuration parameters.
2.ESXi passes these parameters into the VMware environment.
3.The virtual appliance retrieves the parameters from the VMware environment and configures the initial settings.
Using the Deployment Script to Define the Initial Configuration Parameters
A create-va.pl script is included in your ISA-V package and is used to deploy a virtual appliance connected to the VMware vCenter Server. This script can be run on any system that has Perl and VMware OVF Tools installed.
Configuration parameters can be passed to the script through a configuration file, command-line options, or a combination of the two. Command-line parameters are passed to the scripts using the following format:
- - paramname paramvalue
Type two hyphens without a space between them for the “- -” string. The space shown here is for visual purposes only.
A sample configuration file (va.conf) is provided as an example.
The following create-va.pl Parameters table lists the parameters for create-va.pl. Type two hyphens without a space between them for the “- -” string. The space shown here is for visual purposes only.
|
vCenter-Related Parameters |
|
|
- -vCenterServer |
Hostname or IP address of the vCenter Server. |
|
- -vCenterUsername |
Username for logging in to the VMware vCenter Server. |
|
- -vCenterPassword |
Password for logging in to the VMware vCenter Server. Special characters in the password must be escaped with a backslash (\). For example, Ivanti123\$ |
|
- -datacenterName |
Data center under which the Cluster/ESXi Host is present or added. |
|
- -clusterorHostName |
Name of the VMware cluster where the virtual appliance is to be deployed.When deploying the virtual appliance in a cluster, this parameter must follow the format cluster-name/ESXi-server-name. For example, ESXi_5_cluster/mydev.ivanti.net. When deploying the virtual appliance in an ESXi server, this parameter must be following the format ESXI-server-name. For example, mydev.ivanti.net. |
|
- -datastore |
Name of the datastore where the virtual appliance is to be deployed. |
|
- -vaname |
Name of the virtual appliance to create. |
|
Ivanti Policy Secure Related Parameters |
|
|
- -vaIPAddress* |
IP address to assign to the internal port of the Ivanti Policy Secure virtual appliance. |
|
- -vaNetmask*
|
Netmask to assign to the internal port of the virtual appliance. |
|
- -vaGateway* |
Gateway to assign to the internal port of the virtual appliance. |
|
- -vaAdminUsername |
Username for the default administrator account for the virtual appliance. |
|
- -vaAdminPassword |
Password for the default administrator account for the virtual appliance. |
|
- -vaPrimaryDNS* |
IP address for the primary DNS server. |
|
- -vaSecondaryDNS* |
IP address for the secondary DNS server. |
|
- -vaDNSDomain* |
Domain name for the virtual appliance. |
|
- -vaWINSServer |
Windows Internet Name Service (WINS) hostname or IP address. |
|
- -vaCommonName |
Common name for the default device certificate. |
|
- -vaOrganization |
Organization for the default device certificate. |
|
- -vaRandomText |
Random text to use during certificate creation. If spaces are included in the random text, make sure the entire value is enclosed within double-quotes. For example, Ivanti Your Net. |
|
- -vaDefaultVlan |
Specify Default VLAN ID for the internal interface. Default VLAN ID is an optional parameter. When this parameter is set, all the traffic on this interface subsequently will be tagged with the set VLAN ID and accept only incoming traffic with the same tag. Necessary changes are required on the connected switch port to handle bi-directional tagged traffic. |
|
Virtual Appliance-Related Parameters |
|
|
- -ovffile |
Path to the OVF file. |
|
- -configFile |
Name of configuration files containing parameters to pass to the create-va.pl script. Values specified on the command line override the ones specified in the configuration file. |
|
– -ExternalNetwork |
Virtual network in VMware vSwitch to map the external network of the virtual appliance. |
|
- -InternalNetwork |
Virtual network in VMware vSwitch to map the internal network of the virtual appliance. |
|
- -ManagementNetwork |
Virtual network in VMware vSwitch to map the management network of the virtual appliance. |
|
Virtual Appliance Management Port-Related Parameters |
|
|
- -vaManagementIPAddress* |
Management network IP address. |
|
- -vaManagementNetmask* |
Management network netmask address. |
|
- -vaManagementGateway* |
Management network gateway address. |
|
- -vaManagementDefaultVlan |
Specify Default VLAN ID for the management interface. Default VLAN ID is an optional parameter. When this parameter is set, all the traffic on this interface subsequently will be tagged with the set VLAN ID and accept only incoming traffic with the same tag. Necessary changes are required on the connected switch port to handle bi-directional tagged traffic |
|
- -vaManagementPortReconfigWithValueInVAppProperties |
Management port overwrite property. If set to 1, overwrite the management port-related parameters in the Ivanti Policy Secure with the ones defined here. See the Management Port Behavior While Deploying a Template table and Management Port Behavior During a New Deployment table. |
|
- -vaInternalPortReconfigWithValueInVAppProperties |
The internal port overwrite property. If set to 1, overwrite the virtual appliance’s internal port settings with the ones specified during deployment. See the Management Port Behavior While Deploying a Template table and the Management Port Behavior During a New Deployment table.
|
|
Virtual Appliance External Interface Parameters |
|
|
- -vaExternalIPAddress* |
External network IP address. |
|
- -vaExternalNetmask* |
External network netmask address. |
|
- -vaExternalGateway* |
External network gateway address. |
|
- -vaExternalDefaultVlan |
Specify Default VLAN ID for the external interface. Default VLAN ID is an optional parameter. When this parameter is set, all the traffic on this interface subsequently will be tagged with the set VLAN ID and accept only incoming traffic with the same tag. Necessary changes are required on the connected switch port to handle bi-directional tagged traffic |
|
- -vaExternalPortReconfigWithValueInVAppProperties |
External port overwrite property. If set to 1, overwrite the external port-related parameters in Ivanti Policy Secure with the ones defined here. See External Port Behavior While Deploying a Template table and the External Port Behavior During a New Deployment table. |
|
New Parameters |
|
|
- - vaAcceptLicenseAgreement |
By default, this value is set to y. This specifies that admin has accepted the EULA. |
|
- -vaEnableLicenseServer |
Flag to specify if the Virtual Appliance has to come up as a Normal Virtual Appliance or a Virtual License Server. By default, this value is set to n. If set to y, then the Virtual Appliance would function as a Virtual License Server. |
|
- -enableRESTAPI |
By default, this value is set to n. When set to y, enables REST access for the admin user created as part of initial config. (Default option is set to disabled) |
Ivanti Policy Secure supports zero touch provisioning. This feature can detect and assign DHCP networking settings automatically at the Ivanti Policy Secure boot up. The Ivanti Policy Secure parameters should be set to null in order to fetch the networking configuration automatically from the DHCP server.
IPS presumes that IP leased from DHCP server is valid for a long time. Hence IPS does not request for DHCP renewals.
The Ivanti Policy Secure related parameters are used for the initial configuration of the virtual appliance. The script does not validate these parameters. If the values passed are not valid, the installation will stop at the location where a correct value needs to be provided. The administrator can connect to the virtual appliance using the VT or serial console to complete the initial setup.
The below table describes the new parameters that are added in the script file create-va.pl, which is included in your ISA-V package and these are applicable for IPS 22.x version.
|
Parameter |
Type |
Description |
|---|---|---|
|
registrationCode |
string |
The registration code, which is generated during the IPS gateway registration on nSA. Example: KyZR6YDL8 |
|
registrationFQDN |
string |
The registration FQDN name, which is generated during the IPS gateway registration on nSA. Example: sample.domain.com |
|
enableproxy |
string |
Default is set to n. |
|
proxyHost |
string |
The proxy server name. |
|
proxyPort |
integer |
The port number of the proxy server. Example: 8080 |
|
proxyUsername |
string |
The username of the proxy server. Example,:usr |
|
proxyPassword |
string |
The password of the proxy server. Example: pxx124 |
|
registerNetworkInterface |
string |
The interface through which the gateway registers with nSA. Example: external |
The Management Port Behavior While Deploying a Template table and the Internal Port Behavior While Deploying a Template table define the behavior based on options passed while deploying the template.
The following table contains data regarding the Management Port Behavior While Deploying a Template:
|
Management Port Overwrite Value |
Management Port Configuration Values |
Ivanti Policy Secure Behavior |
|---|---|---|
|
0 |
The management port IP address, netmask address and gateway address are valid values. |
Because managementPortReconfigWithValueInVAppProperties is 0, the management port-related parameters are retained and are not overwritten with values in the passed configuration. |
|
0 |
The management port IP address, netmask address and gateway address are not valid values. |
Because managementPortReconfigWithValueInVAppProperties is 0, the management port-related parameters are retained and are not overwritten with values in the passed configuration. |
|
1 |
The management port IP address, netmask address and gateway address are valid values. |
You can configure the management port with the new values passed while deploying. The existing cache value is overwritten with new values. |
|
1 |
The management port IP address, netmask address and gateway address are not valid values. |
During the boot process, the administrator is asked whether to configure the management port. Enter N to skip the management port configuration. Enter Y to specify valid values for the management port. |
The following table contains data regarding the Internal Port Behavior While Deploying a Template:
|
Internal Port Overwrite Value |
Internal Port Configuration |
Ivanti Policy Secure Behavior |
|---|---|---|
|
0 |
Valid or invalid configuration |
Do nothing. The internal port should already be set in the Ivanti Policy Secure. If the internal port is not configured, prompt the administrator to enter the internal port configuration. |
|
1 |
Valid configuration |
Use the new values passed while deploying and configure the internal port. |
|
1 |
Invalid configuration |
During the boot process, the administrator is asked whether to configure the internal port. Enter N to skip the internal port configuration. Enter Y to specify valid values for the internal port. |
The following table contains data regarding the External Port Behavior While Deploying a Template:
|
External Port Overwrite Value |
Management Port Configuration Values |
Ivanti Policy Secure Behavior |
|---|---|---|
|
0 |
The external port IP address, netmask address and gateway address are valid values. |
Because externalPortReconfigWithValueInVAppProperties is 0, the external port-related parameters are retained and are not overwritten with values in the passed configuration. |
|
0 |
The external port IP address, netmask address and gateway address are not valid values. |
Because externalPortReconfigWithValueInVAppProperties is 0, the external port-related parameters are retained and are not overwritten with values in the passed configuration. |
|
1 |
The external port IP address, netmask address and gateway address are valid values. |
You can configure the external port with the new values passed while deploying. The existing cache value is overwritten with new values. |
|
1 |
The external port IP address, netmask address and gateway address are not valid values. |
During the boot process, the administrator is asked whether to configure the external port. Enter N to skip the external port configuration. Enter Y to specify valid values for the management port. |
When deploying a new virtual appliance, the Ivanti Policy Secure does not contain any configuration. The behavior in this case is shown in the Management Port Behavior During a New Deployment table and the Internal Port Behavior During a New Deployment table.
The following table contains data regarding the Management Port Behavior During a New Deployment:
|
Management Port Overwrite Value |
Management Port Configuration Values |
Ivanti Policy Secure Behavior |
|---|---|---|
|
0 |
The management port IP address, netmask address and gateway address are valid values. |
Valid management configuration is available. Configure the Ivanti Policy Secure with these values. |
|
0 |
The management port IP address, netmask address and gateway address are not valid values. |
Invalid management configuration is present. Do not configure the management port properties. |
|
1 |
The management port IP address, netmask address and gateway address are valid values. |
Valid management configuration is available. Configure the Ivanti Policy Secure with these values. The existing cache value is overwritten with new values. |
|
1 |
The management port IP address, netmask address and gateway address are not valid values. |
During the boot process, the administrator is asked whether to configure the management port. Enter N to skip the management port configuration. Enter Y to specify valid values for the management port. |
The following table contains data regarding the Internal Port Behavior During a New Deployment:
|
Internal Port Overwrite Value |
Internal Port Configuration |
Ivanti Policy Secure Behavior |
|---|---|---|
|
0 or 1 |
Valid configuration |
Configure the internal port based on the passed configuration values. |
|
0 or 1 |
Invalid configuration |
During the boot process, the administrator is asked whether to configure the internal port. |
The following table contains data regarding the External Port Behavior During a New Deployment:
|
External Port Overwrite Value |
External Port Configuration |
Ivanti Policy Secure Behavior |
|---|---|---|
|
0 |
The external port IP address, netmask address and gateway address are valid values. |
Valid external configuration is available. Configure the Ivanti Policy Secure with these values. |
|
0 |
The external port IP address, netmask address and gateway address are not valid values. |
Invalid external configuration is present. Do not configure the management port properties. |
|
1 |
The external port IP address, netmask address and gateway address are valid values. |
Valid external configuration is available. Configure the Ivanti Policy Secure with these values. The existing cache value is overwritten with new values. |
|
1 |
The external port IP address, netmask address and gateway address are not valid values. |
During the boot process, the administrator is asked whether to configure the external port. Enter N to skip the external port configuration. Enter Y to specify valid values for the external port. |
After running the create-va.pl script, you can use the VMware vSphere CLI vmware-cmd utility or the VMware vSphere Client to view the status. Once vSphere reports the system is ready, you can log in to the virtual appliance.
The vSphere Client may display a “VMware Tools not installed on this virtual machine” message. You can ignore this message. You do not have to install VMware Tools.
Example Output
The following example passes the IP address of the internal port through the command line and uses the va.conf configuration file for the values of all other parameters.
perl create-va.pl --configFile /root/user1/ovf_dir//va_config_files/vlan_tagging.conf --ipAddress x.x.x.x --extipAddress x.x.x.x --mgmtipAddress x.x.x.x --vaName ISA-V_125_3 --ovffile /root/user1/ovf_dir//ISA-V-VMWARE-IPS-22.1RI-33.1/ISA-V-VMWARE-IPS-22.1R1-33.1.ovf
Your output will look similar to the following:
The following values are used for creating and configuring the VA
OVF File: /root/user1/ovf_dir//ISA-V-VMWARE-IPS-22.1RI-33.1/ISA-V-VMWARE-IPS-22.1R1-33.1.ovf
VA Name: 22.1R1_ISA-V_33_1
vCenter Server: qavc.bnglab.ivanti.net:443
vCenter Username: user1
vCenter Password: XXXXX
Datacenter Name: PBU-QA
Cluster / Host Name: PBU-QA-CLUSTER/pbuesx6.bnglab.ivanti.net
IP Address: x.x.x.x
Netmask: x.x.x.x
Gateway: x.x.x.x
Default VLAN: 3
Management IP Address: 10.209.125.3
Management Netmask: 255.255.240.0
Management Gateway: 10.209.127.254
Management Default VLAN: -1
External IP Address: 2.2.125.3
External Netmask: 255.0.0.0
External Gateway: 2.0.0.1
External Default VLAN: 2
Reconfigure Internal Port with value in VAapp properties: 0
Reconfigure Management Port with value in VAapp properties: 0
Reconfigure External Port with value in VAapp properties: 0
Primary DNS: 1.1.1.1
Secondary DNS: 3.3.115.226
DNS Domains: ipsqa.ivanti.net
WINS: 2.2.2.2
Admin Username: admindb
Admin Password: XXXXX
Enable REST API: y
Common Name: ips.ivanti.net
Organization: Ivanti
Ramdom Text: Ivanti_your_Net
Accept License Agreement: y
Enable Virtual License Server: n
ExternalNetwork Mapped to: "VLAN_TAGGING"
InternalNetwork Mapped to: "VLAN_TAGGING"
ManagementNetwork Mapped to: "PBU-QA-MGMT"
Command = ovftool --skipManifestCheck --name=22.1R1_ISA-V_33_1 --prop:vaIVEConfig="vaIPAddress=3.3.125.3;vaNetmask=255.0.0.0;vaGateway=3.0.0.1;vaDefaultVlan=3;vaManagementIPAddress=10.209.125.3
;vaManagementNetmask=255.255.240.0;vaManagementGateway=10.209.127.254;vaManagementDefaultVlan=-1;vaInternalPortReconfigWithValueInVAppProperties=0;vaExternalIPAddress=2.2.125.3;vaExternalNetmask
=255.0.0.0;vaExternalGateway=2.0.0.1;vaExternalDefaultVlan=2;vaExternalPortReconfigWithValueInVAppProperties=0;vaManagementPortReconfigWithValueInVAppProperties=0;vaPrimaryDNS=1.1.1.1;vaSecondar
yDNS=3.3.115.226;vaDNSDomain=pcsqa.psecure.net;vaWINSServer=2.2.2.2;vaCommonName=pcs.psecure.net;vaOrganization=PulseSecure;vaRandomText=PulseSecure_your_Net;vaAdminUsername=admindb;vaAdminPassw
ord=dana123;vaAcceptLicenseAgreement=y;vaEnableLicenseServer=n;vaAdminEnableREST=y " --net:ExternalNetwork="VLAN_TAGGING" --net:InternalNetwork="VLAN_TAGGING" --net:ManagementNetwork="PBU-QA-MGM
T" --datastore=HP_iSCSI_02 --powerOn /root/user1/ovf_dir///ISA-V-VMWARE-IPS-22.1RI-33.1/ISA-V-VMWARE-IPS-22.1R1-33.1.ovf.ovf vi://user1:Ivanti123\[email protected]:443/PBU-QA/host
/PBU-QA-CLUSTER/pbuesx6.bnglab.ivanti.net
Deploying VA. /root/user1 , /root/user1/ovf_dir///ISA-V-VMWARE-IPS-22.1RI-33.1/ISA-V-VMWARE-IPS-22.1R1-33.1.ovf.ovf.......
Status: Task completed
Verifying Your Deployment with vmware-cmd
Once deployed, the virtual appliance powers on and configures the initial settings for the Ivanti Policy Secure using the parameters passed by the create-va.pl script. The virtual appliance sets the status of the initial configuration in the valnitConfigStatus guest environment variable. You can check the status of the virtual appliance setup with the VMware vSphere CLI vmware-cmd command. Use the following format:
vmware-cmd -H vCenterName -h ESXi-name vm-cfg-path getguestinfo guestinfo.vaInitConfigStatus
For example:
vmware-cmd -H 10.204.54.210 -h asgdevesx2.bngrd.pulsesecure.net \
-U Admin -P Passwd123 "/vmfs/volumes/ds1/SecureAccess/SecureAccess.vmx" \
getguestinfo guestinfo.vaInitConfigStatus
Your output should look similar to this:
getguestinfo(guestinfo.vaInitConfigStatus) = Status: Success Log: Configuring VA settings from OVF; Initial network configuration complete; The self-signed digital certificate was successfully created; VA Initial Configuration completed successfully.
You can ignore the following message:
vmsvc[280]: [warning] [powerops] Unable to send the status RPC
This message appears when you are running Ivanti Policy Secure with ESXi 4.1U3 or ESXi4.x and you power off and then power up the virtual appliance.