Configuring SNMP Policy Enforcement using VLAN (Cisco, HP)
This section covers the configuration for SNMP policy enforcement. SNMP based policy enforcement is applied to endpoints running Pulse Client, and to clientless endpoints where the MAC address is discovered through SNMP. For endpoints running Pulse Client, role assignment is based on compliance; for clientless endpoints, role assignment is based on MAC address.
Configuring a MAC address Authentication Server
A MAC address authentication server defines how endpoints are authorized using the MAC address. You can choose to allow or deny a MAC address or use wildcards to allow or deny groups of MAC addresses.
To configure a MAC address authentication server:
- Select Authentication > Auth Server.
- Select MAC Address Authentication and click New Server to display the MAC Address Authentication Server configuration page as shown in figure.
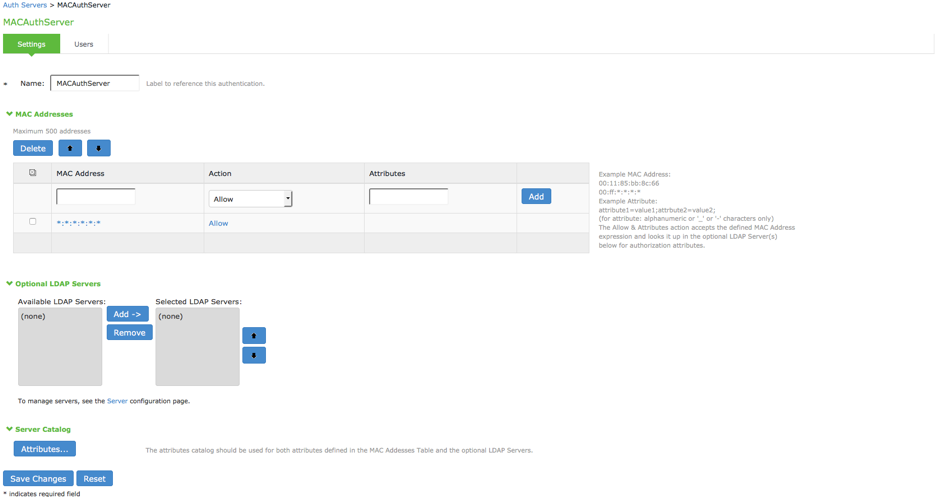
- On the MAC address authentication server configuration page:
- For Name, enter a name to label this MAC address authentication server.
- Under MAC Addresses, enter the MAC address(es) to whitelist.
- Select an action to take when the MAC address matches:
- Allow-Signal successful authentication.
- Deny-Signal unsuccessful authentication.
- Allow and Attributes-Typically, a match terminates the search. If you select Allow and Attributes, the search is not terminated; instead, the system searches the LDAP servers for a match in order to retrieve the LDAP authorization attributes.
- Specify a name-value pair to associate the MAC address with a particular group or organization.
- Under Optional LDAP servers, Use the Add and Remove selector buttons to add LDAP servers to the list of selected servers. Use the up and down buttons to order the list. The order in which the LDAP servers are listed is important.
- Under Server Catalog, Click the Attributes button to display the LDAP server catalog, which you can use to select or add attributes to be retrieved from the LDAP servers.
- Click Save Changes to save the configuration.
Configuring a MAC address Authentication Realm and Role Mapping
A MAC address authentication realm uses a MAC address authentication server and role mapping rules to sort MAC address authentication requests into roles.
To configure a MAC address authentication realm:
- Select Endpoint Policy > MAC Address Realms.
- Click New to display the MAC Address Realm configuration page.
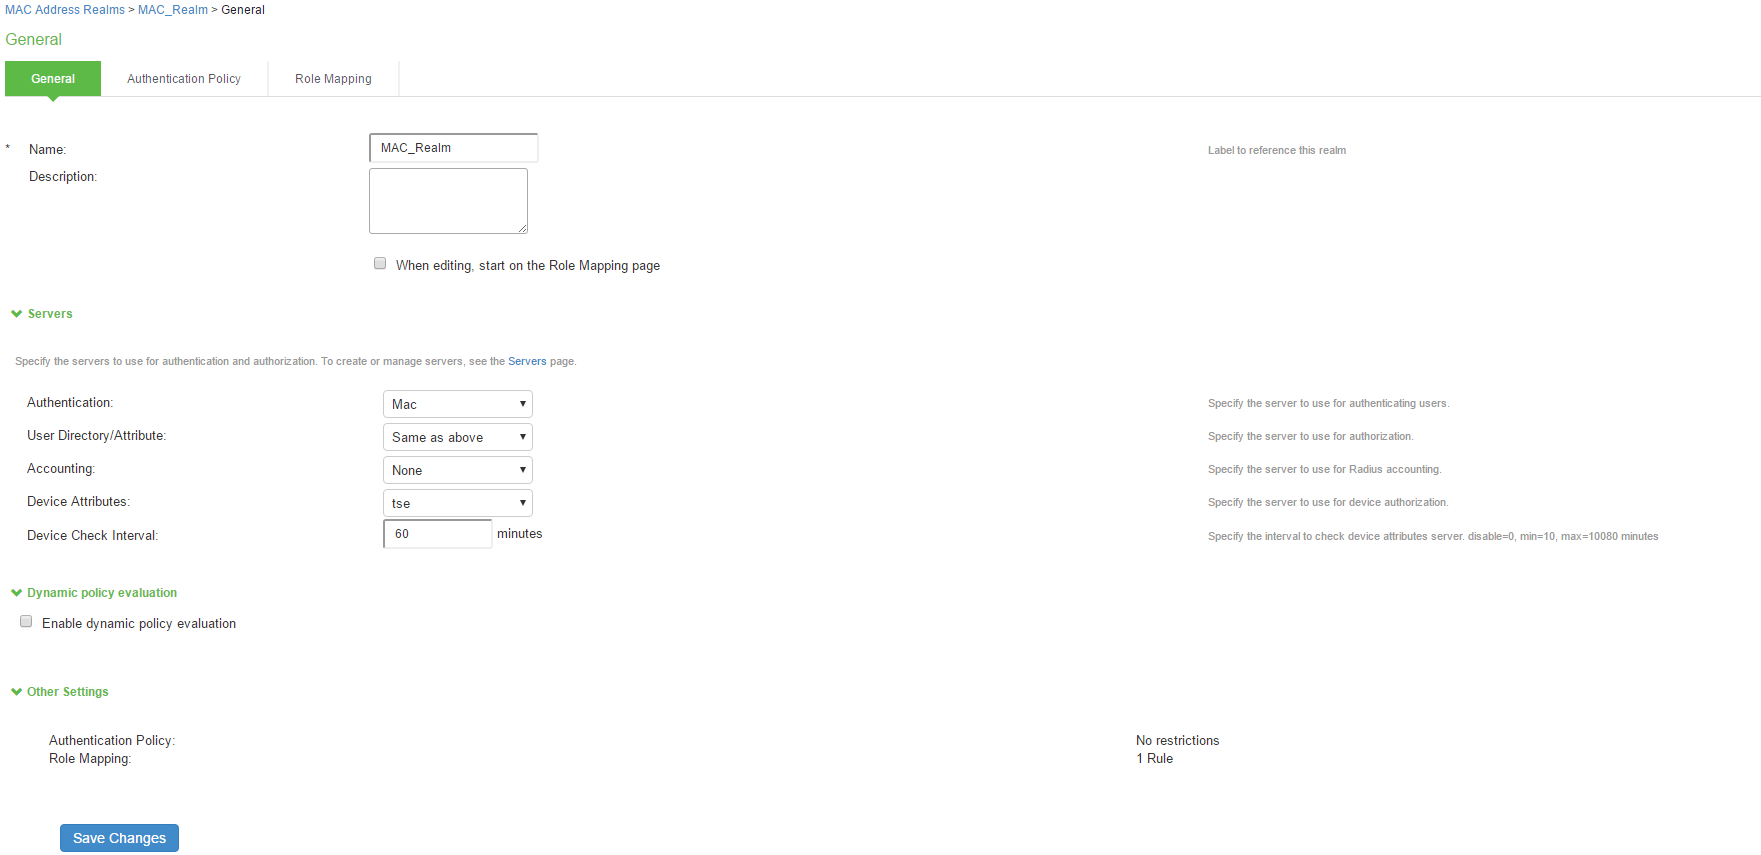
- On the MAC address realm configuration page:
- For Name, enter a name to label this MAC address realm.
- (Optional) For description, enter a description.
- For Authentication Server, select the MAC address authentication server configured earlier.
- For User Directory/Attribute Server, select "Same as above".
- For accounting, select the authentication server.
- For device attribute, select the server for device authorization. For profiler, select the name of the local profiler.
- Specify the device check interval in minutes.
- Select the Enable dynamic policy evaluation to automatically or manually refresh the assigned roles of users by evaluating a realm's authentication policy, role-mappings, role restrictions, and resource policies.
- Click Save Changes to save the configuration.
Role mapping rules define how endpoints are assigned to roles.
To configure the role mapping rules for your MAC Address Realm:
- Click the Role Mapping tab to display the role mapping configuration page for the realm.
- Click New to display the MAC Address Realm configuration page.
-
On the role mapping configuration page, click New Rule to display the role mapping rule configuration page.

- (Optional) For Name, enter a name to label this role mapping rule.
- Select the rule from the Rule based list and provide the appropriate details.
- Select the appropriate role and click Add.
- Click Save Changes to save the configuration.
Configuring a Location Group
A location group enables association of a sign-in policy and MAC address realm for network access policy enforcement.
To configure a location group:
- Select Endpoint Policy > Network Access > Location Group.
- Click New Location Group to display the Location Group configuration page.
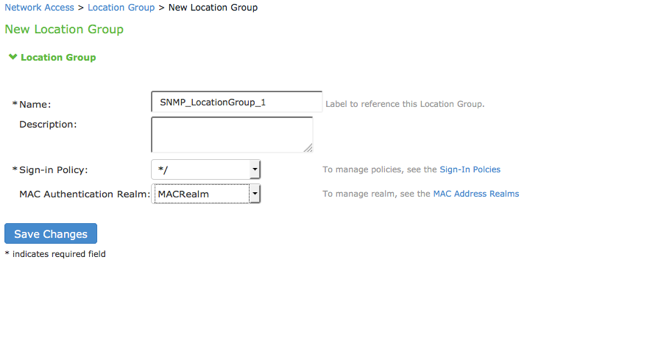
- On the location group configuration page:
- Enter a name or label to describe the location group.
- Enter a description.
- Select the default sign-in policy as it is not applicable for SNMP enforcement. For example, default */ sign-in policy.
- Select the MAC authentication realm which was configured earlier.
- Click Save Changes to save the configuration.
Configuring SNMP Devices
You can add an SNMP device manually through SNMP device configuration or automatically discover SNMP devices through SNMP Device Discovery configuration.
Manual Addition of SNMP Devices
You can manually add SNMP devices from IPS. This section describes the SNMP device configuration for switches with different versions.
- Configuring devices with SNMP v1/v2c
- Configuring devices with SNMP v3
Configuring Devices with SNMP v1/v2c
To configure the device with SNMP v1/v2c:
- Select Endpoint Policy > Network Access > Network Infrastructure Device and click New Network Infrastructure Device.
- Enter a name to label this SNMP device.
- For Description, enter a description. (Optional)
- Enter the IP address of the SNMP device. You must enter a single IP address, not an IP address range or subnet.
- Select the device vendor. SNMP VLAN enforcement check box will appear only for vendors who support SNMP enforcement. VLAN enforcement is supported only for HP and Cisco switches.
- Under Enforcement, enable the VLAN Enforcement checkbox for using the device for SNMP enforcement using VLAN.
For Profiler, you must disable SNMP enforcement; the Location Group, Default VLAN, Write Community and Trap Community String fields are not applicable for profiling. A device so added is not used for enforcement.- For Location Group, select the location group configured earlier. Only location groups which have MAC Address Realms associated will be available for selection.
- For Default VLAN, enter the VLAN to be provisioned when the SNMP user session is deleted or no endpoint is connected.
- Under SNMP Settings, select SNMP version v1/v2c.
- To use different credentials for write and trap community strings, disable the "Use same credentials for write and trap operations” check box.
- Enter the community string(s) for the Read community.
- Click Save Changes to save the configuration.

Configuring Devices with SNMP v3
To configure the switch with SNMP v3:
- Select Endpoint Policy > Network Access > Network Infrastructure Device.
- Click New Infrastructure Device.
- Enter a name to label this SNMP device.
- For Description, enter a description. (Optional)
- Enter the IP address of the SNMP device. You must enter a single IP address, not an IP address range or subnet.
- Select the device vendor. SNMP VLAN enforcement check box will appear only for vendors who support SNMP enforcement. VLAN enforcement is supported only for HP and Cisco switches.
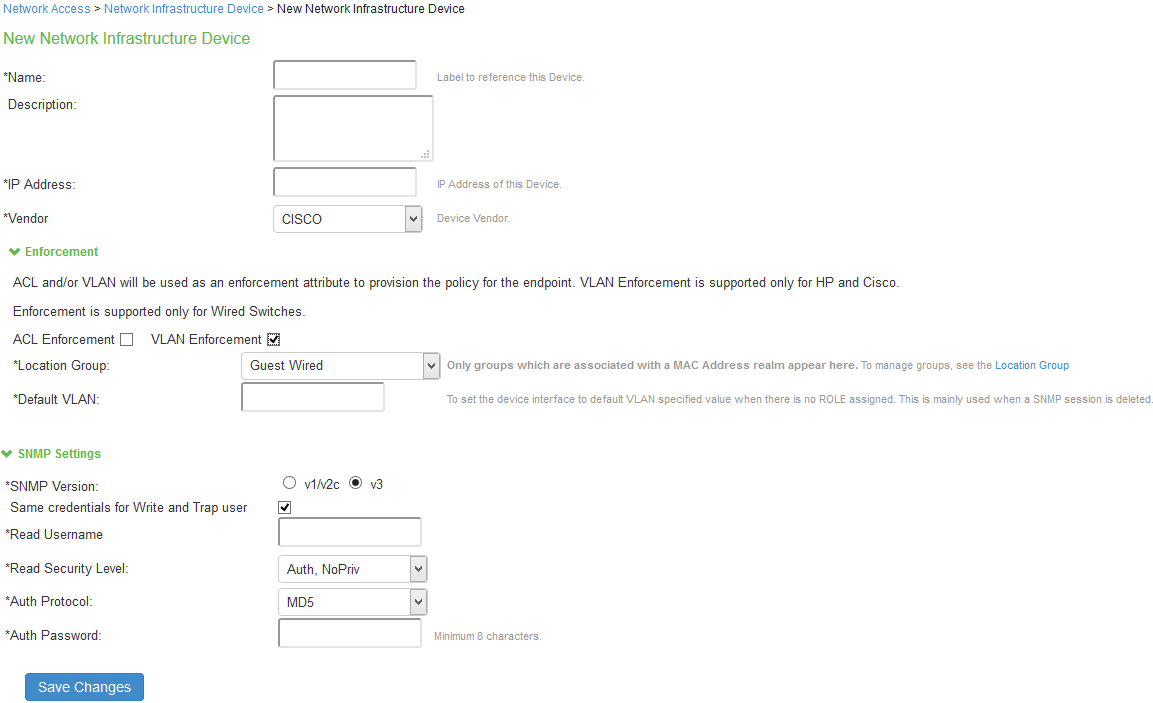
- Under Enforcement, enable the VLAN Enforcement checkbox for using the device for SNMP enforcement using VLAN.
For Profiler, you must disable SNMP enforcement; the Location Group, Default VLAN, Write Community and Trap Community String fields are not applicable for profiling. A device so added is not used for enforcement.- For Location Group, select the location group configured earlier. Only location groups which have MAC Address Realms associated will be available for selection.
- For Default VLAN, enter the VLAN to be provisioned when the SNMP user session is deleted or no endpoint is connected.
- Under SNMP Settings, select SNMP version v3 and define the SNMP switch settings:
- Enter the Read Username, select the Read Security Level and Auth Protocol, and enter the Auth Password.
- To use different credentials for write and trap community strings, disable the "Use same credentials for write and trap operations” check box.
- Click Save Changes to save the configuration.
If you unplug a cable from an interface, the associated session would be deleted only if link down traps are enabled. If the port security traps are configured on the device, unplugging of the cable does not cause session deletion.
Auto Discovery of SNMP Devices
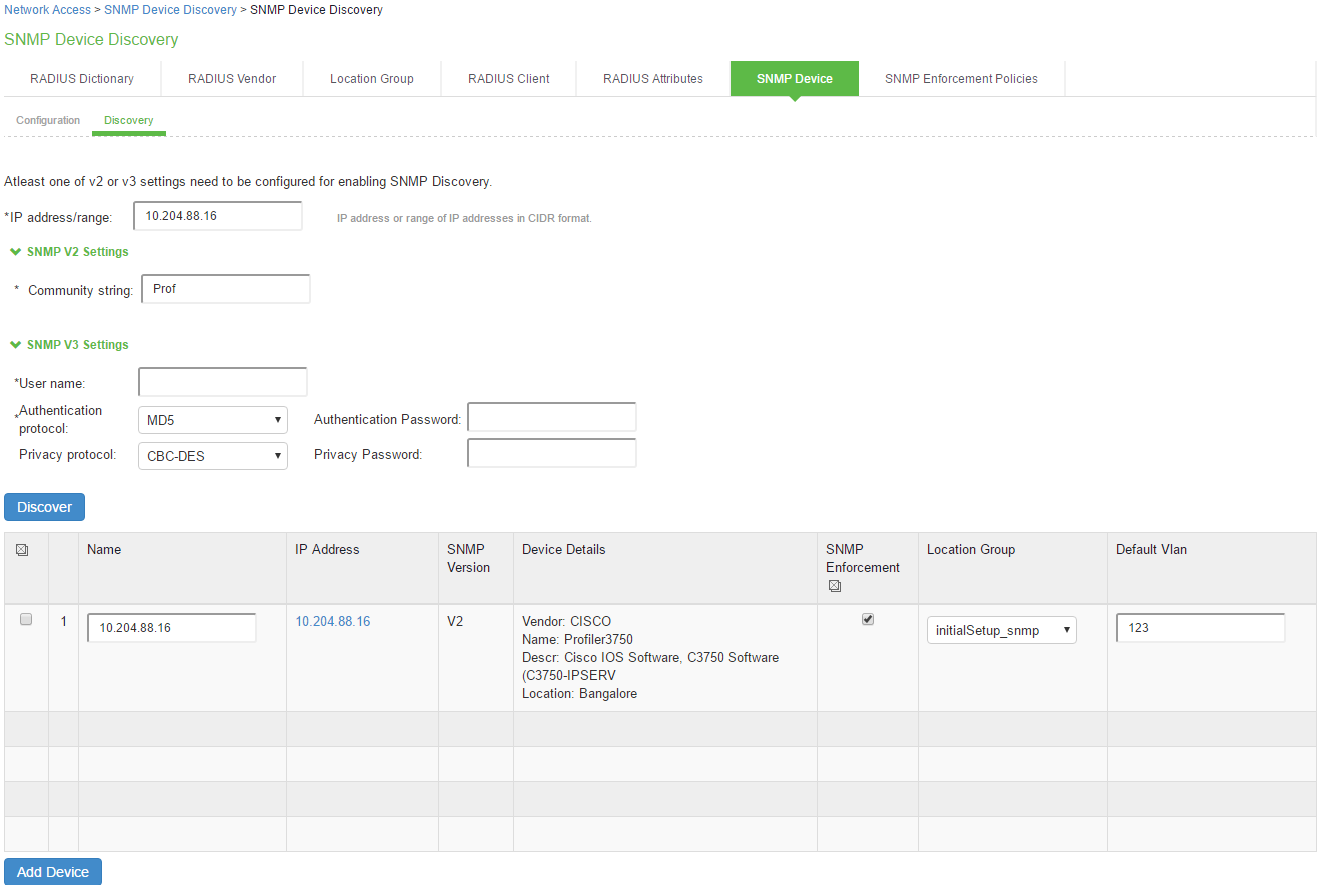
IPS provides an optional SNMP Device Discovery option. You can specify a range of IP addresses and other details needed for SNMP configuration to perform discovery of SNMP enabled devices.
IPS discovers all SNMP enabled L2 or L3 devices. SNMP enabled devices, which are not supported are listed as unsupported and cannot be added to the SNMP devices page.
To discover SNMP enabled devices:
- Select Endpoint Policy > Network Access > Network Infrastructure Device > Discovery.

- On the SNMP device discovery configuration page:
- For IP Address Range, enter a range of IP addresses in CIDR format (for example, 10.204.88.0/28) to discover SNMP devices.
- To discover SNMP v1/v2c devices, enter the community string to use with SNMP v1/v2c device.
- To discover SNMP v3 devices, enter the user name to use with SNMP v3 devices. Enter the Authentication protocol, Authentication password, Privacy protocol and Privacy password for SNMP v3 devices.
- Click Discover to start the discovery process.
Once the devices are discovered, you must complete the following configuration for SNMP enforcement on each device:
- Choose a location group from the dropdown list.
- You can enable the SNMP VLAN enforcement for the supported switches (HP/Cisco).
- Specify a default VLAN.
- Select the devices to be added and click Add Device.
- Click Save Changes.
The SNMP enforcement option is disabled for the Switches, which don't support SNMP enforcement.
- Discovery of SNMP-enabled devices applies only to L2 and L3 devices which support Bridge MIB configuration.
- Enable the SNMP Enforcement checkbox for using the device for SNMP enforcement and then define the location group and the default VLAN. For Profiler, you must disable SNMP enforcement; the Location Group, Default VLAN fields are not applicable for profiling.
- Admin can modify the added SNMP client to enable the ACL enforcement if required. See Adding SNMP Client
Verifying the status of SNMP Devices
You can view the SNMP device status from the SNMP Device page. You can view details such as device name, device location, device description, device contact information, SNMP version, IP Address, model, location group, default VLAN, default ACL, and the current status of the added device.
To view the status of SNMP devices:
- Select Endpoint Policy > Network Access > Network Infrastructure Device.
- Click Configuration.

Configuring SNMP Enforcement Policy
SNMP Enforcement Policy is used for dynamic VLAN assignment and modification, which is based on role assignment.
You must ensure that the session roaming is enabled on the roles for SNMP enforcement.
To configure an SNMP Enforcement Policy:
- Select Endpoint Policy > Network Access > SNMP Enforcement Policies.
- Click New SNMP Policies to display the New SNMP Policy configuration page.
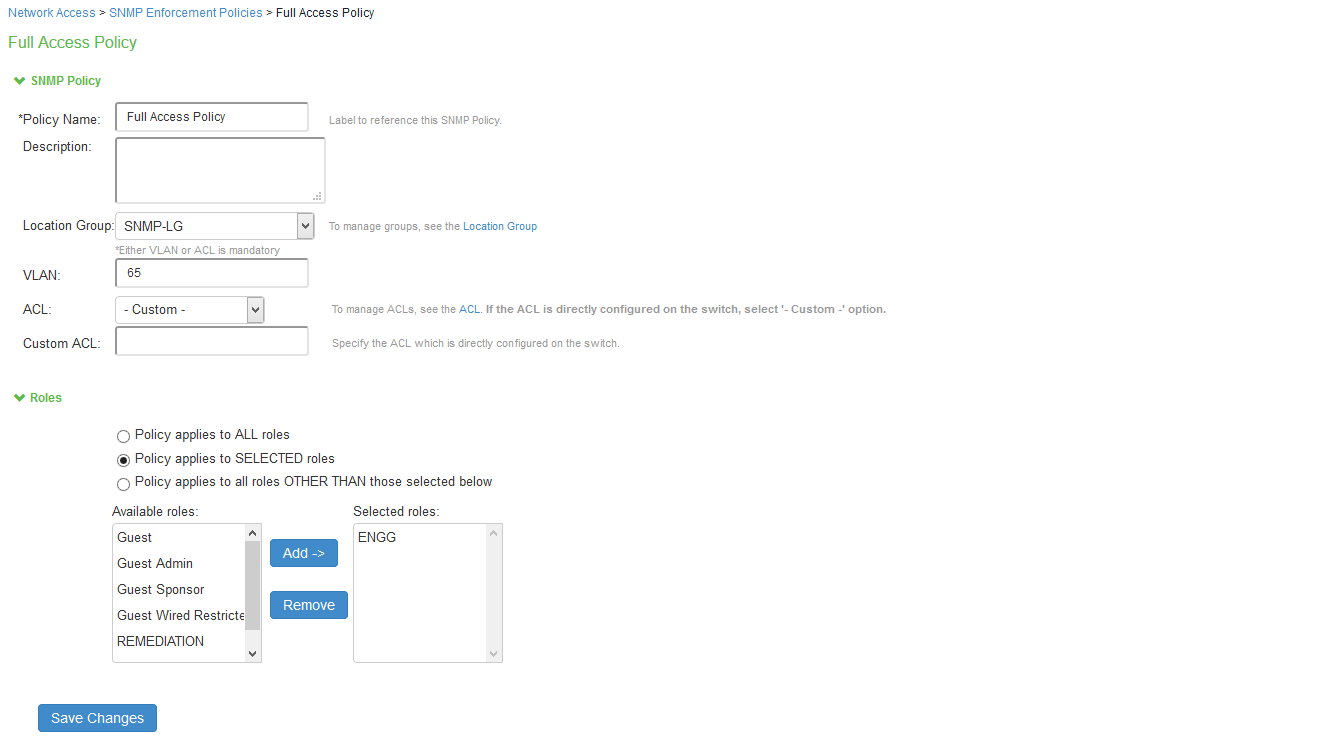
- On the SNMP policy configuration page:
- Enter a label for the SNMP enforcement policy.
- Enter a description for the SNMP policy.
- For VLAN, specify the VLAN to assign.
- Choose a location group from the dropdown menu.
- Under Roles, select Policy Applies to Selected Role; choose a role from the Available Roles and click Add to add it to the Selected Roles list.
- Click Save Changes to save the configuration.