Two-Factor Authentication using Smart Cards
With growing digital world, effectively combating cybersecurity threats has become a major challenge. The scale and robustness of cyberattacks has been increasing rapidly. Sensitive and confidential information are getting comprised across the network due to such attacks. To combat this threat, enterprises are taking mitigating actions to strengthen device access across their critical IT infrastructure.
Two-factor authentication significantly reduces the risk of adversaries penetrating strategic networks and systems. This approach requires the use of a Personal Identity Verification (PIV) card or Common Access Card (CAC). In this document, we will detail the basic procedures required to enable two-factor authentication for the Secure Shell Protocol (SSH) using government-issued PIV or CAC cards.
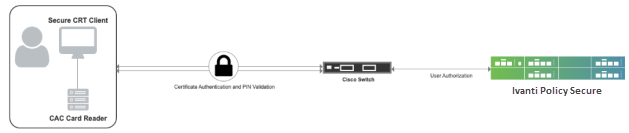
The authentication process is described below:
- User starts SecureCRT client, enters the Cisco switch IP address in the hostname and press Enter.
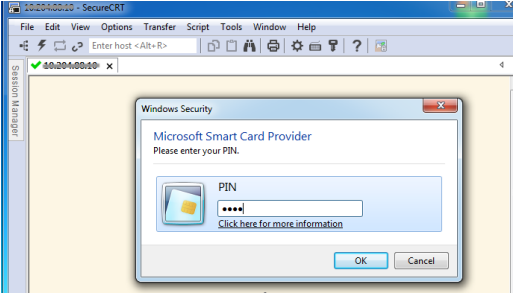
- A dialog box pops up prompting for PIN. User enters the PIN associated with the smartcard credential and press OK.
- SecureCRT forwards certificate to Cisco Switch which validates Certificate handshake.
- Cisco switch sends TACACS+ authorization request to IPS with username set to "common name" received from certificate and "service=pki"
- IPS fetches the role and device group based on username and realm information.
- If a shell policy has same role, device group with mandatory attribute set to "cert-application=all", then it is considered a match. If action is set to Permit, then IPS sends successful response containing all configured attributes.
- User gets logged in to Cisco switch.
Pre-Requisites
- Cisco switch
- Ivanti Policy Secure Release 9.1R4 as TACACS+ Server
- SecureCRT (8.5.4) as the SSH client
- Smart Card Reader
- Common Access Card
Summary of Configuration
Configuring Ivanti Policy Secure
On IPS Server Administration UI, Admin configures:
- Admin Role
- Admin Realm
- TACACS Device group
- TACACS client
- Shell policy
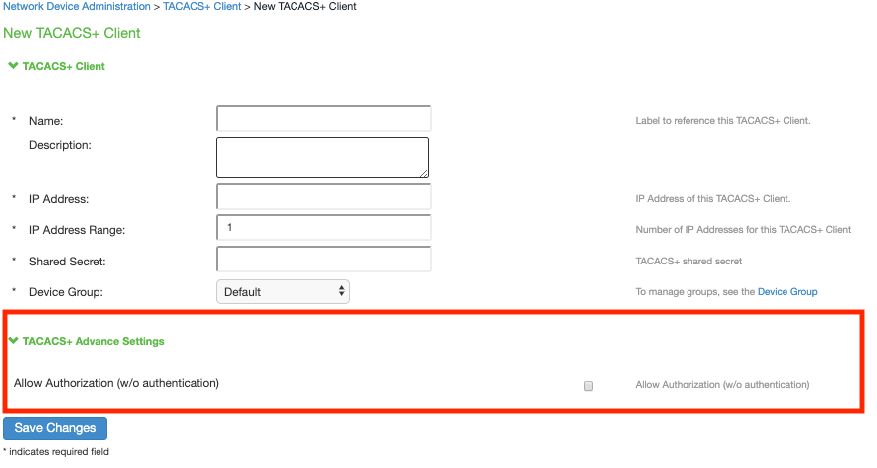
To configure TACACS+ client and shell policy on IPS:
- Select Endpoint Policy > Network Device Management > TACACS+ client, enable Allow Authorization (w/o authentication) under TACACS+ Advance Settings.
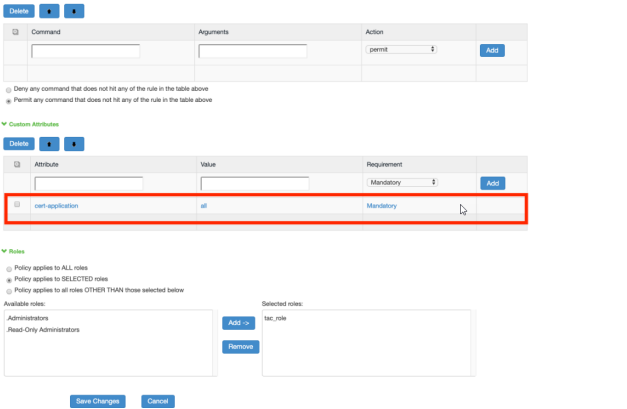
- Select Network Device Management > Shell Policies.
- Under Custom attributes, configure "cert-application=all" as mandatory attribute.
- Click Add.
- Click Save Changes.
Cisco Switch Configuration
-
Set up Network Time Protocol (NTP) with the proper time zone for the device This step is critical for the operation of the public key infrastructure (PKI).
service timestamps debug datetime msec localtime show-timezone
service timestamps log datetime msec localtime show-timezone
clock timezone EST -5 0
clock summer-time EDT recurring
ntp server <server ip>
-
Configure PKI trustpoint for the certificate authority (CA). Specify the field from the user certificate that will be used as the SSH username that will pass to the TACACS server for authorization. The example below uses the common name from the subnet field for the username. The user principal name (UPN) from the Subject-Alternative name can also be used as a username for SSH login.
crypto pki trustpoint <trustpoint name>
enrollment terminal
revocation-check none
authorization username subjectname commonname
-
Manually authenticate and install the root CA’s public certificate.
crypto pki authenticate <trustpoint name>
-
Generate RSA signing and encryption keys for the SSH server.
crypto key generate rsa modulus 2048 label SSH-RSA usage-keys
-
Enable the SSH server and specify the RSA keys to be used for signing and encryption.
ip ssh rsa keypair-name SSH-RSA
ip ssh version 2
-
Configure the Cisco IOS SSH server to verify the user’s X.509v3 digital credential for two-factor authentication.
ip ssh server certificate profile
user
trustpoint verify <trustpoint name>
ip ssh server algorithm hostkey ssh-rsa
ip ssh server algorithm authentication publickey
ip ssh server algorithm publickey x509v3-ssh-rsa
-
Enable SSH for terminal line access, and enable X.509v3 validation.
aaa new-model
!
line vty 0 4
login authentication default
transport input ssh
-
Add the TACACS+ server and provision the shared secret and IP address of the TACACS+ server.
tacacs server IPS
address ipv4 <server-ip>
key <encryption key>
-
Configure TACACS+ for user authorization.
aaa group server tacacs+ IPS
server name IPS
aaa authorization config-commands
aaa authorization exec IPS group tacacs+
aaa authorization commands 0 IPS group tacacs+ if-authenticated
aaa authorization commands 1 IPS group tacacs+ if-authenticated
aaa authorization commands 15 IPS group tacacs+ if-authenticated
aaa authorization network IPS group tacacs+
aaa authorization configuration IPS group tacacs+
-
Enable authorization on the PKI trustpoint CA for the user certificate.
crypto pki trustpoint <trustpoint name>
authorization list IPS
Configuring SecureCRT Client for Two-Factor Smartcard Authentication
If your SSH2 server environment is properly configured for X.509 smartcard certificate authentication, then you can configure SecureCRT/SecureFX to authenticate using Two-Factor Authentication certificates on your smartcard.
To configure SecureCRT/SecureFX for Windows to accomplish authentication using your smartcard:
- Start the SecureCRT client. Open Global Options and select the SSH2 category.
- In the Public key section, enable Use a certificate from your personal CAPI store or a PKCS #11 provider DLL option.
- Insert your smartcard.
- For the Certificate to use field, press the [...] button to the right and browse through the available certificates.
- If your certificate contains the user account name that should be used for authentication, enable the Get username from certificate option. Then specify the certificate field which contains the account name required for smartcard authentication to your SSH2 servers (either Principal Name or Common Name).
- Disable the Add keys to agent option in the Advanced section below the fingerprint viewing area.

- Click OK to save changes.
- Choose Options > Edit Default Session...
- Select the SSH2 category. In the Authentication list, highlight the PublicKey authentication method and move it to the top of the list.
- With PublicKey selected, press Properties... button.

- In the Public Key Properties window, enable the Use global public key setting option. Information should match what was specified in the Global Options settings above.
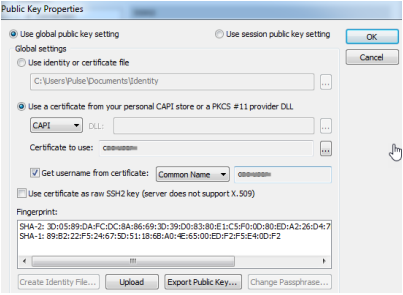
- Press OK button to close the Public Key Properties window
- Press OK button to close the Session Options window.
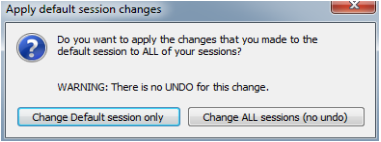
- When prompted for selecting Apply default session changes, choose either of the option. If smartcard certificate will be authenticated for the majority of connections, then consider selecting Change ALL sessions (no undo).
As configured above, SecureCRT do not cache smartcard PIN. The first time user authenticate with a certificate on the smartcard, user will be prompted for the PIN by MS CAPI or your smartcard's middleware provider. If subsequently user is not prompted for PIN when authenticating with the smartcard, it is because PIN has been cached by smartcard's middleware.