Configuring Sign-In Pages
A sign-in page defines the customized properties in the end-user’s welcome page such as the welcome text, help text, logo, header, and footer. The system allows you to create two types of sign-in pages to present to users and administrators:
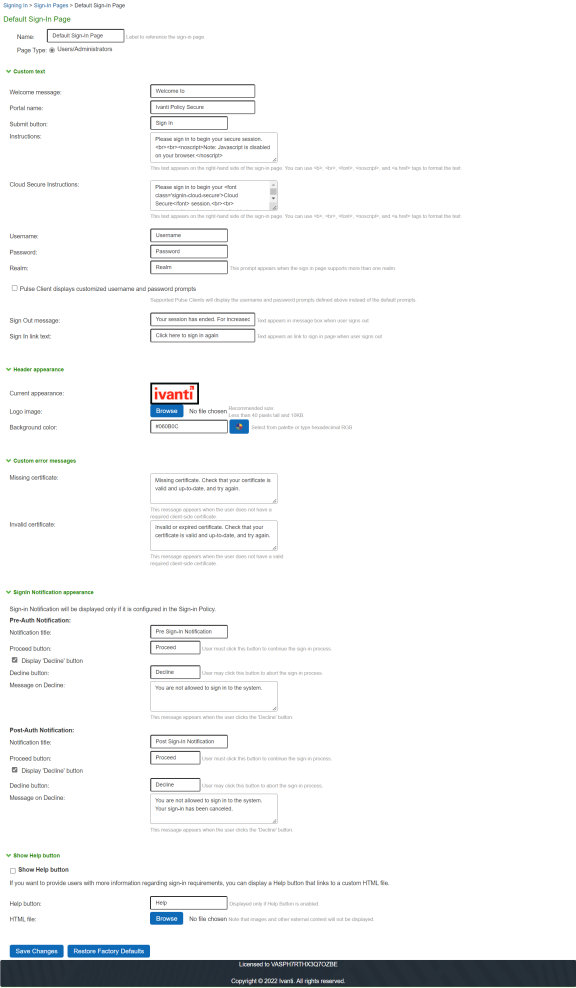
Configuring Standard Sign-In Pages
Standard sign-in pages are included with the default system. You can modify standard sign-in pages. You can modify the default sign-in page that the system displays at sign-in. You can also create new standard sign-in pages that contain custom text, logo, colors, and error message text.
To create or modify a standard sign-in page:
- Select Authentication > Signing In > Sign-in Pages.
- Click New Page. To modify an existing page, select the link for the page you want to modify.
- Enter a name to identify the page.
- In the Custom text section, revise the default text used for the various screen labels. When you add text to the Instructions field, you can format text and add links using the following HTML tags: <i>, <b>, <br>, <font>, and <ahref>. However, the system does not rewrite links on the sign-in page (because the user has not yet been authenticated), so point only to external sites. Links to sites behind a firewall will fail.
If you use unsupported HTML tags in your custom message, the system might display the end-user’s home page incorrectly.
- (Optional) In the Header appearance section, specify a custom logo image file for the header and a different header color.
- (Optional) In the Custom error messages section, revise the default text that is displayed to users if they encounter certificate errors.
You can include <<host>>, <<port>>, <<protocol>>, and <<request>> variables and user attribute variables, such as <<userAttr.cn>> in the custom error messages. These variables must be in the format <variable> to distinguish them from HTML tags that have the format <tag>.
- (Optional) To provide custom help or additional instructions for your users, select Show Help button, enter a label to display on the button, and specify an HTML file to upload. Note that the system does not display images and other content referenced in this HTML page.
- Click Save Changes. The changes take effect immediately, but users with active sessions might need to refresh their Web browser. Click Restore Factory Defaults to reset the sign-in page, user home page, and admin console appearance.
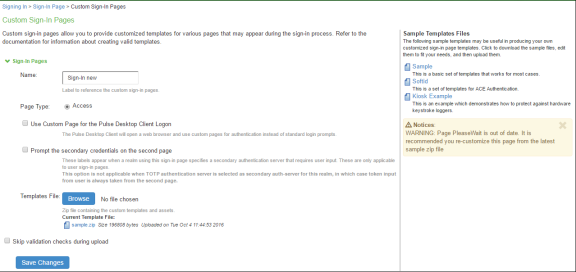
Configuring Custom Sign-In Pages
Customized sign-in pages are THTML pages that you produce using the Template Toolkit and upload in the form of an archived ZIP file. The customized sign-in pages enable you to use your own pages rather than modify the standard sign-in pages.
To upload Custom Sign-In Pages:
- Select Authentication > Signing In > Sign-in Pages.
- Click Sample to download the Sample Folder as ZIP and save it on local disk.
- Copy the following files after unzipping the folder (locally saved in previous step):
- UserAdmin-add-user.thtml
- UserAdmin-add-bulk-users.thtml
- UserAdmin-update-user.thtml
- Logout.thtml
- PleaseWait.thtml
- Open the previously downloaded Sample Custom Sign-in folder and replace the files.
- Select all the files and create *.ZIP file for uploading custom sign-in page.
- Upload the new custom sign-in page and click Save Changes.