Customizing Guest Self Registration User Pages
The customization for GUAM is no more supported from the Ivanti Policy Secure 5.2 release.
This topic describes how to customize the Guest Self Register page. It includes the following information:
- Downloading the Sample Template Files
- Modifying the Sample Template Files
- Uploading Your Customized Files
- Using the Customized Pages
- Verifying the Customization
Downloading the Sample Template Files
The sample template zip file includes the following files which are added for the Ivanti Policy Secure 5.2 release:
- GuestLoginPage.thtml
- GuestLogout.thtml
- GuestSelfRegistration.thtml
- GuestForgotPassword.thtml
- GuestSigninNotifPreAuth.thtml
To download the sample template files:
- Select Authentication > Signing In > Sign in pages. The Signing In screen appears.
- Click Upload Custom Pages.
- The Upload Custom Sign-In Pages screen appears. This page hosts the sample.zip files which can be used to customize the guest sign in pages.
- Click the Sample link in the Sample Template Files pane.
- Download the latest sample.zip file.
Modifying the Sample Template Files
You can edit the HTML to modify the look and feel of your page. You can add, modify, or delete JavaScript functions and variables to customize the functionality presented on your page. This section provides examples of common customizations for Guest Self Registration pages. For a reference on the files, functions, and variables found in the templates included in the sample.zip file, see the Custom Sign-In Pages Developer Reference.
Figure shows the contents of the GuestSelfRegistration.thtml file. The JavaScript functions and variables used for the standard user interface controls that appear in the predefined pages are highlighted in bold.
Table describes some of the common variables used in the templates and their meaning.
|
Variable |
Definition |
|---|---|
|
I18N_FULL_NAME |
Field for entering the full name of guest user. |
|
I18N_USERNAME_ADMIN_EMAIL |
Field for entering the email id of guest user. |
|
I18N_USER_ADMIN_MOBILE_NUMBER |
Field for entering mobile number of guest user. |
|
I18N_USER_ADMIN_REGISTER |
Register option in the Guest Self Registration page. Click the button after entering the user details. |
|
I18N_CANCEL |
Cancel option. Cancels the registration process and takes the user back to the Sign In page of Guest User |
|
I18N_USERNAME_COLON |
Username: field. It displays the username in the confirmation box. |
|
I18N_PASSWORD_COLON |
Password: field. It displays the password in the confirmation box. |
|
I18N_USER_ADMIN_CREATING_ACCOUNT |
Displays the message “An account has been created for you” in the confirmation box. |
<div id= "fnDiv" class="form-group required">
<label for="fullname" class="col-sm-2 control-label"><% I18N_FULL_NAME %></label>
<div id="fnDiv2" class="col-sm-5">
<input type="text" class="form-control" id="fullname" name="fullname" placeholder="<% I18N_FULL_NAME %>" autofocus validate>
</div>
</div>
<div id= "emailDiv" class="form-group <%IF emailRequired == 1%> required <%END%>">
<label for="email" class="col-sm-2 control-label"><% I18N_USER_ADMIN_EMAIL %></label>
<div id="emailDiv2" class="col-sm-5">
<input type="email" class="form-control" id="email" name="email" placeholder="<% I18N_USER_ADMIN_EMAIL %>" validate>
</div>
</div>
<div id= "mnDiv" class="form-group <%IF smsRequired == 1%> required <%END%>">
<label for="mobilenumber" class="col-sm-2 control-label"><% I18N_USER_ADMIN_MOBILE_NUMBER %></label>
<div id="mnDiv1" class="col-sm-2">
<select id="cmbCountryCode" class="form-control" name="cmbCountryCode" <%disabled%>>
<% FOREACH country = countryCode %>
<option id="<% country.id %>" value="<% country.id %>" <%IF countrySelected == country.id%> selected <%END%>> <% country.name %> </option>
<%END%>
</select>
</div>
<div id="mnDiv2" class="col-sm-3">
<input type="tel" class="form-control" id="mobilenumber" name="mobilenumber" placeholder="<% I18N_USER_ADMIN_MOBILE_NUMBER %>" validate>
</div>
</div>
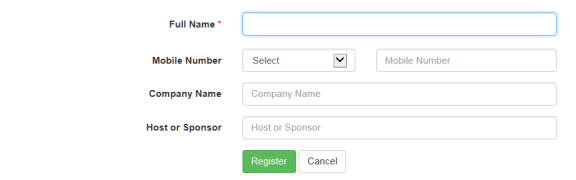
Removing Fields
You can remove fields from the user interface form by deleting the HTML and JavaScript that define them from the sample file. For example, to delete the “Email” option box, delete the following HTML and variables:
Example
<div id= "emailDiv" class="form-group <%IF emailRequired == 1%> required <%END%>">
<label for="email" class="col-sm-2 control-label"><% I18N_USER_ADMIN_EMAIL %></label>
<div id="emailDiv2" class="col-sm-5">
<input type="email" class="form-control" id="email" name="email" placeholder="<% I18N_USER_ADMIN_EMAIL %>" validate>
</div>
</div>
Never delete or modify the following required variables:
Guest_Includes–
signinAgainUrl–
LoginPageErrorMessage–Specifies the error message. The device generates the error message in case of an error otherwise it will be empty
preAuthSNText
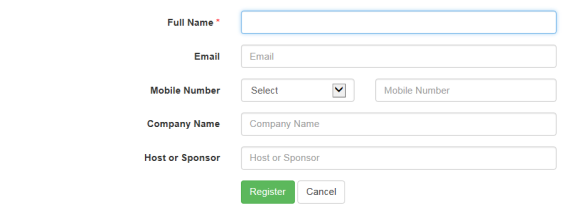
You can add a field in the html to display messages
Figure shows the result of the customization
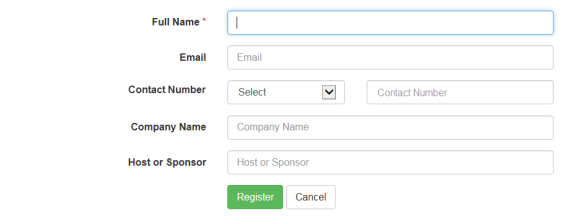
Editing Fields
You can edit fields in the user interface form by editing the HTML and JavaScript that define them from the sample file. For example, to edit the “Mobile Number” option box as ‘Contact Number”, edit the following HTML and variables:
Script Before Editing
<div id= "mnDiv" class="form-group <%IF smsRequired == 1%> required <%END%>">
<label for="mobilenumber" class="col-sm-2 control-label"> <% I18N_USER_ADMIN_MOBILE_NUMBER %>Contact Number</label>
<div id="mnDiv1" class="col-sm-2">
<select id="cmbCountryCode" class="form-control" name="cmbCountryCode" <%disabled%>>
<% FOREACH country = countryCode %>
<option id="<% country.id %>" value="<% country.id %>" <%IF countrySelected == country.id%> selected <%END%>> <% country.name %> </option>
<%END%>
</select>
</div>
<div id="mnDiv2" class="col-sm-3">
<input type="tel" class="form-control" id="mobilenumber" name="mobilenumber" placeholder="<% I18N_USER_ADMIN_MOBILE_NUMBER %>" validate>
</div>
</div>
Script After Editing
<div id= "mnDiv" class="form-group <%IF smsRequired == 1%> required <%END%>">
<label for="mobilenumber" class="col-sm-2 control-label"> Contact Number</label>
<div id="mnDiv1" class="col-sm-2">
<select id="cmbCountryCode" class="form-control" name="cmbCountryCode" <%disabled%>>
<% FOREACH country = countryCode %>
<option id="<% country.id %>" value="<% country.id %>" <%IF countrySelected == country.id%> selected <%END%>> <% country.name %> </option>
<%END%>
</select>
</div>
<div id="mnDiv2" class="col-sm-3">
<input type="tel" class="form-control" id="mobilenumber" name="mobilenumber" placeholder="Contact Number" validate>
</div>
</div>
Figure shows the result of the customization
Uploading Your Customized Files
After you have edited the sample template files, save the files with the same name and add them to the sample.zip file (replacing the previous files).
To upload the files to the system:
- Select Signing In > Sign-in pages.
- Click Browse to select the sample.zip file containing the custom templates and assets.
- Click Upload Custom Pages.
- The Upload Custom Sign-In Pages screen appears.
|
Setting |
Guidelines |
|---|---|
|
Sign-In Pages |
|
|
Name |
Specify the name for the sign-in page. |
|
Page Type |
Specify the page type. Access is selected by default. |
|
Template File |
Select the template file in zipped format that contains the custom templates and assets. |
|
Upload |
|
|
Skip validation checks during upload |
Select this option to skip the validation checks for the template file. |
|
Upload Custom Pages |
Select this option to upload the custom pages. |
Using the Customized Pages
After you have uploaded the customized files, you can associate them with your Guest Self Registration sign-in page.
To use the customized pages:
- Select Authentication > Signing-In > Sign-In Policies to display the sign-in policies configuration page.
- Select the custom sign-in page from the drop-down list..
- Click Save Changes.
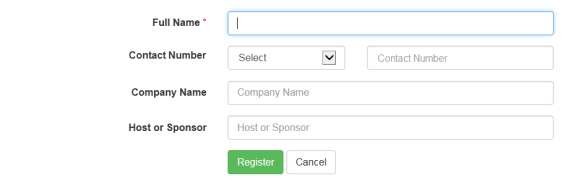
Verifying the Customization
Sign in to the Guest Self Registration sign-in page as a guest user account manager and verify that the customizations you have made were applied.
Figure shows the customized Guest Self Registration page, without the Email ID field, and the Mobile Number field changed as Contact Number.