Using Trusted Client CAs
This topic describes how to use trusted client Certificate Authorities (CAs).
Understanding Trusted Client CAs
A trusted client CA is a CA that you deem trusted by adding it the trusted client CA store. The system trusts any certificate issued by that CA. To use client CA certificates, you must install and enable the proper certificates. Additionally, you must install the corresponding client-side certificates in your users’ Web browsers, or you must use the MMC snap-in in your users’ computer accounts (machine certificate). When validating a client-side CA certificate, the system verifies that the certificate is not expired or corrupt and that the certificate is signed by a CA that the system has been configured to recognize. If the CA certificate is chained, the system also follows the chain of issuers until it reaches the root CA, validating each issuer in turn. The system supports X.509 CA certificates in DER and PEM encode formats.
When you install a client-side certificate, you must determine whether to use the certificate to identify individual users or individual machines. To use the certificate to identify individual users, you must install the certificate in each user’s individual certificate store. Then you must enable authentication using a certificate server, or you must enable authorization using realm, role, and/or resource policy settings. To use the certificate to identify individual machines, you must install the certificate in each computer’s certificate store. Then you must configure a Host Checker policy that checks for the machine certificate and authorizes access to realms, roles, or resource policies based on the certificate's validity.
The system supports using the following additional features with CA certificates:
- Certificate servers—A certificate server is a type of local authentication server that allows you to authenticate users based solely on their certificate attributes rather than authenticating them against a standard authentication server (such as LDAP or RADIUS), and it requires specific certificates or certificate attributes.
- Certificate hierarchies—Within a certificate hierarchy, one or more subordinate certificates (called intermediate certificates) are branched off a root certificate to create a certificate chain. Each intermediate certificate (also called a chained certificate) handles requests for a part of the root CA domain. For example, you can create a root certificate that handles all requests to the yourcompany.com domain and then branch off intermediate certificates that handle requests to partners.yourcompany.com and employees.yourcompany.com. When you install a chained certificate, the system confirms that the chain is valid and allows users to authenticate using the leaf certificate (that is, the lowest certificate in the chain).
- Certificate revocation lists—Certificate revocation is a mechanism by which a CA invalidates a certificate before its expiration date. The CA publishes a certificate revocation list (CRL) which is a list of revoked certificates. Within CRLs, each entry contains the serial number of the revoked certificate, the date that the certificate was revoked, and the reason the certificate was revoked. The CA can invalidate a certificate for various reasons such as when the employee to whom the certificate is issued leaves the company, the certificate’s private key is compromised, or the client-side certificate is lost or stolen. When the CA revokes a certificate, the system can appropriately deny access to users who present a revoked certificate.
Trusted Client CA Implementation Notes
Uploading a trusted client CA certificate does not enable client-side SSL authentication or authorization. To do so, you must use a certificate server, or enable certificate restrictions at the realm, role, or resource policy level, or create a Host Checker policy that verifies a machine certificate.
With client-side certificates, we strongly recommend that you advise users to close their Web browsers after signing out. If they do not, other users might be able to use their open browser sessions to access certificate-protected resources without reauthentication. After loading a client-side certificate, Internet Explorer caches the certificate’s credentials and private key. The browser keeps this information cached until the user closes the browser (or, in some cases, until the user reboots the workstation). For details, see http://support.microsoft.com/?kbid=290345.) To remind users to close their browsers, you can modify the sign out message on the Sign-in Pages tab.
Certificate authentication does not work on Internet Explorer 8 and 9 if SSL 2.0 is enabled with other SSL and TLS versions. For details, see http://support.microsoft.com/kb/2851628.
Understanding CRLs
A certificate revocation list (CRL) is a mechanism for canceling a client-side certificate. As the name implies, a CRL is a list of revoked certificates published by a CA or a delegated CRL issuer. The system supports base CRLs, which includes the company’s revoked certificates in a single, unified list.
The system determines the correct CRL to use by checking the client’s certificate. (When it issues a certificate, the CA includes CRL information for the certificate in the certificate itself.) To ensure that it receives the most up-to-date CRL information, the system periodically contacts a CRL distribution point to get an updated list of CRLs. A CRL distribution point (CDP) is a location on an LDAP directory server or Web server where a CA publishes CRLs. The system downloads CRL information from the CDP at the interval specified in the CRL, at the interval that you specify during CRL configuration, and when you manually download the CRL. The system also supports CRL partitioning. CRL partitioning enables you to verify portions of very large CRLs without spending the time and bandwidth necessary to access and validate a very large CRL or collection of large CRLs. CRL partitioning is only enabled when you employ the Specify the CDP(s) in the client certificates method (described below). In this case, the system validates the user by verifying only the CRL specified in the client certificate.
Although CAs include CRL information in client-side certificates, they do not always include CDP information as well. A CA can use any of the following methods to notify the system of a certificate’s CDP location:
- Specify the CDP(s) in the CA certificate—When the CA issues a CA certificate, it might include an attribute specifying the location of the CDPs that the system should contact. If more than one CDP is specified, the system chooses the first one listed in the certificate and then fails over to subsequent CDPs, if necessary.
- Specify the CDP(s) in the client certificates—When the CA issues a client-side certificate, it might include an attribute specifying the location of the CDPs that the system must contact. If more than one CDP is specified, it chooses the first one listed in the certificate and then fails over to subsequent CDPs, if necessary. When the system employs CRL partitioning and the client certificate specifies only one CRL, it performs verification using only that CRL.
If you choose this method, the user receives an error on the first sign-in attempt because no CRL information is available. Once the system recognizes the client’s certificate and extracts the CRL location, it can start downloading the CRL and subsequently validate the user’s certificate. To successfully sign in, the user must try to reconnect after a few seconds.
- Require the administrator to manually enter the CDP location—If the CA does not include the CDP location in the client or CA certificates, you must manually specify how to download the entire CRL object. You can specify a primary and backup CDP. (Manually entering the CDP location provides the greatest flexibility because you do not need to reissue certificates if you change the CDP location.)
The system compares the user’s certificate against the appropriate CRL during authentication. If it determines that the user’s certificate is valid, the system caches the certificate attributes and applies them, if necessary, during role and resource policy checks. If it determines that the user’s certificate is invalid, if it cannot contact the appropriate CRL, or if the CRL is expired, it denies the user access.
- The system supports only CRLs that are in a PEM or DER format and that are signed by the CA for which the revocations apply.
- The system only saves the first CRL in a PEM file.
Understanding OCSP
The Online Certification Status Protocol (OCSP) is a service that enables you to verify client certificates. When OCSP is enabled, the system becomes a client of an OCSP responder and forwards validation requests for users based on client certificates. The OCSP responder maintains a store of CA-published certificate revocation lists (CRLs) and maintains an up-to-date list of valid and invalid client certificates. After the OCSP responder receives a validation request, it validates the status of the certificate using its own authentication database, or it calls upon the OCSP responder that originally issued the certificate to validate the request. After formulating a response, the OCSP responder returns the signed response, and the original certificate is either approved or rejected.
Importing a Trusted Client CA Certificate
If you require users to provide a client-side certificate to sign in, you must upload the corresponding CA certificate. You can upload CA certificates manually, or you can configure the system to upload CA certificates automatically. The system uses the uploaded certificate to verify that the browser-submitted certificate is valid. In addition, you can specify if you want to automatically import CA certificates for validation, and you can specify a CRL or OCSP retrieval method to use to automatically import CA certificates.
To import a trusted client CA certificate:
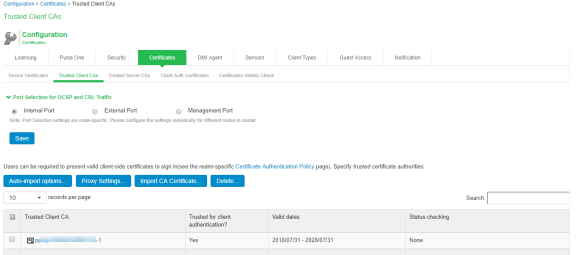
- Select System > Configuration > Certificates > Trusted Client CAs to display the configuration page.
- Click Import CA Certificate to display the configuration page.
- Browse to the certificate file, select it, and click Import Certificate to complete the import operation.
Renewing a Certificate
To renew a certificate:
- Select System > Configuration > Certificates > Trusted Client CAs.
- Click the link for the certificate you want to renew.
- Click Renew Certificate to display the import certificate page.
- Browse to the certificate file, select it, and click Import Certificate to complete the import operation.
Configuring Auto-Importing of Client Certificates
To enable auto-importing:
- Select System > Configuration > Certificates > Trusted Client CAs.
- Click the Auto-Import Options button to display the options.
- Complete the configuration described in table.
- Save your changes.
|
Settings |
Guidelines |
|---|---|
|
Auto-import trusted CAs |
Select this option to enable auto-import and display its configuration settings. |
|
Client Certificate Status Checking |
Select a method to validate the trusted client certificate:
|
|
CDP(s)/OCSP responder |
Select the location of the responder value:
|
|
Verify imported CA certificates |
Select this option to verify that this trusted client CA is valid. Enabling this will check the CRL of this certificate's issuer, and repeat up the chain until reaching the root trusted client CA. |
|
Skip Revocation check when OCSP/CDP server is not available |
Select this option to instruct Ivanti Policy Secure to skip revocation check and accept end user certificates when either OCSP server or CDP server is not accessible over the network. This option is applicable to digital certificates used for end user authentication. Ivanti Policy Secure skips the revocation check in the following conditions:
|
Configuring Options for Trusted Client CA Certificates
To configure options for the trusted client CA certificate:
- Select System > Configuration > Certificates > Trusted Client CAs.
- Under Port Selection for CRL and OCSP Download, select the port: Internal Port, External Port, or Management Port.
- Click the certificate you want to configure.
- Complete the configuration described in the following table.
Settings
Guidelines
Certificate
Use the expander buttons to display the following details:
•Issued To—Name and attributes of the entity to whom the certificate is issued.
•Issued By—Name and attributes of the entity that issued the certificate. Note that the value of this field must match either the Issued To field (for root certificates) or the Issued To field of the next highest certificate in the chain (for intermediate certificates).
•Valid Dates—Time range for which the certificate is valid.
•Details—Various certificate details, including its version, serial number, signature algorithm, CRL distribution points, public key algorithm type, and public key.
Client Certificate Status Checking
Select a method to validate the trusted client certificate:
•None—Do not validate.
•Use OCSP—Use the OCSP method, validating the client certificate in real-time, as needed. After you have selected this option and saved the configuration, you can specify options for OCSP.
•Use CRLs—Use CRLs to validate the client certificate. After you have selected this option and saved the configuration, you can specify options for CRL.
•Use OCSP with CRL fallback—Use the OCSP validation method when possible, but attempt to validate client certificates using CRLs if the OCSP method fails (for example, if the link to the OCSP responder fails). After you have selected this option and saved the configuration, can specify options for OCSP and CRL.
Verify Trusted Client CA
Select this option to verify that this trusted client CA is valid. Enabling this will check the CRL of this certificate's issuer, and repeat up the chain until reaching the root trusted client CA.
Trusted for Client Authentication
Clear this check box to exclude the CA from being trusted for client certificate authentication. You might want to do this if this CA was added for another trusting purpose, such as SAML signature verification or machine certificate validation.
Skip Revocation check when OCSP/CDP server is not available
Select this option to instruct Ivanti Policy Secure to skip revocation check and accept end user certificates when either OCSP server or CDP server is not accessible over the network. This option is applicable to digital certificates used for end user authentication.
Ivanti Policy Secure skips the revocation check in the following conditions:
•Server IP is not reachable
•Server Hostname is either not resolvable or resolving to non OCSP/CRL Server IP
•Proxy IP is either not reachable or not resolving
•Download CRL has expired
•OCSP/CRL service in Server is not responding
- Save your changes.
- If you have enabled CRL Checking, click CRL Checking Options.
- If you have enabled OCSP options:
- Click OCSP Options.
- Complete the configuration described in the following table.
Settings
Guidelines
Use
Select the type of OCSP responder to validate trusted client CAs:
None—The system does not use OCSP to verify the status of certificates issued by this CA.
Responder(s) specified in the CA certificate—The system uses OCSP responders specified in the imported client CA to perform verification. When you select this option, the system displays a list of OCSP responders specified in the imported CA (if any) and the last time they were used.
Responder(s) specified in the client certificates—The system uses responders specified during client authentication to perform verification. When you select this option, the system displays a list of known OCSP responders (if any) and the last time they were used.
Manually configured responders—The system uses primary and secondary OCSP responders at the addresses you specify.
Device Certificate to sign the request
Select the appropriate device certificate or leave the default (unsigned).
Signature Hash Algorithm
Select SHA-1 or SHA-2.
Use Nonce
A nonce is random data the system includes in an OCSP request and the OCSP responder returns in the OCSP response. The system compares the nonce in the request and response to ensure that the response is generated by the OCSP responder. If the two do not match, the system disregards the response and sends a new request.
- Save the configuration.
- After you have added an OCSP responder to the list, you can click its link to display the page.
- Complete the configuration described in the following table.
Guidelines
Responder Signer Certificate
Browse to the network path or local directory location of a Responder Signer Certificate. This is the certificate the OCSP responder uses to sign the response. You must specify the Responder Signer Certificate if the signer certificate is not included in the response.
Trust Responder Certificate
Select this option to allow an OCSP responder certificate that matches the responder signer certificate.
Revocation Checking
Select this option to ensure that the certificate has not recently been revoked. This option has implications only if you specified the Use OCSP with CRL fallback option.
Allow clock discrepancy
Use this option to account for possible mismatches in timestamps between the system clock and the OCSP responder clock. If the mismatch is significant, the system disregards the response from the OCSP responder as out of date or expired.
- Save the configuration.
Configuring a Proxy Server for CRL Downloads and OCSP Status Checks
You can configure the system to send CRL download requests and OCSP status checks to the proxy server and collect the response. You might want to do this if you deploy proxy server to control access to the Internet.
The following types of CRL downloads can use the proxy server:
- CRL distribution points (CDPs) specified in the trusted client CAs
- CDPs specified in client certificates
- Manually configured CDPs
Similarly, the system can send OCSP requests to the OCSP responder through the proxy server. The OCSP responses are also received through the proxy server. This feature is useful when you deploy many Ivanti Policy Secure systems and the OCSP responders are located outside the network.
To configure a proxy server:
- Select System > Configuration > Certificates > Trusted Client CAs.
- Click Proxy Settings to display the page.
- Complete the configuration described in the following table.
- Save the configuration.
|
Guidelines |
|
|---|---|
|
Use Proxy Server for HTTP-based CRL download |
Select to enable the CRL operations to use a proxy server. You can configure a proxy server for web-based URLs, not LDAP URLs. |
|
Use Proxy Server for HTTP-based OCSP status checking |
Select to enable the OCSP operations to use a proxy server. |
|
Host Address |
Specify either an IP address or a fully qualified domain name. |
|
Port |
Enter the proxy server port number if it is different from the default value of 80. |
|
Username/password |
If your proxy server required authentication, enter a username and password to log in to the proxy server. |