Enforcement using FortiGate Firewall
This chapter provides an overview of enforcement using FortiGate firewall. It includes the following information:
Overview of Enforcement using FortiGate Firewall
This chapter covers the FortiGate firewall integration with Ivanti Policy Secure using RADIUS accounting messages. FortiGate Firewall “SSO using RADIUS accounting records” feature allows FortiGate to receive user and group information details using RADIUS accounting messages.
FortiGate firewall can authenticate users transparently who have already authenticated on an external RADIUS server. The security policy applies the appropriate profiles based on the user group to which the user belongs. RADIUS SSO is relatively simple because the FortiGate unit does not interact with the RADIUS server, it only monitors RADIUS accounting records that the server forwards (originating from the RADIUS client, i.e Ivanti Policy Secure). These records include the user’s IP address, user group and user name.
FortiGate needs to know the user’s endpoint identifier (usually IP address) and RADIUS user group.
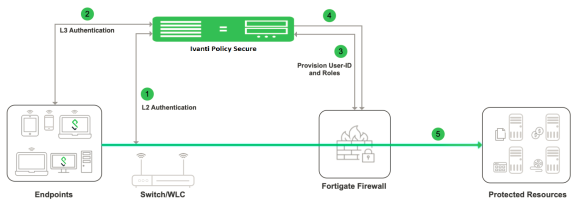
The authentication process is described below:
- The user is authenticated on Ivanti Policy Secure after validating the host check policy to ensure that the endpoints meets the corporate policy.
- Ivanti Policy Secure learns the endpoint IP using RADIUS accounting(L2) or L3 connection.
- The User Id, IP address and role(s) are provisioned to the firewall.
- Ivanti Policy Secure shares the User Id, IP address and role information with FortiGate firewall in the form of a RADIUS accounting packet.
- The FortiGate firewall maps the user to a specific security policy and then provides the required access.
- If multiple firewall devices are configured, then the user's information will be provisioned to all the devices. The user's information will be sent to the firewall only if user's role requires session to be provisioned.
Summary of Configuration
To prepare your network to use Enforcement using FortiGate Firewall, perform the following tasks:
- Configuring Ivanti Policy Secure with FortiGate Firewall
- Configuring Auth Table Mapping Policy
- Configuring FortiGate Firewall
- Reports and Logging
The following sections describe each of these steps in detail.
- Configuring Ivanti Policy Secure with FortiGate Firewall
- Configuring Auth Table Mapping Policy
- Configuring FortiGate Firewall
- Reports and Logging
Configuring Ivanti Policy Secure with FortiGate Firewall
To configure Ivanti Policy Secure FortiGate firewall:
-
Select Endpoint Policy > Infranet Enforcer.
-
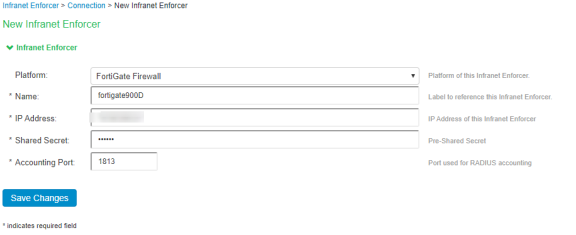
Click New Infranet Enforcer and select FortiGate Firewall in the Platform drop down.
-
Enter the name of the Infranet Enforcer in the Name box.
-
Enter the IP address of FortiGate Firewall.
-
Enter the shared secret.
-
Enter the port number used for RADIUS accounting.
-
Click Save Changes. You must create security policies on the FortiGate firewall for traffic enforcement.
-
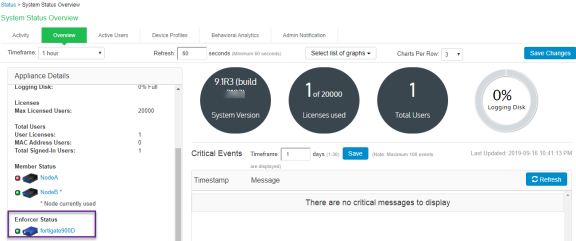
Check the Status > Overview page for checking the status of the connection.
Configuring Auth Table Mapping Policy
To configure auth table mapping policies:
- Select Endpoint Policy > Infranet Enforcer > Auth Table Mapping.
- Click New Policy.
- Enter a name to label this auth table mapping policy.
- Select FortiGate as an enforcer in the Enforcer section, specify the Infranet Enforcer device(s) to which you want to apply this auth table mapping policy.
- In the Action section, specify auth table mapping rules for the specified Infranet Enforcer.
- Click Save Changes.
Configuring FortiGate Firewall
The FortiGate firewall detects traffic from an endpoint that matches a configured security policy using Ivanti Policy Secure RSSO record. It determines the role(s) associated with that user and allows or denies the traffic based on the actions configured in the security policy.
To configure FortiGate firewall:
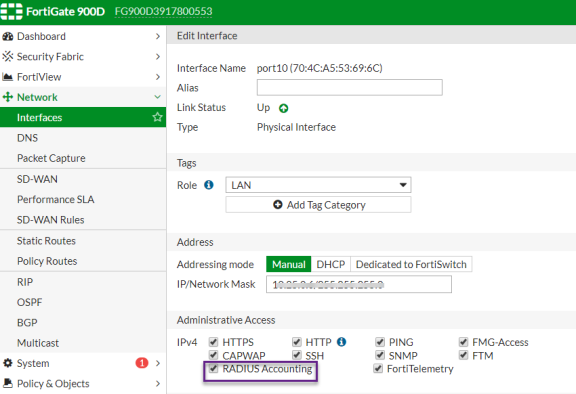
-
Select System > Network > Interfaces [datainterface] and enable RADIUS Accounting to allow the interfaces to listen for RADIUS Accounting Messages.
-
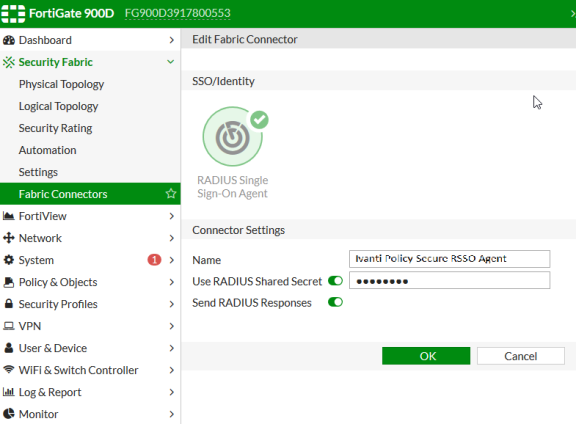
Select Fabric Connector > Create New, under SSO/Identity select RADIUS Single Sign-On Agent.
- Name: Enter a name for the entry
- Enter the RADIUS shared secret, which matches with Ivanti Policy Secure.
-
Click OK.
-
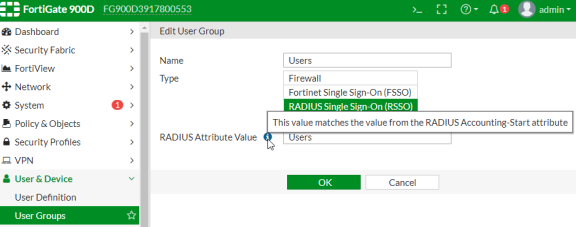
Create matching User groups. Select User & Device > User Groups. Click create New and enter the following data:
- Name- Enter the name of the group. This name will appear in the firewall policy.
- Type- Select RADIUS Single Sign-On as type.
- RADIUS Attribute Value- Enter the User Role created on Ivanti Policy Secure to match the User Group in FotiGate.
-
Click OK.
-
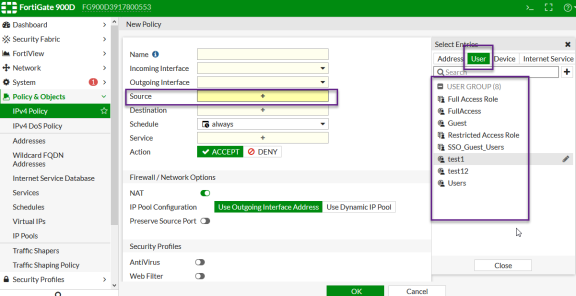
Create a firewall policy to use the Ivanti Policy Secure enforcement groups just created. Select Policy & Objects > IPv4 Policy. Click Create New and create the policy based on the resource access restrictions to be enforced.
-
Disable overriding of the roles on FortiGate firewall when the same user logs in with a different device. The default behavior is to override the role information with the latest role received from Ivanti Policy Secure.
For example, if a same user login’s to Ivanti Policy Secure from different devices (mobile/laptop) with different roles (Employee/Guest). Fortigate firewall overrides the role information with the latest role by default. To disable overriding with the latest roles “set sso-attribute-value-override disable”.
config user radius
edit <My_Rsso>
set rsso enable
set sso-attribute-value-override enable/disable // Enable/Disable override old attribute value with new value for the same endpoint.
end
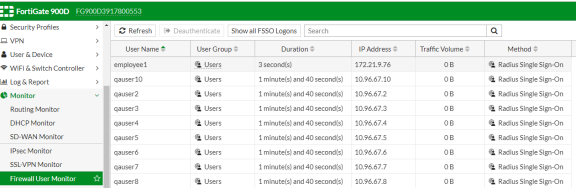
Reports and Logging
You can monitor the RSSO Sessions on FortiGate firewall from CLI or GUI:
-
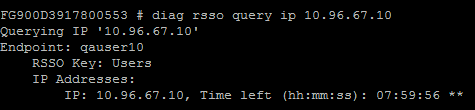
Using the FortiGate CLI, type:
diag rsso query ip <Ip-Address>
diag rsso query rsso-key
*Queries the RSSO database
-
Select Monitor > Firewall user Monitor. The list shows all the identity records.