Identity-Based Access Control with Fortinet Products
This chapter describes on how to integrate FortiAuthenticator and FortiGate Firewall products with Ivanti Policy Secure to support Identity-based admission control in your network.
Overview of Identity-Based Access Control with Fortinet Product
Ivanti Policy Secure integration with the FortiGate Firewall provides identity-enabled enforcement with backend authentication and comprehensive compliance checks.
The authentication process is described below:
- The user is authenticated on Ivanti Policy Secure after validating the host check policy to ensure that the endpoints meets the corporate policy.
- The syslog sessions are exported to FortiAuthenticator.
- FortiAuthenticator, which acts as a syslog server, parses identity information from the syslog message and creates an IP address to username mapping file within FortiAuthenticator. This information is shared with FortiGate Firewall in the form of a FSSO record.
- The FortiGate Firewall maps the user to a specific resource access policy and then provides the required access to protected resources.
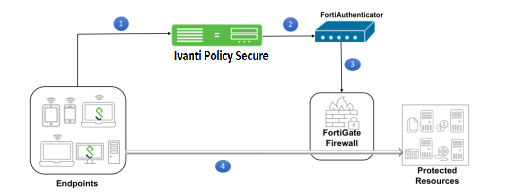
For example, you can use this to extend NAC/BYOD (Bring Your Own Device) to perimeter defense. This unifies the access policies that extend from NAC/BYOD systems to firewall perimeter defenses to enable end-to-end enforcement across the network.
Summary of Configuration
To prepare your network to perform identity-based access control using Ivanti Policy Secure, FortiAuthenticator
- Configuring Ivanti Policy Secure with FortiAuthenticator
- Configuring FortiAuthenticator
- Configuring the FortiGate Firewall
- Reports and Logging
Configuring Ivanti Policy Secure with FortiAuthenticator
The Ivanti Policy Secure configuration requires defining the FortiAuthenticator as the syslog server on Ivanti Policy Secure. The Syslog server uses the filter created in the User Access Log Filters for receiving and parsing the logs.
This section covers the following topics:
Creating a Custom Filter for User Access Logs
To create a custom filter in Ivanti Policy Secure:
-
Select System > Log/Monitoring > User Access > Filters.
-
Click New Filter.
-
Under Filter, enter the required Filter Name.
-
Under Export Format, select WELF.
This selection populates the text box with all parameters for the selected filter. This ensures that it is simple to edit the filter to enable communication with FortiAuthenticator, see Editing a Custom Filter
-
Click Save to save the filter.
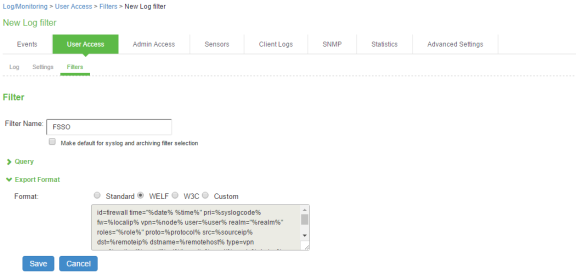
Editing a Custom Filter
Once you have created a populated custom filter for User Access Logs (see Creating a Custom Filter for User Access Logs you must update the ID for the filter to enable communication with FortiAuthenticator.
To edit a custom filter:
-
Select System > Log/Monitoring > User Access > Filters.
-
Click on the filter created in the previous procedure, see Creating a Custom Filter for User Access Logs
-
Under Export Format, select the Custom format.
-
In the text box, edit the ID from “id=firewall” to “id=FSSO”.
This ID will be used by FortiAuthenticator when parsing the syslog events.

-
Click Save.
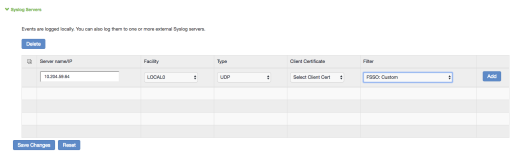
Configuring the Syslog Server
Once you have prepared a custom filter for User Access Logs (see, Creating a Custom Filter for User Access Logs) you must configure Ivanti Policy Secure to send logs to the FortiAuthenticator syslog server.
You must add FortiAuthenticator as a syslog server in all the nodes in a clustering environment.
To configure the syslog server:
-
Select System > Log/Monitoring > User Access > Settings.
-
Under Select Events to Log, retain the default settings.
-
Under Syslog Servers, create a syslog server with the following details:
- Server name/IP: Enter the fully qualified domain name or the IP address of the syslog server (that is, FortiAuthenticator).
- Facility: Select LOCAL0 as the facility level.
- Type: Select UDP as the connection type.
- Do not change Client Certificate.
- Filter: Select the FSSO Custom created filter format.
-
Click Add and then click Save Changes.
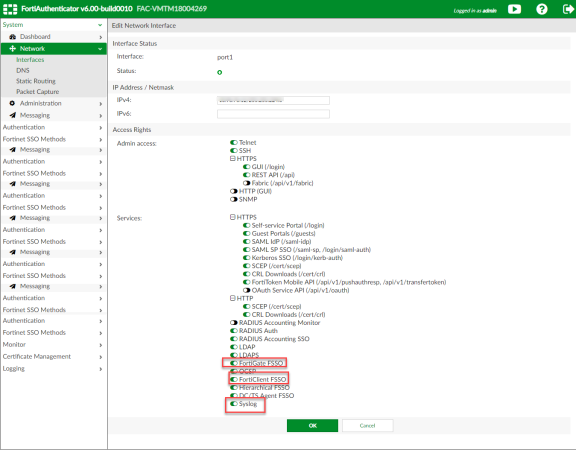
Configuring FortiAuthenticator
You must add Ivanti Policy Secure as a syslog source in FortiAuthenticator to parse the information.
Before you start, ensure you have completed the following tasks:
- Ensure that the FortiAuthenticator instance is communicating on the network and is reachable from the Ivanti Policy Secure appliance’s management interface.
- Select System > Network > Interfaces, then select the required port and enable the FortiGate FSSO, FortiClient FSSO and Syslog services on FortiAuthenticator interface, which communicates with Ivanti Policy Secure and the FortiGate Firewall.
To configure FortiAuthenticator:
-
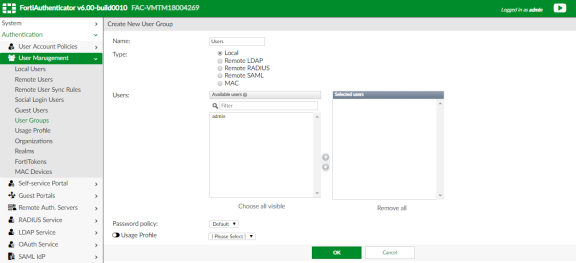
Create a Local user group with a name that matches the name that Ivanti Policy Secure will send as the ‘Group=’ value in your Syslog messages.
To do this, select Authentication > User Management > User Groups and click Create New. Create the group with the following data:
- Name: Enter the name that is defined on Ivanti Policy Secure. For example, Users.
- Type: Select Local.
- Click OK.
-
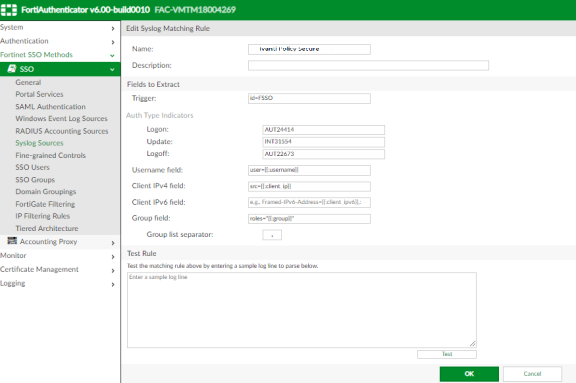
Create a Syslog matching rule.
To do this, select Fortinet SSO methods > SSO > Syslog Sources. In the upper right corner, from the View drop down choose matching rules and click Create New and give the following data:
- Name: Enter the name for the syslog Rule.
- Trigger: Enter the filter name created in Ivanti Policy Secure. For example, id=FSSO.
- Auth Type Indicators: Enter strings to differentiate between the types of user activities. For example:
- Logon: AUT24803
- Update: AUT23524
- Logoff: AUT22673
- Username field: Define the semantics of the username field. In this field, {{:username}} indicates from where the username is extracted. For example: user= {{:username}}.
- Client IP field: Define the semantics of the client IP address. For example: src={{:client_ip}}
- Group field: Define the semantics of the group. For example: roles=” {{: group}}”
There is a trailing space after Username field, Client IP field, and Group field. The parser requires the trailing space as an end character for each of these fields, and will fail if the trailing space is omitted. Do not remove this space.
- Group List Separator: SSO syslog feed can parse multiple groups if the names are separated by a plus (+) symbol or a comma (,). Use the Group list separator to specify the separator.
- Test Rule: Enter a sample log message into the text box, then select Test to test that the desired fields are correctly extracted.
-
Click OK to add the new matching rule.
For the Logon and Logoff indicators, the required data will vary, depending on both your installation and your syslog message contents.
In this example, when a user logs in, the message ID created is AUT24414 and is considered as a Logon event on FortiAuthenticator. When the role change happens as part of periodic host check updates, the message ID created by Ivanti Policy Secure is AUT23524. A sign-out event is considered a Logoff event on FortiAuthenticator, and the identity is removed from the user group, and thus fails to match policy. This logic can be altered depending on the customer’s design and intentions.
-
Create a Syslog source.
-
To do this, select Fortinet SSO methods > SSO > Syslog Sources. In the upper right corner, select the View drop down, select Syslog Source and click Create New. Then, specify the following fields:
- Name: Enter a name for the Syslog source.
- IP address: Enter the IP address of Ivanti Policy Secure server.
- Matching rule: Select the matching rule created above.
- SSO user type: Select External as the user type.

You must add all the cluster node IPs (not cluster VIPs) in the FortiAuthenticator when using Ivanti Policy Secure cluster setup.
Configuring the FortiGate Firewall
The FortiGate Firewall detects traffic from an endpoint that matches a configured security policy using the FortiAuthenticator FSSO record. It determines the role(s) associated with that user, and allows or denies the traffic based on the actions configured in the security policy.
To configure FortiGate Firewall:
-
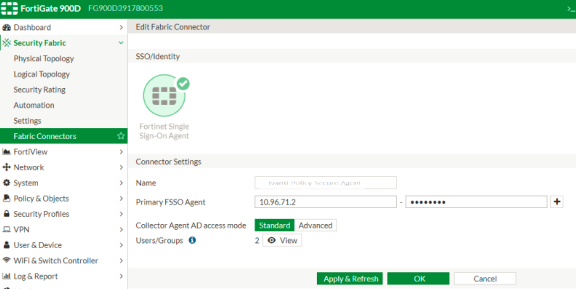
(Applies to Release 6.0.*) Create the FortiAuthenticator as an FSSO agent in the FortiGate Firewall. To do this, select Fabric Connector > Create New, under SSO/Identity select Fortinet Single Sign-On Agent. Then, specify the following fields:
- Name: Enter a name for the entry.
- Primary FSSO Agent: Enter the IP address of the FortiAuthenticator appliance, and the password used to communicate with it. This password is the same as the secret key configured on FortiAuthenticator in the Fortinet SSO Methods > General section.
- Click Apply & Refresh to test your configuration. If correct, the Users /Groups area will populate automatically.
-
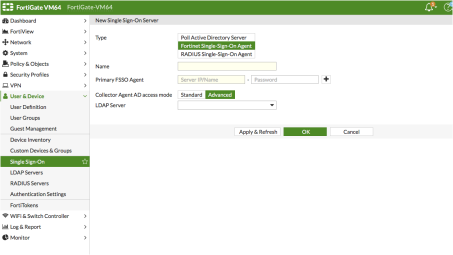
(Applies to Release 5.6.*) Create the FortiAuthenticator as an FSSO agent in the FortiGate Firewall. To do this, select User & Device > Single Sign-On and then click Create New. Then, specify the following fields:
- Type: Select Fortinet Single-Sign-On Agent.
- Name: Enter a name for the entry.
- Primary FSSO Agent: Enter the IP address of the FortiAuthenticator appliance, and the password used to communicate with it. This password is the same as the secret key configured on FortiAuthenticator in the Fortinet SSO Methods > General section.
- Click Apply & Refresh to test your configuration. If correct, the Users /Groups area will populate automatically.
-
Create matching User groups. To do this, select User & Device > User Groups and click Create New. Then, specify the following fields:
- Name: Enter the name of the group. This name will appear in the firewall policy.
- Type: Select Fortinet Single Sign-On.
- Under Members, select the matching user group created on FortiAuthenticator, and click OK.

-
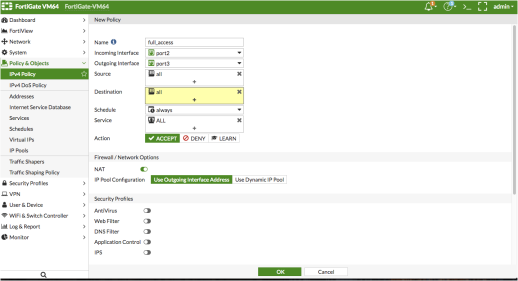
Create a firewall policy to use the Ivanti Policy Secure enforcement groups just created. To do this, select Policy & Objects > IPv4 Policy and click Create New. Then, create the policy based on the resource access restrictions to be enforced.
Reports and Logging
You can verify that the syslog messages are reaching the FortiAuthenticator by doing a packet capture from the FortiAuthenticator user interface.
- Select System > Network > Packet Capture and select the interface which is used to communicate with the Ivanti Policy Secure and click Start Capture. Once packet capture is complete, stop the capture. Then, download the packets and view them using any tool like WireShark.
- To view identity records from the FortiAuthenticator user interface, select Monitor > Sessions. The list shows the records parsed through syslog.

-
You can monitor the FSSO Sessions on a FortiGate Firewall from either its graphical user interface (GUI) or its command-line (CLI) user interface.
-
To do this using the FortiGate Firewall CLI, type:
diag debug auth fsso list
This command displays identity records received from FortiAuthenticator. For example:

-
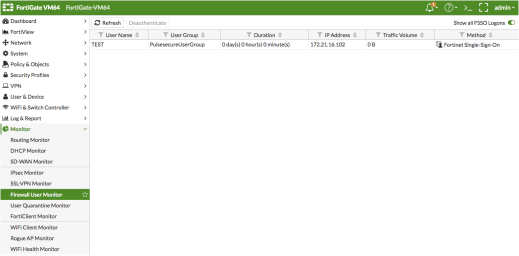
To do this using the FortiGate Firewall GUI, select Monitor > Firewall User Monitor. The list shows all the identity records.
-