Identity-Based Access Control with Check Point
This section describes how to integrate Check Point Next Generation Firewall with Ivanti Policy Secure to support Identity-based admission control in your network.
Overview: Deploying Ivanti Policy Secure with Check Point Next-Generation Firewall
This section describes the integration of Ivanti Policy Secure with Check Point Next-Generation Firewall. The Check Point Next-Generation Firewall controls the access to protected resources (for example, internet, CRM systems, Wikis and so on.) based on policy settings that defines the access. The Check Point Next-Generation Firewall enables integration with directory sources (For example, AD or LDAP) to get user and group information. The policies are then defined based on user role information.
Ivanti Policy Secure serves as the provider of identity information (For example, user-ID, IP address, and roles) for Check Point Next-Generation Firewall. The Check Point Next-Generation Firewall uses the identity information provided by the Ivanti Policy Secure for deciding the resource access.

The authentication process is described below:
- The endpoints connect to Switch/WLAN and performs the layer 2 authentication with Ivanti Policy Secure.
- Ivanti Policy Secure performs the layer 3 authentication and performs compliance check on the endpoint and detects for any unauthorized behavior. Ivanti Policy Secure can also learn endpoint IP address using accounting and provision mapping.
- Ivanti Policy Secure provisions the auth table entries (user-ID, IP address, and roles) on the Check Point Next-Generation Firewall.
- The user role changes, which includes any unauthorized behavior are dynamically updated on the Next-Generation Firewall. Ivanti Policy Secure provisions the auth table with changes in role information if any on Check Point Next-Generation Firewall. The access is based on roles.
- The Check Point Next-Generation Firewall applies policies to allow or block user access to protected resources.
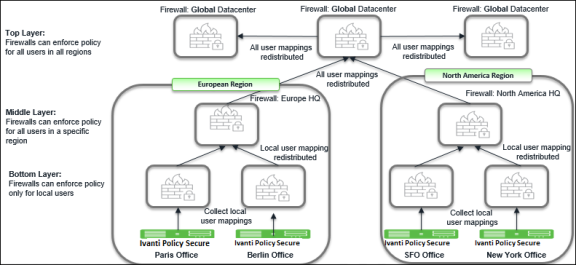
Overview: Deploying Ivanti Policy Secure with Check Point Next-Generation Firewall in a Large Enterprise
For an enterprise with remote branch offices connected to the headquarters with VPN, deploy the Security Gateway at the remote branch offices. When you enable Identity Awareness on the branch office Security Gateway, users are authenticated before they reach internal resources. The identity data on the branch office Security Gateway is shared with other Security Gateways to avoid unnecessary authentication.
Summary of Configuration
To prepare your network to perform identity-based admission control using Ivanti Policy Secure and Check Point Next-Generation Firewall, perform the following tasks:
- Configuring IPS with Check Point Next-Generation Firewall.
- Configuring Check Point Next-Generation Firewall.
Configuring Ivanti Policy Secure with Check Point Next-Generation Firewall
The Ivanti Policy Secure configuration requires adding as an Infranet Enforcer and creating the auth table mapping policy.
This section covers the following topics:
Configuring Check Point Infranet Enforcer in Ivanti Policy Secure
The Ivanti Policy Secure configuration requires defining a new Check Point Next-Generation Firewall Infranet Enforcer instance on Ivanti Policy Secure and then fetching the pre-configured shared secret key from the Next-Generation Firewall. The shared secret key is used to communicate between the Check Point Next-Generation Firewall and Ivanti Policy Secure. The standard user authentication / authorization configurations such as Auth Table Mapping Policies should also be created and associated with the required roles.
To configure a Check Point Next-Generation Firewall Infranet Enforcer in Ivanti Policy Secure:
-
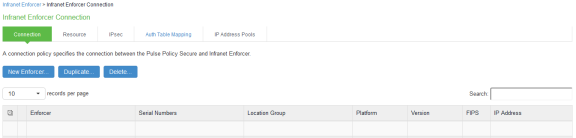
Select Endpoint Policy > Infranet Enforcer.
-
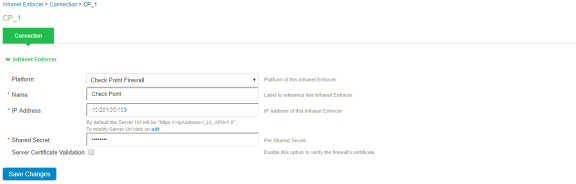
Click New Infranet Enforcer and select Check Point Firewall in the Platform drop down.
-
Enter the Name and IP Address of the Check Point Next-Generation Firewall and enter the shared secret between Ivanti Policy Secure and Check Point Next-Generation Firewall.
Ivanti Policy Secure has the default server URL for Check Point R80.10. You can edit/modify the server URL as per your requirement. For Check Point version (R77.30), edit the server URL manually to https://<IP_Address>/_IA_MU_Agent/idasdk .
-
(Optional) Select Server Certificate Validation to verify the Next-Generation Firewall certificate.
-
Click Save Changes.
Configuring Auth Table Mapping Policies
An auth table entry consists of the user’s name, a set of roles, and the IP address of the user device. An auth table mapping policy specifies which enforcer device (Next-Generation Firewall) can be used for each user role. These policies prevent the Ivanti Policy Secure from creating unnecessary auth table entries on all connected enforcer devices.
The default configuration of Ivanti Policy Secure includes only one default auth table mapping policy. When the default auth table mapping policy is enabled, Ivanti Policy Secure pushes one auth table entry for each authenticated user to the selected Check Point Next-Generation Firewall configured as Infranet Enforcers in Ivanti Policy Secure.
To configure an auth table mapping policy:
-
Select Endpoint Policy > Infranet Enforcer > Auth Table Mapping and click New Policy.
-
On the New Policy page:
-
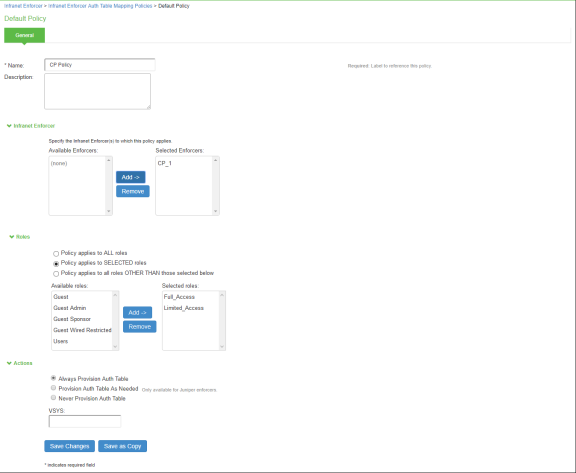
For Name, enter a name to label the auth table mapping policy.
-
(Optional) For Description, enter a description.
-
In the Enforcer section, specify the Infranet Enforcer firewall(s) to which you want to apply the auth table mapping policy.
-
In the Roles section, specify:
-
Policy applies to ALL roles: Select this option to apply the auth table mapping policy to all users.
-
Policy applies to SELECTED roles: Select this option to apply the auth table mapping policy only to users who are mapped to roles in the Selected roles list. You can add roles to this list from the available roles list.
-
Policy applies to all roles OTHER THAN those selected below: Select this option to apply the auth table mapping policy to all users except for those who map to the roles in the Selected roles list. You can add roles to this list from the available roles list.
-
-
In the Action section, specify auth table mapping rules for the specified Infranet Enforcer.
-
Always Provision Auth Table: Select this option to automatically provision auth table entries for chosen roles on the specified Infranet Enforcer.
-
Provision Auth Table as Needed: Select this option to provision auth table entries only when a user with a chosen role attempts to access a resource behind the specified Infranet Enforcer. This option is greyed out for Check Point Next-Generation Firewall Enforcers since it is not supported.
-
Never Provision Auth Table: Select this option to prevent chosen roles from accessing resources behind the specified Infranet Enforcer.
-
-
-
You must delete the default policy if you configure any custom auth table mapping policies. The default configuration includes this default auth table mapping policy that allows all source IP endpoints to use all Infranet Enforcers.
-
Click Save Changes.
Configuring Check Point Next-Generation Firewall
Check Point Next-Generation Firewall detects traffic from an endpoint that matches a configured security policy using the access roles. It determines the role(s) associated with that user, and allows or denies the traffic based on the actions configured in the security policy.
The network interfaces are configured on the Check Point Next-Generation firewall and the remaining configurations are done on the Check Point Smart Console.

Configuring Identity Awareness using Smart Console
The Identity Awareness lets you easily configure network access and auditing based on network location, identity of user, and identity of the device. When Identity Awareness identifies a source or destination, it shows the IP address of the user or computer with a name. For example, this lets you create firewall rules with any of these properties. You can define a firewall rule for specific users when they send traffic from specific computers or a firewall rule for a specific user regardless of which computer they send traffic from.
To enable Identity awareness:
-
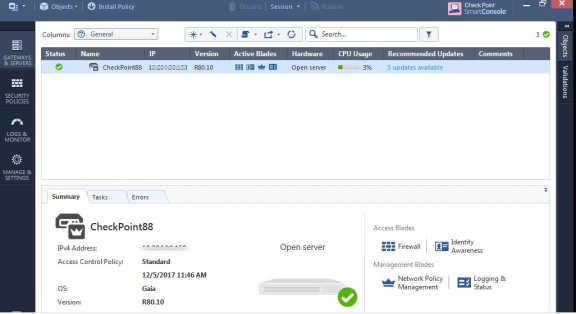
Login to the Check Point SmartConsole.
-
From the Security & Gateways view, double-click the Security Gateway on which to enable identity awareness.
-
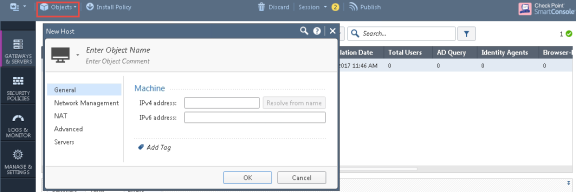
Create an object for Ivanti Policy Secure. Select Objects > New Host and enter the Ivanti Policy Secure IP address. Under Servers, enable Web Server and click OK.
-
Select Gateways & Servers > Identity Awareness and enable the following options:
-
Terminal Servers- Note down the pre-shared secret key.
-
Identity Web API- Click Settings and add the Ivanti Policy Secure device as Authorised Clients.

-
-
Click Install Policy.
-
From the Object Explorer create an object for Identity matching by creating user roles. Select Objects > Object Explorer and Click New > Users > Access Role.

-
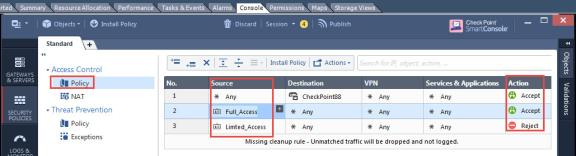
From the Smart Console create a security policy by keeping the Access Role in Source column. Select Security Policies > Access Control > Policy and then configure the required policies. For example:
-
Full_Access role policy allows traffic from Client with Full_Access role.
-
Limited_Access role policy denies traffic from Client with Limited_Access role.
The Full_Access role is on the top of the list as it should be considered first. The role names must match with the Role names created on Ivanti Policy Secure.
-
-
Click Install Policy.
Troubleshooting
You can use the following CLI commands (Expert Mode) on the Check Point Next-Generation Firewall for troubleshooting:
pdp monitor all
This displays the table of user identities mapped to IP addresses.
Unsupported Features
The following features are not supported:
- IP Address Pools.
- IPsec Enforcement.
- IDP Sensors.
- Virtual Systems (VSYS).
- Enforcement for endpoints behind Network Address Translation (NAT).
- Resource access policies. The administrator should configure all firewall policies on the firewall through Check Point SmartConsole.