Configuring Palo Alto Networks Firewall
Palo Alto Networks firewall detects traffic from an endpoint that matches a configured security policy using the endpoint’s auth table entry. It determines the role(s) associated with that user, and allows or denies the traffic based on the actions configured in the security policy.
Configuring User Identification on Security Zones
Policy rules on the firewall use security zones to identify the source and the destination of the traffic. The data traffic flows freely within a zone and not between different zones until you define a security policy rule that allows it. To enable User-ID enforcement, you must enable User Identification on both inbound and outbound zones traversed by the end-user traffic.
To enable User Identification:
-
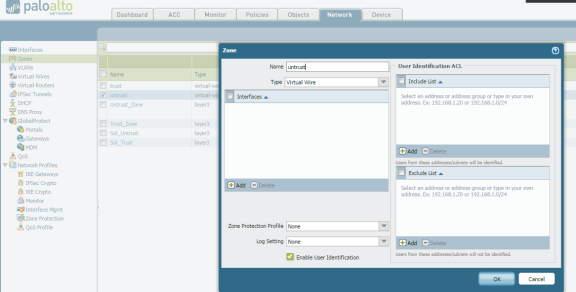
Select Palo Alto Networks > Network > Zones.
-
For each zone that serves as an inbound or outbound zone for enforced traffic, click the zone name (For example, trust, untrust, and so on).
-
Select Enable User Identification and click OK.
Provisioning of Resource Access Policies from Ivanti Policy Secure to the Palo Alto Networks Firewall Enforcer is not supported. You must configure the required security policies on the firewall.
Configuring Dynamic Address Groups
Dynamic address groups allow you to create policy that automatically adapts to changes—adds, moves, or deletions of servers. It also enables the flexibility to apply different rules to the same server based on its role on the network or the different kinds of traffic it processes.
To configure a dynamic address group:
-
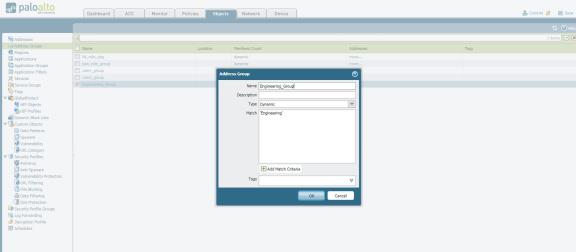
Select Palo Alto Networks > Objects > Address Groups.
-
Click Add and enter a Name and a Description for the address group.
-
Select Type as Dynamic. Define the match criteria. You can select dynamic and static tags as the match criteria to populate the members of the group.
-
Enter the role name of the users. The role name in the Match section should match the roles that are configured in Ivanti Policy Secure.
-
Click OK.
Dynamic discovery of users and their roles is not supported on the Palo Alto Networks firewall.
Configuring Security Policies
Security policies protect network assets from threats and disruptions and aid in optimally allocating network resources for enhancing productivity and efficiency in business processes. On the Palo Alto Networks firewall, security policies determine whether to block or allow a session based on traffic attributes such as the source and destination security zone, the source and destination IP address, the application, user, and the service.
To configure security policies associated with dynamic address groups:
-
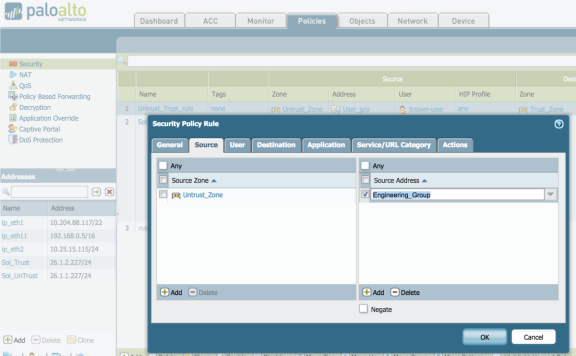
Select Palo Alto Networks > Policies > Security.
-
Click Add to create a new security policy rule. In the Source Address tab, select the previously-configured address group, as shown in figure.
-
In the User tab, enable known-user.
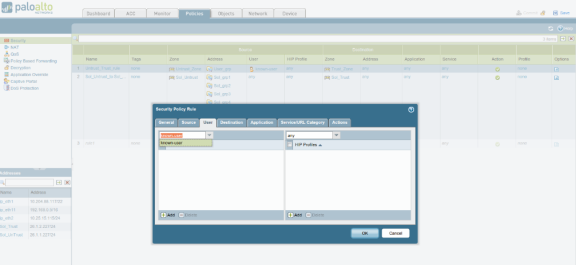
When the known-user is enabled, the resource access is revoked immediately once the user disconnects from Ivanti Policy Secure.
-
Configure the other options to meet your security requirements. Traffic from the endpoint is allowed or blocked based on the action chosen under the Action tab.
-
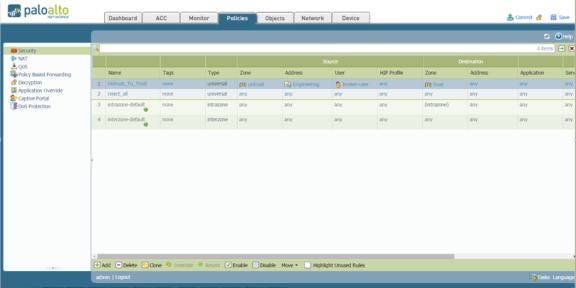
Click Commit to complete the configuration. The completed security configuration on the Palo Alto Networks firewall is shown below.
Configuring PAN Device Certificates
PAN device certificate validation enhances the security between Ivanti Policy Secure and the PAN device. It allows Ivanti Policy Secure to verify whether the server certificate is from a trusted source. This topic describes how to configure the Ivanti Policy Secure for validating device certificates, creating certificates on PAN, and checking the validity of the certificate.
Creating a Certificate Signing Request (PAN 6.0 and later)
To create a Certificate Signing Request (CSR) for sending to public third-party Certificate Authority (like Verisign, Globalsign, Entrust, and so on).
-
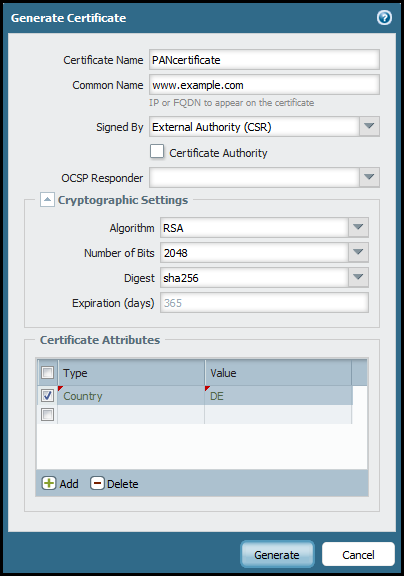
Select Device > Certificate Management > Certificates > Device Certificates.
-
Enter a Certificate Name (save this name for later).
-
In the Common Name field, enter the IP address of the interface where you will configure the service that will use this certificate.
-
Select the Certificate Authority (CA) check box for self-signed root CA certificate. Exporting the CSR and Importing the Signed Certificate are not applicable for self-signed certificates.
Uncheck the Certificate Authority check box if you are using enterprise CA, or trusted third-party CA certificates.
-
Complete the remaining details such as Country, Organization, and so on. Check with the Certificate Authority (CA) about their requirements for Certificate Attribute formatting and criteria.
-
Click Generate.
Ensure that the SSL/TLS service profile is enabled while creating the server certificate.
Exporting the CSR and Importing the Signed Request
Once the CSR is created, you must export the CSR to a third-party CA for signature.
To export the CSR:
-
Click the check box next to the Certificate Name.
-
Click Export and save the file.
-
Send the exported CSR to a third-party Certificate Authority. The CA will respond with a signed certificate.
Once the CA responds with the signed certificate, you must import the signed certificate from the certificate authority.
To import the signed certificate:
-
Note the name, including capitalization, of the certificate to import. (This must match the CSR request from above.)
-
Click Import.
-
In the Import Certificate dialog, type the name of the pending certificate. It must match exactly.
-
Go to the signed certificate received from the Certificate Authority and click OK.
-
Do not click the Import Private Key check box.
-
Depending on the certificate authority used, it may be necessary to chain the intermediate certificate with the server certificate and import it before completing this step.
-
Click OK.
Importing the Certificate on Ivanti Policy Secure
You can use the Trusted Server CAs page to import the trusted root certificate.
To configure device certificate verification:
-
Select System > Trusted Server CAs > Import Trusted Server CA.
-
Click Browse and select the certificate file.
-
Click Import Certificate. The Trusted Server CA page appears.
-
Verify if the certificate is imported successfully and click Done.
-
Click Configuration > Certificates > Trusted Server CAs and verify that the certificate is from a trusted source.
Adding PAN Device to Ivanti Policy Secure
For complete information on configuration, see Configuring PAN Infranet Enforcer in Ivanti Policy Secure.
If the server certificate is not valid the user will see the following error message.
Error: Failed to Retrieve API Key. Peer Certificate cannot be authenticated with known CA certificates.
