Configuring Ivanti Policy Secure with Juniper SDSN
The network security devices are configured with Ivanti Policy Secure for admission access control. A high-level overview of the configuration steps needed to set up and run the integration is described below:
-
The Administrator configures the basic Ivanti Policy Secure configurations such as creating an authentication server, authentication realm, user roles, and role mapping rules.
-
Configure Juniper Policy Enforcer as a client in Ivanti Policy Secure. Ivanti Policy Secure acts as a REST API Server for Juniper Policy Enforcer. The REST API access for the admin user needs to be enabled by accessing the serial console or alternatively from the Ivanti Policy Secure admin UI (Authentication > Auth Server > Administrators > Users > click “admin”, enable Allow access to REST APIs).
-
Configure Ivanti Policy Secure to block/quarantine the endpoint based on the threat prevention policy.
-
Configure the Switches/WLC as RADIUS Client in Ivanti Policy Secure (Endpoint Policy > Network Access > Radius Clients > New Radius Client). Switch should be configured with Ivanti Policy Secure as a RADIUS server.
-
Configure RADIUS return attribute policies to define the action upon receiving the event.
Ensure that Ivanti Policy Secure has the endpoint IP Address for the enforcement to work correctly.
As the endpoint IP Address is mandatory, deployments where the user is behind a NAT might not work well as Ivanti Policy Secure might have actual IP address whereas SDSN may send NAT'ed IP address.
Admission Control Template
The admission control template provides the list of possible events that can be received from the network security device along with regular expression to parse the message. The template also provides possible actions that can be taken for an event.
Ivanti Policy Secure is loaded with default templates for Juniper Policy Enforcer. Admin can create templates for other security devices and can upload to templates.
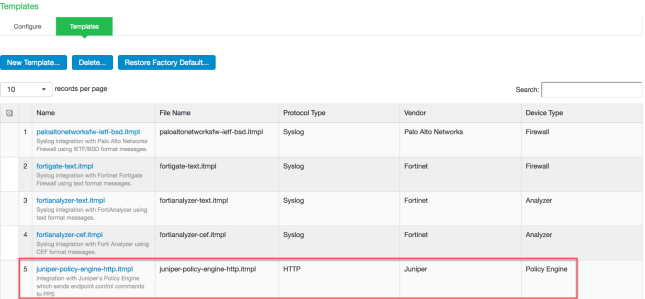
You can view the list of configured integration templates that provides the list of network security devices and the supported protocol type using Endpoint Policy > Admission Control > Templates.
To view the admission control templates:
-
Select Endpoint Policy > Admission Control > Templates.
Admission Control Policies
The admission control policies define the list of actions to be performed on Ivanti Policy Secure for the user sessions. The actions are based on the event and the severity information received from the network security device.
To view and add the new integration policy:
-
Select Endpoint Policy > Admission Control > Policies.
-
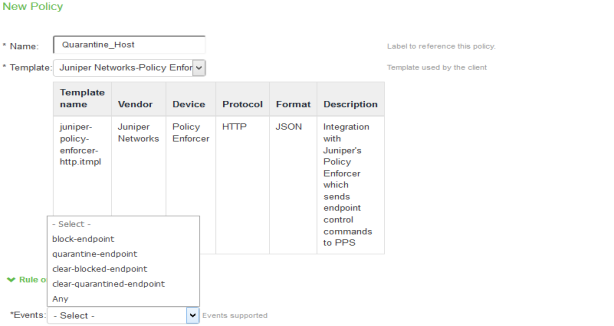
Click New Policy.
-
Enter the policy name.
-
Select Juniper Networks Policy Enforcer as a template.
-
Under Rule on Receiving, select the event type (block-endpoint, quarantine-endpoint, clear-blocked-endpoint, clear-quarantined-endpoint) and the severity level. The event types and the severity level are based on the selected template.
The actions on sessions supported are:
-
Block Endpoint: Blocks the host MAC Address on the Ivanti Policy Secure permanently. If admin choose to clear this, it can be cleared either by using Juniper Security Director application or by using the Ivanti Policy Secure Admin UI.
-
Quarantine Endpoint (Change user roles): Changes the roles assigned to the user on Ivanti Policy Secure so that restriction/privileges for the user can be changed. The Administrator can choose to apply these roles permanently or temporarily. If it is permanent, host will be added to infected host list and will be tracked for subsequent login attempts. Whereas quarantining temporarily is specific to that particular user session (Not tracked in Infected host list and subsequent login attempts will succeed).
-
Clear Blocked Endpoint - Clears a previously blocked MAC Address.
-
Clear Quarantined Endpoint - Clears a previously quarantined MAC Address.
-
-
Under then perform this action, select the desired action.
-
Ignore (log the event) —Received syslog event details are logged on the Ivanti Policy Secure and no specific action is taken.
-
Terminate user session— Terminates the user session on the Ivanti Policy Secure for the received messages.
-
Disable user account— Terminates the user session and disables the user on the Ivanti Policy Secure for the received messages.
-
Replace user role with this role— Changes the roles assigned to the user on Ivanti Policy Secure so that restriction/privileges for the user can be changed.
-
Specify whether to apply the role assignment permanently or only for the session.
-
Admission Control Policy action is not taken for endpoints behind Network Address Translation (NAT).
-
-
Under Roles, specify:
-
Policy applies to ALL roles—To apply the policy to all users.
-
Policy applies to SELECTED roles—To apply this policy only to users who are mapped to roles in the Selected roles list. You must add roles to this list from the Available roles list.
-
Policy applies to all roles OTHER THAN those selected below—To apply this policy to all users except for those who map to the roles in the Selected roles list. You must add roles to this list from the Available roles list.
-
-
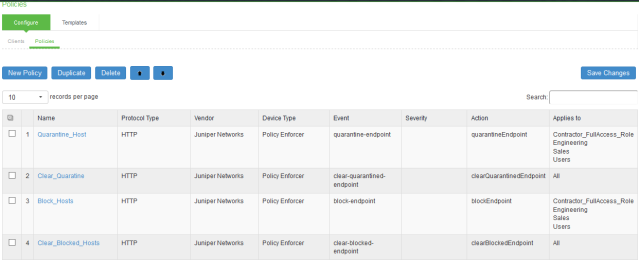
Click Save changes.
Once the policy is created. You can see the summary page as shown below. The following page shows the different policies created for different events with different user roles.
Admission Control Client
The admission control clients are the network security devices on which the syslog forwarding is enabled. The messages are received by the syslog server module running on Ivanti Policy Secure.
To add a client:
-
Select Endpoint Policy > Admission Control > Clients.
-
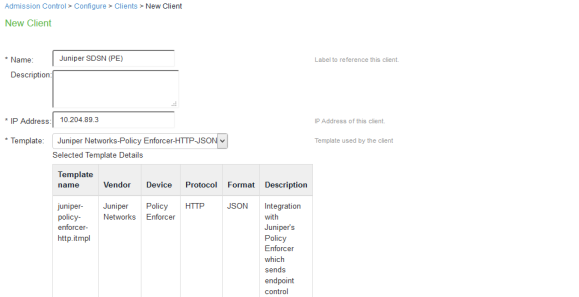
Click New Client.
-
Enter the name of the Juniper Policy Enforcer that will be added as a client in the Ivanti Policy Secure.
-
Enter the description.
-
Enter the IP address of the client.
-
Select the template used by the client.
-
Juniper-Policy Engine-HTTP
-
-
Click Save Changes.