Using IPsec
IPsec and the Junos Enforcer
IP Security (IPsec) is a suite of related protocols for cryptographically securing communications at the IP Packet Layer.
Ivanti Desktop Client support IPsec using IKEv1 with XAuth. For the client to establish an IPsec tunnel, it must retrieve configuration information from the Junos Enforcer. This information is forwarded to The Ivanti Policy Secure device by the respective device.
When a user with Ivanti Desktop Client signs in to the Ivanti Policy Secure device, these configuration details are passed on to the client to establish an IPsec tunnel with the Junos Enforcer.
IPsec is supported on the Junos Enforcer beginning in version 10.0. You configure IPsec routing policies and IP address pool policies on the Ivanti Policy Secure device. You configure security policies on the Junos Enforcer.
IPsec enforcement is supported only with the SRX Series Services Gateway Junos Enforcer. The EX Series Ethernet Switch Junos Enforcer does not support IPsec enforcement; only Source IP enforcement is supported on the EX Series Junos Enforcer.
IPsec policies allow you to specify the parameters between endpoints and the Junos Enforcer.
To set up IPsec for endpoints with Ivanti Desktop Client, you configure policies on the Ivanti Policy Secure device, and on the security device.
The Ivanti Policy Secure device pushes the required IPsec configuration parameters to the client when the client first attempts to connect to a protected resource behind and Ivanti Policy Secure device for which IPsec has been configured.
IPsec Policies on the Junos Enforcer
This section details the policies that you configure in association with using IPsec on the Junos Enforcer.
-
IPsec Routing Policy-This type of policy specifies which Junos Enforcer an endpoint must use to access a resource. This policy also specifies whether that resource requires an IPsec tunnel for endpoints to access it. Note that an IPsec tunnel does not automatically give the endpoint access. You configure IPsec routing policies on the Ivanti Policy Secure device.
-
IP Address Pools Policy-This type of policy specifies a pool of virtual IP addresses that you want the Ivanti Policy Secure device to automatically assign to endpoints in NAT environments that use IPsec tunnels to the Junos Enforcer. You configure IP address pools policies on the Ivanti Policy Secure device.
-
Junos Enforcer Security Policy-On the Junos Enforcer, security policies are used to define the source and destination address, the application, and the phase 2 policy. You configure security policies on the Junos Enforcer. You cannot configure security policies on the Ivanti Policy Secure device.
Using IPsec with the Junos Enforcer
On supported endpoints that use Ivanti Desktop Client, you can use IPsec enforcement to encrypt the traffic between an endpoint and the Junos Enforcer, adding an additional layer of protection for network assets.
IPsec is not supported on agentless or Java agent endpoints, or on endpoints that connect with non-Ivanti Policy Secure software. Instead, you must use source IP enforcement for these clients.
To use IPsec enforcement, you set up a VPN tunnel with IKE (Internet Key Exchange) on the Junos Enforcer. You can configure IPsec enforcement by creating IPsec routing policies on the Ivanti Policy Secure device. For IPsec with the Junos Enforcer, you create security policies on the device.
For IPsec with the Junos Enforcer you use the CLI to create security policies.
With the Junos Enforcer, the Ivanti Policy Secure device uses the destination zone to match the IPsec Routing policies configured on the Ivanti Policy Secure device.
IPsec Enforcement on the Junos Enforcer
The Ivanti Policy Secure device is the policy decision point that determines which users and endpoints can access protected resources.
The Junos Enforcer is the enforcement point to provide the ultimate protection to ensure that your network assets are secured.
Before Configuring IPsec on the Junos Enforcer
|
Topic |
Details |
|---|---|
|
Connection |
The Junos Enforcer and the Ivanti Policy Secure device must be connected before you use the Ivanti Policy Secure device to set up IPsec enforcement on the Junos Enforcer. |
|
Multiple interfaces |
If you configure IPsec enforcement for a Junos Enforcer that has multiple interfaces in the source zone, the Ivanti Policy Secure device configures a unique IKE gateway, VPN, and tunnel policy for each interface. To distinguish between the tunnel policies, the Ivanti Policy Secure device displays the name of the VPN for each tunnel policy in the VPN column on the UAC > Infranet Enforcer > Enforcer Policies page after you click Save Changes. |
|
CLI commands |
To include the CLI commands that the Ivanti Policy Secure device sends to the Junos Enforcer in the Ivanti Policy Secure device event logs, select the Enforcer Command Trace option on the System > Log/Monitoring > Events > Settings page. |
|
Junos Enforcer zone limitation |
On the Junos Enforcer, only one IPsec VPN tunnel per “from-zone” to “to-zone” is supported. |
|
Troubleshooting |
To troubleshoot your IPsec configuration, you can view the Event logs on the Ivanti Policy Secure device. You can also view IPsec information on the endpoint by choosing Tools > Diagnostics > IPsec Diagnostics. |
IPsec Routing Policies for the Junos Enforcer
An IPsec routing policy specifies which Junos Enforcer device endpoints must use to access resources when using IPsec. The IPsec routing policy also specifies that endpoints must use an IPsec tunnel to the Junos Enforcer to access resources.
For example, you might create an IPsec routing policy that uses IPsec for 0.0.0.0/0 (the entire network). In the same policy, you could specify the resources that are exceptions and do not use IPsec, such as 172.24.80.30 (the Ivanti Policy Secure device), 172.24.80.31 (the Junos Enforcer), and 172.24.144/21 (a wireless network).
The Junos Enforcer and the Ivanti Policy Secure device must be connected before you use the Ivanti Policy Secure device to set up IPsec enforcement on the Junos Enforcer
Before Configuring IPsec Routing Policies
|
Topic |
Details |
|---|---|
|
IP address exceptions |
Do not use IPsec for the Ivanti Policy Secure device, the Junos Enforcer, and networks where your endpoints are located. For example, if you create an IPsec routing policy that uses IPsec on an entire network range (such as 0.0.0.0/0) for your protected resources, be sure to specify exceptions in the same policy for the IP addresses assigned to IC Series device, Junos Enforcer, and the endpoint subnets. |
|
UDP encapsulation and virtual adapters |
For maximum interoperability with other third-party IPsec clients, select both Always use UDP encapsulation and Always use a virtual adapter. When both options are selected, NAT is simulated even if a NAT device is not present. Ivanti recommends that you select both options or neither option. For example, assume an endpoint containing two network interfaces, such as a wired and a wireless interface, where a NAT device is not present between the endpoint and the Junos Enforcer. If the endpoint doesn't access a protected resource by using the interface that is connected to the network where the Junos Enforcer is installed, then the user will not be able to access the protected resource through either interface without a virtual adapter. Because the Ivanti Policy Secure device does not automatically install a virtual adapter unless a NAT device is detected, enable the Always use a virtual adapter option to simulate NAT and force the use of a virtual adapter for this use case. |
Configuring an IPsec Routing Policy for the Junos Enforcer
To configure an IPsec routing policy:
-
In the Ivanti Policy Secure device admin console, select Endpoint Policy > Infranet Enforcer > IPsec Routing.
-
Click New Policy.
-
On the New Policy page:
-
For Name, enter a name to label this IPsec routing policy.
-
For Description, enter an optional description.
-
-
For Resources, enter the IP address and netmask of each resource that requires endpoints to use IPsec, one per line, in the following format:
<ip address>[/netmask]
You cannot specify a host name in an IPsec routing policy. You must specify an IP address.
-
For Exceptions, use the following format, one per line, to specify the IP address and netmask of each resource that has traffic which you do not want to flow through the Junos Enforcer:
<ip address>[/netmask]
Each exception must be a subset of what you specify for Resources.
-
For Destination Zone, enter the zone that is configured on the Junos Enforcer where the protected resources specified in this IPsec routing policy are located. For example: trust
-
Select these options to configure IPsec interoperability and tunnel persistence:
-
Always use UDP encapsulation-This option allows the client and the Junos Enforcer to create an IPsec tunnel inside a third-party IPsec tunnel by using UDP encapsulation even if a NAT device is not present. For example, for inter-operability with third-party IPsec clients running on the endpoint, the Ivanti Policy Secure device uses port 4500 for UDP encapsulation in compliance with RFC 3948.
Always use a virtual adapter-This option forces the use of a virtual adapter on the endpoint. If you select this option, you must also set up IP address pools even if a NAT device is not present.
-
Persistent Tunnel Mode-This option allows you to determine whether or not a tunnel is established when a user first connects to the Ivanti Policy Secure device. If the check box is selected, an IPsec tunnel is established when a user authenticates to the Ivanti Policy Secure device regardless of whether users are accessing protected resources behind the Junos Enforcer. If the check box is not selected, the tunnel is not automatically set up: a tunnel will not be initiated until there is a request for traffic accessing potential resources.
-
-
From the Enforcer drop-down list, choose the Junos Enforcer to which endpoints connect to access the resources specified in this IPsec routing policy.
-
In the Roles section, specify:
-
Policy applies to ALL roles-Choose this option to apply this IPsec routing policy to all users.
-
Policy applies to SELECTED roles-Choose this option to apply this IPsec routing policy only to users who are mapped to roles in the Selected roles list. Be sure to add roles to this list from the Available roles list.
-
Policy applies to all roles OTHER THAN those selected below-Choose this option to apply this IPsec routing policy to all users except for those who map to the roles in the Selected roles list. Be sure to add roles to this list from the Available roles list.
-
-
Click Save Changes.
Using IP Address Pool Policies for IPsec in a NAT Environment
The Ivanti Policy Secure device supports the use of IPsec tunnels through NAT devices to allow users secure access to protected resources. In a NAT environment, a virtual IP address must be used for the IPsec tunnel¡¦s inner address.
You can configure a pool of virtual IP addresses that the Ivanti Policy Secure device can automatically assign to endpoints by creating IP address pool policies. An IP address pool is a contiguous range of IP addresses which you configure by specifying the starting address and the number of addresses in the pool. You can associate an IP address pool with one or more Junos Enforcers.
IP address pool policies are required if one of the following is true:
-
You are using IPsec in a NAT environment.
-
You selected the Always use a virtual adapter option in an IPsec routing policy to enable interoperability with other third-party IPsec clients running simultaneously on the endpoint, such as Ivanti Secure Network Connect or Microsoft IPsec.
To use NAT devices in the Ivanti Policy Secure solution, the endpoints must be located on one side of the NAT devices, and both the Ivanti Policy Secure device and Junos Enforcer must be located on the other side of the devices.
Also note the following if you are using NAT:
-
NAT is not supported between the Ivanti Policy Secure device and Junos Enforcer.
-
If there is a NAT device between the endpoint and the Ivanti Policy Secure device, but not between the endpoint and the Junos Enforcer, source IP enforcement does not work. This is also true if there is a NAT device between the endpoint and the Junos Enforcer, but not between the endpoint and the Ivanti Policy Secure device.
If NAT is not detected (and Always use UDP encapsulation / Always use a virtual adapter are not set), the client uses the endpoint¡¦s physical IP address when creating the IPsec tunnel to the Junos Enforcer. The Ivanti Policy Secure device does not allocate an IP address from the pool.
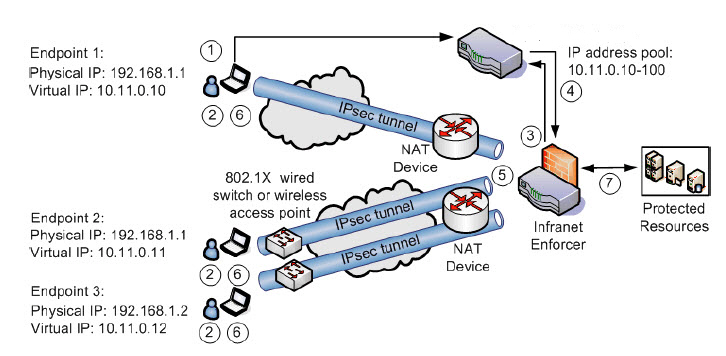
Figure shows an example of a NAT environment where endpoints 1 and 2 have the same physical IP address: 192.168.1.1. By using an IP address pool policy, you can configure the Ivanti Policy Secure device to assign a unique, routable, virtual IP address to each endpoint.
The following sequence of events occur when the Ivanti Policy Secure device and aIvanti Secure Access Client use an IPsec tunnel through a NAT device:
-
When the client connects to the Ivanti Policy Secure device and authenticates the user, the client returns the endpoint¡¦s source IP address that is used to access the Junos Enforcer to the Ivanti Policy Secure device. The Ivanti Policy Secure device saves the source IP address internally.
-
When the user attempts to access a protected resource, an IKE exchange occurs to set up an IPsec tunnel between the endpoint and the Junos Enforcer.
-
During the IKE exchange, the Junos Enforcer detects the source IP address of the endpoint and sends that IP address to the Ivanti Policy Secure device.
-
The Ivanti Policy Secure device compares its saved source IP address for the endpoint with the endpoint¡¦s IP address sent from the Junos Enforcer. If the addresses do not match, the Ivanti Policy Secure device determines that there is a NAT device between the endpoint and the Junos Enforcer. The Ivanti Policy Secure device automatically provisions an IP address from an IP address pool policy that you configured (for example, 10.11.0.10-100). The Ivanti Policy Secure device assigns the IP address to the endpoint based on the IP address pool policy that applies to the users role. The Ivanti Policy Secure device then sends the IP address to the Junos Enforcer.
-
The Junos Enforcer sends that IP address from the IP address pool (for example, 10.11.0.10) to the client on the endpoint during the XAuth authentication exchange.
-
The client on the endpoint configures a virtual network adapter using the IP address sent from the Junos Enforcer.
-
The endpoint initiates an IPsec connection to the Junos Enforcer, and the Junos Enforcer sets up dynamic routes for each IP address. The user can now use the endpoint to access protected resources.
The Ivanti Policy Secure device allocates one IP address for the duration of each client session, which lasts as long as the client is connected to the Ivanti Policy Secure device. After a session ends, the Ivanti Policy Secure device can reuse the allocated address for a different endpoint.
When the Ivanti Policy Secure device must provide an inner IP address for a new IPsec tunnel, it attempts to reuse an existing inner IP address assigned to the endpoint before allocating a new one. The Ivanti Policy Secure device checks all of the inner IPs allocated from IP address pools for the endpoint. For each IP address, the Ivanti Policy Secure device determines whether the policy from which that address was allocated applies to the user and the Junos Enforcer for the new IPsec tunnel. If a compliant IP address is found, it is used and no new IP address is allocated. If a compliant IP address is not found, a new IP address is allocated.
Understanding IP Address Pool Policies
|
Topic |
Details |
|---|---|
|
Multiple Infranet Enforcers |
If you are using multiple Infranet Enforcers across a LAN, make sure that the IP address pool contains addresses that are valid for each Infranet Enforcer. |
|
Multiple unclustered Ivanti Policy Secure devices |
If you are using multiple unclustered Ivanti Policy Secure devices across a LAN, make sure that the IP address pool contains addresses that are unique for each Ivanti Policy Secure device. The endpoint is assigned a virtual IP address for each unclustered Ivanti Policy Secure device. |
|
IP address conflicts |
Make sure that the IP pool addresses do not conflict with addresses of hosts that the endpoint might access. |
|
Deleting IP addresses in an IP pool |
If you change or delete the IP addresses in an IP address pool, you must delete all user sessions in order to stop using those addresses. To delete all user sessions, select System > Status > Active Users page of the Ivanti Policy Secure device admin console and click Delete All. |
|
Number of available IP addresses |
Be sure to specify a sufficient number of addresses in the IP address pool for all of the endpoints in your deployment. When all of the addresses in the pool are assigned to endpoints, additional endpoints cannot obtain a virtual IP address and are blocked from accessing protected resources. The Ivanti Policy Secure device logs a message in the Event log when an IP address cannot be assigned to an endpoint. |
Configuring an IP Address Pool Policy
To configure an IP address pool policy:
-
In the Ivanti Policy Secure device admin console, select Endpoint Policy > Infranet Enforcer > IP Address Pools.
-
Click New Policy.
-
On the New Policy page:
-
For Name, enter a name to label this IP address pool policy.
-
(Optional) For Description, enter a description.
-
-
For IP address pool, specify IP addresses or a range of IP addresses for the Ivanti Policy Secure device to assign to endpoints. The IP address range can be specified as shown in Table 15 where the last component of the IP address is a range delimited by a hyphen (-). Special characters are not allowed.
|
Address Range |
Description |
|---|---|
|
a.b.c.d |
A single IP address |
|
a.b.c.d-e.f.g.h |
All IP addresses from the first address to the last address, inclusive |
|
a.b.c.d-f.g.h |
An abbreviated form that specifies the range a.b.c.d through a.f.g.h |
|
a.b.c.d-g.h |
An abbreviated form that specifies the range a.b.c.d through a.b.g.h |
|
a.b.c.d-h |
An abbreviated form that specifies the range a.b.c.d through a.b.c.h |
|
a.b.c.d/mask |
All addresses in a network |
For example, to allocate all addresses in the range 172.20.0.0 through 172.20.3.255, specify 172.20.0.0-3.255. To allocate all addresses in a class C network, specify 10.20.30.0/24.
-
Under Infranet Enforcer, select the Junos Enforcer to which you want to apply this IP address pool policy and click Add. To apply the policy to all Junos Enforcers, do not add any Junos Enforcers, and leave the default setting (all) listed in the Selected Enforcers list.
-
In the Roles section, specify:
-
Policy applies to ALL roles- To apply this IP address pool policy to all users.
-
Policy applies to SELECTED roles-To apply this IP address pool policy only to users who are mapped to roles in the Selected roles list. Be sure to add roles to this list from the Available roles list.
-
Policy applies to all roles OTHER THAN those selected below-To apply this IP address pool policy to all users except for those who map to the roles in the Selected roles list. Be sure to add roles to this list from the Available roles list.
-
-
Click Save Changes.
If the IP addresses you specify in the IP address pool policies (that is, the virtual IP addresses) are not routable from the network where your protected resources are located, make sure you enable Source Network Address Translation (NAT-src) on the infranet auth tunnel policies that configure IPsec on the Junos Enforcer.
To enable NAT-src using the Junos Enforcer Web UI:
-
Click Policies.
-
Click Edit on the infranet auth tunnel policy.
-
Click Advanced.
-
Select Source Translation and click OK.
For information about enabling NAT-src on the infranet auth tunnel policy, see Juniper's Network Address Translation Feature Guide for Security Devices.
Configuring Junos Enforcer IPsec Routing Policies
This topic describes how to configure Junos Enforcer IPsec routing policies. It includes the following information:
Configuration Summary
You use the Junos OS CLI to configure IPsec routing policies on the Junos Enforcer. Unlike the ScreenOS Enforcer, you cannot create policies on the Ivanti Policy Secure device and push the policies to the Junos Enforcer.
The source interface is specified in the IKE gateway configuration on the Junos Enforcer. In security policies you specify a VPN, and you specify the IKE gateway in the VPN. For more information see Juniper’s Junos OS Initial Configuration Guide for Security Devices.
IPsec on the Junos Enforcer can handle up to 5,000 concurrent IKE gateways.
Dynamic IPsec is not supported on the Junos Enforcer.
To configure IPsec on the Junos Enforcer, you must perform three primary tasks:
-
Configure the Ivanti Policy Secure device as a RADIUS server for the Junos Enforcer RADIUS client to enable XAUTH. You must use the internal interface on the Ivanti Policy Secure device, the external interface does not support XAUTH.
-
Configure IKE and IPsec parameters to specify security restrictions for Ivanti Connect Secure.
-
Configure security policies to route traffic between the security gateway and the interface for endpoints.
The Ivanti Policy Secure device polls the Junos Enforcer to retrieve the following configuration information:
The IKE gateway interface
-
The destination zone
-
Identity
-
The pre-shared seed
-
The RADIUS shared secret
The Ivanti Policy Secure device pushes these details to the client to allow establishment of a dial-up VPN tunnel.
Configuration Example
The following example describes a sample configuration for setting up IPsec on the Junos Enforcer.
To use IPsec with the ScreenOS Enforcer, you can configure basic IPsec security policies on the Ivanti Policy Secure device and then push the policies to the firewall. On the Junos Enforcer, this functionality does not exist. For the Junos Enforcer, you use the CLI to configure settings to create on the Junos Enforcer that are negotiated with Ivanti Desktop Client.
Before you begin, ensure that security zones and interfaces are set up, and that IPsec routing policies and optional IP address pool policies have been configured on the Ivanti Policy Secure device.
Junos Enforcer devices support up to four proposals for Phase 2 negotiations, allowing you to define the range of tunnel parameter restrictions that endpoints will accept.
For a complete description of IPsec on the Junos Enforcer see the Junos OS Initial Configuration Guide for Security Devices.
To configure IPsec on the Junos Enforcer:
-
Configure the Ivanti Policy Secure device as a RADIUS server for the Junos Enforcer RADIUS client.
In this example, you create an instance of the Ivanti Policy Secure device hostname dev1086 as the RADIUS server. The IP address is 192.168.100.5. You need to provide a shared secret, which is used to permit the Ivanti Policy Secure device to accept RADIUS packets from the device. Enter the following commands:
user@host# set access profile dev1086 authentication-order radius
user@host# set access profile dev1086 radius-server 192.168.100.5 secret some-shared-secret
If you are configuring Ivanti Policy Secure devices in an active/active cluster, you must configure all IP addresses for individual Ivanti Policy Secure devices. The shared secret must be the same, as in the following example:
user@host# set access profile dev1086 authentication-order radius
user@host# set access profile dev1086 radius-server 192.168.100.5 secret some-shared-secret
user@host# set access profile dev1086 radius-server 192.168.100.6 secret some-shared-secret
If you are configuring an active/passive cluster, configure the Ivanti Policy Secure device’s VIP as the RADIUS server IP address.
-
Configure IKE and IPsec security parameters.
IPsec with the Junos Enforcer is supported only with aggressive mode and Encapsulation Security Payload (ESP).
In aggressive mode, phase 1 security proposals are negotiated with two exchanges and a total of three messages:
Messages
Because the participants' identities are exchanged in the clear (in the first two messages), Aggressive mode does not provide identity protection.
ESP protects the inner IP packet, while the outer header remains unprotected.You define the security proposals, including all of the IKE parameters that determine the strength of the IPsec tunnels.
Set up a phase 1 IKE proposal named prop, using Diffie-Hellman Group 2, authentication algorithm SHA1, and encryption algorithm 3DES-CBC. Enter the following series of commands.
-
user@host# set security ike proposal prop1 authentication-method pre-shared-keys
The client supports only the preshared key authentication method.
-
user@host# set security ike proposal prop1 dh-group group2
The client supports group1, group2, and group5.
-
user@host# set security ike proposal prop1 authentication-algorithm sha1
The client supports md5 and sha1.
-
user@host# set security ike proposal prop1 encryption-algorithm 3des-cbc
The client supports des-cbc, 3des-dbc, aes-128-cbc, aes-192-cbc, and aes-256 -cbc
Set up an IKE policy named pol1 with aggressive mode, the pre-shared key and the proposal configured above.
-
user@host# set security ike policy pol1 mode aggressive
The client supports only aggressive mode.
-
user@host# set security ike policy pol1 proposals prop1
-
user@host# set security ike policy pol1 pre-shared-key ascii-text some-preshared-key
Only ascii-text is supported. Do not use a hexadecimal pre-shared key.
Configure an IKE gateway named gateway1 with 5000 connection-limits, host.company.com identity, group IKE ID, IKE policy pol1 configured above, and XAUTH dev1086 as configured above.
-
user@host# set security ike gateway gateway1 ike-policy pol1
-
user@host# set security ike gateway gateway1 dynamic hostname host.company.com
-
user@host# set security ike gateway gateway1 dynamic ike-user-type group-ike-id
-
user@host# set security ike gateway gateway1 dynamic connections-limit (maximum 5,000)
-
user@host# set security ike gateway gateway1 external-interface ge-0/0/2.0
-
user@host# set security ike gateway gateway1 xauth access-profile dev1086
The Ivanti Policy Secure device and the client support only group-ike-id.
Configure an IPsec phase 2 proposal named prop1 with ESP protocol, HMAC-SHA1-96 authentication algorithm, and 3DES-CBC encryption algorithm.
-
user@host# set security ipsec proposal prop1 protocol esp
The client supports only esp.
-
user@host# set security ipsec proposal prop1 authentication-algorithm hmac-sha1-96
The client supports hmac-md5-96, and hmac-sha1-96.
-
user@host# set security ipsec proposal prop1 encryption-algorithm 3des-cbc
The client supports des-cbc, 3des-cbc, aes-128-cbc, aes-192-cbc, aes-256-cbc, and no encryption-algorithm.
Configure an IPsec phase 2 policy name pol1 with proposal prop1 as configured above.
-
user@host# set security ipsec policy pol1 proposals prop1
In this section, you configure an IPsec VPN named vpn1 with IKE gateway gateway1 as configured in the above example, and IPsec policy pol1 as configured above.
-
user@host# set security ipsec vpn vpn1 ike gateway gateway1
-
user@host# set security ipsec vpn vpn1 ike ipsec-policy pol1
-
user@host# set security ipsec vpn vpn1 establish-tunnels immediately
-
user@host# set security ike gateway gateway1 external-interface ge-0/0/0.0
The external interface refers to the interface that faces the client.
-
user@host# set security ike gateway gateway1 xauth access-profile name
-
-
Create the security policy.
-
Enable the VPN vpn1 configured above and add Ivanti Policy Security enforcement in a security policy named pol1, from the zone named untrust to the zone named trust.
user@host# set security policies from-zone untrust to-zone trust policy pol1 match source-address any
Always specify any with the following command.
user@host# set security policies from-zone untrust to-zone trust policy pol1 match destination-address any
user@host# set security policies from-zone untrust to-zone trust policy pol1 match application any
user@host# set security policies from-zone untrust to-zone trust policy pol1 then permit tunnel ipsec-vpn vpn1
user@host# set security policies from-zone untrust to-zone trust policy pol1 then permit application-services uac-policy
-