Installation
This chapter provides instructions and tips for installing the chassis into a rack.
Preparing for Setup
Please read this section in its entirety before beginning the installation procedure.
Choosing a Setup Location
Decide on a suitable location for the rack. It should be a clean, dust-free area that is well ventilated. Avoid areas where heat, electrical noise and electromagnetic fields are generated. Place it near a grounded power outlet.
•Leave at least 25 inches clearance in front of the rack to open the front door completely.
•Leave approximately 30 inches of clearance in the back of the rack to allow for sufficient airflow and ease in servicing.
•Install in a restricted access location, such as a dedicated equipment room or service closet.
Ambient Operating Temperature
If installed in a closed or multi-unit rack assembly, the ambient operating temperature of the rack environment may be greater than the ambient temperature of the room. Install the equipment in an environment compatible with the manufacturer’s maximum rated ambient temperature (TMRA).
Adequate Airflow
Equipment should be mounted into a rack so that the amount of airflow required for safe operation is not compromised.
Circuit Overloading
Avoid overloading the power supply circuitry or any overcurrent protection equipment. Use equipment nameplate ratings to calculate your requirements.
Reliable Ground
A reliable ground must be maintained at all times. To ensure this, ground the rack, itself. Pay attention to power supply connections other than the direct connections to the branch circuit, such as power strips.
Physical Rack Precautions
•Ensure that the leveling jacks on the bottom of the rack are fully extended to the floor with the full weight of the rack resting on them.
•In single rack installation, stabilizers should be attached to the rack.
•In multiple rack installations, the racks should be coupled together.
•When mounting this unit in a partially filled rack, load the rack from the bottom to the top with the heaviest component at the bottom of the rack. If this is the only unit in the rack, mount it at the bottom.
•Always make sure the rack is stable before extending a component from the rack. Extend only one com- ponent at a time. Extending two or more simultaneously may cause the rack to become unstable.
Warning: Follow these guidelines to prevent injury. Take all precautions to ensure the system remains stable
General Server Precautions
•Review the electrical and general safety precautions that came with the components you are adding to your chassis.
•Determine the placement of each component in the rack.
•Install the heaviest server components on the bottom of the rack first, and then work up.
•Use a regulating, uninterruptible power supply (UPS) to protect the server from power surges, voltage spikes and to keep your system operating in case of a power failure.
•Allow the hard drives and power supply modules to cool before touching them.
•Always keep the rack front door, all panels and all components on the servers closed when not servicing, to maintain proper cooling.
Warning: If you unscrew and open the chassis cover, it will void your product warranty.
Rack Mounting Instructions
There are a variety of rack units on the market, so the assembly procedure might differ slightly. Refer to the installation instructions that came with your rack unit.
Figures are for illustrative purposes only. Servers should always be installed in racks from the bottom up
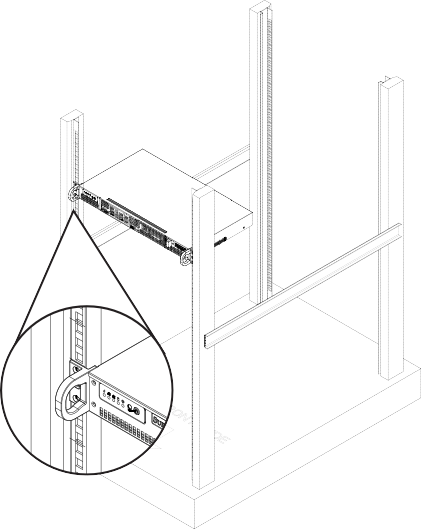
Installing the Chassis into a Standard Rack
Installing the Chassis in a Standard Rack
1.Confirm that chassis includes the four mounting screws required to mount the chassis into a rack.
2.Align the thru holes of the chassis with the thru holes of the rack.
3.Insert the mounting screws into the thru holes in the front of the chassis and through the thru holes in the rack.
Warning: Do not pick up the server by the front handles. They are designed to pull the system from a rack only.