Console and Initial Configuration
Accessing ISA8000 Serial Console through Laptop
1.Get the USB-to-DB9 (female) cable (this cable is not provided by Ivanti).

2.Connect the USB port to the laptop and serial DB9 female port to the ISA8000 console.
3.Configure a terminal emulation utility running on the laptop, such as HyperTerminal or PuTTY, to use these serial connection parameters: 9600 bits per second, 8-bit no parity (8N1), 1 stop bit, no flow control.
4.Connect a network cable from the INT port (internal port) on the appliance to a switch port.
To find your COM port in Windows, go to Start > Search > Device Manager > Ports (COM & LPT) > USB Serial Port (COM#).
Accessing ISA8000 Console through Console Server
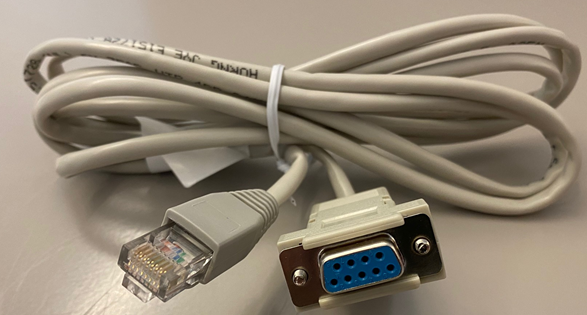
1. Get the RJ45-to-DB9 serial cable.

2.Connect the RJ45 port in RJ45-to-DB9 serial cable to the console server and serial DB9 female to the ISA8000 console (DB9 male).
3.Configure a terminal emulation utility running on the laptop, such as HyperTerminal or PuTTY, connect using telnet to the console server IP and the port number it is connected to.
4.Connect a network cable from the INT port (internal port) on the appliance to a switch port.
Powering On the System and Selecting the Personality
Do this:
1.Connect the AC power cord from the power supply to a power source.
2.Press the power switch on the front of the system.
3.Observe the status LEDs (where applicable) on each power supply faceplate. If an AC power supply is correctly installed and functioning normally, the AC OK and DC OK LEDs light steadily, and the PS FAIL LED is not lit.
After powering off a power supply, wait at least 60 seconds before turning it back on. After powering on a power supply, wait at least 60 seconds before turning it off.
After the power supply is powered on, it can take up to 60 seconds for status indicators—such as the status LEDs on the power supply and the show chassis command display—to indicate that the power supply is functioning normally. Ignore error indicators that appear during the first 60 seconds.
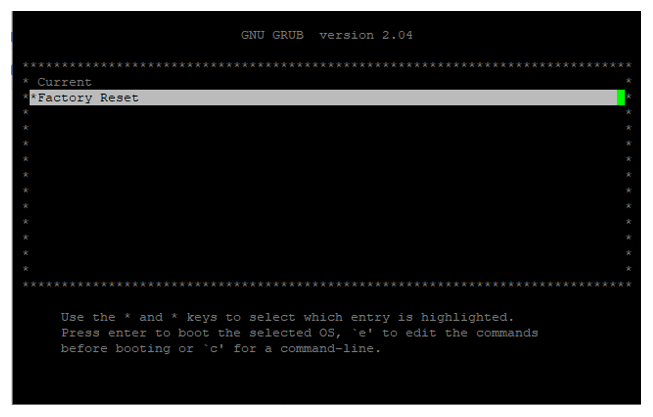
4.The device reboots, and you see the GRUB boot menu. Choose the Factory Reset option using the down-arrow key which supports to select the personality. Please note that here timeout is 3 seconds. If the selection is not made within this period, then the device boots up to current image.

In case the user fails to select the Factory Reset option, then system will boot up with current image. Then user needs to power cycle the device, and select the Factory Reset option and follow with the above procedure.
Configuring Basic Settings
When you bring up a new ISA8000 for the first time, you need to enter basic network and machine information through the console to make it accessible to the network. After entering these settings, you can continue configuring the ISA8000 through the administrator Web console.
The installation process may take up to 30 minutes.
Do this to perform basic setup:
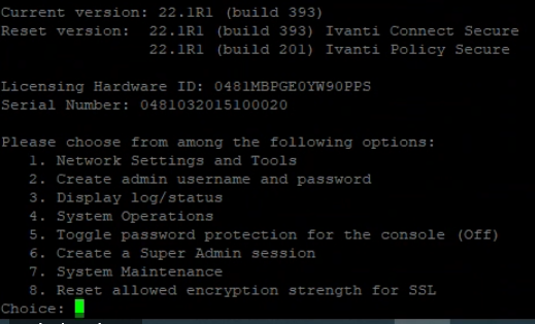
1.In Serial com console, check that the image loaded from local disk. i.e., current partition.
2.Enter the number corresponding to the personality for which you want to configure ISA8000.

3.Enter y to select the appliance as a stand-alone node.

Setting Up Ivanti Connect Secure Package / Ivanti Policy Secure Package
To set up [1] Ivanti Connect Secure package or [2] Ivanti Policy Secure package, do the following:
1.Enter y to accept the license terms (or enter r to read the license first).
2.Follow the directions in the console, and enter the machine information for which you are prompted, including the following:
•Internal port IP address (you configure the external port through the administrator Web console after initial configuration)
•Internal port network mask
•Internal port default gateway address
•Internal port default VLAN (optional)
•Primary DNS server address
•Admin username
•Admin password
•REST API access (for this administrator)
•Digital certificate
•Common name (example: secure.company.com)
•Organization name (example: Company Inc.)
•Register Ivanti Connect Secure with Ivanti Neurons for Secure Access
After you perform the basic setup, you are ready to license the software, verify accessibility, and complete the configuration process through the ISA8000 administrator Web console.
Change the Personality
If ISA8000 is set up as Ivanti Connect Secure or Ivanti Policy Secure device, it can be switched to any other personality anytime. Changing a personality deletes all configuration files and system and user data. You must perform the basic setup again to reestablish network connectivity. The installation process may take up to 20 minutes.
To change the personality:
1.Start a console session and in the options prompt, enter 4 to select System Operations.

2.In the operation to perform, enter 1 to select Reboot this <Ivanti Connect Secure/Ivanti Policy Secure>.

3.After system reboot, choose Factory Reset option.

4.In the personality selection, choose the personality you want to change to and follow the instructions to complete the configuration.

Accessing the Web Admin Interface
1.Launch a web browser from a laptop that is network connected.
2.Point the browser at the same IP address that was assigned to the internal port followed by /admin (for example, https://a.b.c.d/admin).
With base image version 22.1R4, admin portal access might fail using internal port. Please follow the below instructions instead if you encounter the issue:
Enable the management port and assign an IP address to it.
Log in to the admin UI via the management port IP.
Upgrade to any latest release. After upgrading to the latest release, admin portal can be accessed via internal port.
3.When prompted with the security alert to proceed without a signed certificate, click Yes. When the administrator sign-in page appears, you have successfully connected your device to the network.
4.On the sign-in page, enter the administrator username and password you created earlier. Then click Sign In. The administrator Web console opens to the Overview page.
Licensing the System
After you install the device and perform basic setup, you are ready to license it.
To license your device, follow instructions received in an email from Ivanti. For more information, contact Support Center.
The device uses the common machine and organization names to create a self-signed digital certificate for use during product evaluation and initial setup.
We strongly recommend that you import a signed digital certificate from a trusted certificate authority (CA) before you deploy the device for production use.