Ivanti Secure Access Client Connection Set Options for Ivanti Connect Secure
A Ivanti Secure Access Client connection set contains network options and allows you to configure specific connection policies for client access to any Ivanti server that supports Ivanti Secure Access Client. The following sections describe each of the configuration options for a Ivanti Secure Access Client connection set.
Ivanti Secure Access Client Connection Set Options
The following items apply to all connections in a connection set.
•Allow saving logon information: Controls whether the Save Settings check box is available in login dialog boxes in Ivanti Secure Access Client. If you clear this check box, Ivanti Secure Access Client always requires users to provide credentials. If you select this check box, users have the option of saving their credentials.
•Ivanti Secure Access Client can retain learned user settings. These settings are retained securely on the endpoint, evolving as the user connects through different Ivanti servers. Ivanti Secure Access Client can save the following settings:
•Certificate acceptance
•Certificate selection
•Realm
•Username and password
•Proxy username and password
•Secondary username and password
•Role
If the authentication server is an ACE server or a RADIUS server and authentication is set to Users authenticate using tokens or one-time passwords, Ivanti Secure Access Client ignores the Allow saving logon information option. If the user sees a username and token prompt and the Save settings check box is disabled. Ivanti Secure Access Client supports soft token, hard token, and smart card authentication.
Ivanti Secure Access Client introduced two new features to improve the end-user experience during certificate authentication. The administrative console option to configure this feature is now available. This feature enables the following:
- Allow user connections: Controls whether connections can be added by the user. This feature is disabled by default.
- Always-on Ivanti Secure Access Client: Prevent end users from circumventing Ivanti Secure Access Client connections. This option disables all configuration settings that allow the end user to disable or remove Ivanti Secure Access Client connections, service or software. For more details refer to Ivanti Secure Access Client Connection Set Options for Ivanti Connect Secure.
Checking the “Always-on Ivanti Secure Access Client” option does not prevent end users with administrative privileges from stopping the Ivanti Secure Access Client service on the endpoint device. Create a group policy object (GPO) to prevent users from disabling the Ivanti Secure Access Client service. For more details on how to create GPOs refer to the article found in Microsoft’s Website.
•VPN only access: When Ivanti Secure Access Client connects to Ivanti Connect Secure having lock down mode enabled, it will enable lock-down mode and block network if VPN is not in connected state.
•When VPN only access option is enabled, the Enable captive portal detection and Enable embedded browser for captive portal will be automatically checked and cannot be edited.
•Display splash screen: Clear this check box to hide the Ivanti Secure Access Client splash screen that normally appears when Ivanti Secure Access Client starts.
•Dynamic certificate trust: Determines whether users can opt to trust unknown certificates. If you select this check box, a user can ignore warnings about invalid certificates and connect to the target Ivanti server. This feature is disabled by default.
By default, Dynamic certificate trust check box will be unchecked.
•Dynamic connections: Allows connections within this connection set to be automatically updated or added to Ivanti Secure Access Client when the user connects to Ivanti Connect Secure through the user Web portal, and then starts Ivanti Secure Access Client through the Web portal interface. Dynamic connections are created as manual rather than automatic connections, which means that they are run only when the user initiates the connection or the user browses to a Ivanti server and launches Ivanti Secure Access Client from the server’s Web interface.
If dynamic connections are disabled, and the user logs in through the Web portal of a Ivanti server that is not already included in Ivanti Secure Access Client’s connection set, then starting Ivanti Secure Access Client from the Web portal does not add a new Ivanti Secure Access Client connection for that Ivanti server. If you choose to disable dynamic connections, you can still allow users to manually create connections by enabling Allow User Connections.
•Enable captive portal detection: To detect the presence of a captive portal hotspot enable this option. It can be applied only to Ivanti Connect Secure and Ivanti Policy Secure (L3) connections.
•Enable embedded browser for captive portal: When enabled, Ivanti Secure Access Client uses an embedded web browser that the end user can use to traverse captive portal pages and to gain network connectivity for establishing a VPN connection. This applies only when captive portal detection is enabled.
•Enable embedded browser for authentication: When enabled, Ivanti Secure Access Client uses the system default browser for SAML authentication, rather than external browser. This feature is supported only on Windows.
•FIPS mode enabled: Enable FIPS mode communications for all Ivanti Secure Access Client connections in the connection set. The Federal Information Processing Standard (FIPS) defines secure communications for the U.S. government. When a Ivanti Secure Access Client connection is operating in FIPS mode, FIPS On appears in the lower corner of the Ivanti Secure Access Client interface. If your Ivanti Connect Secure hardware does not support FIPS mode operations, FIPS mode configuration options are not present in the admin console interface. FIPS mode operations are supported on PSA-V Series Ivanti Gateways and some SA series appliances.
Users cannot enable FIPS mode from within Ivanti Secure Access Client. You must create FIPS-enabled connections on the server and deploy them.
•Prevent caching smart card PIN: Enabling this field will allow system administrators to prevent smart card PIN values from being cached. This feature is applicable only to Windows.
•Wireless suppression: Disables wireless access when a wired connection is available. If the wired connection is removed, Ivanti Secure Access Client enables the wireless connections with the following properties:
•Connect even if the network is not broadcasting.
•Authenticate as computer when computer information is available.
•Connect when this network is in range.
Wireless suppression occurs only when the wired connection is connected and authorized. If you enable wireless suppression, be sure to also configure a connection that enables Ivanti Secure Access Client to connect through a wired connection.
Configuring Client Certificate Selection Option
While Configuring Ivanti Connect Secure settings, the following are the new checkboxes added under Client Certificate Selection Option.
•Accept certificates with smartcard logon EKU
•Accept certificate with Custom EKU text
•Accept certificate with Custom EKU OID
The valid certificates get filtered based on the specifications provided by administrator in the above fields.
Only the filtered certificates get displayed in certificate selection prompt.
Enhanced Key Usage (EKU) field, abbreviated as EKU has following two components to it.
•EKUText - It is the text which is in human readable format.
•EKUOID - It is the OID number which is unique for a given purpose.
|
Variable |
Description |
Examples |
|
EKUText |
Format to be given is: EKUText = string or <comma separated string> or string with regular expression. Custom regular expressions need to be given with the following format: certAttr.EKUText = string or <comma separated string> or string with regular expression. |
certAttr.EKUText = "TLS Web Server Authentication", "E-mail Protection" ,"TLS Web Client Authentication". |
|
EKUOID |
Format to be given is: EKUOID = to a.b.c.d.e.f.g.h.i or <comma separated list of EKUOIDs> or OID with regular expressions. This works in both certificate rule as well as custom expressions. Custom regular expressions need to be given with the following format: certAttr.EKUOID = a.b.c.d.e.f.g.h.i or <comma separated list of EKUOIDs> or OID with regular expressions. |
Customer can create certificates with Custom OIDs. Example: certAttr.EKUOID=1.3.6.1.5.5.7.3.1,1.3.6.1.5.5.7.3.4,1.3.6.1.5.5.7.3.2 |
To configure Certificate Matching and Certificate Ranking under Client Certificate Selection Option, the administrator needs to follow the below steps.
1.Log in to admin console.
2.Go to Users > Ivanti Secure Access Client > Connections.
3.Select the connection from the Connections or click New to display the New Connection set configuration page.
4.Complete the configuration, as required.
5.Save the configuration.
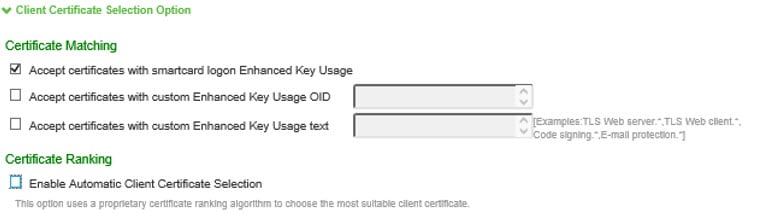
Prefer smart card certificate option can be checked only if Enable Automatic Client Certificate Selection option is checked.
If Prefer smart card certificate option is checked, then certificates with client auth EKU set get displayed on the top of the list of certificates and preferred over other certificates.
Accept certificates with smartcard logon Enhanced key Usage option is enabled by default.
Accept Certificates with smartcard logon Enhanced key Usage option should be checked to use Yubikey as PIV smart card for VPN authentication.
Based on the EKU configuration settings, Ivanti Secure Access Client will pick-up the available certificate and make successful connection.
If end-user has more than one certificates, then Ivanti Secure Access Client will prompt the end-user to select the certificates to make successful connection.
Always-on VPN
By default, Always-on option is disabled. There are many possible configuration options within the Always-on feature. Although some of these options are new for the 5.2r5 Ivanti Secure Access Client (e.g., lock-down mode, embedded browser for captive-portal remediation), some Always-on options existed in previous versions of Ivanti Secure Access Client. To make management of all these options easier, the Ivanti Connect Secure gateway’s administrative console provides a simplified way of configuring all the possible Always-on VPN options.
Note the following:
•Ivanti Secure Access Client for macOS will support Always-on VPN except Lock-Down Exception function.
•Ivanti Secure Access Client for Linux will not support for Always-on VPN.
Configuring Always-on Options
To configure the Connection set:
1.Login to Ivanti Connect Secure admin console
2.Select Users> Ivanti Secure Access Client > Connections
3.Click New to display the New Connection set configuration page, refer to figure.
4.Complete the configuration as described in table.
5.Save the configuration.
|
Settings |
Description |
|
Allow user connection |
Controls whether connections can be added by the user. |
|
Always-on Ivanti Secure Access Client |
When checked it prevents end users from circumventing Ivanti Secure Access Client connections. This option will disable all configuration settings that allow the end user to disable or remove Ivanti Secure Access Client connections, service or software. |
|
Enable captive portal detection |
Controls whether Ivanti Secure Access Client will notify the end user that a VPN connection cannot be established until the requirements of a captive portal are fulfilled. |
|
Enable embedded browser for captive portal |
When checked, Ivanti Secure Access Client uses an embedded web browser for captive portal pages. |
When Always-on Ivanti Secure Access Client is enabled “VPN Only Access”, “Enable captive portal detection” and “Enable embedded browser for captive portal” will be automatically checked and cannot be edited.
Checking this option will modify several checkboxes in both the Connection Set and the Connections within the Connection Set with the effect of:
•Impeding the end user’s ability to disconnect or disable VPN connections (Windows and Mac)
•Ensuring that captive portals can still be traversed even when connectivity is locked down (Windows and Mac)
"Always-on" checkbox does not prevent end users (with admin privileges) from stopping endpoint services (the Ivanti Secure Access Client Service and the Base Filtering Engine (BFE)) which are required for VPN connections to be established. If you wish to have the level of protection that comes with prohibiting end users from stopping these services, then it is best to use Group Policy Objects (GPOs).
Configuring Always-on VPN Options using Wizards
To configure the Always-on VPN Options using wizards.
1.Login to Ivanti Connect Secure admin console.
2.Admin can configure Always-on VPN options using Wizards in following two ways:
•Using Global Wizards
•Using Connection Set
Using Global Wizards
•Click Wizards. Following screen appears:

• Select Wizard -> Basic -> Always-on VPN Configuration. Following screen appears:
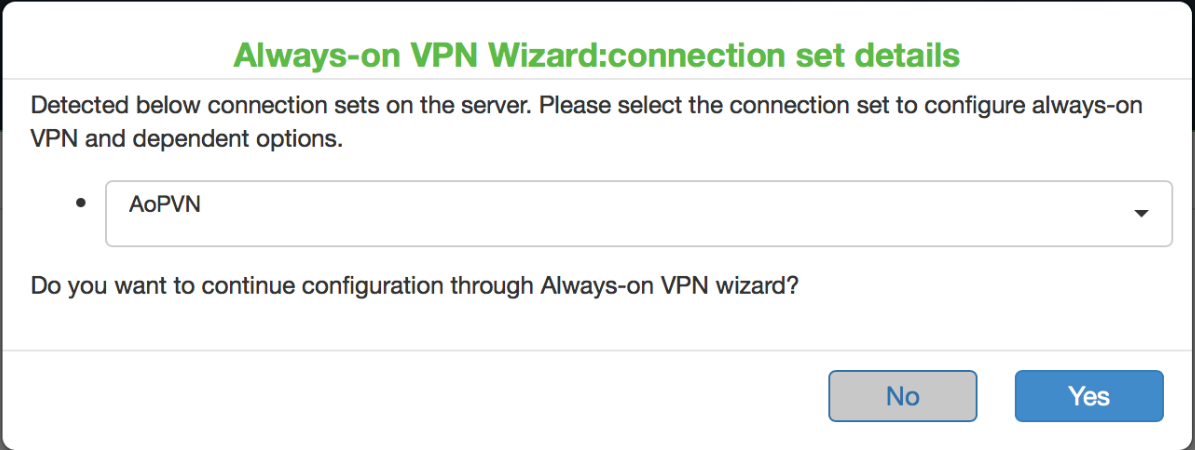
•Choose the connection set from the drop-down list of existing connection sets. Figure appears.
•Go to step 5 to continue with configuration of Always-on VPN.
Using Connection Set
•Select Users > Ivanti Secure Access Client > Connections. Continue to next step to continue with configuration of Always-on VPN.
3.Click New to display the New Connection set configuration page. The following screen appears:
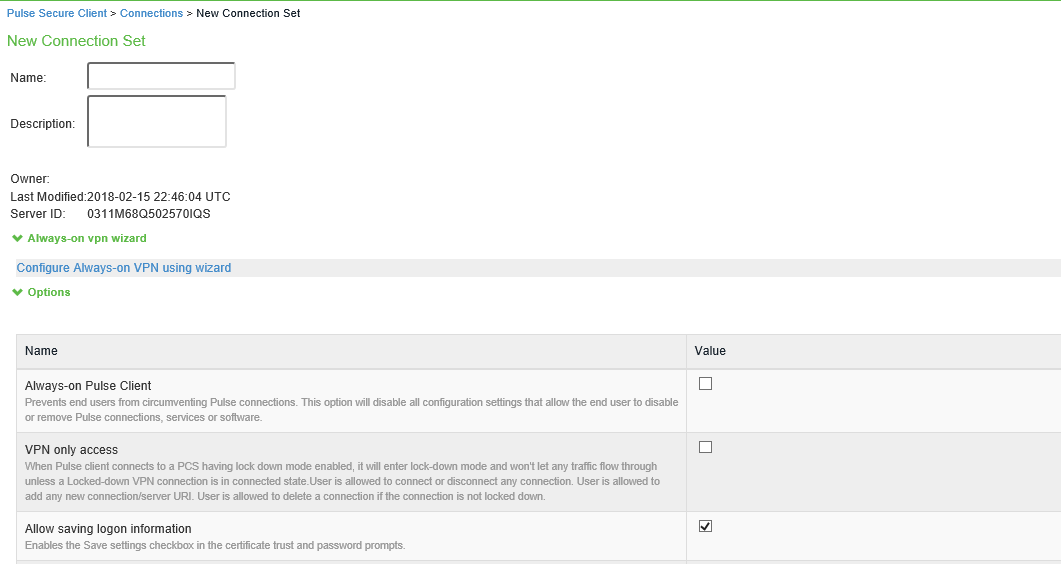
Create new connection set with default values.
Admin can edit the existing connection set also.
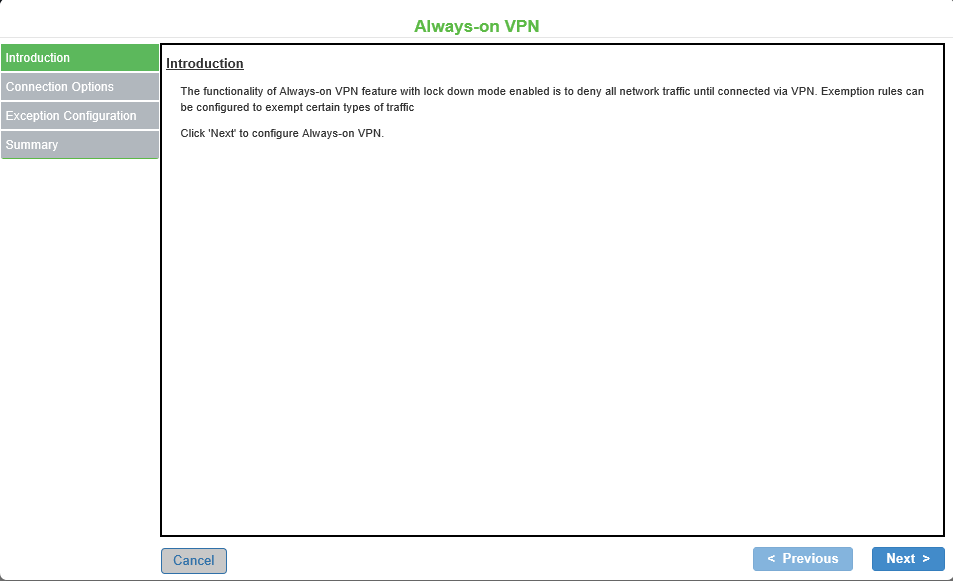
4.Click Configure Always-on VPN using wizard. The following screens appears:
5.If admin has already configured Always-on VPN, the following screen appears:
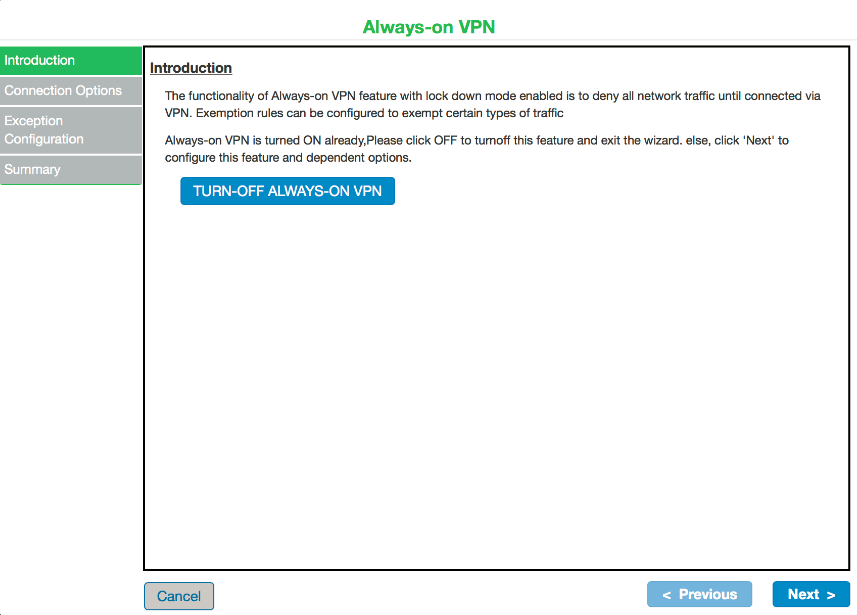
Click TURN-OFF ALWAYS-ON VPN if you want to disable Always-on VPN option. Also, VPN only access will get disabled.
6.Click Next to continue with configuration of Always-on VPN. The following screen appears:
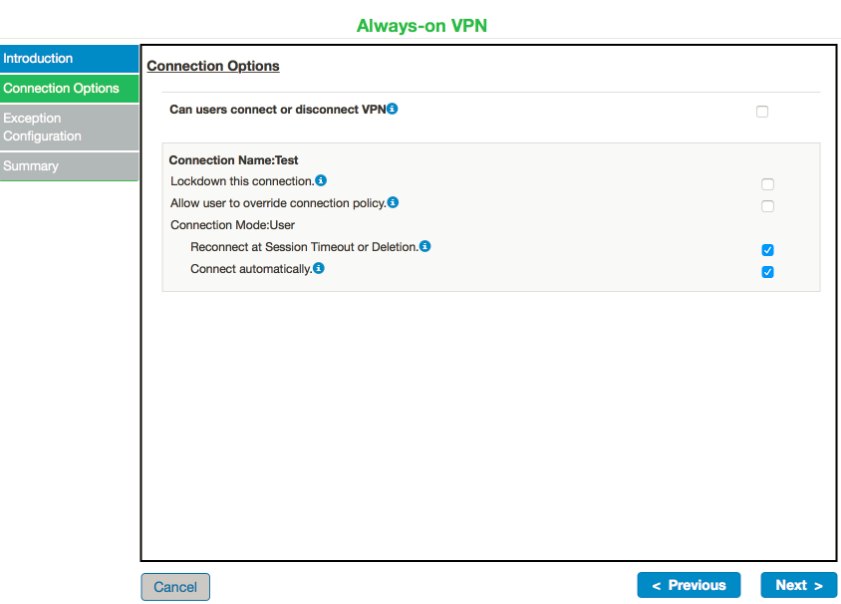
Check the Lockdown this connection checkbox. Following screen appears:
Scenario 1 – Always-on VPN
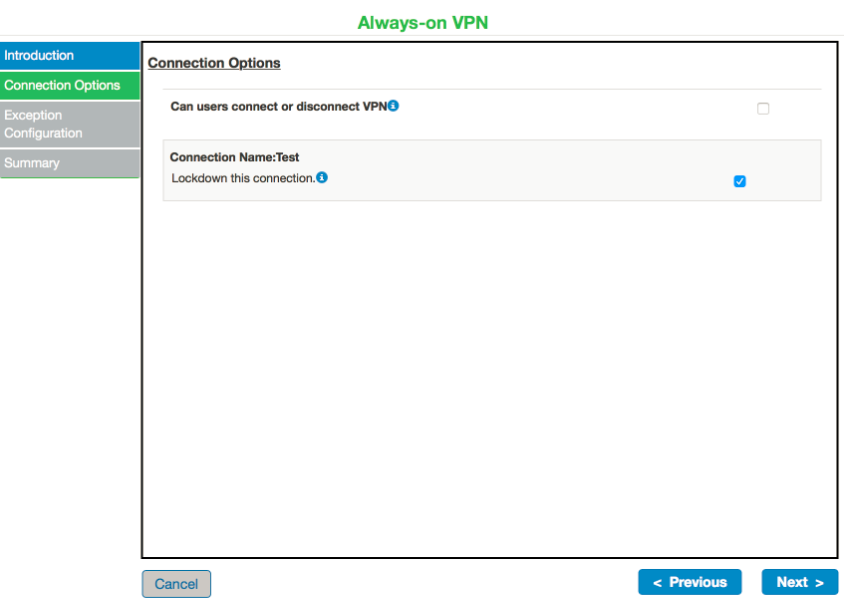
Scenario – 2 VPN Only Access
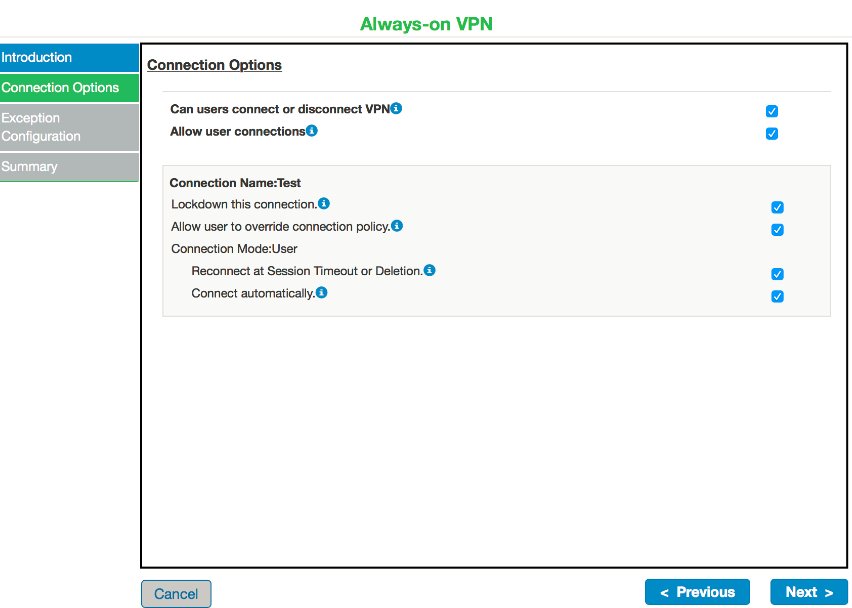
7.Check Can users connect or disconnect VPN checkbox to continue with Always-on VPN configuration.
8.Click Next. The following screen appears:
Scenario – 1: Always-on VPN
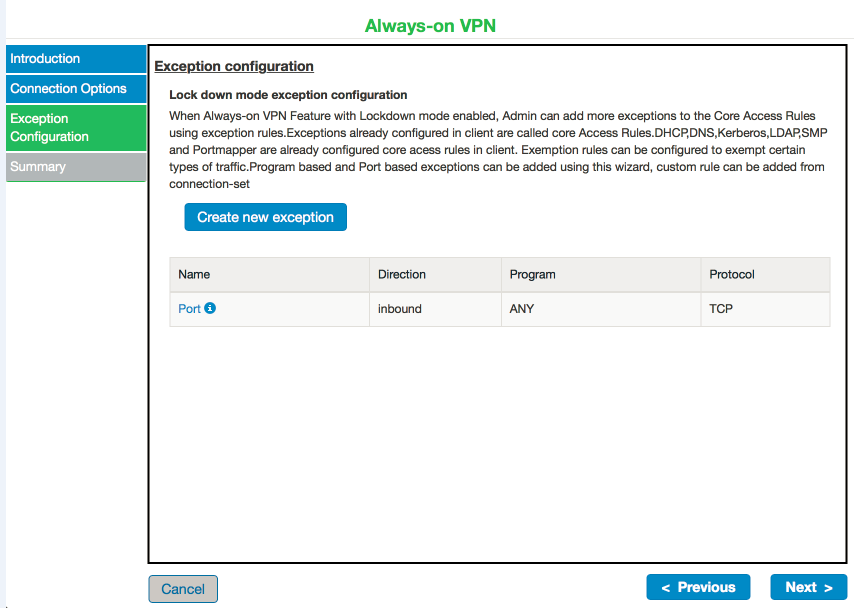
9.Configure the exception rules. Admin can add more exception rules to the Core Access Rules.
10.Click Create new exception. The following screen appears:
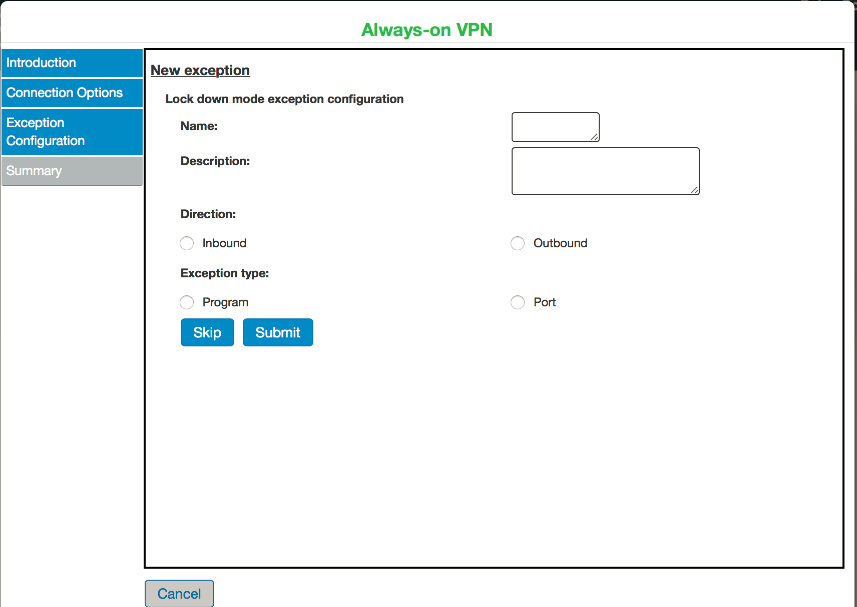
11.Click Submit, if exception rules are set.
12.Click Skip, if admin wants to change the exception rules.
Scenario – 1: Always-on VPN
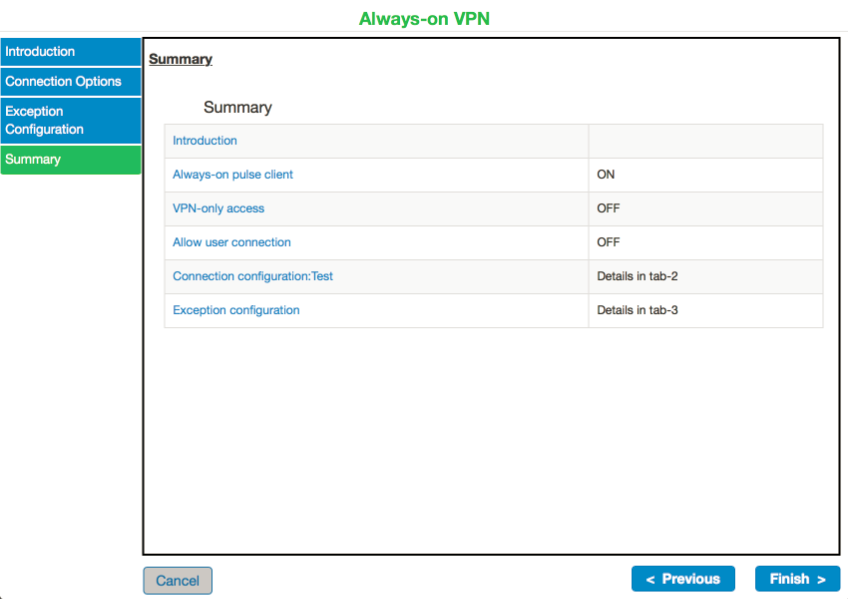
Scenario – 2 VPN Only Access
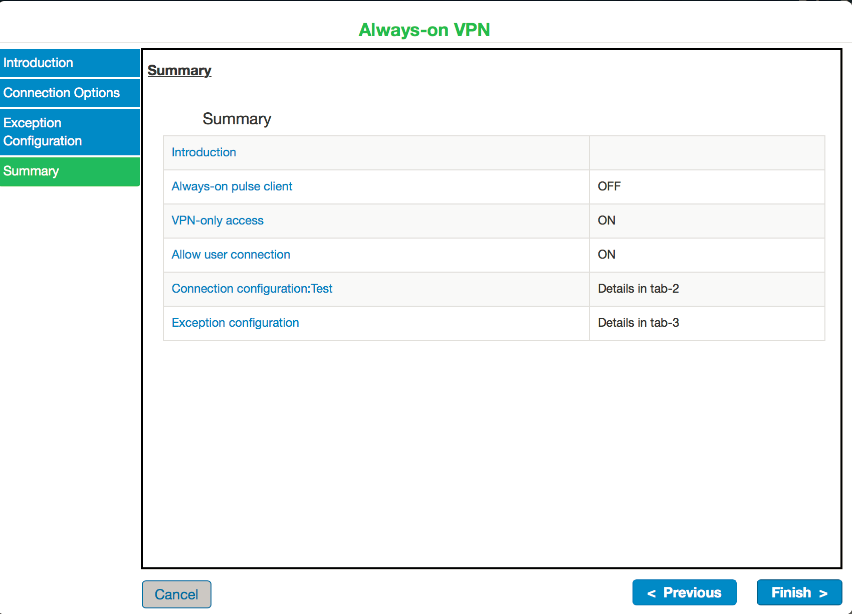
13.Click Finish. "Always-on VPN update successful" message appears on the screen.
"Always-on VPN update successful" message appears along with connection set page (see figure, if Admin is configuring Always-on VPN using Wizards through Wizard tab in Ivanti Connect Secure console.
Requirement to set up the appropriate GPOs
Setting up GPOs is not required to leverage the benefits of the Ivanti Secure Access Client’s Always-on VPN feature. Setting up GPOs would only be necessary if you need the extra security of restricting users with admin privileges from stopping Ivanti Secure Access Client services. As such, setting up GPOs should be considered optional.
Ivanti Secure Access Client should be installed on a box running a server version Microsoft Windows (e.g., Windows server 2008 R2, 2012 R2, 2016).
•The startup type for "Ivanti Service" should be set to "Automatic", and permission to start and stop the service should be removed from "Administrators".
•Ensure that "SYSTEM" still retains permission to start and stop the service.
•An "Ivanti Admins" should be created on the domain. Permission to start and stop the service should be assigned to this "Ivanti Admins". The "Domain Admins" and any other group which should be allowed to start and stop Ivanti Secure Access Client can be made members of the "Ivanti Admins" group.
•Disabling the ability to stop the Base Filtering Engine (BFE) should be done in a manner similar to what is described above for the Ivanti Secure Access Client Service.
Installing Ivanti Secure Access Client in Windows Server
To install Ivanti Secure Access Client in Windows Server, follow the below steps:
1.The Ivanti Secure Access Client MSI file should be used for installation.
2.Install Wireless LAN service on Windows 2008 R2, 2012 R2 and 2016 servers before installing Ivanti Secure Access Client to avoid unsuccessful registration during Ivanti Secure Access Client Installation.
3.To enable the Wireless LAN service, follow the below steps:
•Open Server Manager.
•Navigate to Feature > Add Feature.
•Select the Wireless LAN Service.
•Click on install Wireless LAN Service for installing.
•Click on Close > Done once the Wireless LAN Service is installed.
On Windows 2016 servers, even after Wireless LAN Service is installed, an error message will appear during Ivanti Secure Access Client Installation and the error can be accepted and the Ivanti Secure Access Client Installation will be completed.
There is no mechanism within Ivanti Secure Access Client itself to prevent end users with administrative privileges from uninstalling Ivanti Secure Access Client. If this functionality is needed, then it would be best to enforce those restrictions outside of Ivanti Secure Access Client.
Always-on with Lock-down Mode
“Lock-down” mode is a new aspect of Always-on functionality that was added to the Ivanti Secure Access Client for Windows and Mac. Lock-down mode prohibits network communication outside the VPN tunnel when a VPN tunnel is in the process of being created. Lock-down option can be enabled only in conjunction with the “Always-on” and “VPN only access” option. To ensure that end users can easily traverse captive portals in lock-down mode, the “Captive portal remediation with embedded mini-browser” is automatically enabled when lock-down mode is enabled. Lock-down mode is intended for use with Location Awareness rules; this feature can ensure that the user is either:
•Physically on the corporate network.
•Connected to the corporate network through a VPN connection or on the process of creating a VPN connection and cannot access the Internet/local subnet in the meantime.
Location Awareness rules should be set up to automatically initiate a VPN connection when the user is not on the corporate network, and to disconnect the VPN connection when the user is physically on the corporate network. If Location Awareness rules are not configured in this method, then Lock-down mode has very little value, because Lock-down mode prohibits connectivity only when Ivanti Secure Access Client is in the process of creating a network connection. If Ivanti Secure Access Client is not configured to automatically create a Ivanti Secure Access Client connection when off the corporate network, then Lock-down mode will not be automatically invoked when the user leaves the corporate network. For information on configuring Location Awareness rules, refer to “Location Awareness Rules” on page 68.
The lock-down option blocks nearly all network traffic, but there are exceptions for the minimum amount of traffic required to initialize network adapter such that a tunnel can be created. As such, traffic used to get IP addresses, hostnames, etc. (DHCP, DNS, etc.) are permitted even when the machine is locked down.
Lock-down mode is supported only for IPv4 endpoints.
To enable the “Lock down this connection” option, follow the below steps:
1.Log in to the Ivanti Connect Secure admin console.
1.Navigate to Users > Ivanti Secure Access Client > Connections.
2.Open a record, select the connection from Connection Options.
3.Use a Connect Secure L3 connection for a Layer 3 connection to Ivanti Connect Secure.
4.Check Lock–down this connection to disable network access when VPN is enabled until connected, see figure below.
5.Click on Save Changes.
Lock-down Exception
When Ivanti Secure Access Client is in Lock-down mode, all network traffic except those defined in Lock-down exception rules will be denied when VPN is not connected.
In the New Configuration section, administrator can add Lock-down mode exceptions rules. Administrator has to configure these rules for which traffic need to be exempted when Lock-down mode has applied at user end.
The ICS populates the list of core access rules depending on the platforms. Administrators are allowed to modify and reorder the list. Administrators can also configure the exception rules with allow/deny option.
To configure exception rules, an administrator needs to follow the below steps.
1.Log in to admin console.
2.Go to Users > Ivanti Secure Access Client.
3.Select Connections.
4.Select Options > Enable Always-on Ivanti Secure Access Client & VPN only access.
Lock-down Exception can be enabled by selecting Always-on Ivanti Secure Access Client alone or VPN only Access.
Lock-down Exception rule can be configured in the following three ways under Resources for both Inbound and Outbound traffic separately.
•Ivanti Secure Access Client Connection Set Options for Ivanti Connect Secure
•Ivanti Secure Access Client Connection Set Options for Ivanti Connect Secure
•Ivanti Secure Access Client Connection Set Options for Ivanti Connect Secure
Windows: Select Windows to define exception rules for only Windows.
Mac: Select Mac to define exception rules for only Mac.
All: Select All to define exception rules for both Windows and Mac.
Inbound traffic is always directed towards user’s machine (Example: RDP).
Outbound traffic is always directed towards outside the machine (Example: Skype for Business Application).
Allow or Deny allows to configure the exception rules.
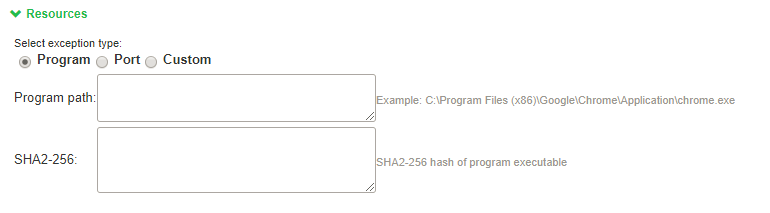
Program-based Resource Access
To configure Program-based resource access, administrator needs to select Program. Then the following configuration UI appears.
Windows – Program based Resource Access
macOS – Program based Resource Access

An administrator has to provide absolute path for the program that needs to be exempted and optionally provide SHA-256 checksum.
Following are the examples for Lockdown Exception rules for macOS.
1.MAC Update program path:
/Applications/App Store.app/Contents/MacOS/App Store
/System/Library/PrivateFrameworks/StoreXPCServices.framework/Versions/A/XPCServices/com.apple.appstore.PluginXPCService.xpc/Contents/MacOS/com.apple.appstore.PluginXPCService
/System/Library/Frameworks/ApplicationServices.framework/Versions/A/Frameworks/HIServices.framework/Versions/A/XPCServices/com.apple.hiservices-xpcservice.xpc/Contents/MacOS/com.apple.hiservices-xpcservice
/System/Library/CoreServices/Software Update.app/Contents/Resources/softwareupdated
/System/Library/Frameworks/WebKit.framework/Versions/A/XPCServices/com.apple.WebKit.Networking.xpc/Contents/MacOS/com.apple.WebKit.Networking
2.Safari browser program path:
/Applications/Safari.app/Contents/MacOS/Safari
/System/Library/PrivateFrameworks/SafariSafeBrowsing.framework/Versions/A/com.apple.Safari.SafeBrowsing.Service
/System/Library/Frameworks/WebKit.framework/Versions/A/XPCServices/com.apple.WebKit.Networking.xpc/Contents/MacOS/com.apple.WebKit.Networking
/System/Library/StagedFrameworks/Safari/WebKit.framework/Versions/A/XPCServices/com.apple.WebKit.Networking.xpc/Contents/MacOS/com.apple.WebKit.Networking -> Mac 11 & Mac 12
3.Facetime program path:
/System/Library/PrivateFrameworks/ApplePushService.framework/apsd
/Applications/FaceTime.app/Contents/MacOS/FaceTime
/System/Library/PrivateFrameworks/AuthKit.framework/Versions/A/Support/akd
/System/Library/PrivateFrameworks/IDS.framework/identityservicesd.app/Contents/MacOS/identityservicesd
/System/Library/PrivateFrameworks/AOSKit.framework/Versions/A/XPCServices/com.apple.iCloudHelper.xpc/Contents/MacOS/com.apple.iCloudHelper
/usr/libexec/avconferenced
/usr/libexec/nsurlsessiond
4.Symantec Norton security program path:
/Applications/Norton Security.app/Contents/MacOS/Norton Security
/Library/Application Support/Symantec/Silo/NFM/Daemon/SymDaemon.bundle/Contents/MacOS/SymDaemon
/Library/Application Support/Symantec/Silo/NFM/LiveUpdate/com.symantec.SymLUHelper
/Library/Application Support/Symantec/Silo/NFM/SymUIAgent/Norton.app/Contents/MacOS/Norton
Each process needs to configure with different process rules, and not with single process.

When a lockdown is applied. Use below command to ping IPv6 address.
ping6 -S (Source IPv6) (destination IPv6)
Port-based Resource Access
To configure Port-based resource access, administrator needs to select Port. Then the following configuration UI appears.
Windows and macOS Port based Resource Access:

An administrator can select either TCP or UDP and needs to add respective port number.
Custom-based Resource Access
To configure Custom-based resource access, administrator needs to select Custom. Then following configuration UI appears.
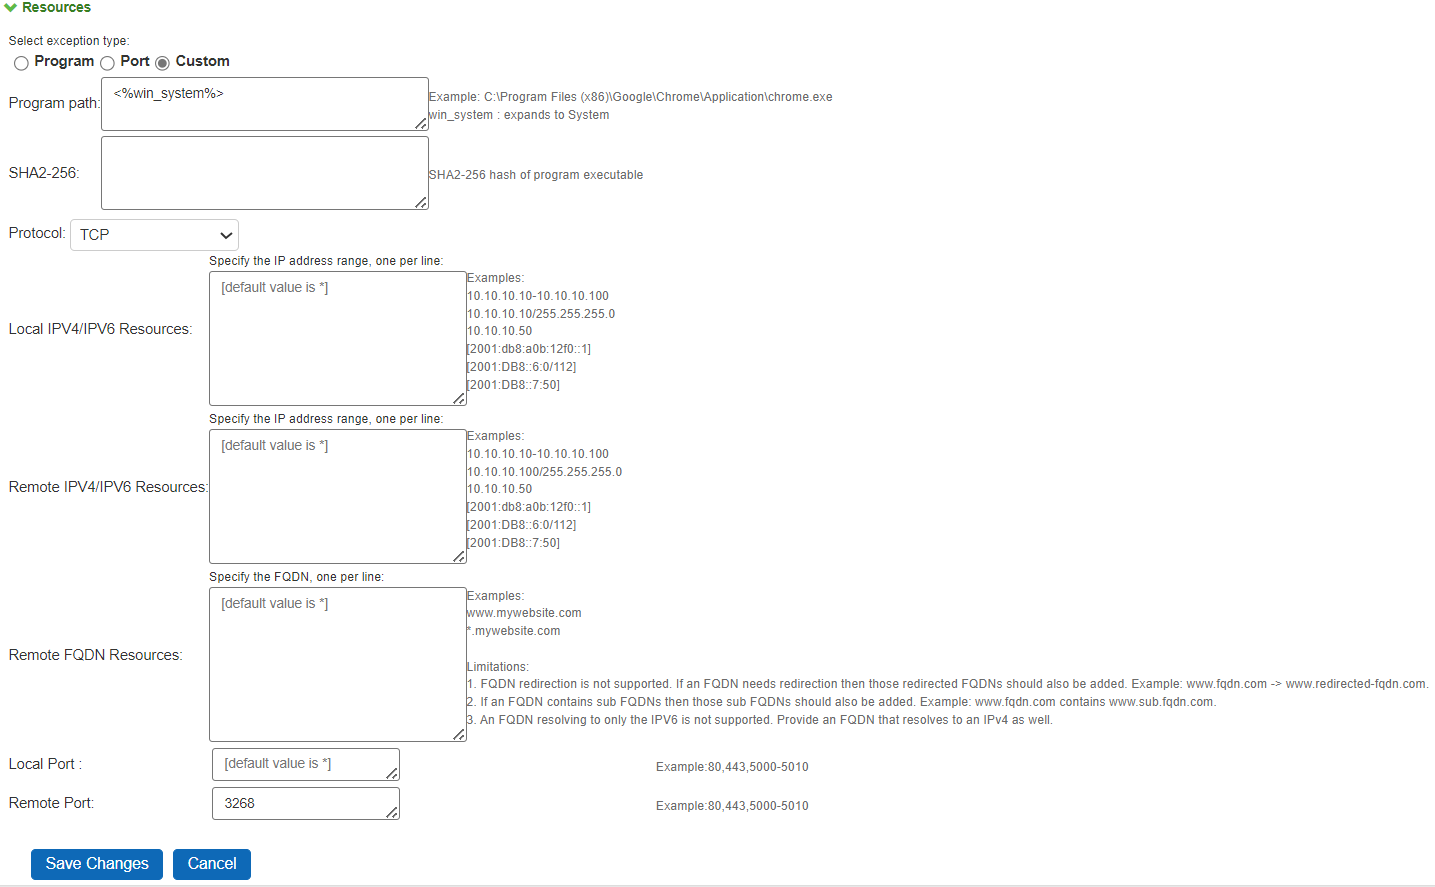
After Custom is selected, administrator can configure any of the applicable rules. (Example: administrator can configure Local, Remote IPv4/IPv6 addresses, Remote FQDN resources or Ports or Absolute Program Path or Type of protocol).
Note the following:
•In custom-based resource access, it is not mandatory to configure all the options. Default value for all configurable fields are “*”.
•After a Ivanti Secure Access Client upgrade, user has to make at least one successful connection to the Ivanti Connect Secure, so that the configured Lock-down exceptions can be applied on the client machine.
•Remote FQDN Resources list is available on Windows platform and for IPv4 resources only. This field supports both TCP and UDP DNS. Ensure Secure DNS is disabled on the endpoint browsers. If the same IP address is configured for two different FQDNs with different Actions then the evaluation is based on the priority of the rule.
•Maximum upto 10 FQDN exception rules are supported.
Retry Buttons
The Retry button allows the user to reconnect the connection after a time out or failure. When an authentication has failed, Always-on VPN attempts to reestablish the connection to activate the session if the session time is still open or user can reconnect to new VPN session by clicking on Retry button.
The retry option can be found in the Ivanti Secure Access Client user interface:
1.Open Ivanti Secure Access Client.
2.Click on File > Connections > Retry to reconnect.
Captive Portal Remediation with Ivanti Secure Access Client Embedded Mini-Browser
The “Enable embedded browser for captive portal” option makes it easy for end users to satisfy captive portals (for example, when in a coffee-shop that requires either credit-card payment or acceptance of an acceptable-use policy before gaining Wi-Fi access). By default, support for captive portal remediation is disabled.
To enable Embedded Browser:
1.Log in to Ivanti Connect Secure admin console.
2.Select Users>Ivanti Secure Access Client > Connections.
3.Click New to display the New Connection set configuration page.
4.Complete the configuration as described in table.
5.Save the configuration.
|
Settings |
Guidelines |
|
Enable Captive Portal detection |
If this option is checked, Ivanti Secure Access Client will detect if connectivity is hampered by a captive portal, then Ivanti Secure Access Client will automatically display an embedded browser (not an external browser, like IE or Chrome or Safari) so that the end user can traverse the captive portal and gain the network connectivity needed to establish a VPN connection. |
|
Enable embedded browser for captive portal |
Ivanti Secure Access Client will use an embedded browser for captive portal pages, applicable only if Captive Portal detection is enabled. |
Although this feature can be used as a convenience independent of the Always-on VPN and VPN only access feature, it is essential (and is enabled automatically) when using lock-down mode. The embedded browser is part of Ivanti Secure Access Client’s internal processes, and is therefore exempt from the lock-down connectivity restrictions placed on external browsers. Lock-down mode prevents external browsers from communicating before the VPN is established, so external browsers cannot be used for captive-portal remediation with lock-down mode enabled. The embedded browser is the only option for remediating a captive portal in lock-down mode.
For macOS, Captive Portal Remediation using external browser needs admin privileges if system proxy settings are configured. Embedded browser will bypass proxy settings automatically without admin privileges.
For Windows OS, user can bypass proxy settings and perform captive portal remediation using external browser.
Ivanti Secure Access Client’s embedded browser is restricted to ensure that end users cannot use it for purposes other than traversing captive portals. Furthermore, certain web-browser functionality is disabled to make the embedded browser more secure.
The following table describes features which are enabled and disabled:
|
Features |
Enabled |
|
Display of images & playing of sound |
Yes |
|
Running scripts |
Yes |
|
Display of script errors |
Yes |
|
Display popup windows and dialogs |
Yes |
|
Running JAVA |
No |
|
Downloading or running ActiveX |
No |
|
Downloading Files |
No |
Policy Secure 802.1X Connection Type Options
Use this connection type to define authenticated connectivity to 802.1X devices, wired or wireless. Users cannot create 802.1X connections from the Ivanti Secure Access Client interface. Users see 802.1X connections in the Ivanti Secure Access Client interface only when the connection has been deployed from the server and the specified network is available.
•Adapter type: Specifies the type of adapter to use for authentication: wired or wireless.
If you leave the box blank, Ivanti Secure Access Client passes the user’s or the machine’s Windows login name as the outer identity.
•Scan list: If you selected wireless as the adapter type, the scan list box is available to specify the SSIDs, including non-broadcast SSIDs, to connect to in priority order. If you leave the list empty, the user can connect to any available wireless network.
•Support Non-broadcast SSID: Allows a user to connect to a non-broadcast wireless network from within the Ivanti Secure Access Client interface. Selecting this field enables the following options:
Wireless Security Cipher: Specify the type of encryption used by the non-broadcast network:
•TKIP
•AES
If the non-broadcast SSID options are configured, the Ivanti Secure Access Client connection configuration includes the values and they are used to configure the wireless profile on the endpoint.
Trusted Server List (for Policy Secure 802.1X Connection)
FQDN criteria for 802.1X/EAP server certificates (with wildcard support) can be specified in the Trusted Server List of the Ivanti Connect Secure admin console. In the name field, you can enter a fully-qualified-domain name (FQDN) that can be either an exact FQDN or an FQDN that begins with a “.” and/or can contain wildcards (“*”).
Note the Following:
•The “ANY” entry matches any server certificate name.
•An entry that contains “=” requires an exact Subject:DN (Distinguished Name) match.
•An entry that is neither “ANY” nor contains “=” is an FQDN. It can be either an exact value or include wildcards and/or begin with a “.” character. This value will be checked against FQDNs in the server’s certificate (Subject:DN:CN=…, SAN:DNS=…).
•An entry that begins with “.” will wildcard only the first subdomain (domain component) in the FQDN. For example, ".mycompany.com" will match "foo.mycompany.com" but not "foo.bar.mycompany.com". As such, a FQDN beginning with “.” is equivalent to the same FQDN beginning with “.” (e.g., “.mycompany.com” is equivalent to “.mycompany.com”). Note that this mechanism is more restrictive than what is described in RFC 5280.
•FQDN may contain at most one wildcard per domain component (DC). For example, "a.mycompany.com" is not allowed and will always result in authentication failure.
•A wildcard matches 1 or more characters (but not zero characters). For example, "f*r.mycompany.com" will match "foo-bar.mycompany.com" but not "fr.mycompany.com".
•See RFC 2818 and RFC 6125 for more details and security implications of wildcards.
•Be careful when mixing wildcard FQDN entries with certificates that contain wildcards in their names. For example, the entry "foo*.mycompany.com" will match a certificate with the name "*bar.mycompany.com”.
•This wildcarding mechanism does not work with server certificates that contain the “?” character in their names. (This is not a common occurrence.)
•You can choose any server certificate's issuing certificate authority (CA) from the drop-down list. It could be the direct issuer or any CA at higher level in the certificate chain, up to the root.
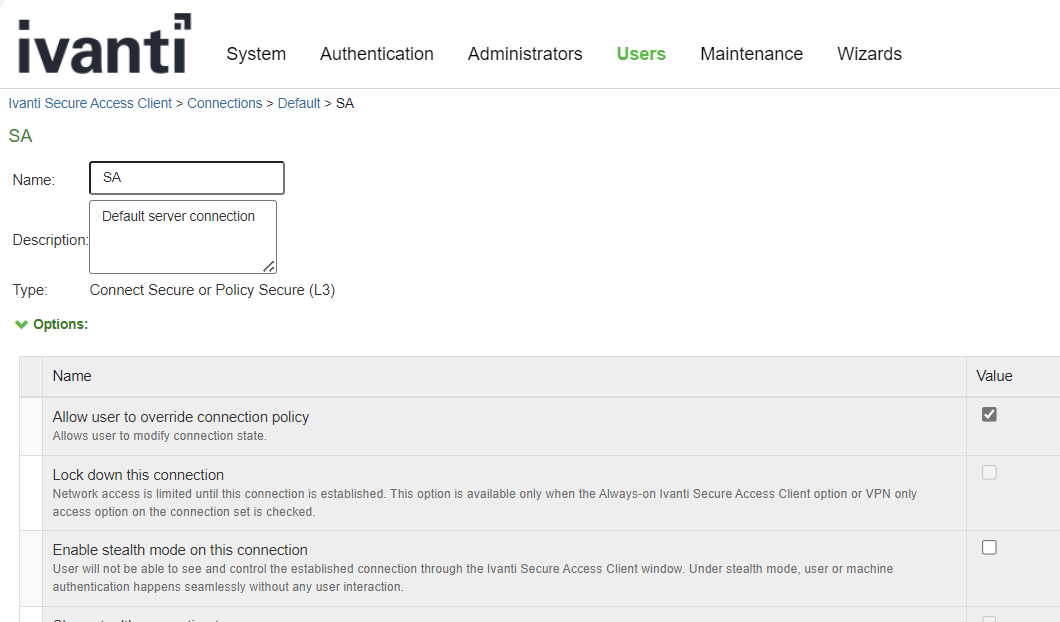
Connect Secure or Policy Secure (L3) Connection Type Options
Use a Connect Secure or Policy Secure (L3) connection for a Layer 3 connection to Ivanti Connect Secure or Ivanti Policy Secure.
•Allow user to override connection policy: Allows a user to override the connection policy by manually connecting or disconnecting. Typically, you leave this option selected to make sure that a user can establish a connection under all conditions. If you disable this check box, the user cannot change the endpoint’s connection status, suspend/resume a connection to Ivanti Connect Secure or shut down Ivanti Secure Access Client.
•Lock-down this connection: When enabled, this option limits network connectivity while Ivanti Secure Access Client is in the process of creating a VPN connection. When used in conjunction with Location Awareness rules, this option ensures that end users cannot access network resources outside of a VPN tunnel.
Lock-down this connection feature exists in Ivanti Secure Access Client for Windows only.
•Support Remote Access (SSL VPN) or LAN Access (UAC) on this connection: This option must be selected if this connection is for Ivanti Policy Secure. If the connection is for Ivanti Connect Secure, you can disable this check box.
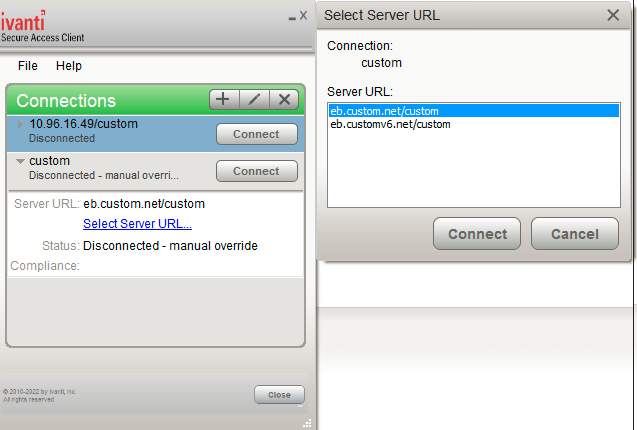
•Connect to URL of this server only: Specifies whether the endpoint connects to this Ivanti server exclusively or if it can connect to the any of the servers listed in the list of connection URLs. Disable this check box to enable the List of Connection URLs.
•List of Connection URLs: Allows you to specify a list of Ivanti servers (Ivanti Policy Secure or Ivanti Connect Secure) for this connection. Ivanti Secure Access Client attempts to reach each server in the list, in the order listed, until it succeeds. You can specify up to 8 Ivanti servers.
Figure shows how the Ivanti Secure Access Client user can select a server from the connection’s list of URLs.
•Attempt most recently connected URL first: If you have specified a list of connection URLs, you can select this check box to have Ivanti Secure Access Client always attempt the most recent successful connection. If that connection is not successful, Ivanti Secure Access Client then starts at the top of the list. The most recently connected URL is saved across reboots.
•Randomize URL list order: If you have specified a list of connection URLs, select this check box to have Ivanti Secure Access Client ignore the order in which the servers are listed. You can select this option to spread the connection load across multiple Ivanti servers.
If you enabled Attempt most recently connected URL first, then Ivanti Secure Access Client attempts that connection first. If the connection attempt fails, Ivanti Secure Access Client chooses randomly from the list for the next connection attempt. During a credential provider connection attempt, Ivanti Secure Access Client chooses the URL automatically. It does not display a window to let the user choose a URL. Connections that use machine authentication ignore this option and always use the ordered list of connection URLs. Any preferred roles and realms you specify must be applicable to all of those servers. In the case of an interrupted connection, such as temporarily losing the WiFi link, Ivanti Secure Access Client always tries to reconnect to the most recently connected URL.
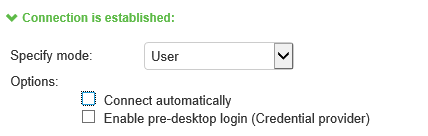
Ivanti Secure Access Client Connection is Established Options
For all connection types, specify how the connection is established. The options vary according to the type of connection. Automatic connections include machine authentication and credential provider connections. Connections can be established using the following options.
All connections that are configured to start automatically attempt to connect to their target networks at startup time. To avoid multiple connection attempts, be sure that only one connection is configured to start automatically, or configure location awareness rules.
•Modes:
•User: Enables user authentication.
•Machine: Enables machine authentication, which requires that Active Directory is used as the authentication server and that machine credentials are configured in Active Directory. A machine connection is, by default, an automatic connection.
•Machine or user: Enables machine authentication for the initial connection. After user authentication, the machine authentication is dropped. When the user logs out, the machine authentication connection is restored.
•Options:
•Connect automatically: Connections are attempted when the conditions specified in the location awareness rules are true, and disconnected when the conditions are no longer true.
•Reconnect at Session Timeout or Deletion: If this option is enabled, user initiated sessions automatically attempt to reconnect upon a session timeout or deletion. If this option is disabled, then user initiated sessions remain disconnected upon a session timeout or deletion.
•Enable pre-desktop login (Credential provider): Enables Ivanti Secure Access Client interaction with the credential provider software on the endpoint. The user credentials are used to establish the authenticated Ivanti Secure Access Client connection to the network, login to the endpoint, and login to the domain server.
•Disconnect tunnel on smart card removal: Disconnects the tunnel when the smart card used for client certificate authentication is removed. This is not enabled by default.
This feature works only when the primary authentication server is configured for certificate authentication, and the client certificate authentication is performed using a smart card certificate or when the realm is configured with certificate restriction and fulfilled with a smart card certificate.
The Disconnect tunnel on smart card removal configuration is applicable only when performing client certificate authentication with a smart card certificate in the ISAC client, even if it is enabled on the ICS.
The smart card's user certificate must include the smart-card-logon OID for this feature to function.
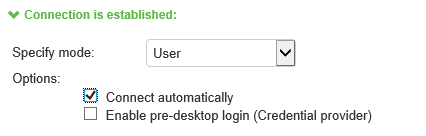
Ivanti Secure Access Client Connection is Established Examples
The following configurations show how to select the Connection is established options of a Ivanti Secure Access Client connection set for specific user login behavior:
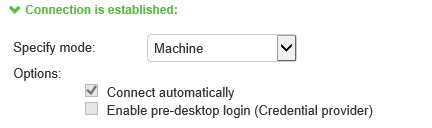
When you use machine credentials for authentication and no user credentials, Ivanti Secure Access Client cannot perform user-based tasks. The following tasks can be run only when the user is logged in:
- Run session scripts
- Detect or modify proxy settings
- Run automatic Ivanti Secure Access Client upgrade
- Install or upgrade Ivanti Secure Access Client components
The configuration in the above figure enables machine authentication for the initial connection. After the user connects with user credentials, the machine authentication is dropped. When the user logs out, the machine authentication connection is restored. In one typical use case, the machine credentials provide access to one VLAN, and the user credentials provide access to a different VLAN.
If the machine and user have different roles, each role should map to the same connection set. Otherwise, after the user connects, the existing connection set might be replaced.
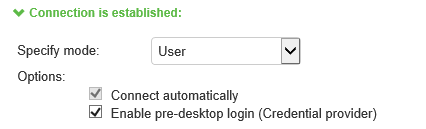
The configuration in above figure enables Ivanti Secure Access Client interaction with the credential provider software on the endpoint. The user credentials are used to establish the authenticated Ivanti Secure Access Client connection to the network, to log in to the endpoint, and to log in to the domain server.
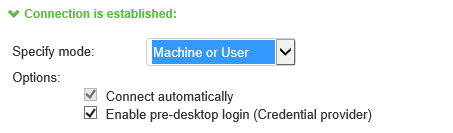
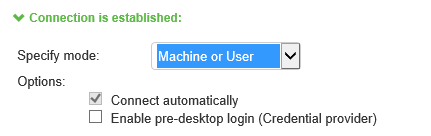
The configuration in figure above enables Ivanti Secure Access Client interaction with the credential provider software on the endpoint. Machine credentials are used to establish the authenticated Ivanti Secure Access Client connection to the network. When the user provides user credentials, the connection is authenticated again. In one typical use case, the machine credentials provide access to one VLAN, and the user credentials provide access to a different VLAN.
Location Awareness Rules
For Ivanti Connect Secure or Ivanti Policy Secure (L3) connections, you can define location awareness rules that enable an endpoint to connect conditionally. If you do not have location awareness rules defined, Ivanti Secure Access Client attempts to connect with each connection that is defined as an automatic connection until it connects successfully. Location awareness rules allow you to define an intelligent connection scheme. For example, the endpoint connects to Ivanti Policy Secure if it is connected to the company intranet, or it connects to Ivanti Connect Secure if it is in a remote location.
A Ivanti Secure Access Client connection uses the IP address of a specified interface on the endpoint to determine its network location. Each location awareness rule includes the following settings:
•Name: A descriptive name, for example, “corporate-DNS.” A name can include letters, numbers, hyphens, and underscores.
•Action: The method the connection uses to discover the IP address. Choose one of the following values:
•DNS Server: Allows the endpoint to connect if the endpoint’s DNS server on the specified interface is set to one of the specified values. Use the Condition box to specify IP addresses or address ranges.
•Resolve Address: Allows the endpoint to connect if the hostname specified in the DNS Name box can be resolved by the DNS server for the specified interface. If one or more address ranges are specified in the Address Range box, the address must resolve to one of the ranges to satisfy the expression.
•Endpoint Address: Allows the endpoint to connect if the IP address of the specified interface is within a range specified in the IP Address Range box.
To create a negative location awareness rule, you first create the positive state and then use rule requirement logic to use the rule as a negative condition.
Machine Connection Preferences
The Machine Connection Preferences appear if you have selected one of the machine authentication options for how the connection is established. Normally Ivanti Secure Access Client presents a selection dialog box if more than one realm or role is available to the user. However, a connection that is established through machine authentication fails if a dialog box is presented during the connection process. To suppress the selection dialogs, either ensure that only one role and realm is available to users, or specify a preferred realm and role for this connection.
•Preferred Machine Realm: Specify the realm that this connection uses when establishing the machine connection. The connection ignores any other realm available for the specified login credentials
•Preferred Machine Role Set: Specify the role or the name of rule for the role set that this connection uses when establishing the machine connection. The role or rule name used must be a member of the preferred machine realm.
User Connection Preferences
The User Connection Preferences options enable you to specify a realm and role for automatic connections that would otherwise present a selection dialog box to the user. To suppress the selection dialogs, either ensure that only one role and realm is available to users, or specify a preferred realm and role for this connection.
•Preferred User Realm: Specify the realm for this connection that is used when a user logs onto the endpoint. The connection ignores any other realm available for the user’s login credentials
If one of the credential provider connection options is enabled, the following options are available:
•Preferred Smartcard Logon Realm: Preferred realm to be used when user logs in with a smart card.
•Preferred Password Logon Realm: Preferred realm to be used when user logs in with a password.
Be sure that the authentication realms you specify exist, and that they support the appropriate login credential option.
•Preferred User Role Set: Specify the preferred role or the name of the rule for the role set to be used for user authentication. The role or rule name used must be a member of the preferred user realm.
•Select client certificate from machine certificate store: Enables you to specify the location of the client certificate on a Windows endpoint as part of a Ivanti Secure Access Client connection that verifies the identity of both the machine and the user before establishing a connection. When this check box is selected, the Ivanti Secure Access Client connection looks at client certificates located in the Local Computer personal certificate store. When this check box is not selected, the connection accesses the user certificate store as a Windows endpoint.