Ivanti Connect Secure Overview
As you plan your Ivanti Secure Access Client configuration, be sure you know how you want to deploy Ivanti Secure Access Client software. You can use one or more of the following deployment options:
•Use the defaults or make changes to the Ivanti Connect Secure default component set and default connection set, and then download and distribute Ivanti Secure Access Client by having users log in to the Ivanti server’s user Web portal and be assigned to a role. After the installation is complete, users have all the connections they need to access network resources.
•Create the connections that an endpoint needs for connectivity and services, download the settings file (.pulsepreconfig), and download default Ivanti Secure Access Client installation program. For Windows endpoints you run the Ivanti Secure Access Client installation program by using an msiexec command with the settings file as an option. For OS X endpoints, you run the default installer and then import the .pulsepreconfig file using a separate command.
•Distribute Ivanti Secure Access Client with no preconfiguration. You can download the default Ivanti Secure Access Client installation file (.msi format for Windows; .dmg format for Mac) from Ivanti Connect Secure, and then distribute the file to endpoints using your organization’s standard software distribution methods. Because the installer does not contain preconfigured connections, users must define network connections manually. Or you can create dynamic connections on each Ivanti Connect Secure. These connections are automatically downloaded to the installed Ivanti Secure Access Client when users provide their login credentials to the Ivanti server’s user Web portal, and then starts Ivanti Secure Access Client through the Web portal interface. Dynamic connections are created as manual rather than automatic connections, which means that they are run only when the user initiates the connection or the user browses to a Ivanti Connect Secure and launches Ivanti Secure Access Client from the server’s Web interface.
For a Windows installation (.msi) that uses an automated distribution mechanism and where the users do not have administrator privileges, you should ensure that the installation is run in the proper context, typically the USER context. To install in USER context, first advertise the .msi while in the SYSTEM context.
The advertisement allows the installation to be run in USER context even if the user is a restricted (non-admin) user. The location where the advertisement is run and where the actual installation is run must be the same. If the installation is an upgrade, you must advertise the upgrade version before running it.
It is much easier to upgrade Ivanti Secure Access Client by not disabling the automatic upgrade feature on Ivanti Connect Secure.
After the installation is run by the user, Ivanti Secure Access Client will use the correct user certificate and context.
The following tasks summarize how to configure Ivanti Connect Secure
•Create and assign user roles to control who can access different resources and applications on the network. If you are converting your access environment from agentless or a Network Connect environment, you should create new roles that are specific for Ivanti Secure Access Client.
•Define security restrictions for endpoints with Host Checker policies.
•Define user realms to establish authentication domains. If you are converting your access environment from agentless or a NC environment, typically you can use your existing realms.
•Associate the roles with appropriate realms to define your access control hierarchy using role mapping.
•Define Ivanti Secure Access Client component sets, connection sets, and connections.
•Deploy Ivanti Secure Access Client to endpoints.
Ivanti Secure Access Client and IVS
Ivanti Connect Secure and Ivanti Secure Access Client do not support Instant Virtual System (IVS) feature anymore.
Ivanti Secure Access Client and Traffic Enforcement
The Traffic Enforcement feature (supported on Windows and macOS) enables the user to prevent the leakage of any packet out of the tunnel as per Ivanti Connect Secure tunnel configuration. This is accomplished by applying firewall rules in Ivanti Secure Access Client. These rules are created based on the Ivanti Connect Secure tunnel configuration.
For more information on Ivanti Connect Secure tunnel configuration policies, refer to the section “Defining Split Tunneling Network Policies” and “Defining the Route Precedence Options” of chapter “VPN Tunneling” of Ivanti Connect Secure Administration Guide.
A local program might bypass the routing tables and bind traffic to the physical interface instead of allowing it to go through the Ivanti Secure Access Client virtual interface. If you enable Traffic Enforcement, you ensure that all traffic is bound by the Ivanti Connect Secure tunnel configuration. Traffic Enforcement feature is more useful in macOS because of Apple routing behavior.
For example, If SSH session is created using physical adapter before VPN tunnel, the session will continue to use physical adapter even after the tunnel is established because of macOS scoped routing (Apple functionality). If Traffic Enforcement is enabled, the same SSH session gets terminated because firewall rule finds packet leaking out of tunnel from SSH session and it will deny that traffic.
A DNS proxy provider is an application extension that handles DNS proxying. It takes responsibility for resolving all DNS queries on the system. On Ivanti Secure Access Client, the DNS Proxy Provider intercepts DNS queries and responses to create a DNS cache.
Advanced Ivanti Secure Access Client Configuration Feature
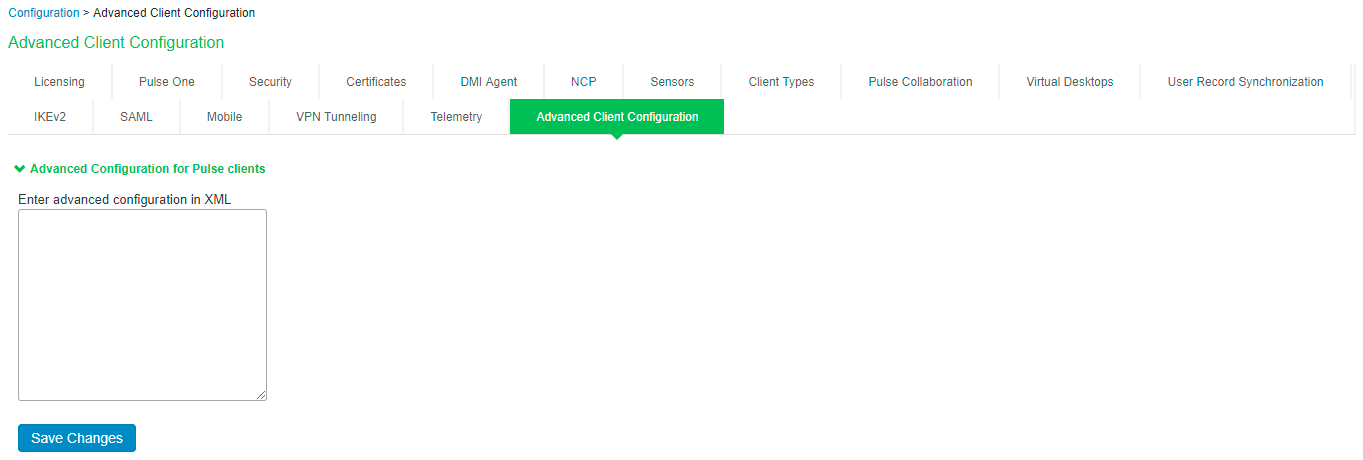
This topic describes the XML advanced Ivanti Secure Access Client configuration that can be used by the Ivanti Connect Secure administrator to configure the custom settings, which are meant to solve a specific customer scenario without changing the Ivanti Connect Secure admin console. Admin can set these custom settings in the form of XML input through the Advanced Client Configuration UI feature. Ivanti Secure Access Clients supporting these custom settings will consume them when connecting to this Ivanti Connect Secure, and the same would be applied on Ivanti Secure Access Client machines. This feature minimize the number of changes going into the Ivanti Connect Secure admin console to fulfill the requirement of a specific customer.
In the earlier Ivanti Secure Access Client releases, the virtual adapter MTU was calculated based on the physical adapter MTU (of the host machine) and the MTU sent by the Ivanti Connect Secure.
Basically, the formula used to calculate the virtual adapter MTU is:
MIN (Physical Adapter MTU, MTU from Ivanti Connect Secure, TCP MSS value + 40)
Following is a scenario where Firewall on the data path is stripping the TCP MSS options being advertised by the SA/Ivanti Connect Secure to Ivanti Secure Access Client. In this scenario, the TCP MSS value on Ivanti Secure Access Client will default to a minimum value of 536, and as a result the client-side MTU calculation will result in a minimum MTU value of 576. Here, customer wants to ignore the TCP MSS options while calculating the Virtual Adapter MTU calculation.
If the administrator configures the Ivanti Connect Secure server with the following XML input in “Advanced Client Configuration for Ivanti Secure Access Client” option, it will ignore TCP MSS options while calculating the virtual adapter MTU on client side.
1.Select System > Configuration > Advanced Client Configuration to display the configuration page.

2.Enter the following XML input in “Advanced Client Configuration for Ivanti Secure Access Client”.
<advanced-config>
<version>22.8.3</version>
<desktop-client-config>
<layer3-connection-config>
<adapter-config>
<ignore-tcp-mss>TRUE</ignore-tcp-mss>
</adapter-config>
</layer3-connection-config>
</desktop-client-config>
</advanced-config>
3.Click Save Changes.
The advanced configuration setting "ignore-tcp-mss" is Layer3 Adapter configuration setting and this will be consumed by Ivanti Secure Access Client as part of the IpsecConfig.
This “ignore-tcp-mss” setting is applicable for the virtual adapter MTU calculation only for IPv4. By default the setting is always false, and therefore the TCP MSS options are always considered for MTU by default. Admin has to explicitly set the ignore-tcp-mss setting to TRUE (case-insensitive), to ignore the TCP MSS.
Disabling NetBIOS driver Using Advanced Client Configuration
This feature provides an option to enable/disable the NetBIOS configurations permanently on the Network Adaptor.
On the ICS UI, navigate to System > Configuration > Advance Client Configuration. Under, Advanced Configuration for Ivanti Secure Access Client, set the <disable-Netbios> flag to “True”.
Disabling JNPRNS driver Using Advanced Client Configuration
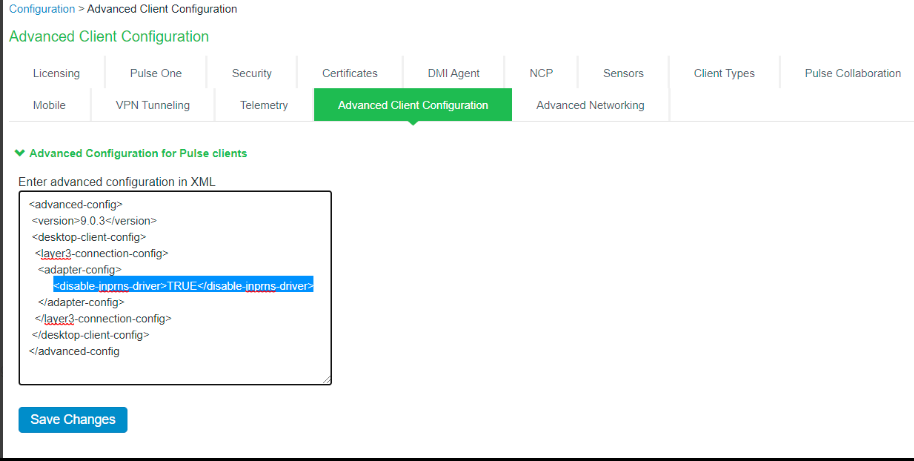
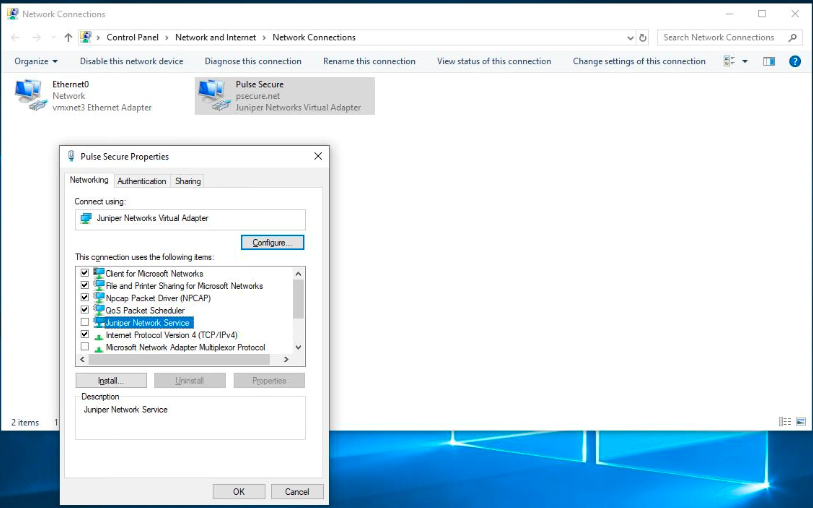
JNPRNS is a Network Driver Interface Specification (NDIS) based Light Weight Filter (LWF) driver used for certain operations in IPSEC L3 Flow. By default, JNPRNS driver is enabled on all the network adapters associated with PDC. Enabling JNPRNS driver can affect the upload and download performance on normal SSL/ESP L3 VPN. To improve the speed, you can disable JNPRNS driver.
Use any one of the methods to disable JNPRNS driver:
•On windows endpoint, disable JNPRNS driver manually from the network adapter stack using the powershell command
Disable-NetAdapterBinding -Name * -DisplayName "Juniper Network Service"
•On the ICS UI, navigate to System --> Configuration --> Advance Client Configuration. Under, Advanced Configuration for Ivanti Secure Access Client, set the <disable-jnprns-driver> flag to “True” as shown in the figure.


This setting is applicable for clients running on Windows 10 operating system only.
Adoption of dynamic Windows driver interface
This feature is implemented to avoid the intermittent disconnections of Ivanti Secure Access Client . The connections fail due to the combination of VPN connection and Windows Connection Manager. This feature supports to install the JNPRVA driver interface types IF_TYPE_ETHERNET_CSMACD (6) or IF_TYPE_PROP_VIRTUAL (53). By default, the IF_TYPE_ETHERNET_CSMACD (6) interface is selected.
On the ICS UI, navigate to System --> Configuration --> Client Configuration. Under, Advanced Configuration for Ivanti Secure Access Client, set <driver_type>ethernet</driver_type> or <driver_type>virtual</driver_type>.
For Ivanti Secure Access Client 22.6R1 onwards, use <driver_type>ethernet</driver_type> to set IF_TYPE_ETHERNET_CSMACD (6) or <driver_type>virtual</driver_type> to set IF_TYPE_PROP_VIRTUAL (53) as drivers.
For Ivanti Secure Access Client 22.5Rx and below, use %WINDIR%\System32\msiexec.exe /i PulseSecure.msi DRIVERTYPE=ethernet /L*Vx! install.log to set IF_TYPE_ETHERNET_CSMACD (6) or %WINDIR%\System32\msiexec.exe /i PulseSecure.msi DRIVERTYPE=virtual /L*Vx! install.log to set IF_TYPE_PROP_VIRTUAL (53) as drivers.
The feature works for the following scenarios:
•Ivanti Secure Access Client fresh Installation through command line
•Ivanti Secure Access Client manual Upgrade through command line
•Ivanti Secure Access Client auto upgrade from 22.6R1 onwards
•Ivanti Secure Access Client upgrade from the Web Browser from 22.6R1 onwards
•SCCM client push through command line
•Ivanti Secure Access Client uninstallation (SAVESETTINGS=<1/0>)
The dynamic driver type functionality does not work when the client is auto-upgraded or upgraded through the Web Browser from 22.5Rx or older builds to 22.6R1.
Defining the default SAML window size using Advanced Client Configuration
This feature allows the administrator to set the default size of the embedded browser as small or large.
On the ICS UI, navigate to System > Configuration > Advance Client Configuration. Under, Advanced Configuration for Ivanti Secure Access Client, set the <saml_window_type>small</saml_window_type> or <saml_window_type>default</saml_window_type>.
Enabling Split DNS using Advanced Client Configuration
This feature allows administrators to enable loading of split DNS.
On the ICS UI navigate to System > Configuration > Advance Client Configuration. Under, Advanced Configuration for Ivanti Secure Access Client, set the <enable-SplitDNS-driver>true</enable-SplitDNS-driver>.
Enabling DNS Proxy provider using Advanced Client Configuration
A DNS proxy provider is an application extension that handles DNS proxying. It takes responsibility for resolving all DNS queries on the system.
On Ivanti Secure Access Client, the DNS Proxy Provider intercepts DNS queries and responses to create a DNS cache.
This feature allows administrators to enable DNS Proxy provider.
On the ICS UI navigate to System > Configuration > Advance Client Configuration. Under, Advanced Configuration for Ivanti Secure Access Client, set the <enable-DNS-Proxy-Provider>true</enable-DNS-Proxy-Provider>.
Bypass client proxy setting using advanced client configuration
Ivanti Secure Access Client supports connecting to the Ivanti Connect Secure server through a proxy server configured in the endpoint system settings or browser. Ivanti Secure Access Client first attempts to connect through the proxy server and if it fails, it attempts to connect directly.
In some cases, if the proxy server is reachable through corporate network only, an option to ignore the proxy settings helps to establish a seamless connection.
This feature allows administrators to bypass client proxy settings and establish a seamless connection when the proxy server is not reachable.
If this setting is not specified, ICS continues to use the current proxy settings.
On the ICS UI navigate to System > Configuration > Advance Client Configuration. Under, Advanced Configuration for Ivanti Secure Access Client, set the <ignore-endpoint-proxy>TRUE</ignore-endpoint-proxy>.
Enable ISAC custom URL launch using advanced client configuration
ISAC launch through URL is disabled by default. This feature allows the administrators to enable ISAC launch through URL.
On the ICS UI navigate to System > Configuration > Advance Client Configuration. Under, Advanced Configuration for Ivanti Secure Access Client, set the <enable-isac-url-launch>true</enable-isac-url-launch>.
VPN Connectivity and NlaSvc Service Issue
VPN connectivity may fail if required components—specifically the Network Location Awareness Service. (NlaSvc)—is not fully installed or configured. To mitigate this:
-
Manual Restart
Once your VPN tunnel is established, try restarting the NlaSvc Windows service.
-
Advanced Client Configuration (Automated Restart via XML).
In Advanced Client Configuration for Ivanti Secure Access Client, insert the following XML:
Copy<restart-nlasvc>
Set to TRUE to automatically restart the NlaSvc service after VPN tunnel
establishment.
This configuration is applicable on all supported Windows OS versions.
<restart-nlasvc-delay>
Adjust this value based on system needs (default example: 120
Sample XML for Advanced Configuration
<advanced-client-configuration><restart-nlasvc>TRUE</restart-nlasvc><restart-nlasvc-delay>120</restart-nlasvc-delay></advanced-client-configuration>If VPN tunnels do not establish reliably, ensure proper installation, then use the above XML configuration to control the automatic restart of the NlaSvc service. This can resolve network profile and routing detection issues on Windows. Adjust the delay as required.
<restart-nlasvc>TRUE</restart-nlasvc><restart-nlasvc-delay>120</restart-nlasvc-delay>Enabling FQDN-based Split Tunneling
VPN connection for a domain initiates a DNS update consisting of both physical and virtual IPs in the DNS server. Any application attempting to connect to the endpoint fails due to multiple IPs.
Update the DNS request to retain only one IP (virtual IP).
<fix_dynamic_dns_after_tunnel_setup> TRUE
</fix_dynamic_dns_after_tunnel_setup>
ISAC desktop vpn connection failover timeout
Keep-Alive timing is managed via Advanced client config. By default it is 120 seconds. To reduce the setup time, reduce the keep-alive client time to detect the server down time and retry connection.
In Advanced Client Configuration for Ivanti Secure Access Client, insert the following XML:
<cluster_failover_timeout>
30
</cluster_failover_timeout>
Disconnection of Pulse windows desktop client services
Disconnection of Pulse windows desktop client services in the registry with an IF Type of 0x6 is identified as an Ethernet connection. Windows connection manager attempts to connect via Ethernet and connection fails.
Updated the driver which changes the VPN from 0x6 to either 53 or 131. This way Windows Connection Manager doesn’t keep trying to switch over to it as the primary connection instead
In Advanced Client Configuration for Ivanti Secure Access Client, insert the following XML:
<driver_type>virtual</driver_type> or
<driver_type>ethernet</driver_type>
Cisco umbrella disrupts services
Enabling the Cisco umbrella disrupts VPN accessibility for a few applications.
In Advanced Client Configuration for Ivanti Secure Access Client, insert the following XML:
<delete-default-gateway-route>true</delete-default-gateway-route>