ISAC Application Deployment through Intune on Android
To deploy ISAC application using Intune, refer to Intune documentation for complete procedure.
- Create Users and Groups. For more information on User management, refer Create a user in Intune and Create a group to manage users.
- Enrol devices: Device enrollment guide for Microsoft Intune and https://www.youtube.com/watch?v=mJyv6YcHi7c.
- Add ISAC application to Intune: Add apps to Microsoft Intune.
- Setup the application assignment: Include and exclude app assignments in Microsoft Intune.
- Assign the application to specific user and endpoints: Assign apps to groups in Microsoft Intune.
Set Up Groups
Groups in Intune provide great flexibility for managing the mobile devices and users. You can set up specific mobile device groups based on your organizational requirements.
For more information device categorization, refer Categorize devices into groups in Intune.
For more information on User management, refer Create a user in Intune and Create a group to manage users.
When the policies are created, you can deploy them to one or more devices or user groups.
Compliance Policies
Create compliance policy for each platform, click Create Policy. Select Platform and the Profile Type. Refer to Device compliance policies in Microsoft Intune.
Configuration Profiles
Microsoft Intune policies provide settings that help you control the security settings on mobile devices. Using its capability of controlling access to company resources, you can deploy certificates, VPN profiles, and so on.

Creating Trusted Certificate Profile
Before proceeding, ensure you have exported the Trusted Root Certification Authorities (CA) certificate as a .cer file from the issuing CA.
To create trusted certificate profile in Intune:
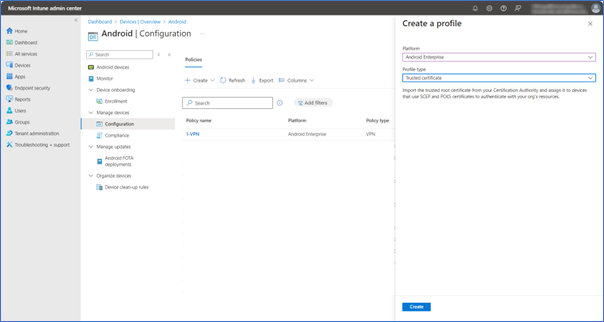
- Navigate to Home > Devices > Android > Configuration.
- In the Create a profile window, from Android Enterprise list, select Trusted Certificate as Profile Type and click Create.
- Enter a name and description for the policy. Under certificate settings, upload the root certificate file and the select the required destination store. Assign to the required groups and create the Policy.
Creating Certificate Profile
Before proceeding with VPN profile creation, the certificate profile MUST be created in Intune. Configure the SCEP certificate profiles to use for VPN connections. For more information see, Use SCEP certificate profiles with Microsoft Intune.
Creating VPN Profile
Mobile devices use a VPN connection profile to initiate a connection with the VPN server. Use VPN profiles in Microsoft Intune to deploy VPN settings to mobile devices in your organization, so they can easily and securely connect to the network. For more information, see Use VPN settings for Android Enterprise in Microsoft Intune.
Before proceeding, make sure you have IP address or FQDN name of Ivanti Connect Secure (ICS) server that mobile devices will connect to.
To create a VPN profile:
- In the Intune admin console, navigate to Home > Devices > Android > Configuration.
- Under Policies, click Create and select New Policy.
- In the Create a profile window, select Platform as Android Enterprise and choose VPN as Profile type and click Create.
- In the Basics details, enter a name and description for the policy.
- In the Configuration settings, from the Connection type drop-down list, select Custom VPN.
- Under Base VPN details, enter the ICS server name for Connection Name.
- For VPN IP address name, enter the ICS sign-in URL or the server IP address.
- From the Authentication method, drop down list. You can select to use credential based or certificate-based authentication.
- If you select Certificates, click Select and choose client certificate for authentication. Enter the SCEP Certificate profile name created before; for details, see Creating Certificate Profile.
ISAC is named as Pulse Secure VPN. You can use Pulse Secure as VPN. Ensure to re-push the profiles in case the profiles are not recognised by the VPN application.
This procedure creates a Manual VPN connection. User needs to manually establish the connection from ISAC.
ICS Configuration to import CA certificate
To import a trusted client CA certificate:
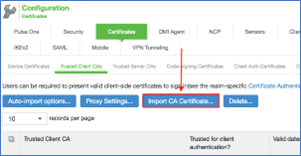
- On ICS console, select System > Configuration > Certificates > Trusted Client CAs to display the configuration page.
- Click Import CA Certificate to display the configuration page.
- Browse to the VPN certificate file, select it, and click Import Certificate to complete the import.
To configure authentication with the certificate server:
- On ICS console, select Authentication > Auth. Servers.
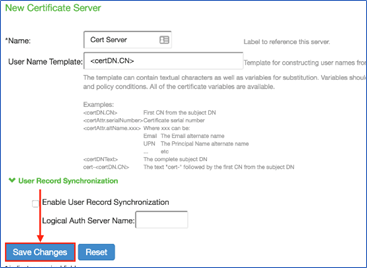
- Select Certificate Server and click New Server to display the configuration page.
- Specify a name to identify the server within the system.
- Specify a username template. Specify how the system should construct a username. You may use any combination of certificate variables contained in angle brackets and plain text.
To implement certificate restrictions at the realm level:
- On ICS console, select Users > User Realms > <Select Realm>, select the corresponding User Realm used for L3 connections.
- Under Servers, select the certificate auth server from the authentication drop-down menu.
ICS Configuration for L3 VPN
For L3 VPN, in ICS server navigate to Users > User Roles > General. In the Access features section, enable VPN tunneling. For more details, refer to the section “Configuring General Role Options” in Ivanti Connect Secure Administration Guide.
Limitations
•No Support for FQDN based Split Tunnelling.
•L4 connections are not applicable for Android.
Android VPN Settings
To configure On-Demand and Always-On VPN To use VPN on Android Enterprise devices, use an app configuration policy. App configuration policies support VPN client application.
Configuring Application Restrictions Policy on Intune
To create application restriction policies to use the Configuration designer:
- Add the application to the Intune MDM.
- Once the App is approved on the App Store, click on Sync to sync the Apps into the Intune
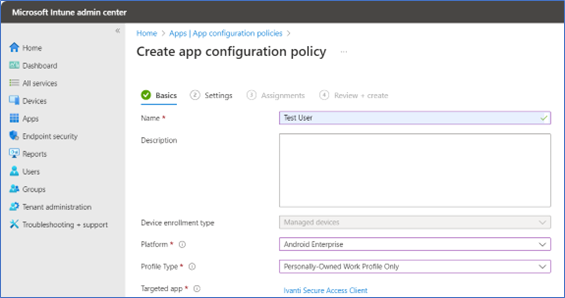
- To configure application restrictions, goto Apps > App configuration policies, click Add and select Managed Devices.
- To create App configuration policy, provide the name of the Policy, select Android Enterprise as Platform, select the Profile Type, select Ivanti Secure Access Client as Targeted App and click Next.
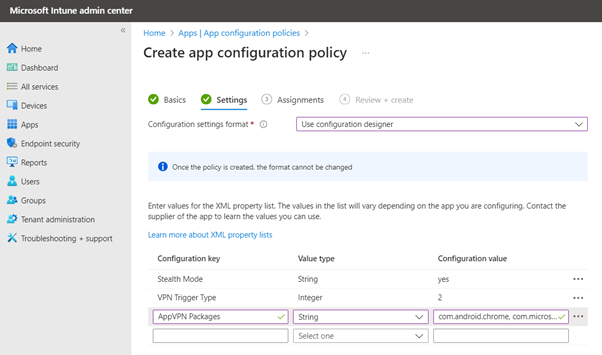
- Under the Settings, select Configuration settings format as “Use configuration designer”.
- Enter the configuration keys and values manually, click Next.
- Alternatively, under the Settings, select Enter JSON data and use the following template:
- Select the Group Assignments, Review and create the Policy.
|
{ "kind": "androidenterprise#managedConfiguration", "productId": "app:net.pulsesecure.pulsesecure", "managedProperty": [ { "key": "profile_name", "valueString": STRING_VALUE }, { "key": "url", "valueString": STRING_VALUE }, { "key": "authentication_type", "valueString": STRING_VALUE }, { "key": "username", "valueString": STRING_VALUE }, { "key": "password", "valueString": STRING_VALUE }, { "key": "username2", "valueString": STRING_VALUE }, { "key": "password2", "valueString": STRING_VALUE }, { "key": "cert_alias", "valueString": STRING_VALUE }, { "key": "default", "valueBool": true|false }, { "key": "realm", "valueString": STRING_VALUE }, { "key": "role", "valueString": STRING_VALUE }, { "key": "route_type", "valueString": STRING_VALUE }, { "key": "appvpn_action", "valueString": STRING_VALUE }, { "key": "appvpn_packages", "valueString": STRING_VALUE }, { "key": "vpn_trigger_type", "valueString": STRING_VALUE }, { "key": "uiless_auth", "valueBool": true|false }, { "key": "device_udid", "valueString": STRING_VALUE } ] } |
Ensure the configuration keys are used with values as specified:
- For VPN on Demand, Stealth Mode must set as True.
- Configure mandatory parameters like Connection Name, URL, Authentication type, Certificate Alias (in case of cert auth), username, password (in case of userpass).
|
Configuration Keys |
Value Type |
Configuration values |
Description |
|---|---|---|---|
|
Stealth Mode |
String |
|
Stealth Mode Authentication |
|
VPN Trigger Type |
Choice |
0 or 1 or 2 |
VPN Trigger Type: Manual = 0, OnDemand = 1, Always on VPN = 2 |
|
AppVPN Packages |
string |
com.android.chrome, com.microsoft.skydrive |
Application VPN packages (value should be comma separated) |
|
AppVPN Action |
Choice |
0 or 1 |
Application VPN action: allow = 0, deny = 1 |
|
Route Type |
String |
0 or 1 |
Route Type: device VPN = 0 or Per-App VPN = 1 |
|
Role |
String |
|
VPN Role |
|
Realm |
String |
|
VPN Realm |
|
VPN-Standard |
bool |
|
Set this profile as default. Existing default profile will be override |
|
Certificate Alias |
String |
|
Certificate alias in the Android KeyStore |
|
Password2 |
String |
|
VPN Password 2 |
|
Username2 |
String |
|
VPN username 2 |
|
Password |
String |
|
VPN Password |
|
Username |
String |
|
VPN username |
|
Authentication Type |
choice |
Certalias or userpass or dualauth |
VPN Authentication Type: certalias: Certificate Authentication, userpass: Username/Password based Authentication, dualauth: combination of userpass/certauth |
|
URL |
String |
|
VPN Connection URL |
|
Connection Name |
String |
|
VPN Connection name |
If any of the selected configuration keys are empty, policy cannot be created.
Conditional Access on Android ISAC client
Conditional access feature allows to use identity-driven signals as part of the access control decisions. Conditional Access brings signals together, to make decisions, and enforce organizational policies. This feature allows administrators to restrict access to approved client apps using Intune app protection policies.
For detailed information, refer What is Conditional Access in Microsoft Entra ID?
Conditional Access feature is only applicable in case of SAML authentication. Before proceeding with configuring Conditional Access feature on Intune, ensure SAML server is configured on Ivanti connect Secure server. For configuration procedure, see User Verification and Key Concepts.
Ensure you follow the steps to enable Conditional Access feature.
- Configure a SAML cloud app on Azure IdP and Ivanti Connect Secure. See, Deploying a BYOD Policy for Microsoft Intune Managed Devices and Client application configuration.
- Create Device Feature policy configuration in Intune MDM under Devices > Manage devices > Configuration > Create > New policy.
- Configure device compliance policy, see Password compliance policy for Android Enterprise devices.
- Connect your Intune account to your Managed Google Play account.
- Enroll the android devices, see Android device enrollment guide for Microsoft Intune.
- Configure conditional access policy, See Plan a Microsoft Entra Conditional Access deployment.
- Create Conditional access policy on Azure IdP:
- Select the user to apply the policy.
- Select the target resource as the ISAC client name.
- Choose conditions. Select Device platform as Android for Android devices.
- Select Client apps as Browser, mobile devices use browser for login.
- Block or grant access to the resources based on the above conditions and device compliance state. Ensure Required Device to be marked as Compliant is checked.
Identity based restriction is configured from MDM, Conditional access policy gets applied based on the compliance state fetched from Azure IdP.
When establishing a connection with conditional access from ISAC, a prompt to accept the certificate appears and user input is required to proceed with connection.