Multinode Configuration Management
•Editing an Existing Config Sync Rule
•Scheduling Config Sync Rule Job
•Viewing Config Sync Rule Status
The config synchronization feature supports simple configuration management across an enterprise without requiring you to deploy the systems as a cluster. You synchronize a partial configuration from the running configuration on the source system to the running configuration on one or more target systems. It supports configuring the entire configuration synchronization across multiple targets (up to 15 targets for entire configuration and 50 targets for selective configuration).
This feature enhances flexibility and scalability for managing multiple gateways or clusters. This is particularly useful for enterprises with extensive networks, as it simplifies configuration management across various systems
NSA Config Authoring can handle multiple certificates with the same serial number.
- Disable Gateway Push Config while using NSA Config Sync.
- Gateway Push Config fails if the configured admin account has MFA enabled on the target ICS server.
Config Synchronization
To configure config synchronization rule:
-
Log into the NSA as a Tenant Admin.
-
From the Ivanti Connect Secure menu, click Gateways, then click Multinode Configuration and then select Config Synchronization.
-
In the Config Synchronization page, click Create Config Sync Rule.
-
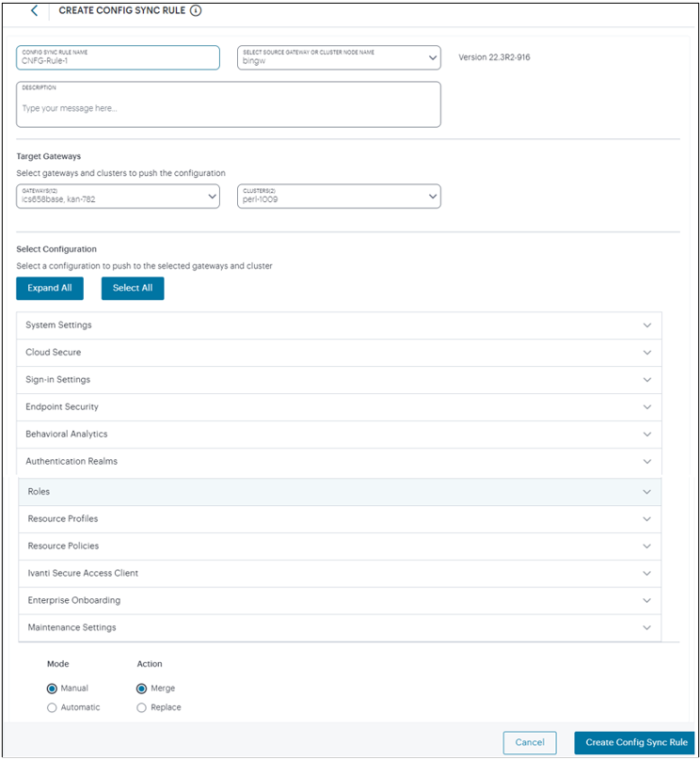
Enter Config Sync Rule Name, select a Gateway or Cluster, and enter Description.
-
Under Target Gateways, select Gateways and Clusters to synchronize.
It is recommended to not use more than 15 targets per config sync rule. A warning message is shown when you create config sync rule with more than the recommended number of targets. Ensure config sync rule is applied only after config upload is successful for all the target gateways.
Config Synchronization fails if the source gateway is 22.7R2.9 and target gateway selected is 25.1R1.
-
Under Select Configuration, select a configuration to synchronize to the target Gateways and Clusters.
-
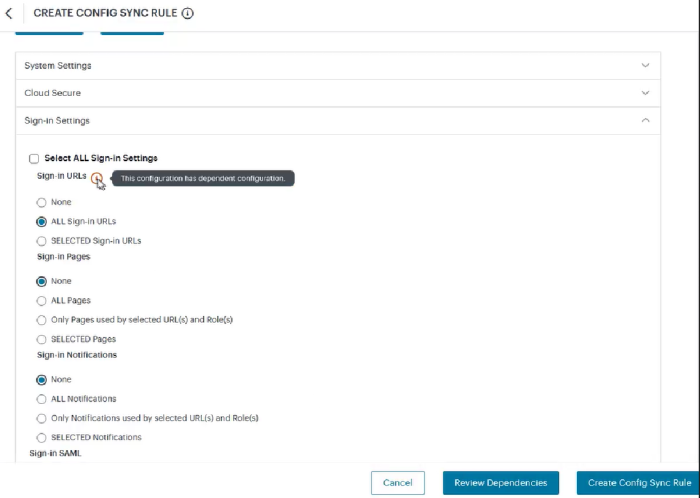
You can expand all the configurations using Expand All and select all the configurations using Select All. You can expand each group and select the required settings.
-
Look for any dependent configuration and select the required settings. The Review Dependencies button will appear at the bottom of the page.
-
Select the Mode: Manual or Automatic. Automatic option will sync the targets whenever there is change in source configuration.
-
Select the Action: Merge or Replace. The Merge option applies only changes in source to the targets, whereas the Replace option replaces the targets configuration with the source configuration.
-
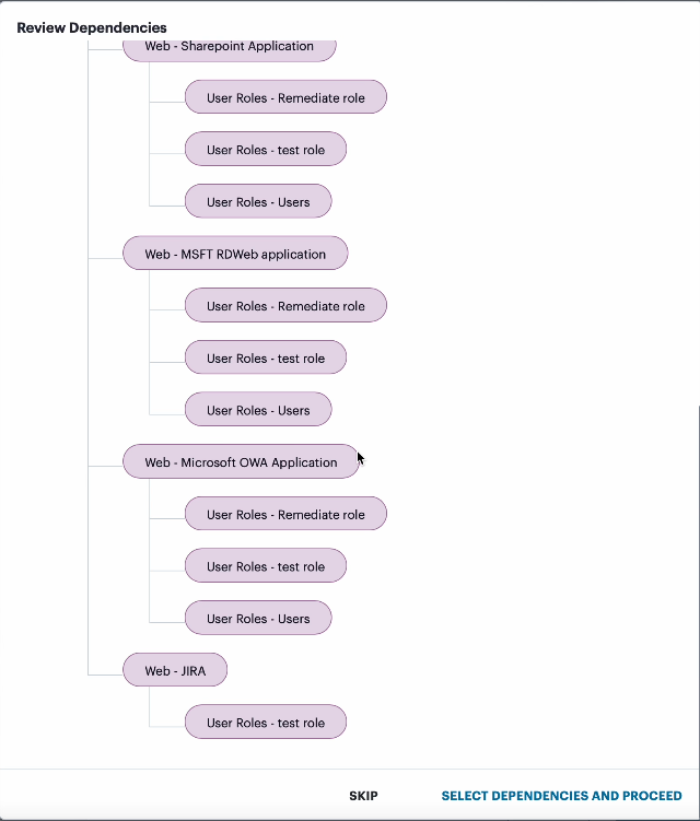
To review the dependencies, click Review Dependencies.
- To make any changes, click Skip and select the required dependencies.
- To proceed with the changes, click Select Dependencies and Proceed.
-
Click Create Config Sync Rule.
The config sync rule gets listed in the Config Synchronization page under the Config Sync Rule tab..
Editing an Existing Config Sync Rule
To edit an existing config sync rule:
- In the Config Synchronization page, click on the config sync rule name that you want to edit.
- In the Edit Rule page, make the necessary changes. You cannot modify the rule name and source Gateway or Cluster.
- Click Update Config Sync Rule.
-
If Manual Mode is selected, then in the Config Synchronization page, select the check box corresponding to the config sync rule that you modified. Then select Actions > Trigger Config Sync Rule.
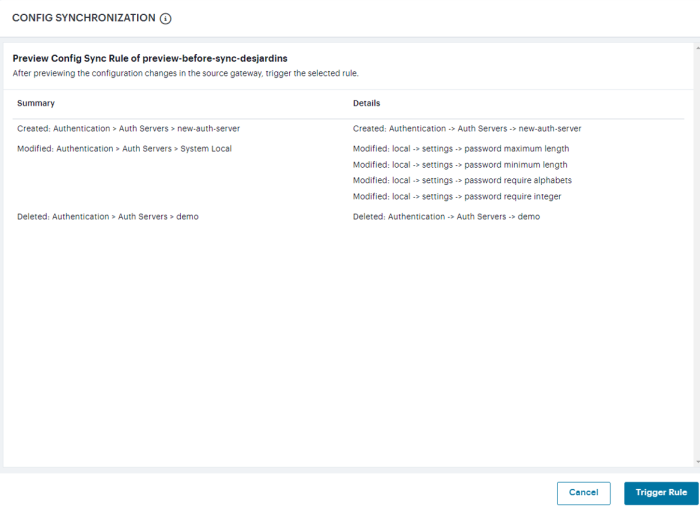
The Preview Config Sync Rule page appears.
-
Preview the config sync rule details, and click Trigger Rule.
Preview before sync works only when one manual config sync rule is triggered.
Removing Config Sync Rule(s)
To delete one or more config sync rule(s):
- In the Config Synchronization page, select the check boxes next to the config sync rule names that you want to delete.
- Select Actions > Delete.
- Click OK to confirm the deletion.
Cloning a Config Sync Rule
Cloning allows the admin to work on a copy of the original config sync rule and create a new rule.
To clone a config sync rule:
- In the Config Synchronization page, identify the suitable config sync rule that you want to clone from the list.
- Select the check box next to the config sync rule name.
- Select Actions > Duplicate Rule.
-
In the Duplicate Config Sync Rule page displayed, edit the rule name. You cannot modify the source Gateway or Cluster.
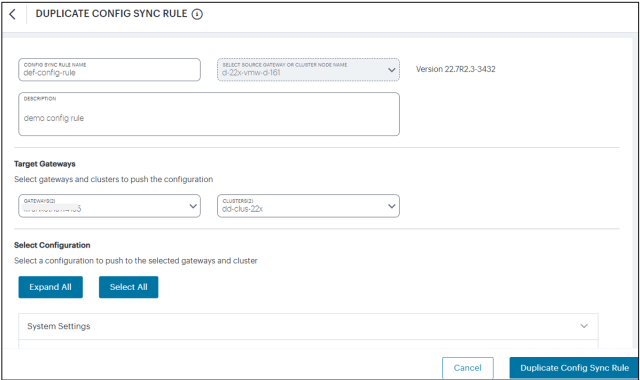
- Make required changes to the rule and dependencies. For details, see Config Synchronization.
-
Click Duplicate Config Sync Rule.
The new rule gets listed in the Config Synchronization page.
Scheduling Config Sync Rule Job
Config sync rule, by default, executes periodically every 10 minutes. Admins may want to trigger one or more config sync rules across the target gateways at a specific time or periodically. Schedule jobs feature allows scheduling config sync rule job to run on a specific date and time, or to run daily or weekly or monthly frequencies.
Scheduling a Config Sync Rule Job
Scheduling One-time Job
To schedule a job for executing only once (On Demand Only):
1.In the Config Synchronization page, select the Config Sync Rule tab.
A list of config sync rules is displayed.
2.Select one or more check box(es) beside the config sync rule name that you want to schedule job.
Config sync rule cannot be part of more than one job.
3.From the Actions menu, select Schedule Jobs.
4.In the Schedule Jobs page, enter a unique name for the job.
5.Select the On Demand Only option.
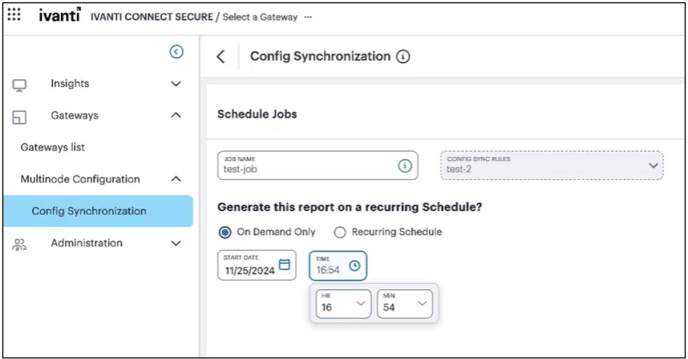
6.Select the date and time for executing the job.
Time is represented in Timezone set in the Timezone settings.
7. Click Schedule Config Sync Rule.
The new job is listed under the Scheduled Jobs tab.
Scheduling Recurring Job
To schedule a job for daily, weekly or monthly frequencies:
1.In the Config Synchronization page, select the Config Sync Rule tab.
A list of config sync rules is displayed.
2.Select one or more check box(es) beside the config sync rule name that you want to schedule job.
3.From the Actions menu, select Schedule Jobs.
4.In the Schedule Jobs page, enter a unique name for the job.
5.Select the Recurring Scedule option.
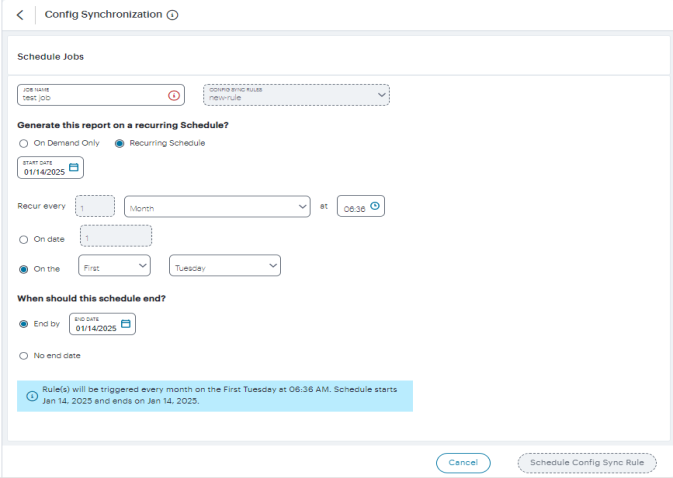
6.Select the Start Date.
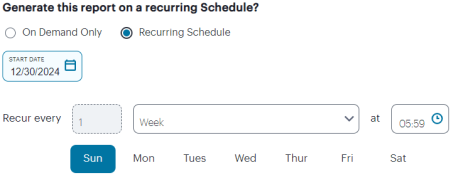
7.From the Recur every drop-down list, select one of the options:
- Day: Click the time icon and select the start time.

or
- Week: Select the days of the week. Click the time icon and select the start time.
or
- Month: Select one of the options:
- On date: Specify a date in the month. Click the time icon and select the start time. For example, on 10th of every month at 5:15AM.
- On First/Second/Third/Fourth/Last week of month on Sunday/Monday/Tuesday/Wednesday/Thursday/Saturday.

Time is represented in Timezone set in the Timezone settings.
8.If you want to end the recurring schedule on a specific date, select End by date. Else, select the No end date option.
9.Click Schedule Config Sync Rule.
The new job is listed under the Scheduled Jobs tab.
Editing a Scheduled Job
To edit a scheduled job:
1.In the Config Synchronization page, select the Scheduled Jobs tab.
A list of scheduled jobs is displayed.
2.Click the job name link that you want to modify.
3.Make the necessary changes and click Schedule Config Sync Rule.
Pausing/Resuming Scheduled Job(s)
To pause one of more scheduled jobs:
1.In the Config Synchronization page, select the Scheduled Jobs tab.
A list of scheduled jobs is displayed.
2.Select one or more jobs by clicking the check box(es) adjacent to the job name.
3.From the Actions menu, select Pause Jobs.
The Status column shows the job is paused.
4.To resume the job, select the paused job, and from the Actions menu, select Resume Jobs.
The Status column shows the job is scheduled.
Removing Scheduled Job(s)
To remove one or more scheduled jobs:
1.In the Config Synchronization page, select the Scheduled Jobs tab.
A list of scheduled jobs is displayed.
2.Select one or more jobs by clicking the check box(es) adjacent to the job name.
3.From the Actions menu, select Delete Jobs.
Viewing Config Sync Rule Status
To view the config sync rule status on the target gateways:
- Click on the config sync rule name that you want to view the status.
- Click the Status tab.
A list of target gateways, their config sync rule status, start and end time, and brief description is displayed. Start time and end time helps admin to know exactly when the config sync rule was triggered and when the config is imported on the ICS gateway.
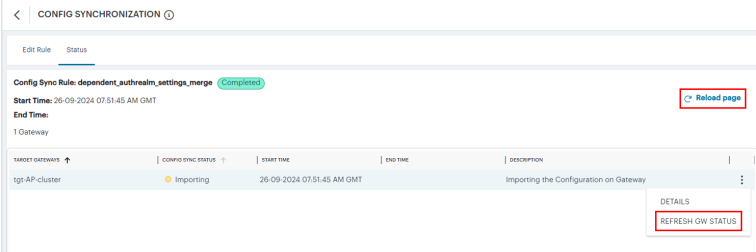
- Click Reload Pageto view the latest status of all the gateways. The status includes:
- Not Synced - Initial state
- Pending - Configuration pushed to ICS gateway
- Importing - Importing configuration on ICS gateway
- Failed - Configuration import failed on ICS gateway
- Successful - Configuration import successful on ICS gateway
- Timed out - Timed out because the status stuck at Pending / Importing state for more than 2 hours
-
For the target gateways with status "Pending", Importing" or "Timed out", click Refresh GW Status that fetches the latest status from the gateway. The status and description columns are updated according to the latest status of the gateway.
Config Sync status history shows the history of previous states for each target gateway.
Config Backup
Config Backup allows tenant admin to take a config backup of any of their registered, supported gateways.
Gateway default admin password policy should be same across all the supported gateways in the tenant.
To take backup:
1.Log into the NSA as a Tenant Admin.
2.From the Ivanti Connect Secure menu, click Gateways, then click Multinode Configuration and then select Config Backup.
A list of supported gateways is displayed under the Overview tab. You can sort the list based on Status or search for a specific gateway by its name.
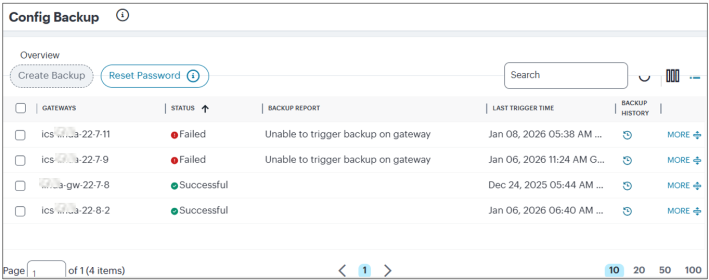
3.Click Set Password, and in the window displayed, set a password for the backup. The password criteria should match with the one set on the ICS Gateway.
4.Select one or more gateways and click Create Backup. The Status tab indicates the backup is "In Progress" and the check box corresponding to this gateway is disabled; means, one more not allowed when backup is already in progress. The Status tab indicates the backup is "Successful" or "Failed" once the backup process is complete.
5.To view backup history, click the Backup History icon. The backup History window shows the details of the last three backups. Use the Delete button if you want to remove the history.
6.To change the password for backup, click Reset Password, and in the window displayed, enter new password.
Config Sync Alerts
The following alerts are generated:
- Config Sync Rule Deleted - This alert is generated when the Config Sync rule is deleted.
- Config Sync Rule Updated - This alert is generated when the Config Sync rule is updated.
- Config Sync Target Cluster Deleted - This alert is generated when the Target Cluster, which is in the Config Sync rule, gets deleted.