Users Configuration
•Ivanti Secure Access Client Connections
Configuring User Realm
The user realm configuration associates the authentication server data and MDM server data with user roles.
To configure user realm:
- Log into the NSA as a Tenant Admin.
- From the Ivanti Connect Secure menu, click the Gateway > Gateway List and then select any standalone ICS Gateway and Cluster node.
-
Navigate to Users > User Realms.
A list of user realms is displayed. Use the Search bar at the top to filter the results list. For each column, click the arrow icon adjacent to the column name to sort in ascending or descending order.
- In the User Realms page, click the Add icon.
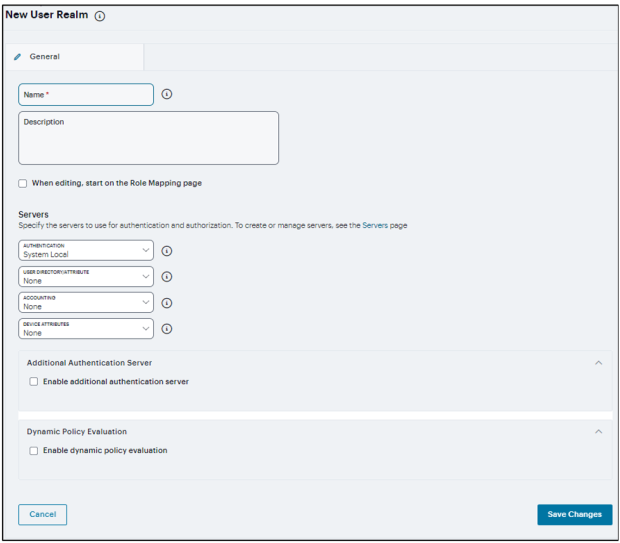
- Enter a name and description for the realm.
- Under Servers, select the user authentication server for this realm’s users.
- If you want to use dynamic policy evaluation for this realm, select
Dynamic policy evaluation to enable an automatic timer
for dynamic policy evaluation of this realm’s authentication policy,
role mapping rules, and role restrictions:
- Use the Refresh interval option to specify how often you want Connect Secure to perform an automatic policy evaluation of all currently signed-in realm users.
- Select Refresh roles to also refresh the roles of all users in this realm.
- Select Refresh resource policies to also refresh the resource policies for all users in this realm.
- Click Refresh Now to manually evaluate the realm’s authentication policy, role mapping rules, role restrictions, user roles, and resource policies of all currently signed-in realm users.
- Click Save Changes to create the realm.
Ivanti recommends Multi factor Authentication (MFA) for all realms to minimizes authentication related security vulnerabilities. If not configured with MFA, realms will be listed in red color with (**) asterisk next to realm name.
Configuring User Role
A user role is an entity that defines user session parameters, personalization settings, and enabled access features. You can customize a user role by enabling specific access features, defining Web, application, and session bookmarks, and configuring session settings for the enabled access features.
To add a new user role:
-
Log into the NSA as a Tenant Admin.
-
From the Ivanti Connect Secure menu, click the Gateway > Gateway List and then select any standalone ICS Gateway and Cluster node.
-
Navigate to Users > User Roles.
A list of user roles is displayed. Use the Search bar at the top to filter the results list. For each column, click the arrow icon adjacent to the column name to sort in ascending or descending order.
-
In the User Roles page, click the Add icon.
-
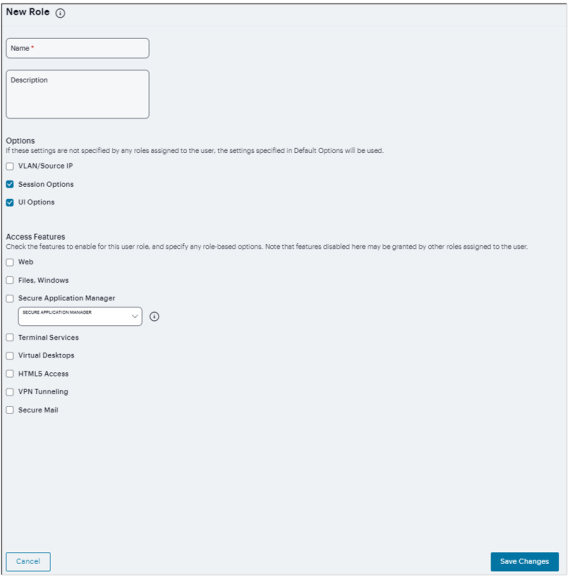
Enter a name and optionally a description.
-
Under Options:
- Select the VLAN/Source IP option to apply the role settings configured on the General > VLAN/Source IP page.
- Select the Session Options option to apply the role settings in the General > Session Options page to the role.
- Select the UI Options option to apply the role settings in the General > UI Options page to the role.
-
Under Access features, select the features you want to enable for the role. Options include:
- Web - intermediate Web URLs through the Content Intermediation Engine.
- Files, Windows - resource profile that controls access to resources on Windows server shares.
- Secure Application Manager (Windows version or Java version) - provides secure, application-level remote access to enterprise servers from client applications.
- Terminal Services - enable terminal emulation sessions on a Windows terminal server, Citrix NFuse server, or Citrix Metaframe server.
- Virtual Desktops - enable virtual desktop session using the VDI architecture.
- HTML5 Access - enable HTML5 session for RDP connection, telnet connection, SSH session or VNC connection.
- VPN Tunneling - provides secure, SSL-based network-level remote access to all enterprise application resources using the system.
- Secure Mail - enables automatic synchronization with an Exchange server (ActiveSync) and e-mail encryption for iOS devices that have the Ivanti Secure Access Client.
-
Click Save Changes to apply the settings to the role.
Resource Profiles
A resource profile contains all of the resource policies, role assignments, and end-user bookmarks required to provide access to an individual resource. Resource profiles simplify resource configuration by consolidating the relevant settings for an individual resource into a single page within the admin console.
The system comes with two types of resource profiles:
- Standard resource profiles enable you to configure settings for a variety of resource types, such as web sites, client/server applications, directory servers, and terminal servers. When you use this method, you choose a profile type that corresponds to your individual resource and then provide details about the resource.
- Resource profile templates enable you to configure settings for specific applications. When you use this method, you choose a specific application (such as the Citrix NFuse version 4.0). Then, the system pre-populates a variety of values for you based on your chosen application and prompts you to configure additional settings as necessary.
Resource profiles are an integral part of the access management framework, and therefore are available on all Ivanti Connect Secure products. However, you can only access resource profile types that correspond to your licensed features.
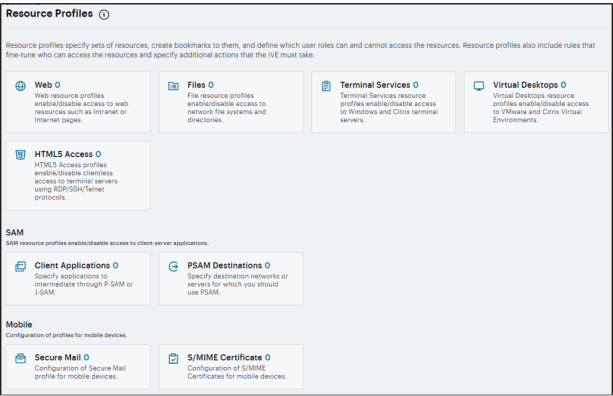
Web Resource Profile
To Create new Web Application Resource Profiles:
-
Log into the NSA as a Tenant Admin.
-
From the Ivanti Connect Secure menu, click the Gateway > Gateway List and then select any standalone ICS Gateway and Cluster node.
-
Navigate to Users > Resource Profiles >Web.
A list of resource profiles is displayed. Use the Search bar at the top to filter the results list. For each column, click the arrow icon adjacent to the column name to sort in ascending or descending order.
-
Click ‘+’ and select the Profile Template from drop down.

-
Enter a unique Name and optionally a Description for the profile.
Citrix Storefront Server
If you have the Citrix StoreFront 31. and above, you can create a Web template to allow users to access Citrix applications without the need for a Citrix client. Users must have one of the following browser versions (or later) to support HTML5 and Websockets:
- Internet Explorer 10
- Safari 6
- Google Chrome 23
- Mozilla Firefox 17
If Citrix resource profile selected as Profile Template, then
-
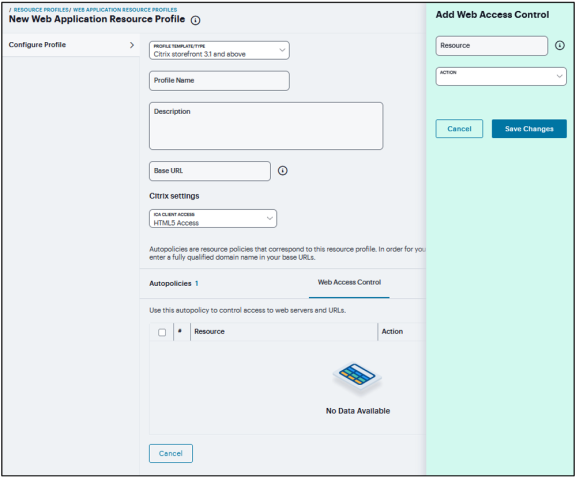
Enter the URL of the Citrix StoreFront Web server in the Base URL field. Use the format: [protocol://]host[:port][/path]. The system uses the specified URL to define the default bookmark for the Citrix resource profile.
-
Under Citrix Settings, select the ICA Client Access option. Admin can either choose to go with the HTML5 way of delivery or can choose to deliver ICA over CTS/PSAM/HTML5 Access clients. If admin chooses the ICA over CTS/PSAM/HMTL5 Access, the corresponding ACL should be created and when ICS rewrites ICA content it should launch the appropriate client. Add the Number of servers/applications and Citrix Ports which require ICA client access.
-
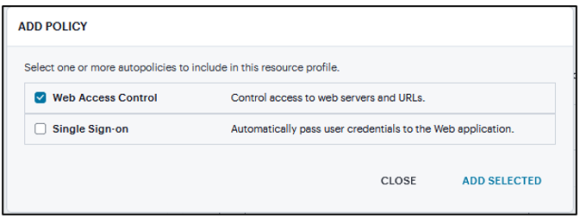
Click Add Autopolicy, Web Access Control or Single Sign-on check box to create a policy and click Add Selected.
-
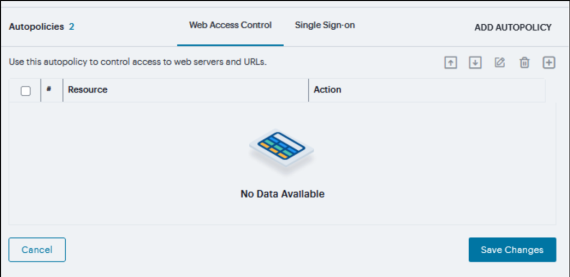
Under Web Access Control, click ‘+’ specific Resource under the Base URL. Enter the full URL of the resource, select Allow or Deny, and click Save Changes. By default, the system automatically creates a policy that enables access to the resource and all of its subdirectories.
-
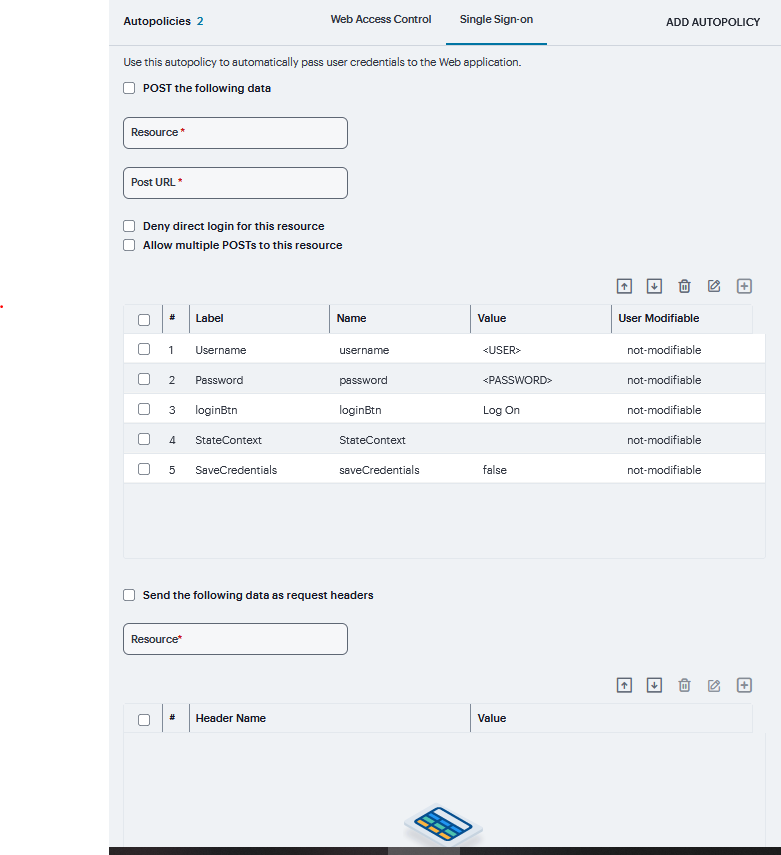
Under Single Sign-on, select the POST the following data check box and specify the application's sign-in page in Resource field and In Post URL field, specify the absolute URL where the application posts the user's credentials.
- In the Resource field, specify the application's sign-in page, such as: http://my.domain.com/public/login.cgi. Wildcard characters are not supported in this field.
- In the Post URL field, specify the absolute URL where the application posts the user's credentials, such as: http://yourcompany.com/login.cgi.
-
Select the Deny direct login for this resource check box if you do not want to allow users to manually enter their credentials in a sign-in page. Users may see a sign-in page if the form POST fails.
-
Select the Allow multiple POSTs to this resource check box if you want to send POST and cookie values to the resource multiple times if required.
-
Optionally, click ‘+’ specify the Label, Name, Value, and select User modifiable, clickSave Changes**.
- Label - The name used to identify the data.
- Name - The name used to identify the data in the Value field. The back-end application should expect this name.
- Value - The value to post to the form for the specified Name. You can enter static data, a system variable, or system session variables containing username and password values.
- User modifiable? - Select Not modifiable to prevent users from changing the information in the Value field. Select User CAN change value to allow users to specify data for a back-end application. Select User MUST change value if users must enter additional data to access a back-end application.
-
To post header data to the specified URL select the Send the following data as request headers check box.
-
Specify the Resources to which this policy applies.
-
Optionally, click ‘+’ specify the Header name and Value and click Save Changes.
Hosted Java Applet
For ICS 25.x Gateways, this feature is deprecated and will be removed in the near future.
The Java applet upload feature enables you to store the Java applets of your choice directly on the device without employing a separate Web server to host them. When you use this feature, you simply upload the applets to the device (along with additional files that the applets reference) and create a simple Web page through the system that references the files. Then, the system intermediates the Web page and Java applet content using its Content Intermediation Engine.
For example, you might want to use the system to intermediate traffic between an IBM AS/400 system on your network and individual 5250 terminal emulators on your users' computers. To configure the system to intermediate this traffic, obtain the 5250 terminal emulator's Java applet. Then you can upload this applet to the system and create a simple Web page that references the applet. After you create the Web page through the system, it creates a corresponding bookmark that users can access through their home pages.
If Hosted Java applet is selected as Profile Template, then
-
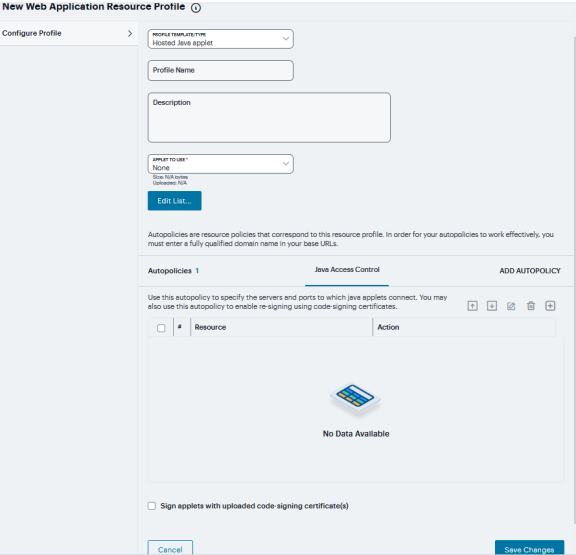
Select the Java applet that you want to associate with the resource profile from the Applet to use list. Or, if the applet that you want to use is not currently available in the list, click Edit list.
-
Click ‘+’ to add an applet to this list.
If you replace an existing archive, make sure that the new applet archive contains all of the necessary files for the applet to successfully launch and run. If the associated HTML for the applet refers to files that do not exist in the new archive, then the applet will not function correctly.
-
Enter Name to identify the applet.
-
Click the text field to browse to the applet that you want to upload.
-
Select the Uncompress archive file check box if the file that you selected is an archive that contains the applet. Click OK.

When you select an applet in the Java Applets dialog box, you are loading third-party software onto the Ivanti product. By clicking OK, you are agreeing to the following terms on behalf of yourself (as purchaser of the equipment) or the organization that purchased the Ivanti product, as applicable.
-
-
Click Add Autopolicy, select Java Access Control to enable access if your Java applets need to make socket connections.
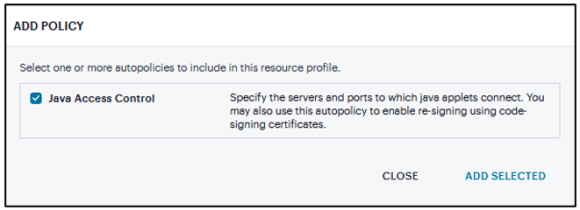
-
Click ‘+’ specific Resource under the Base URL. Enter the full URL of the resource, select Allow or Deny, and click Save Changes.
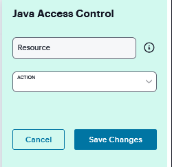
-
Select the Sign applets with uploaded code-signing certificate(s) to use a single code-signing certificate to resign all Java applets.
-
Click Save Changes.
Microsoft RDWeb
For ICS 25.x Gateways, this feature is deprecated and will be removed in the near future.
A Microsoft RDWeb template is a resource profile that controls access to the published desktops and applications based on HTML5. Microsoft RDWeb templates significantly reduce the configuration time by consolidating configuration settings into one place and by pre-populating a variety of resource policy settings.
If Microsoft RDWeb resource profile selected as Profile Template, then
-
Enter the URL of the Microsoft RDWeb server in the Base URL field.
-
Click Add Autopolicy, Web Access Control check box to create a policy and click Add Selected.

-
Under Web Access Control, click ‘+’ specific Resource under the Base URL. Enter the full URL of the resource, select Allow or Deny, and click Save Changes.
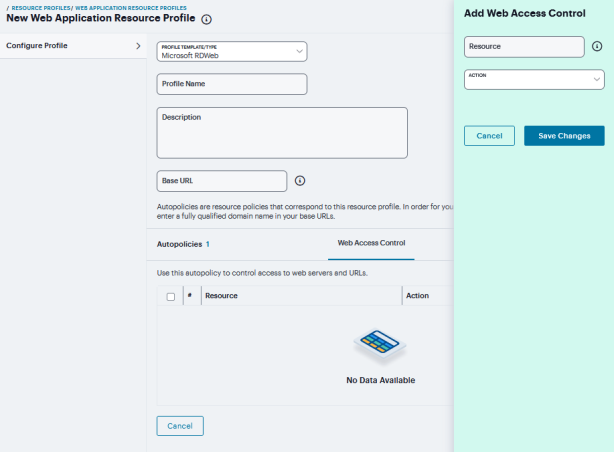
Microsoft OWA Versions
For ICS 25.x Gateways, this feature is deprecated and will be removed in the near future.
A Microsoft Outlook Web Access (OWA) template is a resource profile that controls access to the application and configures OWA settings as necessary. OWA templates significantly reduce your configuration time by consolidating configuration settings into one place and by prepopulating a variety of resource policy settings for you depending on the type of setup you select. The system supports intermediating traffic to Microsoft OWA through a Web rewriting resource profile template, JSAM, PSAM, and VPN Tunneling. This topic describes how to configure access using the Web rewriting template. The prepopulated values vary depending on the version of OWA you select and are based on the most common deployment of the servers.
If any of the Microsoft OWA Versions are selected as Profile Template, then
-
Enter the URL of the OWA resource to which you want to control access In the Base URL box.
-
Under OWA settings, select Security Settings and Select Prevent download of attachments to prohibit users from downloading attachments to their systems.
-
Select Prevent upload of attachments to prevent users from transmitting (uploading) attachments to the system.
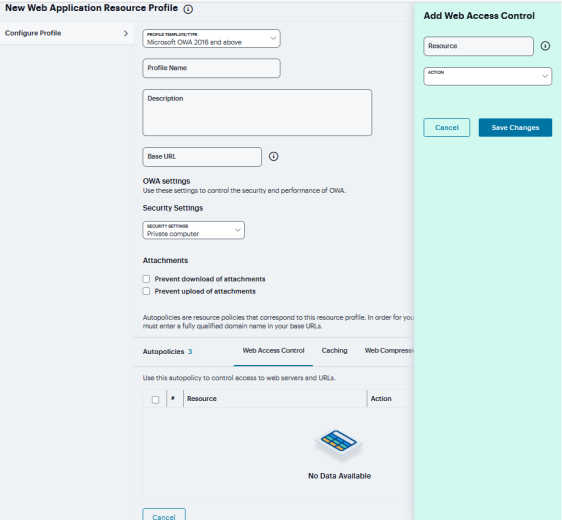
-
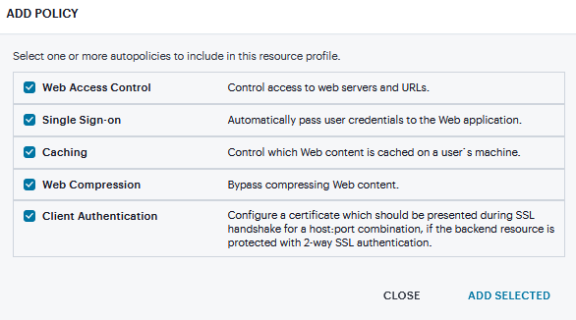
Click Add Autopolicy, check box to create a policy and click Add Selected.
-
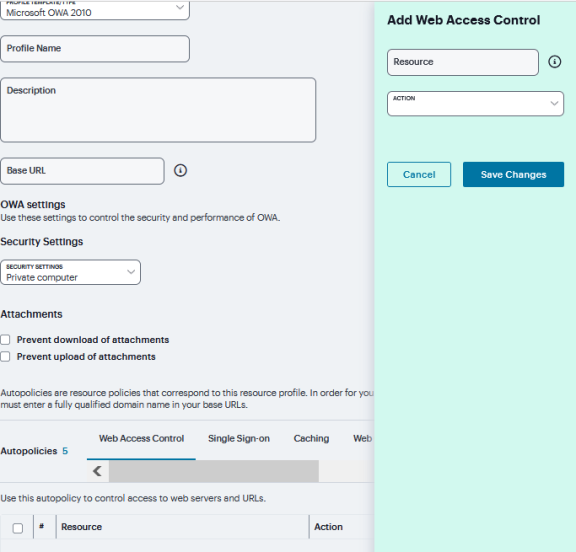
Under Web Access Control, click ‘+’ specific Resource under the Base URL. Enter the full URL of the resource, select Allow or Deny, and click Save Changes.
-
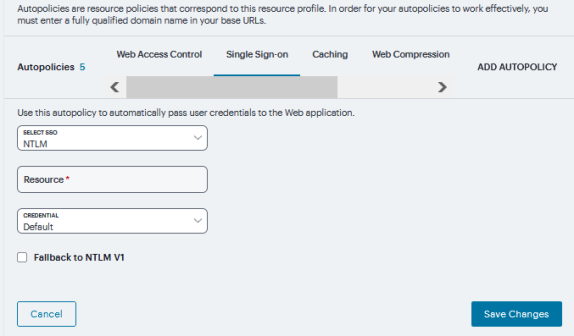
Under Single Sign-on, select the SSO from drop down and specify the application's sign-in page in Resource field and select user's credentials.
-
Check Fallback to NTLM V1 to enable fallback option and click Save Changes.
-
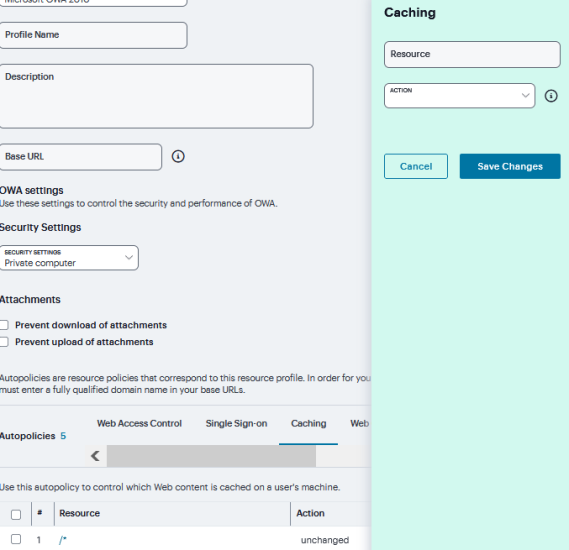
Under Caching, click ‘+’ and specify the resources to which this policy applies in the Resource filed and select the Action from drop down and click Save Changes.
-
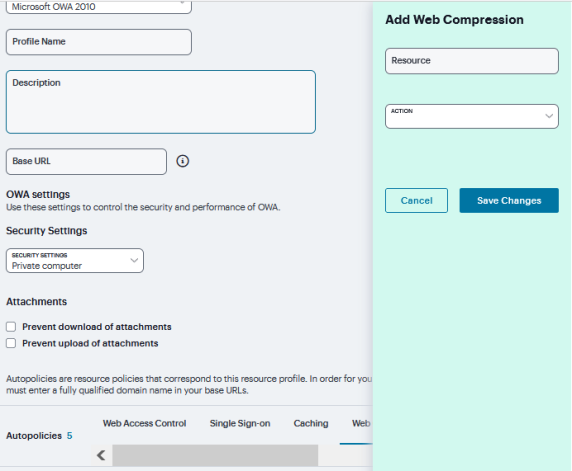
Under Web Compression, click ‘+’ and specify the resources to which this policy applies in the Resource filed and select the Action from drop-down and click Save Changes.
-
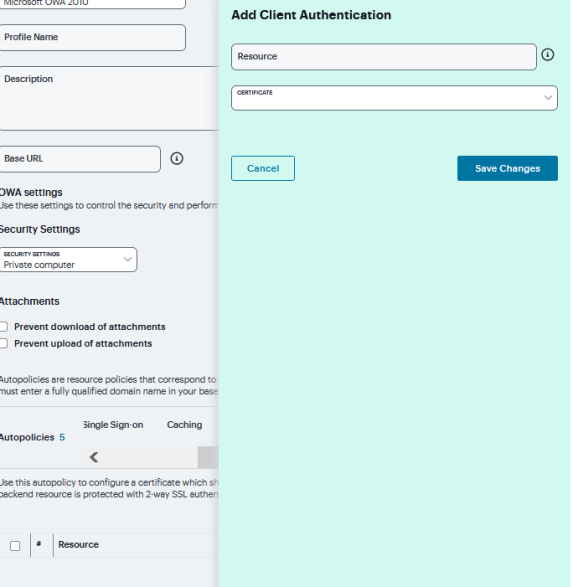
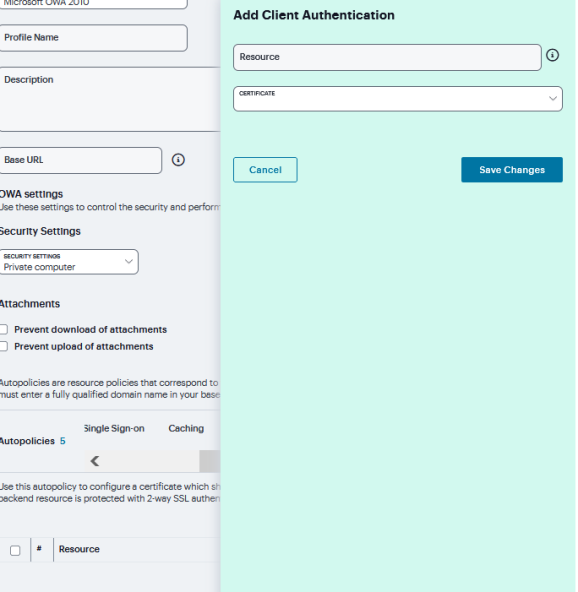
Under Client Authentication, click ‘+’ and specify the resources to which this policy applies in the Resource filed and select the Certificate from drop down and click Save Changes.
Lotus iNotes Versions
For ICS 25.x Gateways, Lotus iNotes 7 and Lotus iNotes 8 are deprecated and will be removed in the near future.
A Lotus iNotes template is a resource profile that controls access to the Web application and configures iNotes settings as necessary. Lotus iNotes templates significantly reduce your configuration time by consolidating settings into one place and by prepopulating a variety of resource policy settings for you depending on the type of setup you select.
The system supports intermediating traffic to Lotus iNotes through a Web rewriting resource profile template, JSAM, PSAM, and VPN Tunneling. This topic describes how to configure access using the Web rewriting template. The prepopulated values vary depending on the version of iNotes you select and are based on the most common deployment of the servers.
If any of the Lotus iNotes versions resource profile are selected as Profile Template, then
-
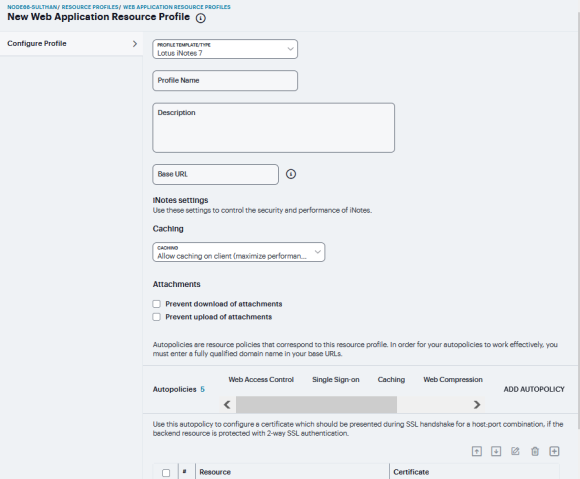
Enter the URL of the Lotus iNotes resource to which you want to control access In the Base URL box.
-
Under iNotes settings, select Caching Settings, select Allow caching on client to let Web browsers store non-user data, such as Javascript and CSS files, on a user's machine. Select Minimize caching on client to allow the system to send a cache-control:no-store header or a cache-control:no-cache header based on the user's Web browser and content type. This is the same as smart caching.
The Allow caching on client option caches content that the backend iNotes server typically caches. This caching option improves performance by using the cached content instead of retrieving the content from the server the next time the page displays. The Minimize caching on client option provides security by sending a cache-control:no-store header or a cache-control:no-cache header to either not store content or to re-validate the cached content each time it is requested. With both caching option, you can choose to either allow or prevent the uploading or downloading of attachments.
-
Select Prevent download of attachments to prohibit users from downloading attachments to their systems.
-
Select Prevent upload of attachments to prevent users from transmitting (uploading) attachments to the system.
-
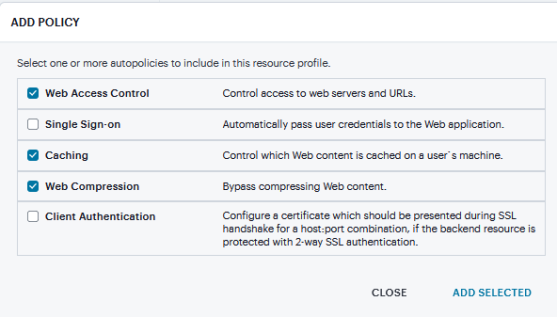
Click Add Autopolicy, check box to create a policy and click Add Selected.
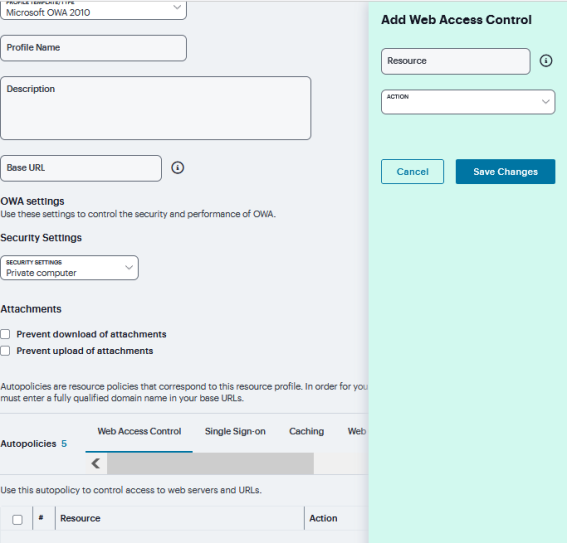
-
Under Web Access Control, click ‘+’ specific Resource under the Base URL. Enter the full URL of the resource, select Allow or Deny, and click Save Changes.
-
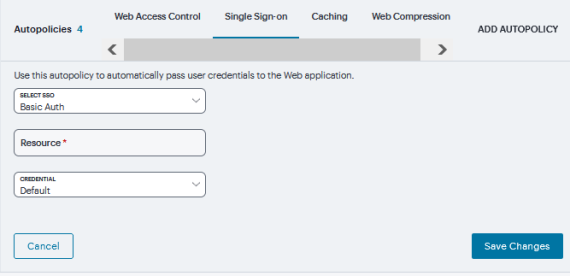
Under Single Sign-on, select the SSO from drop down and specify the application's sign-in page in Resource field and select user's Credentials and click Save Changes.
-
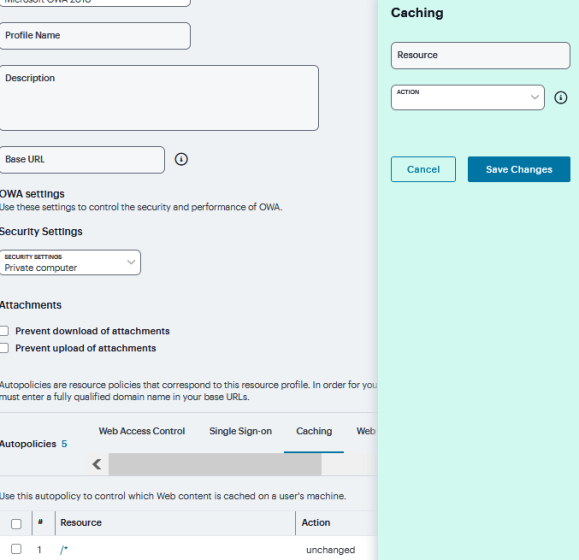
Under Caching, click ‘+’ and specify the resources to which this policy applies in the Resource filed and select the Action from drop down and click Save Changes.
-
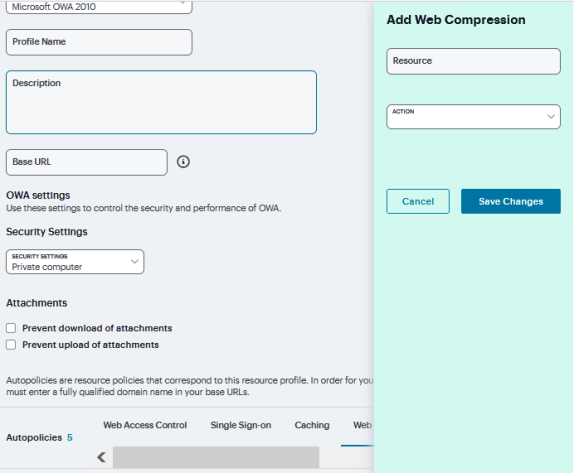
Under Web Compression, click ‘+’ and specify the resources to which this policy applies in the Resource filed and select the Action from drop down and click Save Changes.
-
Under Client Authentication, click ‘+’ and specify the resources to which this policy applies in the Resource filed and select the Certificate from drop down and click Save Changes.
Microsoft Sharepoint
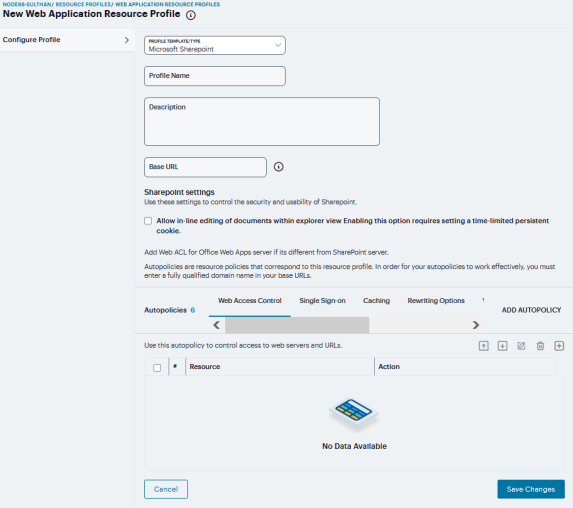
A Microsoft Sharepoint template is a resource profile that controls access to the application and configures Sharepoint settings as necessary. Microsoft Sharepoint templates significantly reduce your configuration time by consolidating configuration settings into one place and by pre-populating a variety of resource policy settings for you depending on the type of setup you select.
The system supports intermediating traffic to Microsoft Sharepoint through a Web rewriting resource profile template, JSAM, PSAM, and VPN Tunneling. This topic describes how to configure access using the Web rewriting template.
If Microsoft Sharepoint resource profile selected as Profile Template, then
-
Enter the URL of the Sharepoint resource to which you want to control access In the Base URL box.Use the format: [protocol://]host[:port][/path].
-
Under Sharepoint Settings, select Allow in-line editing of documents within explorer view to allow users to modify files displayed in the explorer view.
-
Click ‘+’ to add the Resource and click Save Resource.
-
Enter the number of minutes a persistent cookie resides on a user's computer before it expires in the Persistent cookie timeout box.
-
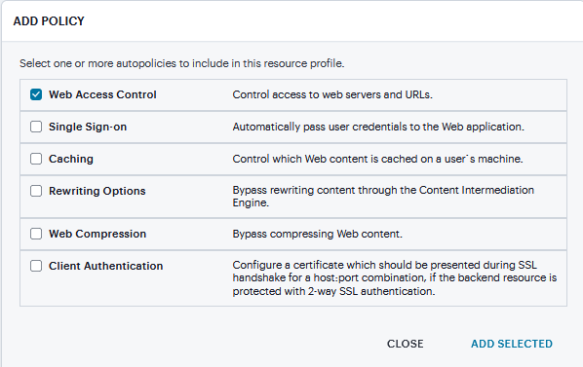
Click Add Autopolicy, check box to create a policy and click Add Selected.
-
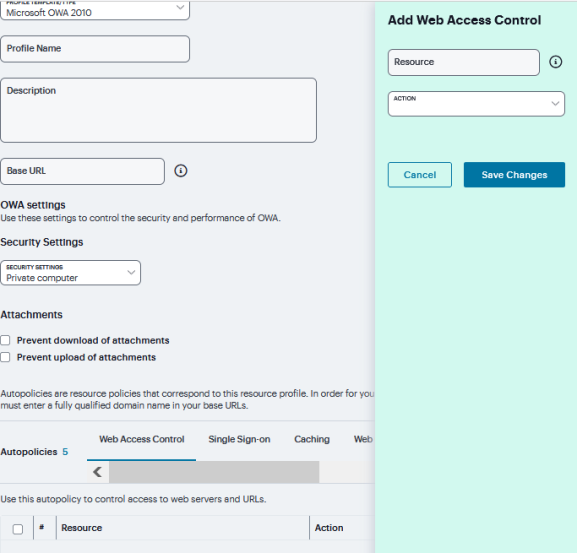
Under Web Access Control, click ‘+’ specific Resource under the Base URL. Enter the full URL of the resource, select Allow or Deny, and click Save Changes.
-
Under Single Sign-on, select the SSO from drop down and specify the application's sign-in page in Resource field and click Save Changes.
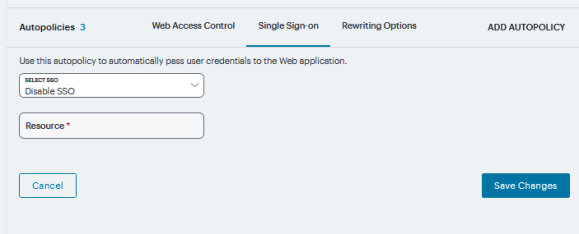
-
Under Caching, click ‘+’ and specify the resources to which this policy applies in the Resource filed and select the Action from drop down and click Save Changes.
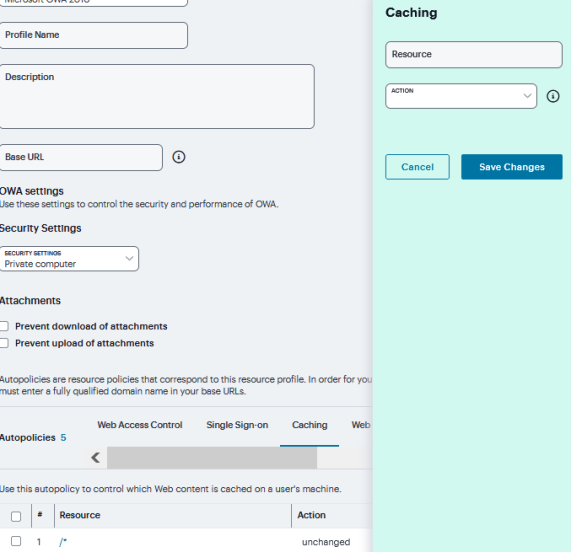
-
Under Rewriting Options, select the Rewriting Options:
- Passthrough Proxy - Select this option to specify Web applications for which the Content Intermediation Engine performs minimal intermediation.
- No rewriting (use WSAM) - Select this option to intermediate content using PSAM instead of the Content Intermediation Engine. Then, specify the application server for which you want to intermediate content. (At minimum, you need to click Add in order to intermediate content to and from the server that the system extracts from the Web access control policy).
- No rewriting (use JSAM) - Select this option to intermediate content using JSAM instead of the Content Intermediation Engine. Then, specify the application server for which you want to intermediate content. (At minimum, you need to click Add in order to intermediate content to and from the server that the system extracts from the Web access control policy).
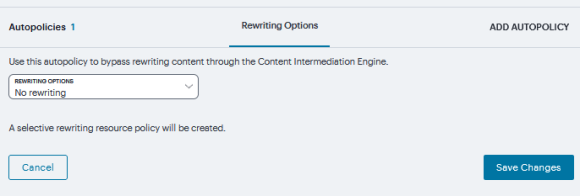
- No rewriting - Select this option to automatically create a selective rewriting policy for the autopolicy's URL, thereby configuring the system to not intermediate any content to and from the resource. For example, you may choose this option if you do not want the system to intermediate traffic from web sites that reside outside of the corporate network, such as yahoo.com. If you select this option, you do not have to configure any additional rewriting settings.
If Passthrough Proxy is selected:
-
Choose the way in which you want to enable the passthrough proxy feature:
- Use virtual hostname - If you choose this option, specify a hostname alias for the application server. When the system receives a client request for the application server hostname alias, it forwards the request to the specified application server port in the Base URL field.
- Use IVE port - If you choose this option, specify a unique port in the range 11000-11099. The system listens for client requests to the application server on the specified port and forwards any requests to the application server port specified in the Base URL field.
-
Select the Rewrite XML check box if you want to rewrite URLs contained within XML content. If this option is disabled, the system passes the XML content "as is" to the server.
-
Select the Rewrite external links check box if you want to rewrite all the URLs presented to the proxy. If this option is disabled, the system rewrites only those URLs where the hostname is configured as part of the passthrough proxy policy.
-
Select the Block cookies from being sent to the browser check box if you want to block cookies destined for the client's browser. The system stores the cookies locally and sends them to applications whenever they are requested.
-
Select the Host-Header forwarding check box if you want to pass the hostname as part of the host header instead of the actual host identifier. click Save Changes.
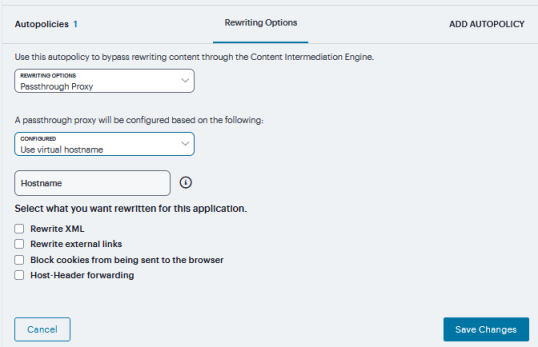
If No rewriting (use WSAM) is selected
-
Create a rewriting autopolicy and select No rewriting (use WSAM).
-
In the Destination field, specify resources for which PSAM secures client/server traffic between the client and the system. By default, the system extracts the correct server from the Web access control policy. You may choose to use this server as-is, modify it, and/or add new servers to the list.
When specifying a server, specify the hostname (the wild cards '*' or '?' are accepted) or an IP/netmask pair. Specify multiple ports for a host as separate entries.
-
Click Save Changes.
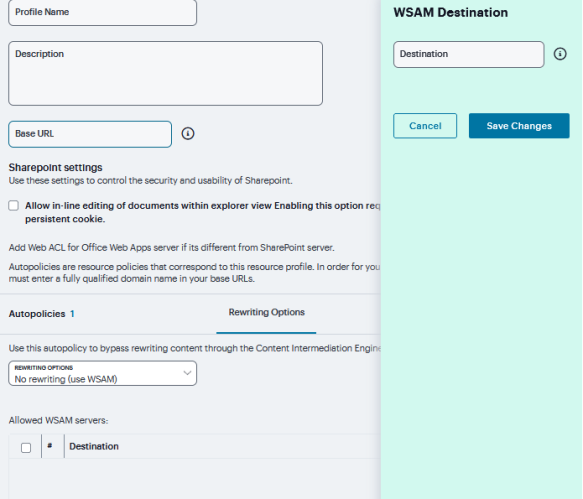
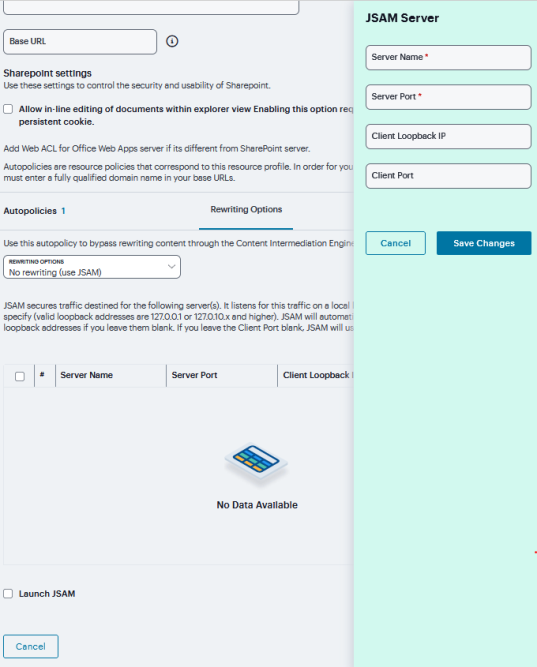
If No rewriting (use JSAM) options is selected:
-
In the Server Name field, enter the DNS name of the application server or the server IP address.
-
In the Server Port field, enter the port on which the remote server listens for client connections.
- For example, to forward Telnet traffic from a remote machine, specify port 23 for both the client port (on which JSAM listens) and the server port (on which the Telnet server listens).
- To enable drive mapping to this resource, enter 139 as the server port.
-
In the Client Loopback IP field, provide a static loopback address. If you do not provide a static IP loopback address, the system assigns an IP loopback address dynamically.
-
In the Client Port field, enter the port on which JSAM should listen for client application connections.
Typically, the local port value is the same value as the server port; the local port value usually only differs for Linux or Macintosh users who want to add applications for port forwarding that use ports under 1024.
To enable drive mapping to this resource, enter 139 as the server port.
-
Select Launch JSAM to automatically start JSAM when the system encounters the Base URL.
-
Click Save Changes.
If No rewriting options is selected, then only selective rewriting resource policy is created.
-
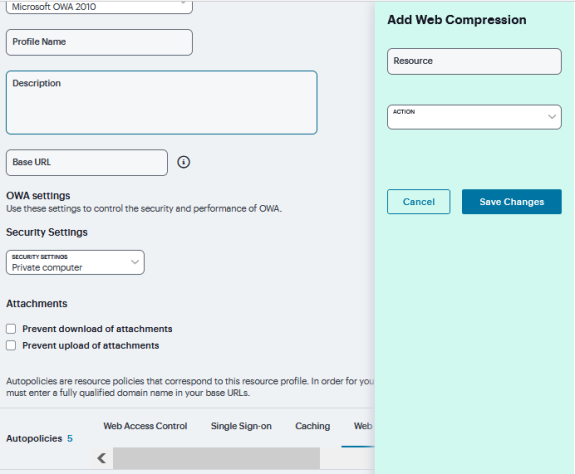
Under Web Compression, click ‘+’ and specify the resources to which this policy applies in the Resource filed and select the Action from drop down and click Save Changes.
-
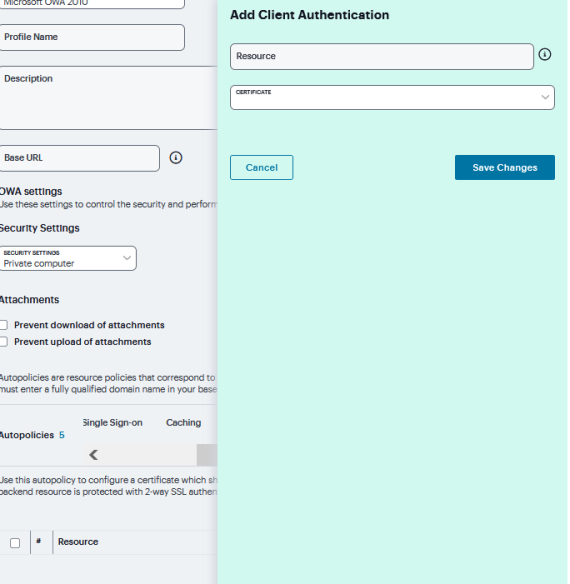
Under Client Authentication, click ‘+’ and specify the resources to which this policy applies in the Resource filed and select the Certificate from drop down and click Save Changes.
File Browsing
To create a Windows file browsing resource profile:
-
Navigate to Users > Resource Profiles > Files.
-
Click ‘+’. Or select an existing profile from the list.

-
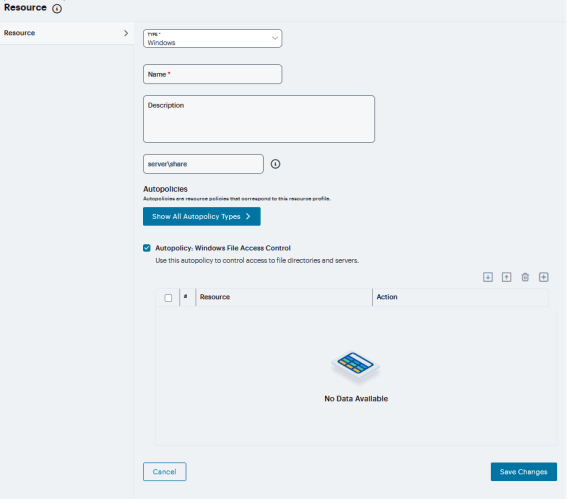
Select Windows from the Type list.
-
Enter a unique Name and optionally a Description for the resource profile. (This name becomes the default session bookmark's name.)
-
Enter the Server name to share.
-
If required, select to show All AutoPolicy types.
-
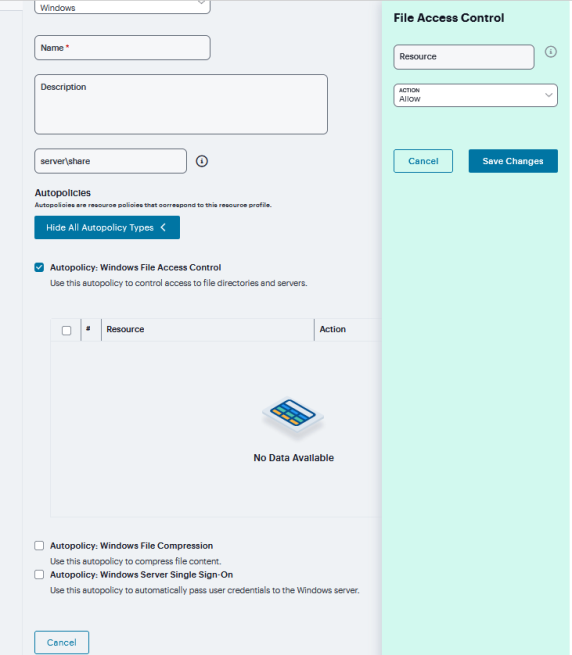
Check Autopolicy Windows File Access Control to set the file access control.
-
Click ‘+’ to add specific Resource. Enter the full URL of the resource, select Allow, Deny or Read Only, and click Save Changes.
-
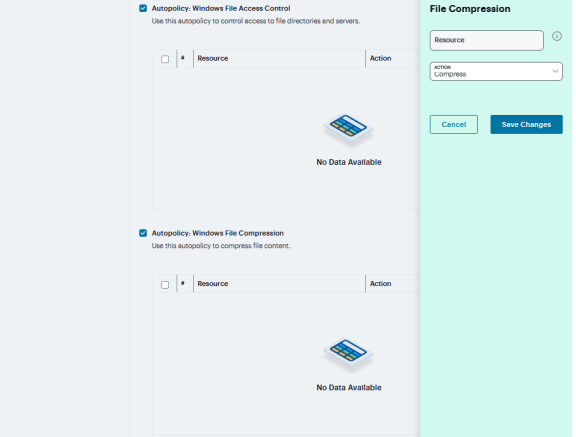
Check Autopolicy: Windows File Compression to set the file access control.
-
Click ‘+’ to add specific resource. Enter the full URL of the resource, select Compress or Do not Compress, and click Save Changes.
-
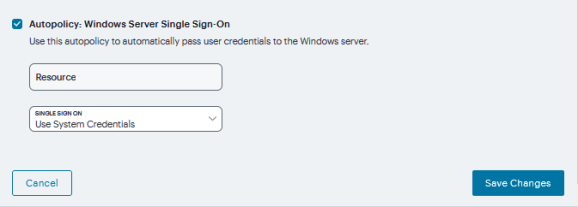
Under Autopolicy: Windows Server Single Sign-On, select the SSO from drop down and specify the application's sign-in page in Resource field and click Save Changes.
Terminal Services
Terminal Services resource profile configuration instructions vary depending on whether you want to configure access to a Windows terminal server (which requires an RDP client) or Citrix terminal server (which requires an ICA client). Furthermore, if you choose to configure access to a Citrix server using a custom ICA file, you include many of your configuration settings in the ICA file itself and therefore do not need to configure them through the system.
If you configure access to a Citrix server using the default ICA file on the system, however, you must configure additional settings. You may want to create multiple bookmarks for the same terminal services resource in order to provide easy access to multiple applications. For instance, the server defined in your resource profile may provide access to multiple applications (such as Siebel and Outlook). To easily provide access to each of these applications, you can create resource profile bookmarks to each. Or, you may want to use multiple bookmarks to configure single sign-on to one application, but not another.
To create a terminal services resource profile:
-
Navigate to Users > Resource Profiles > Terminal Services.
-
Click ‘+’. Or select an existing profile from the list.

-
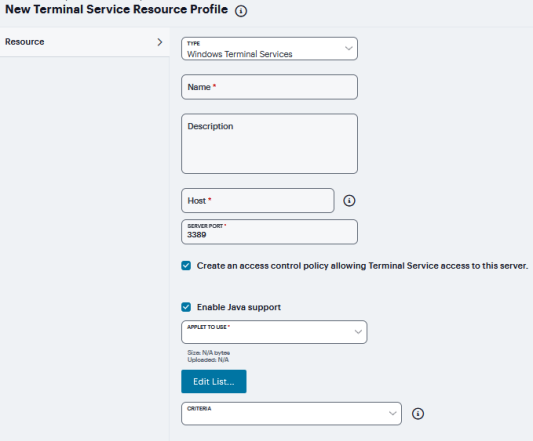
If Windows Terminal Services is selected from the Type list.
-
Enter a unique Name and optionally a description for the resource profile. (This name becomes the default session bookmark's name.)
-
Specify the server and port to which this resource profile should connect in the Host field. When entering the server, you may enter a hostname or IP address.
-
Enter the port on which the terminal server listens in the Server port box. (By default, the system populates this box with port number 3389.)
-
Select the Create an access control policy allowing Terminal Service access to this server check box to enable access to the server specified in the Server Port box (enabled by default).
-
If you want to enable intermediation using a Java client, select Enable Java support and then specify which Java client the system should use.
-
Select the Java applet that you want to associate with the resource profile from the Applet to use list. Or, if the applet that you want to use is not currently available in the list, click Edit list.
-
Click ‘+’ to add an applet to this list.
-
Enter Name to identify the applet.

-
Click the text field to browse to the applet that you want to upload.
-
Select the Uncompress archive file check box if the file that you selected is an archive that contains the applet. Click OK.
-
Select the Criteria from the drop down. If the Windows client launches, then this Java applet will not be used.
-
Click Save Changes.
When you select an applet in the Java Applets dialog box, you are loading third-party software onto the Ivanti product. By clicking OK, you are agreeing to the following terms on behalf of yourself (as purchaser of the equipment) or the organization that purchased the Ivanti product, as applicable.
-
-
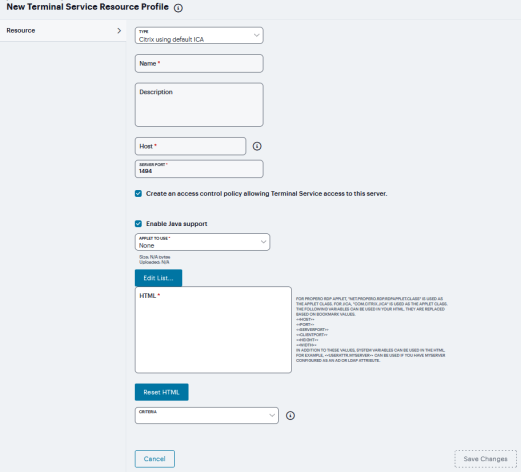
If Citrix using default ICA is selected from the Type list.
-
Enter a unique Name and optionally a description for the resource profile. (This name becomes the default session bookmark's name).
-
Specify the server and port to which this resource profile should connect in the Host field. When entering the server, you may enter a hostname or IP address.
-
Enter the port on which the terminal server listens in the Server port box. (By default, the system populates this box with port number 3389).
-
Select the Create an access control policy allowing Terminal Service access to this server check box to enable access to the server specified in the Server Port box (enabled by default).
-
If you want to enable intermediation using a Java client, select Enable Java support and then specify which Java client the system should use.
For ICS 25.x Gateways, this option is disabled and will be removed in the near future.
-
Select the Java applet that you want to associate with the resource profile from the Applet to use list. Or, if the applet that you want to use is not currently available in the list, click Edit list.

-
Click ‘+’ to add an applet to this list.
-
Enter Name to identify the applet.
-
Click the text field to browse to the applet that you want to upload.
-
Select the Uncompress archive file check box if the file that you selected is an archive that contains the applet. Click OK.
-
Enter HTML with variables to replace the bookmark.
-
Select the Criteria from the drop down. If the Windows client launches, then this Java applet will not be used.
-
Click Save Changes.
When you select an applet in the Java Applets dialog box, you are loading third-party software onto the Ivanti product. By clicking OK, you are agreeing to the following terms on behalf of yourself (as purchaser of the equipment) or the organization that purchased the Ivanti product, as applicable.
-
-
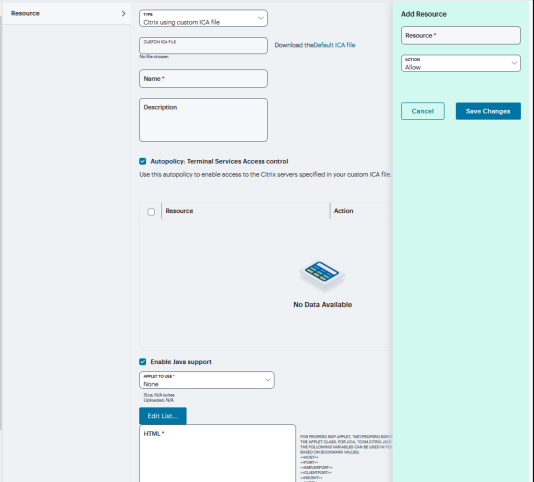
If Citrix using custom ICA file is selected from the Type list.
-
Specify the ICA file that contains the session parameters that you want use in the Custom ICA File box. Note that you may download and customize the following ICA files from the system.
- ICA file that comes with the system-To customize this file, click the Open link, save the file to your local machine, customize the file as required, and upload it back to the system using the Browse option. If you customize this file, you must replace the following parameters in the default.ica file: <CITRIX_CLIENT_NAME>, <APPDATA> and <TARGET_SERVER>.
- ICA file that you have already associated with the resource profile-To customize this file, click the Current ICA File link, save the file to your local machine, and customize the file as required. Once you make changes, you must upload the revised version using the Browse option.
-
Enter a unique Name and optionally a Description for the resource profile. (This name becomes the default session bookmark's name.)
-
Select the Autopolicy: Terminal Services Access Control check box.
-
Click '+' and Specify the Metaframe servers to which you want to enable access in the Resource field.
-
Choose Allow to enable access to the specified resource or Deny to block access to the specified resource from the Action list. Click Save Changes.
-
Specify the server and port to which this resource profile should connect in the Host field. When entering the server, you may enter a hostname or IP address.
-
If you want to enable intermediation using a Java client, select Enable Java support and then specify which Java client the system should use.
For ICS 25.x Gateways, this option is disabled and will be removed in the near future.
-
Select the Java applet that you want to associate with the resource profile from the Applet to use list. Or, if the applet that you want to use is not currently available in the list, click Edit list.

-
Click ‘+’ to add an applet to this list.
-
Enter Name to identify the applet.
-
Click the text field to browse to the applet that you want to upload.
-
Select the Uncompress archive file check box if the file that you selected is an archive that contains the applet. Click OK.
-
Enter HTML code with variables to replace the bookmark.
-
Select the Criteria from the drop down. If the Windows client launches, then this Java applet will not be used.
-
Click Save Changes.
-
-
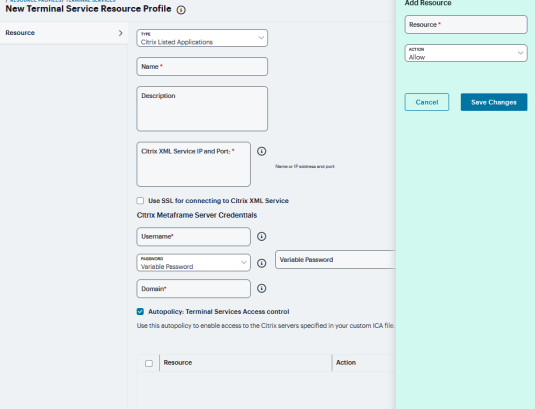
If Citrix Listed Applications is selected from the Type list:
-
Enter a unique Name and optionally a Description for the resource profile. (This name becomes the default session bookmark's name.)
-
Enter the IP address and port of the Citrix MetaFrame server where the XML service is running.
- You do not need to enter the port number if you are using the default value. The default port is 80 (if SSL is selected, the default port is 443).
- You can enter more than one server. If the connection fails on one server, the next server in the list is used.
-
Click the Use SSL for connecting to Citrix XML Service check box to send the password through SSL instead of cleartext.
Although cleartext is supported, we recommend you always use SSL to avoid any security issues.
-
Enter the Username, Password, and Domain name for connecting to the Citrix Metaframe server where the XML service is running.
- You can enter variable credentials such as <USERNAME> and <PASSWORD>. If you use variable credentials, the Subset of selected Applications option is disabled in the Bookmarks window.
- When the user accesses the application list, their credentials are submitted to the Citrix XML service, substituting the session context variables <USERNAME> and <PASSWORD>. Only the user's specific applications (as determined by the Citrix administrator) are returned.
-
Select the Autopolicy: Terminal Services Access Control check box.
-
Click '+' and Specify the Metaframe servers to which you want to enable access in the Resource field.
-
Choose Allow to enable access to the specified resource or Deny to block access to the specified resource from the Action list. Click Save Changes.
-
Specify the server and port to which this resource profile should connect in the Host field. When entering the server, you may enter a hostname or IP address.
-
If you want to enable intermediation using a Java client, select Enable Java support and then specify which Java client the system should use.
For ICS 25.x Gateways, this option is disabled and will be removed in the near future.
-
Select the Java applet that you want to associate with the resource profile from the Applet to use list. Or, if the applet that you want to use is not currently available in the list, click Edit list.

-
Click ‘+’ to add an applet to this list.
-
Enter Name to identify the applet
-
Click the text field to browse to the applet that you want to upload.
-
Select the Uncompress archive file check box if the file that you selected is an archive that contains the applet. Click OK.
-
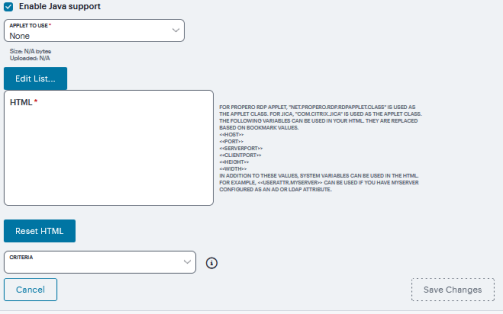
Enter HTML code with variables to replace the bookmark.
-
Select the Criteria from the drop down. If the Windows client launches, then this Java applet will not be used.
-
Click Save Changes.
-
Virtual Desktop
In addition to standard resource profiles and resource profile templates, you can configure virtual desktops as resource profiles. As with the other resource profiles, a virtual desktop profile contains all of the role assignments and end-user bookmarks required to provide access to an individual resource. Unlike other resource profile types, there is no resource policy to configure for virtual desktops due to the dynamic nature of virtual desktops. The IP address and port of the system is not known until the end user launches a session so dynamic ACLs are used. Icons in the Virtual Desktops section on the end user's home page represent desktops defined by the administrator. Clicking the icon launches the session using the Virtual Desktop Infrastructure (VDI) architecture.
The Citrix XenDesktop manages a pool of virtual desktops hosted on virtual machines and provides the connection management to those desktops. A list of XenDesktops is displayed to the end user as bookmarks. When a desktop is selected, the Citrix client is launched and the user can access that desktop.
VMware View Manager, formerly VMware VDI, lets you run virtual desktops in a data center that provide end users a single view of all their applications and data in a personalized environment regardless of the device or location they log in from.
To configure a Citrix XenDesktop or VMware View Manager profile:
-
Navigate to Users > Resource Profiles > Virtual Desktops.
-
Click ‘+’ and Select VMware View Manager or Citrix XenDesktop from the Type drop-down list

-
Enter a Name and Description (optional) to identify this profile.
-
Enter the Name or IP address and port of the connection broker using the format ip:port.
You can enter more than one IP address. Place each address on a separate line.
-
Select the Use SSL for connecting to the Server check box if SSL is required to connect to the server.
-
Enter the Username to connect to the connection broker or use the <USERNAME> session variable.
-
Enter the Variable Password or Password
- To use a variable password to connect to the connection broker, select Variable Password and enter the variable in the form of <PASSWORD> or <PASSWORD@SEcAuthServer>.
- Select Password to use a static password to connect to the connection broker and enter the user credential's password.
-
Enter the Domain where the connection broker is located.
-
Click Save Changes.

-
If you want to enable intermediation using a Java client, select Enable Java support and then specify which Java client the system should use (applicable only if Citrix XenDesktop is selected in type).
For ICS 25.x Gateways, this option is disabled and will be removed in the near future.
-
Select the Java applet that you want to associate with the resource profile from the Applet to use list. Or, if the applet that you want to use is not currently available in the list, click Edit list.

HTML5 Access
A HTML5 Access resource profile is a profile that enables users to connect to Remote Desktops or to connect to internal server hosts in the clear using Telnet protocols or to communicate over an encrypted Secure Shell (SSH) session through a Web-based terminal session emulation.
The HTML5 license count was based on the number of active HTML5 sessions. The HTML5 licenses will be counted based on the number of active users. Each user will be allowed to access up to five user sessions.
To create a HTML5 Access resource profile:
-
Navigate to Users > Resource Profiles > HTML5 Access.
-
Click ‘+’. Solution Type is Advanced HTML5.

-
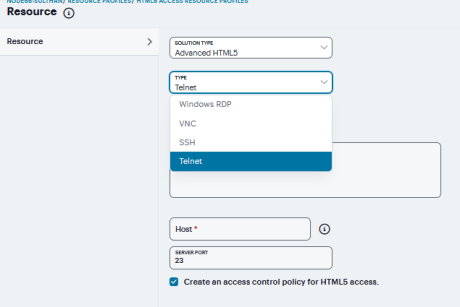
From the Type list, specify the session type (Windows RDP or SSH or Telnet) for this resource profile. If you have selected Advanced HTML5 solution type, you can also specify VNC session type.
For ICS 25.x Gateways, the Telnet option is deprecated and will be removed in the near future.
-
Enter a unique Name and optionally a Description for the resource profile.
-
In the Host field, enter the Hostname, IP or user attribute of the server to which this resource profile should connect.
-
In the Server Port field, enter the port on which the system should connect to the server. (By default, the system populates this field with port number 3389 if you select Windows RDP, port number 23 if you select Telnet, port number 22 if you select SSH and port number 5900 if you select VNC.)
-
Select the Create an access control policy for HTML5 access check box to enable access to the server specified in the Server Port box (enabled by default).
-
Click Save Changes.
-
Edit the profile. In the Roles tab, select the roles to which the resource profile applies and click Add.
The selected roles inherit the autopolicy and bookmarks created by the resource profile. If it is not already enabled, the system also automatically enables the HTML5 Access option in the Users > User Roles > Select Role > General > Overview page of the admin console for all of the roles you select.
- Click Save Changes.
- (Optional) In the Bookmarks tab, modify the default bookmark created by the system and/or create new ones. (By default, the system creates a bookmark to the server defined in the Host field and displays it to all users assigned to the role specified in the Roles tab.)
For ICS 25.x Gateways, the Bookmarks option is deprecated and will be removed in the near future.
To configure the external storage for session recordings:
-
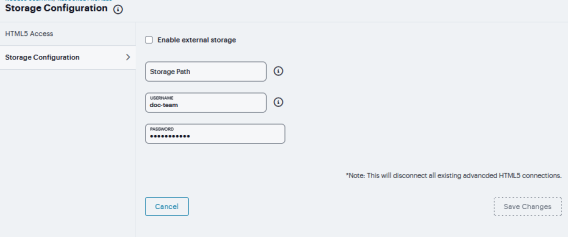
Navigate to Users > Resource Profiles > HTML5 Access > Storage Configuration.
-
Select Enable external storage.
-
Enter the complete storage path to store the session recordings.
-
Enter the Username and Password required to access the location.
-
Click Save Changes.
SAM Resource Profiles
You can create two types of PSAM resource profiles:
- PSAM application resource profiles-These resource profiles configure PSAM to secure traffic to a client/server application. When you create a PSAM application resource profile, the PSAM client intercepts requests from the specified client applications to servers in your internal network.
- PSAM destination network resource profiles-These resource profiles configure PSAM to secure traffic to a server. When you create a PSAM destination network resource profile, the PSAM client intercepts requests from processes running on the client that are connecting to the specific internal hosts.
When creating PSAM resource profiles, note that the resource profiles do not contain bookmarks. To access the applications and servers that PSAM intermediates, users must first launch PSAM and then launch the specified application or server using standard methods (such as the Windows Start menu or a desktop icon).
When you enable JSAM or PSAM through Web rewriting autopolicies in the Users > Resource Profiles > Web Applications/Pages page of the admin console, the system automatically creates JSAM or PSAM autopolicies for you. You can only view these SAM policies through the appropriate Web resource profile-not through the SAM resource profile pages of the admin console.
Client Applications PSAM
To create a PSAM application resource profile:
-
Navigate to Users > Resource Profiles > SAM > Client Applications.
-
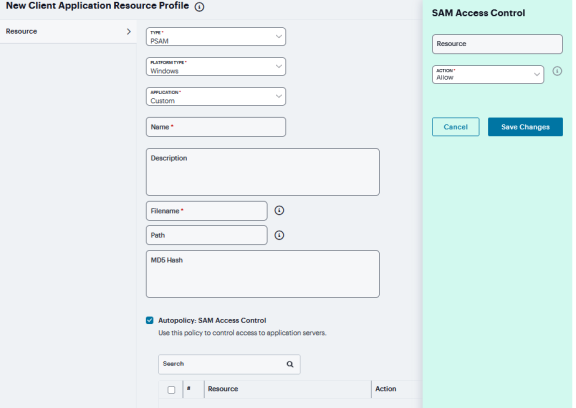
Click ‘+’. choose PSAM from the Type list
-
From the Application list, select one of the options.

- Custom - When you select this option, you must manually enter your custom application's executable file name (such as telnet.exe). Additionally, you may specify this file's path and MD5 hash of the executable file (although it is not required that you specify the exact path to the executable). If you enter an MD5 hash value, PSAM verifies that the checksum value of the executable matches this value. If the values do not match, PSAM notifies the user that the identity of the application could not be verified and does not forward connections from the application to the system.
- Lotus Notes - When you select this option, PSAM intermediates traffic from the Lotus Notes fat client application.
- Microsoft Outlook - When you select this option, PSAM intermediates traffic from the Microsoft Outlook application.
- NetBIOS file browsing - When you select this option, PSAM intercepts NetBIOS name lookups in the TDI drivers on port 137.
- Citrix - When you select this option, PSAM intermediates traffic from Citrix applications.
The system supports several mechanisms for intermediating traffic to the Lotus Notes, Microsoft Outlook, and Citrix applications.
-
Domain Authentication - Select this option to allow integrated Windows applications, such as file sharing, Outlook, and so forth to authenticate to the domain controller when the client machine is part of a domain. Before using this option, you must:
- Specify domain controllers that are reachable through the system in the PSAM Destination list so that LDAP and Kerberos traffic can be proxied and sent to the system.
- Configure a PSAM Access Control Policy (ACL) to allow access to all domain controllers.
-
Enter a unique Name and optionally a Description for the resource profile.
-
Enter the File Name and Path and in case of Windows Platform enter MD5 Hash.
-
Under Autopolicy: SAM Access Control (this is applicable only for PSAM), click ‘+’ specific Resource under the Base URL. Enter the full URL of the resource, select Allow or Deny, and click Save Changes.
Client Applications JSAM
JSAM resource profiles configure JSAM to secure traffic to a client/server application. When you create a JSAM application resource profile, the JSAM client tunnels network traffic generated by the specified client applications to servers in your internal network.
To create a JSAM applied:
-
Navigate to Users > Resource Profiles > SAM > Client Applications.
-
Click ‘+’. choose JSAM from the Type list.
-
From the Application list, select one of the options.
-
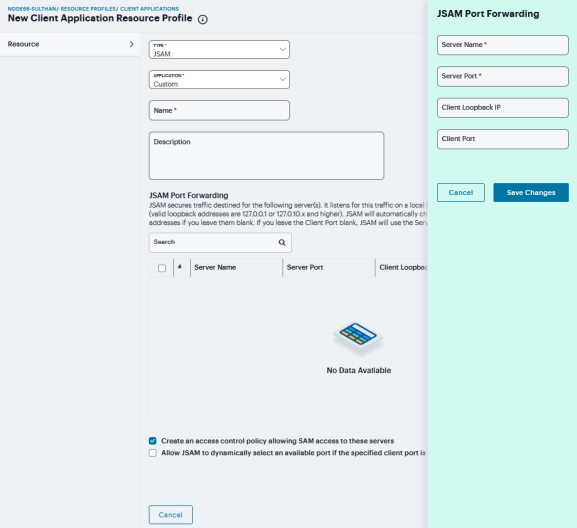
- Custom - Select this option to intermediate traffic to a custom application. Then:
-
- Under JSAM Port Forwarding click '+'.
- In the Server Name field, enter the name or IP address of the remote server. If you are using automatic host mapping, enter the server as it is known to the application. If you enter an IP address, note that end users must connect to JSAM using that IP address in order to connect to the specified server.
- In the Server Port field, enter the port on which
the remote server listens for client connections. For example, to
forward Telnet traffic from a remote machine, specify port 23 for both
the client port (on which JSAM listens) and the server port (on which
the Telnet server listens).
- To disable the registry change made by JSAM and restore the original copy of the etc/hosts file, users must uninstall the JSAM client using settings in the Preferences > Applications page of the end-user console. To re-enable the change, they need to reboot.
- You can also use the restore system settings script. However, the restore system settings script cannot restore the hosts file successfully if you log in as a different user from the one that originally launched JSAM.
- In the Client Loopback IP field, provide a static loopback address. If you do not provide a static IP loopback address, the system assigns an IP loopback address dynamically.
- In the Client Port field, enter the port on which JSAM should listen for client application connections. Typically, the local port value is the same value as the server port; the local port value usually only differs for Linux or Macintosh non-root users who want to add applications for port forwarding that use ports under 1024.
- Click Save Changes.
-
-
Select the Allow JSAM to dynamically select an available port if the specified client port is in use check box if JSAM is listening for multiple hosts on the same port and you want JSAM to select an available port when the client port you specify is taken. The client application must allow you to specify the port number for the connection in order to use this option.
-
Select the Create an access control policy allowing SAM access to these servers check box to enable access to the list of servers specified in the Server column (enabled by default).
For ICS 25.x Gateways, the Lotus Notes and Microsoft Outlook options are deprecated and will be removed in the near future.
-
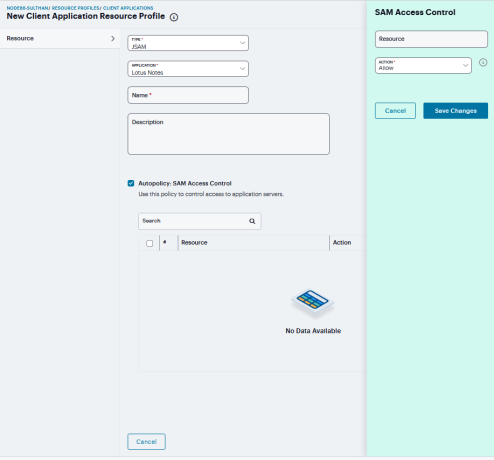
Lotus Notes - Select this option to intermediate traffic from the Lotus Notes fat client application. Then, in the Autopolicy: SAM Access Control section, create a policy that allows or denies users access to the Lotus Notes server:
-
If it is not already enabled, select the Autopolicy: SAM Access Control check box.
-
In the Resource field, specify the application server to which this policy applies. You can specify the server as a fully-qualified hostname or an IP/netmask pair. For example, if the fully-qualified hostname is notes1.yourcompany.com, add notes1.yourcompany.com and notes1 to the Resource field.
-
From the Action list, select Allow to enable access to the specified server or Deny to block access to the specified server. Click Save Changes.
You can only use JSAM to configure access to one Lotus Notes application per user role.
-
-
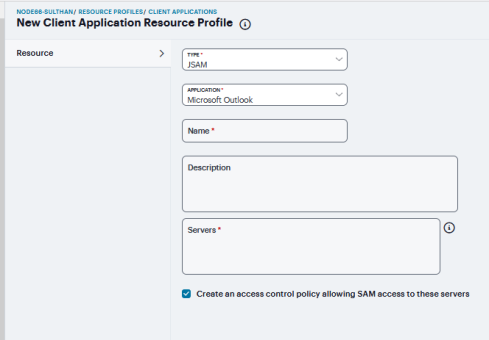
Microsoft Outlook - Select this option to intermediate traffic from the Microsoft Outlook application. Then:
- Enter a unique Name and optionally a Description for the resource profile.
- Enter the Hostname for each MS Exchange server in
the Servers field. For example, if the fully-qualified hostname is
exchange1.yourcompany.com, add exchange1.yourcompany.com to the Servers
field.
- You must enter the full name of the servers in this field since the system creates direct one-to-one mappings between the servers you enter here and IP addresses in the etc/hosts file. For more information about registry changes made by JSAM, see the Client-side Changes Guide on the Global Support Center.
- The system does not support Outlook through SVW, since Outlook applications require HKLM registry key changes.
- Select the Create an access control policy allowing SAM access to these server check box to enable access to the server specified in the previous step (enabled by default).
You can only use JSAM to configure access to one Microsoft Outlook application per user role.
-
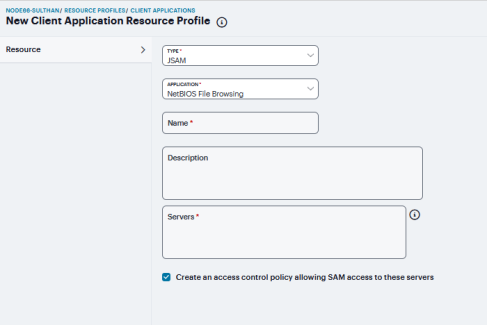
NetBIOS file browsing - Select this option to tunnel NetBIOS traffic through JSAM. Then:
- Enter a unique Name and optionally a Description for the resource profile.
- Enter the fully-qualified Hostname for your
application servers in the Servers field.
- You must enter the full name of the servers in this field since the system creates direct one-to-one mappings between the servers you enter here and IP addresses in the etc/hosts file. For more information about registry changes made by JSAM, see the Client-side Changes Guide on the Global Support Center.
- If you want to enable drive mapping on a Windows client machine, use the standard NetBIOS file browsing option. When you do, JSAM automatically modifies the registry to disable port 445 on Windows machines, which forces Windows to use port 137, 138, or 139 for drive-mapping. Windows users need to reboot one time to enable the registry change to take effect.
- Select the Create an access control policy allowing SAM access to these server check box to enable access to the server specified in the previous step (enabled by default).
You can only use JSAM to configure NetBIOS file browsing once per user role.
-
-
Click Save Changes.
PSAM Destinations
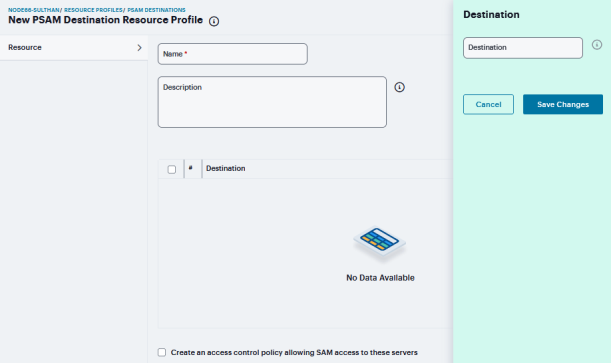
When you create a PSAM destination network resource profile, the PSAM client intercepts requests from processes running on the client to internal hosts. When destinations (using either IP address or hostnames) are configured on the system, all DNS and NetBIOS names are resolved through the system.
To create a PSAM destination network resource profile:
-
Navigate to Users > Resource Profiles > SAM > PSAM Destinations.
-
Click ‘+’, enter a unique Name and optionally a Description for the resource profile.

-
In the PSAM Destinations section, click ‘+’, specify which servers you want to secure using PSAM. You can specify the servers as hostname or IP/netmask pairs. You may also include a port. and click Save Changes.
-
Select the Create an access control policy allowing SAM access to this server check box to enable access to the server specified in the previous step (enabled by default).
-
Click Save Changes.
Secure Mail
To use Secure Mail for iOS devices, you must enable it at the role level and then create a resource profile that specifies the Exchange server and encryption settings. You must also obtain and import an S/MIME certificate.
To define the Secure Mail resource profile:
-
Navigate to Users > Resource Profiles > Mobile.
-
Specify the information in the following table:
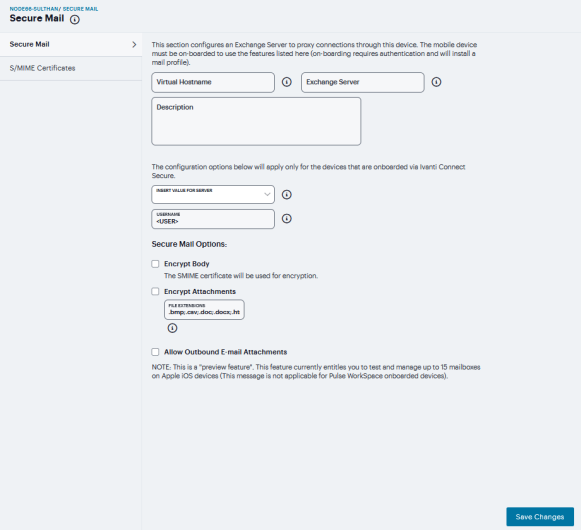
Secure Mail Settings Setting Guidelines Virtual Hostname
Enter a hostname alias for the Exchange server, and update your DNS server to map the alias to the IP address of Ivanti Connect Secure. The name must be unique among all virtual hostnames.
For example, if the virtual hostname is email.com, and the backend URL is https://mail.pulsesecure.net:8080, a client request to https://email.com/test1 via Ivanti Connect Secure is converted to https://mail.pulsesecure.net:8080/test1. The response to the converted request is sent to the client web browser.
Exchange Server Enter the URL and port number of the Microsoft Exchange server, such as https://mail.pulsesecure.net:379. If the port number is omitted, it defaults to 80. Description Description of the Exchange server (optional). Username Select one of the following to specify the e-mail account format used by the Exchange server: - None: Inserts the <USER> variable for the user's login name for Ivanti Connect Secure (the default).
- Exchange 2007/2010/2013: Inserts the <NTDOMAIN><USER> variables to include the user's domain before the login name.
- Office 365: Inserts <USER>@domain.com, and you can enter the appropriate domain, such as <USER>@pulsesecure.net.
Secure Mail Options Select one or more of the following encryption options: Encrypt Body: Encrypts the body of the e-mail using an S/MIME certificate. The encrypted e-mail body can be viewed by any native e-mail client.
Graphics embedded in the encrypted e-mail body are displayed twice on iOS devices.
Encrypt Attachments: Encrypts the e-mail attachments using a key generated by Ivanti Connect Secure. Encrypted attachments, which must be opened with Ivanti Mobile Client, are identified by a pulsesecure file extension, such as report.pdf. pulsesecure. The encrypted file types are listed in the File Extensions text box, separated by semicolons. You can add or delete file extensions from the list.
If you add .gif, .jpeg, .jpg, .png or .htm to the list of encrypted file types, graphics embedded in the e-mail body are not displayed correctly on iOS devices.
Allow Outbound E-Mail Attachments: Decrypts attachments before forwarding an e-mail to an external account. If this option is not selected, e-mails are forwarded without attachments and include a note indicating that attachments were removed.
If you change the encryption settings, onboarded devices must be re-onboarded to obtain the new settings.
-
Click Save Changes.
S/MIME Certificate
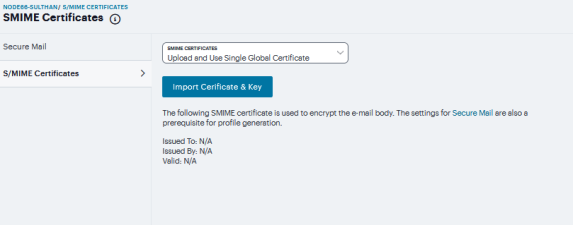
If you enable Secure Mail, an S/MIME is required for each client device. You can generate an S/MIME certificate for each device or use a global certificate for all devices by requesting an S/MIME certificate from a Certificate Authority (CA) and importing the certificate and private key to Ivanti Connect Secure.
To generate or import an S/MIME certificate:
-
Navigate to Users > Resource Profiles > Mobile > S/MIME Certificate.
-
Specify one of the following options:
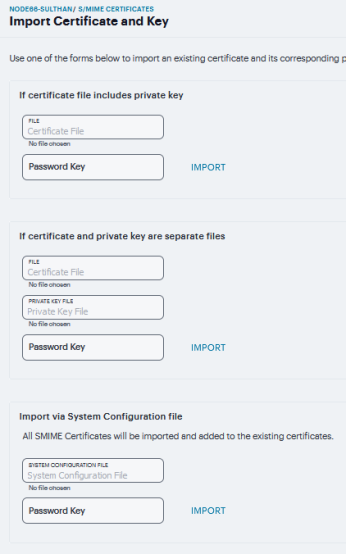
S/MIME Certificate Settings Setting Guidelines Generate per User Certificate Select this option to use the SCEP server and a CSR template to generate a certificate for each client. Select a CSR template from the Use Certificate Template list. To create a CSR template, see Configuring Enterprise Onboarding. Upload and Use Single Global Certificate Select this option to use the same certificate for all client devices. Click Import Certificate & Key, click file field in one of the following forms to locate the certificate file, enter the password key if the file is encrypted, and then click Import. - If certificate file includes private key: When the certificate and key are contained in one file.
- If certificate and private key are separate files: When the certificate and key are in separate files.
- Import via System Configuration file: When the certificate and key are contained in a system configuration file that has been exported from Ivanti Connect Secure.
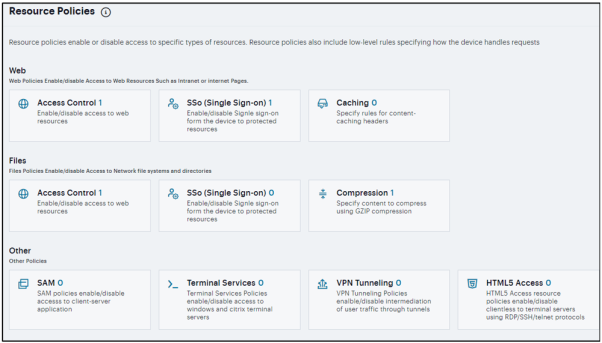
Resource Policies
A resource policy is a system rule that specifies resources and actions for a particular access feature. A resource is either a server or file that can be accessed through the system, and an action is to "allow" or "deny" a resource or to perform or not perform a function. Each access feature has one or more types of policies, which determine the system's response to a user request or how to enable an access feature. You may also define detailed rules for a resource policy, which enable you to evaluate additional requirements for specific user requests.
You can create the following types of resource policies through the Resource Policies pages:
- Web Resource Policies - specify the Web resources to which users may or may not browse. They also contain additional specifications such as header caching requirements, servers to which java applets can connect, code-signing certificates that the system should use to sign java applets, resources that the system should and should not rewrite, applications for which the system performs minimal intermediation, and single sign-on options.
- File Resource Policies - specify the Windows, UNIX, and NFS file resources to which users may or may not browse. hey also contain additional specifications such as file resources for which users need to provide additional credentials.
- Secure Application Manager Resource Policies - allow or deny access to applications configured to use JSAM or PSAM to make socket connections.
- Terminal Services Policies - allow or deny access to the specified Windows servers or Citrix Metaframe servers.
- VPN Tunneling Resource Policies - allow or deny access to the specified servers and specified IP address pools.
- HTML5 Access Resource Policies - allow or deny clientless to terminal servers using RDP/SSH/Telnet protocols.
You can also create resource policies as part of the resource profile configuration process. In this case, the resource policies are called "advanced policies."
Resource policies are an integral part of the access management framework, and therefore are available on all Ivanti Connect Secure products. However, you can access only resource policy types that correspond to your licensed features.
VPN Tunneling Resource Policy Configuration Use Case
This topic describes a real-world VPN tunneling application and the steps necessary to configure the appropriate resource policy providing access to remote users on the network.
Large financial institutions (also called Fortune Companies) require a robust client sign-in application like VPN tunneling to help provide remote employees seamless network connection to a large range of enterprise resources at the corporate headquarters. Often, remote users need to be able to access multiple applications on their laptops/client machines beyond simple e-mail or meeting scheduling applications. These remote super users or power users require secure, encrypted access to powerful server applications like Microsoft OutlookTM, OracleTM databases, and the RemedyTM case management system.
- FQDN supports IPv6 only on Windows, and IPv4 only on other platforms.
- FQDN-based split tunneling supports dual stack (both IPv6 and IPv4) only on Windows, and not supported on other platforms.
- FQDN based split tunneling only supported with IPv4 Traffic Enforcement feature enabled for the respective role.
For this scenario, let's assume the following:
•There is a small collection of remote users who will all access their financial institution's enterprise resources via the same device.
•All the users have the same user_role_remote role assigned to their user ID
•Host Checker and Cache Cleaner are configured and verifying the users' machines upon logging into a device and launching their VPN tunneling sessions
•All users require access to three large servers at the corporate headquarters with the following attributes:
•outlook.acme.com at IP address 10.2.3.201
•oracle.financial.acme.com at IP address 10.2.3.202
•case.remedy.acme.com at IP address 10.2.3.99
•Because the Company wants to manage their IP address pool very strictly, each device provides IP addresses to remote users (our particular device controls the IP addresses between 10.2.3.128 and 10.2.3.192)
•The company is interested in the most secure access possible, simultaneously accepting only the least possible amount of client down-time
To configure a VPN tunneling resource policy providing appropriate access to the Fortune Company remote users:
1.Create a new VPN tunneling resource policy where you specify the three servers to which you want to grant remote users access:
•In the New Profilesection, specify the IP address ranges necessary to allow access to the three servers (outlook.acme.com, oracle.financial.acme.com, and case.remedy.acme.com) separated by carriage returns.
udp://10.2.3.64-127:80,443
udp://10.2.3.192-255:80,443
Configuring your resource as 10.1.1.1-128:* is not supported. Doing so will result in an error.
•In the Roles section, select the Policy applies to SELECTED roles option and ensure that only the "user_role_remote" role appears in the Selected roles list.
•In the Action section, select the Allow access option.
2.Create a new VPN tunneling connection profile where you define the transport and encryption method for the data tunnel between the client(s) and system:
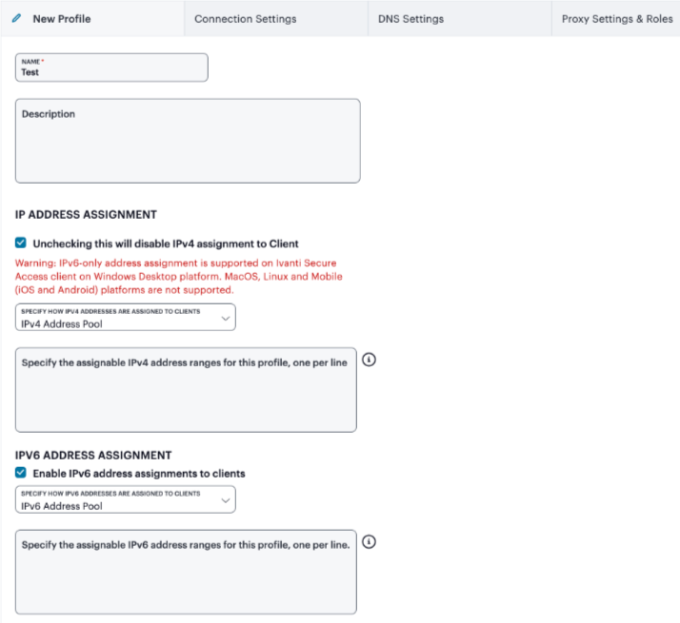
•In the IP address assignment section, select the disable IPv4 address assignment and enable IPv6 address assignment check boxes as per your requirement. Then specify the assignable IPv4 address and IPv6 address ranges in the associated text field.
•In the Connection Settings section, select the ESP transport option and the AES/SHA1 encryption option.
•In the Roles section, select the Policy applies to SELECTED roles option and ensure that only the "user_role_remote" role appears in the Selected roles list.
Ivanti Secure Access Client Connections
An Ivanti Secure Access component set includes specific software components that provide Ivanti Secure Access Client connectivity and services.
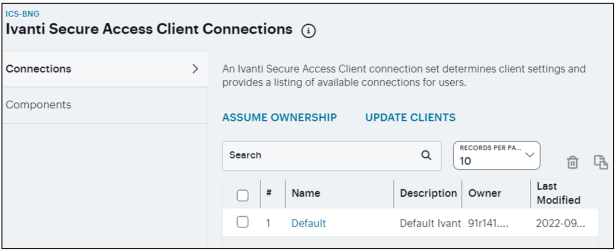
Ivanti Secure Access Client Connection Set Options
The following items apply to all connections in a connection set.
-
Allow saving logon information: Controls whether the Save Settings check box is available in login dialog boxes in Ivanti Secure Access Client. If you clear this check box, Ivanti Secure Access Client always requires users to provide credentials. If you select this check box, users have the option of saving their credentials.
-
Ivanti Secure Access Client can retain learned user settings: These settings are retained securely on the endpoint, evolving as the user connects through different Ivanti servers. Ivanti Secure Access Client can save the following settings:
- Certificate acceptance
- Certificate selection
- Realm
- Username and password
- Proxy username and password
- Secondary username and password
- Role
-
VPN only access: When Ivanti Secure Access Client connects to Ivanti Connect Secure having lock down mode enabled, it will enable lock-down mode and block network if VPN is not in connected state.
When VPN only access option is enabled, the Enable captive portal detection and Enable embedded browser for captive portal will be automatically checked and cannot be edited.
-
Display splash screen: Clear this check box to hide the Ivanti Secure Access Client splash screen that normally appears when Ivanti Secure Access Client starts.
-
Dynamic certificate trust: Determines whether users can opt to trust unknown certificates. If you select this check box, a user can ignore warnings about invalid certificates and connect to the target Ivanti server. This feature is disabled by default.
By default, Dynamic certificate trust check box will be unchecked.
-
Dynamic connections: Allows connections within this connection set to be automatically updated or added to Ivanti Secure Access Client when the user connects to Ivanti Connect Secure through the user Web portal, and then starts Ivanti Secure Access Client through the Web portal interface. Dynamic connections are created as manual rather than automatic connections, which means that they are run only when the user initiates the connection or the user browses to a Ivanti server and launches Ivanti Secure Access Client from the server’s Web interface.
If dynamic connections are disabled, and the user logs in through the Web portal of a Ivanti server that is not already included in Ivanti Secure Access Client’s connection set, then starting Ivanti Secure Access Client from the Web portal does not add a new Ivanti Secure Access Client connection for that Ivanti server. If you choose to disable dynamic connections, you can still allow users to manually create connections by enabling Allow User Connections.
-
Enable captive portal detection: To detect the presence of a captive portal hotspot enable this option. It can be applied only to Ivanti Connect Secure and Ivanti Policy Secure (L3) connections.
-
Enable embedded browser for captive portal: When enabled, Ivanti Secure Access Client uses an embedded web browser that the end user can use to traverse captive portal pages and to gain network connectivity for establishing a VPN connection. This applies only when captive portal detection is enabled.
-
Enable embedded browser for authentication: When enabled, Ivanti Secure Access Client uses embedded browser for SAML, Custom Sign-in or token-based authentication, rather than external browser. This feature is supported only on Windows.
-
FIPS mode enabled: Enable FIPS mode communications for all Ivanti Secure Access Client connections in the connection set. The Federal Information Processing Standard (FIPS) defines secure communications for the U.S. government. When a Ivanti Secure Access Client connection is operating in FIPS mode, FIPS On appears in the lower corner of the Ivanti Secure Access Client interface. If your Ivanti Connect Secure hardware does not support FIPS mode operations, FIPS mode configuration options are not present in the admin console interface. FIPS mode operations are supported on ISA-V Series Ivanti Gateways and a few ISA series appliances.
Users cannot enable FIPS mode from within Ivanti Secure Access Client. You must create FIPS-enabled connections on the server and deploy them.
-
Prevent caching smart card PIN: Enabling this field will allow system administrators to prevent smart card PIN values from being cached. This feature is applicable only to Windows.
-
Wireless suppression: Disables wireless access when a wired connection is available. If the wired connection is removed, Ivanti Secure Access Client enables the wireless connections with the following properties:
- Connect even if the network is not broadcasting.
- Authenticate as computer when computer information is available.
- Connect when this network is in range.
Wireless suppression occurs only when the wired connection is connected and authorized. If you enable wireless suppression, be sure to also configure a connection that enables Ivanti Secure Access Client to connect through a wired connection.
Creating a Client Connection Set for Ivanti Connect Secure
To create a Ivanti Secure Access Client connection set:
-
Select Users > Ivanti Secure Access Client > Connections.
-
Click '+' to create a new connection set.
-
Enter a name and, optionally, a description for this connection set.
-
Under Options, select or clear the following check boxes:
- Allow saving logon information: Controls whether the Save Settings check box is available in login credential dialog boxes in Ivanti Secure Access Client. If you clear this check box, Ivanti Secure Access Client always requires users to provide credentials. If you select this check box, users have the option of saving their credentials.
- Allow user connections: Controls whether connections can be added by the user through the Ivanti Secure Access Client interface.
-
Always-on Ivanti Secure Access Client: Prevent end users from circumventing Ivanti Secure Access Client connections. This option disables all configuration settings that allow the end user to disable or remove Ivanti Secure Access Client connections, service or software.
-
VPN only access: When Ivanti Secure Access Client connects to Ivanti Connect Secure having lock down mode enabled, it will enable lock-down mode and block network if VPN is not in connected state.
- Display splash screen: Clear this check box to hide the Ivanti Secure Access Client splash screen that normally appears when Ivanti Secure Access Client starts.
- Dynamic certificate trust: Determines whether users can opt to trust unknown certificates. If you select this check box, a user can ignore warnings about invalid certificates and connect to the target Ivanti server. This feature is disabled by default.
- Dynamic connections: Allows new connections to be added automatically to Ivanti Secure Access Client when the user logs into a Ivanti server through the server’s Web portal, and then starts Ivanti Secure Access Client though the Web portal interface.
- FIPS mode enabled: Enable FIPS mode communications for all Ivanti Secure Access Client connections in the connection set. The Federal Information Processing Standard (FIPS) defines secure communications for the U.S. government. When a Ivanti Secure Access Client connection is operating in FIPS mode, FIPS On appears in the lower corner of the Ivanti Secure Access Client interface.
- Wireless suppression: Disables wireless access when a wired connection is available. Wireless suppression occurs only when the wired connection is connected and authorized.
-
Prevent caching smart card PIN: Enabling this field will allow system administrators to prevent smart card PIN values from being cached. This feature is applicable only to Windows.
-
Under Connections, click '+' to define a new connection.
-
Enter a name and, optionally, a description for this connection.
-
Select a type for the connection and then specify the connection. Type can be any of the following:
- Policy Secure (802.1X): Select this type if the connection establishes connectivity to an 802.1X wired or wireless device.
- Connect Secure or Policy Secure (L3): Select this type to define a connection for Ivanti Connect Secure or Ivanti Policy Secure.
-
The connection configuration options that appear depend on the connection type you select.
After you have created the client connection set:
- create a client component set and select this connection set.
- open this saved connection set and create sub connection set for it.
Configuring Client Certificate Selection Option
While Configuring Ivanti Connect Secure settings, the following are the new checkboxes added under Client Certificate Selection Option.
- Accept certificates with smartcard logon EKU
- Accept certificate with Custom EKU text
- Accept certificate with Custom EKU OID
The valid certificates get filtered based on the specifications provided by administrator in the above fields.
Only the filtered certificates get displayed in certificate selection prompt.
To configure Certificate Matching and Certificate Ranking under Client Certificate Selection Option, the administrator needs to follow the below steps.
- Go to Users > Ivanti Secure Access Client > Connections.
- Select the connection from the Connections or click "+" to display the New Connection set configuration page.
- Complete the configuration as required.
- Save the configuration.
If the Prefer smart card certificate option is selected, then certificates with client auth EKU set get displayed on the top of the list of certificates and preferred over other certificates.
The Accept certificates with smartcard logon Enhanced key Usage option is enabled by default. This enables you to use Yubikey as PIV smart card for VPN authentication.
Based on the EKU configuration settings, Ivanti Secure Access Client will pick-up the available certificate and make successful connection.
If end-user has more than one certificates, then Ivanti Secure Access Client will prompt the end-user to select the certificates to make successful connection.
Ivanti Secure Access Client Connection is Established Options
For all connection types, specify how the connection is established. The options vary according to the type of connection. Automatic connections include machine authentication and credential provider connections.
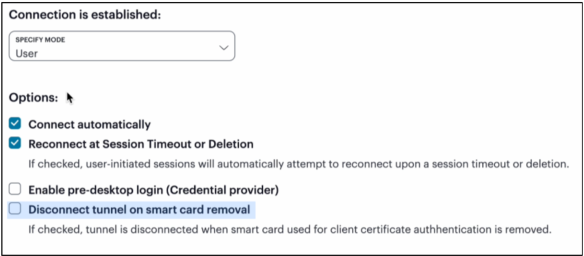
Connections can be established using the following options.
All connections that are configured to start automatically attempt to connect to their target networks at startup time. To avoid multiple connection attempts, be sure that only one connection is configured to start automatically, or configure location awareness rules.
•Modes:
•User: Enables user authentication.
•Machine: Enables machine authentication, which requires that Active Directory is used as the authentication server and that machine credentials are configured in Active Directory. A machine connection is, by default, an automatic connection.
•Machine or user: Enables machine authentication for the initial connection. After user authentication, the machine authentication is dropped. When the user logs out, the machine authentication connection is restored.
•Options:
•Connect automatically: Connections are attempted when the conditions specified in the location awareness rules are true, and disconnected when the conditions are no longer true.
•Reconnect at Session Timeout or Deletion: If this option is enabled, user initiated sessions automatically attempt to reconnect upon a session timeout or deletion. If this option is disabled, then user initiated sessions remain disconnected upon a session timeout or deletion.
•Enable pre-desktop login (Credential provider): Enables Ivanti Secure Access Client interaction with the credential provider software on the endpoint. The user credentials are used to establish the authenticated Ivanti Secure Access Client connection to the network, login to the endpoint, and login to the domain server.
•Disconnect tunnel on smart card removal: Disconnects the tunnel when the smart card used for client certificate authentication is removed. This is not enabled by default.
This feature works only when the primary authentication server is configured for certificate authentication, and the client certificate authentication is performed using a smart card certificate or when the realm is configured with certificate restriction and fulfilled with a smart card certificate.
The Disconnect tunnel on smart card removal configuration is applicable only when performing client certificate authentication with a smart card certificate in the ISAC client, even if it is enabled on the ICS.
The smart card's user certificate must include the smart-card-logon OID for this feature to function.
Creating a Client Component Set for Ivanti Connect Secure
To create a Ivanti Secure Access Secure Client component set:
-
Select Users > Ivanti Secure Access Client > Components.
-
Click '+' to create a new component set.
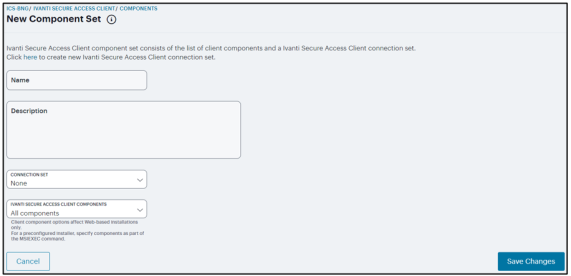
-
If you have not yet created a client connection set, select Users > Ivanti Secure Access Client > Connections and create a new connection set. Or you can use the default client configuration, which permits dynamic connections, and allows Ivanti Secure Access Client to automatically connect to Ivanti Policy Secure or Ivanti Connect Secure.
-
Specify a name for the client component set.
-
(Optional) Enter a description for this client component set.
-
Select a connection set that you have created, or use the default connection set.
-
For Ivanti Secure Access Client components, select one of the following options:
- All components: Supports all Ivanti Secure Access Client connection types.
- No components: Updates existing Ivanti Secure Access Client configurations, for example, to add a new connection. Do not use this setting for a new installation.
-
Click Save Changes.
-
After you create a component set, distribute Ivanti Secure Access Client to users through a role. When users access the role, the installer automatically downloads to the endpoint. The installer components and connections are applied to the endpoint client.
- If client connections associated with the component set for a role are changed even though the list of components has not, the existing configuration on the endpoint is replaced immediately if the endpoint is currently connected, or the next time the endpoint connects.
- If a user is assigned to multiple roles and the roles include different component sets, the first role in an endpoint’s list of roles is the one that determines which client (component set) is deployed.
Manage Ivanti Secure Access Client Versions
This feature is supported for Ivanti Secure Access Client on macOS and Windows, and supported for iOS Mobile Client and Android Mobile Client also.
This feature allows admin to configure a minimum client version. If the client has version lower than the configured minimum version, then the ICS server will reject the client connection.
If the client is older than the configured minimum client version, then ICS gateway will reject the connection. User can upgrade it later through browser or SCCM server.
To enable this feature on Ivanti Connect Secure:
- From the admin console, select Users > Ivanti > Components.
- Select the Enable minimum client version enforcement check box (see
). The following options appear:
- Ivanti Secure Access Desktop Clients
- Android Mobile Clients
- iOS Mobile Clients
Enterprise Onboarding
For ICS 25.x Gateways, this feature is deprecated and will be removed in the near future.
Enterprise onboarding allows users to securely access enterprise network resources with almost any device. WiFi, VPN and certificate profiles can be defined for enterprise resources and downloaded to a device during onboarding, depending on the device type.
The profiles can be defined on a single Ivanti Connect Secure server dedicated to onboarding or they can be defined on each server. Alternatively, the profiles can be defined on a third-party MDM server, in which case users will see a link and instructions on the onboarding page to continue onboarding using the external MDM server.
Onboarding is initiated from the browser. The supported profiles depend on the device type and whether the Ivanti Secure Access Client is installed. Device Onboarding Profile supports:
- Android 4.0 or later: Supports all profiles, but the Ivanti Secure Access Client must be installed during onboarding.
- iOS 6.0 or later: Supports all profiles (Safari browser).
- Windows 7.0, 8.0, and 8.1: Supports WiFi and certificate profiles (IE, Firefox, or Chrome browser). The Ivanti Secure Access Client onboarding application must be installed during onboarding. Windows 8 RT and Windows 8 Phone are not supported.
- MAC OS X: Supports WiFi and certificate profiles (Safari browser).
Enterprise onboarding is enabled in the user role, and each profile can be applied to all user roles or specific roles. The SCEP server and CSR templates allow certificates to be generated dynamically for device and server authentication.
Defining the SCEP Server
The Simple Certificate Enrollment Protocol (SCEP) server configuration and CSR templates allows each client device to dynamically obtain certificates for authentication.
To define the SCEP server:
-
Log into the NSA as a Tenant Admin.
-
From the Ivanti Connect Secure menu, click the Gateway > Gateway List and then select any standalone ICS Gateway.
-
Navigate to Users > Enterprise Onboarding.
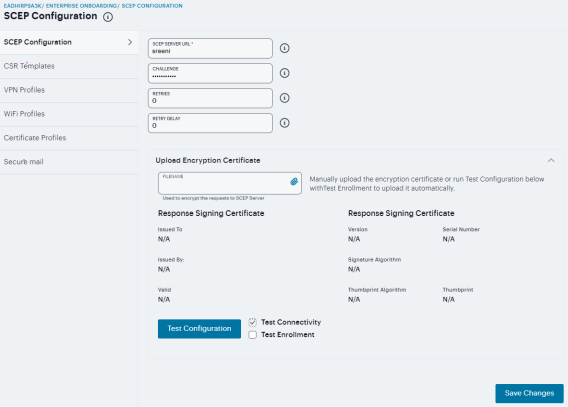
-
Enter the URL for the SCEP server.
-
Specify the password required by the SCEP server.
-
Specify the number of attempts to access the server when the first attempt fails.
-
Specify the number of seconds between retry attempts.
-
Click Browse to upload the certificate used to encrypt SCEP requests. To upload the certificate automatically, select the Test Enrollment check box, select a CSR template, and click Test Configuration.
-
Click Save Changes.
Defining CSR Templates
If the SCEP server is configured, the Certificate Signing Request (CSR) templates can be used in the VPN, WiFi, and certificate profiles to allow each onboarded device to dynamically obtain certificates for authentication on all mobile devices. Up to 10 templates can be defined.
To define CSR templates:
-
Navigate to Users > Enterprise Onboarding and select CSR Templates.
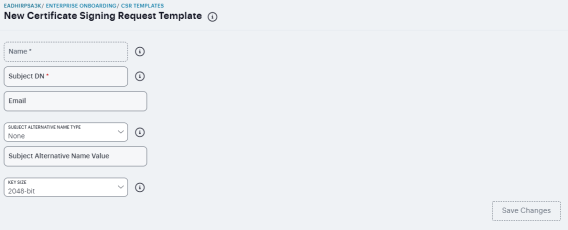
-
Click '+' to add a new template.
-
Enter a unique template name.
-
Specify the subject distinguished name. For example: CN=<USERNAME>,OU=Engineering=Ivanti
-
(Optional) Specify an email address with the <USER> variable, such as <USER>@ivanti.com.
-
Select an alternative name type if the CA requires an alternative subject name.
-
Specify one or more values for the selected alternative name type. Multiple values must be separated by a comma or space.
-
Select the key size used by the SCEP server.
-
Click Save Changes.
Defining VPN Profiles
VPN profiles provide Android and iOS devices with secure access to enterprise networks. One or more VPN profiles can be assigned to specific user roles or to all roles. Up to 10 profiles can be defined.
To define VPN profiles:
-
Navigate to Users > Enterprise Onboarding and select VPN Profiles.
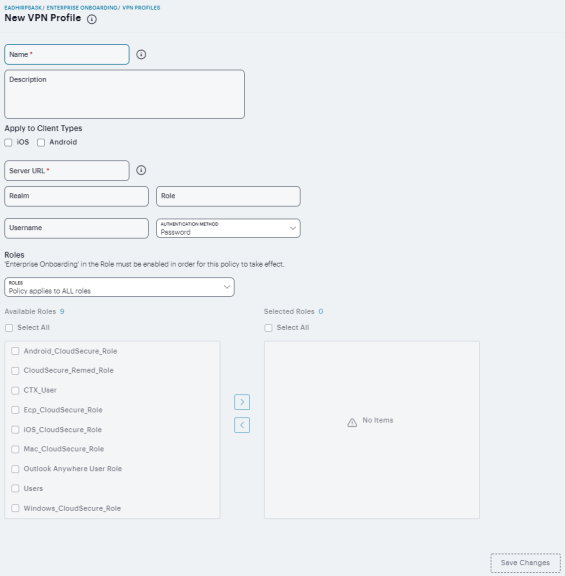
-
Click '+' to add a new VPN profile.
-
Enter a unique name for the VPN profile.
-
(Optional) Enter a description of the VPN profile.
-
Select the device types the profile applies to (Android and iOS only).
-
Specify the URL of the VPN server.
-
Specify the realm name. The realm is required only if the sign-in URL has the User picks from a list of authentication realms option enabled.
-
Specify the user role. The user role is required if the role mapping rules for the user realm specify multiple roles and the User must select from among assigned roles option is enabled.
-
Specify the <USER> variable for the user name.
-
Select Password or Certificate for the user authentication method.
-
Select one of the following options:
- Policy applies to ALL roles - To apply this profile to all users.
- Policy applies to SELECTED roles - To apply this profile only to users who are mapped to roles in the Selected roles list. Make sure to add roles to this list from the Available roles list.
- Policy applies to all roles OTHER THAN those selected below - To apply this profile to all users except for those who map to the roles in the Selected roles list. Make sure to add roles to this list from the Available roles list.
-
Click Save Changes.
Defining WiFi Profiles
WiFi profiles provide Android, iOS, MAC OS X, and Windows devices with secure access to wireless networks. One or more WiFi profiles can be assigned to specific user roles or to all roles. Up to 10 profiles can be defined.
To define WiFi profiles:
-
Navigate to Users > Enterprise Onboarding and select WiFi Profiles.
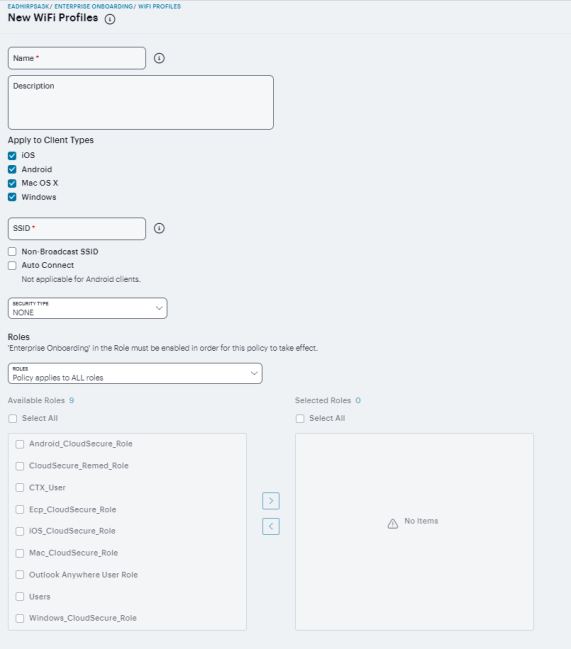
-
Click '+' to add a new WiFi profile.
-
Enter a unique name for the WiFi profile.
-
(Optional) Enter a description of the profile.
-
Select the device types the profile applies to (Android, iOS, MAC OS X, and Windows).
-
Specify the server set ID of the wireless network.
-
Select the Non-Broadcast SSID check box if the wireless network does not broadcast its identity.
-
Select the Auto Connect check box to connect the client automatically when the network is detected (not supported by Android clients).
-
Select the type of authentication used by the network, and specify the password or enterprise settings, as required.
-
For the WPA Enterprise and WPA2 Enterprise security types, select the supported EAP protocols and specify the associated authentication settings.
-
The PEAP protocol is supported by all clients. Specify inner authentication method, username and password, outer identity, Trusted Server name, Trusted CA certificate.
-
The EAP-TLS protocol is supported by all clients. Specify User name, CSR template, IP address or FQDN name, Trusted CA certificate.
-
The TTLS protocol is supported by all clients. Specify inner authentication method, username and password, Trusted Server name, Trusted CA certificate.
-
Select a role from Policy applies to ALL roles, Policy applies to SELECTED roles, Policy applies to all roles OTHER THAN those selected below.
-
Click Save Changes.
Defining Certificate Profiles
Certificate profiles specify the device certificates sent to each client device during onboarding. Up to 10 profiles can be defined.
To define certificate profiles:
-
Navigate to Users > Enterprise Onboarding and select Certificate Profiles.
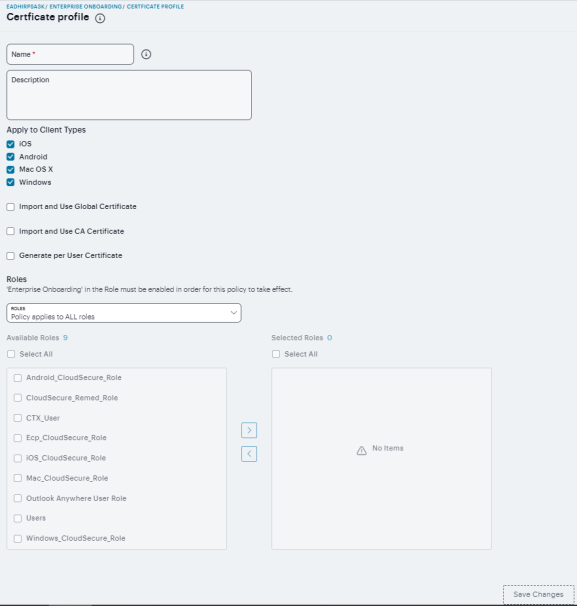
-
Click '+' to add a new certificate profile.
-
Select the device types the profile applies to (Android, iOS, MAC OS X, and Windows).
-
Select the Import and Use Global Certificate option to use the Ivanti Connect Secure global certificate to authenticate the client device. Click Import Certificate & Key, click Browse to locate the certificate file, and then click Import.
-
Select the Import and Use CA Certificate option to import any CA certificate (public Root CA, private Root CA, public intermediate CA, or private intermediate CA). These CA's can be used in WiFi profiles and must be downloaded to the client devices. Click Import and Use CA Certificate, click Browse to locate the certificate, and then click Import CA Certificate.
-
Select the Generate per User Certificate option to use the SCEP server and a CSR template to generate a certificate for each client. Select a CSR template from the Use Certificate Template list.
-
Select a role from Policy applies to ALL roles, Policy applies to SELECTED roles, Policy applies to all roles OTHER THAN those selected below.
-
Click Save Changes.
Defining Secure Mail
To define secure mail:
-
Navigate to Users > Enterprise Onboarding and select Secure Mail.
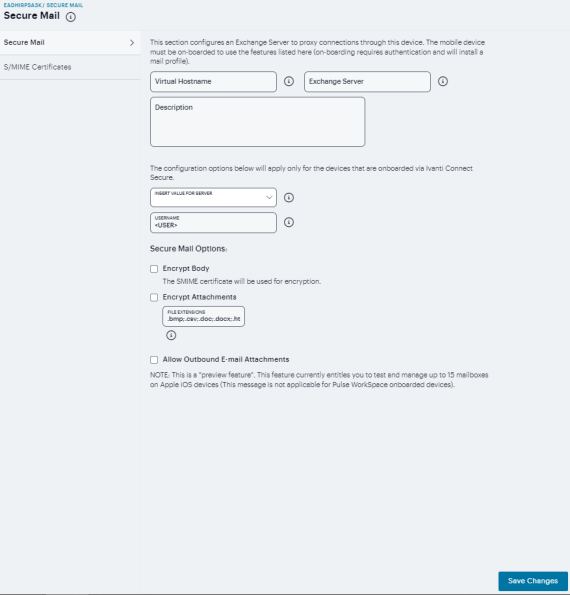
For the configuration details, see Secure Mail.