Deploying a BYOD Policy for AirWatch Managed Devices
This example shows how to use policies to enable security based on device identity, device posture, or user identity in a bring your own device (BYOD) environment for an enterprise that uses AirWatch® for mobile device management (MDM).
Requirements
The following table lists version information for the solution components shown in this example.
|
Component |
Version |
|
Pulse Connect Secure |
Release 8.0r1 or later is required. |
|
AirWatch MDM |
Release 6.4.1.2 is used in this example. Any version that supports the device ID and device attributes you plan to query is compatible. |
Configuring the AirWatch MDM Service
This solution assumes you know how to configure and use the features of your MDM, and that you can enroll employees and their devices. For more information about the AirWatch MDM, refer to its documentation and support resources. This section focuses on the following elements of the MDM configuration that are important to this solution:
•Device identifier - The primary key for device records. Your MDM configuration determines whether a universal unique identifier (UUID), unique device identifier (UDID), or serial number is used as the device identifier. For AirWatch, UDID is supported and recommended.
•Device attributes - A standard set of data maintained for each device. For AirWatch, see Figure.
When the user installs the MDM application on the device and completes enrollment, the MDM pushes the device certificate to the device. After enrollment, the MDM maintains a database record that includes information about the enrollee-attributes related to device identity, user identity, and posture assessment against MDM policies. Figure describes these attributes. In this solution, these attributes are used in the role mapping that is the basis for network access and resource access policies. When you configure role-mapping rules, you select the normalized Connect Secure attribute name.
|
AirWatch Attribute |
Normalized Connect SecureName |
Description |
Data Type |
|
BlockLevelEncryption |
BlockLevelEncryption |
True if block-level encryption is enabled; false otherwise. |
Boolean |
|
ComplianceStatus |
complianceReason |
Values: Compliant, Non-Compliant. |
String |
|
ComplianceStatus |
isCompliant |
True if the status is compliant with MDM policies; false otherwise. |
Boolean |
|
CompromisedStatus |
CompromisedStatus |
True if the status is compromised; false otherwise. |
Boolean |
|
CompromisedStatus |
isCompromised |
True if the device is compromised; false otherwise. |
Boolean |
|
DataProtectionEnabled |
DataProtectionEnabled |
True if data protection is enabled; false otherwise. |
Boolean |
|
DeviceFriendlyName |
deviceName |
The concatenated name used to identify the device/user combination. |
String |
|
EnrollmentStatus |
isEnrolled |
True if MDM value is Enrolled; false otherwise. |
Boolean |
|
FileLevelEncryption |
FileLevelEncryption |
True if file-level encryption is enabled; false otherwise. |
Boolean |
|
Id.Value |
deviceId |
Device identifier. |
String |
|
Imei |
IMEI |
IMEI number of the device. |
String |
|
IsPasscodeCompliant |
IsPasscodeCompliant |
True if the passcode is compliant with the MDM policy; false otherwise |
Boolean |
|
IsPasscodePresent |
IsPasscodePresent |
True if a passcode has been configured; false otherwise. |
Boolean |
|
LastComplianceCheckOn |
LastComplianceCheckOn |
The refresh date and timestamp of the last status reported. |
Timestamp |
|
LastCompromisedCheckOn |
LastCompromisedCheckOn |
The refresh date and timestamp of the last status reported. |
Timestamp |
|
LastSeen |
lastSeen |
Date and time the device last made successful contact with the MDM. |
Timestamp |
|
LocationGroupName |
LocationGroupName |
MDM location group configuration value. |
String |
|
MacAddress |
macAdress |
The Wi-Fi MAC address. |
String |
|
Model |
model |
Model is automatically reported by the device during registration. |
String |
|
OperatingSystem |
osVersion |
OS version. |
String |
|
Ownership |
ownership |
Values: C, E, or S (Corporate, Employee, or Shared). |
String |
|
PhoneNumber |
phoneNumber |
Phone number entered during registration. |
String |
|
Platform |
platform |
Platform specified during registration. |
String |
|
SerialNumber |
serialNumber |
Serial number. |
String |
|
Udid |
UDID |
Unique device identifier. |
String |
|
UserEmailAddress |
userEmail |
E-mail address of device user. |
String |
|
UserName |
userName |
Name of device user. |
String |
|
Uuid |
UUID |
Universal unique identifier. |
String |
To configure the MDM:
1.Enroll devices in the MDM using the methods supported by the MDM.
2.Create a profile. The profile determines many MDM management options. The following configurations are key to this solution:
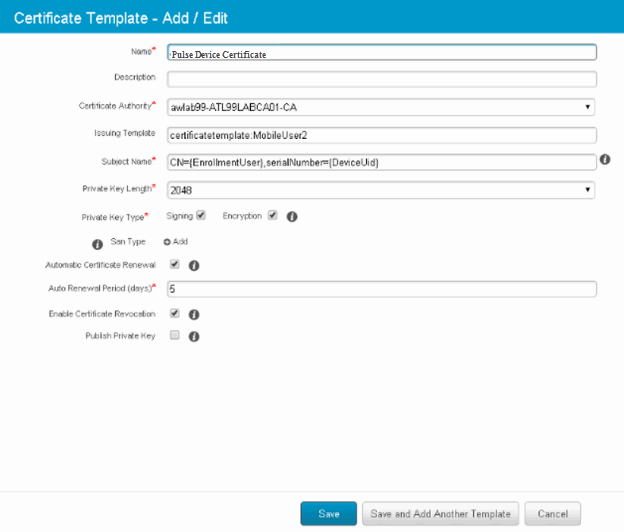
•Certificate template. Create a configuration that specifies the field and type of identifier for client device certificates. See Figure.
The MDM configuration templates provide flexibility in how the device identifier can be placed in the device certificate's subject or alternative subject. We recommend you include the user ID in the certificate, so the certificate can identify both the user and the device. For example:
CN=<EnrollmentUser>, serialNumber=<DeviceUid>, o=Company
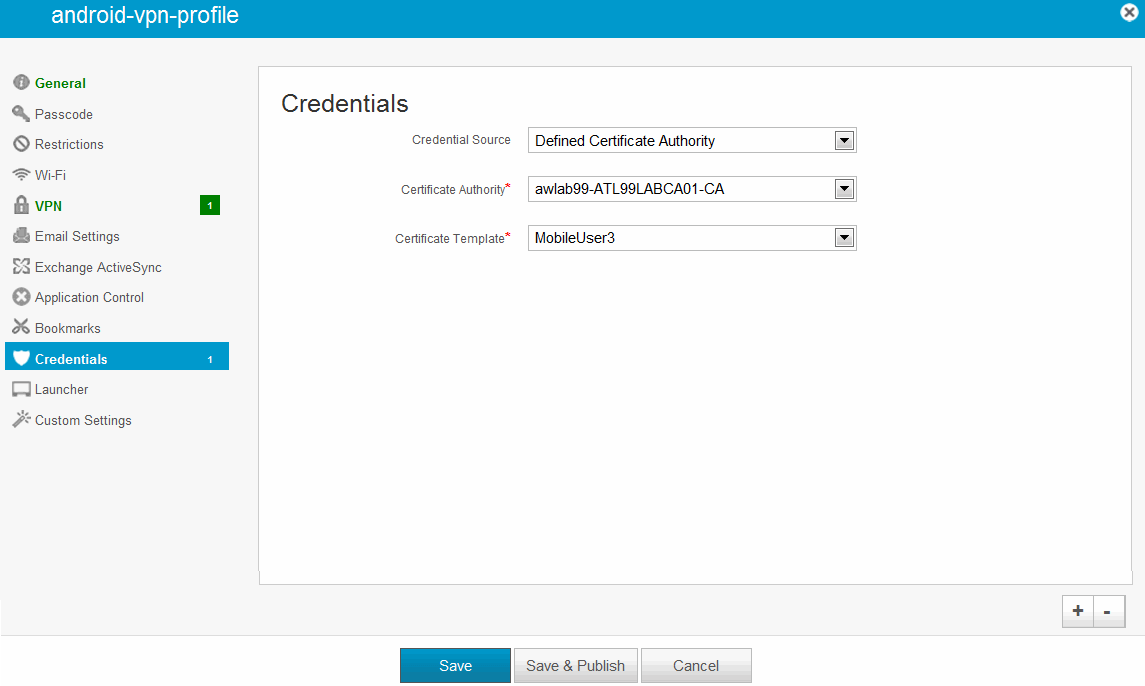
•Credential profile. Create a configuration that specifies the certificate authority and certificate template configuration. See Figure.
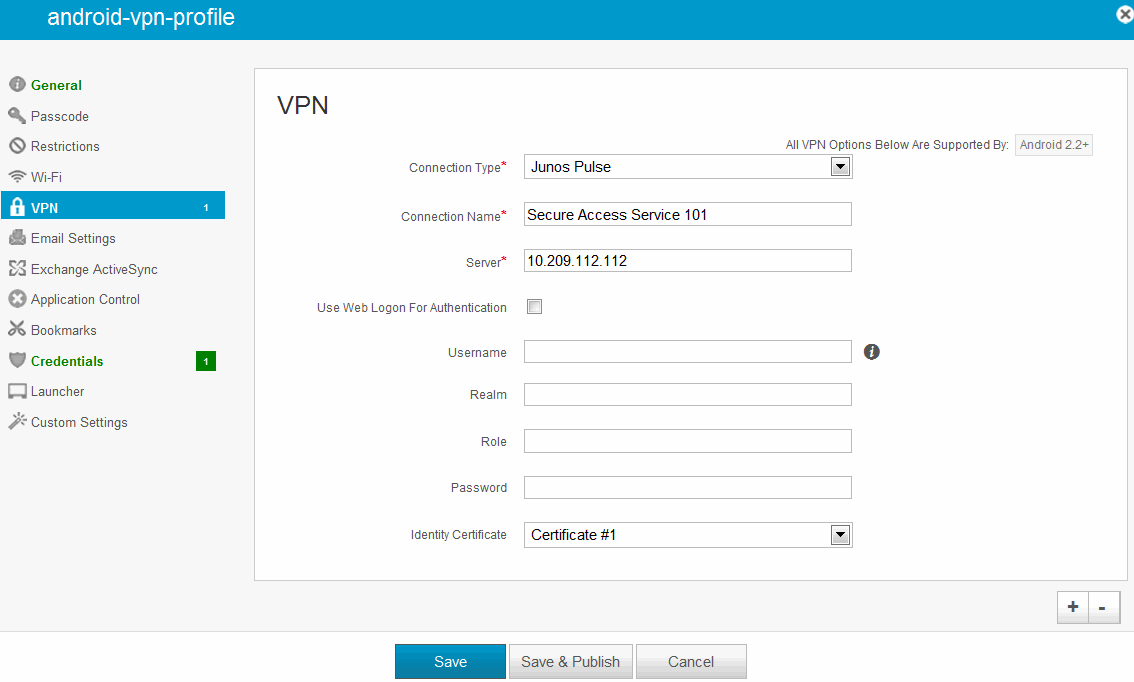
•VPN profile. Create a configuration that specifies the system VPN, security options, and the credential configuration. See Figure.
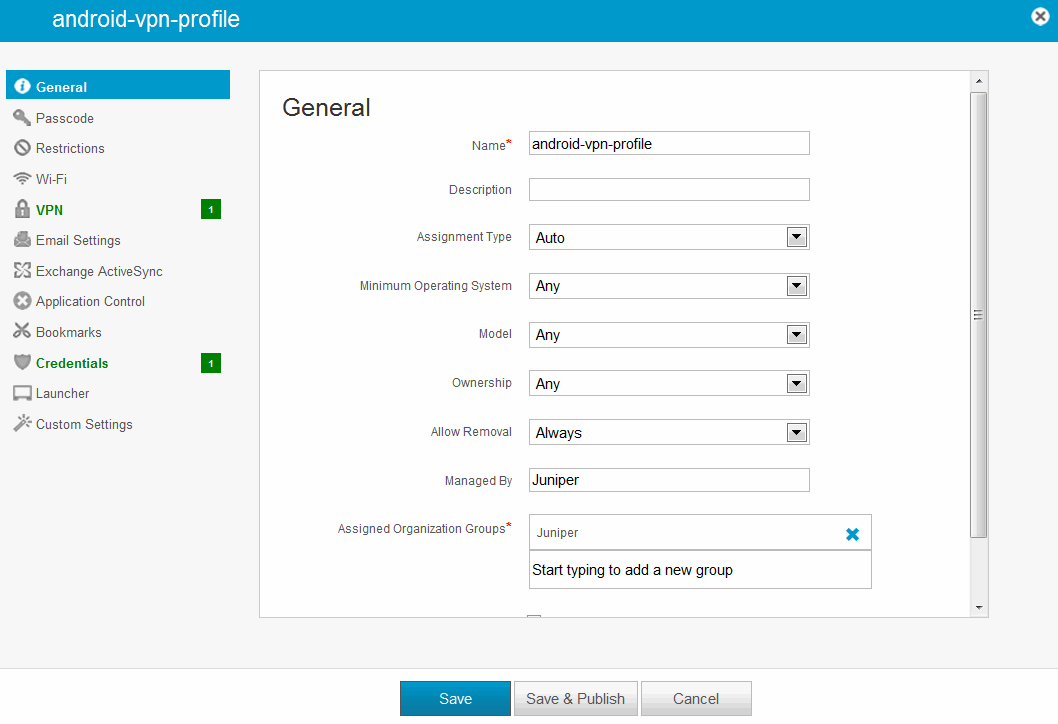
3.Save and deploy the profile to devices registered with your organization. See Figure
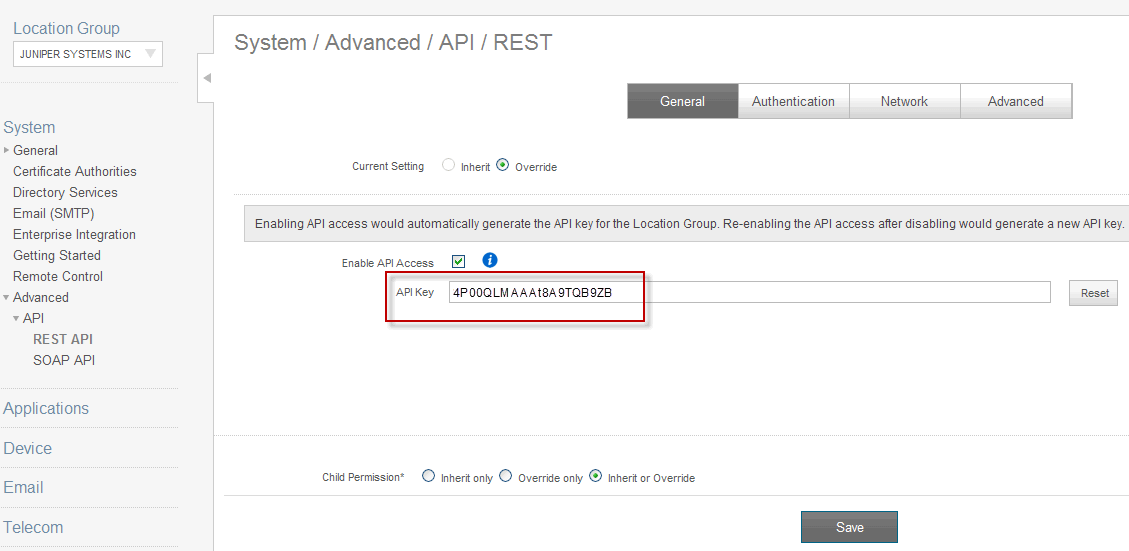
4.Enable API access and generate the AirWatch API key (tenant code). The tenant code is part of the REST API configuration. The tenant code must be included in the system MDM server configuration. It is sent in the API call. See Figure.
Configuring the Device Access Management Framework
This section describes the basic steps for configuring the device access management framework:
Configuring the MDM Authentication Server
The MDM authentication server configuration is used by the system to communicate with the MDM. In the device access management framework, the MDM server is used as the device authorization server.
To configure the authentication server:
1.Select Authentication > Auth Servers to navigate to the authentication server configuration pages.
2.Select MDM Server and click New Server to display the configuration page shown in Figure.
3.Complete the configuration as described in Figure.
4.Save the configuration.
|
Settings |
Guidelines |
|
Name |
Specify a name for the configuration. |
|
Type |
Select AirWatch. |
|
Server |
|
|
Server Url |
Specify the URL for your AirWatch server. This is the URL AirWatch has instructed you to use to access its RESTful Web API (also called a RESTful Web service). You must configure your firewalls to allow communication between these two nodes over port 443. |
|
Viewer Url |
Specify the URL for the AirWatch report viewer. This URL is used for links from the Active Users page to the AirWatch report viewer. |
|
Request Timeout |
Specify a timeout period (5-60 seconds) for queries to the MDM server. The default is 15 seconds. |
|
Administrator |
|
|
Username |
Specify the username for an account that has privileges to access the AirWatch RESTful Web API. |
|
Password |
Specify the corresponding password. |
|
Tenant Code |
Copy and paste the AirWatch API tenant code. See Figure. |
|
Device Identifier |
|
|
ID Template |
Construct a template to derive the device identifier from the certificate attributes. The template can contain textual characters as well as variables for substitution. The variables are the same as those used in role mapping custom expressions and policy conditions. Enclose variables in angle brackets like this <variable>. For example, suppose the certificate DN is: CN=<EnrollmentUser>, serialNumber=<DeviceUid>, o=Company. With this configuration, the certificate could identify both the user and the device. In this example, the device ID template is <certDN.serialNumber>. |
|
ID Type |
Select the device identifier type that matches the selection in the MDM certificate configuration: UUID - Not applicable for the AirWatch MDM. Serial Number - The device serial number. UDID - The device unique device identifier. This is supported by the AirWatch MDM. IMEI - Not applicable for the Airwatch MDM. |
Configuring the Certificate Server
The certificate server configuration enables device users to authenticate using the certificate pushed to the device by the MDM. The certificates are used for user authentication, and the users do not have to enter user credentials.
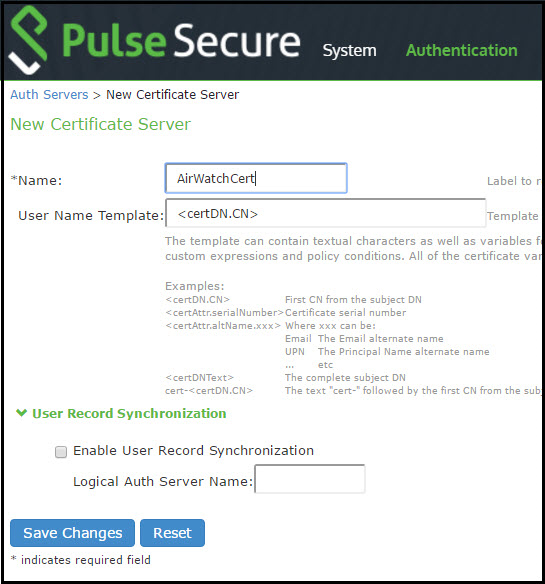
To configure authentication with the certificate server:
1.Select Authentication > Auth. Servers.
2.Select Certificate Server and click New Server to display the configuration page shown in Figure 55.
3.Complete the configuration as described in Figure.
4.Save the configuration.
|
Settings |
Guidelines |
|
Name |
Specify a name to identify the server within the system. |
|
User Name Template |
Specify a username template. Specify how the system should construct a username. You may use any combination of certificate variables contained in angle brackets and plain text. The username template you configure must be consistent with the MDM certificate template configuration. Your goal is to identify the values specified in the MDM certificate that are to be used as the username in the system. This value populates the <USER> and <USERNAME> session variables for use throughout the rest of the system configuration. For example, suppose the certificate DN is: CN=<EnrollmentUser>, serialNumber=<DeviceUid>, o=Company. With this configuration, the certificate could identify both the user and the device. In this example, the username template is <certDN.CN>. |
Adding the MDM Certificate to the Trusted Client CA Configuration
The system uses the uploaded certificate to verify that the browser-submitted certificate is valid. You must upload the MDM certificate that signed the client certificate that was pushed to the mobile devices. Typically, you obtain this certificate from the MDM when your company establishes its account with them.
To import a trusted client CA certificate:
1.Select System > Configuration > Certificates > Trusted Client CAs to display the page shown in Figure.
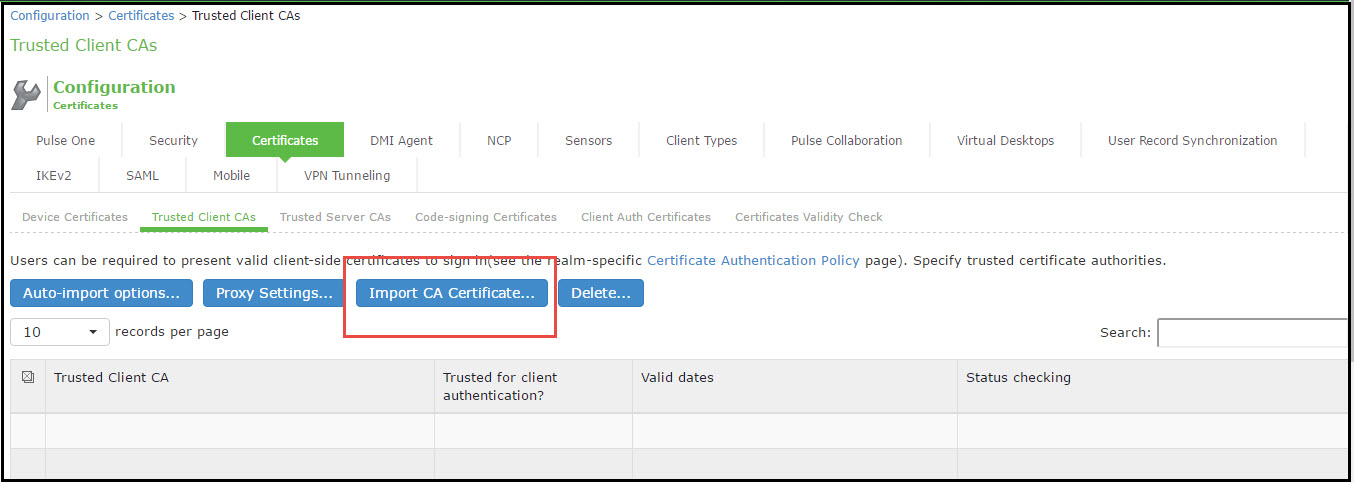
2.Click Import CA Certificate to display the page shown in Figure.
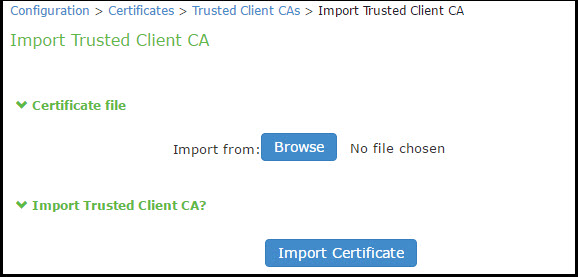
3.Browse to the certificate file, select it, and click Import Certificate to complete the import operation.
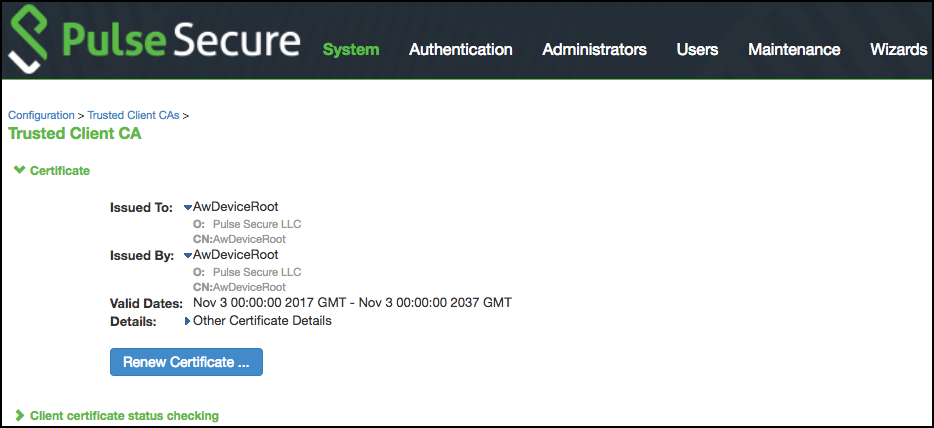
4.Click the link for the Trusted Client CA to display its details. Figure shows the configuration for this example.
Configuring User Roles
User roles are classifiers for network access control policies. You create a set of roles to use in your classification scheme: device status is MDM enrollment complete or incomplete; device status is MDM-policy compliant or noncompliant; device is employee owned or company owned; device platform is iOS, Android, or neither; and so forth.
The user role configuration also includes options to customize user interface features that are appropriate for a particular role. For MDM deployments, you can use the Personalized Greeting UI option to send a notification message to the device when the role has been applied.
To configure user roles:
1.Select Users > User Role to navigate to the role configuration page.
2.Click New Role to display the configuration page shown in Figure.
3.Complete the configuration for general options as described in Figure.
4.Save the configuration.
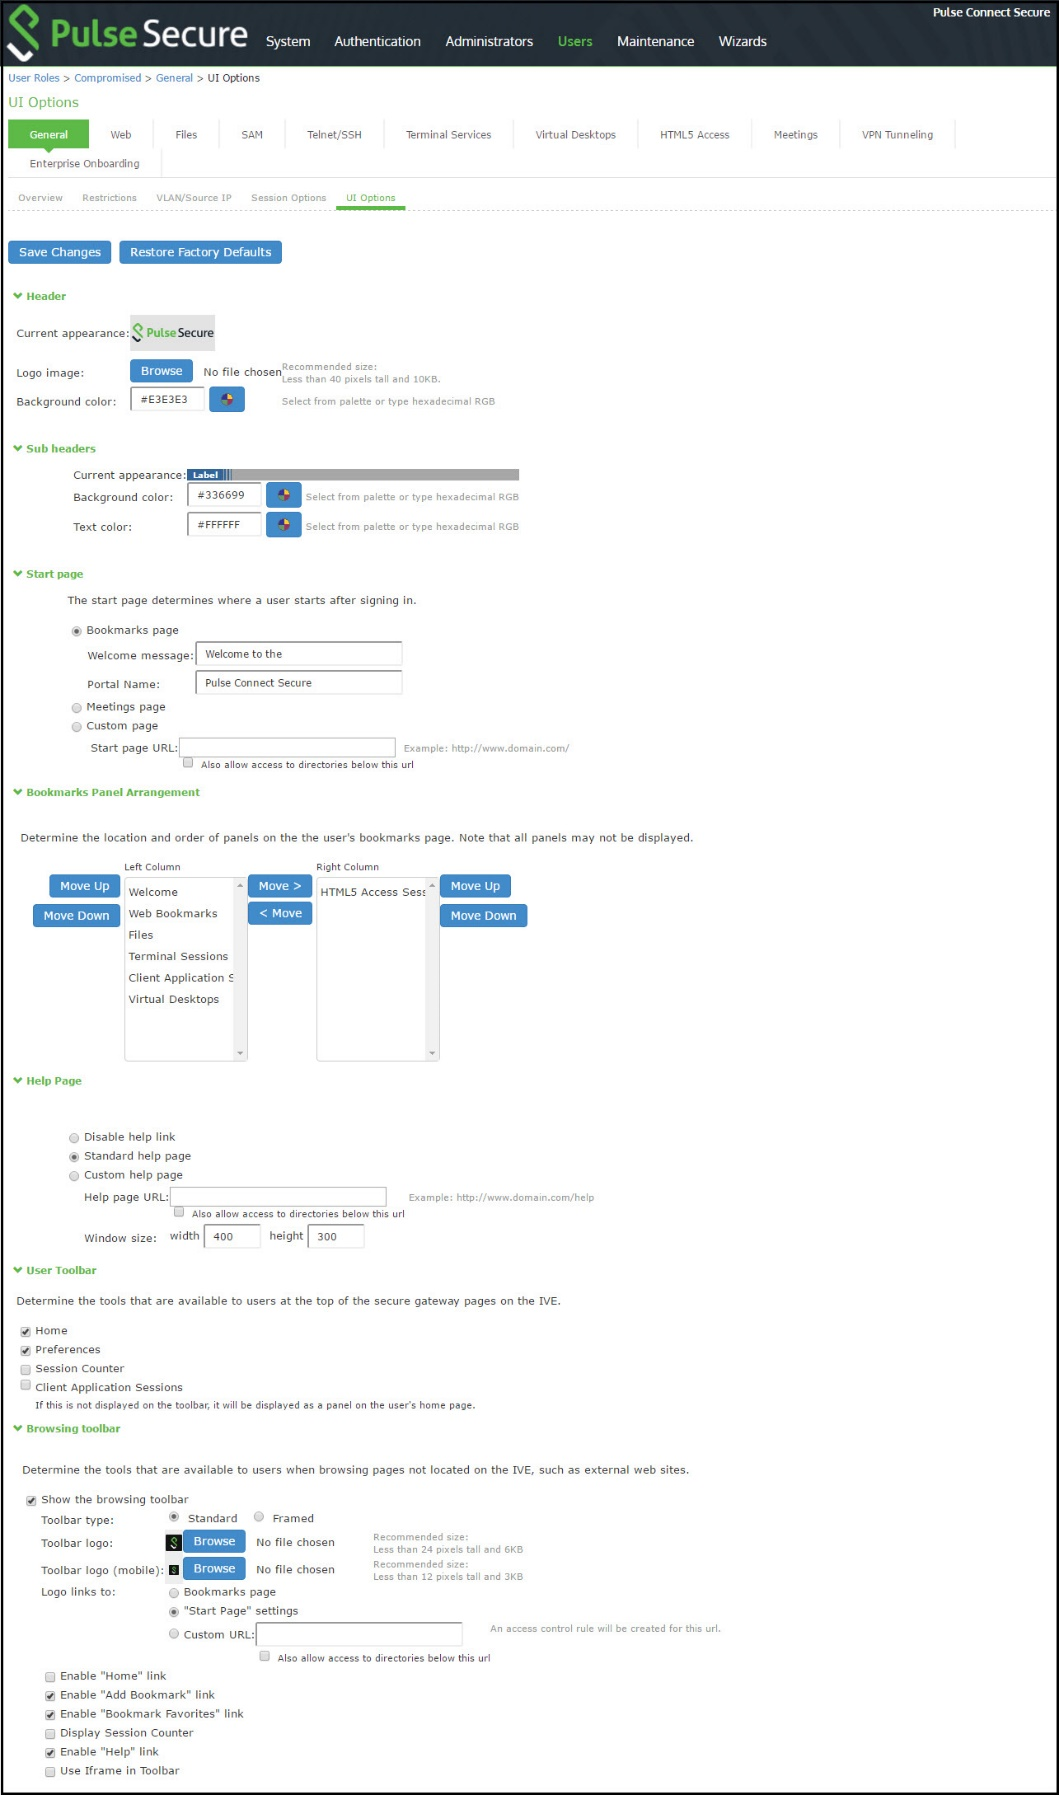
5.Click UI options to display the configuration page shown in Figure.
6.Complete the configuration for UI options as described in Figure.
7.Save the configuration.
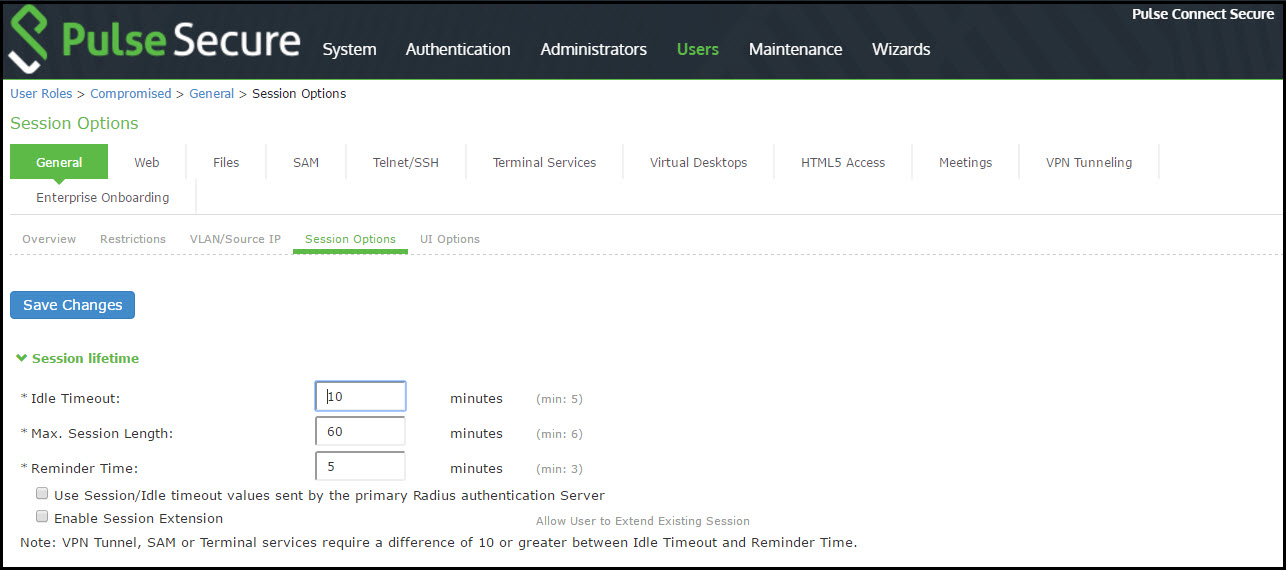
8.Click Session Options to display the configuration page shown in Figure.
9.Complete the configuration for session options as described inFigure.
10.Save the configuration.

|
Settings |
Guidelines |
|
Overview tab |
|
|
Name |
Specify a name for the configuration. |
|
Description |
Describe the purpose of the role so that other administrators are aware of it. |
|
Options |
Select UI Options so that you can customize a message to be sent to the device when the role is applied. |
|
UI Options tab |
|
|
Personalized greeting |
Select the Show notification message option and enter a message to be sent to the device (through the MDM API) after sign-in and this role has been applied. In this example, we are using the system to enforce MDM enrollment by flagging compromised devices. The message, therefore, is: Your device is compromised. Network access may be limited. The message is forwarded to the device using the MDM server Push Notification feature. When multiple roles are assigned, UI options are not merged. The UI options for the first role that matches are applied. |
|
Session Options |
|
|
Session lifetime |
Use the session lifetime options to establish the time limits that would require the user to sign in again. |
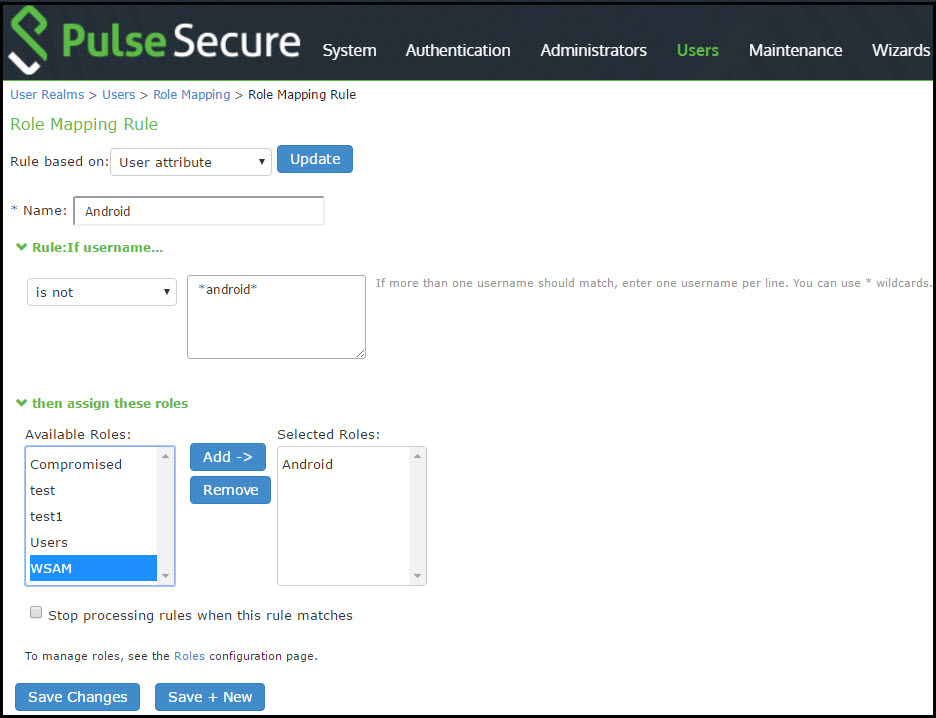
Configuring a Realm and Role Mapping Rules
The user realm configuration associates the authentication server data and MDM server data with user roles.
To configure the realm and role mapping rules:
1.Select Users > User Realms > New User Realm to display the configuration page shown in Figure
2.Complete the configuration as described in Figure.
3.Save the configuration.
Upon saving the new realm, the system displays the role mapping rules page.
4.Click New Rule to display the configuration page shown in Figure
5.Complete the configuration as described in Figure.
6.Save the configuration.
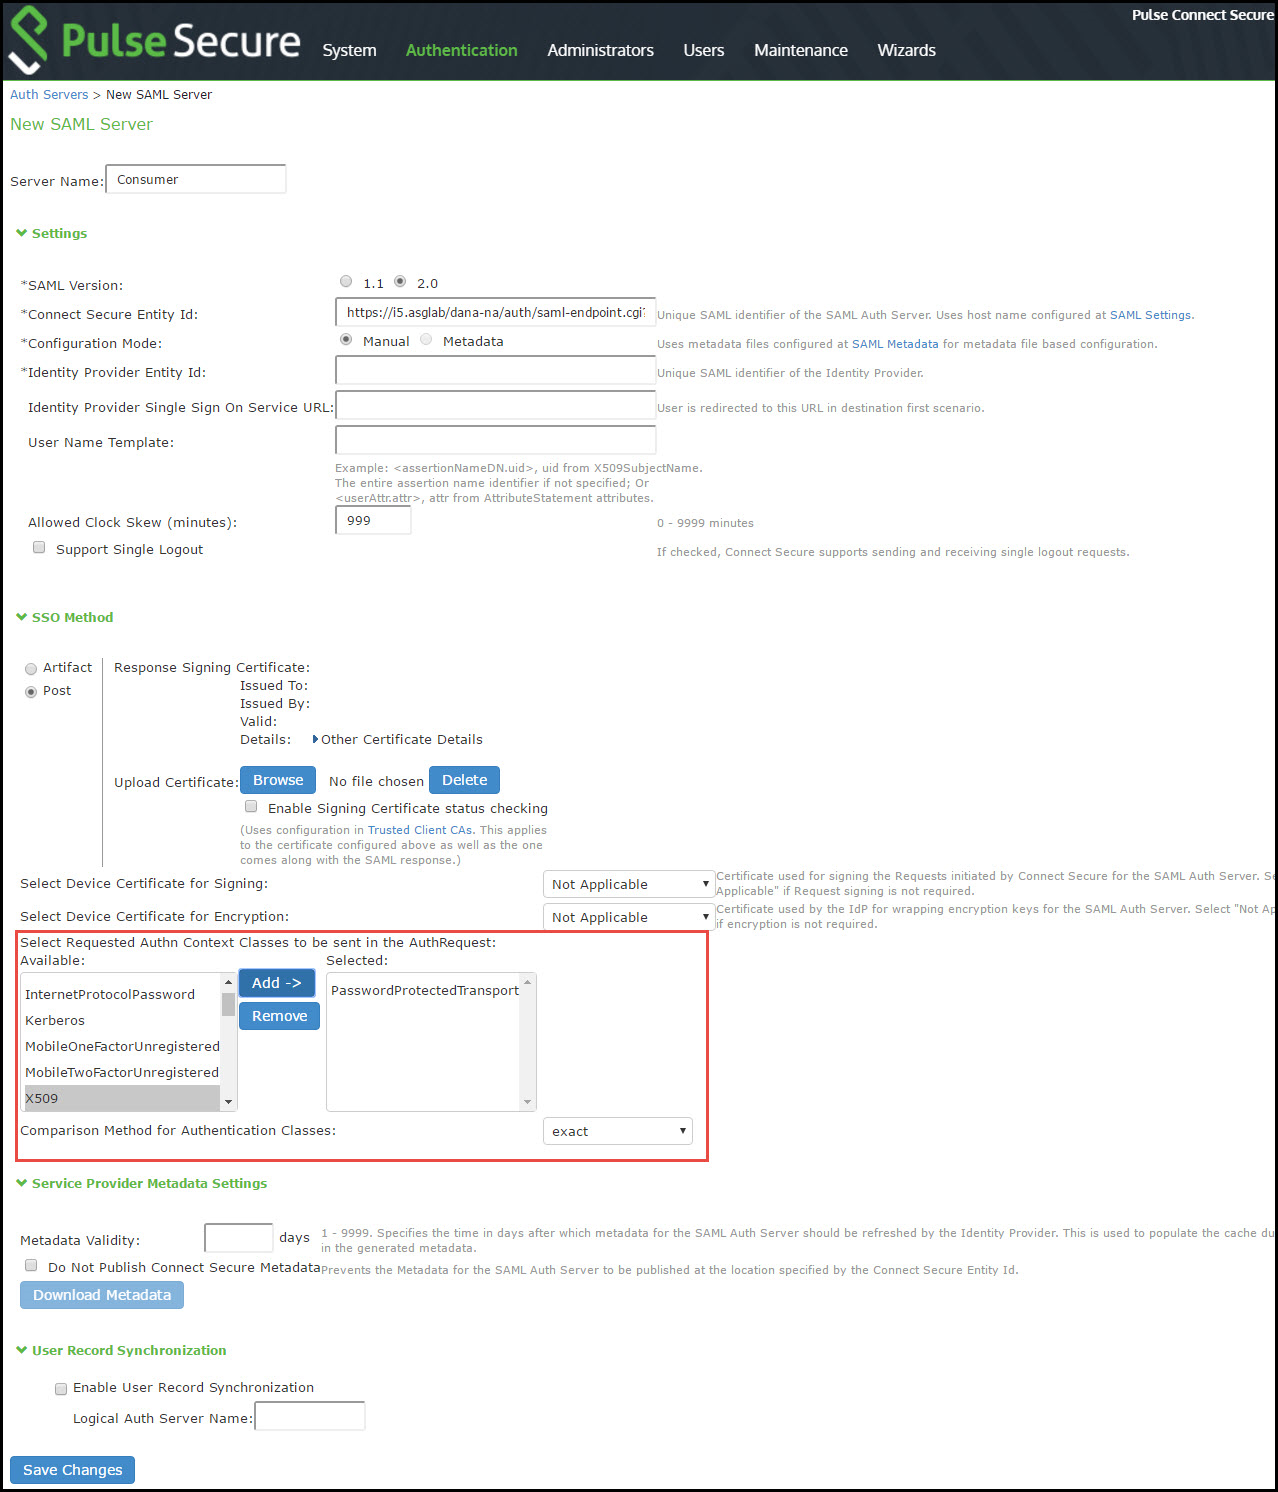
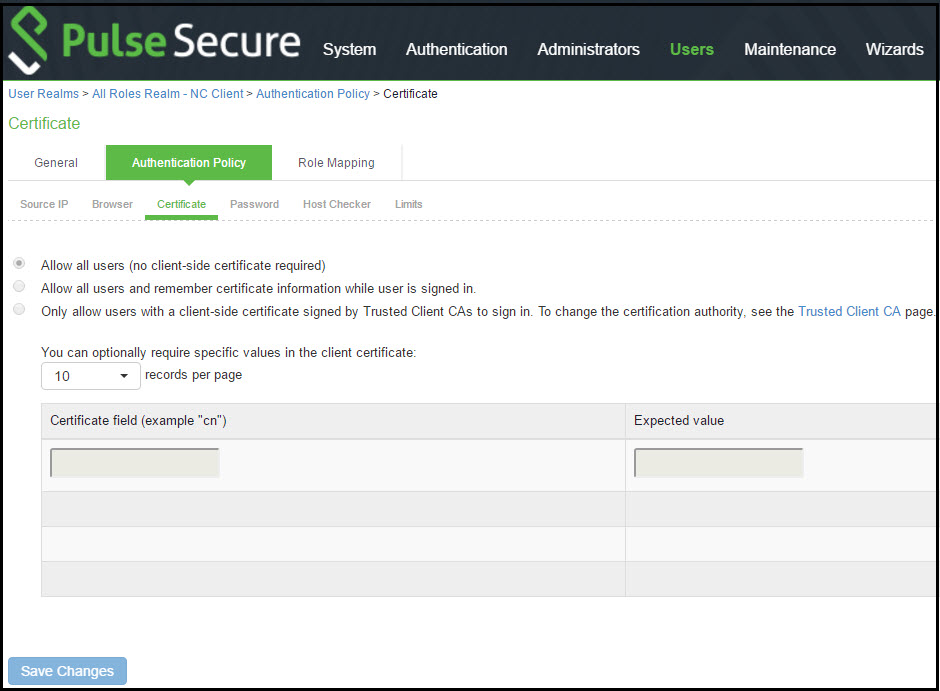
7.Click the Authentication Policy tab and then click the Certificate sub-tab to display the certificate restriction configuration page shown in Figure
8.Complete the configuration as described in Figure.
9.Save the configuration.

|
Settings |
Guidelines |
|
Name |
Specify a name for the realm. If you enable sign-in using a realm suffix in the sign-in policy configuration, the realm name must match the username realm configured in the VPN profile. |
|
Description |
Describe the purpose of the realm so that other administrators are aware of it. |
|
Servers |
|
|
Authentication |
Select the user authentication server for this realm's users. This example uses the certificate server configured in the earlier step. When you use a certificate server, users are not prompted for their credentials. You can also select the authentication server used for employees. In that case, users are prompted by the sign-in page to provide their username and password. |
|
User Directory/Attribute |
Do not select. |
|
Accounting |
Do not select. |
|
Device Attributes |
Select the MDM server configured in the earlier step. |
|
Dynamic Policy Evaluation |
|
|
Dynamic Policy Evaluation |
Do not select this option. A limitation for this release is that role evaluation occurs only when the user signs in. To force role reevaluation, you must force the users to sign in again. |
|
Refresh interval |
Do not select. |
|
Refresh roles |
Do not select. |
|
Refresh resource policies |
Do not select. |
|
Session Migration |
|
|
Session Migration |
Do not select this option. Session migration is useful for endpoints running Pulse Secure client software, which is not the case for the endpoints in this MDM example. |

|
Settings |
Guidelines |
|
Rule based on |
Select Device Attribute and click Update to update the configuration page so that it displays settings for role mapping using device attributes. |
|
Name |
Specify a name for the configuration. |
|
Rule |
Select a device attribute (see Figure and a logical operator (is or is not), and type a matching value or value pattern. In this example, select isCompromised and the logical operator is, and enter the value 1 (true). This means that devices with a compromised status match the rule. |
|
Role assignment |
Select the roles to apply if the data matches the rule. |
You likely are to create multiple roles and role-mapping rules to assign roles for different policy purposes. Your realm can have a set of rules based on user attribute, group membership, and device attribute. Be mindful that the user and device can map to multiple roles. Use stop rules and order your rules carefully to implement the policy that you want.
The following table describes the AirWatch record attributes that can be used in role mapping rules.
|
Role Mapping Attribute Name |
AirWatch Attribute Name |
Description |
Data Type |
|
BlockLevelEncryption |
BlockLevelEncryption |
True if block-level encryption is enabled; false otherwise. |
Boolean |
|
complianceReason |
ComplianceStatus |
Values: Compliant, Non-Compliant. |
String |
|
CompromisedStatus |
CompromisedStatus |
True if the status is compromised; false otherwise. |
Boolean |
|
DataProtectionEnabled |
DataProtectionEnabled |
True if data protection is enabled; false otherwise. |
Boolean |
|
deviceId |
Id.Value |
Device identifier. |
String |
|
deviceName |
DeviceFriendlyName |
The concatenated name used to identify the device/user combination. |
String |
|
FileLevelEncryption |
FileLevelEncryption |
True if file-level encryption is enabled; false otherwise. |
Boolean |
|
IMEI |
Imei |
IMEI number of the device. |
String |
|
isCompliant |
ComplianceStatus |
Values: Compliant. |
String |
|
isCompromised |
CompromisedStatus |
True if the device is compromised; false otherwise. |
Boolean |
|
isEnrolled |
EnrollmentStatus |
True if MDM value is Enrolled; false otherwise. |
Boolean |
|
IsPasscodeCompliant |
IsPasscodeCompliant |
True if the passcode is compliant with the MDM policy; false otherwise |
Boolean |
|
IsPasscodePresent |
IsPasscodePresent |
True if a passcode has been configured; false otherwise. |
Boolean |
|
LastComplianceCheckOn |
LastComplianceCheckOn |
The refresh date and timestamp of the last status reported. |
Timestamp |
|
LastCompromisedCheckOn |
LastCompromisedCheckOn |
The refresh date and timestamp of the last status reported. |
Timestamp |
|
lastSeen |
LastSeen |
Date and time the device last made successful contact with the MDM. |
Timestamp |
|
LocationGroupName |
LocationGroupName |
MDM location group configuration value. |
String |
|
macAdress |
MacAddress |
The Wi-Fi MAC address. |
String |
|
model |
Model |
Model is automatically reported by the device during registration. |
String |
|
osVersion |
OperatingSystem |
OS version. |
String |
|
ownership |
Ownership |
Values: C, E, or S (Corporate, Employee, or Shared). |
String |
|
phoneNumber |
PhoneNumber |
Phone number entered during registration. |
String |
|
platform |
Platform |
Platform specified during registration. |
String |
|
serialNumber |
SerialNumber |
Serial number. |
String |
|
UDID |
Udid |
Unique device identifier. |
String |
|
userEmail |
UserEmailAddress |
E-mail address of device user. |
String |
|
userName |
UserName |
Name of device user. |
String |
|
UUID |
Uuid |
Universal unique identifier. |
String |
By design, you should be able to specify true or false, or 1 or 0, for Boolean data types in your role mapping rules. Due to an issue in this release, you must use 1 for true and 0 for false.
|
Settings |
Guidelines |
|
Allow all users |
Do not select this option. If you select this option, the system does not request a client certificate during the TLS handshake. |
|
Allow all users and remember certificate |
If you select this option, the system requests a client certificate during the TLS handshake. It does allow endpoints to authenticate without a client certificate. For those with a client certificate, the certificate attributes are placed in the session context. TIP: Without a certificate, device attributes cannot be determined, and the session can be mapped only to roles that do not require particular device attributes. You might use this option to grant restricted access or to send a notification that MDM enrollment is required for a greater level of access. |
|
|
|
|
Only allow users with a client-side certificate |
If you select this option, the system requests a client certificate during the TLS handshake. It does not allow endpoints to authenticate without a valid client certificate. If the realm is configured with a certificate server, like this example, this option is the only option that can be selected. |
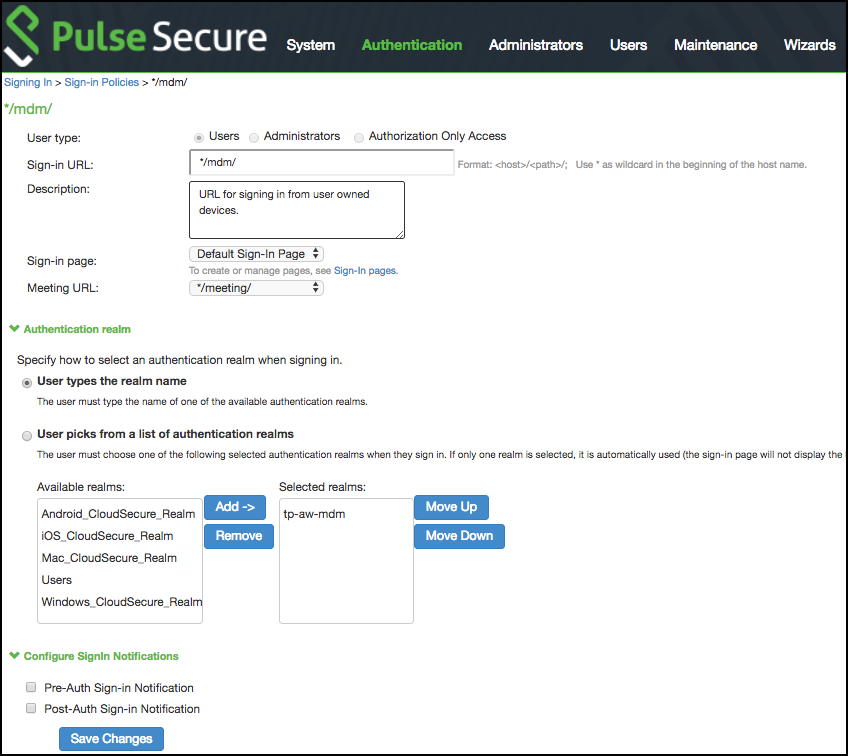
Configuring a Sign-In Policy
A sign-in policy associates devices with a realm.
To configure a sign-in policy:
1.Select Authentication > Signing In > Sign-In Policies to navigate to the sign-in policies configuration page.
2.Click New URL to display the configuration page shown in Figure
3.Complete the configuration as described in Figure.
4.Save the configuration.
|
Settings |
Guidelines |
|
User type |
Select Users. |
|
Sign-in URL |
Enter a URL. |
|
Description |
Describe the purpose of the sign-in policy so that other administrators are aware of it. |
|
Sign-In Page |
Select a sign-in page. |
|
Authentication Realm |
|
|
User experience |
Select one of the following options: User types the realm name User picks from a list of authentication realms |
|
Realm |
Select the realm you configured in the earlier step. |
|
Configure Sign-in Notifications |
|
|
Pre-Auth Sign-in Notification |
Not used in this scenario. |
|
Post-Auth Sign-in Notification |
Not used in this scenario. |
Configuring a Resource Policy
A resource policy enforces role-based access to resources accessed during the SSL VPN session. You use the device access management framework to assign roles to devices, and you use the resource policy to deny access to resources that should not be downloaded onto a specific device platform-in this example, Android devices.
In this scenario, the role configuration and role mapping configuration create a classification for Android devices. Figure shows the user role configuration.
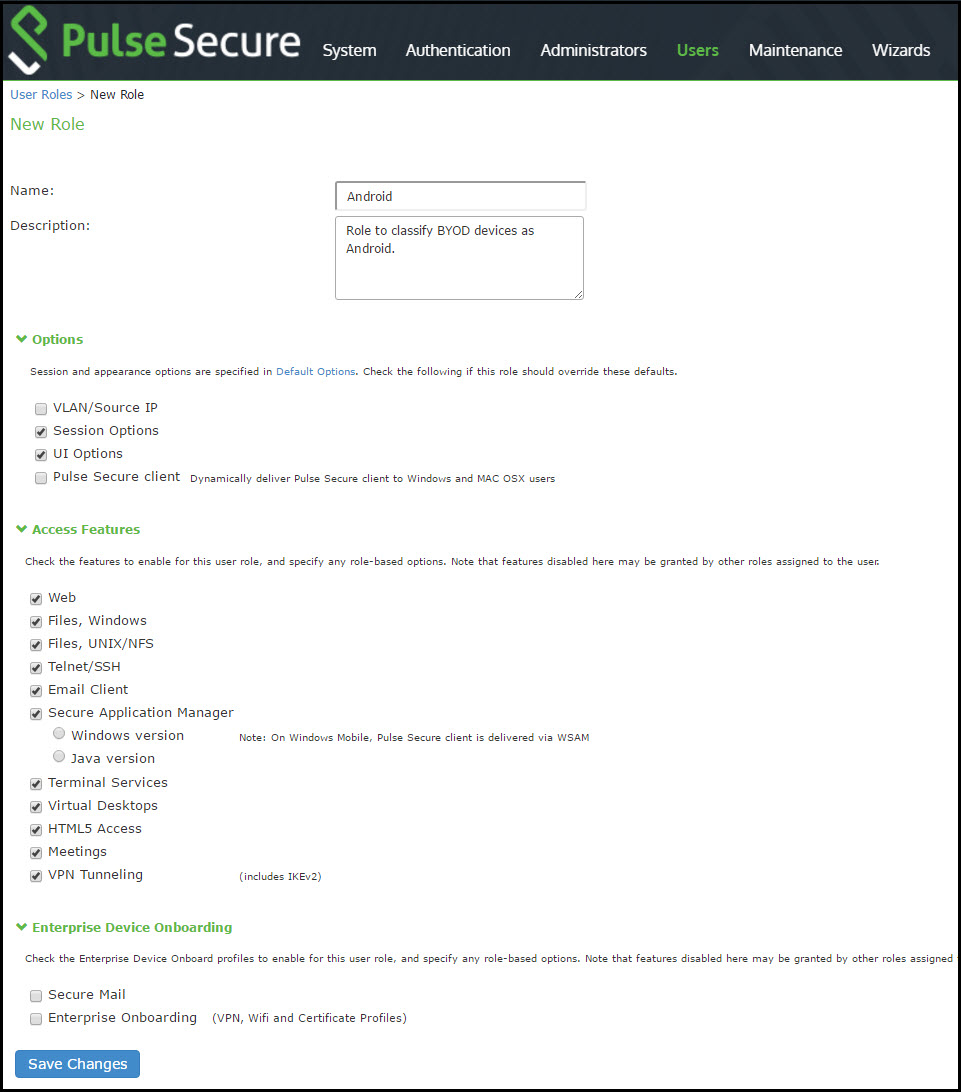
Figure shows the role mapping configuration.
To configure a resource policy:
1.Select Resource Policies > VPN Tunneling > Access Control to display the access control policy configuration pages.
2.Click New Policy to display the configuration page shown in Figure.
3.Complete the configuration as described in Figure.
4.Save the configuration.
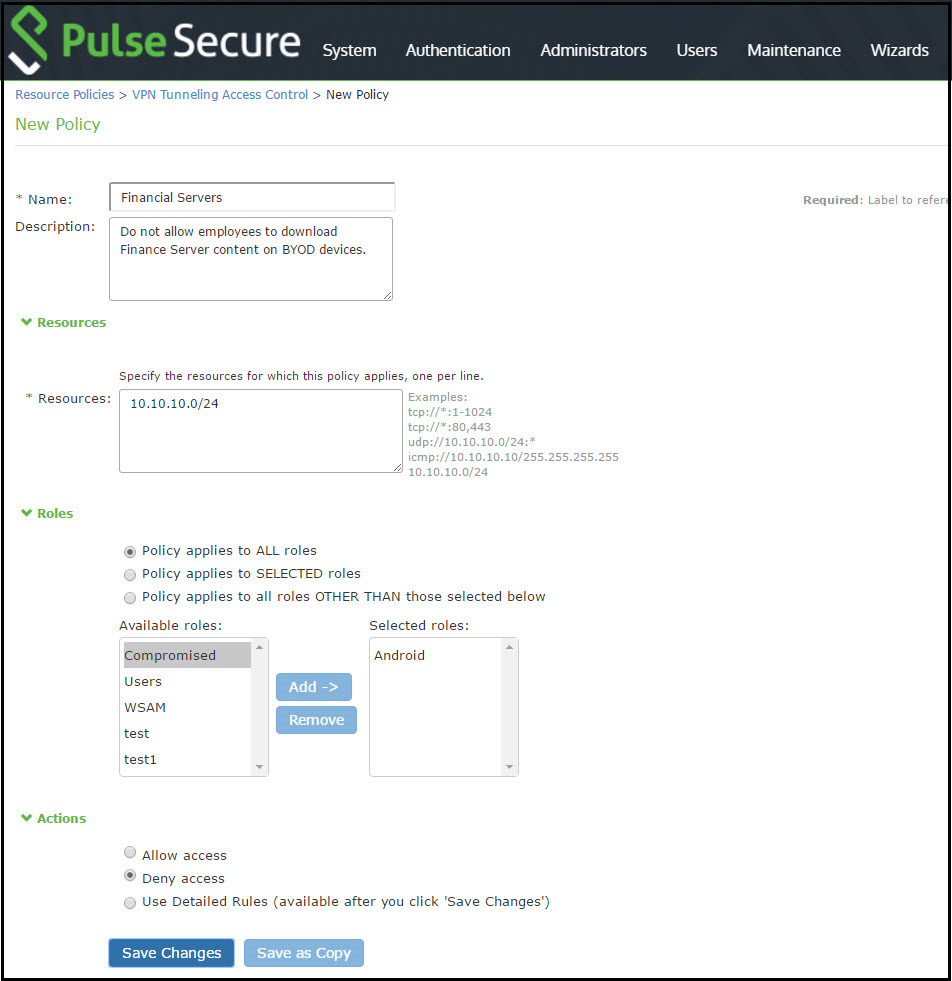
|
Settings |
Guidelines |
|
Name |
Specify a name for the configuration. |
|
Description |
Describe the purpose of the configuration so that other administrators are aware of it. |
|
Resources |
|
|
Resources |
Specify the resources for which this policy applies, one per line. |
|
Roles |
|
|
Roles |
Select the roles to which the policy applies. In this example, Android is selected. |
|
Action |
|
|
Action |
Select one of the following actions: Allow Access Deny Access Use Detailed Rules In this example, we deny access from Android devices. |