Admin Console Procedures
Creating a Cluster
To create a cluster and add members:
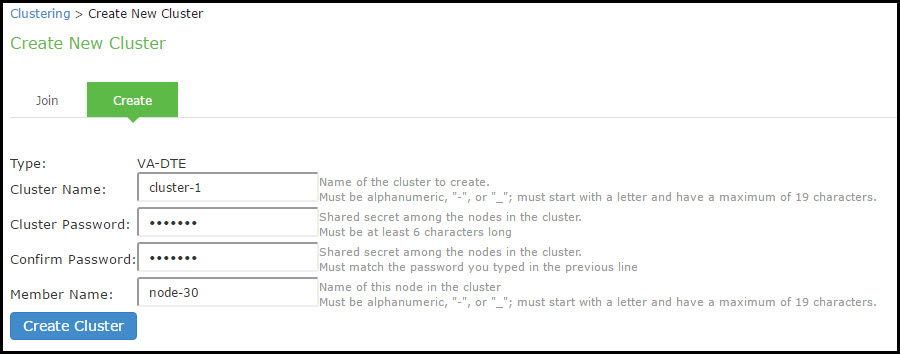
1.Select System > Clustering > Create Cluster and complete the configuration as described in Table.
The following figure shows the Create New Cluster page.
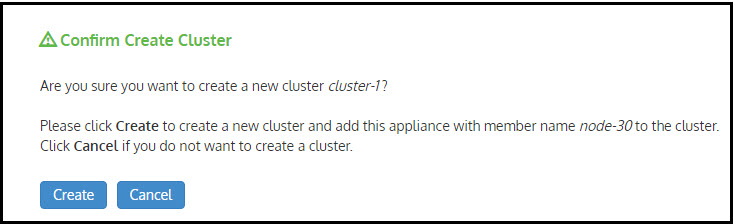
2.Click Create Cluster. When prompted to confirm the cluster creation, click Create. After the device initializes the cluster, the Clustering page displays the Status and Properties tabs.
|
Settings |
Actions |
|
Specifies a name to identify the cluster. |
|
|
Cluster Password |
Specifies the cluster password. You need to enter the password again when specifying additional nodes to join the cluster. All nodes in the cluster use this password to communicate. |
|
Confirm Password |
Specifies the password that is confirmed. |
|
Member Name |
Specifies the name of the member. |
Adding a Node to a Cluster Through the Admin Console
Before you can add a node to a cluster (through either the Web or the serial console), you need to make its identity known to the cluster. Note that if a node has a cluster license key, it has only a Clustering > Join tab.
To add a node to a cluster through its admin console:
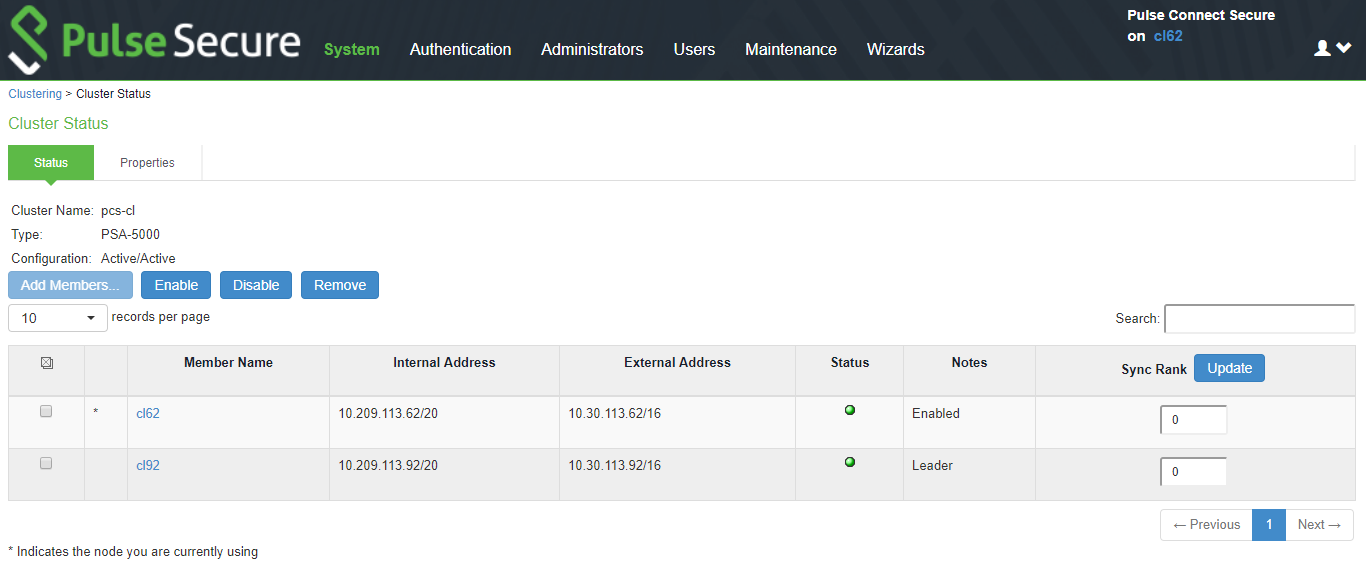
1.From an existing cluster member, select System > Clustering > Cluster Status, and specify the node you want to add to the cluster.
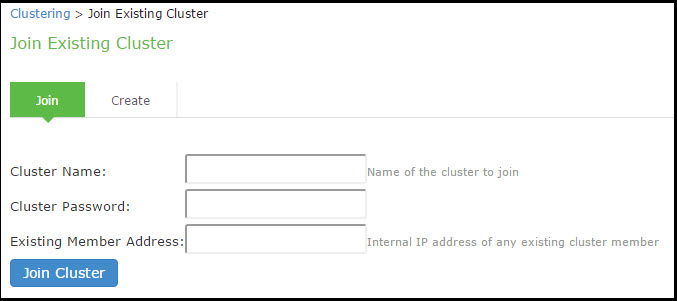
2.From the admin console of the node you want to add to a cluster, select System > Clustering > Join, and enter:
•The name of the cluster to join
•The cluster password you specified when defining the cluster
•The IP address of an active cluster member
3.Click Join Cluster. When you are prompted to confirm joining the cluster, click Join. After the node joins the cluster, you may need to sign in again.
The following figure shows the Join Cluster page.
While the new node synchronizes its state with the existing cluster member, each node's status on the Status page indicates Enabled, Enabled; Transitioning; or Enabled, Unreachable.
Deleting a Cluster
If you delete a cluster, all of the nodes begin running as standalone systems.
To delete a cluster:
1.From the admin console of an active cluster member, select the System > Clustering > Properties page.
2.Click the Delete Cluster button.
3.Click Save Changes.
The following figure shows the properties for the Clustering page.
Failing Over the VIP to Another Node
In an active/passive cluster, you might need to fail the VIP to the other node, regardless of which node you are currently using.
To fail-over the VIP:
1.Select System > Clustering > Cluster Status from the admin console.
2.Click the Fail-Over VIP button to move to the other node. The Fail-Over VIP button is a toggle button, so you can move from one node to the other, regardless of which is the leader. The fail-over occurs immediately.
VIP failover does not occur when the management port fails.
The following figure shows the fail-over VIP option on the Clustering page.
Changing the IP Address of a Cluster Node
Changing the IP address of a cluster while it belongs to a cluster is not supported. In order to change the IP address, you must first remove it from the cluster, update the IP address and then add it back.
If you attempt to change the IP address of a node while it belongs to a cluster, unpredictable results might occur.
For example:
1.Select System > Clustering > Cluster status.
2.Select the check box for the name of the node whose IP address you want to change.
3.Click Remove.
4.After the node is removed, sign in to that node, change its IP address and click Save Changes.
5.In the main node, add the changed node to the cluster configurations.
6.Log in to the changed node and rejoin the cluster.
The following procedure is a model for changing both node IP addresses in an active/passive cluster:
1.Select System > Clustering > Cluster status.
2.Click Delete Cluster.
3.Change the IP address of each node.
4.Log in to the main node and re-create the cluster, changing it from active/active to active/passive and defining the internal and/or external VIP addresses.
5.Add the other node to the cluster configurations.
6.Log in to the passive node and add it to the cluster.
Adding Multiple Cluster Nodes
To add multiple nodes to a cluster:
Select System > Clustering > Cluster Status.
1.Click Add Members.
2.Enter the node name and internal IP address.
3.Modify or add the default internal netmask and internal gateway addresses, if necessary.
4.Click Add.
The following figure shows the Add Cluster Member page.
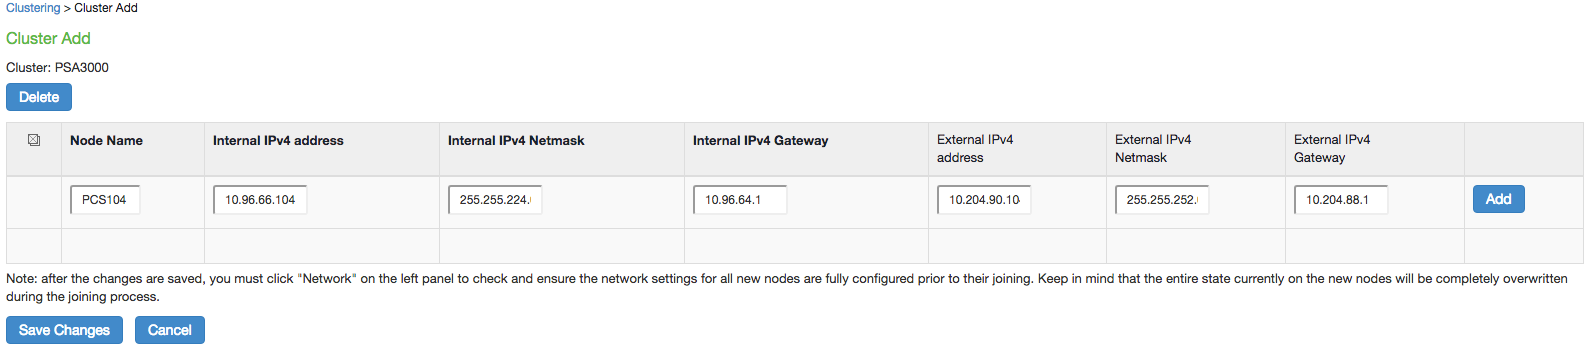
5.Repeat the process until you have added all of the nodes.
6.Click Save Changes to save the node configurations.
The system automatically enables the added nodes, even if they are unreachable.
Re-Adding a Node to a Cluster
With some maintenance operations, you might need to remove a node from a cluster, then re-add and re-join it to the cluster.
When a node joins a cluster, all of its node-specific settings (including network interface addresses, route tables, virtual ports, ARP caches, VLAN interface, SNMP settings) are overwritten by the corresponding configuration setting it receives from the cluster.
To populate the newly joined node with the correct node-specific settings:
1.Add the node to the cluster.
2.On any of the existing nodes in the cluster, manually configure the appropriate node-specific settings for the newly added node by selecting the node from the menu in the settings page.
3.Add the node to the cluster.
When the node joins the cluster, it receives its newly configured node-specific settings from the cluster.
You configure the node-specific settings for the newly added node manually because binary import options are not useful. The only recommended binary import option into a cluster is "Import everything except network settings and licenses" from the Maintenance > Import/Export > Configuration page, which restores cluster-wide configuration (sign-in, realms, roles, resource policies etc.) from a backup binary file. Because this option skips node-specific settings, you must perform step 2 manually to populate the newly joined node with the right set of node-specific settings.
Restarting or Rebooting Cluster Nodes
When you create a cluster of two or more nodes, the clustered nodes act as a logical entity. When you reboot one of the nodes using either the serial console or the admin console, all nodes in the cluster restart or reboot.
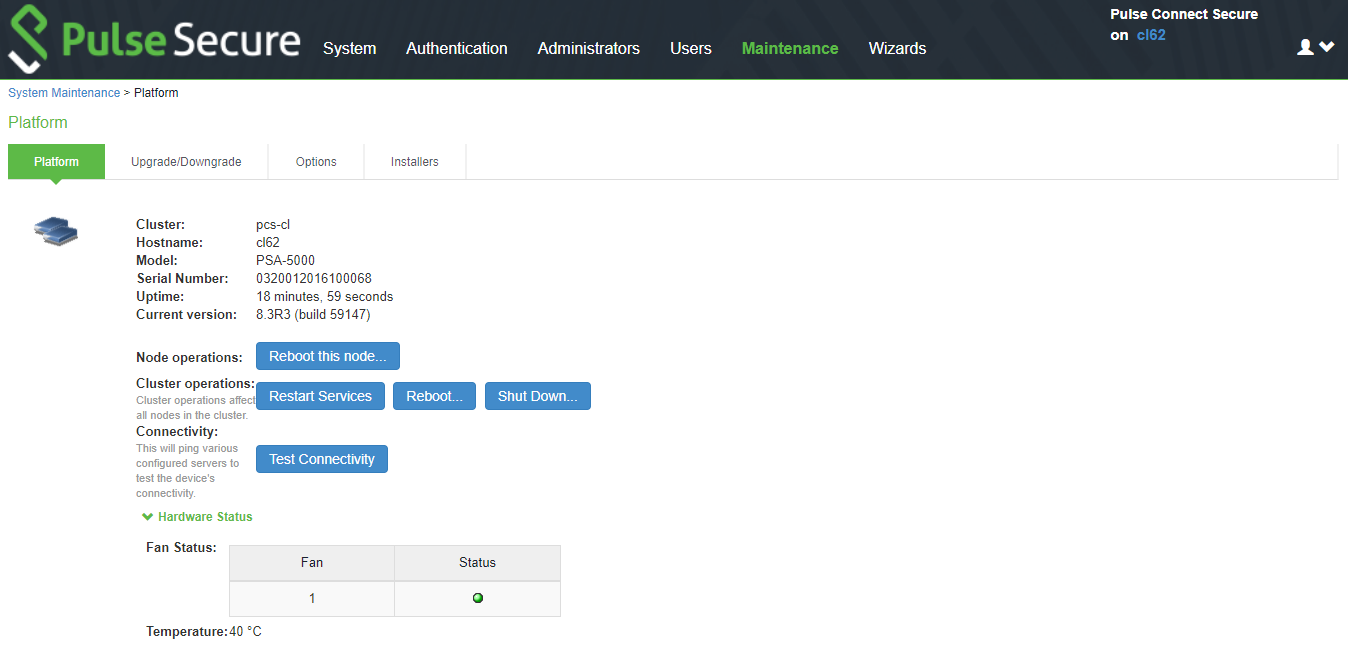
To reboot only one node:
1.Select System > Clustering > Status to disable the node you want to restart or reboot within the cluster.
2.Select Maintenance > System > Platform.
3.Reboot the node, then enable the node within the cluster again.
The system reconciles session state with the Infranet Enforcer upon restart or cluster failover. If the Infranet Enforcer is running ScreenOS 6.0r2 or later, a Policy Secure restart or failover does not interrupt network traffic of existing sessions, as long as the restart or failover occurs within two minutes.
The following figure shows the System Maintenance page.
Modifying the Cluster Properties
To modify the cluster properties:
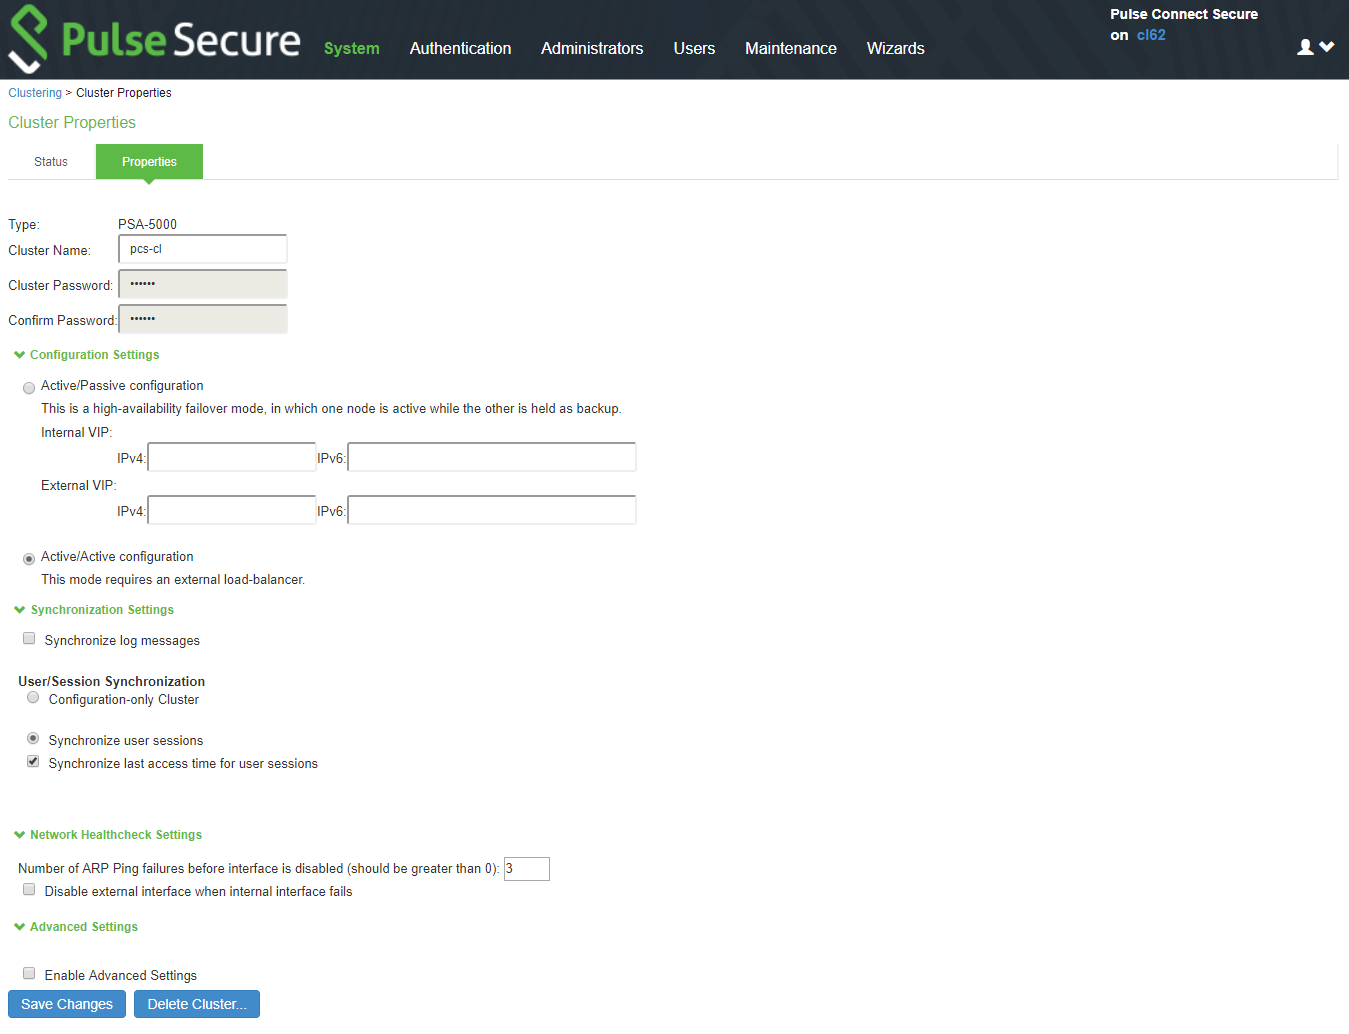
1.Select System > Clustering > Properties.
The following figure shows the properties of the Clustering page.
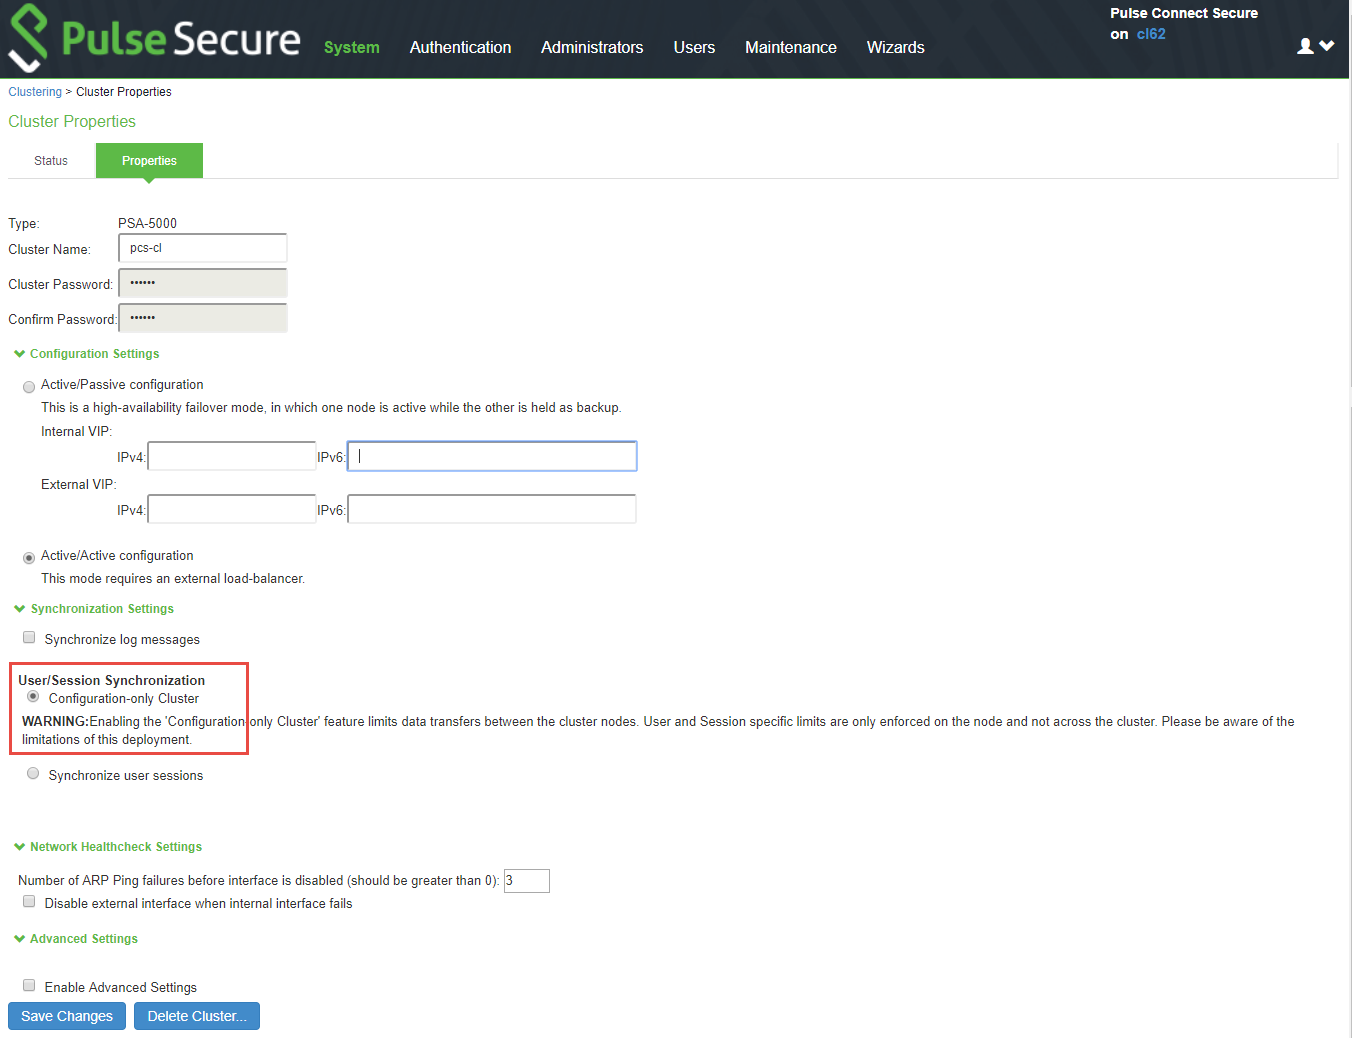
2.Complete the configuration as described in Table.
|
Settings |
Actions |
|
Identifies the cluster. |
|
|
Configuration Settings |
|
|
Active/Passive configuration |
Runs a cluster pair in active/passive mode. Then specify an internal VIP (virtual IP address) and an external VIP if the external port is enabled. |
|
Active/Active configuration |
(Default) Runs a cluster pair in active/active mode. This configuration runs a cluster of two or more nodes in active/active mode using an external load balancer. To change a two-unit active/passive cluster to an active/active cluster with more than two nodes, first change the configuration of the two-unit cluster to active/active and then add the additional nodes. |
|
Synchronization Settings |
|
|
Synchronize log messages |
Propagates all log messages among the devices in the cluster. |
|
User/Session Synchronization Configuration only cluster |
Select this option to disable synchronization of session data and to replicate only configuration data and user records (for example, web bookmarks, NFS and windows shared files, terminal servers, telnet sessions, SAM, preferences, and passwords).
Enabling this option limits data transfers between the cluster nodes. User and Session specific limits are only enforced on the node and not across the cluster. Do not activate this feature when the user sessions are in progress. Session failover is not supported in configuration only cluster mode. |
|
Synchronize user sessions |
Synchronizes all user session information (for example, instances of access to intranet services) among all the devices in the cluster. |
|
Synchronize last access time for user sessions |
Propagates the latest user access information across the cluster. |
|
If you select both the Synchronize log messages and Synchronize user sessions check boxes, everything is replicated on the cluster nodes, including networking information. Even though networking information, including syslog and SNMP settings, can be configured per node or per cluster, all of the networking information is synchronized between nodes when these two options are set. If your cluster node configurations diverge because of changes made to one node while another is disabled or unavailable, the system manages the remerging of the configurations automatically for up to 16 updates. Beyond the maximum number of allowable updates, you might need to intervene and remerge the configurations manually. In some instances, the system might be unable to remerge the configurations if there is not enough overlapping configuration information between two nodes to manage the internode communication. For example, for a two-node cluster in which the two nodes are partitioned from each other because of a network outage, if the internal network IP address of one of the nodes changes in one of the partitions, the two partitions are unable to rejoin, even when the network is repaired. In such a case, you must remerge the configurations manually. |
|
|
Network Healthcheck Settings |
|
|
Number of ARP Ping Failures |
Specifies the number of ARP ping failures allowed before the internal interface is disabled. |
|
Disable external interface when internal interface fails |
Disables the external interface of the device if the internal interface fails. |
|
Advanced Settings |
|
|
Enable Advanced Settings |
Select the Advanced Settings check box to specify the timeouts for the underlying cluster system. Do not change any values under this setting unless instructed to do so by Pulse Secure Technical Support. |
|
Network Type |
Select the appropriate network type. Network type selection controls the timeouts used by the underlying cluster system. Change this value only when you observe repeated cluster partitions that may be related to long network delays or significant load in any of the cluster nodes. A non-default network type cannot be used in conjunction with non-default timeout multipliers. If a non-default network type is picked, the timeout multiplier will silently get reset to the default value. |
|
Timeout Multiplier |
Default cluster timeouts have been picked to be optimal for typical cluster installations. Administrators have the ability to adjust the cluster timeouts over a linear scale of 1-20. Smaller timeouts result in faster failure detection. Larger timeouts minimize the risk of cluster splits during transient network glitches. The system can be instructed to pick a reasonable default for the current cluster configuration by specifying a value of 0. A non-default timeout multiplier can only be used in conjunction with the default network type. If a non-default network type is picked, the timeout multiplier will silently get reset to the default value. |
3.Click Save Changes.
Synchronizing the Cluster State
State synchronization occurs only by means of the internal network interface cards (NICs), and each cluster member is required to possess the cluster password to communicate with other members. Cluster members synchronize data when there is a state change on any member. Cluster state data is either persistent-permanently stored on the device-or transient-stored on the device only for the user's session. State data is divided into the following major categories:
•System state - This state is persistent and does not change often.
•Network settings
•Authentication server configurations
•Authorization group configurations, such as access control list, bookmark, messaging, and application data
•User profile - This data can be either persistent or transient, depending on whether or not you have enabled persistent cookies and persistent password caching. If you have not enabled these features, then the data is transient and falls into the next category.
•User bookmarks - persistent
•Persistent user cookies - if the persistent cookies feature is enabled, the device stores user cookies for web sites that issue persistent cookies
•Persistent user passwords - if the password caching feature is enabled, the user can choose to store her credentials for applications and web sites
•User session -This state is transient and dynamic. The user session consists of the following data:
•The user session cookie
•Transient user profile information, which includes cookies and passwords stored only for during the user's session
•Monitoring state - This persistent information consists of log messages.
Whether you deploy a cluster in active/passive or active/active mode, the Connect Secure is responsible for synchronizing data between cluster members. The Connect Secure synchronizes all system data, user profile data, and the user session cookies immediately, so if one cluster member goes off-line, users do not need to sign in to the device again. A small amount of latency occurs when the device synchronizes user session profile and monitoring state data, so if a member goes off-line, the user may need to sign in to some back-end Web applications again and administrators may not have access to the logs on the failed machine.
If you notice too much latency occurring on one or more nodes, you might need to change the Clustering Timeouts Settings.
When you add the device to a cluster, the cluster leader does not send log messages to the new member. Log messages are also not synchronized between cluster members when one member restarts its services or when an offline machine comes back online. Once all machines are online, however, log messages are synchronized.
If you are running an active/active cluster, you must not allow the cluster to switch to active/passive mode unless the active/active and active/passive clusters share compatible spread timeout settings.
You may also configure synchronization settings to improve performance:
•Specify the synchronization protocol - When running three or more devices in a multi-unit or multi-site cluster, you can choose to use the synchronization protocol (Unicast, Multicast, or Broadcast) that best suits your network topology.
•Synchronize log messages - Log messages may create a huge payload on the network and affect cluster performance. This option is disabled by default.
•Synchronize user sessions - This option synchronizes all user session information (instances of access to intranet services, for example) among all devices in the cluster.
You must select this option if your cluster is an IF-MAP client. If you do not select this option, your IF-MAP client may not work as expected.
•Synchronize last access time for user sessions-This option allows you to propagate user access information in the cluster. If this option is the sole synchronization item among the cluster nodes, you can significantly reduce CPU impact among the cluster devices.
•If you configure your cluster as active/passive, the Synchronize user sessions and Synchronize last access time for user sessions options are automatically checked.
•If you select both the both Synchronize log messages and Synchronize user sessions check boxes, everything is replicated on the cluster nodes, including networking information. Even though networking information, including syslog and SNMP settings, can be configured per node or per cluster, all of the networking information is synchronized between nodes when these two options are set.
•If your cluster node configurations have diverged due to changes made to one node while another is disabled or unavailable, the devices manage the remerging of the configurations automatically, for up to 16 updates. Beyond the maximum number of allowable updates, you may need to intervene and remerge the configurations manually. In some instances, the devices may be unable to remerge the configurations if there is not enough overlapping configuration information between two nodes to manage the internode communication.
For example, given a two-node cluster in which the two nodes are partitioned from each other because of a network outage, if the internal network IP address of one of the nodes gets changed in one of the partitions, the two partitions are unable to rejoin, even when the network is repaired. In such a case, you must manually remerge the configurations.