Configurations
This section covers the configurations required on different products involved in Cloud Secure solution.
To enable Cloud Secure solution, admin needs to configure PCS as a SAML Identity Provider, Cloud Service (For example, O365) as SAML Service Provider, PPS for On-Premise SSO, and Pulse Workspace as Mobile Device Management (MDM) Server.
This section lists the following configurations:
•Configuring Pulse Connect Secure
•Basic Configurations (Mandatory)
•Advanced Configurations (Optional)
•Configuring Pulse Policy Secure for On-Premise/Location Awareness
Configuring Pulse Connect Secure
The Cloud Secure simplified UX is a modern, faster and responsive user interface which allows you to quickly and easily configure the Cloud Secure functionality without navigating into multiple pages. The new UX enhances the administrator experience through pre-populating the relevant settings, reusing the existing configurations, and guides the user with help sections. It also enables simpler way of configuring the cloud applications as Service Providers.
The Admin can choose to configure Cloud Secure in two ways:
•Completing all the basic configurations.
•Reusing the existing PCS configurations.
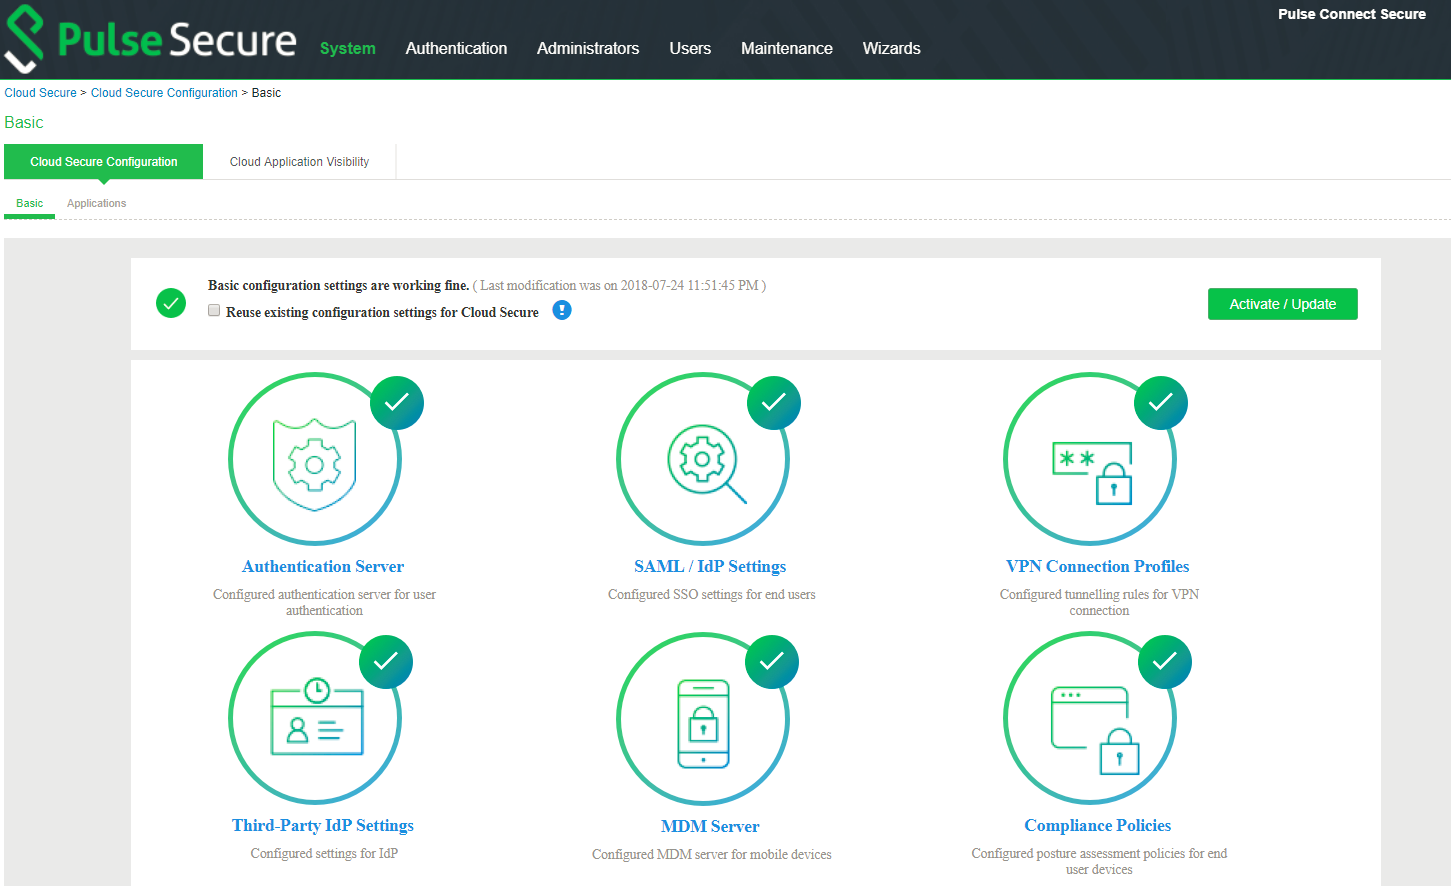
Basic Configurations
To launch the configuration page, select System > Cloud Secure > Cloud Secure Configuration.> Basic
Reusing existing PCS configurations
If the user has already configured the Role, Realms, Authentication server and so on. The existing configurations can be reused for Cloud Secure by enabling the Reuse existing configuration settings for Cloud Secure option from the Cloud Secure UX Home Screen. It simplifies the Cloud Secure configurations for the existing users as it requires only SAML/IdP settings to be configured.

Prerequisites
The following information should be available before configuring Pulse Connect Secure:
1.Authentication server details for authenticating end users.
2.Device Certificates and Trusted Server and Client CAs for establishing connections from clients, external servers (MDM, IdP) and for signing SAML assertions.
3. (Optional) Metadata file of Okta/PingOne/Microsoft AD FS, in case of Deployments with Third-Party IdP servers.
4.(Optional) MDM server details (Pulse Workspace/Airwatch/MobileIron) including the required certificates for VPN connection establishment.
Limitations
The following configurations should be done by navigating through respective pages:
•Clustering configurations
•Advanced configurations like multiple role mapping rules. Administrator must browse to respective pages on the UI for such configurations.
Basic Configurations (Mandatory)
The following configurations are mandatory to enable Cloud Secure:
•Configuring Authentication Servers
•Configuring SAML/IdP Settings
•Configuring VPN Connection Profiles
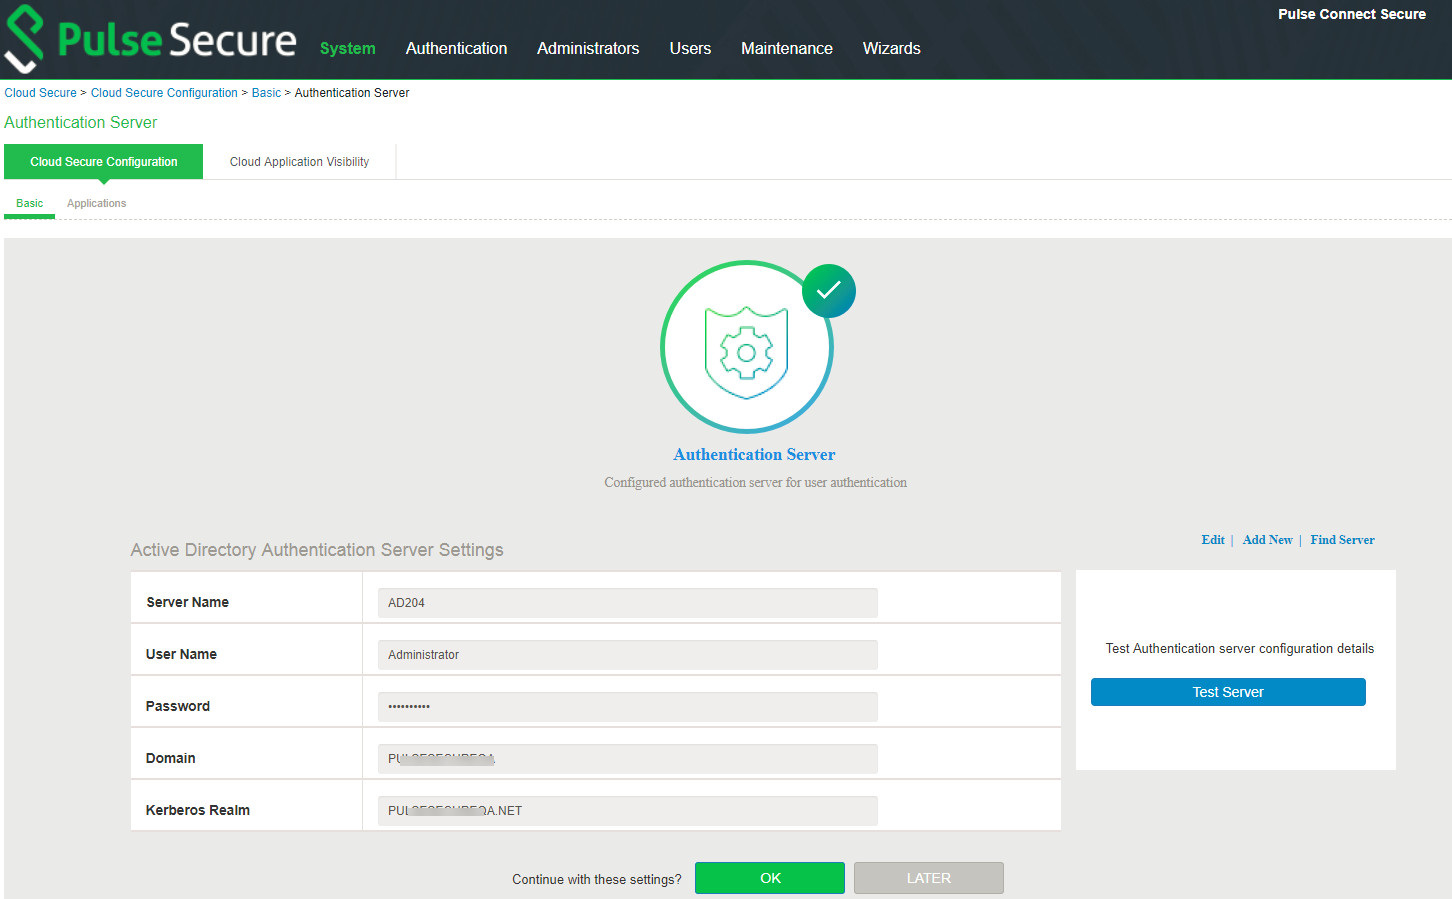
Configuring Authentication Servers
The user accesses the data and applications remotely when they are hosted in Cloud. The Administrators need to implement user access control for Cloud resources similar to the local resources that reside in the data center.
Cloud Secure supports many authentication mechanisms. It is suggested to use Certificate authentication for mobile devices, AD authentication for Desktops.
Cloud Secure UX allows configuring AD/LDAP authentication servers.
1.Select Authentication Servers.
2.Click Add New.
3.Select Server Type as Active Directory.
4.Enter Server Name.
5.Enter the administrator Username and Password for communicating with the AD server.
6.Enter Domain Name.
7.Enter Kerberos Realm.
8.Click OK.
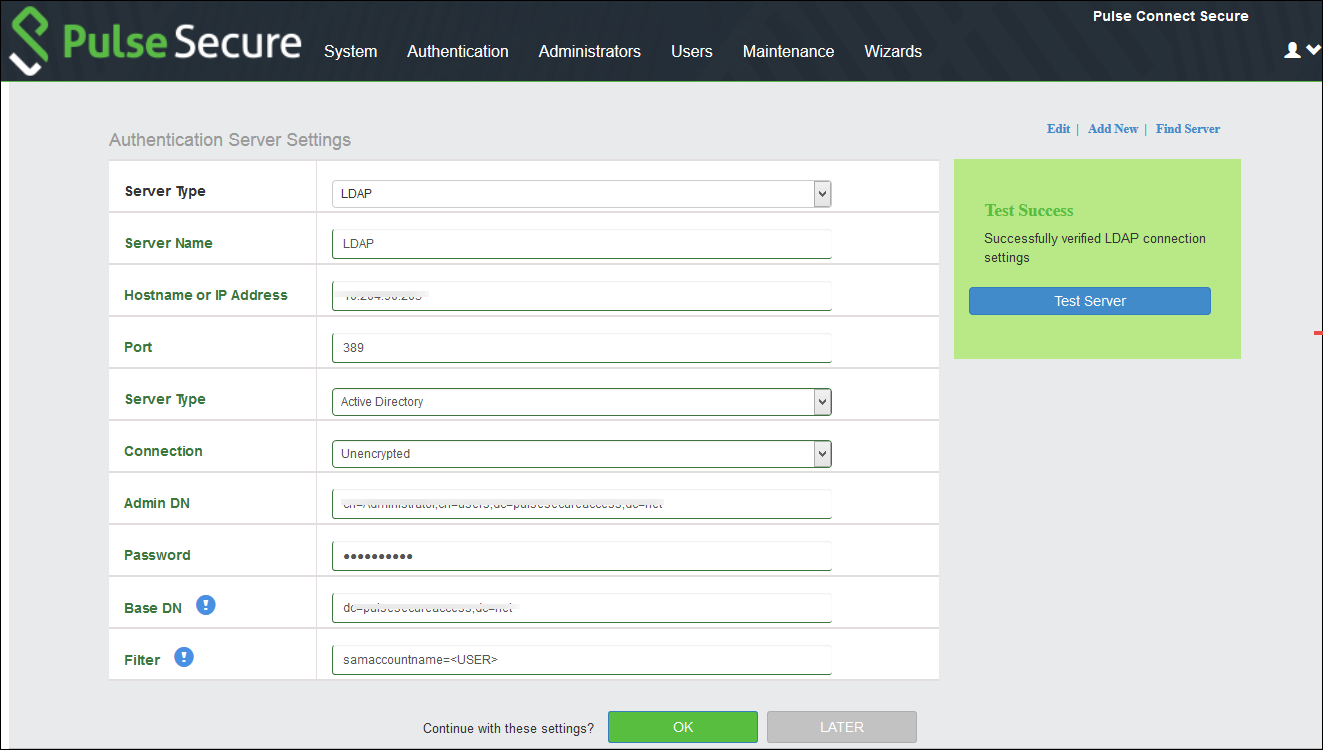
Office 365 Services need LDAP server to retrieve user attributes before sending SAML assertions.
To configure/add LDAP Authentication Server.
1.Select Authentication Servers.
2.Click Add New.
3.Select Server Type as LDAP.
4.Enter Server Name.
5.Enter Server IP Address in the Host Name Field.
6.Select appropriate server type from the dropdown.
7.Select appropriate Connection from the drop down.
8.Enter Admin DN details.
9.Enter Password.
10.Enter Base DN.
11.Click OK.
- Cloud Secure UX allows reusing existing AD/LDAP server configurations by selecting the already existing server from the Find Server option.
- Cloud Secure UX allows validation of AD/LDAP server connection and configuration details. “Test” option Validates connectivity, Domain reachability, Login credentials and so on.
- Cloud Secure UX allows to edit the Authentication Server settings.
Configuring SAML/IdP Settings
Cloud Secure supports SAML based SSO which allows authenticated users to access Cloud resources without entering credentials again. Pulse Connect Secure acts as Identity Provider and responds to all SAML requests from Cloud Services.
1.Select SAML Settings section:
2.Enter Host FQDN for SAML.
3.Enter Alternate Host FQDN for SAML.
4.Enter the Entity Id, that is SAML unique identifier for PCS. The Admin can also choose to update/populate this field using the Host FQDN.
5.Sign-in URL: Admin can either use an existing Sign-in URL or create a new URL. To create a Sign-in URL, select Create New and give New Sign in URL Name and select Sign-in Page.
Create New url option appears only if the Admin unchecks the Reuse existing configuration settings for Cloud Secure option in the configuration page.
6.Select Subject Name Format from the drop-down list.
7.Enter the subject name.
8.Set the Signature Algorithm to Sha-1 or Sha-256.
9.Click Yes to use the new redesigned end user pages while accessing Cloud Secure. This option is enabled by default. However, if you are upgrading the Cloud Secure from a previous release to the latest release, you must enable this option manually.
10.Upload a new signing certificate or select the certificate from the existing certificates. After uploading a new signing certificate, click on the Device Certificate link populated for configuring the certificate on network ports.
11.Click OK.
For most of the use cases Subject Name format is Email Address and Subject Name is <USERNAME>@<DOMAIN>.
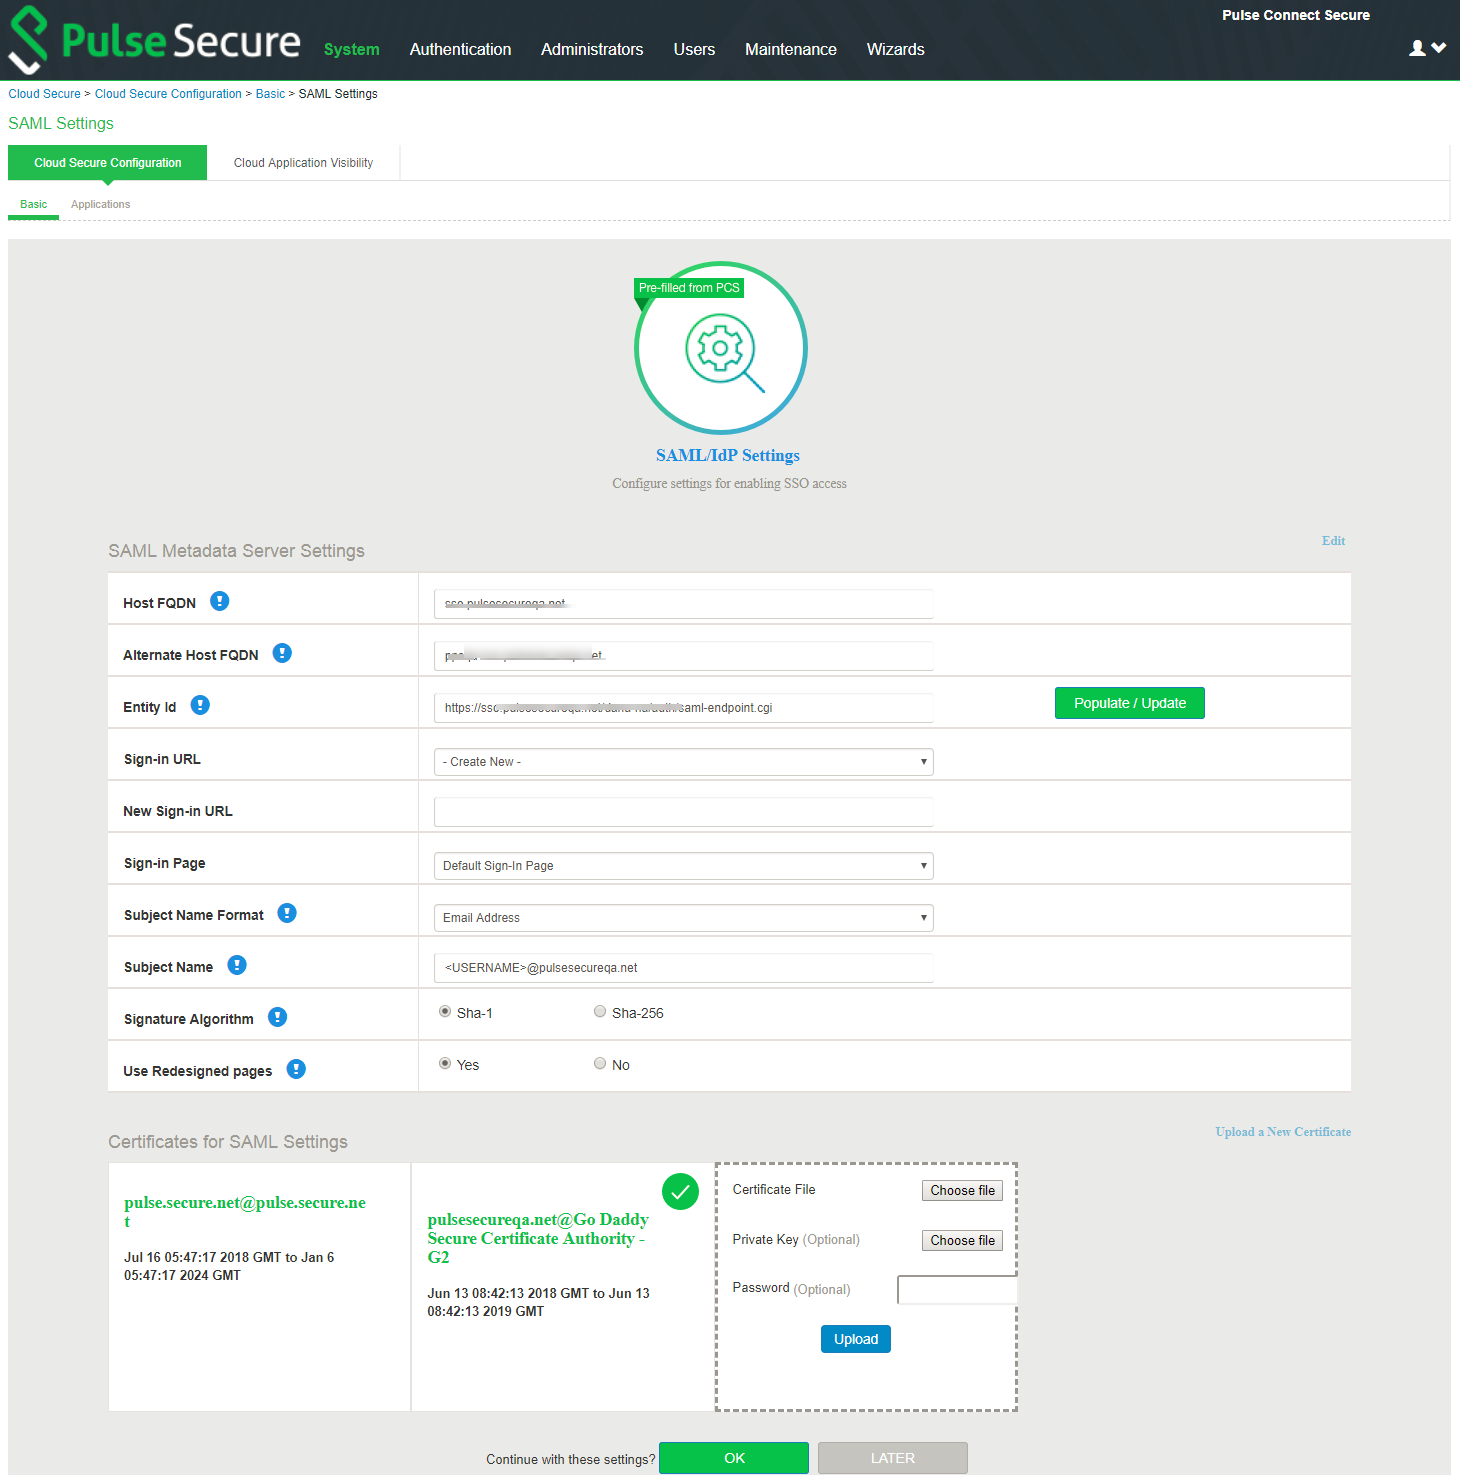
- For two arm deployments, Host FQDN for SAML is DNS Host name of External Port and Alternate Host FQDN is DNS Host name for Internal Port. Alternate Host FQDN for SAML configured on PCS is used to redirect user to IdP login URL provided in Service Provider. On public DNS servers, both Host FQDN and Alternate Host FQDN should resolve to External Port IP Address. In local DNS servers, Alternate Host FQDN should resolve to Internal Port IP Address.
- For one arm deployments, Host FQDN is host name of Network Port and Alternate Host FQDN is host name of Virtual Port. On public DNS servers, both Host FQDN and Alternate Host FQDN should resolve to Network Port IP Address. In local DNS servers, Alternate Host FQDN should resolve to Virtual Port IP Address.
Configuring VPN Connection Profiles
VPN Connection Profiles are used to assign tunneling IP’s to client machines using DHCP servers or Global Address Pools during VPN tunnel establishment. You can also configure a split tunneling policy to send only the authentication, authorization, and compliance check traffic to PCS and application data directly to the cloud. Tunneled Resources list captures list of resources, which needs to be tunneled through PCS. This list is a combination of resources IP address and FQDN host names.
Select VPN Connection Profiles section:
1.Enter the Internal IP Address/subnet and Internal DNS Server under Tunneled Resource List and click Add.
2.Under IP Address assignment type:
•Select DHCP and give DHCP Server’s IP address and click Add or
•Select Manual and give IP Address pool and click Add.
3.Click OK.
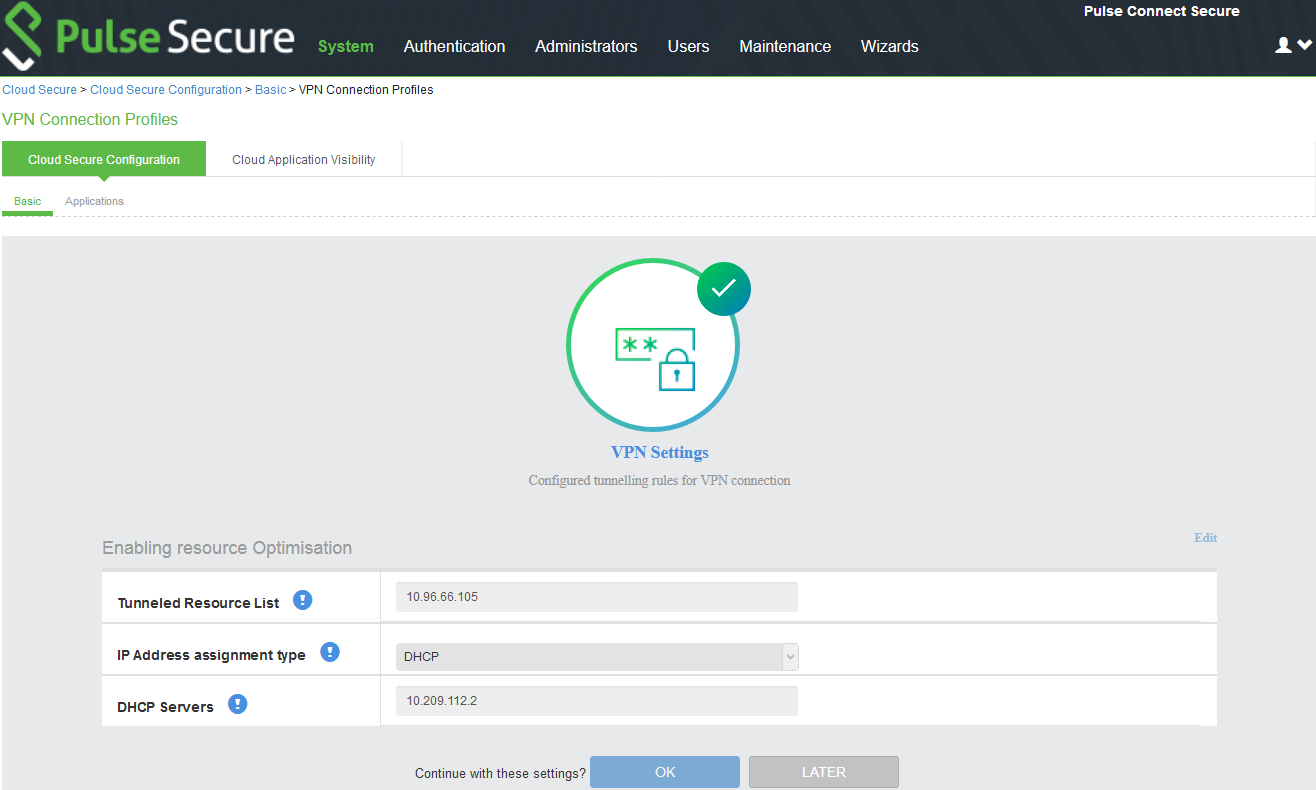
Internal IP Address or FQDN hostnames needs to be added in the Tunneled Resource List. This enables SSO access to the cloud resource by leveraging re-use VPN functionality when client machine having VPN tunnel accesses the cloud resource.
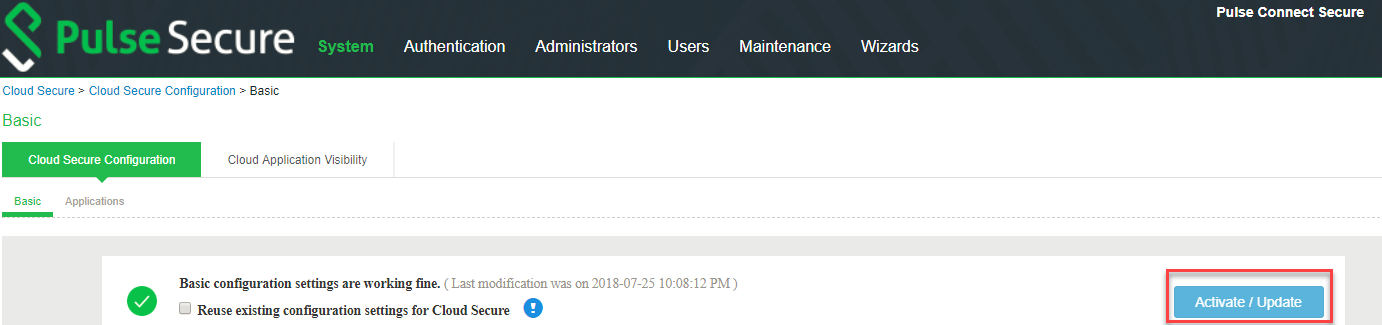
The following screen is displayed after completing the basic configurations on PCS. Click Activate/Update to enable Cloud Secure. After activating, the administrator will be redirected to Applications page. Click Open to go back to basic configuration page.
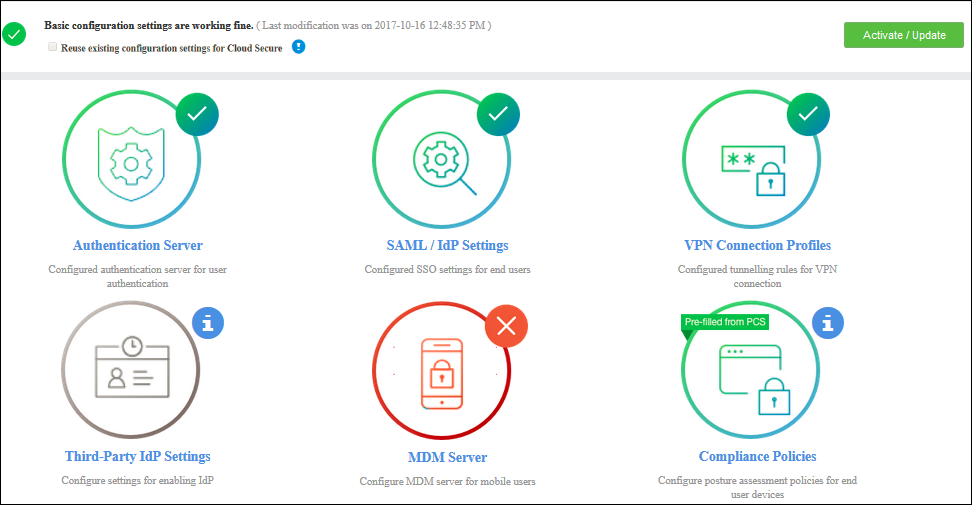
The icons in the configuration page indicate the status of configuration.
•Green Tick mark refers that this section is configured correctly.
•If the configuration section is in grey color, it indicates that the section is not configured.
•Red cross mark refers there is a connection problem with Authentication/MDM server.
•Pre-filled from PCS refers that the Admin can reuse the existing configurations from PCS.
•Advanced Configurations (Optional)
The following configurations are optional.
•Configuring Third-Party IdP Settings
•Configuring Compliance Policies
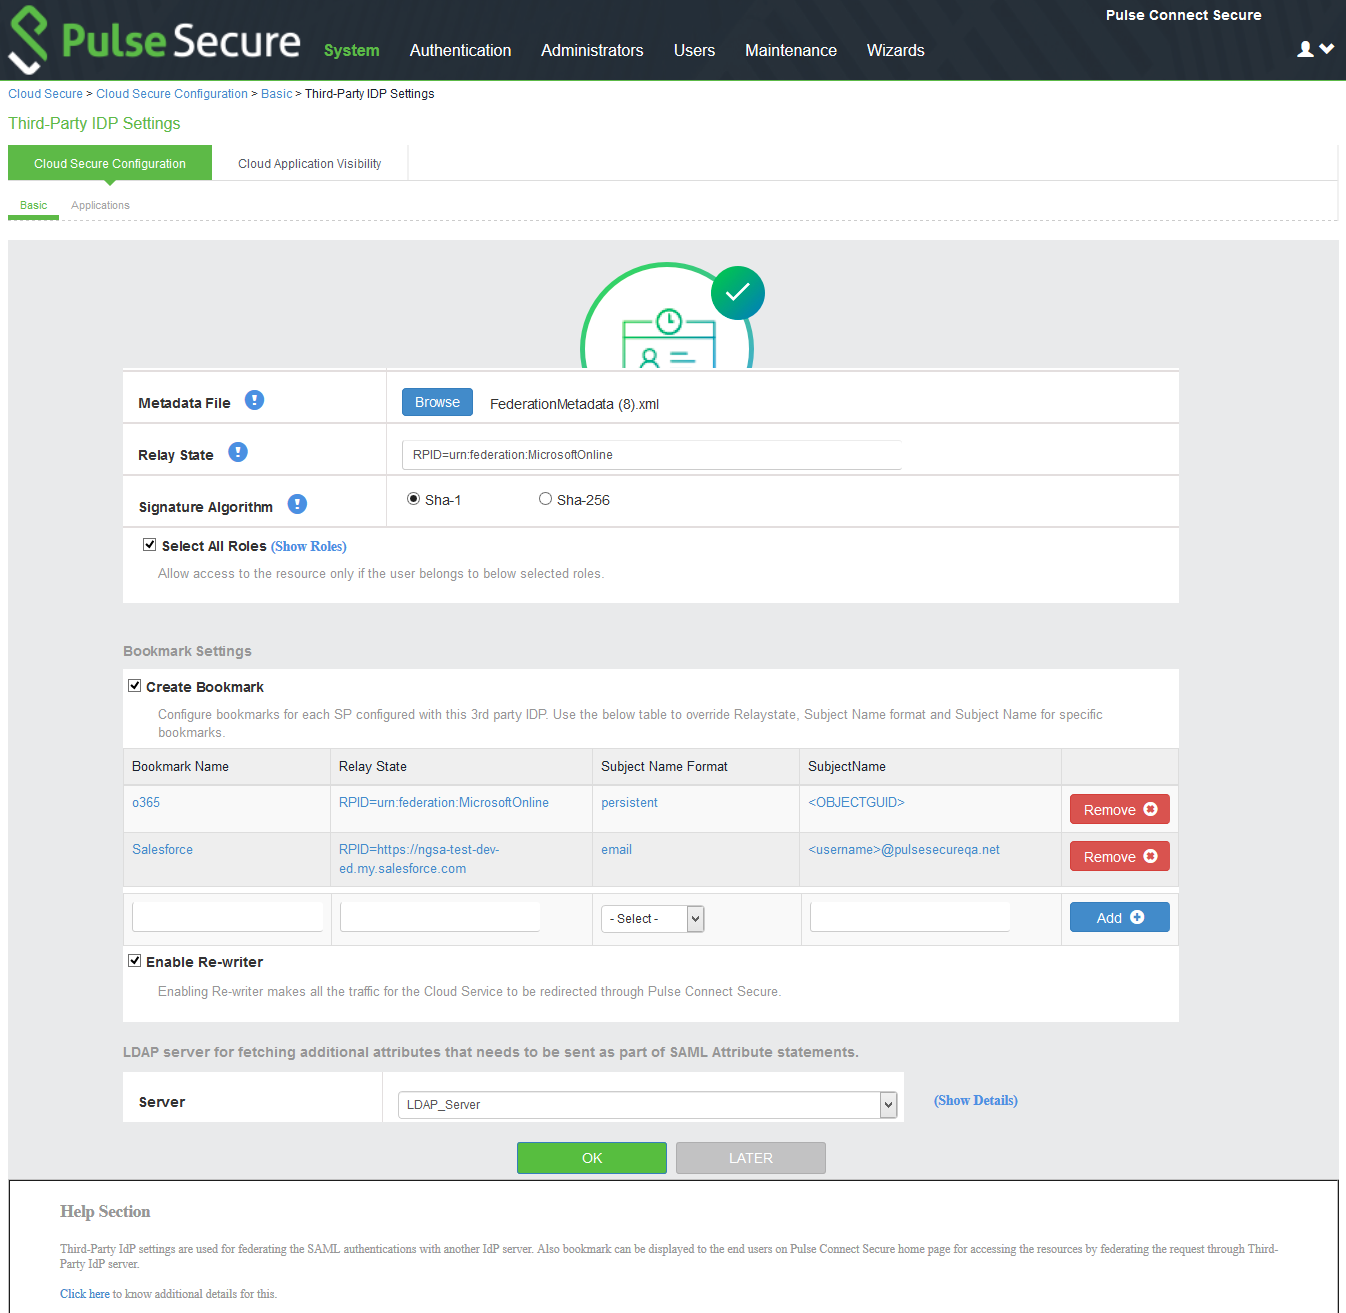
Configuring Third-Party IdP Settings
SAML allows cloud services to delegate user authentication to IdP. The IdP can also delegate the authentication to another IdP, which is called IdP federation. Cloud Secure supports IdP federation with PingOne, Okta, and Microsoft AD FS.
ADFS as Third-Party IdP
To add ADFS as third-party IdP provider:
1.Click Add New and select the Third-party IdP as Microsoft ADFS
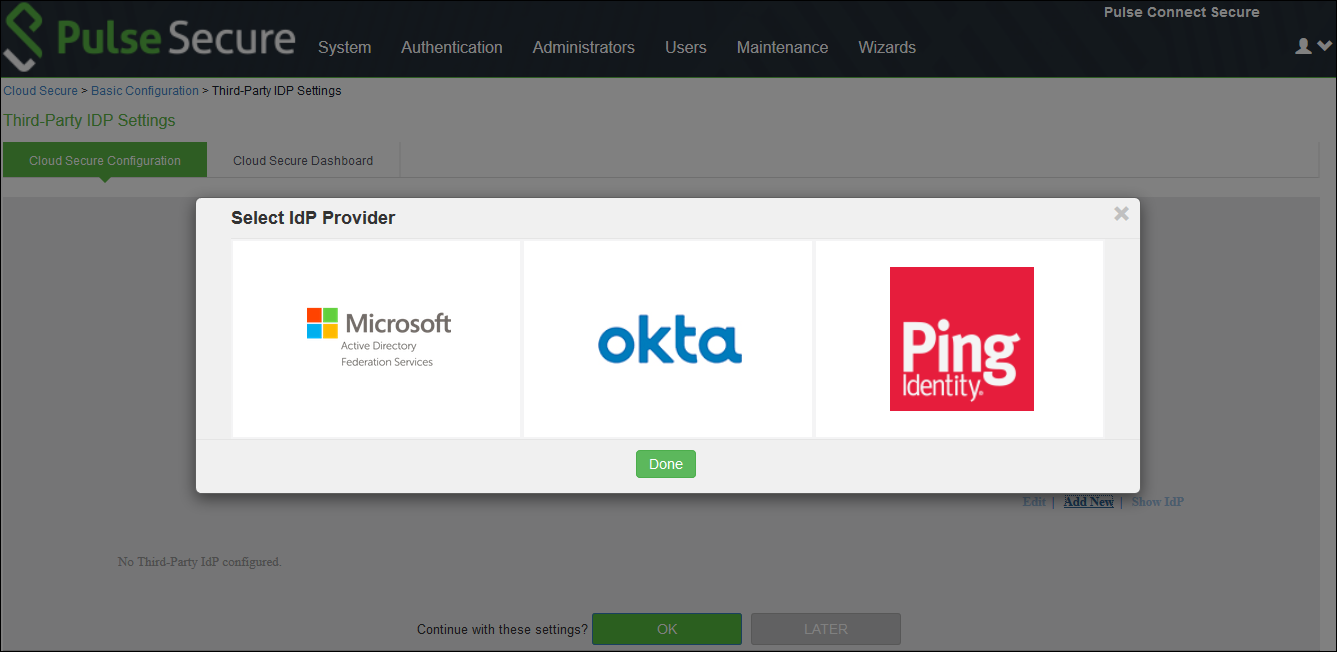
2.Click Done
3.Under User Identity, select the Subject Name format
4.Enter the Subject Name
5.Click Browse and upload the metadata file.
6.Enter the relay state.
7.Set the signature algorithm to Sha-1 or Sha-256.
8.Select the desired roles.
9.Under Bookmark settings, enable the checkbox for Create Bookmark to configure bookmarks for each SP configured with the third-party IDP.
•You can configure multiple bookmarks for each SP configured with the Microsoft Active Directory Federation Service (ADFS) server.
•Enter the bookmark name.
•Enter the relay state.
•Enter the subject name format.
•Enter the subject name.
•Click Add.
10.Enable the checkbox Enable Re-writer to redirect all the Cloud Secure traffic through PCS.
11.Configure the LDAP server for fetching the additional details.
12.Click OK.
PingOne/Okta as Third-Party IdP
Under Third-Party IdP Settings section:
1.Click Add New and select the Third-Party IdP (PingOne/Okta).
2.Click Done.
3.Enter the Subject Name Format.
4.Enter the Subject Name
5.Click Browse and upload the metadata file (UX allows configuring Third party IdPs only through metadata file).
6.Set the signature algorithm to Sha-1 or Sha-256.
7.Select the desired roles.
8.Click OK.
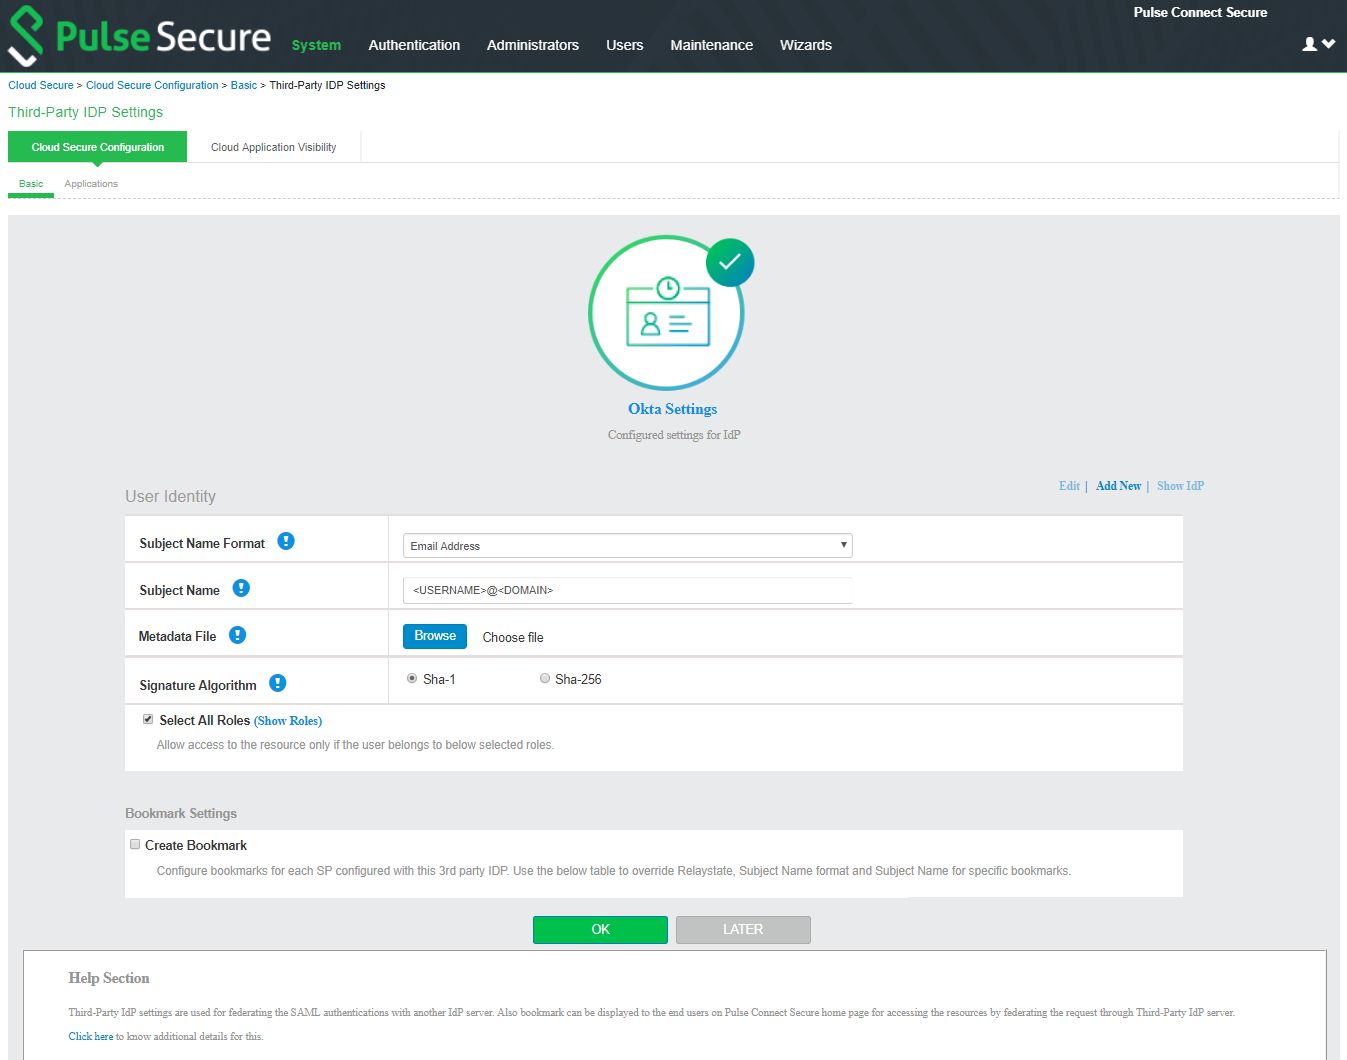
Click Show IdP to view the details of the configured Third-Party IdP servers.
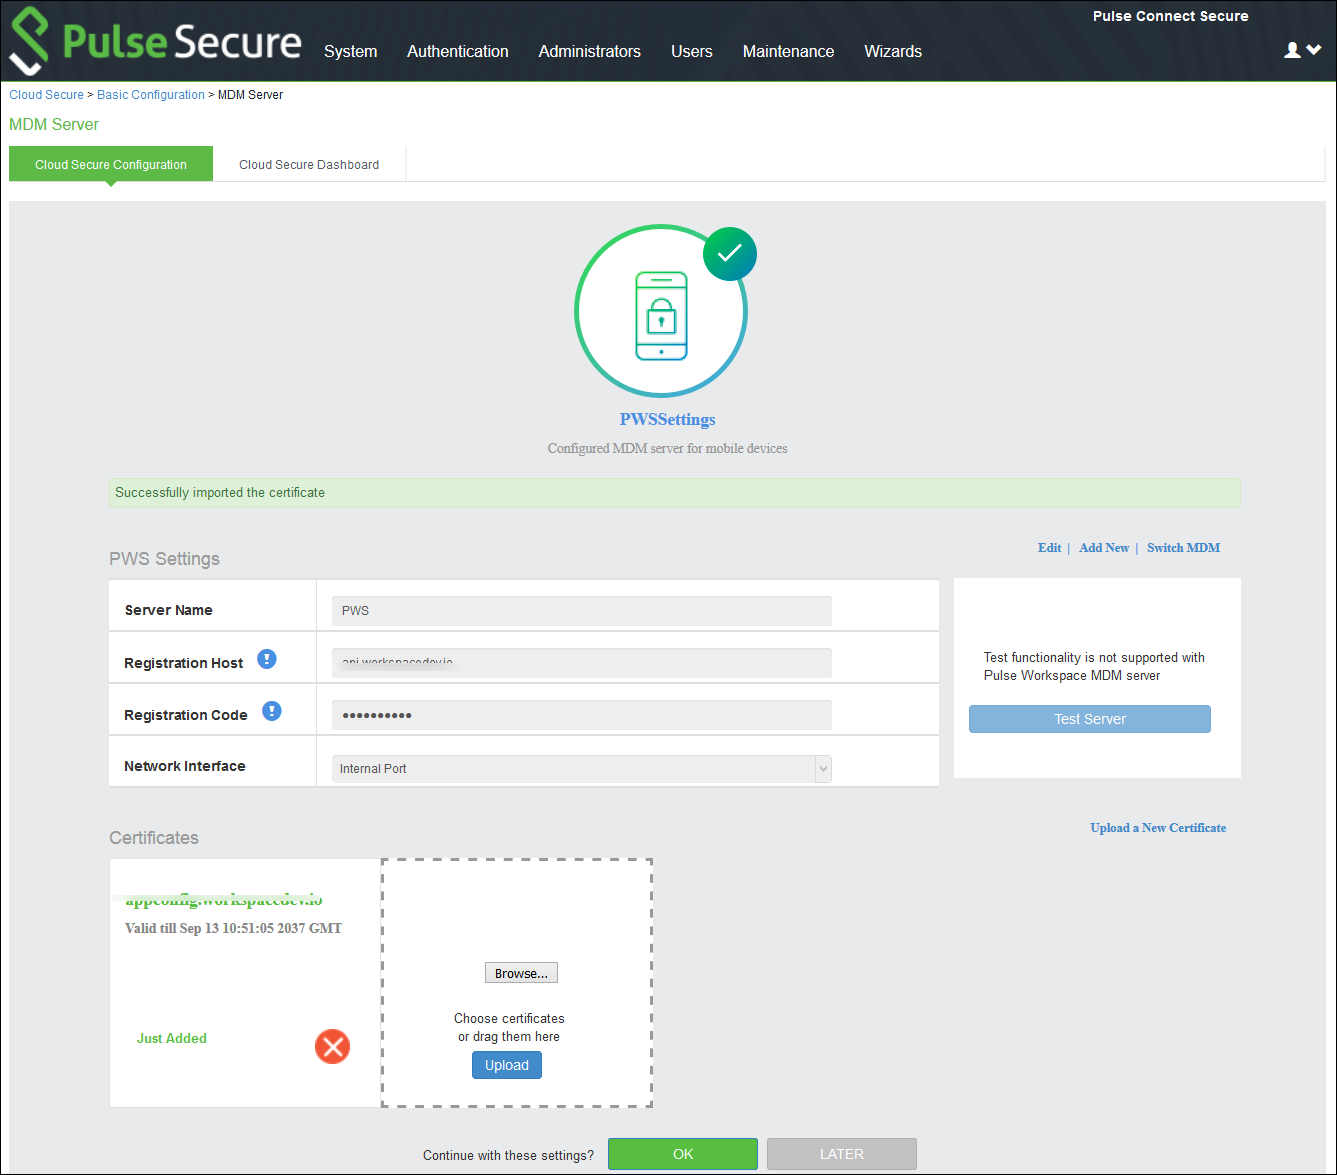
Configuring MDM Settings
Mobile Device Management (MDM) Server is used to perform compliance check for managed mobile devices. The authentication is based on the certificate installed on the mobile device when the user enrolls the device with the MDM.
Cloud Secure Solution integrates with multiple MDM servers (Pulse Workspace, AirWatch, and MobileIron) for mobile device management and compliance checks.
Select MDM Server section:
1.Click Add New and select the PWS as MDM server and click Done.
2.Enter Server name.
3.Enter Registration host and Registration code details. See Select the Appliances tab. Click Add Appliance and provide a name to register Pulse Connect Secure /Pulse Policy Secure with Pulse One. Admin will be provided with Registration Host and Registration code details to be configured in PCS/ PPS..of Configuring Pulse Workspace.
4.Click Browse and upload a PWS VPN certificate. See VPN Cert of Pulse Workspace Configuration.
5.Click OK.
To configure Airwatch/MobileIron MDM Server:
1.Under MDM Server, click Add New and select Airwatch/MobileIron as MDM server.
2.Enter Server Name.
3.Enter Server URL.
4.Enter Viewer URL.
5.Enter Username and password for communicating with the MDM server.
6.Enter Tenant Code [Not Applicable for MobileIron].
7.Click Browse and upload MDM certificate.
8.Click OK.
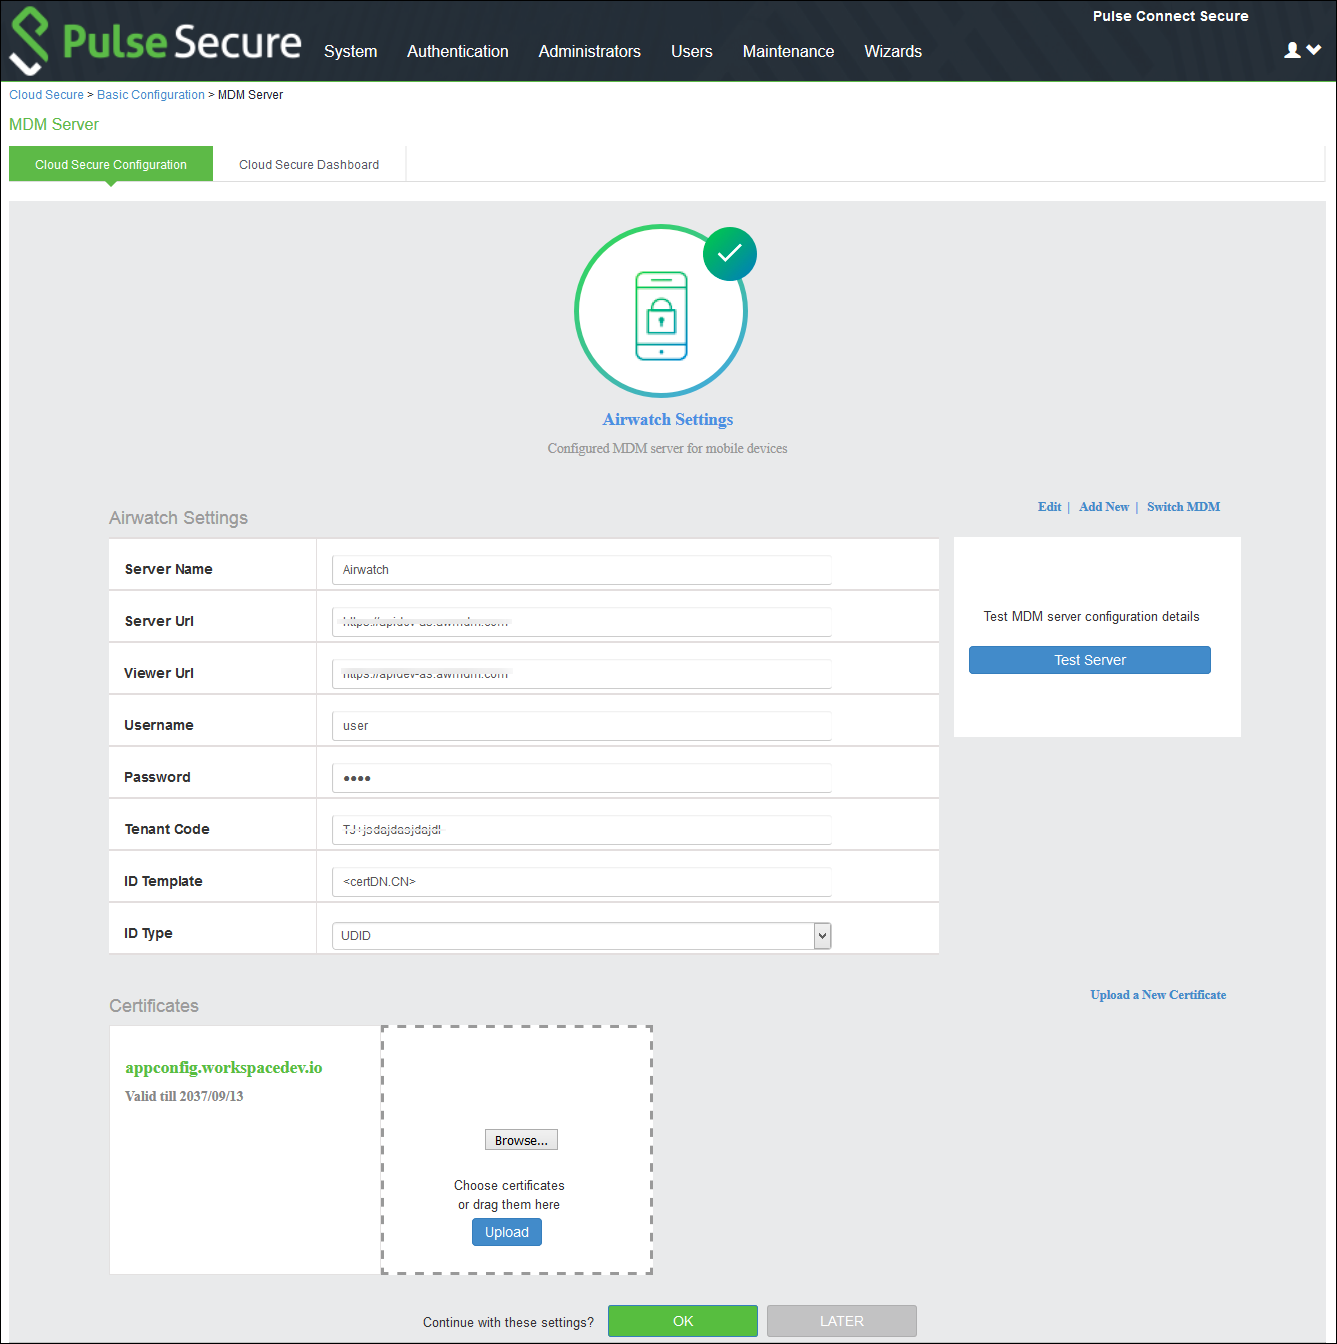
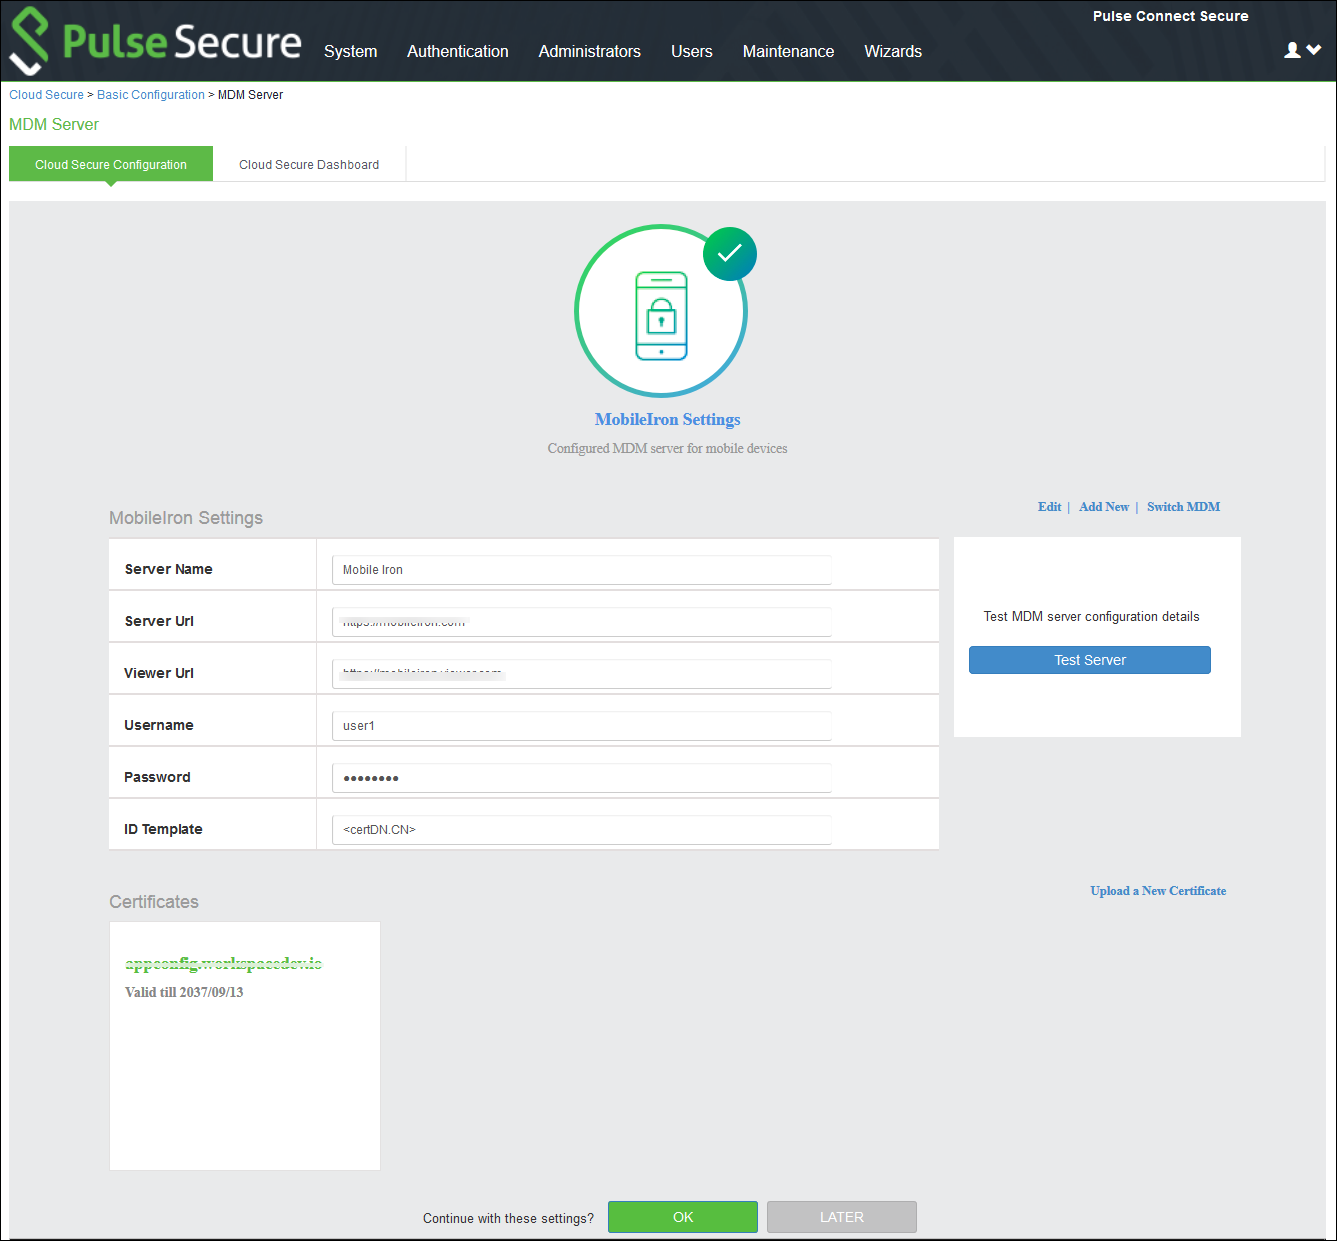
- Cloud Secure UX allows validating the configurations and connections. “Test Server” verifies the connection between PCS and MDM server.
- Cloud Secure UX allows using the existing MDM configuration in PCS. Select Switch MDM to switch between already configured MDM servers or to add a new MDM server.
Configuring Compliance Policies
Cloud Secure supports compliance for Windows and Macintosh desktops/laptops through Host Checking capabilities and for mobile devices through MDM servers. The mobile compliance policies are based on device attributes retrieved from MDM server.
Select Compliance Policies section:
To configure the compliance policies for Desktops.
1.Under Compliance Policies > Create a New Desktop Compliance Policy.
Enter Policy Name. Select the OS and Compliance check from the respective drop down and specify the details.
2.Click ADD.
3.Click OK.
Cloud Secure UX allows reusing existing Host Checker Policies by enabling the checkbox from the pre-filled compliance policies. For desktops, only Antivirus, Firewall, and Process Host Checker policies are supported.
To configure the compliance policies for Mobiles:
1.Under Compliance Policies > Edit Mobile Compliance settings. Select the OS and Compliance check from the respective drop down and specify the details.
2.Click ADD.
3.Click OK.

Multiple Attributes can be configured for Compliance Checks. Admin can also create custom expression for mobile compliance checks in the Expression Field manually.
The mobile compliance policies are based on device attributes retrieved from PWS. Refer to Configuring Pulse Workspace for Mobile Compliance Policies for understanding how the compliance policies are retrieved/evaluated in PWS.
4.Click Activate/Update after the advanced configurations are completed. After activating, the administrator will be redirected to Applications page. Click Basic to go back to basic configuration page.
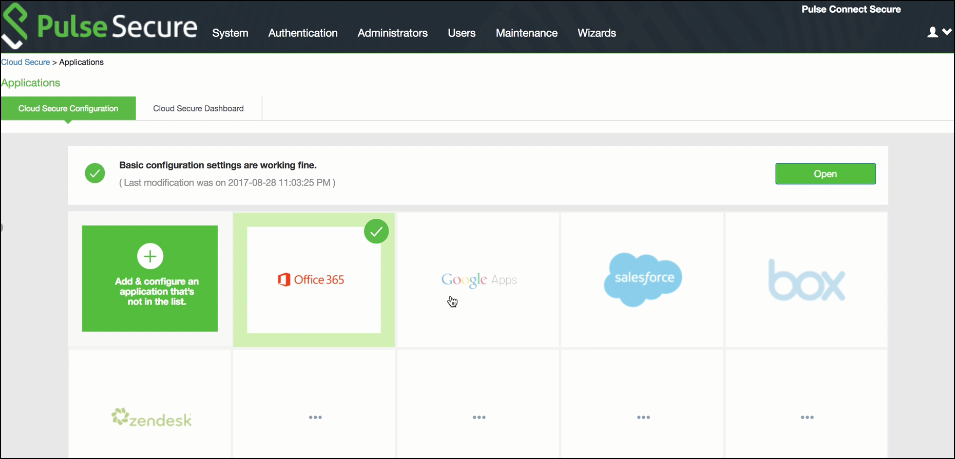
Configuring Applications
The Admin can configure Cloud Applications as Peer SP once the basic configurations are completed and activated. Once the basic configurations are activated, Admin can click Applications tab to go to Applications configuration page. The widely used applications (O365, Google Apps, salesforce, box, and Zendesk) are available by default and come with pre-populated application settings for ease of configuration. The Administrator can also choose to add new applications by clicking + Add & configure an application that is not in the list.
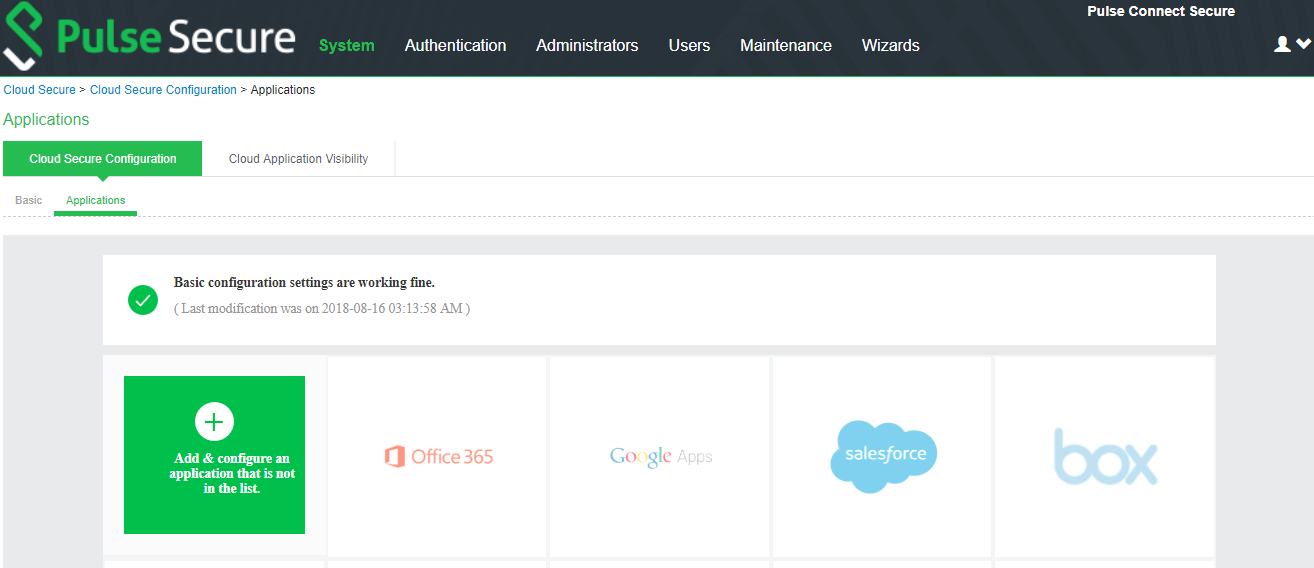
To configure O365 application:
1.Click the Office 365 icon to configure the application.
2.Select Enable Directory Server lookup to enable LDAP server for fetching additional attributes. If the LDAP server is already configured the details will be pre-populated. Admin also has a provision to create a new LDAP server in the same section.
3.Under Cloud Application Settings:
•Enter the application name.
•Click Browse and select the application icon.
•Enter the Subject Name Format.
•Enter the Subject Name.
•Under Metadata details, the metadata file is uploaded from a remote URL by default. The Admin can also choose to upload the metadata file from a local file or through manual configuration by entering the Entity ID and Assertion Consumer Service URL.
•(Optional) Set Create Bookmark to Yes to support IdP initiated SSO.
•Set the Force Authentication Behaviour to Ignore Re-Authentication.
•Set the Signature Algorithm to Sha-1 or Sha-256.
4.Under Enhanced Client or Proxy Profile (ECP) Settings.
•Enable Detect duplicate ECP request to detect and stop from sending any duplicate ECP requests to backend AD server.
•Enter the user threshold.
•Enter the blocking time in minutes.
5.Under SAML Customization & User Access settings, Assign the application to applicable roles.
6.Click OK.
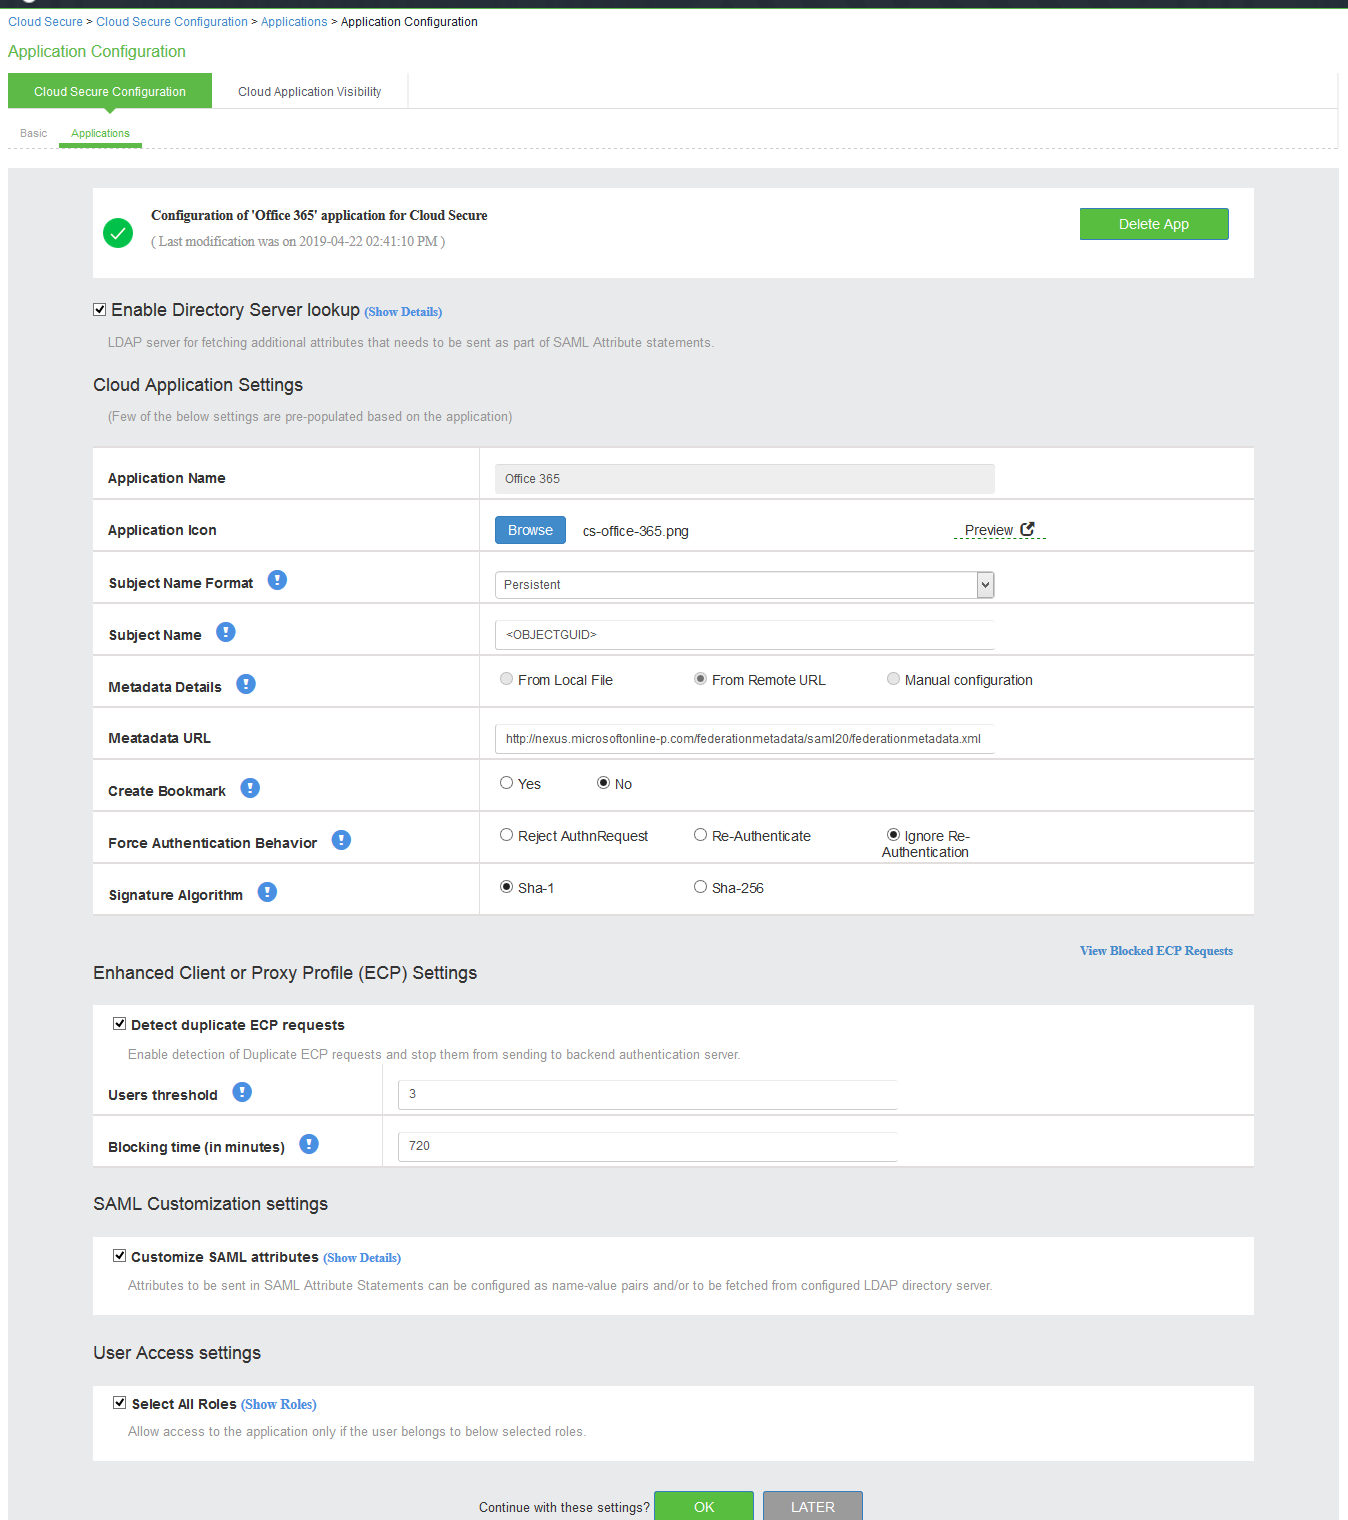
The following screen with a green tick mark on the Office 365 application is displayed after a successful configuration.
The Administrator can also choose to delete an application using the Delete App option on the Application Configuration page.
Configuring IdP Initiated Single Logout
With Single Sign On service, users with role-based access are able to log into and access all SP provided services. The Single Logout feature allows the administrator to deny user access to services and initiate Single Logout in the following scenarios:
•machine goes out of compliance during a session.
•session times out.
•administrator deletes the session in PCS configured as Identity Provider (IdP).
•user logs out from PCS (configured as IdP) landing page.
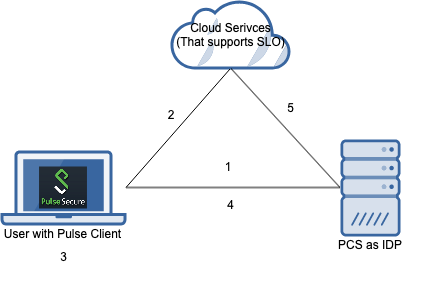
- When Single Logout is initiated by PCS configured as IdP, all the SPs linked to the session will be sent SLO requests.
- The IdP session is not affected by the SP’s logout.
- IdP SAML session timeout can be either role-based or configured via Identity Provider page.
- Maximum timeout of SAML sessions could be increased, so that it matches with or be greater than the SP’s Max Session timeout to get a seamless experience.
Prerequisites
•SP should be configured for Single Logout option even before uploading the SP's metadata to IdP. Otherwise, the metadata will not have the Single Logout details.
•If the user is using the same SP with multiple devices, it is recommended to have multi-user session enabled in PCS.
Scenario 1: When the machine goes out of compliance while user is accessing SPs
1.Pulse Client establishes connection to PCS (as IdP) with full access or partial access.
2.From the same machine, user accesses SPs that support SLO.
3.After some time, Pulse Client goes out of compliance.
4.Pulse Client reports the compliance check in server and switches to a remediate role that does not have access to SPs.
5.PCS (as IdP) sends an SLO to SP's Logout URL and there by user needs to SSO again to access the resource.
Since the Remediation role do not have access to the SPs, SSO will be denied and hence the user will be denied access.
Scenario 2: When the user session times out
1.Pulse Client establishes connection to PCS (as IdP) with full access.
2.From the same machine, user accesses SPs that support SLO.
3.User session times out.
4.PCS deletes the user session.
5.PCS (as IdP) sends an SLO to all the SPs that are associated with the user session.
Scenario 3: When the administrator deletes the user session from the PCS (as IdP) active user page
1.Pulse Client establishes connection to PCS (as IdP) with full access.
2.From the same machine, user accesses SPs that support SLO.
3.User gets access to SP through SSO.
4.Administrator deletes the user session from the active user's page.
5.PCS (as IdP) sends an SLO to all the SPs that are associated with the user session.
Scenario 4: When the user disconnects from PCS (as IdP)
1.Pulse Client establishes connection to PCS (as IdP ) with full access.
2.From the same machine, user accesses SPs that support SLO.
3.User disconnects the Pulse session.
4.PCS deletes the user session.
5.PCS (as IdP) sends an SLO to all the SPs that are associated with the user session.
After SLO is sent, the response is handled and logged in user access log and policy tracing.
Configuring Single Logout
The administrator can configure the Single Logout option for the applications.
To configure Single Logout:
1.Select Cloud Secure > Cloud Secure Configuration > Applications.
2.Click the application icon to configure the application.
3.In the Single Logout Settings section, select the Enable Single Logout option.
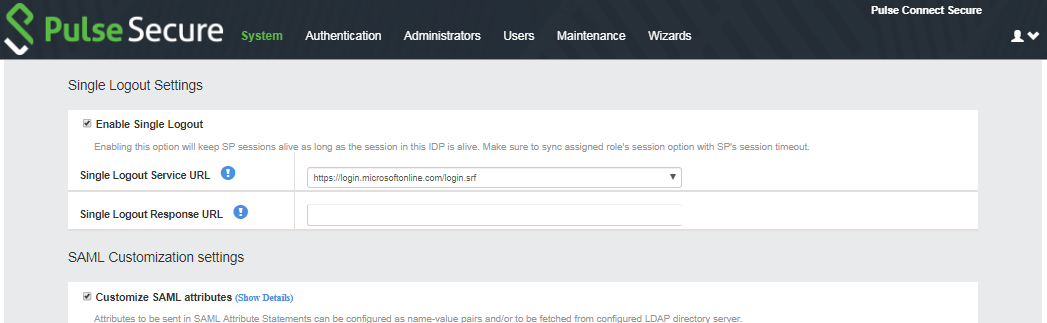
4.Use one of the following to configure Single Logout:
•Metadata upload from local file - Administrator needs to configure SP for both SAML SSO and SLO. The metadata from SP needs to be provided to PCS which is acting as IDP.
•Manual configuration - Administrator needs to enter the SLO URL of SP manually along with other SSO configurations.
•Using Remote URL - Administrator needs to configure SP for both SAML SSO and SLO. The SP’s metadata will be parsed from the online URL directly. The SLO details will be automatically populated.
End User Workflow
Browser based flow (SP initiated)
In the SP initiated case, when the user logs into an SP by authenticating with PCS, the user is allowed SSO to other SPs from the same browser. If the user logs out of the SP, then SLO is sent to all other SPs associated with the IdP.
Browser based flow (IdP initiated)
In the IdP initiated case, it is bookmark flow. This has two scenarios - with rewriter enabled and without rewriter enabled. In both the cases, when the user session gets logged out, the SLO is sent to all the SPs in which it was already logged in.
If the bookmark is created from 3rd Party IdP page, then this SLO is not applicable.
Single user signed in with multiple devices with multi-users session enabled in PCS
Multiuser session is enabled in Users > User Roles > RoleName > General > Session Options. If multiuser session is not enabled for SLO, then user can use only one device/session.
Pulse Desktop based flow
User can perform Single Sign on using Pulse Desktop client. When Pulse Desktop client is connected to PCS as IdP, users can access any SP for which the role has access. The user can sign into SP directly as long as the connection exists. If the user logs out from Pulse Desktop client, then an SLO will be sent to all those SPs to which SSO was granted there by clearing all the SPs associated with the PCS SSO session.
Single user signed in with multiple devices without multi-users session enabled in PCS
In the scenario where user performs multiple logins with a single user session, only one device can be used by the user at any given time. The user cannot use multiple devices with the same user name. Because, when the user tries to use another device, when SSO happens on the 2nd device, the first device will be sent an SLO. which means, the session is teared down and re-created in PCS. So, only one device can be active for one user session at any given point of time.
Single user session in PCS and multiple logins from a single device
Through Pulse Desktop client connection, the user can sign into same SPs from different browsers or apps as many times as the SSO is in place. But, if the user tries to use two different browsers or use a browser-based login and another app-based login without Pulse Desktop client, then only one will be given access at any given point of time.
By default, SLO is not enabled for any new peer SPs. Administrator has to manually configure it.
Configuring Pulse Policy Secure for On-Premise/Location Awareness
Cloud service SSO for On-Premise users is achieved by sharing PPS session information to PCS and using this imported IF-MAP session information to generate SAML response. Configure Pulse Policy Secure as Federation Client and associate it to a Federation Server.
PPS retrieves mobile device attributes from MDM server and uses it for compliance assessments whereas in desktops, native Host Checker is used for compliance checks.
This section describes the following tasks:
•Configuring Pulse Policy Secure as IF-MAP Client
•Configuring Pulse Policy Secure as IF-MAP Federation Server
•Configuring Pulse Connect Secure as IF-MAP Client
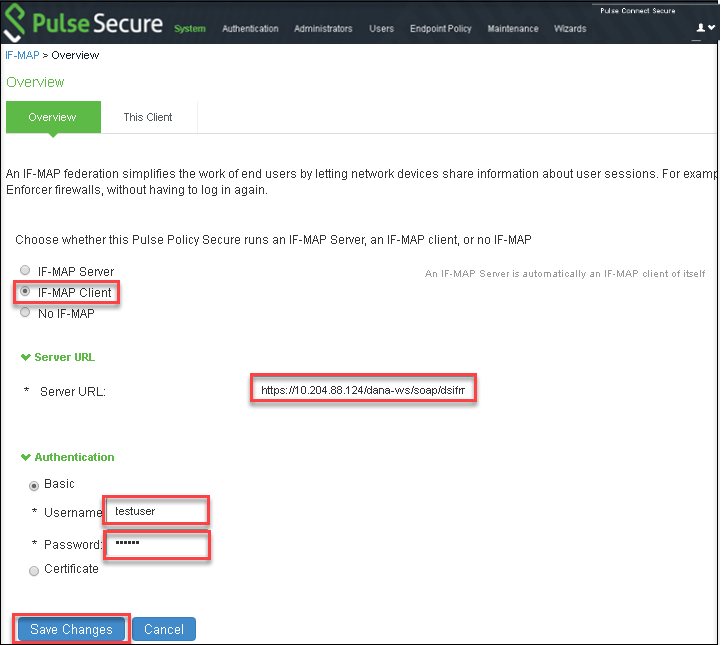
Configuring Pulse Policy Secure as IF-MAP Client
Follow below steps to configure Pulse Policy Secure as Federation Client, enable 802.1x and configure MDM Server:
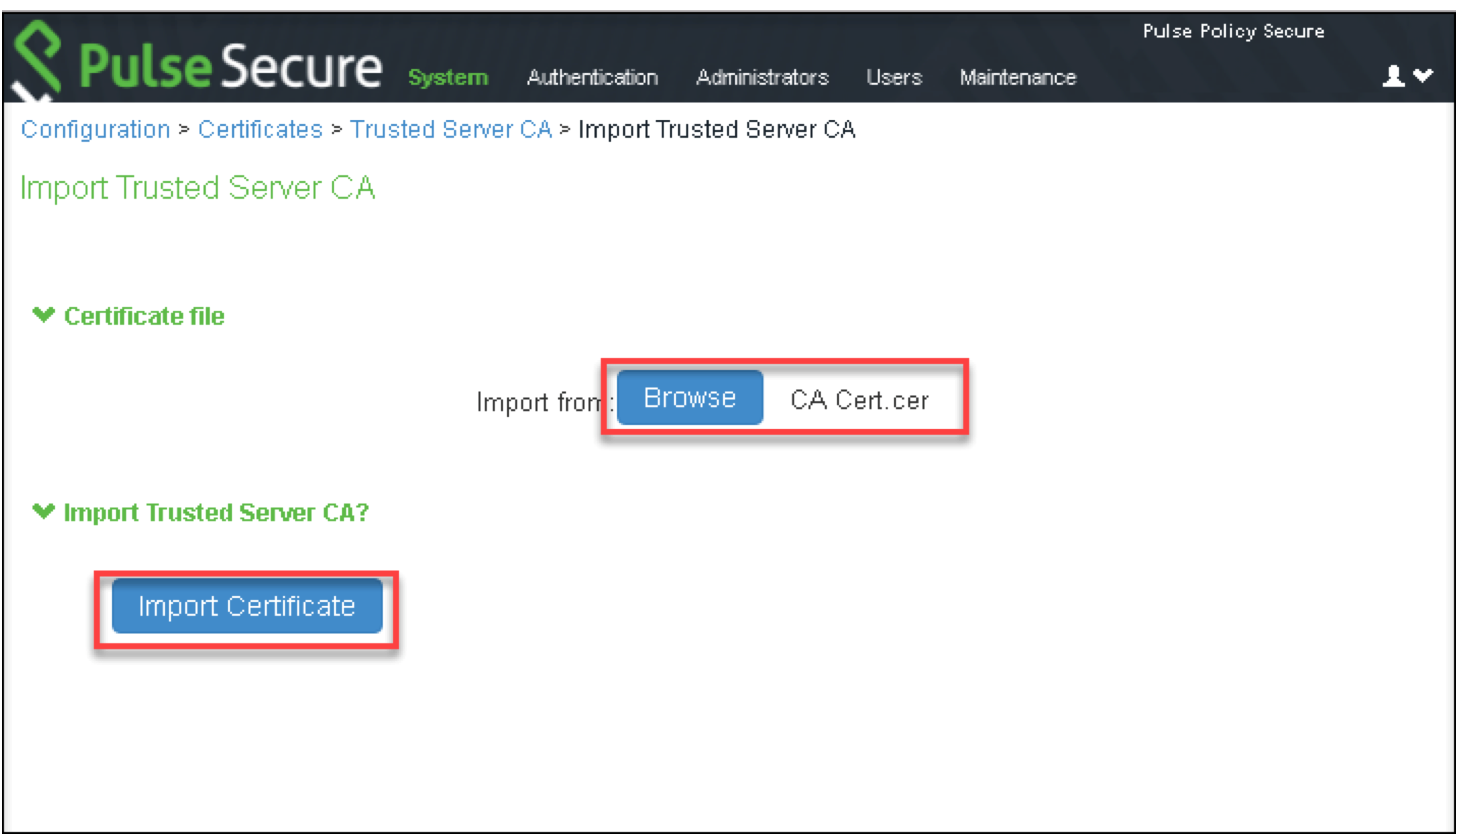
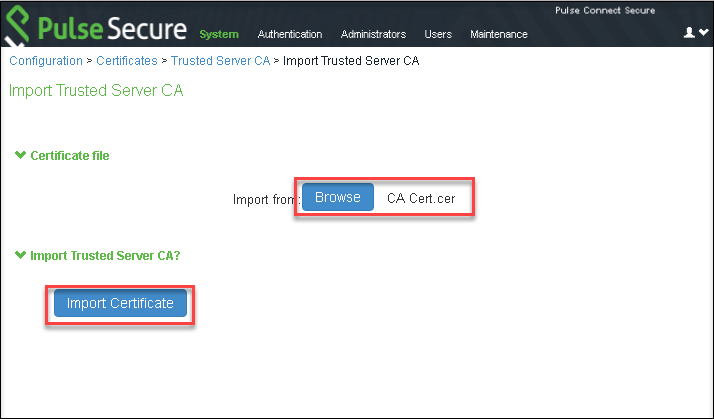
1.Log into Pulse Policy Secure admin console Environment Details.
2.Navigate to System > Configuration > Certificates > Trusted Server CAs.
3.Click Import Trusted Server CA….
4.Click Browse and select the CA certificate file.
5.Click Import Certificate.
6.Navigate to System > If-MAP Federation > Overview.
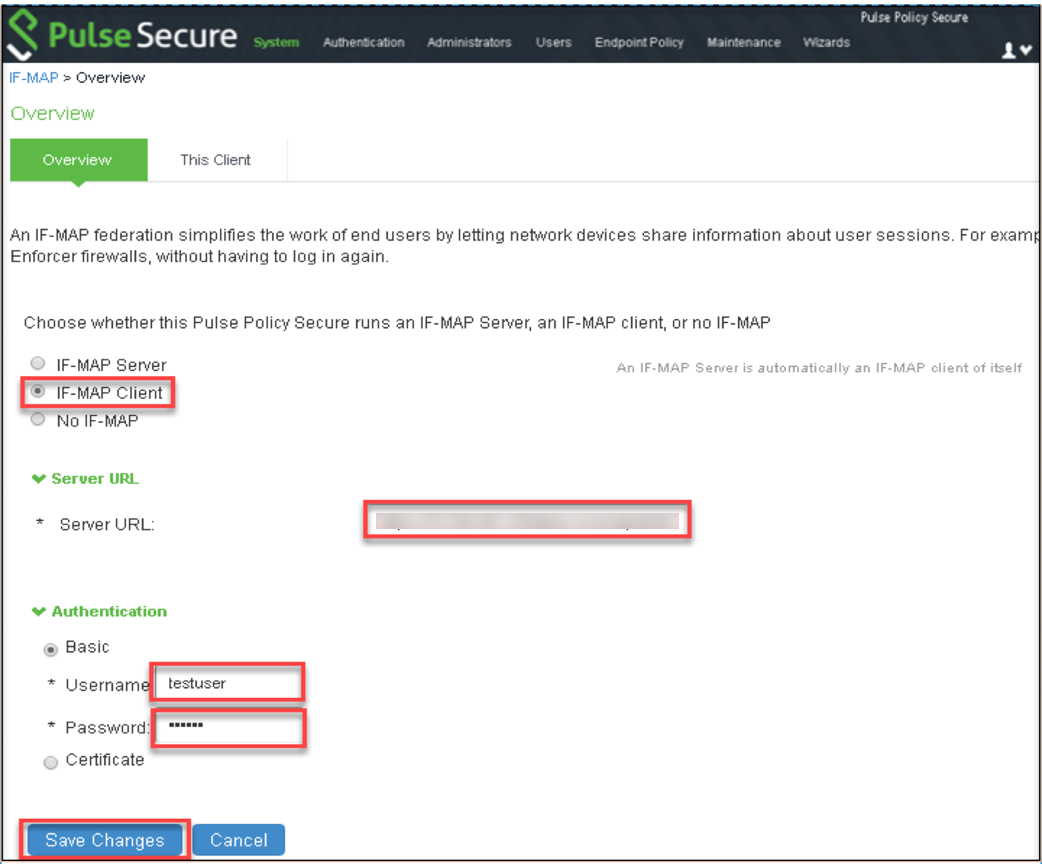
7.Select IF-MAP Client and provide the following details:
•Under Server URL, provide IP address of Federation Server.
•Select Basic under Authentication and provide same Username and Password provided in Step 4 of IF-MAP.
•Click Save Changes.
8.Navigate to Endpoint Policy > Network Access > RADIUS Client.
9.Click ‘New RADIUS Client…’ and provide the following details:
•Enter Name.
•Enter the IP Address of RADIUS Client.
•Enter Shared Secret.
•Select Make/Model.
•Select Location Group.
•Select Support Disconnect Messages and/or Support CoA Messages (Optional)
•Enter the port value for dynamic authorization.
•Click Save Changes.

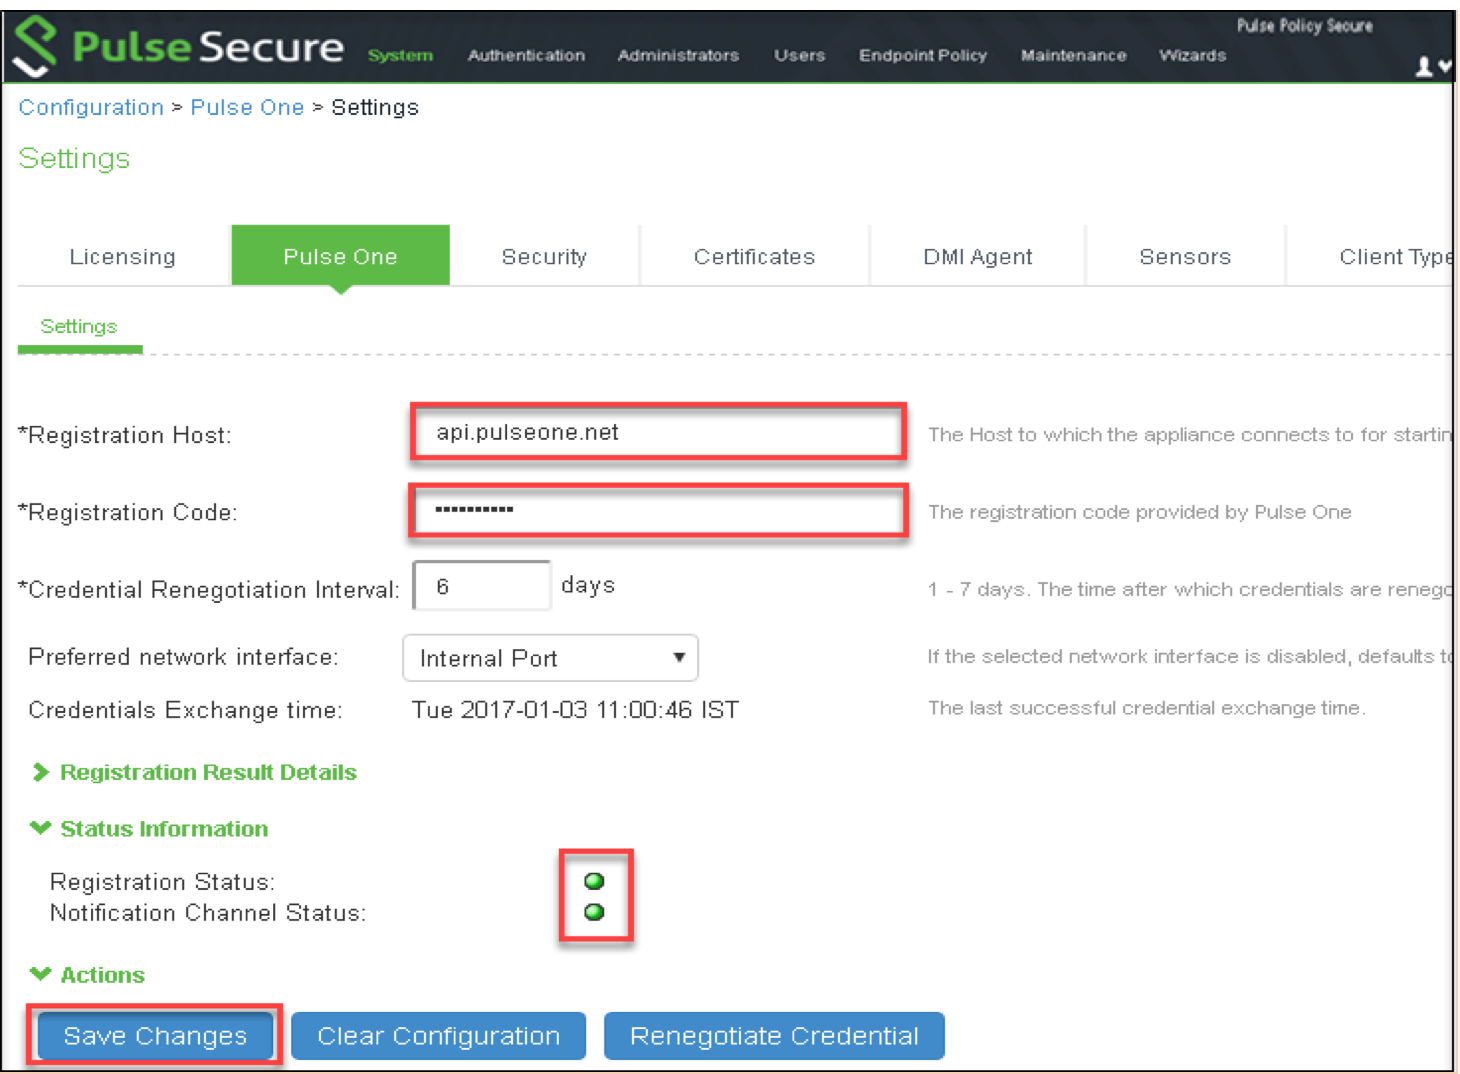
10.Navigate to System > Configuration > Pulse One > Settings to register PPS with Pulse One and provide the following details
•Enter Registration Host and Registration Code details from Step 9 of Pulse Workspace Configuration.
•Click Save Changes.
•Registration Status and Notification Channel Status under Status Information section should turn green after few seconds.
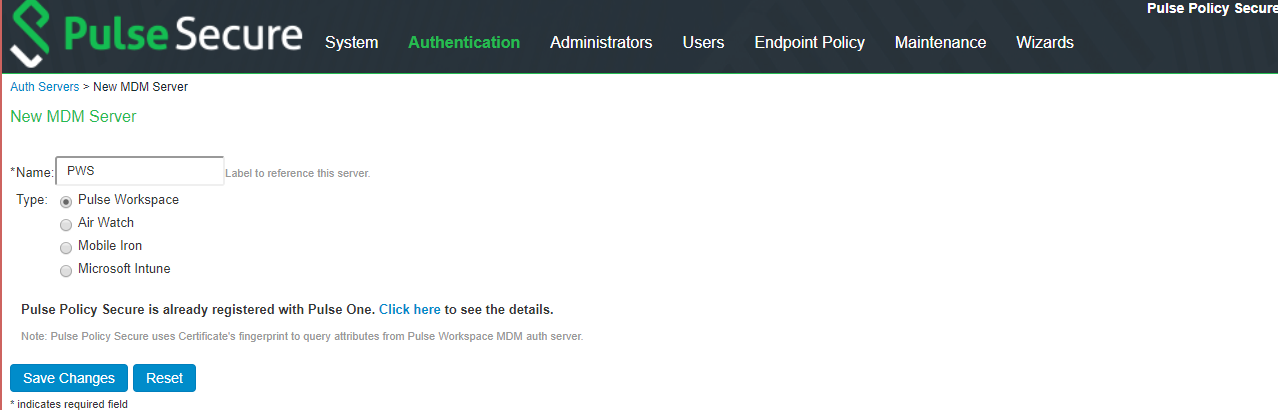
11.Navigate to Authentication > Auth Servers to create Pulse Workspace MDM Authentication Server.
12.Select New Server of Type ‘MDM Server’ and Click New Server.
•Enter Name
•Select Pulse Workspace.
•Click Save Changes.
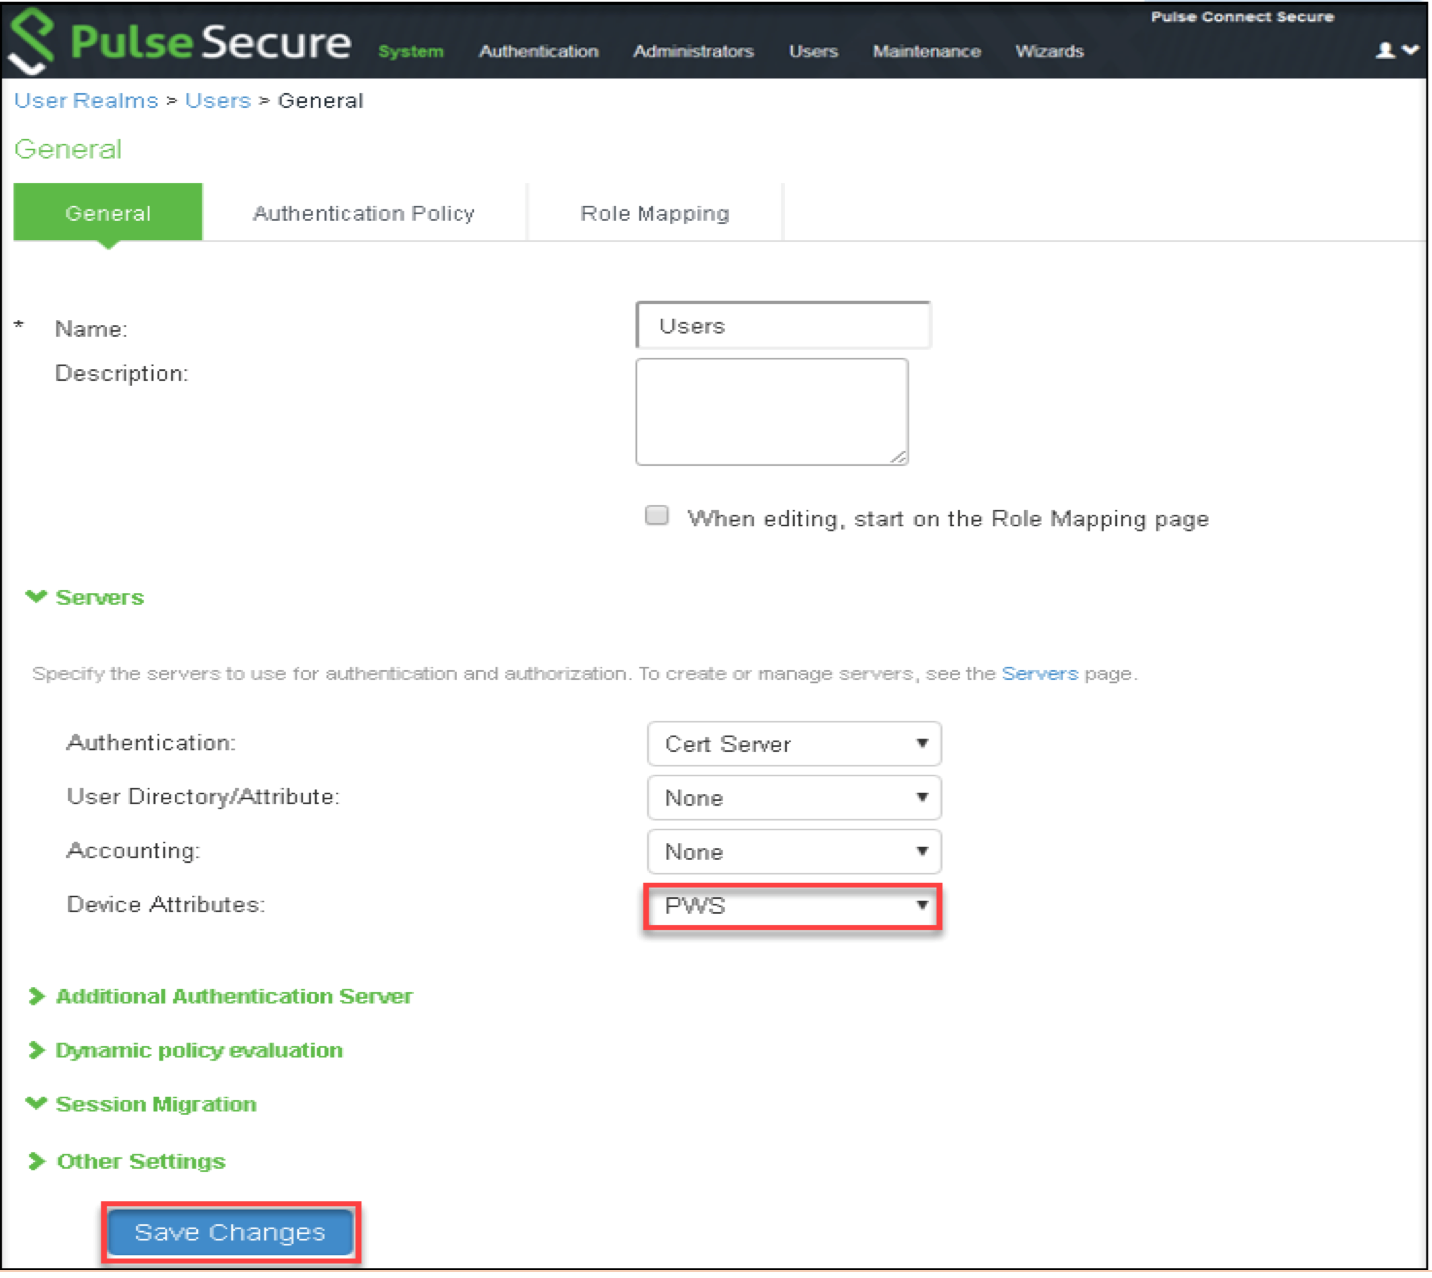
13.Navigate to Users > User Realms. Select the desired realm, configure PWS MDM Server created in Step 6 above as Device Attribute Server and click Save Changes.
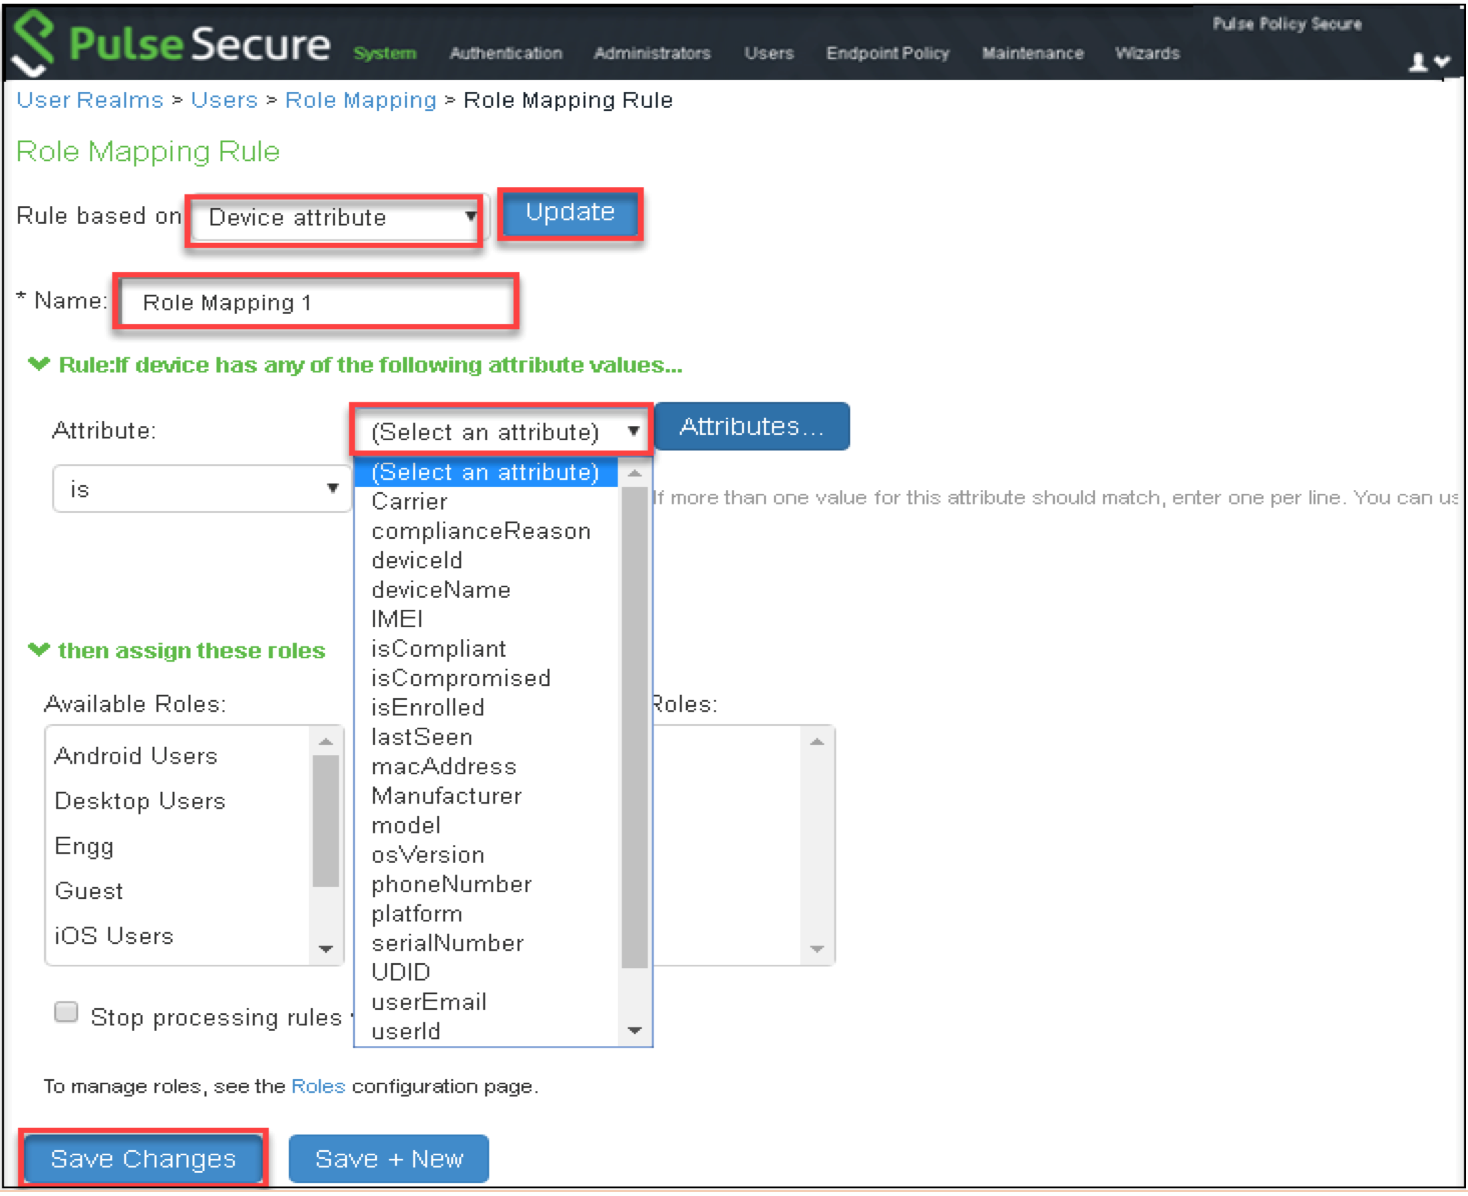
14.(Optional) Navigate to Role Mapping tab of the user realm to create role mapping rules. Click ‘New Rule…’ and provide following details:
•Select Rule based on Device attribute and Click Update.
•Enter Name.
•Select an Attribute and provide a value.
•Assign required roles.
•Click Save Changes.
Compliance check for mobile users will be done by MDM Server (PWS/MobileIron/ AirWatch). For desktop users, PCS/PPS uses Host Checker functionality for compliance check.
Configuring Pulse Policy Secure as IF-MAP Federation Server
Follow below steps to configure PPS as IF-MAP Federation Server:
1.Log into Pulse Policy Secure admin console.
2.Navigate to System > Configuration > Certificates > Trusted Server CAs.
3.Click ‘Import Trusted Server CA…’. Browse CA certificate file and click ‘Import Certificate’.

4.Navigate to System > If-MAP Federation > Overview. Select IF-MAP Server and Save Changes.
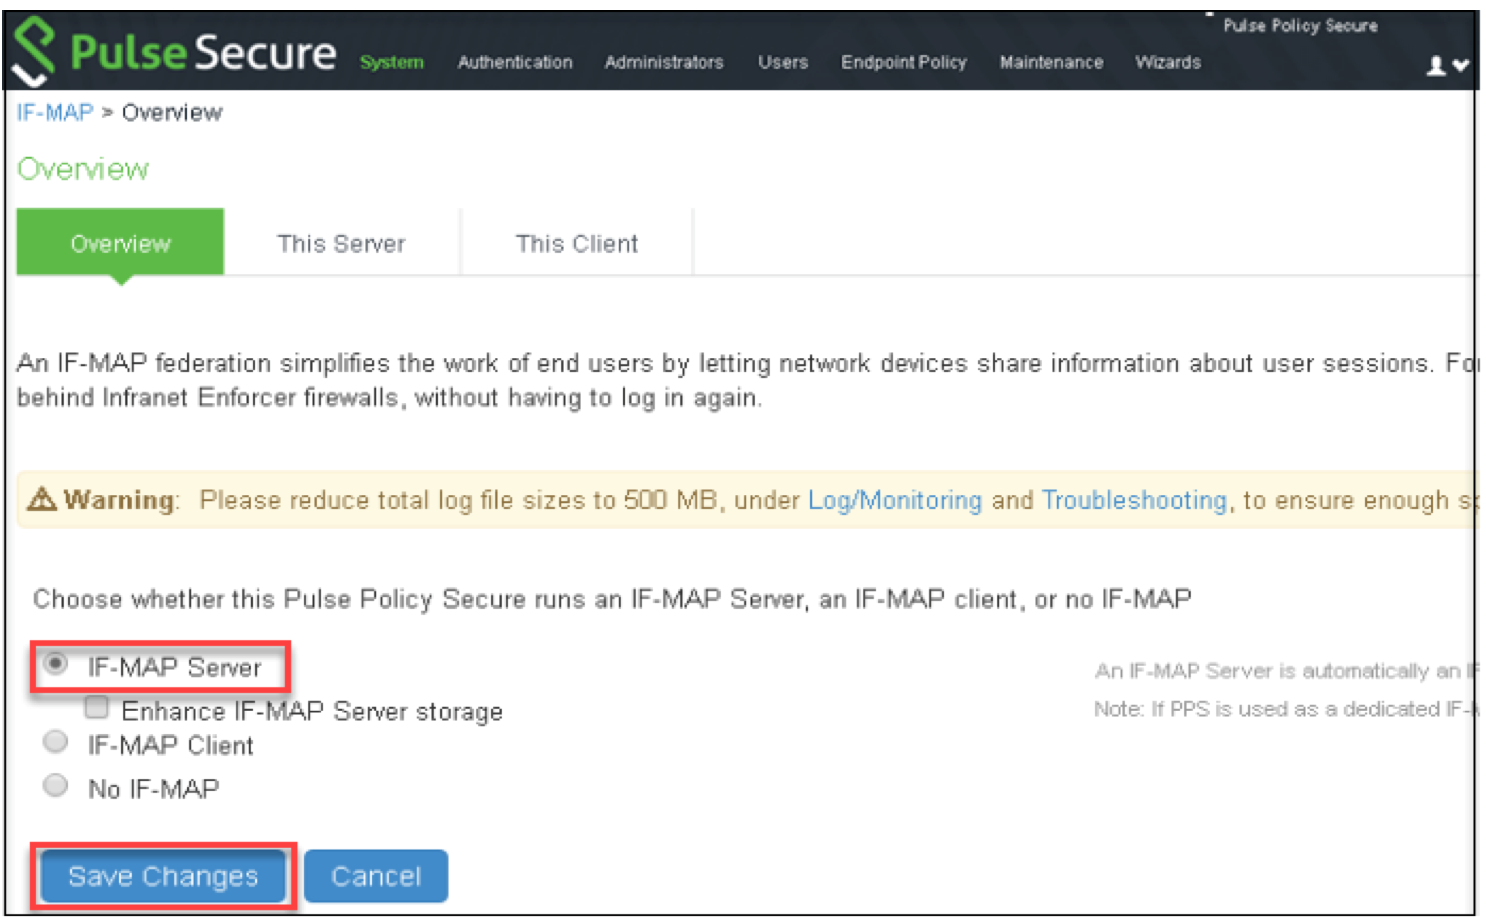
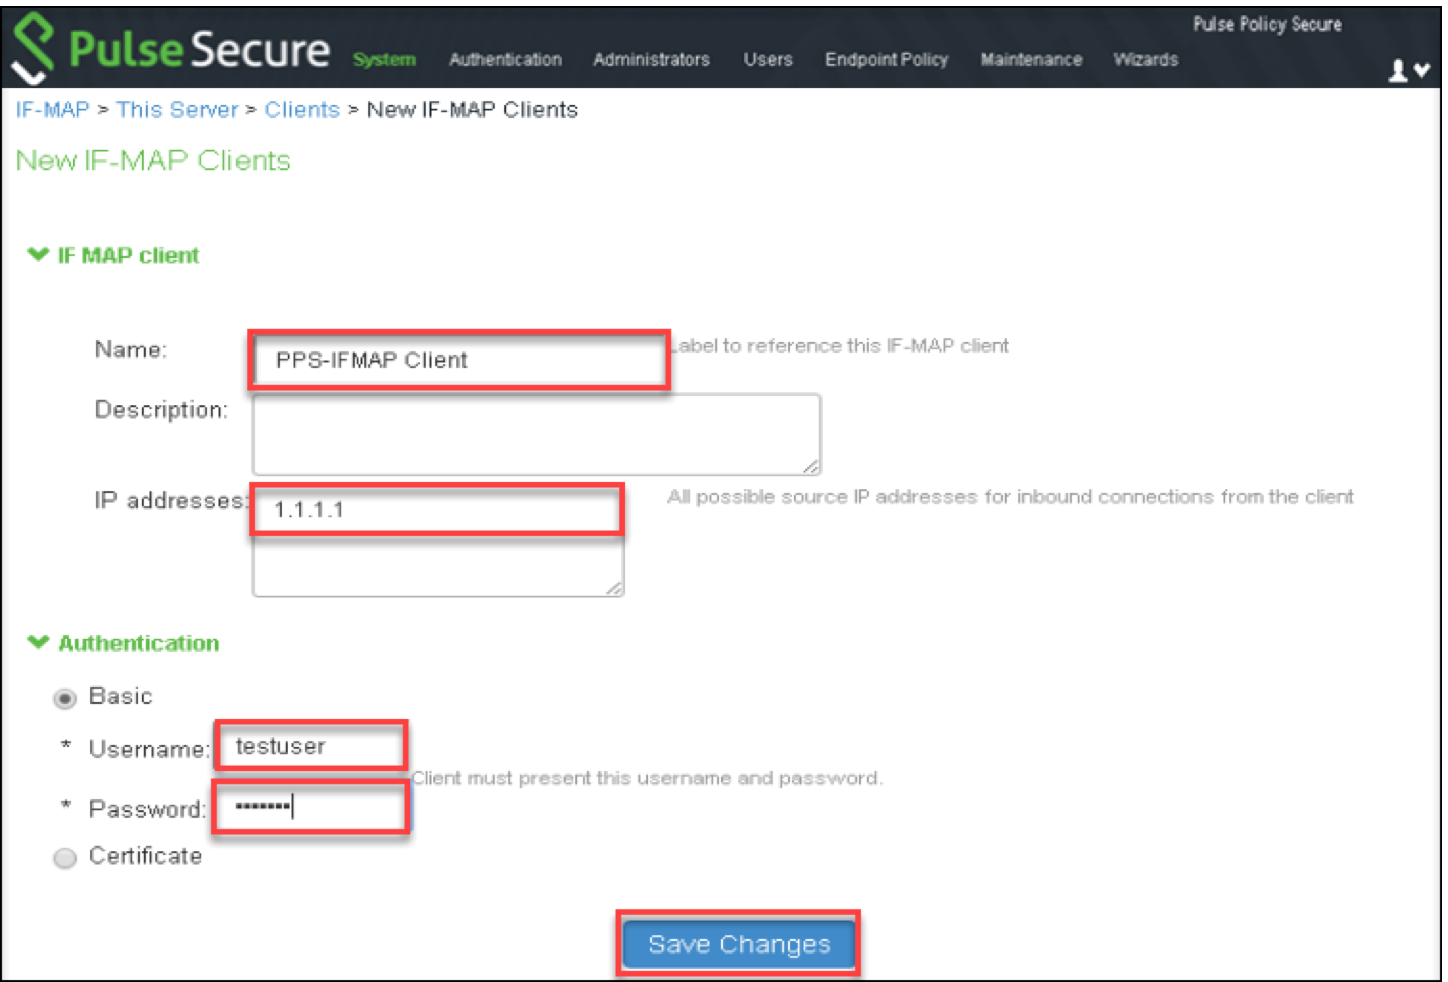
5.Navigate to System > IF-MAP Federation > This Server > Clients. Click ‘New Client…’ and provide following details to configure PCS/PPS as Federation Client (Configure both PCS and PPS as Federation Clients).
•Provide Name.
•Provide IP address of PCS/PPS.
•Select Basic under Authentication and provide Username and Password.
•Click Save Changes.
Configuring Pulse Connect Secure as IF-MAP Client
Follow below steps to configure Pulse Connect Secure (SAML IDP) as Federation Client: and enable Re-use existing IF-MAP session option:
1.Log into Pulse Connect Secure admin console
2.Navigate to System > Configuration > Certificates > Trusted Server CAs. Click ‘Import Trusted Server CA…’. Browse to the CA certificate file and click ‘Import Certificate’. Ensure that the certificate of the CA that signed the IF-MAP server certificate is added.
3.Navigate to System > If-MAP Federation > Overview. Select IF-MAP Client and provide following details:
•Under Server URL, provide IP address of Federation Server
•Select Basic under Authentication and provide same Username and Password provided in Step 4 of Federation Server configuration
•Click Save Changes
4.Navigate to Authentication > Signing In > Sign-in SAML > Identity Provider. Select ‘Re-use Existing If-MAP Session’ option, specify the signature algorithm and click Save Changes
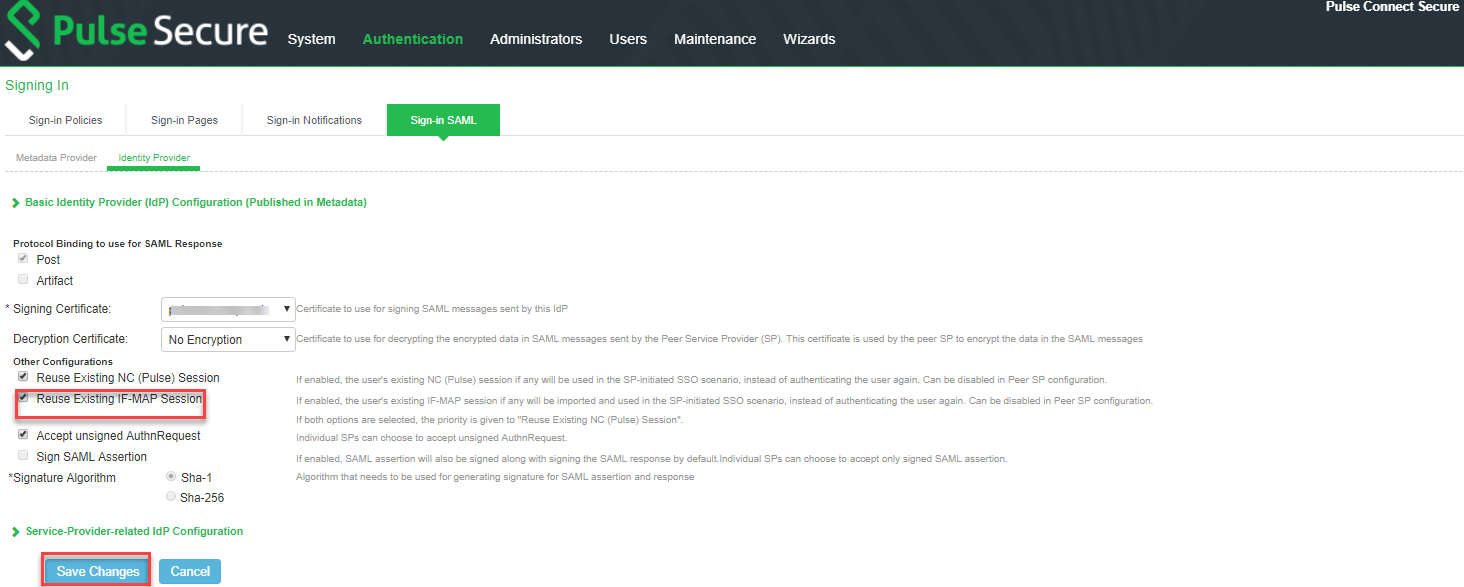
5.Select desired Peer SP configured, enable ‘Re-use Existing If-MAP Session’ option and click Save Changes.
Once both PCS and PPS are enabled as IF-MAP Clients, verify that the status for both the clients is green on Federation Server.
Configuring Pulse Workspace
Pulse Workspace acts as Mobile Device Management (MDM) Server to manage mobile devices and to evaluate compliance posture of the devices.
•Configuring Pulse Workspace for Mobile Compliance Policies
•Configuring Pulse Workspace for Location Awareness
•Configuring On-Demand VPN for Android devices
For Cloud Secure solution, Pulse Workspace should be configured with:
•Policy configured with VPN properties and iOS/Android applications enabled with Per app VPN.
•Workspace user.
•PCS appliance.
•Configure Wi-Fi profile and add PPS appliance for On-Premise solution.
Follow the below steps to configure Pulse Workspace for Cloud Secure:
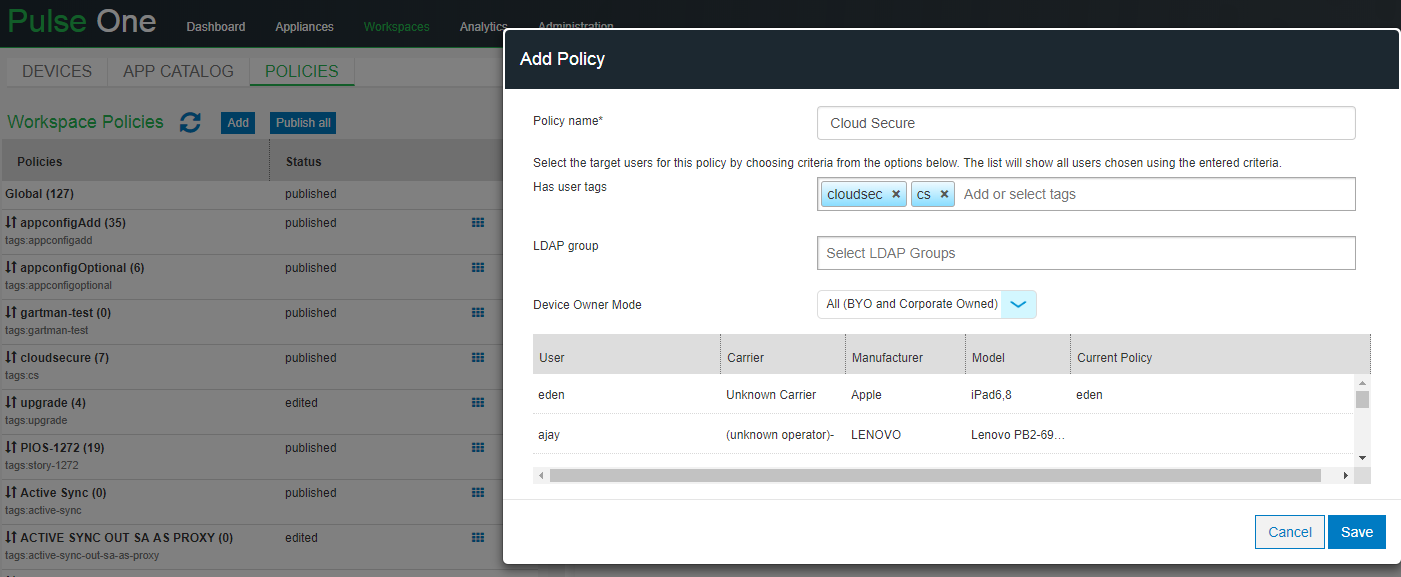
1.Log into the Pulse One admin console
2.Use existing Global policy or create a new policy. To create new policy, select Workspaces > Policies > Add.
•Enter the Policy name.
•Under Has user tags, Add or select tags.
•Click Save.
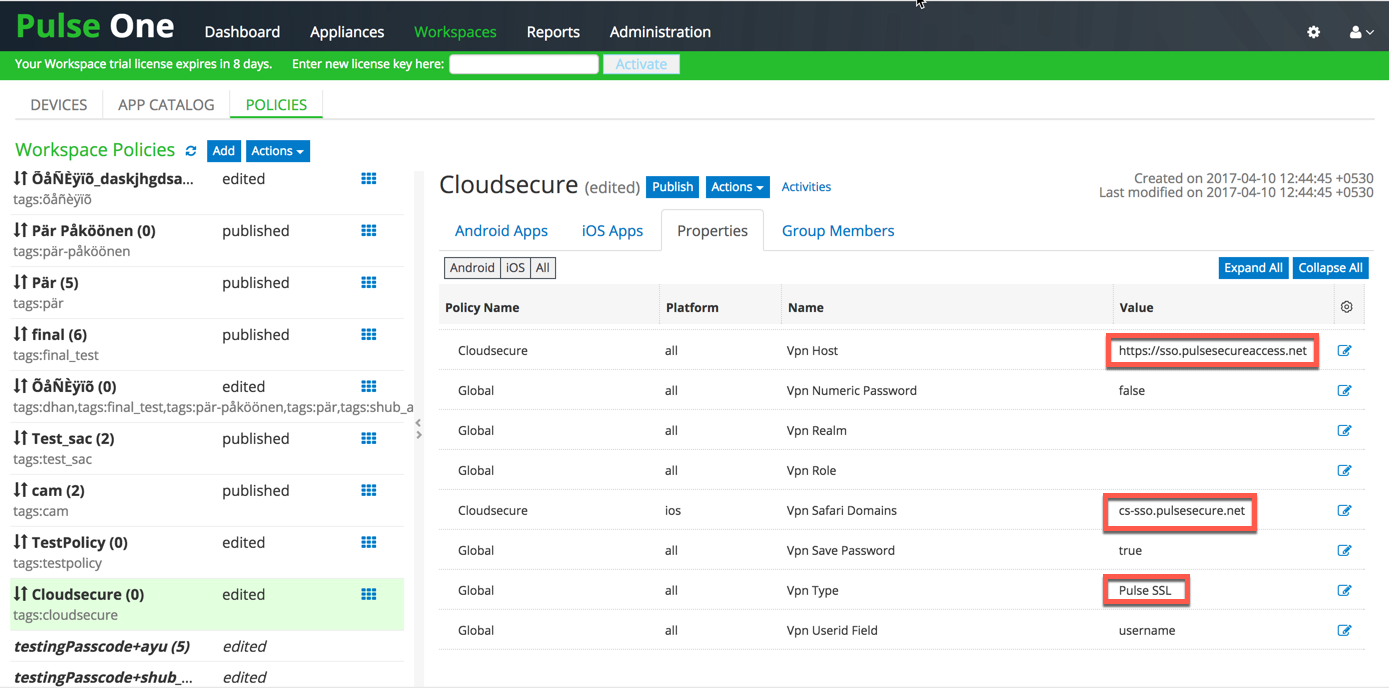
3.Modify the VPN properties of new policy or Global policy to support Per App VPN. Navigate to the Properties Tab. Scroll down to ‘VPN’ section, click the Edit icon against each field below and provide the following values:
•Set Use L3 VPN to true (in case of L3 VPN).
•VPN Host = https:// <Host FQDN for SAML>.
•VPN Safari Domains = <Alternate Host FQDN for SAML> (Required for iOS devices).
•Select VPN Type as ‘Pulse SSL’.
•Leave rest of the fields to defaults and click Publish
Android devices support only L3 VPN whereas iOS devices support both L3 and L4 VPN.
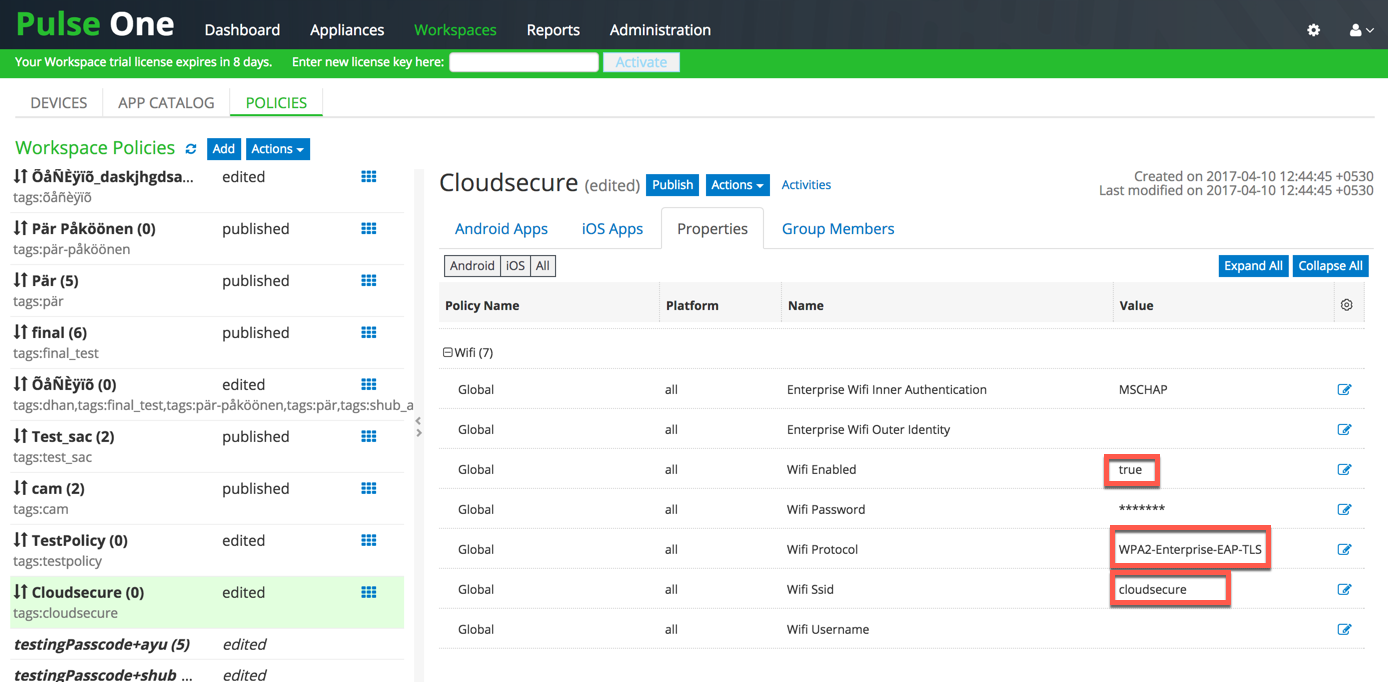
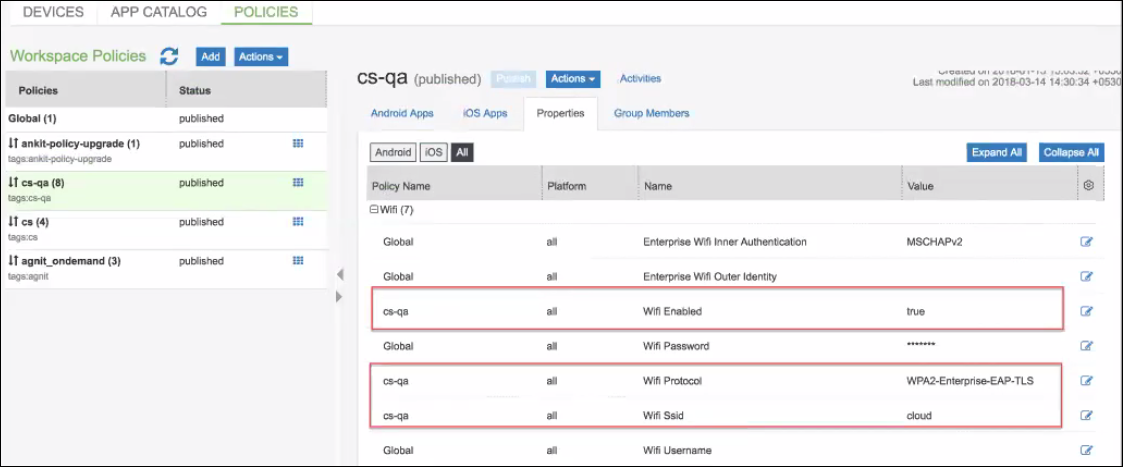
4. (Optional) Modify the ‘Wifi’ Properties of the new policy or Global policy. Navigate to Properties tab. Scroll down to ‘Wifi’ section, click the Edit icon against each field below and provide following details:
•Set Wifi Enabled to true.
•Select WPA2-Enterprise-EAP-TLS as Wifi Protocol.
•Provide Wifi Ssid.
•Click Publish.
SSO access to On-Premise Mobile Users requires Wifi Configurations.
5.(Optional) Modify the Active Sync properties.
•Set Activesync Accept All Certs to Yes.
•Set Activesync Server to outlook.office365.com.
•Set Use Pulse One for authentication (Override Active Sync Server) to Yes.
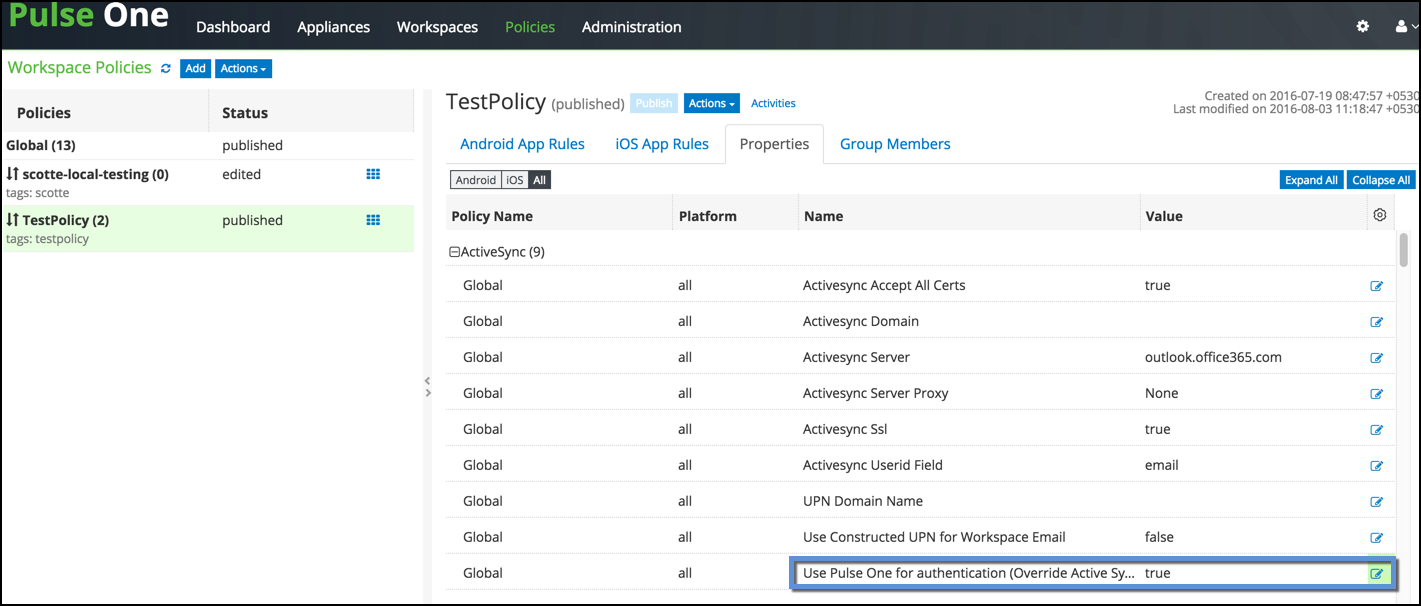
The option ‘Use Pulse One for authentication’ enables Pulse One to push token to the registered mobiles which is used in authenticating the user for Email Access.
6.Modify the iOS ActiveSync properties. Set ios Activesync Enabled to Yes.
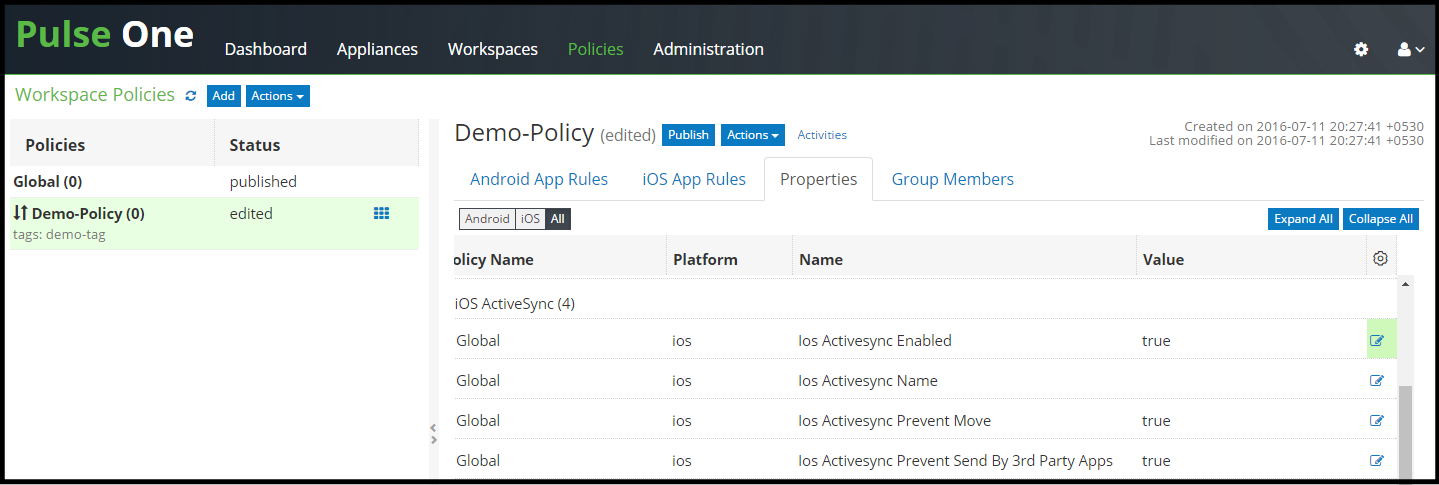
iOS Active Settings are applicable only to iOS devices.
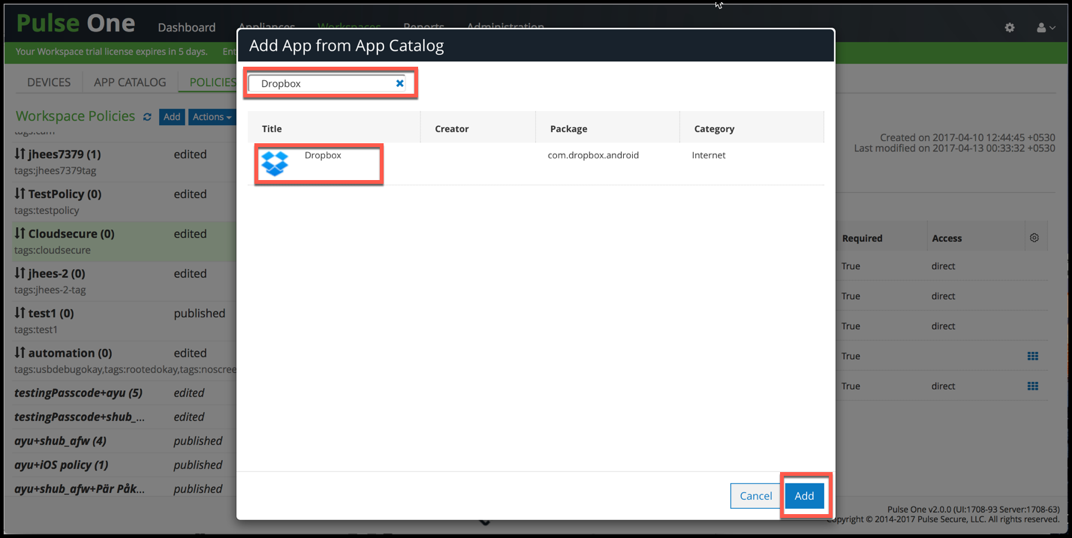
7.Select the iOS App / Android App tab under the policy created.
•Click Add App to add a new application.
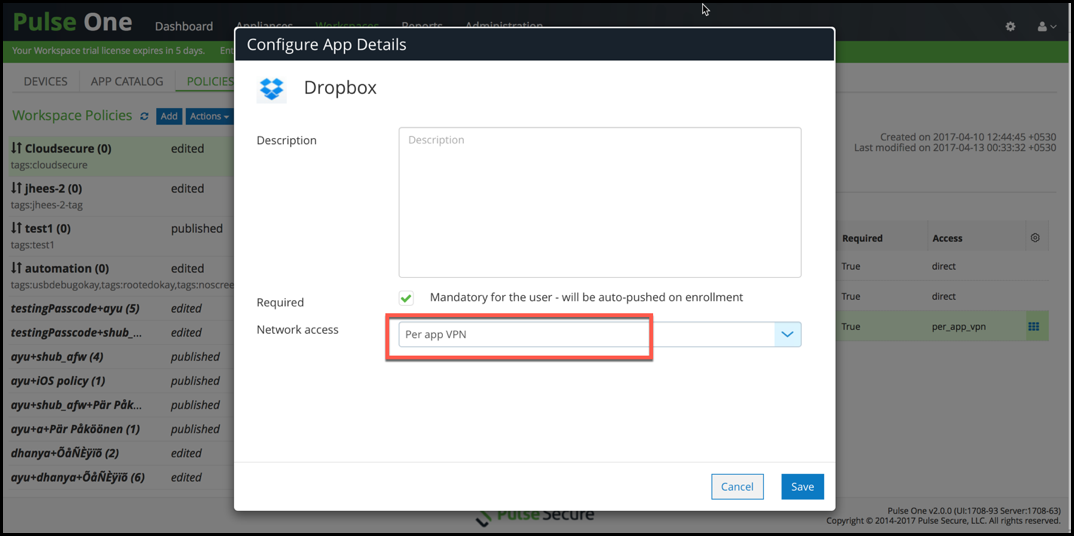
•Enter the application name in the search list (Salesforce1, Zendesk, Box etc.), select the application and click Add.
•Select the application added and click Edit app rule. Select ‘Per app VPN’/’Require VPN’ for Network Access.
•Click Save.
Add applications to “App Catalog” before associating it to Workspace Policies. Refer to the PWS Administration guide for adding Applications to App Catalog.
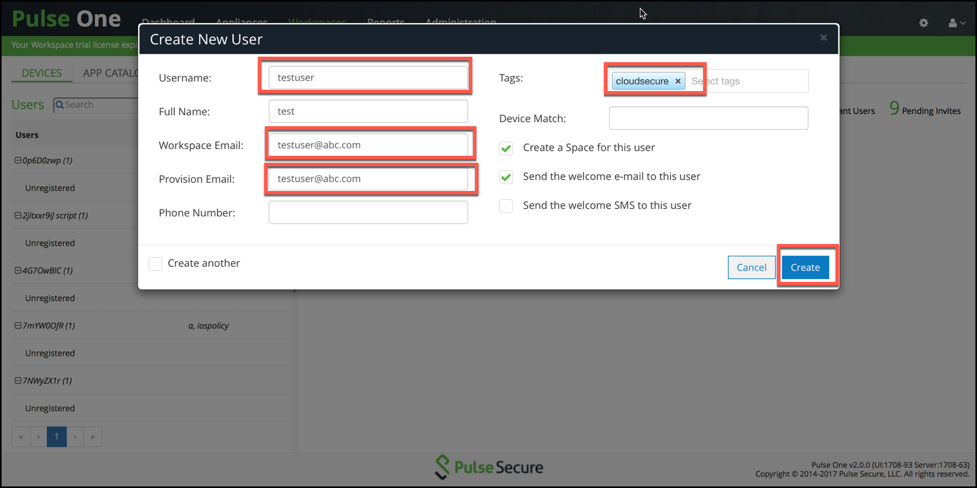
8.Navigate to the Workspaces >Devices tab. Click Actions > Add User to create a new user if user does not exist. Provide the following details:
•Enter Username.
•Enter Workspace Email. Provision Email will get populated automatically.
•Enter Policy name created in as Tags if required (else, Global policy will be assigned by default). See
•Click Create
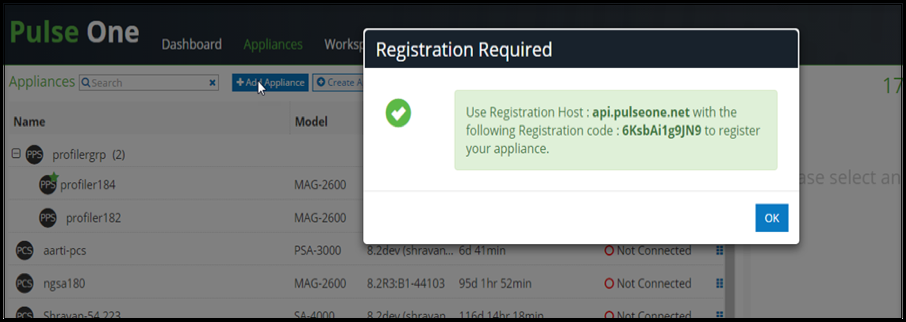
9.Select the Appliances tab. Click Add Appliance and provide a name to register Pulse Connect Secure /Pulse Policy Secure with Pulse One. Admin will be provided with Registration Host and Registration code details to be configured in PCS/ PPS.
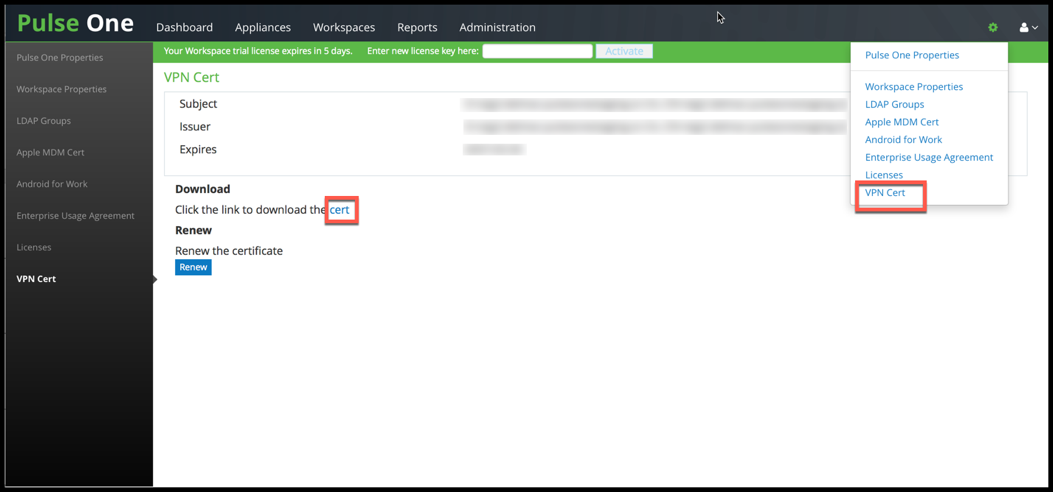
10.Click the Settings gear on the top right corner of the page.
11.Click VPN Cert and then click the cert link to download Pulse One VPN certificate, which needs to be uploaded in PCS / PPS as Trusted Clients CA.
Configuring Pulse Workspace for Mobile Compliance Policies
Pulse Workspace enables mobile compliance policy management for employees who bring their own devices (BYOD). To enable policy based access to mobile devices. The administrator can configure compliance policies for mobile devices based on the various device attributes, such as:
•Jail Break Detection-When compliance is set to Allow, "isCompliant" value sent from client is True. When compliance is set to Restrict VPN, "isCompliant" value sent from client is False. When compliance is set to Wipe, "isCompliant" value sent from client is False.
•Minimum OS version-Sets minimum OS version.
•Rooted Detection- Determines the action the client should take when it determines a device is Rooted. The options are allow, notify, lock or wipe.
•Non-Compliant OS Version Action-If user provisions the device that has Pulse Client version lower than that is set in Minimum Pulse Client Version policy, the device becomes non-compliant device. Actions for a non-compliant device can be one of the following:
•Allow: User is allowed VPN access, and the device remains in the non-compliant state
•Restrict VPN: User is restricted from VPN access
•Wipe: Profile is wiped off from the user's device
•Minimum Pulse Client Version- Sets minimum Pulse Client version.
For more information on how to configure the compliance properties on PWS, see PWS Configuration Guide.
Configuring Pulse Workspace for Location Awareness
The location awareness feature enables the PWS managed iOS devices to suppress the VPN connections based on the user location. This enables On-Premise users to get access to cloud applications without establishing a VPN connection.
For location awareness, Pulse Workspace should be configured with:
•Wi-Fi profile and add PPS appliance for On-Premise solution. For configuration, see Configuring Pulse Workspace
•Configure PCS for reusing the existing session through IF-MAP. For configuration, see Step 4 in Configuring Pulse Policy Secure as IF-MAP Client.
Follow the below steps to configure location awareness on Pulse Workspace for Cloud Secure:
1.Log into the Pulse One admin console.
2.Modify the ‘Wifi’ Properties of the new policy or Global policy. Navigate to Properties tab. Scroll down to ‘Wifi’ section, click the Edit icon against each field below and provide following details:
•Set Wifi Enabled to true.
•Select WPA2-Enterprise-EAP-TLS as Wifi Protocol.
•Provide Wifi Ssid.
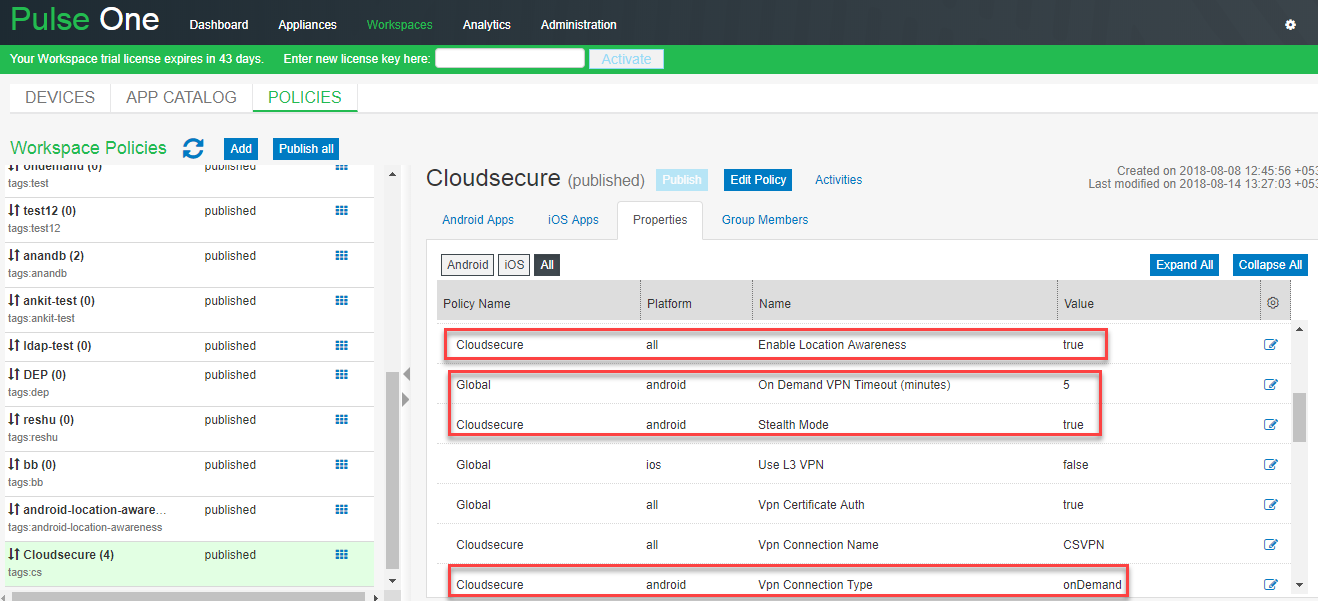
3.Modify the VPN properties of new policy or Global policy to support Location Awareness. Navigate to the Properties Tab. Scroll down to ‘VPN’ section, click the Edit icon and Set Enable Location Awareness to true. For Android, under VPN configure the following.
•On Demand VPN Timeout (minutes): 5 (optional)
•Stealth Mode: true (mandatory)
•Vpn Connection Type: OnDemand (mandatory)

Configuring On-Demand VPN for Android devices
The On-Demand VPN feature enables the VPN connection to be triggered dynamically on accessing applications managed by Pulse Workspace (PWS). Cloud Secure re-uses the VPN session information for providing SSO access to applications.
To enable On-Demand VPN for PWS managed applications, perform the following configuration on PCS:
1.Log into Pulse One Admin console.
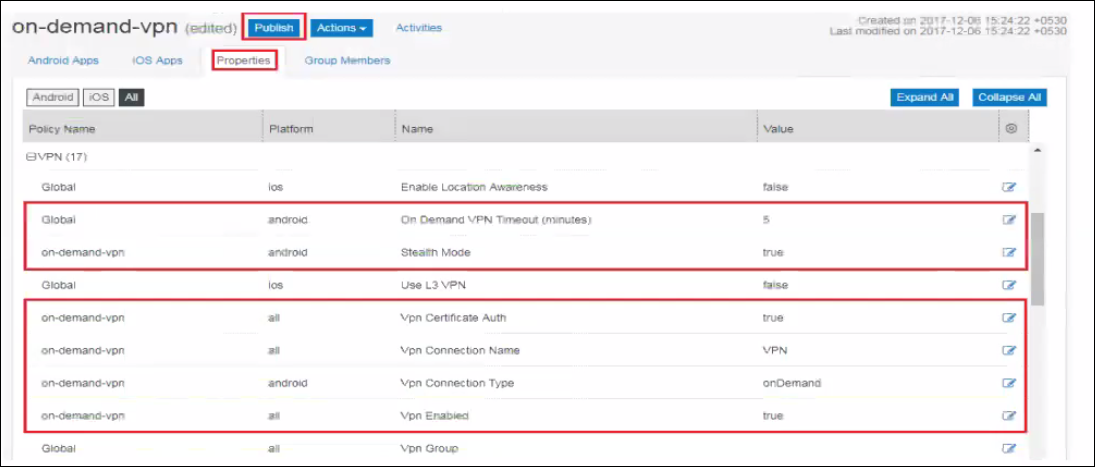
2.Navigate to Policies > <policy_name> for which you would like to add On-Demand configuration and click the Properties tab.
3.Under VPN, configure the following:
•On Demand VPN Timeout (minutes): 5 (optional)
•Stealth Mode: true (mandatory)
•Vpn Certificate Auth: true (mandatory)
•Vpn Connection Name: VPN (mandatory)
•Vpn Connection Type: OnDemand (mandatory)
•Vpn Enabled: true (mandatory)
4.Click Publish.
For more information, see PWS Configuration Guide.
Redesigned End-User Pages
Cloud Secure enables end-users to access Cloud Applications seamlessly and securely. While accessing the cloud applications, different end-user pages are shown for performing various actions such as user login, Host Checker, SAML Authorization and so on.
The end-user pages are redesigned to improve the user experience. This includes users who access the cloud services using the web browser and applications across various platforms such as Windows, Mac, Android and iOS.
The new redesigned user pages can be enabled from both the existing PCS sign-in policy page and the new Cloud Secure UX home page.
Cloud Secure UX page
To enable the usage of redesigned pages for Cloud Secure from new Cloud Secure UX configuration page:
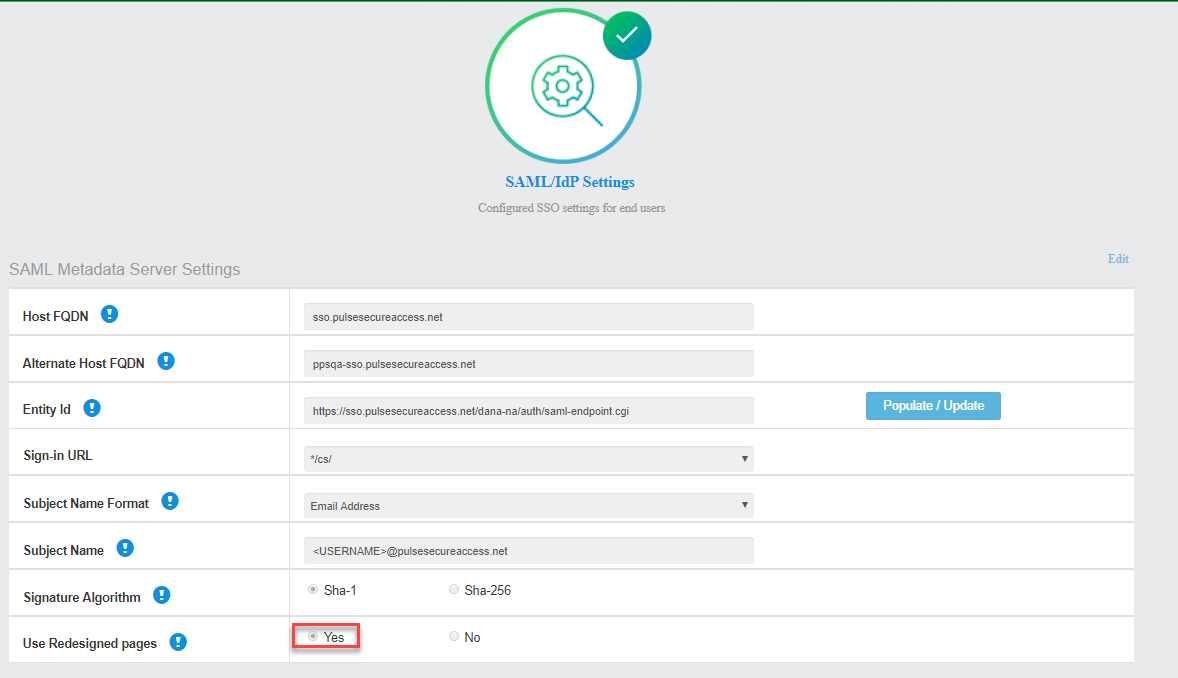
1.Navigate to System > Cloud Secure > Cloud Secure Configuration and select the SAML/IdP Settings section from the UX Home Screen.
2.Under SAML Metadata Server Settings, Click Yes to Use Redesigned Pages.
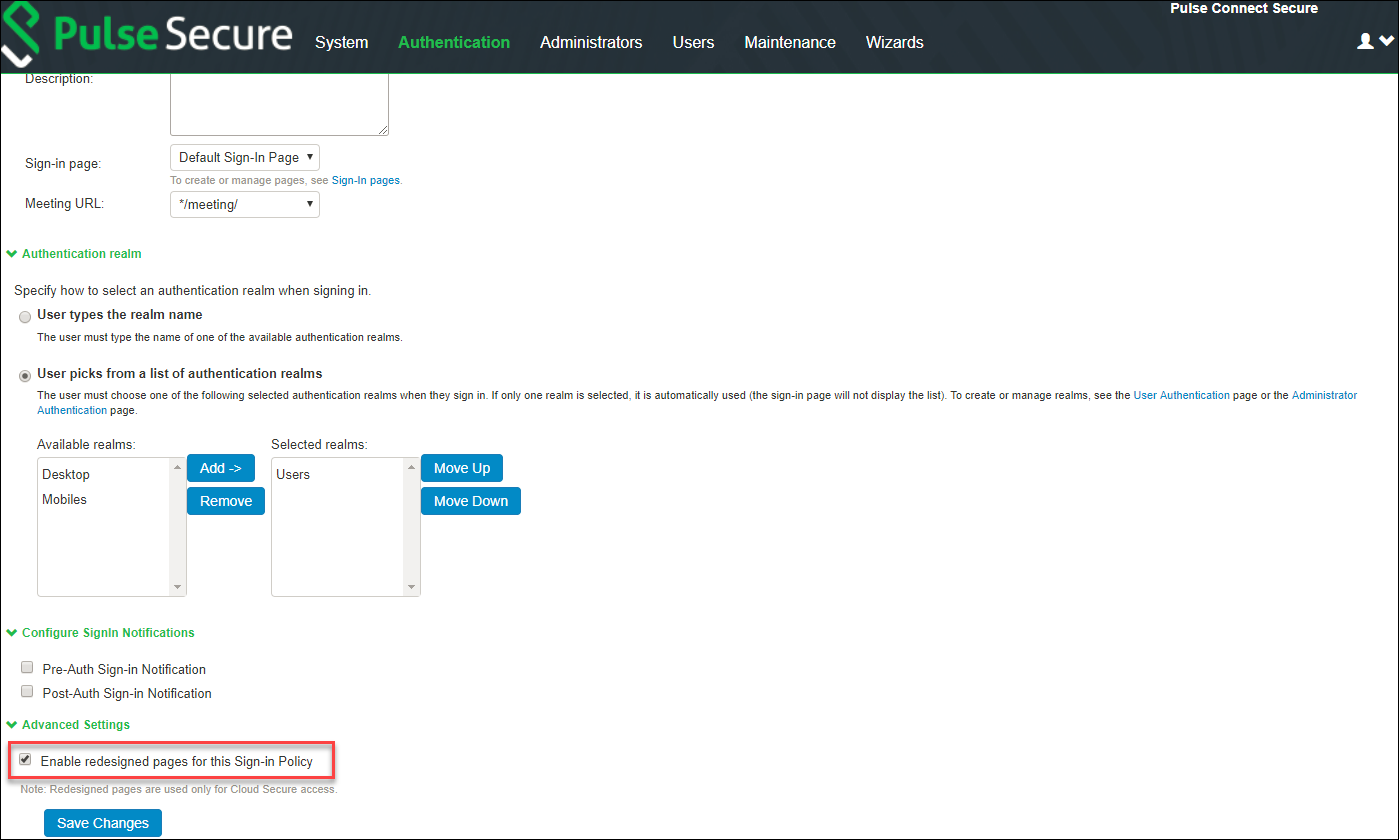
Existing PCS Sign-In Policy Page
To enable the usage of new redesigned user pages using the existing sign-in policy page:
1.Select Authentication > Signing In > Sign-In Policies and click New URL to create a new sign-in policy.
2.Under Advanced Settings, click the checkbox for Enable redesigned pages for this sign-in policy.