Configuring Pulse Collaboration
To configure Pulse Collaboration:
1.Specify a network identity through the System > Network > Overview page of the admin console. Pulse Collaboration uses this hostname when constructing meeting URLs for e-mail notifications.
2.Configure role-level settings using settings in the following pages of the admin console:
•Use settings in the Users > User Roles > Role Name > General page to enable Pulse Collaboration at the role level.
•Use settings in the Users > User Roles > Role Name > Meetings > Options page to configure role-level meeting restrictions.
3.Specify which authentication servers meeting creators can access and search using settings in the following pages of the admin console:
•Use settings in the Users > User Roles > Select Role > Meetings > Auth Servers page to specify which authentication servers meeting creators can access and search.
•If you want to allow meeting creators to invite users from an LDAP server, use settings in Authentication > Auth. Servers > Select LDAP Server> Meetings page to enable the server.
4.If you want to change the default sign-in page or URL that meeting attendees use to sign into meetings, use settings in the following pages of the admin console to configure meeting sign-in policies:
•Use settings in the Authentication > Signing In > Sign-in Pages page to customize the pages that meeting attendees see when they sign into a meeting.
•Use settings in the Authentication > Signing In > Sign-in Policies > Meeting Policy page to define the URL that meeting invitees must use in order to access a meeting. You can also use this page to associate a meeting page with the URL.
•Use settings in the Authentication > Signing In > Sign-in Policies > User Policy page to associate your meeting sign-in policy with a user sign-in policy. The system applies the specified meeting URL to any meeting created by a user who signs into the associated user URL.
5.Configure system-level meeting settings, include session timeouts, SMTP server information, time zone settings, and color-depth settings using options in the System > Configuration > Pulse Collaboration page of the admin console.
6.If you want to enable client-side logging, use settings in the following pages of the admin console:
•Use settings in the System > Log/Monitoring > Client Logs > Settings page of the admin console to enable client-side logging. You must enable this option in order to generate logs for end users and for meeting attendees.
•Use settings in the System > Log/Monitoring > Uploaded Logs page of the admin console to view the logs.
Pulse Collaboration installs client files in different directories depending on your operating system and privileges. For more information, see Pulse Connect Secure Client-Side Changes Installation Reference.
Scheduling Meetings Through the End-User Console
If you enable meeting creation abilities at the role level, system users can create meetings through the Meetings page of the end user console. When they do, they must specify all of the standard meeting details such as the meeting name, description, start time, start date, recurrence pattern, duration, password, and a list of invitees. Additionally, they must categorize all invitees into one of two categories:
•System invitees - A system invitee (also called an in-network invitee) is a user who signs into the same device or cluster as the meeting creator. When inviting a system user to a meeting, the meeting creator must specify the user's username and authentication server.
•Non-system invitees - A non-system invitee (also called an out-of-network invitee) is a non-system user or a system user who signs into a different device or cluster than the meeting creator. When inviting a non-system user to a meeting, the meeting creator must specify the user's e-mail address.
If a system invitee uses the meeting URL instead of the Meetings page in the end user console to join a meeting, Pulse Collaboration classifies the user as a non-system invitee.
Scheduling Meetings Through Microsoft Outlook
If you enable meeting creation abilities at the role level, system users can create meetings through the Microsoft Outlook calendar using the Pulse Collaboration Outlook plug-in.
You must use the same Outlook profile to remove the Pulse Collaboration plug-in for Outlook as the one used to install the plug-in. Switching profiles between the installation and removal of the Plug-In is not supported.
The Pulse Collaboration Outlook plug-in is only supported on Windows machines with Outlook 2007 or later.
To use this plug-in, the user must:
1.Install the plug-in from the Meetings page in the end user console.
2.Open the Pulse Collaboration scheduling form in Outlook by clicking the Collaboration button located on the Outlook ribbon.

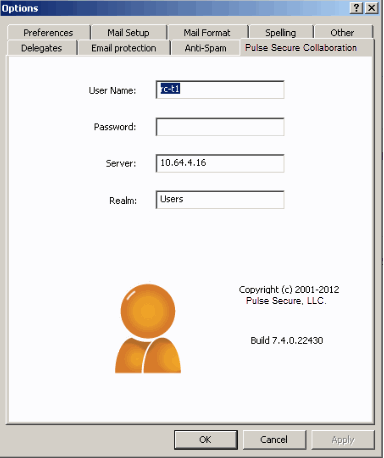
3.Use the Options window to enter details about the server on which the meeting should be scheduled as well as the user's sign-in credentials, realm, and a meeting password. See the above figure, to open the Options window:
•(Outlook 2010) Select File > Help > Options > Add-Ins and then click Add-in Options.
•(Outlook 2007) Select Tools > Options and then click the Pulse Collaboration tab.
Due to limitations with Microsoft Outlook, not all meeting details cross-populate between Microsoft Outlook and Connect Secure. For example, if the user schedules a meeting through Connect Secure, Microsoft Outlook does not display the meeting in its calendar. For a complete list of restrictions, see the Pulse Collaboration for Outlook document available from the end user help system as well as the Pulse Collaboration for Outlook plug-in installer.
4.Use the Outlook Scheduling and Appointment tabs to schedule the meeting and add invitees using standard Outlook functionality. Note that Pulse Collaboration supports creating standard or recurring meetings through Outlook.
Depending on your Outlook version, the Appointment tab may have an Online Meeting button. This button is not related to the Meeting Server or the Pulse Collaboration Outlook Plug-in and cannot be used by a third-party plug-in.

5.Save the calendar entry to send the information to the Pulse Collaboration server. Note that when saving a meeting, the user might see a certificate warning because the plug-in is communicating with a secure server.
6.Outlook sends invitation e-mails to the invitees using the text and meeting URL link constructed by the Pulse Collaboration Outlook plug-in. Outlook also adds the meeting to the Outlook calendars of meeting invitees. This calendar item includes all of the standard information recorded by Outlook as well as an additional Pulse Collaboration tab containing the information specified by the meeting creator in the Pulse Collaboration tab. Note that the system does not send an additional e-mail using the SMTP server.
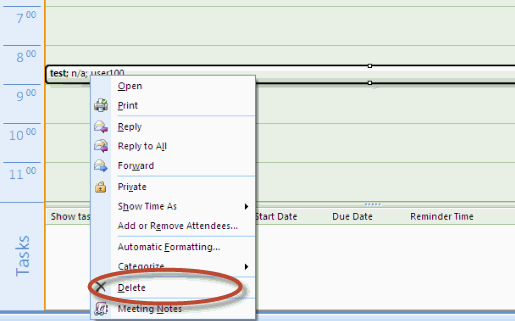
7.To delete a meeting, right-click the meeting in the Outlook window and select Delete.
The Pulse Collaboration Outlook plug-in authentication does not work if the realm enables Host Checker policies or requires users to select a role.
Sending Notification E-mails
You can configure Pulse Collaboration or Outlook to send notification e-mails to invitees when the meeting creator saves a new or modified meeting. The e-mail contains meeting details, a link that the invitee can use to join the meeting, and another link that the invitee can use to check whether his system is compatible with Pulse Collaboration.
If your users are scheduling meetings through the end user console, you must enable an SMTP server in the Users > Resource Policies > Meetings page of the admin console in order to send e-mail notifications to invitees.
If your users are scheduling a meeting through Microsoft Outlook, the Pulse Collaboration Outlook plug-in uses the e-mail addresses that are stored on the Outlook e-mail server.
If the person creating a Pulse Collaboration is using e-mail invitations and accesses the device using a URL that is not the fully-qualified domain name (for example, https://sa instead of https://sa.company.com), the e-mail invitation may display https://sa in the invitation information and not the true hostname. As a result, e-mail recipients may not be able to access the link from the e-mail. We recommend you configure the system's network identity. If configured, Pulse Collaboration invitations use that hostname.
Pulse Collaboration Bridge Profile
Pulse Collaboration Bridge Profile Overview
You can embed the phone bridge number, or a list of phone numbers, and the conference access PIN into your e-mail so that mobile phone users can just click the link to join a Pulse Collaboration meeting. The Pulse Collaboration meeting bridge profile lets you enter "structured" data for audio bridges. This data can then be passed from the meeting server to a meeting client and used for dialing the audio bridge.
An end user opens the meeting invite e-mail through their mobile phone and selects a local phone number from the list. The mobile phone dials the selected phone number. After the call connects, the access code is automatically entered, and the user connects to the Pulse Collaboration meeting.
Depending on how the bridge profile is configured, mobile phone users can use their location services feature or IP address to display the local phone number at the top of the list. For example, if the administrator creates a profile with "US", "China" and "India" numbers and includes the correct country codes, mobile phone users joining from the US will see the US number displayed at the top of the list.
- The meeting bridge profile applies only to mobile phones. Joining audio conference bridges from a desktop client is not supported.
- XML external entity injection (XXE) is a type of attack that may lead to the disclosure of confidential data, denial of service, and other system impacts. Pulse Collaboration does not allow any xml file with Entity element to be uploaded.
Creating a Pulse Collaboration Bridge Profile
The system ships with a sample Pulse Collaboration bridge profile template. You can download and edit the sample bridge profile template, shown below, to create your own custom version. For example, you may want to create a meeting bridge profile for each audio bridge provider your company uses.
<?xml version="1.0" encoding="UTF-8"?>
<!--
dialing-number: You can configure 1-500 dialing numbers in one profile.
display-name: Please use UTF-8 encoding.
country-code: Country code of the phone number.
phone-number: Please enter digits only, without ' ', '(', '-' or ')'.
You can enter 3-15 digits in each phone number.
moderator:
Please enter the extra dialing steps for the moderator (host).
In this example, after the moderator dials one of the phone numbers, she
needs to enter a "Meeting Code" and a "PIN" to start the bridge.
You only need to specify the names of the extra steps here, the moderator
will configure their own pin codes.
participant:
Please enter the extra dialing steps for other participants.
In this example, after a participant dials one of the phone numbers, she
needs to enter a "Meeting Code" to connect to the bridge.
You only need to specify the names of the extra steps here, the moderator
will configure their own pin codes.
-->
<jnpr:configuration xmlns:jnpr="http://xml.juniper.net/">
<dialing-numbers>
<dialing-number>
<display-name>US Local</display-name>
<country-code>1</country-code>
<phone-number>8001112222</phone-number>
</dialing-number>
<dialing-number>
<display-name>China Southern</display-name>
<country-code>86</country-code>
<phone-number>108001234567</phone-number>
</dialing-number>
<dialing-number>
<display-name>Germany</display-name>
<country-code>49</country-code>
<phone-number>01801003825</phone-number>
</dialing-number>
<dialing-number>
<display-name>India, Mumbai</display-name>
<country-code>91</country-code>
<phone-number>2261501727</phone-number>
</dialing-number>
</dialing-numbers>
<moderator>
<display-name>Meeting Code</display-name>
<display-name>PIN Code</display-name>
</moderator>
<participant>
<display-name>Meeting Code</display-name>
</participant>
</jnpr:configuration>
The moderator and participant sections contain <display-name> parameters. These strings are the text included in the collaboration e-mails and in the end-user Preference page that identify the meeting conference code and the host's PIN number. For example, if you change the participant <display-name> from "Meeting Code" to "Participant Passcode":
<participant>
<display-name>Participant Passcode</display-name>
</participant>
The collaboration e-mail invite will look similar to this:
Teleconference Info
---------------------------------------
Participant Passcode: 1234567
Local Access Numbers:
US Local: 12 123456789012345
China Southern: 86 108001234567
Germany: 49 01801003825
India, Mumbai: 91 0008001007678
Any bridge profile configured by the system administrator is available to all user roles.
To download and edit the sample bridge profile template:
1.Select System > Configuration > Pulse Collaboration > Teleconference Bridge Profiles.
2.Click Download Template.
3.Select Save to save the template to your hard drive, or click Open to open the template in your default editor.
4.Edit the template according to the instructions located at the top of the template and save it to your local hard drive. See the above example for the template format.
To upload your modified bridge profile:
1.Select System > Configuration > Pulse Collaboration > Teleconference Bridge Profiles.
2.Click Upload New Profile.
3.Enter a unique name to identify your new bridge profile template.
4.Click Browse to locate your bridge profile and click Open.
5.Click Create New Profile and then click Close Window.
The system parses the profile for syntax errors. If no errors are found, the new bridge profile appears in the Available Bridge Profiles section.
Viewing, Editing and Deleting Your Pulse Collaboration Bridge Profile
Once your Pulse Collaboration bridge profile is created, you can perform the following operations:
•Viewing the Contents of the Pulse Collaboration Bridge Profile
•Editing a Pulse Collaboration Bridge Profile
•Deleting a Pulse Collaboration Bridge Profile
Viewing the Contents of the Pulse Collaboration Bridge Profile
You can view a bridge profile's content at any time. The content includes the:
•Name of each country listed in the profile
•Country code
•Phone number
•Moderator information
•Participant information
To view the contents of a Pulse Collaboration bridge profile:
1.Select System > Configuration > Pulse Collaboration > Teleconference Bridge Profiles.
2.Click the View button next to the profile name that you want to display.
A new window appears displaying the contents of the bridge profile.
3.When you're done, click the Close icon located in the lower right corner of the window.
Editing a Pulse Collaboration Bridge Profile
You can edit a Pulse Collaboration bridge profile at any time. However, you must download the bridge profile to your local system before you can edit it. Updated information will be present the next time a meeting invite e-mail is sent.
To download and edit a Pulse Collaboration bridge profile:
1.Select System > Configuration > Pulse Collaboration > Teleconference Bridge Profiles.
2.Click the Edit/Modify button next to the profile name you just updated.
3.Click Download Profile.
4.Click Open to open the profile in your default text editor or click Save to save the profile to your local drive.
5.Edit your bridge profile.
6.Click Next.
7.Click Browse to locate the bridge profile you just edited and then click Open.
8.Click Update Profile.
The system parses the profile for syntax errors. If no errors are found, an upload successful message appears, and the bridge profile is saved.
9.Click Close Window.
Deleting a Pulse Collaboration Bridge Profile
When you no longer need a Pulse Collaboration bridge profile you can remove it. Once you delete a bridge profile, you cannot retrieve it later.
To delete a Pulse Collaboration bridge profile:
1.Select System > Configuration > Pulse Collaboration > Teleconference Bridge Profiles.
2.Click the Delete button next to the name of the bridge profile you want to remove.
3.Click Delete Profile to delete the bridge profile or click Cancel to close the dialog box without deleting the bridge profile.
Entering the Pulse Collaboration Bridge Profile Conference and PIN IDs
End users can select the default bridge profile and assign their conference ID and host PIN ID through the Preference window of their home page.
When creating a meeting through the web interface, the meeting host can choose whether to include the bridge profile details (phone number, conference code, and PIN number) in the collaboration e-mail.
If you are using the Pulse Collaboration Outlook plug-in, you are given the option to include the bridge profile information in your e-mail.
If the option to include the bridge profile information is disabled, verify that you selected a default bridge profile.
End users must log in to their home page. To set up the conference ID and PIN numbers:
1.Click Preferences and then click Pulse Collaboration.
2.Under Meeting Bridge Profile, do the following:
•Select the bridge profile to use from the Default Meeting Bridge Profile pull-down menu.
•Enter the moderator meeting code and PIN number.
•Enter the participant PIN number.
Typically, there is a slight delay after entering a PIN number and the meeting operator confirming your PIN number. To reduce this delay, append a pound sign (#) to the end of the PIN. For example, 1234#.
•Click Save Changes.
Joining Meetings
Invitees are allowed to join up to 15 minutes before the meeting is scheduled to start. Pulse Collaboration holds its online meetings on the system, allowing both system users and non-system users to attend meetings. (However, non-system meeting attendees cannot access anything on the system except the meeting to which they were invited.)
To join a meeting, Pulse Collaboration invitees must navigate to the meeting site on the Pulse Collaboration server using one of the following methods:
•Use the link provided in the Meetings page (system invitees only).
•Use the link provided in the notification e-mail.
•Enter the meeting URL in a Web browser.
MyMeeting support only entering the meeting URL in a Web browser.
To obtain the URL for a meeting, the meeting creator can look on the Join Meeting page. Or, if you choose to use the default meeting URL, any meeting invitee can determine the appropriate URL by entering the applicable values into the following URL:
https://<YourSA>/meeting/<MeetingID>
Where:
•<YourSA> is the name and domain of the device hosting the meeting, such as YourServer.yourcompany.com. Pulse Collaboration pulls this name from the Hostname field in the System > Network > Overview tab, if defined. Otherwise, Pulse Collaboration pulls the system name from the meeting creator's browser.
•meeting is a literal string. (This string is always the same.) Note that meeting must start with a lower-case "m."
•<MeetingID> is the unique 8-digit identification number that Pulse Collaboration generates for the meeting. If the user does not include the meeting ID in the URL, Pulse Collaboration prompts him for it when he signs into the meeting. For example:
https://connect.acmegizmo.com/meeting/86329712
You can choose to customize the meeting URL using the customized sign-in pages feature. If you do, users cannot access a meeting using the URL described here.
Once they have navigated to the meeting site, authenticated system users can directly join the meeting-they do not need to enter a username or password to access the meeting site on the system since they are already authenticated.
Non-system users must enter a name and password in the meeting sign-in page, however, since they are not yet authenticated. Pulse Collaboration authenticates the non-system users based on the meeting IDs and passwords that they enter in the sign-in page. (Note that the system does not use the invitees' names for authentication-it only uses the names for display purposes during the meeting.)
When an invitee chooses to join a meeting, Pulse Collaboration downloads and launches either a Windows client or a Java applet on to the invitee's system. This client-side component contains a meeting viewer, presentation tools, and a text messaging application. Once Pulse Collaboration launches the Windows client or Java applet on the user's desktop, the user becomes a meeting attendee and can begin participating in the meeting.
When configuring Pulse Collaboration, note that:
- Pulse Collaboration does not work with PAC files on Macintosh or Linux systems.
- Pulse Collaboration allows Windows users to join meetings through an NTLM proxy with or without authentication, provided that their browsers properly support proxies. Pulse Collaboration does not support NTLM proxies on Macintosh or Linux clients.
A few things to note about joining a meeting from an Apple iOS device using the Pulse Client:
- If the Pulse client is not installed on the Apple iOS device, nothing happens when a user clicks the mobile meeting invitation link.
- If a user joins a meeting from an Apple iOS device, the user is removed from the attendee list if the iOS devices goes to sleep or is locked. The user is added back to the attendee list after the device is awakened or unlocked.
Sign-in UR L Cookie
The last meeting sign-in URL ID is saved in a cookie. If you access another sign-in URL, this cookie is overwritten. If you access the collaboration server without a sign-in URL information, the web server uses the saved cookie and redirects you to the last sign-in URL you used.
For example, suppose User A schedules a meeting and makes User B the meeting host. User B receives an e-mail invite with the meeting host URL similar to this: https://vpn.mycompany.com/dana/meeting/weekly.cgi?t=65837483. When User B clicks this URL to start the meeting, User B is directed to the last sign-in URL they accessed from that system. If they previously accessed https://vpn.mycompany.com/vpn, clicking the URL in the e-mail invite redirects User B to https://vpn.mycompany.com/vpn. If User B did not previously access any sign-in URL, clicking the URL in the e-mail invite redirects User B to https://vpn.mycompany.com as expected.
A workaround is for User B to log in to the collaboration server and to start the meeting manually. This guarantees that the correct sign-in URL is used.
Attending Meetings
By default, as soon as an attendee joins a meeting, he can see the names of other users who are attending the meeting and can start sending text messages to them using the Pulse Collaboration Chat window. However, you can choose to disable these capabilities in order to make meetings more secure or productive.
For instance, if your company's CFO chooses to hold a meeting with your company's analyst community, you can choose to hide attendee names in order to keep the identities of the analysts confidential. Additionally, you can choose to disable text chatting so that the meeting attendees cannot disrupt the CFO's presentation.
You can disable text chatting and enable hidden names for individual user roles. Or, you can specify that meeting creators within the role can decide themselves whether or not Pulse Collaboration hides attendee names. If you do, meeting creators can make this choice in the following situations:
•When scheduling or modifying a meeting from the Meetings page of the standard system interface. (The meeting creator cannot choose to hide attendee names from the Microsoft Outlook scheduling interface.)
•When joining a standard meeting or instant meeting. (Note, however, that the meeting creator can only choose to hide attendee names if he is the first person to join the meeting. If another attendee joins the meeting before the creator, Pulse Collaboration automatically displays the names of the meeting attendees and does not allow the meeting creator to change the display setting.)
If you or the meeting creator chooses to hide attendee names, Pulse Collaboration users can only see their own names and the names of the meeting host and presenter.
The Pulse Collaboration Chat functionality only supports users using the same language encoding (based on the Web browser settings) in a single meeting. Using a different encoding results in garbled text. Meeting invitations are sent based on the language setting in the creator's Web browser when meetings are created or saved.
Conducting Meetings
The meeting host is a system user who is responsible for starting the meeting. Pulse Collaboration grants the host the following responsibilities and capabilities in order to help him effectively run his meeting:
•Starting the meeting presentation - Before the host joins, the other attendees can only chat. They cannot view or make a presentation because the host is also the default meeting presenter. The meeting presenter starts the meeting presentation by sharing his desktop or applications with other attendees.
•Passing host and presenter rights - The meeting host can choose to pass some or all of his responsibilities to another meeting attendee. For instance, after joining the meeting, the host can specify that another attendee should start the meeting presentation by passing that attendee presenter rights. The host can pass his host rights to any other system user and pass his presenter rights to any other system user or non-system user.
•Monitoring the meeting - The meeting host is responsible for expelling meeting attendees if necessary. The meeting host can also see the names of all meeting attendees so that he can determine who is attending.
•Ending the meeting - The meeting host is responsible for extending the meeting if it runs over the scheduled duration and closing the meeting when it is done.
Presenting Meetings
Once the presenter begins sharing, a meeting viewer automatically opens on all of the meeting attendees' desktops and displays the presenter's shared applications. Pulse Collaboration grants the presenter the following capabilities in order to help him effectively present to other users:
•Sharing multiple applications - The presenter can share a single application, multiple applications, or his entire desktop with other meeting attendees. (Note that Macintosh users cannot share individual applications. The can only share their desktops.)
•Passing controller rights - The meeting presenter can designate a controller. A meeting controller uses his own mouse and keyboard to remote control the presenter's shared desktop or applications. The presenter can pass remote control rights to any other attendee. When the presenter wants to regain control of his remote-controlled applications, he simply needs to click and Pulse Collaboration returns control to the presenter.
Like the meeting host, the meeting presenter can also see the names of all meeting attendees. Pulse Collaboration allows him to view all attendee names so that he knows to whom he is passing controller rights.
Pulse Collaboration cannot display the content of meeting presenter's desktop if it is locked.
Viewers on Linux and Macintosh clients may take a while to load the presentation if the presenter's desktop screen area is larger than 1856 x 1392.
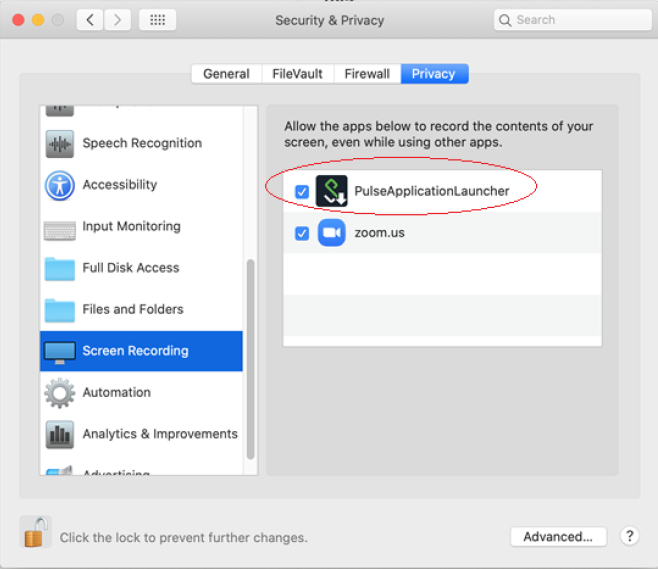
Presenting Meetings in macOS Mojave and above
1.You must grant permission to allow remote access and to share the screen in Pulse Collaboration meeting.
When you start screen sharing from macOS Catalina, the following window appears.
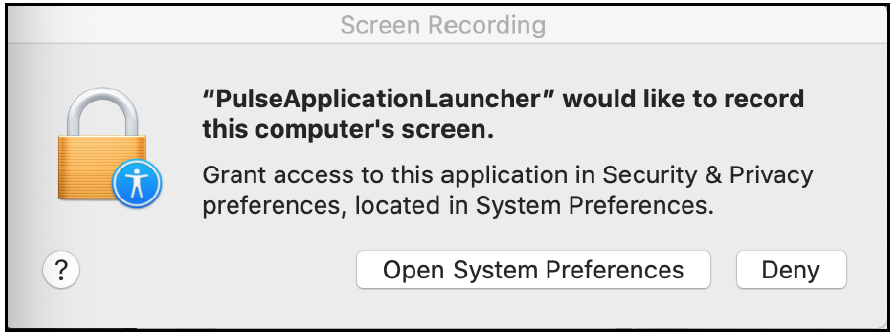
2.In the window, click Open System Preferences.
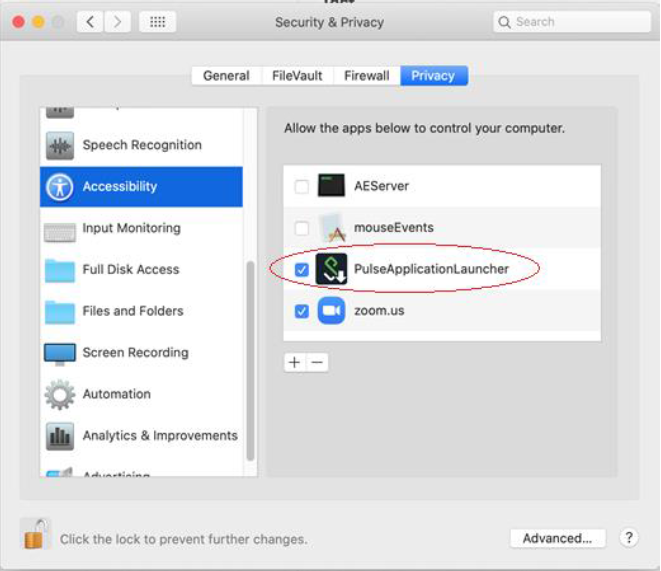
The Security & Privacy window appears with the Privacy tab enabled.
Skip the steps 3 and 4 if remote control access is not required or not allowed.
3.From the options listed in the left of Security & Privacy window, select Accessibility.
4.Enable PulseApplicationLauncher to provide the access for Remote Control.
If PulseApplicationLauncher is not available in the apps, then you have to add it manually using the ‘+’ button.
If PulseApplicationLauncher is enabled already, you must disable and enable it again every time before sharing your desktop.
Steps 5 and 6 are only applicable to macOS Catalina.
5.From the options listed in the left window, select Screen Recording.
6.Enable PulseApplicationLauncher to proceed with screen sharing.
About Instant Meetings and Support Meetings
Instant meetings and support meetings are meeting that users can quickly create without going through Connect Secure or Microsoft Outlook scheduling pages. Instead, a Connect Secure user simply needs to click the Instant Meeting button or Support Meeting button in the end-user console and click Start Meeting. The system then starts the meeting.
When creating instant meetings and support meetings, the system expedites the process by skipping certain scheduling steps. For instance, the system does not prompt the meeting creator to add the e-mail addresses of other invitees. Instead, it makes the meeting creator the only meeting invitee. The meeting creator can then provide other invitees with the information they need to join the meeting, such as the meeting URL, ID, and password.
The system also expedites the scheduling process by making certain assumptions about what the meeting attendees want to do. For instance, in addition to making the meeting creator the only meeting invitee, the system also assumes that he wants to run the meeting and therefore makes him the meeting host. (In fact, since other attendees are probably joining the meeting through the meeting URL instead of the end-user console, the meeting creator is the only user who can conduct the meeting. Additionally, the system automatically assigns a meeting name ("Pulse Collaboration (MeetingID)" for instant meetings and "Support Meeting (MeetingID)" for support meetings), a meeting start time and date (immediately), a meeting duration (one hour), and a meeting recurrence (one-time meeting).
The system also uses default settings that correspond to the meeting type:
•Instant meeting - An instant meeting is basically a standard meeting that users can create more quickly. Therefore, when a user chooses to create an instant meeting, the system applies all of the user's role-level settings, such as authentication requirements, remote control, and secure chatting.
•Support meeting - A support meeting is a two-person meeting that is primarily intended to allow a system user to quickly troubleshoot another user's problem. Therefore, the system does not enable all of the user's role-level settings. Instead, the system automatically enables those options that facilitate quick troubleshooting and disables other settings, as described below:
•Desktop sharing enabled - When the second user joins the meeting, the system automatically shares his desktop with the meeting host, enabling the host to immediately view the user's problem without having to explain what a meeting presenter is or how to share a desktop.
•Remote control initiated - When the second user joins the meeting, the system automatically asks him whether the host can remote control his desktop. Assuming the user clicks Yes, the meeting creator can immediately start navigating through the user's computer in order to find and fix the problem. If the user clicks No, the host can gain remote control later using the standard request mechanisms.
•Secure chatting disabled - The system does not expose the secure chatting feature during a support meeting, since users should not need to send text messages to each other. Instead, the users should talk to each directly over the phone.
About MyMeeting Meetings
MyMeetings, or personal meetings, are meetings that users can quickly create without going through the system or Microsoft Outlook scheduling pages. Instead, a user simply needs to click the Meeting button in the end-user console, enter the meeting subject and click Start Meeting. The system then starts the meeting.
MyMeeting meetings are different from instant meetings in that MyMeeting meetings have a fixed meeting URL for a specific meeting. You can bookmark this URL since it doesn't change. Meetings name must be unique within your personal meeting list and can be reused indefinitely until it is deleted by either the owner or the administrator. The meeting URL uses the format:
https://YourDevice/MyMeetingRoot/userToken/MeetingID
where:
•YourDevice is the name and domain of the device hosting the meeting, such as yourserver.yourcompany.com. Pulse Collaboration pulls this name from the Hostname field in the System > Network > Overview tab, if defined. Otherwise, Pulse Collaboration pulls the device name from the meeting creator's browser.
•MyMeetingRoot is the root string of your personal URL. By default, the root is meeting.
•userToken is a string that uniquely identifies this URL. It can be the user's username, a string (with a number automatically appended for uniqueness), or an expression. For example:
https://my.company.com/meetings/chris/
https://my.company.com/meetings/room1
https://my.company.com/meetings/chris.andrew
•MeetingID is the meeting name token for this meeting. It is static for a particular meeting, and can be reused indefinitely until it is deleted. For example:
https://my.company.com/meetings/chris/weeklystaff
The user's Meetings page displays their personal meeting address(es). Users can send this URL to the invitees to join whenever the meeting starts.
All past meetings are listed on the user's Meetings page, making it easy to locate a specific meeting and retrieve the meeting details.
Joining MyMeeting Meetings
Attendees can join the MyMeeting meeting by entering the meeting URL in a browser.
Once they have navigated to the meeting site, authenticated system users can directly join the meeting-they do not need to enter a username or password to access the meeting site on the system since they are already authenticated.
Non-system users must enter a name and password in the meeting sign-in page, however, since they are not yet authenticated. MyMeeting authenticates the non-system users based on the meeting IDs and passwords that they enter in the sign-in page. (Note that the system does not use the invitees' names for authentication-it only uses the names for display purposes during the meeting.)
Enabling and Configuring Pulse Collaboration
To enable and configure meetings:
1.In the admin console, choose Users > User Roles.
2.Select a role.
3.If you have not already enabled Pulse Collaboration, in the General > Overview tab, select the Meetings check box and click Save Changes.
If you do not select the Meetings check box, users cannot create meetings, schedule meetings, or view the Meetings page. Note, however, that they can still attend the meetings to which they are invited by using the link provided in their invitation e-mails or by directly entering the meeting URL in to their web browsers.
4.Choose the Meetings > Options tab.
5.Under Meeting Types section, specify the type of meeting you want to provide users:
•Users cannot create meetings - Select this option to disable meeting creation and scheduling, but still provide users access to the Meetings page in order to join the meetings to which they are invited.
•MyMeetings - Select this option to allow users to create personal meetings without having to schedule them ahead of time.
•Users can create additional meeting URLs under their personal URL - Select this check box if you want to enable users to create additional <meetingID> tokens.
•Users can create Support meetings - Select this check box if you want to enable users to create two-person support meetings.
•Standard Meetings - Select this option to allow users to create scheduled meetings through the Meetings page.
•Users can create Scheduled meetings - Select this check box to allow users to create scheduled meetings.
•Users can create Instant meetings - Select this check box to allow users to create instant meetings.
•Users can create Support meetings - Select this check box if you want to enable users to create two-person support meetings.
6.Under Authentication Requirements, specify the authentication restrictions that you want users to apply to the meetings that they create:
•Meeting password optional (more accessible) - Select this option to allow the meeting creator to decide whether or not the meeting requires a password to join. When you choose this option, anyone who knows the meeting URL, ID number, and password (if applicable) can join the meeting, including non-system users.
•Require meeting password (more secure) - Select this option to require the meeting creator to either create a meeting password or use the one generated by Pulse Collaboration. When you choose this option, anyone who knows the meeting URL, ID number, and password can join the meeting, including non-system users.
•Require server-generated password (even more secure) - Select this option to require the meeting creator to use the password generated by Pulse Collaboration. When you choose this option, anyone who knows the meeting URL, ID number, and password can join the meeting, including non-system users.
•Require secure gateway authentication (most secure) - Select this option to only allow invited users authenticated against the system to attend meetings. When you choose this option, the meeting creator does not need to create a meeting password, since all users must authentication through the system.
7.(MyMeeting only) Under Password Options, specify password requirements.
•Minimum length - Set the minimum character length for passwords.
•Maximum length - Set the maximum character length for passwords (optional). The maximum length cannot be less than the minimum length. There is no maximum limit to the length.
•Password must have one or more digits - Select this option to require passwords to have at least one digit.
•Password must have one or more letters - Select this option to require passwords to have at least one letter.
•Password must have mix of UPPERCASE and lowercase letters - Select this option if you want all passwords to contain a mixture of upper- and lowercase letters.
•Password must be different from username - Select this option if the password cannot equal the username.
8.(MyMeeting only) Under Password Management, specify when passwords should be changed.
•Allow meeting creator to decide - Select this option to let the meeting creator decide when to change the password.
•Every_meetings - Select this option to specify the number of meetings after which a password expires.
9.(Standard Meetings only) Under Password Distribution, specify the distribution method that you want meeting creators to employ:
•Do not display the password in the notification email (more secure) - Select this option to require that meeting creators manually distribute the meeting password to invitees. When you select this option, Pulse Collaboration does not distribute the password in the automatic e-mail notifications it sends to invitees and Microsoft Outlook does not display the Pulse Collaboration tab (which contains the meeting password) to invitees. Omitting the password from the meeting e-mail and Microsoft Outlook calendar entry helps increase meeting security.
•Display the password in the notification email (more accessible) - Select this option to automatically distribute the meeting password in the e-mail notification sent by Pulse Collaboration and to display the Pulse Collaboration tab in Microsoft Outlook calendar entries.
•Allow the meeting creator to decide - Select this option to allow the meeting creator to determine whether or not Pulse Collaboration and Microsoft Outlook should automatically distribute the meeting password to meeting invitees.
You must enable an e-mail server in order to send meeting notification e-mails.
10.(Instant or Scheduled meetings only) Under Attendee Names, specify whether you want Pulse Collaboration to display the names of attendees during a meeting:
•Do not allow hiding of attendee names - Select this option to always display the names of meeting attendees.
•Allow meeting creator to hide attendee names - Select this option to allow the meeting creator to decide whether or not to display the names of meeting attendees.
•Hide attendee names - Select this option to always hide the names of meeting attendees. Note that when you select this option, Pulse Collaboration still exposes the names of the meeting host and presenter to other meeting attendees.
11.(Instant or Scheduled meetings only) Under Remote Control, specify whether you want to allow meeting presenters to share control of their desktops and applications with other meeting attendees:
•Allow remote control of shared windows (more functional) - Select this option to allow the meeting presenter or host to pass control of the presenter's desktop and desktop applications to any of the meeting attendees, including non-system users.
•Disable remote control (more secure) - Select this option to limit control of the meeting presenter's desktop and desktop applications exclusively to the presenter.
12.Under Secure Chat, indicate whether or not you want to allow users to chat during their meetings:
•Allow secure chat (more functional) - Select this option to enable chatting in the meetings that are created by users who map to this role.
•Disable secure chat (more secure) - Select this option to disable chatting in the meetings that are created by users who map to this role.
If you change this setting while a meeting is in progress (that is, after any user has joined the meeting), Pulse Collaboration does not apply the modified setting to the in-progress meeting.
13.(Standard Meetings only) Under Pulse Collaboration for Outlook, select the Allow users to download Pulse Collaboration for Outlook Plugin check box if you want to allow users to schedule secure meetings through Microsoft Outlook.
14.Under Meeting Policy Settings, indicate whether or not you want to restrict the resources that are used by Pulse Collaboration users:
•Limit number of simultaneous meetings - Select this check box and enter a corresponding value to specify the maximum number of meetings that may be held by at any given time by members of the role.
•Limit number of simultaneous meeting attendees - Select this check box and enter a corresponding value to specify the maximum number of people that may simultaneously attend meetings scheduled by members of the role.
•Limit duration of meetings (minutes) - Select this check box and enter a corresponding value to specify a maximum duration (in minutes) that a meeting may run.
The system also limits the number of meetings users can attend. An individual user can only attend one meeting at a time per computer and cannot attend more than 10 consecutive meetings within a 3-minute period.
15.Click Save Changes. The system adds a Meeting link to the secure gateway home pages of the users in the specified role.
Permissive Merge Guidelines for Pulse Collaboration
If you choose to merge roles, the system merges all options on the Users > User Roles > Select Role > Meetings > Options page to favor more accessible settings rather than more secure, except policy settings. When applying the policy settings that control the number of meetings and attendees allowed per role, Pulse Collaboration runs through the various roles trying to find one whose limit is not yet reached.
For example, you might specify that the following roles can schedule the following number of meetings:
•Engineering: 25 meetings
•Management: 50 meetings
•Sales: 200 meetings
If Joe maps to all of these roles (in the order listed), and tries to schedule a meeting, Pulse Collaboration first checks whether the scheduled meeting limit for Engineering has been met. If it has, Pulse Collaboration then checks the Management meeting quota. If that limit has been met, Pulse Collaboration checks the limit for the Sales role. Only when the limit for all of these roles has been reached does display a message to Joe telling him that the scheduled meeting limit has been reached and he cannot create a meeting. You cannot limit the number of meetings or meeting users at the realm level.
Specifying Authentication Servers That Meeting Creators Can Access
You can specify which authentication servers meeting creators may access and search when inviting other system users to meetings. When specifying servers, you can select any authentication server that you have enabled through the Authentication > Auth. Servers page of the admin console.
When you enable servers for meeting creators, Pulse Collaboration displays the following tabs to them in the Add Invitees dialog box:
•Local - Using the Local tab, the meeting creator may access and search for users from any enabled authentication server (including LDAP servers). The meeting creator may access and search all users that are managed through a local system authentication server in addition to all users that are managed by other types of authentication servers and cached in the system's memory. The meeting creator cannot view or search for users who are included in a non-system server's database but have not yet signed in to the system and created persistent data (such user bookmarks or password modifications).
•LDAP - If you enable an LDAP server, Pulse Collaboration displays the LDAP tab in the Add Invitees dialog box. The meeting creator may use this tab to access and search for all users in the enabled LDAP server(s)-not just those users who are cached in the system's memory. When a meeting creator adds a user through the LDAP tab, Pulse Collaboration also uses the e-mail attribute defined in the LDAP server to populate the invitee's e-mail address in his notification e-mail.
When adding local and LDAP users, the meeting creator's ability to access and search the servers is dependent on options you specify in the Auth Servers tab of the admin console. This tab contains two options that you may use to control access to each authentication server:
•Access - Select this option to allow the meeting creator to add and validate users from the corresponding authentication server. If you enable this option, Pulse Collaboration validates any users that the meeting creator tries to add from this server. If the meeting creator enters the name of a user that does not exist, Pulse Collaboration displays a warning to the creator when he finishes configuring the meeting and removes the invalid user from the list of invitees. If you disable this option, the meeting creator must use e-mail addresses instead of system usernames to invite any users from this server to a meeting. Pulse Collaboration then treats the specified users as non-system invitees.
•Search - Select this option to allow the meeting creator to search user entries in the corresponding authentication server. If you enable this option, Pulse Collaboration displays information about all available users who match the search criteria entered by the meeting creator. If you disable this option, the meeting creator must know the exact username and authentication server of the system users that he wants to invite to the meeting.
If you enable an LDAP server, note that it must be searchable. Also note that you may use options in the Authentication > Auth. Servers > Select LDAP Server > Meetings tab to specify individual LDAP attributes that Pulse Collaboration should display to meeting creators when they search an LDAP database.
To specify which authentication servers' users may access and search when scheduling a meeting:
1.In the admin console, choose Users > User Roles.
2.Select a role.
3.If you have not already enabled Pulse Collaboration, in the General > Overview tab, select the Meetings check box and click Save Changes.
4.Choose the Meetings > Auth Servers tab.
5.In the User's Authentication Server section, indicate whether the members of this role may access and search the authentication servers that they are currently authenticated against.
6.In the Authentication Servers section, indicate additional authentication servers that members of this role may access and search.
7.Click Save Changes.
Configuring System-Level Meeting Settings
Unlike other access features, Pulse Collaboration does not have a resource policy. Instead, you configure system-level settings that apply to all roles for which this feature is enabled. You can:
•Specify session lifetime limits for meetings.
•Enable daylight savings adjustments to scheduled meetings.
•Specify the maximum color depth of meeting presentations.
•Enable automatic e-mail notifications for users who are invited to meetings scheduled through the end user console.
•Define the MyMeeting URL.
To configure Pulse Collaboration:
1.In the admin console, choose System > Configuration > Pulse Collaboration.
2.In the Session lifetime section, specify values for:
•Idle Timeout - Use this field to specify the number of minutes a meeting session may remain idle before ending.
•Max. Session Length - Use this field to specify the number of minutes a meeting session may remain open before ending.
The values entered here apply to the meeting session, not the system session. For example, you may enter lower session lifetime values in the Users > User Roles > Select Role > General > Session Options page of the admin console. If the user reaches one of the role-level values before joining a meeting, he must sign back in to the device in order to access the meeting through the end user console. If the user reaches these role-level values after joining a meeting, however, they are not applied to the meeting. He may continue attending the meeting uninterrupted until he reaches the resource policy-level limits specified here.
3.In the Upload logs section, select Enable Upload Logs to allow non-system users to upload meeting logs.
If you select the Upload logs option, you must also use settings in the System > Log/Monitoring > Client Logs > Settings page of the admin console to enable client-side logging.
4.In the MyMeeting section, specify values for:
•Root meeting URL - Select the meeting URL you want associated with MyMeeting meetings. Meeting URLs are created in the Authentication > Signing In > Sign-In Policies page.
•Meeting name - Specify the token to append to the meeting URL to uniquely identify this URL. You can use:
•Username - Append the user's username to the meeting URL.
•Sequential room number with prefix - Specify a string to append to the meeting URL, such as a "meeting". Numbers will be appended to the string to ensure uniqueness. For example, meeting_room1, meeting_room2, etc.
•Expression - Append an expression, such as <userAttr.lname>, to the meeting URL. If the attribute is not valid, username is appended to the meeting URL instead.
Changing this token affects only users who have not created meetings. Users who have already created MyMeetings retain their existing token setting.
To view a list of MyMeeting URLs users have already created, see System > Status > Meeting Schedule. Choose MyMeeting URLs from the View drop-down menu.
1.In the Email meeting notifications section, select Enabled to enable an SMTP e-mail server. Then:
•In the SMTP Server field, enter the IP address or hostname of an SMTP server that can route e-mail traffic from the appliance to the meeting invitees.
•In the SMTP Login and SMTP Password fields, enter a valid login name and password for the specified SMTP e-mail server (if required by the SMTP server).
•In the SMTP Email field, enter your e-mail address or the address of another administrator. Pulse Collaboration uses the specified address as the sender's e-mail if the e-mail creator does not configure his own e-mail address on the system.
If you enable an SMTP server for use with Pulse Collaboration, you should also define a virtual hostname for your system in the Hostname field of the System > Network > Overview tab. Pulse Collaboration uses the name you specify when populating notification e-mails with meeting URLs and when making SMTP calls. If your system maps to multiple names and you do not define a virtual hostname, you may need to restrict which name users sign in to before creating a meeting. For example, if your system maps to an internal name (such as sales.acmegizmo.com) that is only accessible from inside your company's firewall and another name (such as partners.acmegizmo.com) that is accessible from anywhere, users should sign in to partners.acmegizmo.com before creating meetings. Otherwise, non-system invitees will receive e-mail notifications containing links to the system to which they cannot connect.
•Select whether to enable iCal attachments. If you disable this option, meeting invites are sent as an HTML text message, not as invites that can be imported into your calendar tool. By default, iCal attachments are enabled.
2.In the Options section, configure daylight savings and color-depth options:
•From the Observe DST rules of this country list, specify the country whose daylight savings time rules the system should observe. The client uses this setting as a baseline and then adjusts meeting times for individual users as necessary based on browser settings and client-side DST preference settings.
When a user signs into the device, Pulse Collaboration determines his time zone by running an ActiveX component called "Timezone Grabber" on his machine.
•Select Enable 32-bit (True Color) Presentations to allow users to present in true color. By default, Pulse Collaboration presents applications to users using the same color-depth as the presenter's desktop (up to 32-bit color). If you do not select this option and a user presents an application in 32-bit color, however, Pulse Collaboration changes the image to 16-bit to improve performance.
3.Click Save Changes.
4.Configure Pulse Collaboration settings for individual roles.