Deploying PCS Active-Active Cluster using Virtual Traffic Manager in Microsoft Azure
This section describes deploying PCS A-A cluster with vTM load balancer in Microsoft Azure.
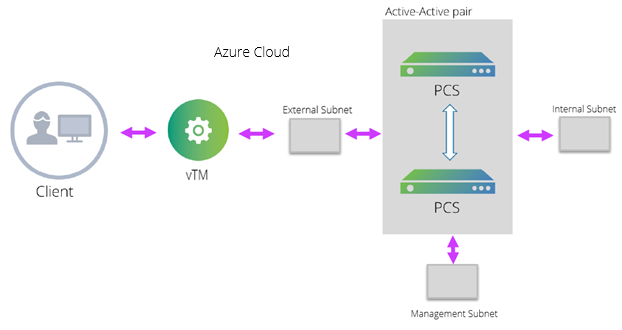
Deploying PCS A-A Cluster Topology Diagram
The deployment process involves the following steps:
•Deploying Two PCS EC2 instances Using ARM Template
•Forming the Active-Active Cluster
•Deploying Virtual Traffic Manager EC2 Instance in the External Subnet of PCS in Microsoft Azure
•Setting Up and Configuring vTM for External Users
Deploying Two PCS EC2 instances Using ARM Template
PCS can be deployed in Azure using ARM template in a 3-armed model. Based on the need, deploy two PCS instances using the json template from one of the following zip files:
•pulsesecure-pcs-3-nics.zip
•pulsesecure-pcs-3-nics-existing-vnet.zip
Forming the Active-Active Cluster
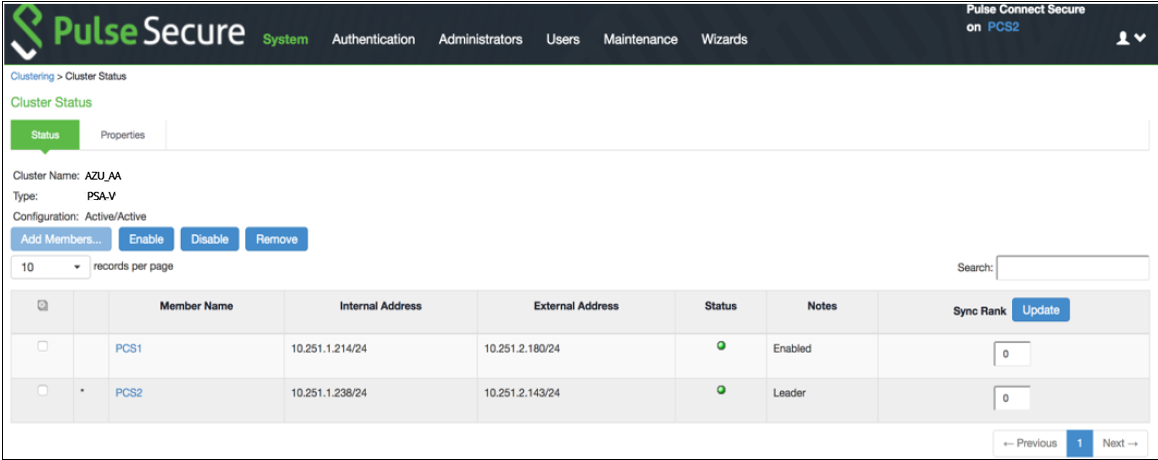
Once the two PCS instances are initialized, form the Active-Active cluster between them. For details about creating PCS clusters, refer to PCS Administration Guide.
PCS A-A Cluster Status
Deploying Virtual Traffic Manager EC2 Instance in the External Subnet of PCS in Microsoft Azure
Virtual Traffic Manager can be deployed through either Azure Marketplace or Azure CLI.
Deploying Virtual Traffic Manager through Marketplace includes the following steps:
To deploy through Marketplace, follow the below steps:
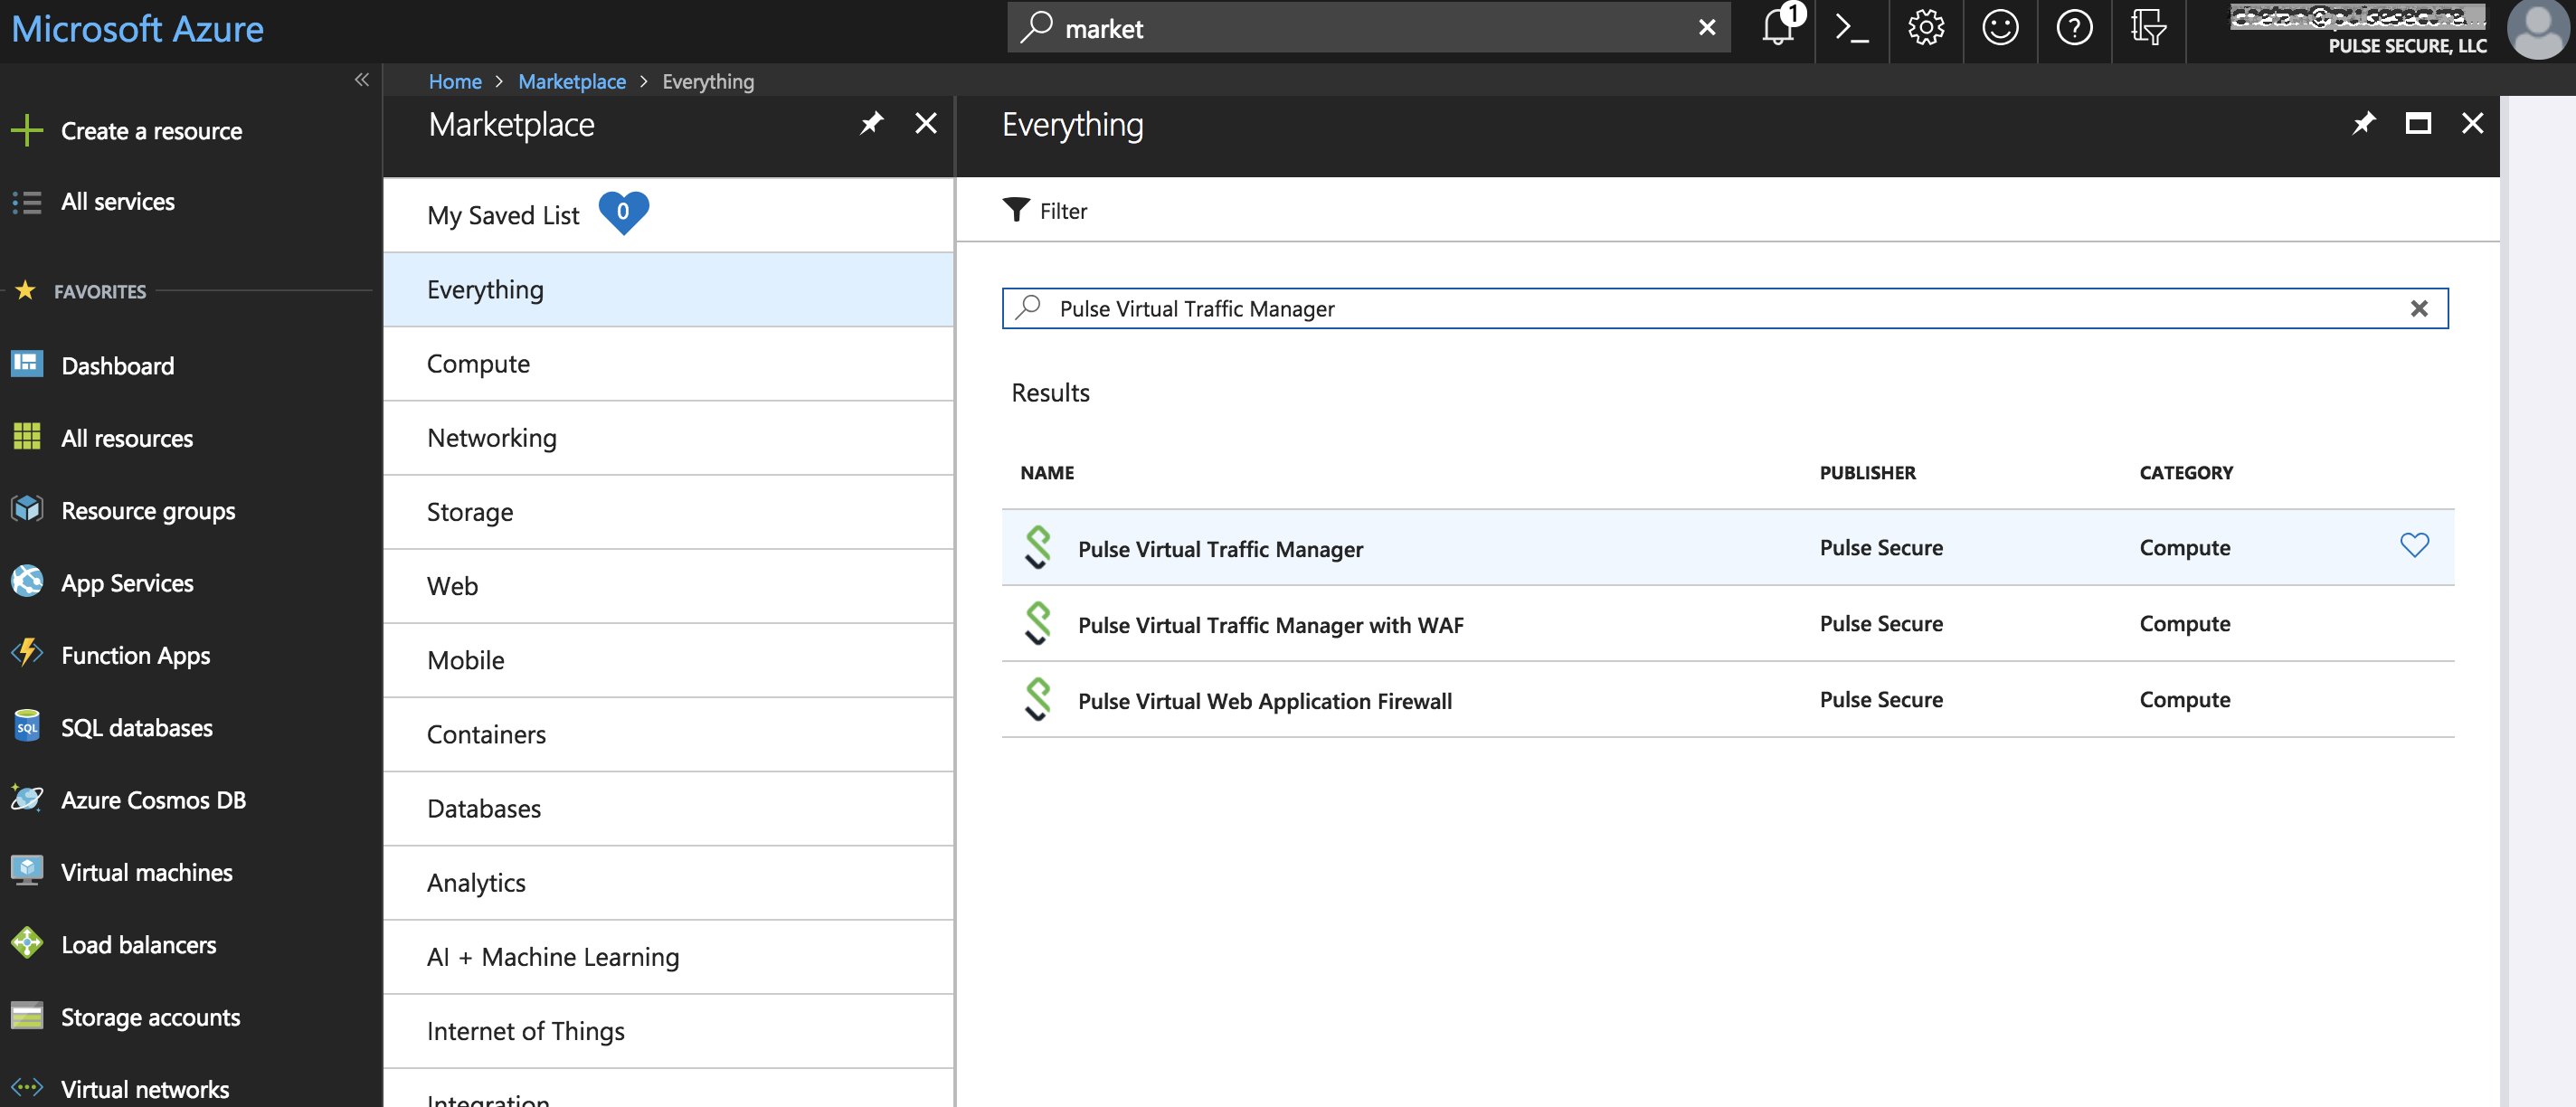
1.Search and select Pulse Secure vTM in Azure Marketplace.
Azure Marketplace > Pulse Secure vTM
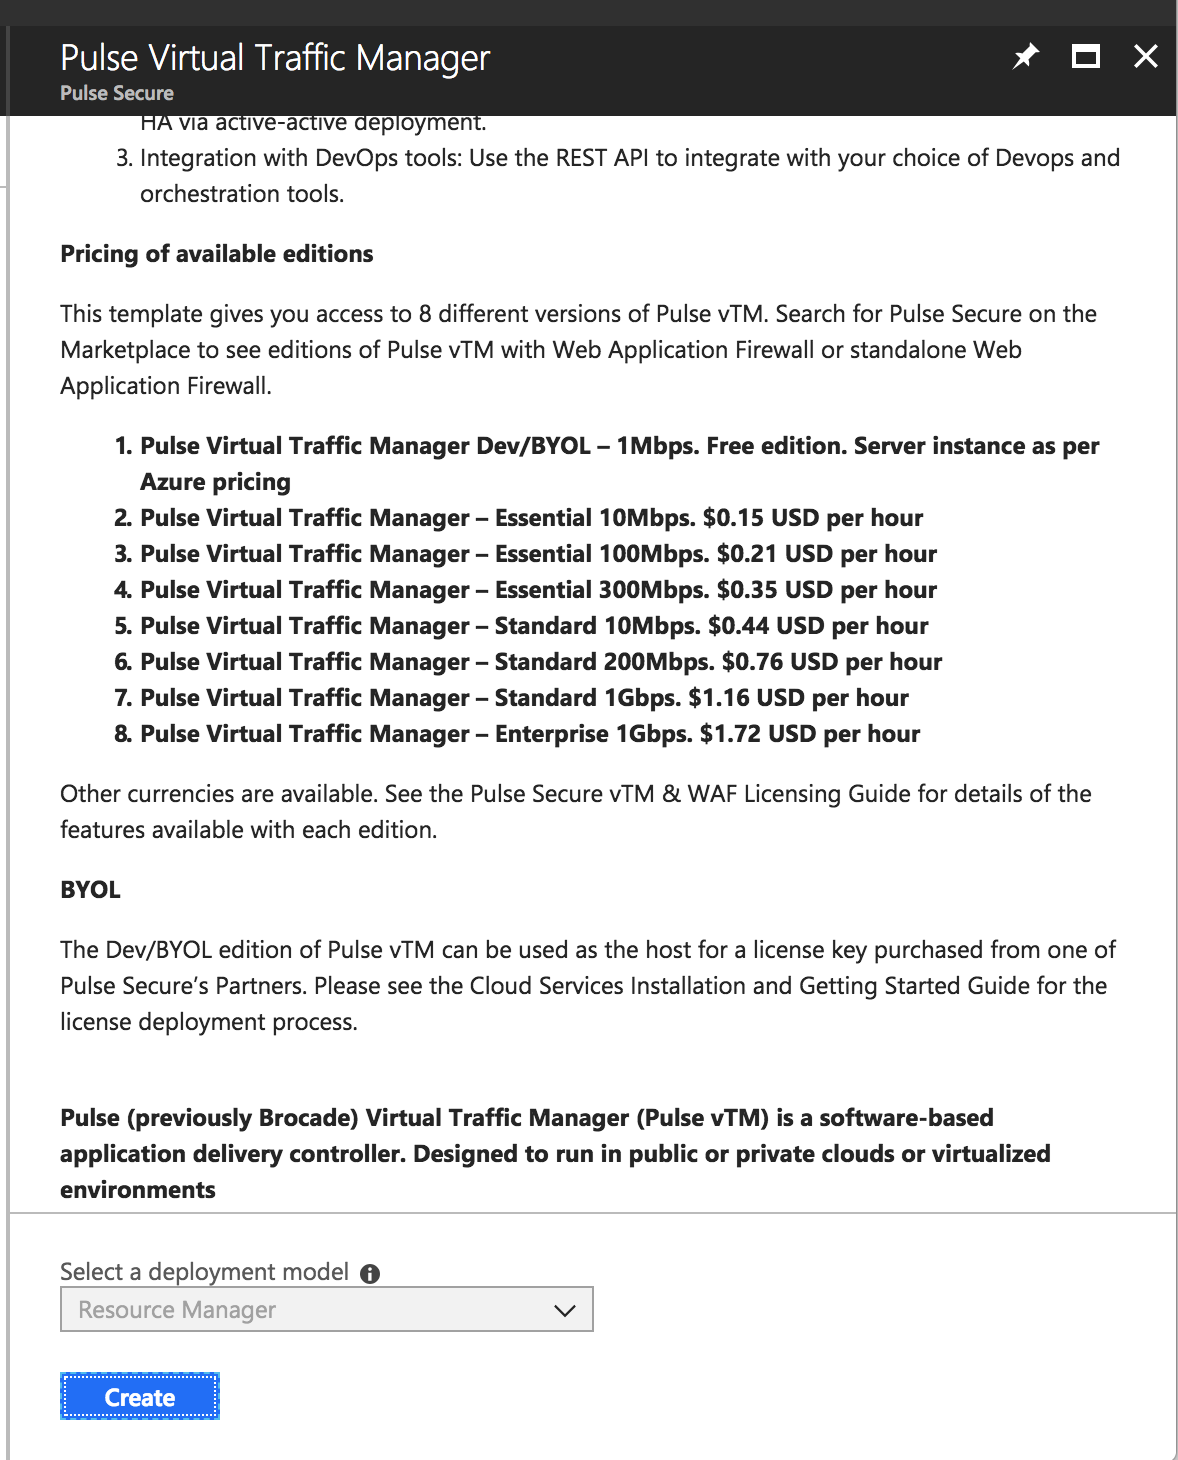
2.Select the required deployment model and click Create.
vTM Editions Available in Azure Marketplace
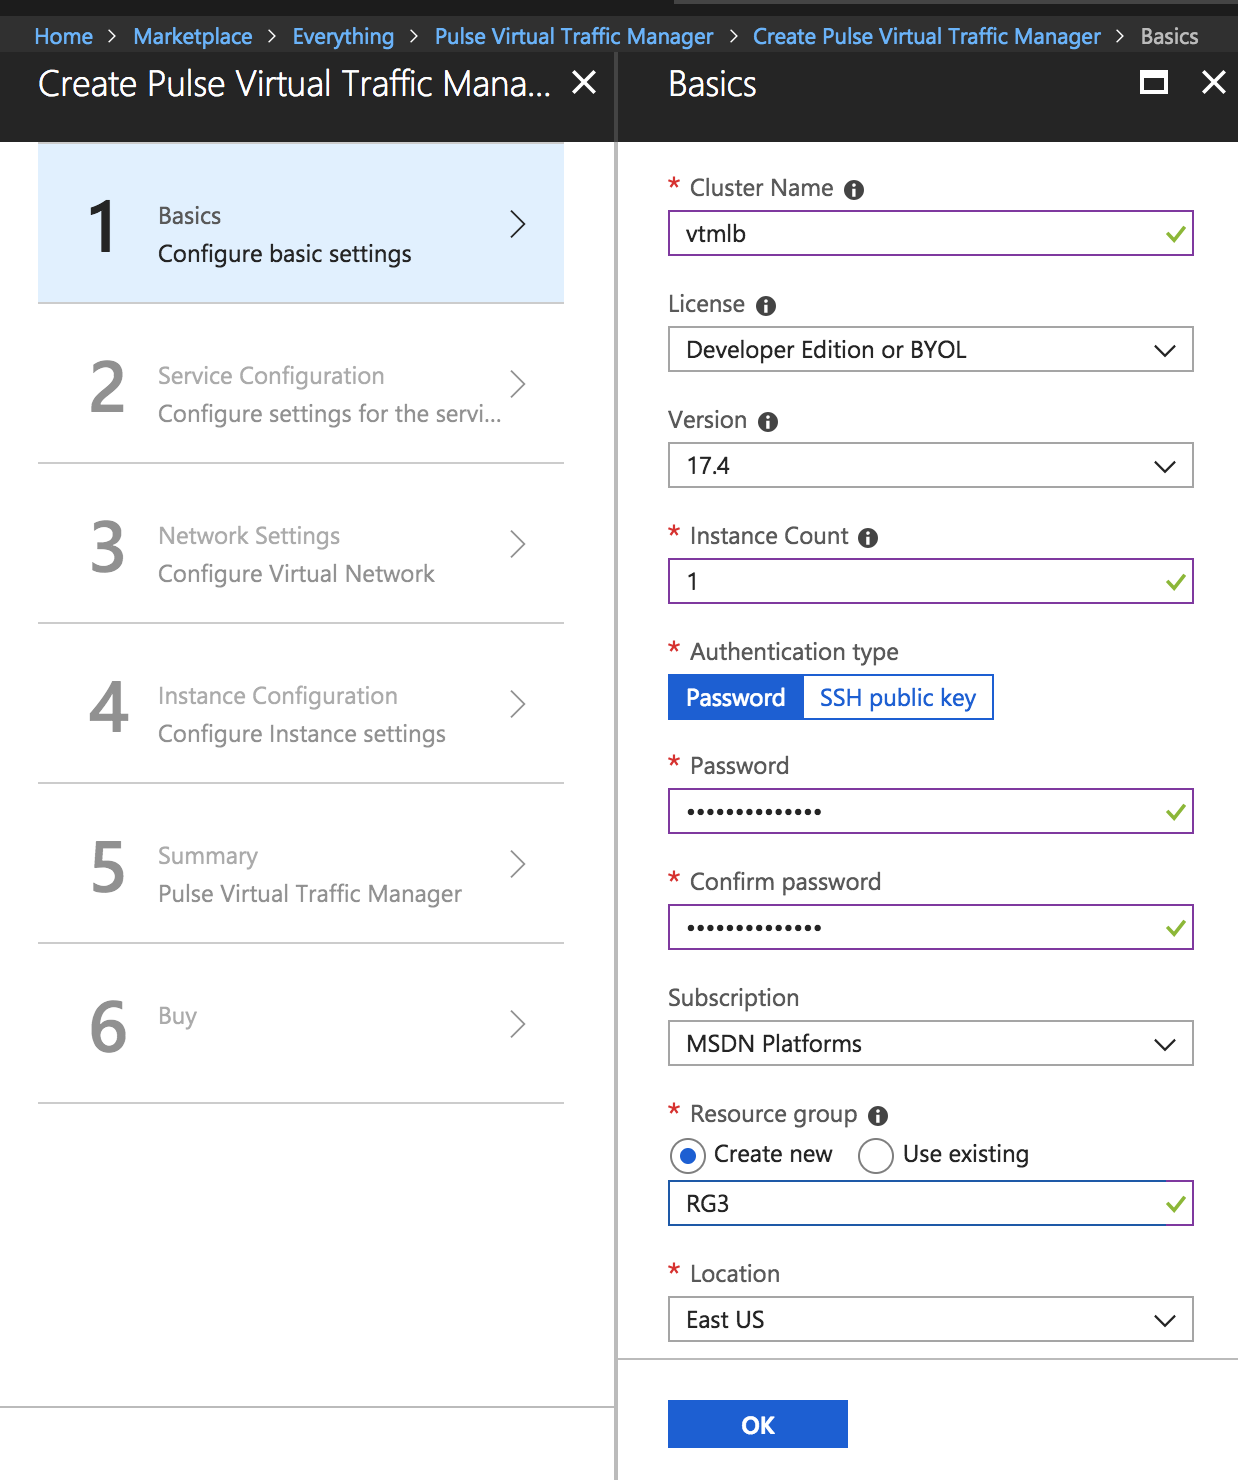
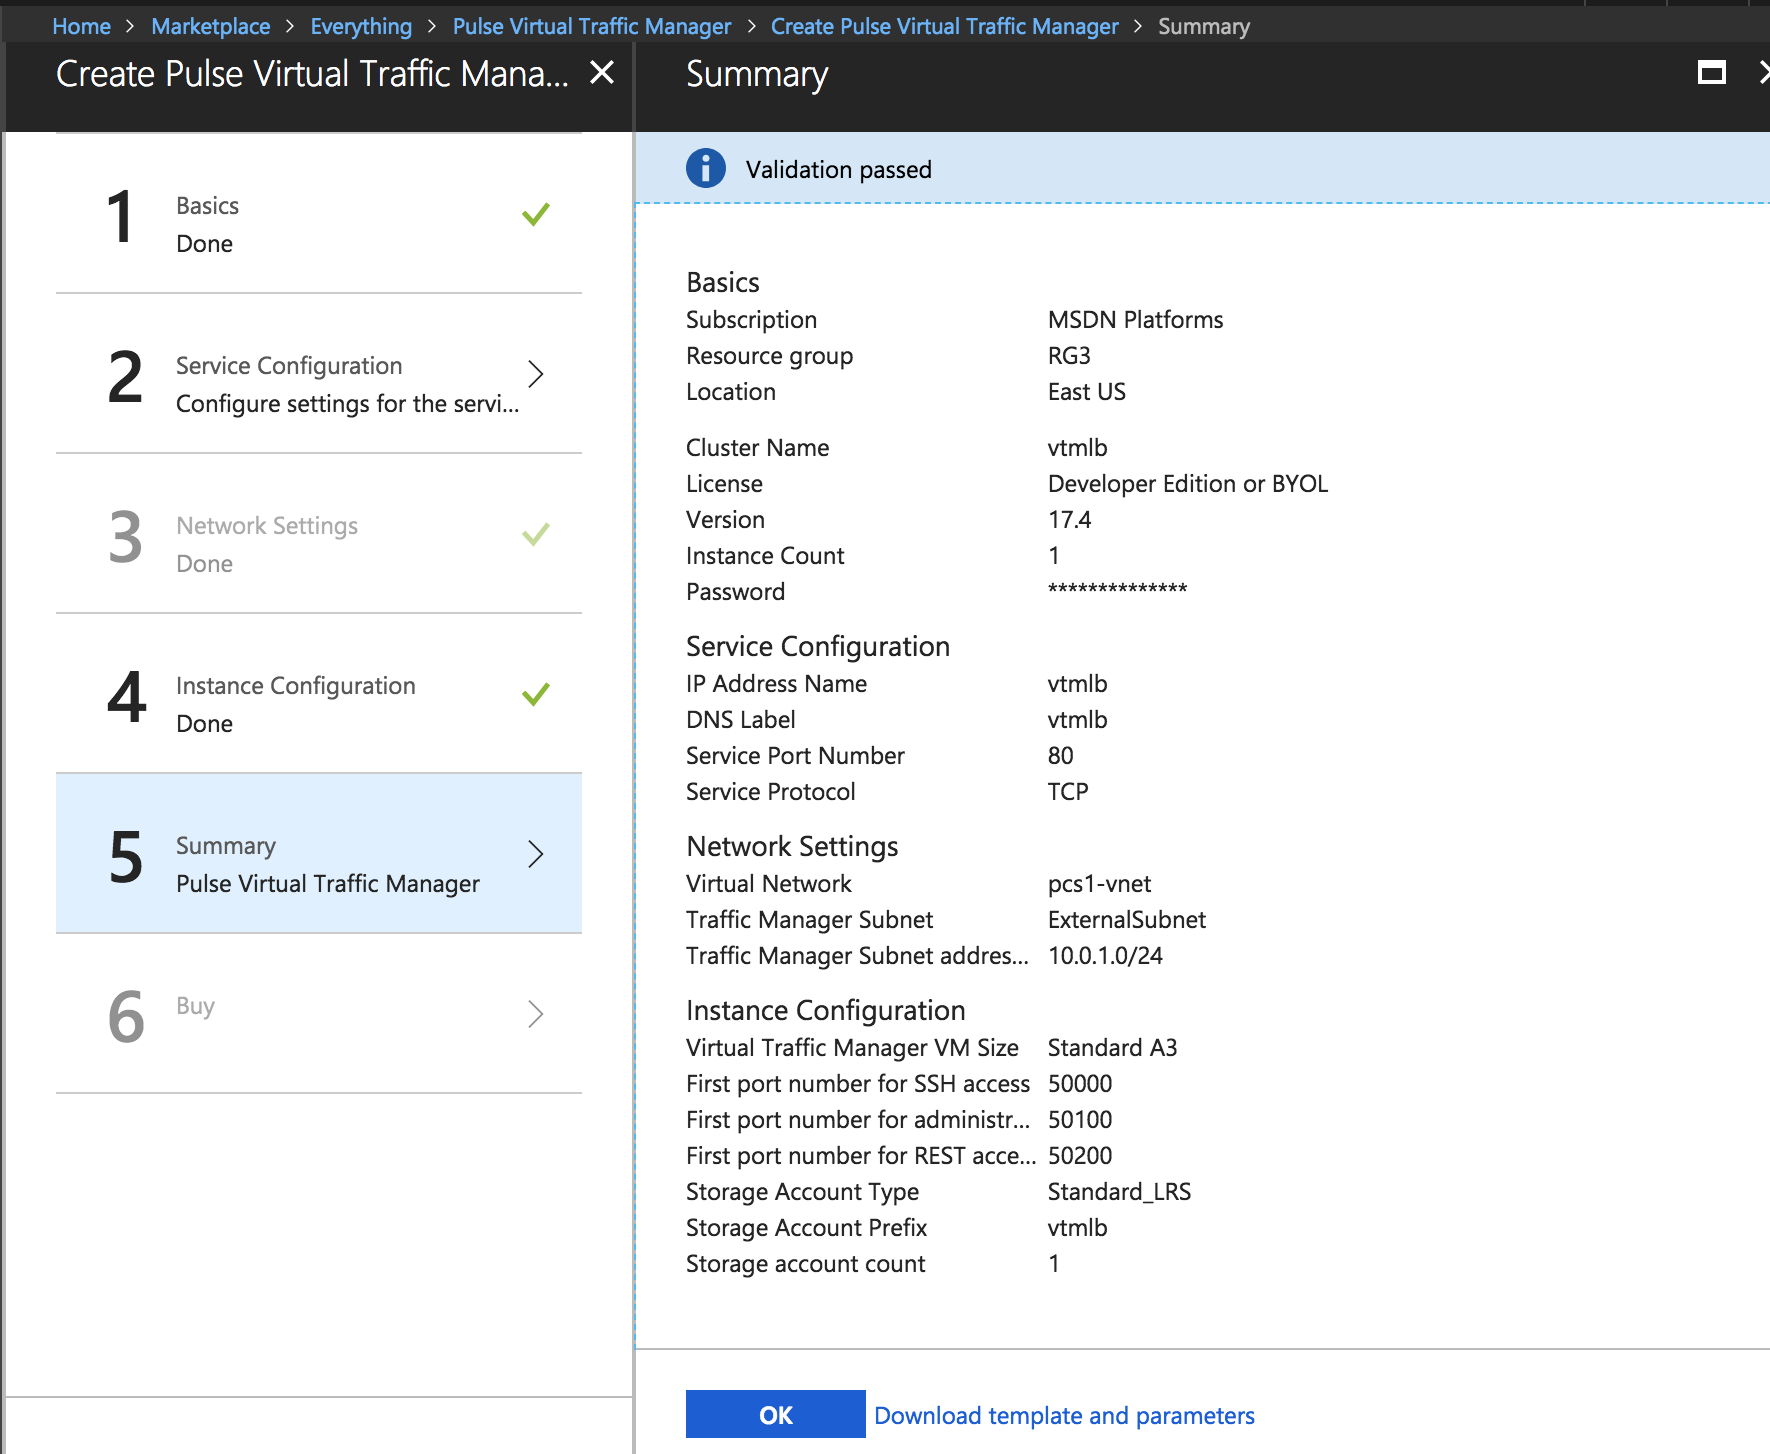
3.In the wizard that follows, provide the required configuration details:
•Cluster name
•License type
•Authentication details
•Virtual Network and Subnet settings
•Resource group
•Location information
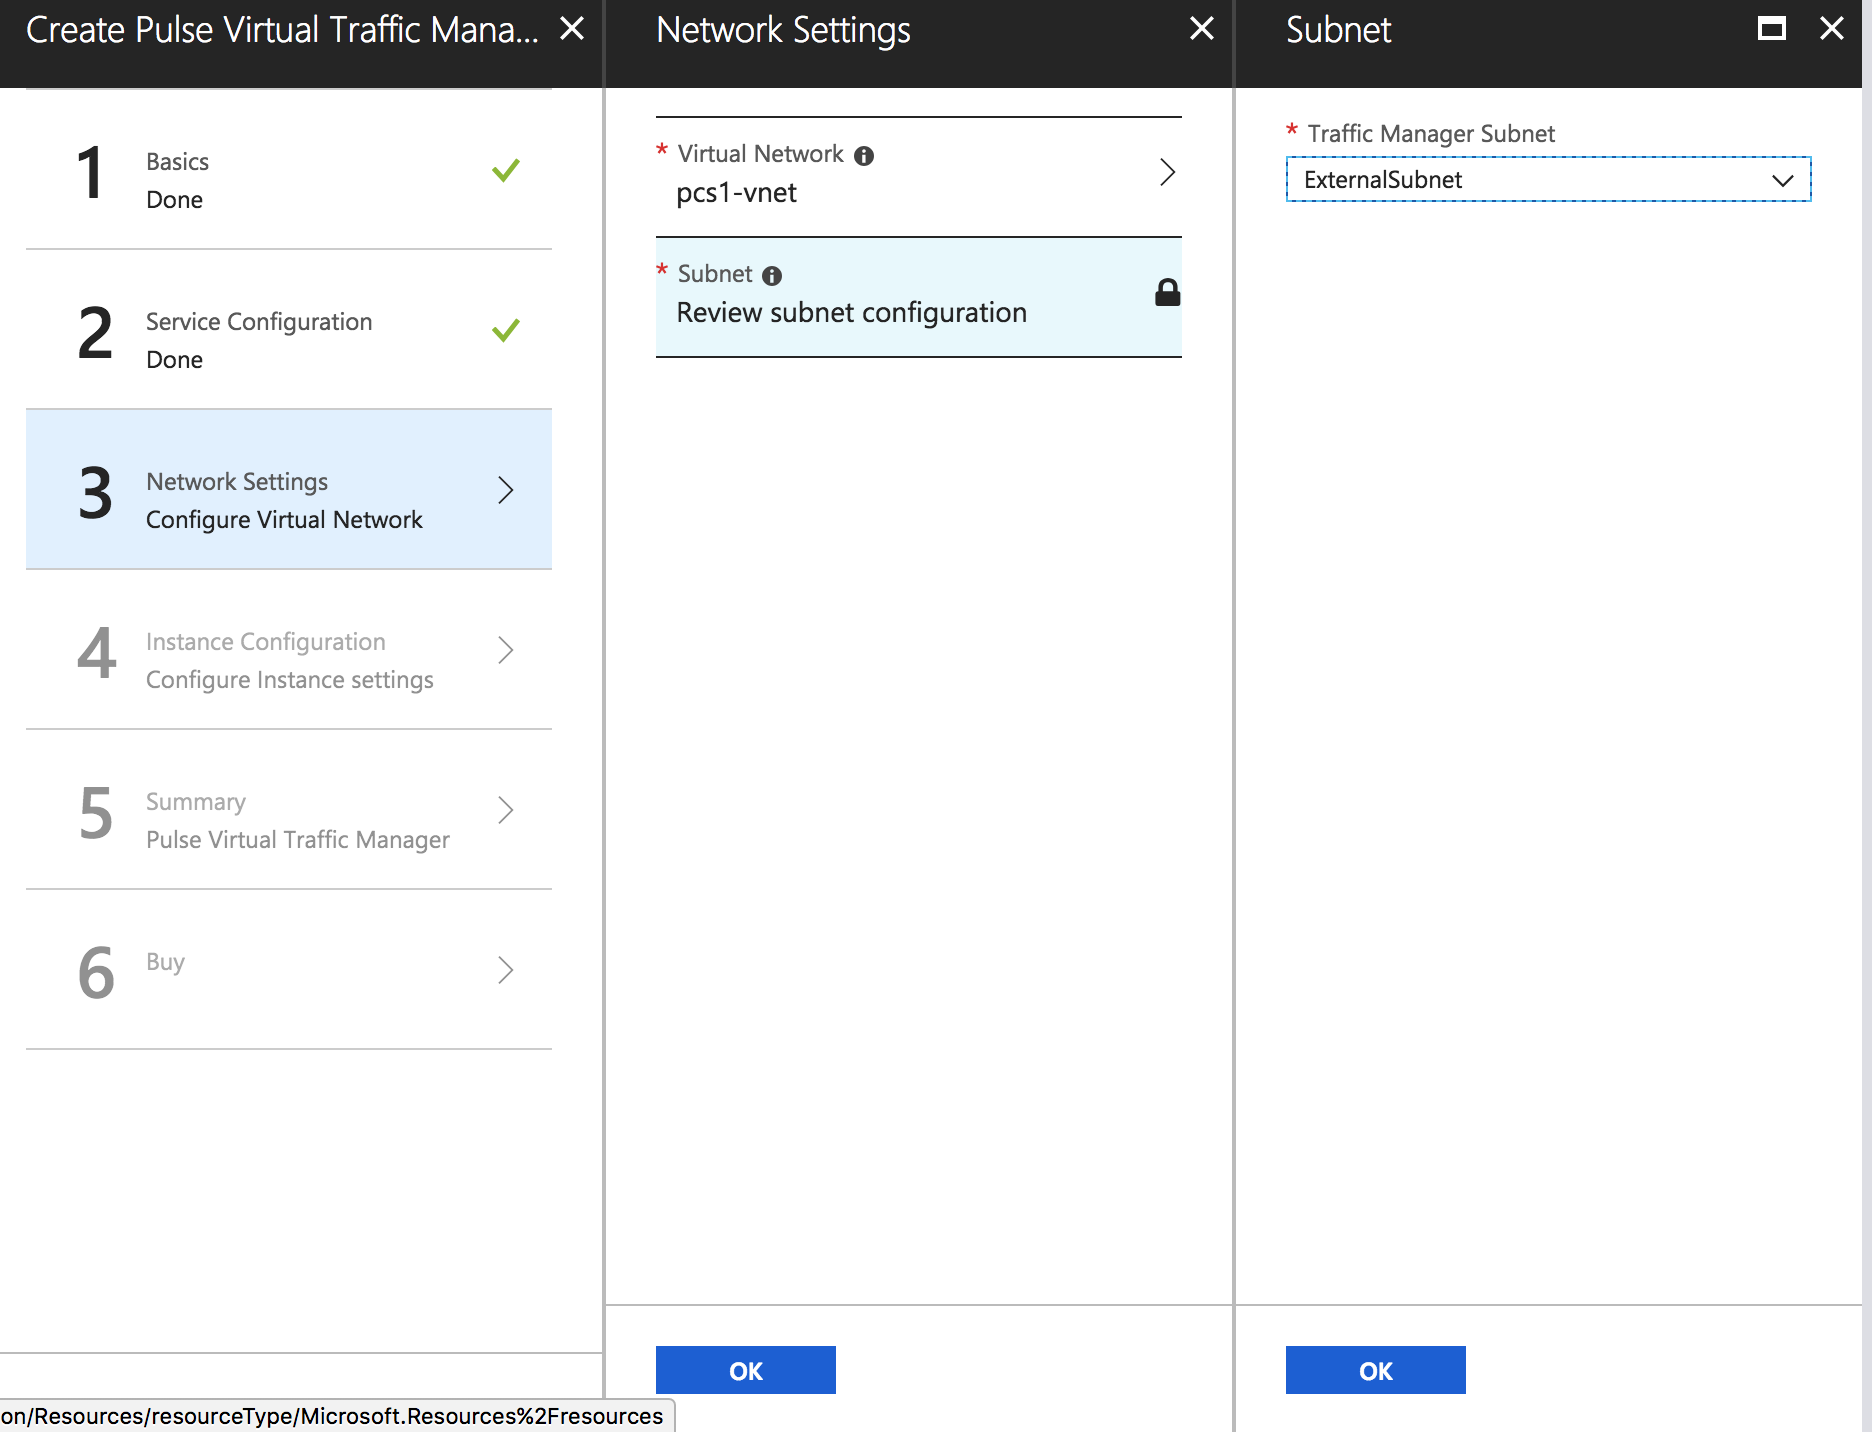
In the Network Settings tab, select the Virtual Network and Traffic Manager Subnet matching PCS’s Vnet and External Subnet.
Configuration Wizard
Adding Load Balancing and Inbound Network Security Rules
To manage an additional service in your Traffic Manager cluster, or if the existing service uses multiple ports or protocols, add load balancer and network security rules after creating the cluster.
To add load balancing rule, perform the following steps:
1.Navigate to your resource group.
2.Click the Load Balancer resource name (typically named “<clustername>-vtmLB”).
3.From the load balancer settings pane, click Load balancing rules.
4.Click Add.
Add Load Balancing Rule
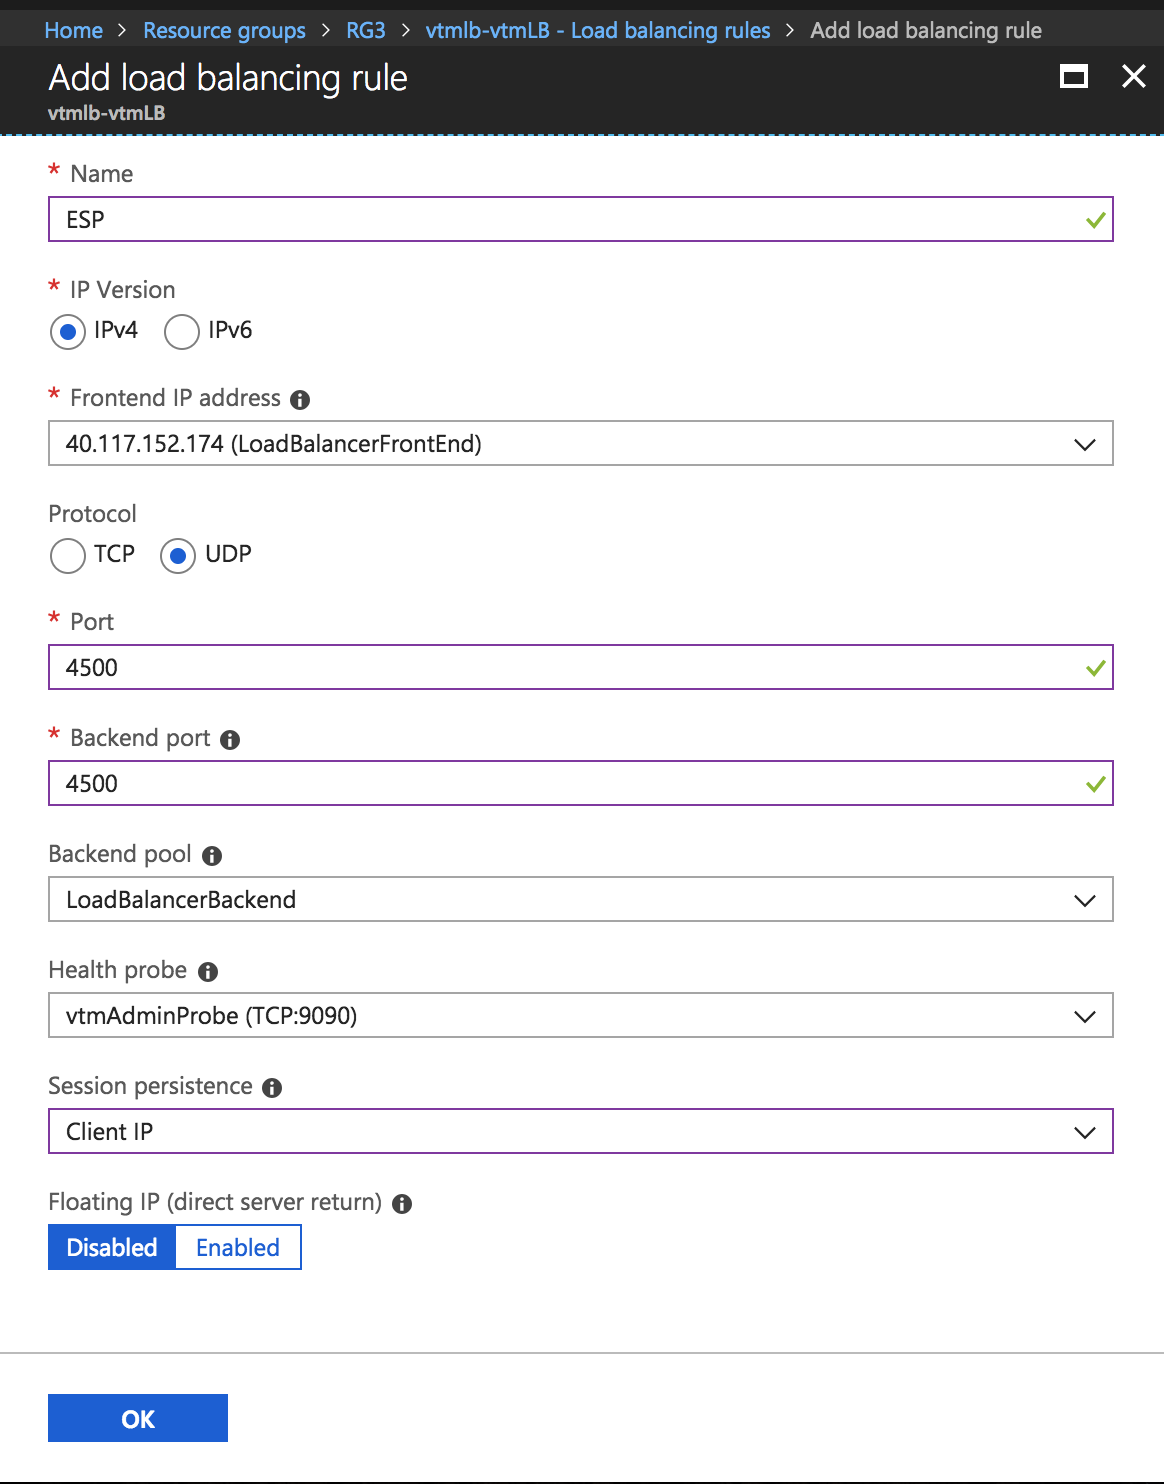

5.Configure the following settings for ESP and SSL traffic modes, and click OK:
•Name: Type a descriptive name for this rule.
•Protocol: Select your traffic protocol.
•Port: Enter the port number for your traffic.
•Backend Port: Set to the same value as Port.
•Session Persistence: Select “None”.
•Idle Timeout (minutes): Set to a timeout value suitable for your service.
•Floating IP (direct server return): Select “Disabled”.
6.In the resource group, click the name of the Network Security Group resource (typically named “<clustername>-vtmNSG”).
7.Click Inbound Security Rules and then click Add.
Inbound Security Rules
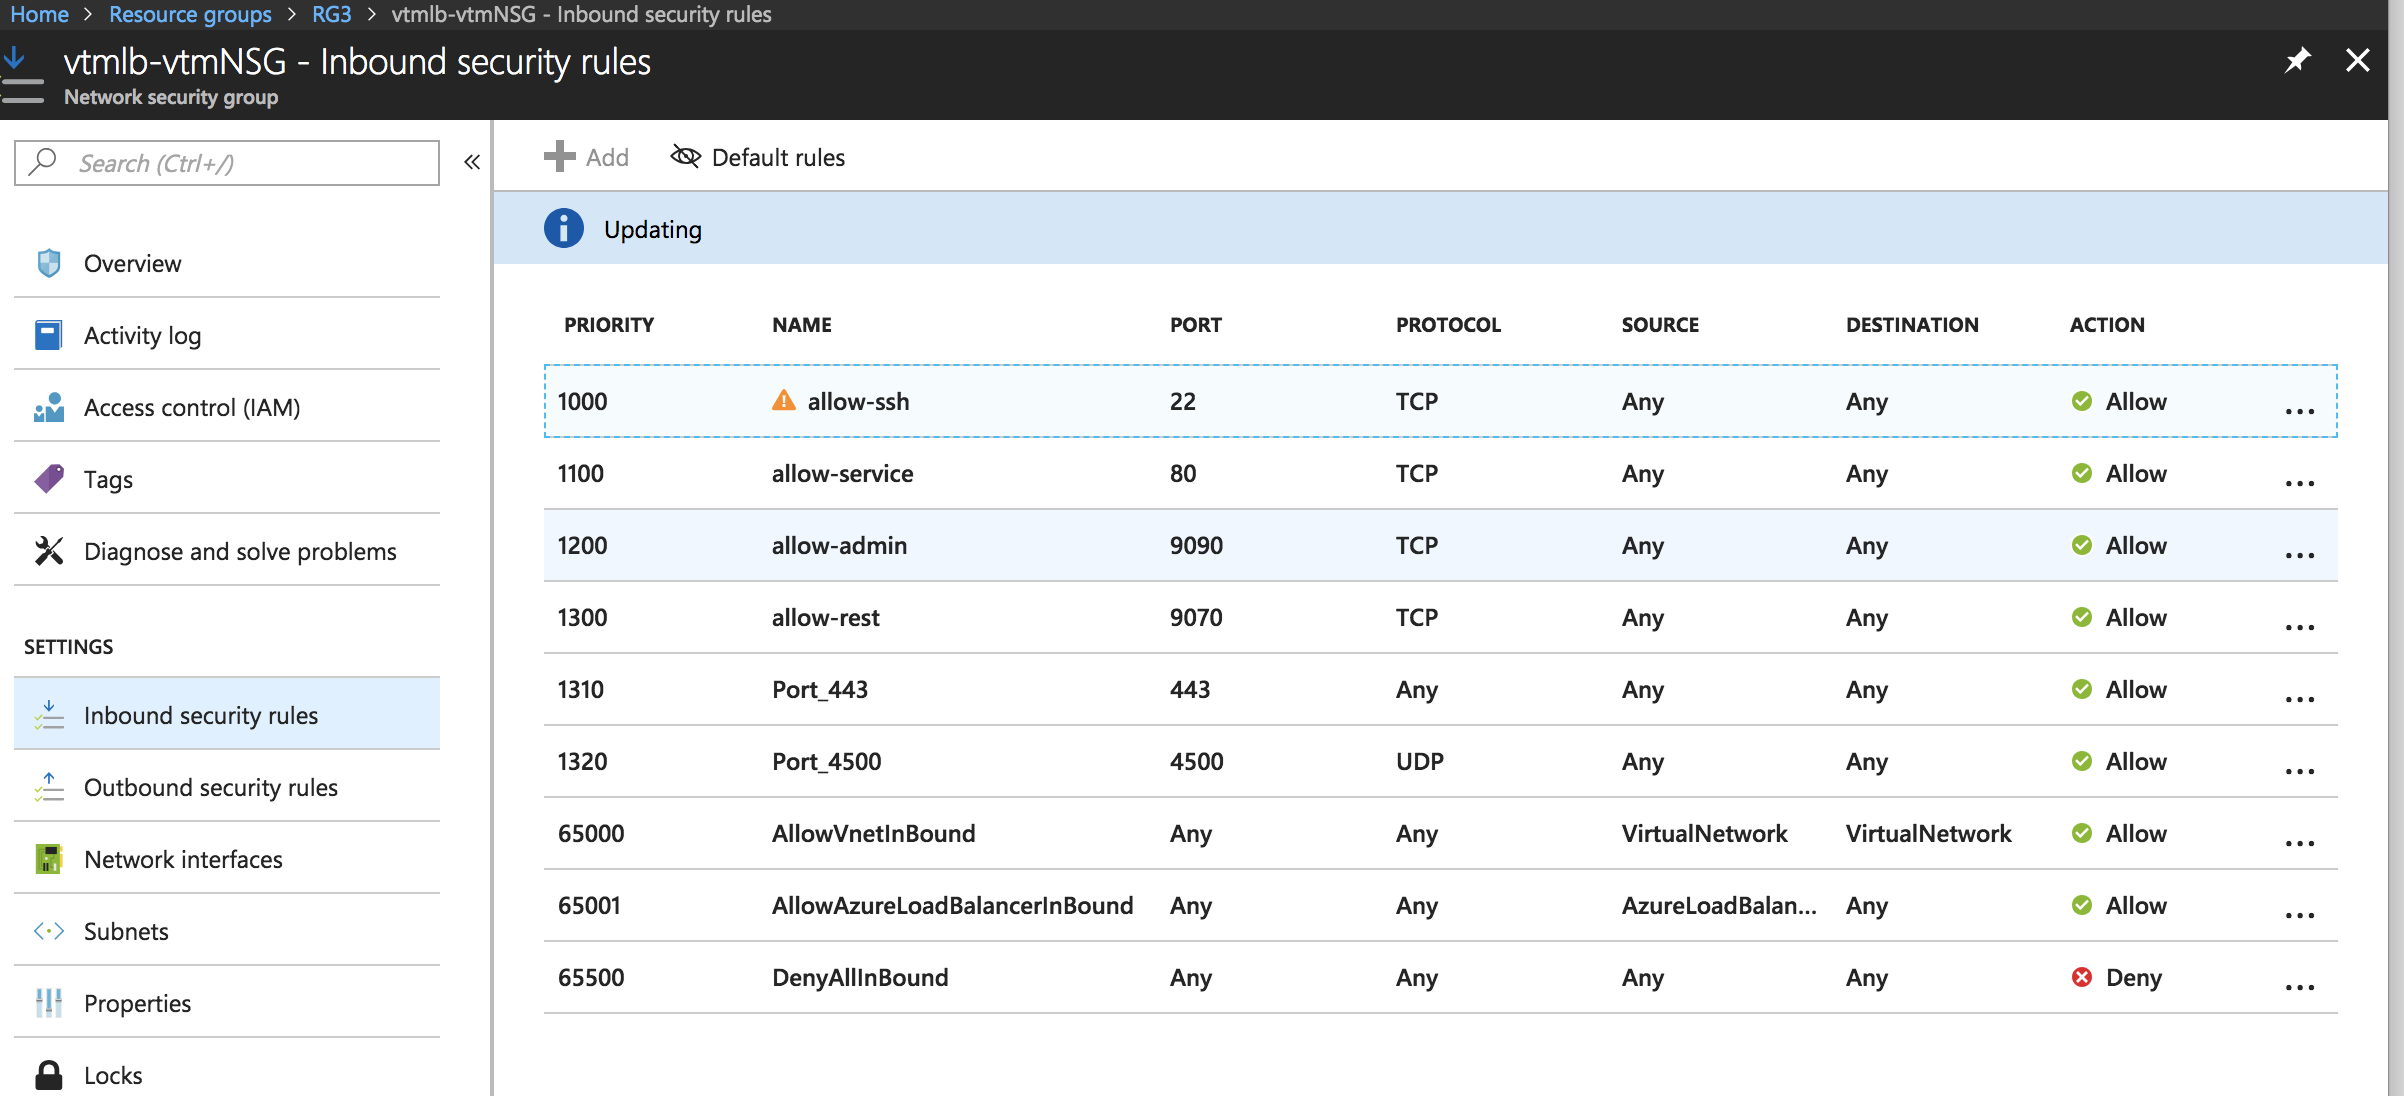
8.Configure the following settings:
•Name: Type a descriptive name for this rule.
•Priority: Enter the desired priority number. The higher the priority number, the lower the priority over other rules.
•Source: Select “Any”.
•Protocol: Select your traffic protocol.
•Source Port Range: Leave this setting as the default “*”.
•Destination: Select “Any”.
•Destination Port Range: Enter the port number or range for your traffic.
•Action: Select “Allow”.
9.Click OK to save the rule.
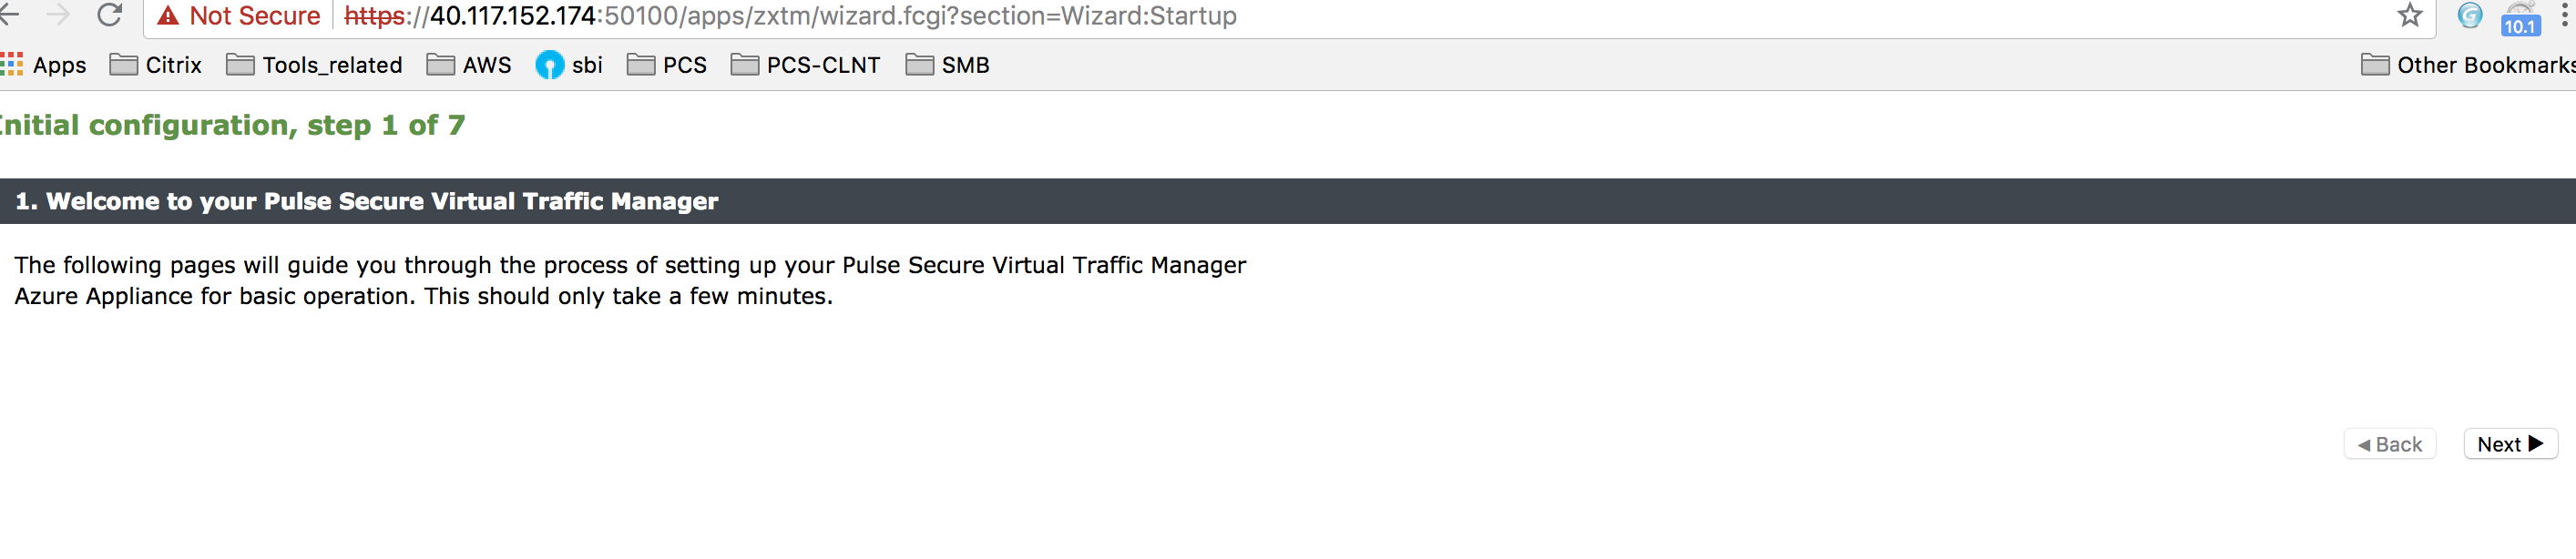
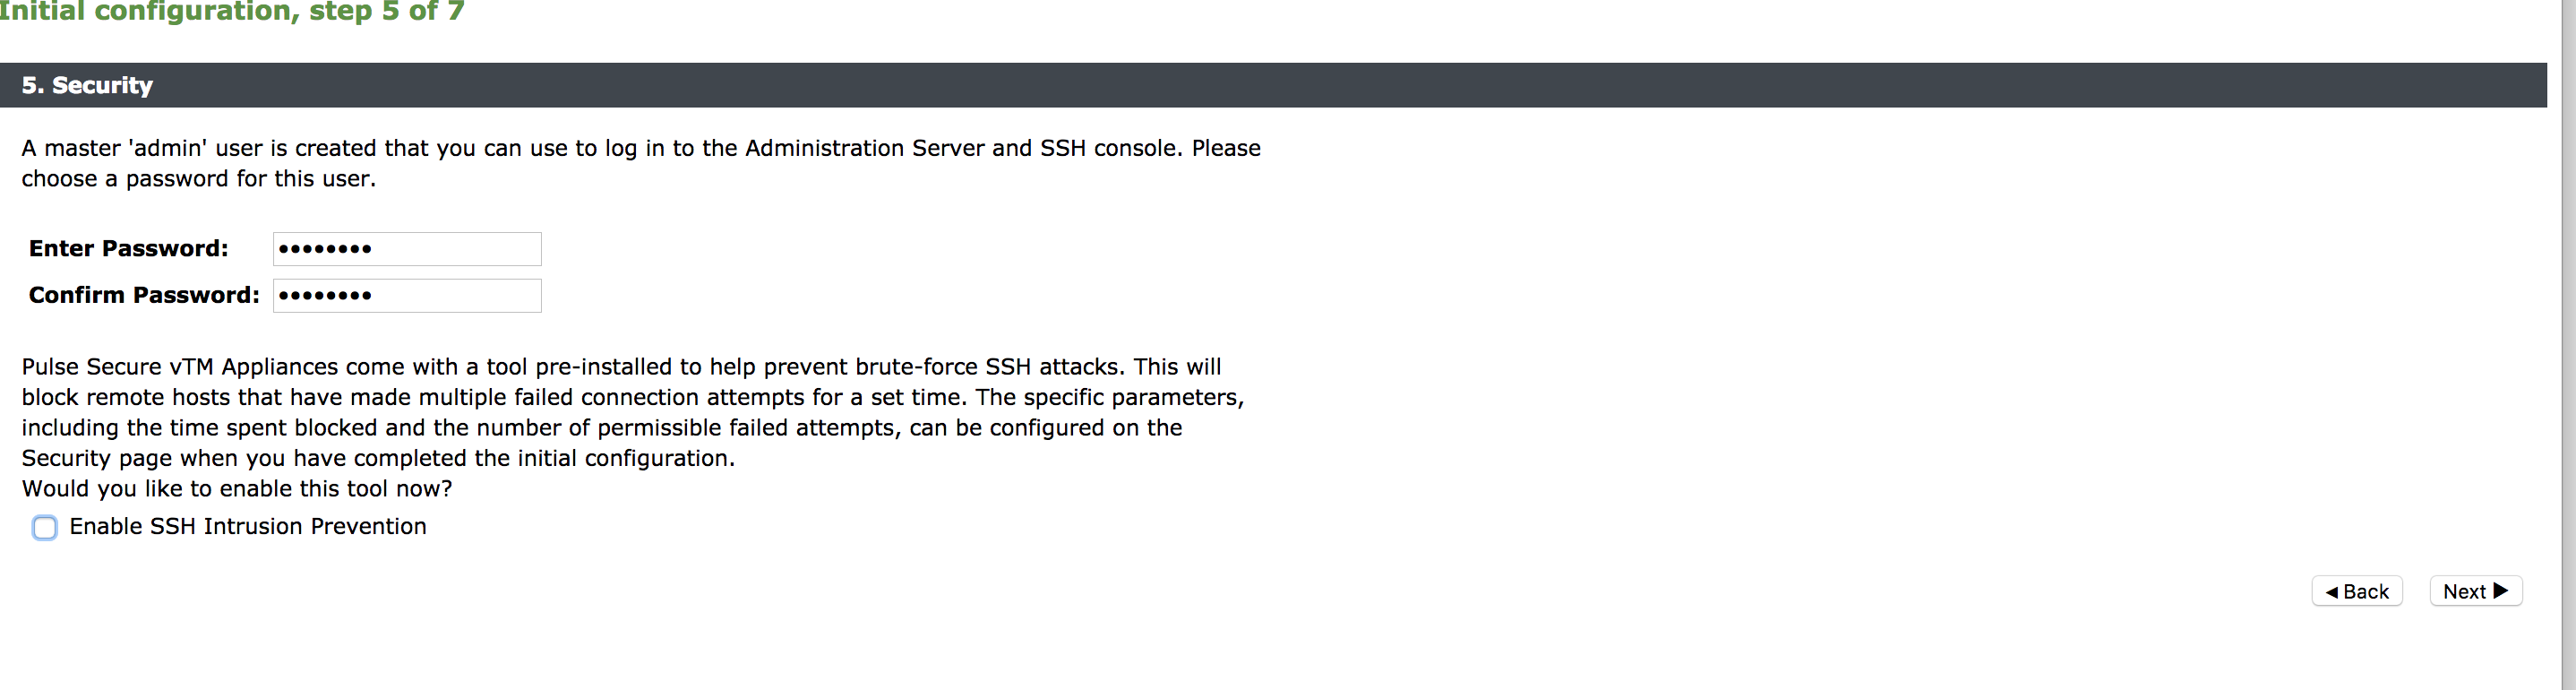
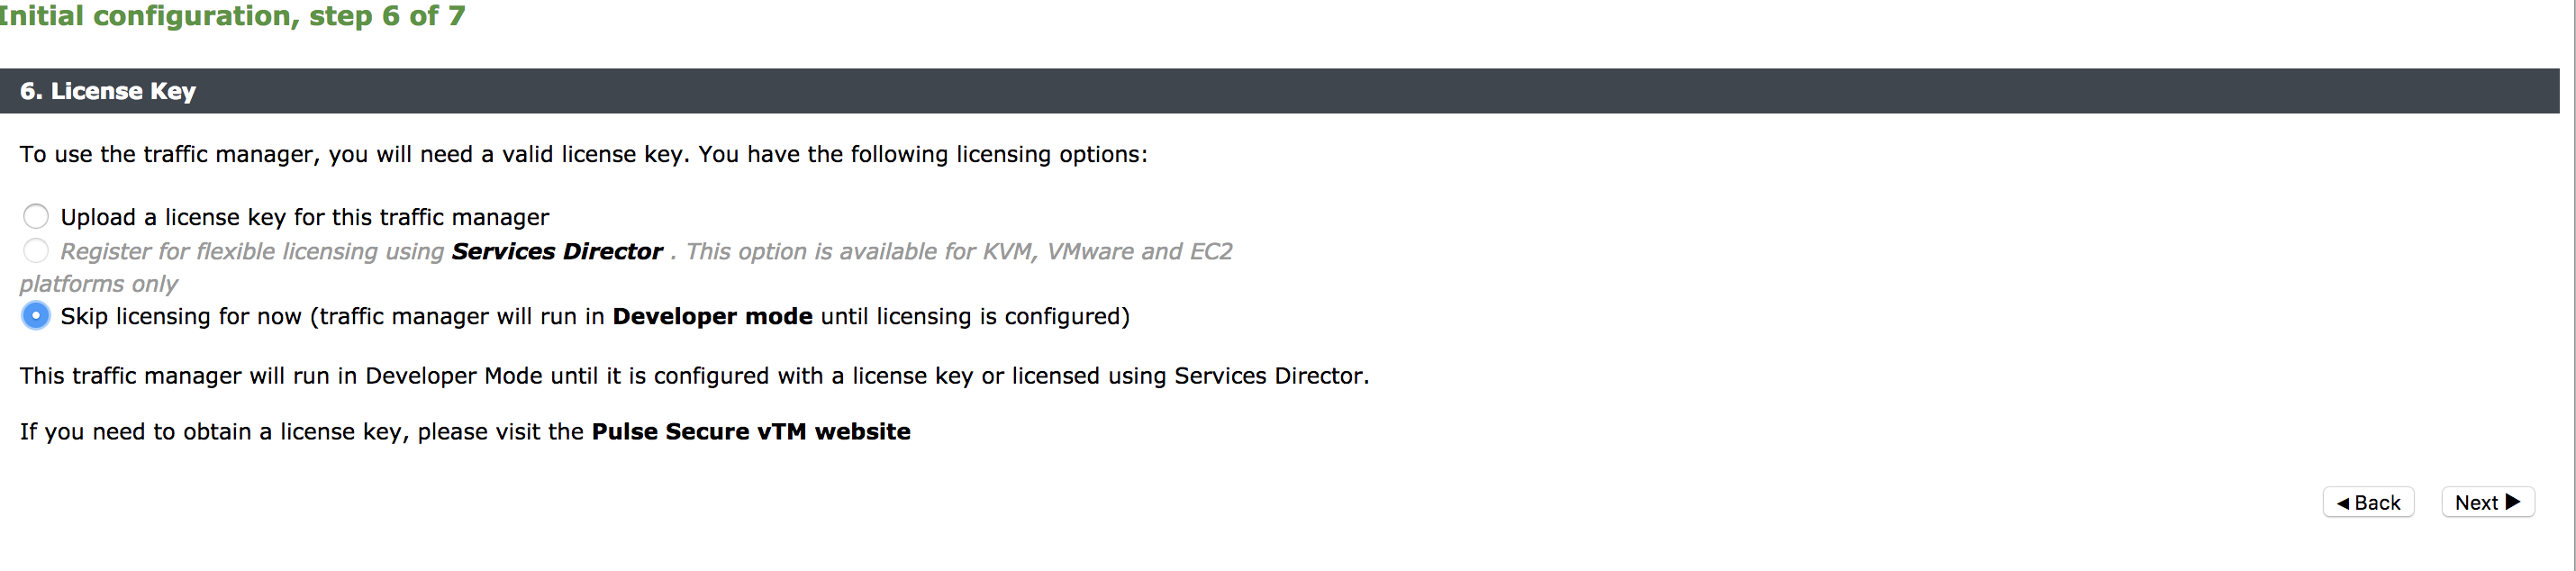
Pulse Secure Virtual Traffic Manager Initial Configuration
A newly created Virtual Traffic Manager requires some basic information to function normally.
Use the Initial Configuration wizard by entering the URL of the Admin UI into your Web browser. Provide the following details:
•Administrator password for the instance
•Confirmation to the terms and conditions
•Time zone settings for the appliance
•Login credentials for master admin user to log in to the Administration server and SSH console
•Licensing option
Pulse Secure vTM Initial Configuration Wizard


For additional details, and to deploy vTM though Azure CLI, follow the steps in the section “Creating a Traffic Manager Instance on Azure EC2” in Pulse Secure Virtual Traffic Manager: Cloud Services Installation and Getting Started Guide. Make sure that vTM is deployed on the external network of PCS.
Setting Up and Configuring vTM for External Users
Once the vTM EC2 instance is deployed, set up the instance using the Initial Configuration wizard. For details, refer Pulse Secure Virtual Traffic Manager: Cloud Services Installation and Getting Started Guide.
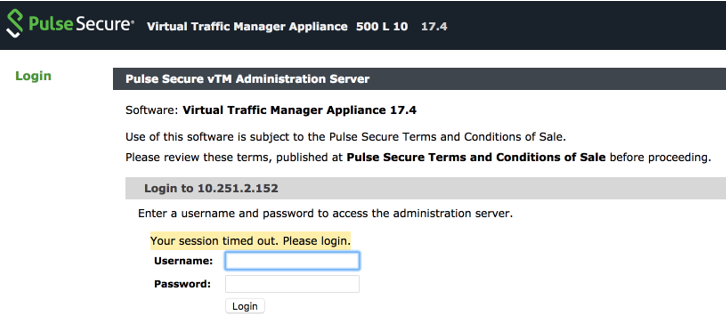
The Pulse Secure vTM Administrator login prompt appears.
Pulse Secure vTM Login Page
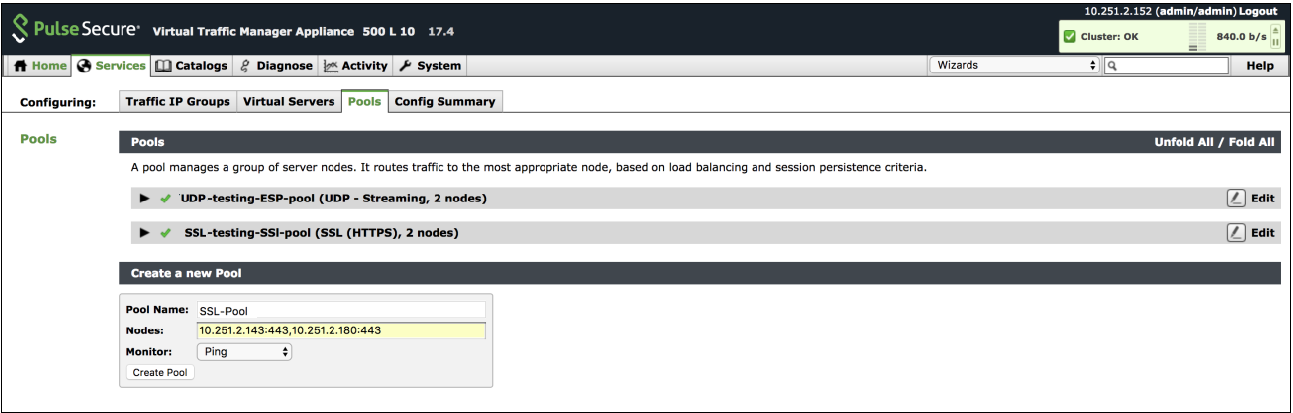
Next step is to set up the vTM for the external users using traffic pools and load balancing virtual servers. Traffic pool is the group that will bind to virtual server for load balancing. In an Active-Active Cluster scenario, traffic pool comprises cluster nodes. We need to create two separate traffic pools, each for SSL(L7) and ESP(L3) traffic modes.
Create Service Pool
In the Services tab, select Pools and create new pool by adding external IPs of cluster nodes along with port number. Also, select appropriate monitor from the drop-down options.
Complete these steps for SSL and UDP. For details, refer to the section “Creating PCS Pools” in Load Balancing PCS with vTM Deployment Guide.
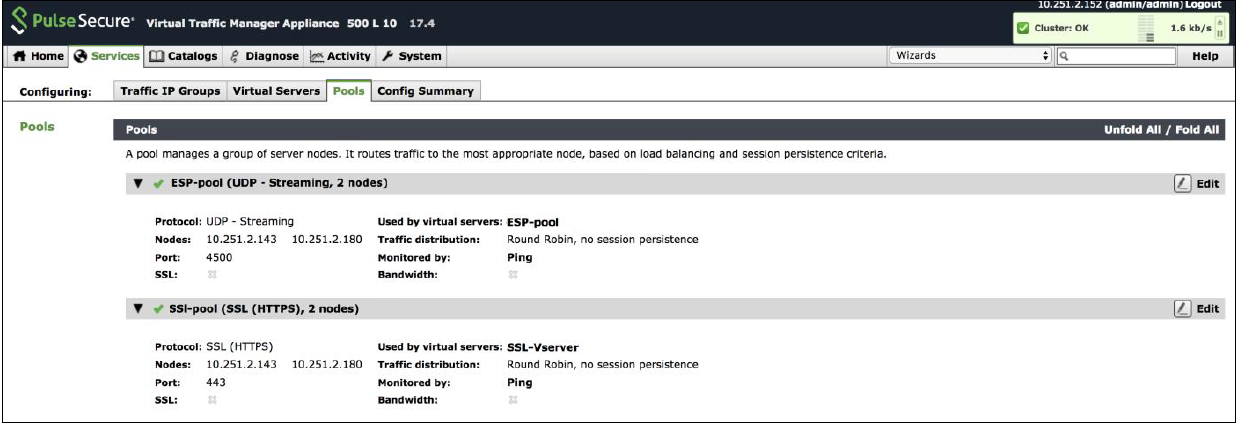
Create Traffic Pool
By default, they use Round Robin method of traffic distribution without any session persistency. Make a note of protocol type and port numbers that has been used for this use case.
SSL and UDP Pools
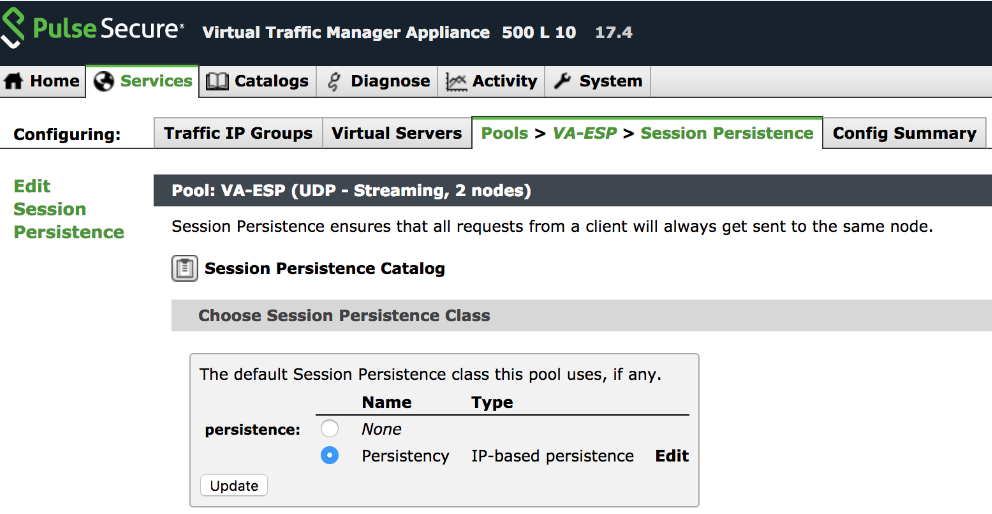
Choose an IP-based Session Persistence Class
In the Services tab, select Pools. In the pool edit page, locate the Session Persistence section and enable the Session Persistence class. Session persistency is required for ESP-based VPN tunnels.
Session Persistency Class
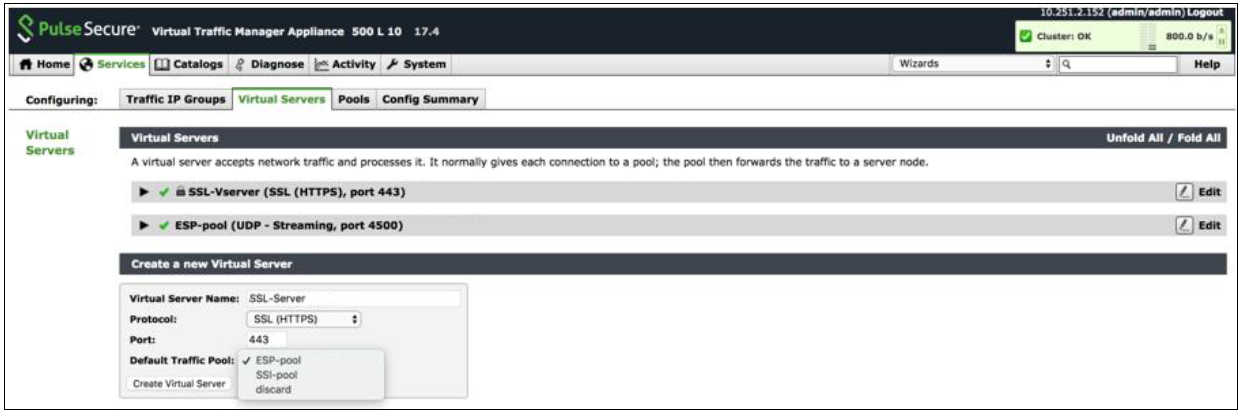
Create Virtual Servers
In the Services tab, select Virtual Servers and create a new virtual server by selecting protocol type and traffic pools. You need to create separate virtual servers to handle both SSL and UDP traffic. Each virtual server balances traffic across the pool of the same protocol type.
For details, refer to the section “Creating Virtual Server” in Load Balancing PCS with vTM Deployment Guide.
Create Virtual Server
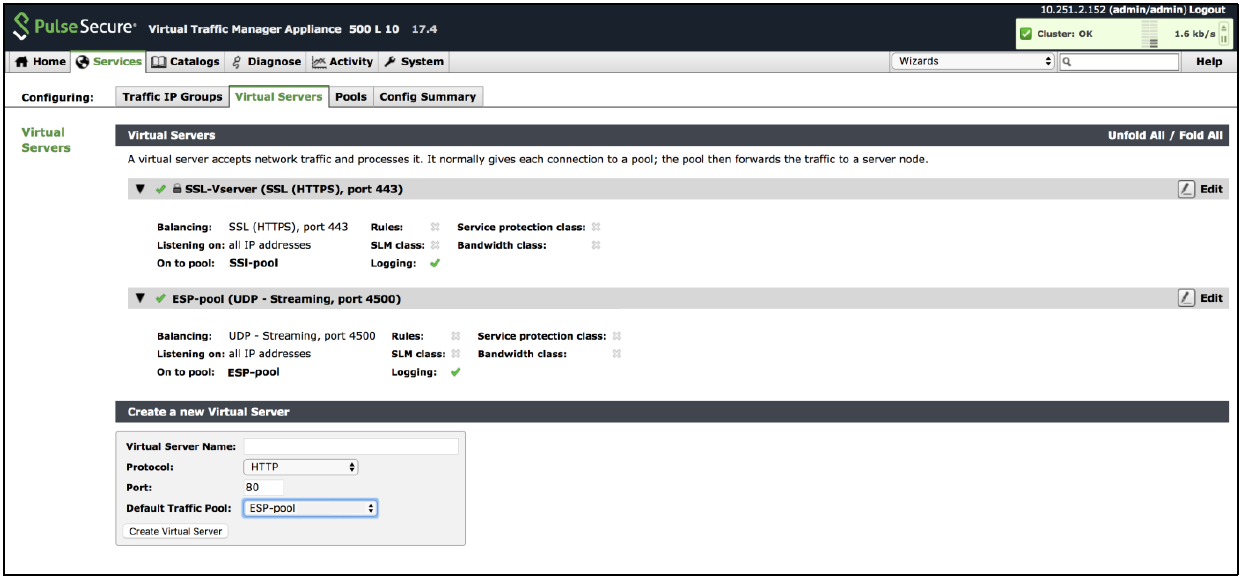
Virtual Servers to Handle SSL and UDP Traffic
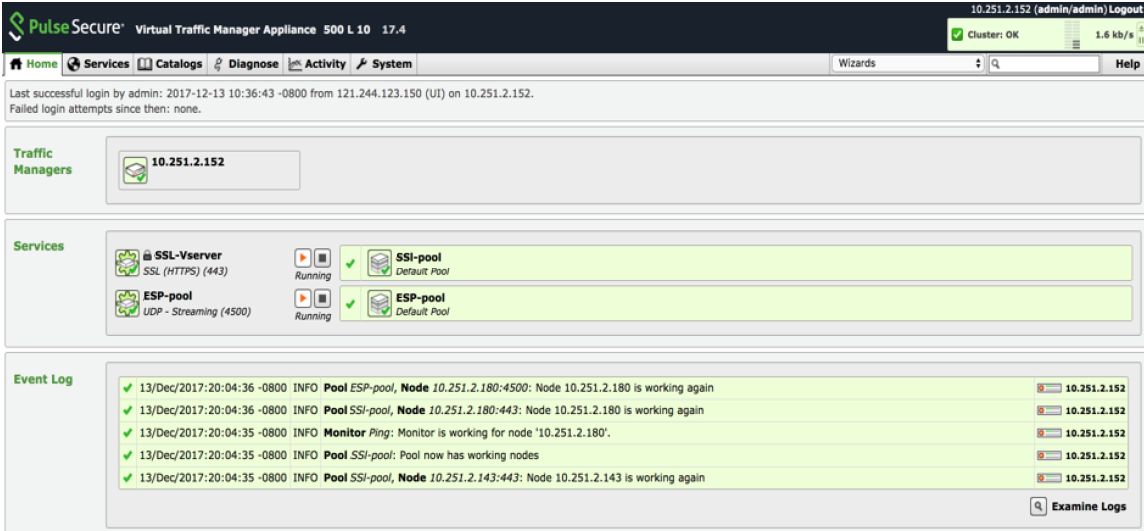
Once the configuration is complete, go to home page and verify the configurations.
Pulse Secure vTM Home Page Showing Services and Event Logs