Authentication Realms
Understanding Authentication Realms
An authentication realm specifies the conditions that users must meet in order to sign into the system. A realm consists of a grouping of authentication resources, including:
•An authentication server - verifies that the user is who he claims to be. The system forwards credentials that a user submits on a sign-in page to an authentication server.
•A directory server - an LDAP server that provides user and group information to the system that the system uses to map users to one or more user roles.
•An authentication policy - specifies realm security requirements that need to be met before the system submits a user's credentials to an authentication server for verification.
•Role mapping rules - conditions a user must meet in order for the system to map the user to one or more user roles. These conditions are based on either user information returned by the realm's directory server or the user's username.
Authentication realms are an integral part of the access management framework, and therefore are available on all Pulse Connect Secure products.
Creating an Authentication Realm
To create an authentication realm:
1.In the admin console, choose Administrators > Admin Realms or Users > User Realms.
2.On the respective Authentication Realms page, click New. Or, select a realm and click Duplicate to base your realm on an existing realm.
3.Enter a name to label this realm and (optionally) a description.
4.If you are copying an existing realm, click Duplicate. Then, if you want to modify any of its settings, click the realm's name to enter into edit mode.
5.Select When editing, start on the Role Mapping page if you want the Role Mapping tab to be selected when you open the realm for editing.
6.Under Servers, specify:
•An authentication server to use for authenticating users who sign in to this realm.
•A directory/attribute server to use for retrieving user attribute and group information for role mapping rules and resource policies. (optional)
•A RADIUS accounting server to use to track when a user signs-in and signs-out of the Pulse Connect Secure (optional).
7.If you want to submit secondary user credentials to an SSO-enabled resource or enable two-factor authentication to access the device, select Additional authentication server. Then:
1.Select the name of the secondary authentication server. Note that you cannot choose an anonymous server, certificate server, or CA SiteMinder server.
2.Select Username is specified by user on sign-in page if you want to prompt the user to manually submit his username to the secondary server during the sign-in process. Otherwise, if you want to automatically submit a username to the secondary server, enter static text or a valid variable in the predefined as field. By default, the system submits the <username> session variable, which holds the same username used to sign in to the primary authentication server.
3.Select Password is specified by user on sign-in page if you want to prompt the user to manually submit his password to the secondary server during the sign-in process. Otherwise, if you want to automatically submit a password to the secondary server, enter static text or a valid variable in the predefined as field.
Mask Static Password: From 8.3R4, a check box has been added to mask static password. This new check box by default is disabled and any new upgrade with this feature will show the UI as unchecked. Once password is masked, there is no way the password can be unmasked and only way would be to edit and set a new password. This option can be done for both Admin realm and User Realm.
4.Select End session if authentication against this server fails if you want to control access to the system based on the successful authentication of the user's secondary credentials. If selected, authentication fails if the user's secondary credentials fail.
5.If you want to use dynamic policy evaluation for this realm select Dynamic policy evaluation to enable an automatic timer for dynamic policy evaluation of this realm's authentication policy, role mapping rules, and role restrictions. Then:
6.Use the Refresh interval option to specify how often you want the Pulse Connect Secure to perform an automatic policy evaluation of all currently signedin realm users. Specify the number of minutes (5 to 1440).
7.Select Refresh roles to also refresh the roles of all users in this realm. (This option does not control the scope of the Refresh Now button.)
8.Select Refresh resource policies to also refresh the resource policies (not including Meeting) for all users in this realm. (This option does not control the scope of the Refresh Now button.)
9.Click Refresh Now to manually evaluate the realm's authentication policy, role mapping rules, role restrictions, user roles, and resource policies of all currently signed-in realm users. Use this button if you make changes to an authentication policy, role mapping rules, role restrictions, or resource policies and you want to immediately refresh the roles of this realm's users.
8. Click Save Changes to create the realm on the device. The General, Authentication Policy, and Role Mapping tabs for the authentication realm appear.
9. Perform the next configuration steps:
•Configure one or more role mapping rules.
•Configure an authentication policy for the realm.
Role Mapping Rules
Role mapping rules are conditions a user must meet in order for the system to map the user to one or more user roles. These conditions are based on either user information returned by the realm's directory server or the user's username. You must specify role mapping directives in the following format: If the specified condition is not true, then map the user to the selected roles.
You create a role mapping rule on Role Mapping tab of an authentication realm. When you click New Rule on this tab, the Role Mapping Rule page appears with an inline editor for defining the rule. This editor leads you through the three steps of creating a rule:
•Specify the type of condition on which to base the rule. Options include:
•Username
•User attribute
•Certificate or certificate attribute
•Group membership
•Custom expressions
•Specify the condition to evaluate, which consists of:
•One or more usernames, user attributes, certificate attributes, groups (LDAP), or expressions depending on the type of condition you selected.
•To what the value(s) should equate, which may include a list of usernames, user attribute values from a RADIUS or LDAP server, client-side certificate values (static or compared to LDAP attributes), LDAP groups, or predefined custom expressions.
•Specify the roles to assign to the authenticated user.
The system compiles a list of eligible roles to which a user may be mapped, which are roles specified by the role mapping rules to which the user conforms. Next, the system evaluates the definition for each role to determine if the user complies with any role restrictions. The system uses this information to compile a list of valid roles, which are roles for which the user meets any additional requirements. Finally, the system either performs a permissive merge of the valid roles or presents a list of valid roles to the user, depending on the configuration specified on the realm's Role Mapping tab.
Specifying Role Mapping Rules for an Authentication Realm
When creating a new rule that uses LDAP or SiteMinder user attributes, LDAP group information, or custom expressions, you must use the server catalog.
To specify role mapping rules for an authentication realm:
1.In the admin console, choose Administrators > Admin Realms or Users > User Realms.
2.On the respective Authentication Realms page, select a realm and then click the Role Mapping tab.
3.Click New Rule to access the Role Mapping Rule page. This page provides an inline editor for defining the rule.
4.In the Rule based on list, choose one of the following:
•Username - Username is the system username entered on the sign-in page. Choose this option if you want to map users to roles based on their system usernames. This type of rule is available for all realms.
•User attribute - User attribute is a user attribute from a RADIUS, LDAP, or SiteMinder server. Choose this option if you want to map users to roles based on an attribute from the corresponding server. This type of rule is available only for realms that use a RADIUS server for the authentication server, or that use an LDAP or SiteMinder server for either the authentication server or directory server. After choosing the User attribute option, click Update to display the Attribute list and the Attributes button. Click the Attributes button to display the server catalog.
•To add SiteMinder user attributes, enter the SiteMinder user attribute cookie name in the Attribute field in the server catalog, and then click Add Attribute. When you are finished adding cookie names, click OK. The system displays the names of the SiteMinder user attribute cookies in the Attribute list on the Role Mapping Rule page.
•For information on how to use the server catalog to add LDAP user attributes.
•Certificate or Certificate attribute - Certificate or Certificate attribute is an attribute supported by the users' client-side certificate. Choose this option if you want to map users to roles based on certificate attributes. The Certificate option is available for all realms; the Certificate attribute option is available only for realms that use LDAP for the authentication or directory server. After choosing this option, click Update to display the Attribute text box.
•Group membership - Group membership is group information from an LDAP or native Active Directory server that you add to the server catalog Groups tab. Choose this option if you want to map users to roles based on either LDAP or Active Directory group information. This type of rule is available only for realms that use an LDAP server for either the authentication server or directory server or that use an Active Directory server for authentication. (Note that you cannot specify an Active Directory server as an authorization server for a realm.)
•Custom Expressions - Custom Expressions is one or more custom expressions that you define in the server catalog. Choose this option if you want to map users to roles based on custom expressions. This type of rule is available for all realms. After choosing this option, click Update to display the Expressions lists. Click the Expressions button to display the Expressions tab of the server catalog.
If you add more than one custom expression to the same rule, the system creates an "OR" rule for the expressions. For example, you might add the following expressions to a single rule:
•Expression 1: cacheCleanerStatus = 1
•Expression 2: loginTime = (8:00AM TO 5:00PM)
Based on these expressions, a user would match this rule if Cache Cleaner was running on his system OR if he signed into the device between 8:00 and 5:00.
1.Under Rule, specify the condition to evaluate, which corresponds to the type of rule you select and consists of:
•Specifying one or more usernames, SiteMinder user attribute cookie names, RADIUS or LDAP user attributes, certificate attributes, LDAP groups, or custom expressions.
•Specifying to what the value(s) should equate, which may include a list of usernames, user attribute values from a RADIUS, SiteMinder, or LDAP server, client-side certificate values (static or LDAP attribute values), LDAP groups, or custom expressions.
For example, you can choose a SiteMinder user attribute cookie named department from the Attribute list, choose is from the operator list, and then enter "sales" and "eng" in the text box.
Or, you can enter a custom expression rule that references the SiteMinder user attribute cookie named department:
<userAttr.department = ("sales" and "eng")>
2.Then assign these roles:
•Specify the roles to assign to the authenticated user by adding roles to the Selected Roles list.
•Check Stop processing rules when this rule matches if you want to stop evaluating role mapping rules if the user meets the conditions specified for this rule.
3.Click Save Changes to create the rule on the Role Mapping tab. When you are finished creating rules:
Make sure to order role mapping rules in the order in which you want to evaluate them. This task is particularly important when you want to stop processing role mapping rules upon a match.
Machine Authentication for Pulse Secure Connections
Pulse Secure client supports machine authentication. Machine authentication uses machine credentials (machine name and password or machine certificate) to authenticate the endpoint. You can enable machine authentication for the system as part of a Pulse Secure Connection and distribute the connection to endpoints through the normal Pulse distribution methods.
The following describes the requirements for a machine authentication environment:
•Machine authentication for Pulse Connect Secure is available for Pulse layer 3 connections only.
•The authentication server used by the Pulse connection must be Active Directory/Windows NT for machine name/password authentication or a certificate server for machine certificate authentication. You can also use machine credentials when authenticating to RADIUS servers that verify the machine credentials against an Active Directory listing.
•The endpoint must be a member of a Windows domain and the machine credentials must be defined in Active Directory. Typically, during login, the user must enter domain/user in the username box.
•The Pulse connection must be configured so that no prompts are presented during the login process. For example, prompts for realm or role selection or a server certificate trust prompt cause the connection to fail.
•For machine certificate authentication, the domain workstation logon certificate must be issued by the domain certificate authority. The root certificate (CA) must be in the Machine Trusted Certificate store instead of the certificate store for a particular user.
To enable a Pulse connection for machine authentication:
1.Click Users > Pulse Secure > Connections and create or select a connection set.
2.Create or edit a connection. Machine authentication is available for connection type Connect Secure or Policy Secure (L3), Policy Secure (802.1X), or SRX only.
3.Under Connection is established, select one of the following options:
•Automatically when the machine starts. Machine credentials used for authentication-This option enables machine-only authentication. Machine credentials are used to connect to the system before the user logs on. The user does not need to be logged in. The connection is maintained when a user logs on, logs off, or switches to a different logon.
•Automatically when the machine starts. Connection is authenticated again when the user signs in into the desktop-This option enables user-after-desktop authentication. Machine credentials are used to authenticate the endpoint when no user is logged on. When a user logs on, the machine authentication connection is dropped, and the user login is used instead. When the user logs off, the machine connection is reestablished.
Pulse Secure Connection Realm and Role Preferences for Machine Authentication
When a Pulse Secure Connection is configured to use machine authentication, any prompts that occur during the login process cause the connection to fail. For example, if the Pulse server authentication policy allows a user to select a realm or a role during the login process, Pulse presents a dialog box to the user and prompts for the realm or role selection. To avoid failed connections due to prompts during machine authentication you can specify a preferred role and realm for a Pulse connection.
For a Pulse connection that is used for machine authentication, you do not need to specify the preferred role if any of the following conditions are true:
•Users are mapped to only one role.
•Users are mapped to more than one role, but the realm's role mapping properties are set to merge settings for all assigned roles.
For a Pulse connection that is used for machine authentication, you must specify the preferred realm if the authentication sign-in policy allows the user to select a realm. If that realm maps to only one role, you do not need to specify the role.
For a Pulse connection that is used for machine authentication, you must specify the preferred role if any of the following conditions are true:
•The realm that the user connects to maps to more than one role and the realm's role mapping properties are set to require that the user must select a role. The preferred role set must be the name of a role assigned in that realm.
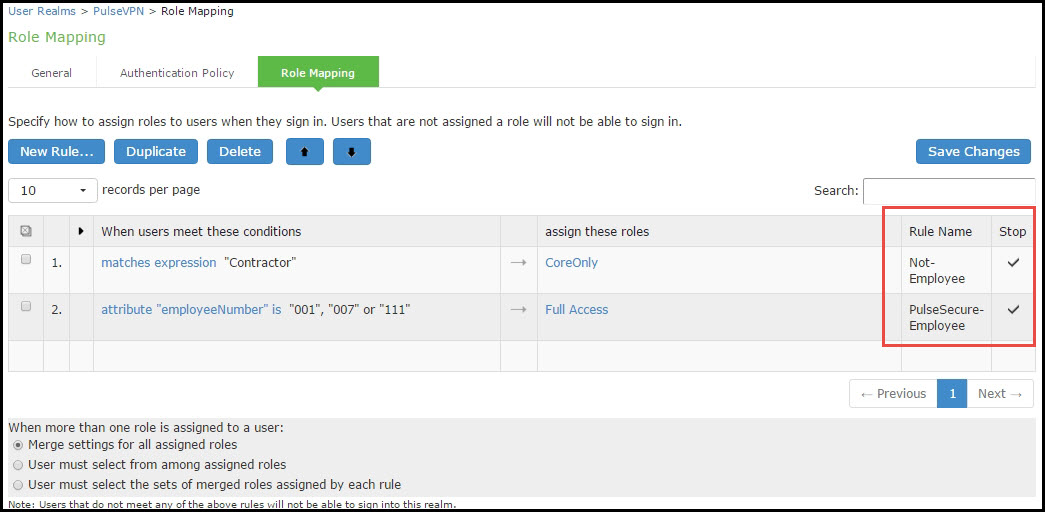
•The realm that the user connects to maps to more than one role and the realm's role mapping properties are defined by role mapping rules. You specify the preferred role by specifying the name of a rule that assigns the role set. The following figure shows a role mapping rule with the rule name highlighted.
The following figure depicts the Pulse Secure Client Role Mapping Rule:
When you create a Pulse connection for machine authentication, you must use the connection type Connect Secure or Policy Secure (L3), Policy Secure (802.1X), or SRX. To identify the connection as a machine authentication connection, you specify how the connection is established using one of the following options:
•Automatically when the machine starts. Machine credentials used for authentication
This option uses the machine credentials defined in Active Directory for the machine login process and uses the same credentials for user login. When you select this option, the Realm and Role Set Preferences enable you to specify the following options:
•Preferred Machine Realm-Type the realm name that maps to the role you want to assign.
•Preferred Machine Role Set-Type the name of the role. The role must be one that is identified in the realm's role mapping properties. Or specify the name of a role mapping rule that assigns the role set.
•Automatically when the machine starts. Connection is authenticated again when the user signs in into the desktop
This option uses the Active Directory machine credentials for the machine login process. When machine login is complete, Pulse drops that connection and then uses the user credentials for user login. When you select this option, the Realm and Role Set Preferences enable you to specify the following options:
•Preferred Machine Realm-Type the realm name that maps to the role you want to assign.
•Preferred Machine Role Set-Type the name of the role. The role must be one that is identified in the realm's role mapping properties. Or specify the name of a role mapping rule that assigns the role set.
•Preferred User Realm-Type the realm name that maps to the role you want to assign.
•Preferred User Role Set-Type the name of the role. The role must be one that is identified in the realm's role mapping properties. Or specify the name of a role mapping rule that assigns the role set.
Realm and role prompts are not the only prompts that are possible during the login process. If the Pulse connection has the Dynamic Certificate Trust option enabled, and there is an issue with the server certificate, Pulse asks the user if it is Ok to proceed. That certificate prompt causes a machine connection to fail. Note that the Pulse prompt for upgrading Pulse software is presented after the user connection is established and it will not affect a machine authentication connection.
Configuring Role Mapping Rules based on Geo Location Custom Expressions
An admin can configure role mapping rules for any realm based on Geo Location custom expressions.
To create a role mapping rule:
1.Select Users > User Realms.
2.On the User Realms page, select a realm and then click the Role Mapping tab.
3.Click New Rule to access the Role Mapping Rule page. This page provides an in-line editor for defining the rule.
4.From the Rule based on list, select 'Custom Expressions' and click Update.
5.Enter an appropriate Name for the expression.
6.Click the Expressions tab. In the Expressions Dictionary box, under Variables look for 'geoLocationCountry'
The following figure depicts the geoLocationCountry Expression:
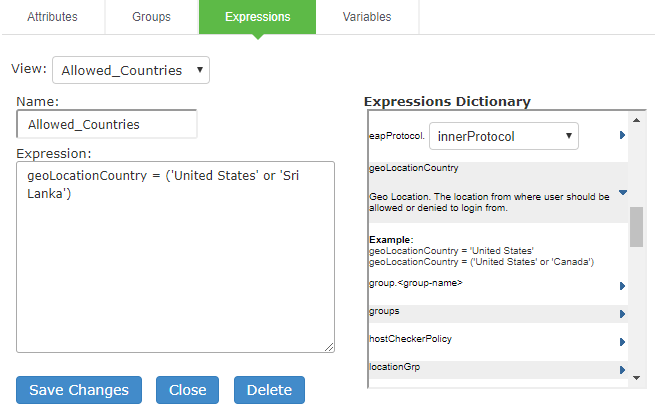
7.Copy the Examples text to the Expression box and change the Country Name of your choice.
8.Click Add Expression and then click Close.
9.Select the rule you just created from the Available Expressions list and click Add to move it to the Selected Expressions list.
Specify the roles to assign by adding roles to the Selected Roles list.
10.Click Save Changes.
The new rule will be listed in the Role Mapping list.
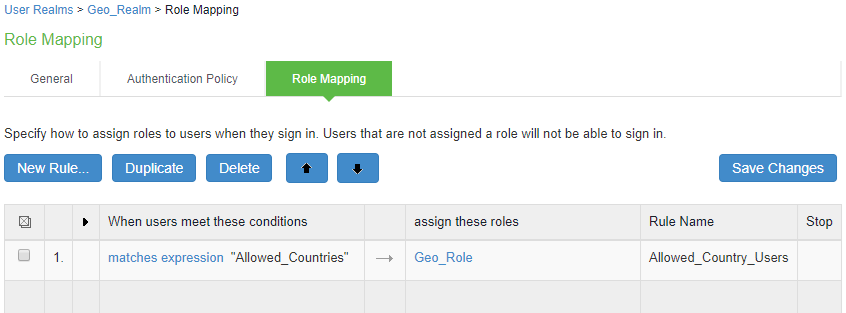
The following figure depicts geoLocationCountry Role Mapping Rule:
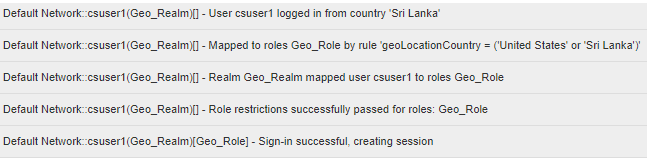
The following screen shows the Policy Trace log output where the role is mapped based on the defined Rules.
The list of countries supported:
|
Afghanistan Aland Islands Albania Algeria American Samoa Andorra Angola Anguilla Antarctica Antigua and Barbuda Argentina Armenia Aruba Asia/Pacific Region Australia Austria Azerbaijan Bahamas Bahrain Bangladesh Barbados Belarus Belgium Belize Benin Bermuda Bhutan Bolivia Bonaire Bosnia and Herzegovina Botswana Bouvet Island Brazil |
British Indian Ocean Territory Brunei Darussalam Bulgaria Burkina Faso Burundi Cambodia Cameroon Canada Cape Verde Cayman Islands Central African Republic Chad Chile China Christmas Island Cocos (Keeling) Islands Colombia Comoros Congo Cook Islands Costa Rica Cote d'Ivoire Croatia Cuba Curacao Cyprus Czech Republic Denmark Djibouti Dominica Dominican Republic Ecuador |
Egypt El Salvador Equatorial Guinea Eritrea Estonia Ethiopia Europe Falkland Islands (Malvinas) Faroe Islands Fiji Finland France French Guiana French Polynesia French Southern Territories Gabon Gambia Georgia Germany Ghana Gibraltar Greece Greenland Grenada Guadeloupe Guam Guatemala Guernsey Guinea Guinea-Bissau Guyana Haiti |
Heard Island and McDonald Islands Holy See (Vatican City State) Honduras Hong Kong Hungary Iceland India Indonesia Iran Iraq Ireland Isle of Man Israel Italy Jamaica Japan Jersey Jordan Kazakhstan Kenya Kiribati Korea Kuwait Kyrgyzstan Lao People's Democratic Republic Latvia Lebanon Lesotho Liberia Libyan Arab Jamahiriya Liechtenstein |
|
Lithuania Luxembourg Macao Macedonia Madagascar Malawi Malaysia Maldives Mali Malta Marshall Islands Martinique Mauritania Mauritius Mayotte Mexico Micronesia Moldova Monaco Mongolia Montenegro Montserrat Morocco Mozambique Myanmar Namibia Nauru Nepal Netherlands New Caledonia New Zealand |
Nicaragua Niger Nigeria Niue Norfolk Island Northern Mariana Islands Norway Oman Pakistan Palau Palestinian Territory Panama Papua New Guinea Paraguay Peru Philippines Pitcairn Poland Portugal Puerto Rico Qatar Reunion Romania Russian Federation Rwanda Saint Barthelemey Saint Helena Saint Kitts and Nevis Saint Lucia Saint Martin Saint Pierre and Miquelon |
Saint Vincent and the Grenadines Samoa San Marino Sao Tome and Principe Saudi Arabia Senegal Serbia Seychelles Sierra Leone Singapore Sint Maarten Slovakia Slovenia Solomon Islands Somalia South Africa South Georgia and the South Sandwich Islands South Sudan Spain Sri Lanka Sudan Suriname Svalbard and Jan Mayen Swaziland Sweden Switzerland Syrian Arab Republic Taiwan Tajikistan |
Tanzania Thailand Timor-Leste Togo Tokelau Tonga Trinidad and Tobago Tunisia Turkey Turkmenistan Turks and Caicos Islands Tuvalu Uganda Ukraine United Arab Emirates United Kingdom United States United States Minor Outlying Islands Uruguay Uzbekistan Vanuatu Venezuela Vietnam Virgin Islands Wallis and Futuna Western Sahara Yemen Zambia Zimbabwe |
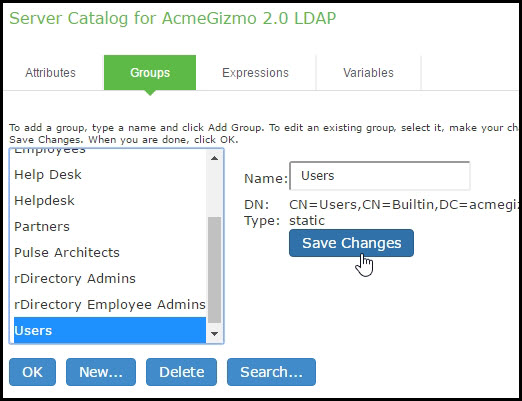
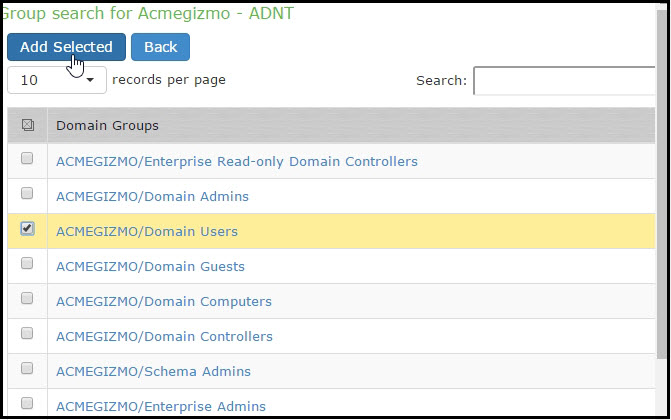
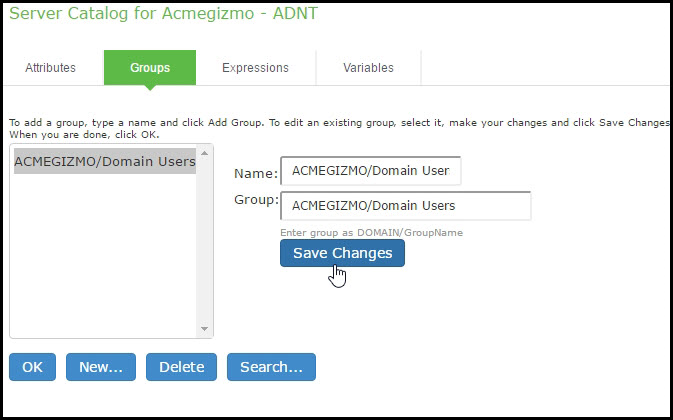
Using the LDAP Server Catalog
The LDAP server catalog is a secondary window through which you specify additional LDAP information for the system to use when mapping users to roles, including:
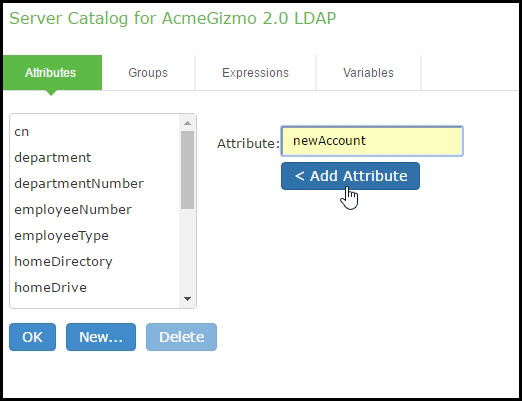
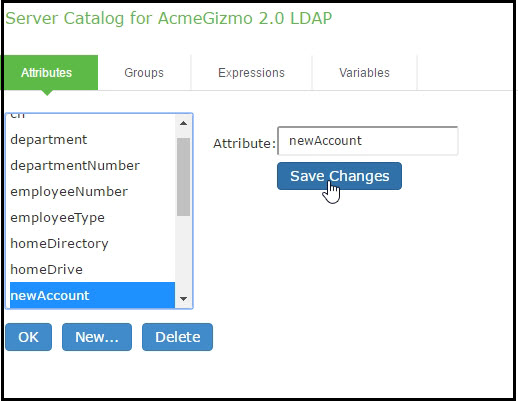
•Attributes - The Server Catalog Attributes tab shows a list of common LDAP attributes, such as cn, uid, uniquemember, and memberof. This tab is accessible only when accessing the Server Catalog of an LDAP server. You can use this tab to manage an LDAP server's attributes by adding custom values to and deleting values from its server catalog. Note that the system maintains a local copy of the LDAP server's values; attributes are not added to or deleted from your LDAP server's dictionary. The following figure shows an example of adding the newAccount attribute.
The following figure depicts the Server Catalog > Attributes Tab - Adding an Attribute for LDAP:
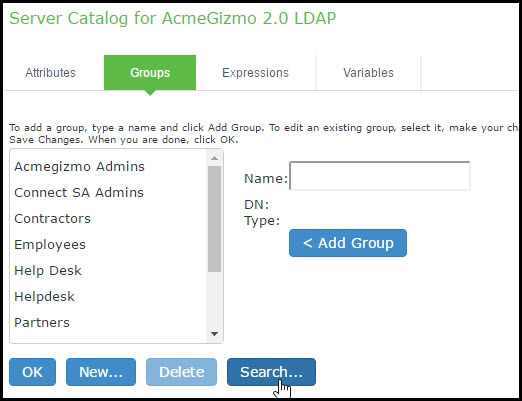
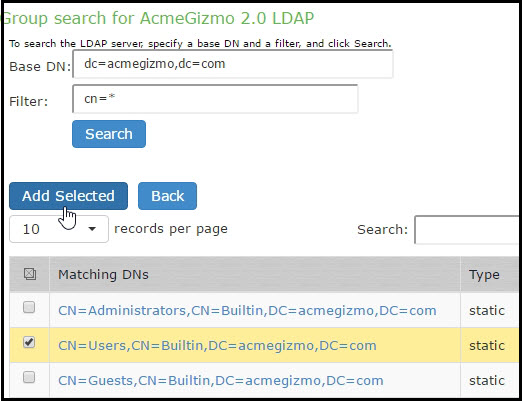
•Groups - The Server Catalog Groups tab provides a mechanism to easily retrieve group information from an LDAP server and add it to the server catalog. You specify the BaseDN of your groups and optionally a filter to begin the search. If you do not know the exact container of your groups, you can specify the domain root as the BaseDN, such as dc=test, dc=test. The search page returns a list of groups from your server, from which you can choose groups to enter into the Groups list.
The BaseDN value specified in the LDAP server's configuration page under chapter is the default BaseDN value. The Filter value defaults to (cn=*).
You can also use the Groups tab to specify groups. You must specify the Fully Qualified Distinguished Name (FQDN) of a group, such as cn=GoodManagers, ou=HQ, ou=test, o=com, c=US, but you can assign a label for this group that appears in the Groups list. Note that this tab is accessible only when accessing the Server Catalog of an LDAP server. The following figure depictsServer Catalog > Groups Tab - Adding LDAP Groups: and the following figures showing examples of adding LDAP and Active Directory groups.
The following figure depictsServer Catalog > Groups Tab - Adding LDAP Groups:
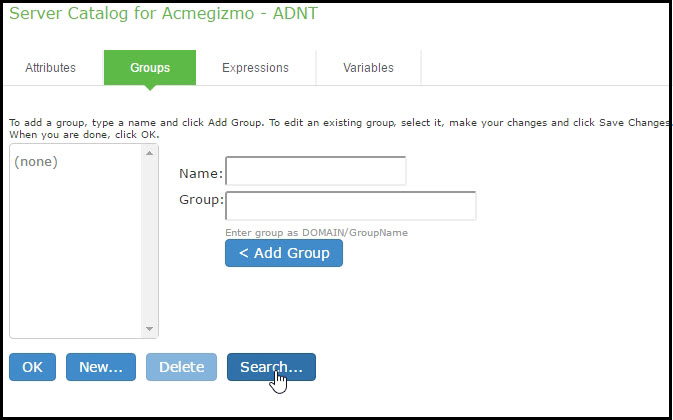
The following figure depicts the Server Catalog > Groups Tab - Adding Active Directory Groups:
•Expressions - The Server Catalog Expressions tab provides a mechanism to write custom expressions for the role mapping rule.
To display the LDAP server catalog:
•After choosing the User attribute option on the Role Mapping Rule page, click Update to display the Attribute list and the Attributes button.
•Click the Attributes button to display the LDAP server catalog. (You can also click Groups after choosing the Group membership option, or click Expressions after choosing the Custom Expressions option.)
Customizing User Realm UI Views
You can use customization options on the User Authentication Realms page to quickly view the settings that are associated with a specific realm or set of realms. For instance, you can view the role-mapping rules that you have associated with all your user realms. Additionally, you can use these customized views to easily link to the authentication policies, servers, role-mapping rules, and roles associated with a user realm.
To view a sub-set of data on the User Authentication Realms page:
1.Select one of the following options from the View menu:
•Overview - Displays the authentication servers and dynamic policy evaluation settings that you have set for the specified user realms. You may also use this setting to link to the specified server configuration pages.
•Authentication Policy - Displays Host Checker and Cache Cleaner restrictions that you have enabled for the specified user realms. You may also use this setting to link to the specified Host Checker and Cache Cleaner configuration pages.
•Role Mapping - Displays rule conditions and corresponding role assignments that you have enabled for the specified user realms. You may also use this setting to link to the specified rule conditions and role assignments configuration pages.
•Servers - Displays authentication server names and corresponding types that you have enabled for the specified user realms. You may also use this setting to link to the specified server configuration pages.
•Roles - Displays role assignments and corresponding permissive merge settings that you have enabled for the specified user realms.
2.Select one of the following options from the for list:
•All realms - Displays the selected settings for all user realms.
•Selected realms - Displays the selected settings for the user realms you choose. If you select this option, select one or more of the check boxes in the Authentication Realm list.
3.Click Update.