Secure Application Manager
Secure Application Manager Overview
The Secure Application Manager option provides secure, application-level remote access to enterprise servers from client applications. You may deploy two versions of the Secure Application Manager:
•Windows version (PSAM) - The Windows version of the Secure Application Manager is a Windows-based solution that enables you to secure traffic to individual client/server applications and application servers.
•Java version (JSAM) - The Java version of the Secure Application Manager provides support for static TCP port client/server applications, including enhanced support for Microsoft MAPI, Lotus Notes, and Citrix NFuse. JSAM also provides NetBIOS support, which enables users to map drives to specified protected resources.
Beginning PCS 9.0R4, support is not available for the legacy Pulse Windows Secure Application Manager (PSAM) clients. Users are recommended to migrate to Pulse Desktop Client to get continued maintenance. For migration details, refer to the PSAM to Pulse SAM Migration Guide.
Task Summary: Configuring PSAM
This section provides high-level PSAM configuration steps. These steps do not account for preliminary system configuration steps such as specifying the system's network identity or adding user IDs.
To configure PSAM:
1.Create resource profiles that enable access to client/server applications or destination networks, create supporting autopolicies as necessary, and assign the policies to user roles using settings in the Users > Resource Profiles> SAM pages of the admin console.
The following figure depicts Configuring PSAM:
We recommend that you use resource profiles to configure PSAM (as described above). However, if you do not want to use resource profiles, you can configure PSAM using role and resource policy settings in the following pages of the admin console instead:
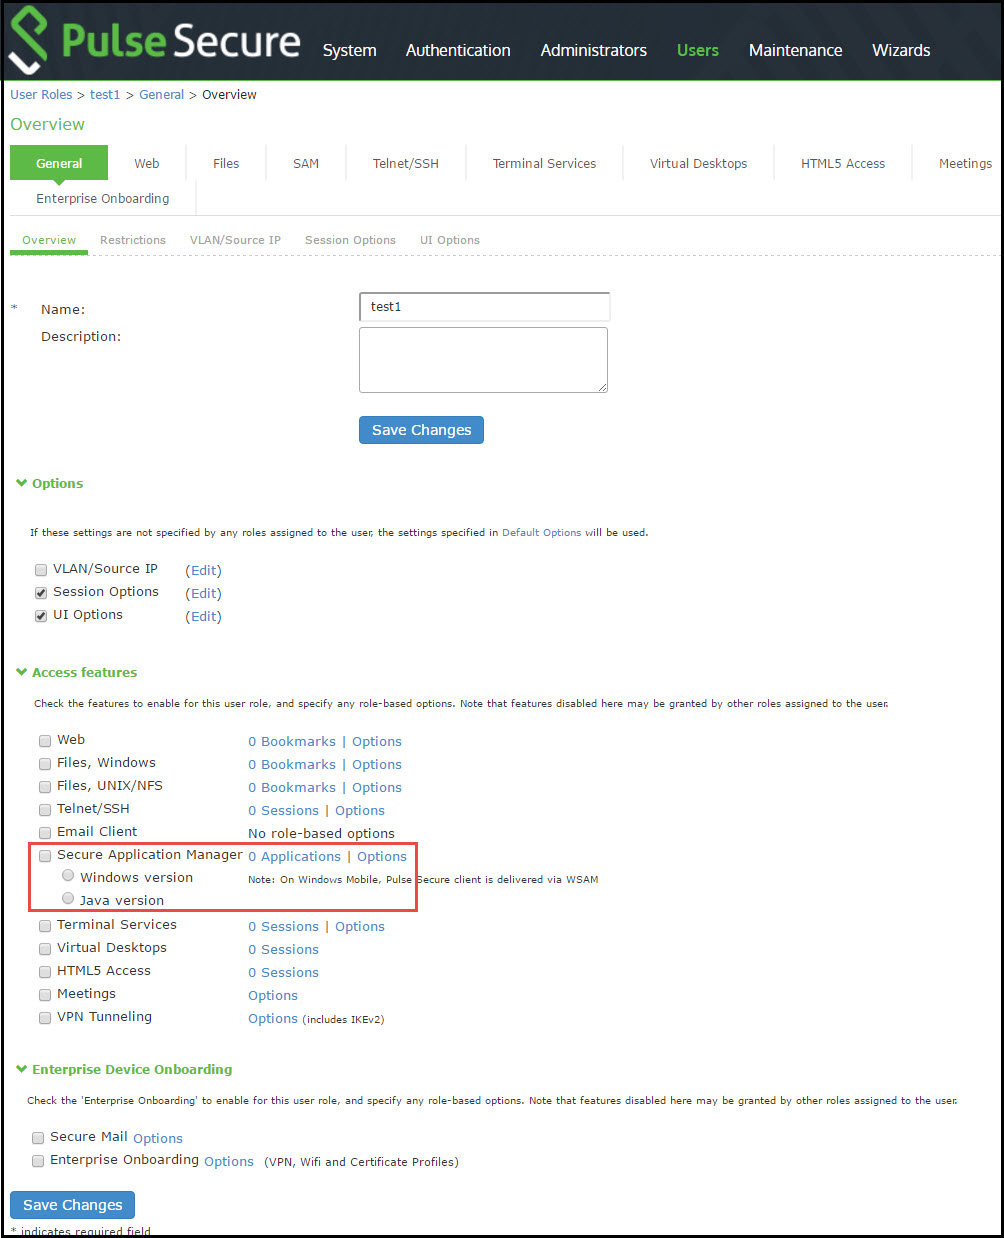
•Enable access to PSAM at the role-level using settings in the Users > User Roles > Role > General > Overview page of the admin console.
•Specify which client/server applications and servers PSAM should intermediate using settings in the Users > User Roles > SAM > Applications page of the admin console.
•Specify which application servers' users can access through PSAM using settings in the Users > Resource Policies > SAM > Access page of the admin console.
2.After enabling access to client/server applications and/or destination networks using PSAM resource profiles or roles and resource policies, you can modify general role and resource options in the following pages of the admin console:
•(Optional) Configure role-level options such as whether the system should automatically launch and upgrade PSAM using settings in the Users > User Roles > SAM > Options page of the admin console.
•(Optional) Control IP based hostname matching at the resource level using settings in the Users > Resource Policies > SAM > Options page of the admin console.
3.Ensure that an appropriate version of PSAM is available to remote clients using settings in the Maintenance > System > Installers page of the admin console.
4.If you want to enable or disable client-side logging for PSAM, configure the appropriate options through the System > Configuration > Security > Client-side Logs tab of the admin console.
PSAM Recommended Operation
Pulse Secure recommends the following operation when using PSAM:
•PSAM supports client-initiated UDP and TCP traffic by process name, by destination hostname, or by destination address range:port range. Except for Passive FTP, PSAM only supports protocols that do not embed IP addresses in the header or payload. W-SAM also supports unicast client-initiated UDP.
•Users must launch drive maps through PSAM in one of the following ways:
•NetUse - At the Command prompt, type net use * \\server\share /user:username.
•Right-click My Computer > Map Network Drive, or in Windows Explorer, go to Tools > Map Network Drive and select Connect using a different username.
•When using the PSAM Access Control List (ACL), administrators should take extra precaution when granting access to hosts. We recommend that administrators use the IP address instead of the hostname. If the hostname is required for security purposes, administrators should try to include additional ACLs with the corresponding IP address or IP addresses for that hostname. Reverse DNS lookups are not supported.
•To run Citrix NFuse through W-SAM, you must define a Caching rule to cache launch.asp files. For example, configure the resource policy to server name:80,443/*.launch.asp and the Caching Option to Cache (do not add/modify caching headers).
•When using PSAM on Pocket PC, session roaming should be enabled when being used over GPRS because the IP address of the phone may change.
•When using PSAM on Pocket PC, if you have multiple roles defined, select the Merge settings for all assigned roles option under Administrators > Admin Realms > Realm > Role Mapping.
•When using an external load balancer and accessing J-SAM, W-SAM, or the Online Meeting functionality, persistence must be employed on the load balancer. This persistence should be based on Source IP or Destination Source, depending on the load balancer being used.
Debugging PSAM Issues
You can use the Secure Application Manager dialog box on an end-user's system to view the PSAM status and a variety of details about the user's session. For instance, the Secure Application Manager dialog box displays the applications and servers that PSAM is configured to secure, event logs and Winsock data for the user's session, and various system diagnostics and performance data. This information can help you or a Pulse Secure Support representative debug any problems your users may encounter.
To access the Secure Application Manager dialog box, users simply need to double-click the PSAM icon on their Windows task bars:

For more information about viewing information in the Secure Application Manager dialog box, see the end-user help system available from the Help link in the end-user console.
About PSAM Resource Profiles
You can create two types of PSAM resource profiles:
•PSAM application resource profiles-These resource profiles configure PSAM to secure traffic to a client/server application. When you create a PSAM application resource profile, the PSAM client intercepts requests from the specified client applications to servers in your internal network.
•PSAM destination network resource profiles-These resource profiles configure PSAM to secure traffic to a server. When you create a PSAM destination network resource profile, the PSAM client intercepts requests from processes running on the client that are connecting to the specified internal hosts.
When creating PSAM resource profiles, note that the resource profiles do not contain bookmarks. To access the applications and servers that PSAM intermediates, users must first launch PSAM and then launch the specified application or server using standard methods (such as the Windows Start menu or a desktop icon).
When you enable JSAM or PSAM through Web rewriting autopolicies in the Users > Resource Profiles > Web Applications/Pages page of the admin console, the system automatically creates JSAM or PSAM autopolicies for you. You can only view these SAM policies through the appropriate Web resource profile-not through the SAM resource profile pages of the admin console.
Creating PSAM Client Application Resource Profiles
When you create a PSAM application resource profile, the PSAM client intercepts requests from the specified client applications to servers in your internal network.
To create a PSAM application resource profile:
1.In the admin console, choose Users > Resource Profiles > SAM > Client Applications.
The following figure depicts Creating PSAM Client Application Resource Profiles:
2.Click New Profile.
3.From the Type list, choose PSAM.
4.From the Application list, select one of the following options:
•Custom-When you select this option, you must manually enter your custom application's executable file name (such as telnet.exe). Additionally, you may specify this file's path and MD5 hash of the executable file (although it is not required that you specify the exact path to the executable). If you enter an MD5 hash value, PSAM verifies that the checksum value of the executable matches this value. If the values do not match, PSAM notifies the user that the identity of the application could not be verified and does not forward connections from the application to the system.
•Lotus Notes-When you select this option, PSAM intermediates traffic from the Lotus Notes fat client application.
•Microsoft Outlook-When you select this option, PSAM intermediates traffic from the Microsoft Outlook application.
•NetBIOS file browsing-When you select this option, PSAM intercepts NetBIOS name lookups in the TDI drivers on port 137.
•Citrix-When you select this option, PSAM intermediates traffic from Citrix applications.
You can only use PSAM to configure access to a standard application once per user role. For example, you can enable one configuration of Microsoft Outlook and one configuration of Lotus Notes for the "Users" role.
The system supports several mechanisms for intermediating traffic to the Lotus Notes, Microsoft Outlook, and Citrix applications.
•Domain Authentication-Select this option to allow integrated Windows applications, such as file sharing, Outlook, and so forth to authenticate to the domain controller when the client machine is part of a domain. Before using this option, you must:
•Specify domain controllers that are reachable through the system in the PSAM Destination list so that LDAP and Kerberos traffic can be proxied and sent to the system.
•Configure a PSAM Access Control Policy (ACL) to allow access to all domain controllers.
5.Enter a unique name and optionally a description for the resource profile. The system displays this information in the Client Application Sessions section of the end-user home page.
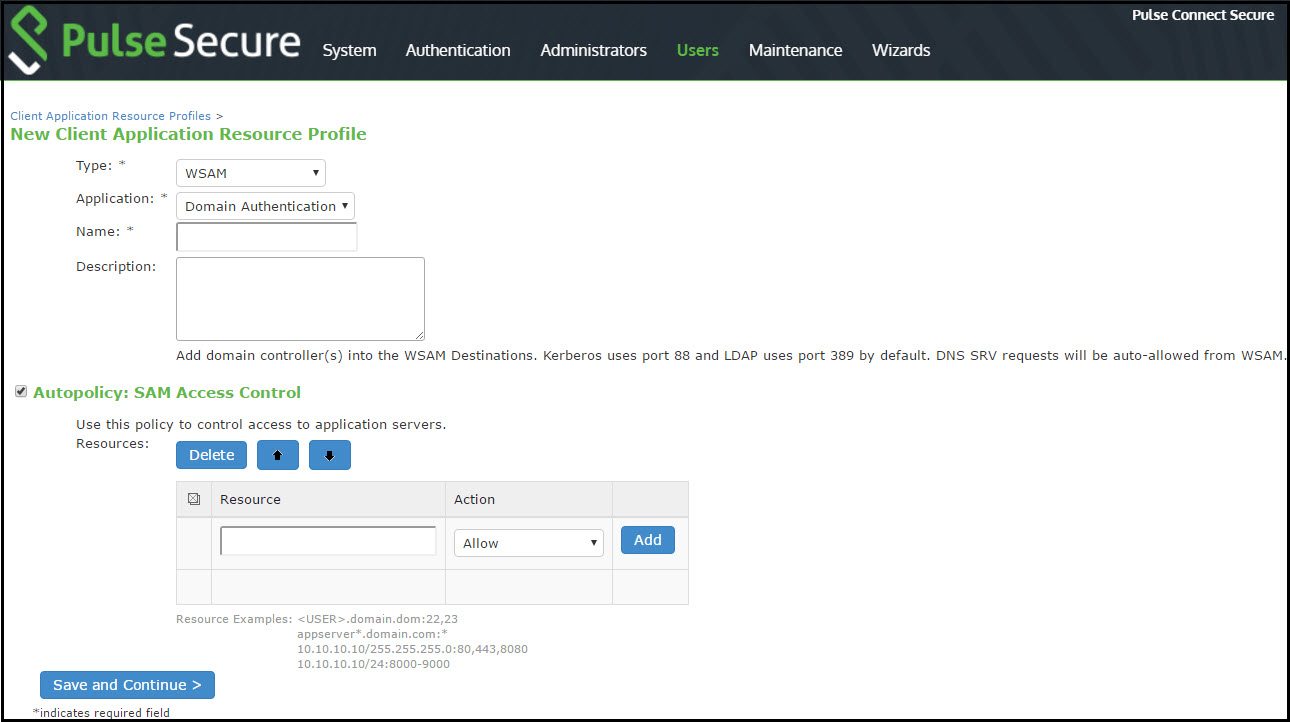
6.In the Autopolicy: SAM Access Control section, create a policy that allows or denies users access to the server that hosts the specified application.
The following figure depicts Autopolicy: SAM Access Control:
1.If it is not already enabled, select the Autopolicy: SAM Access Control check box.
2.In the Resource field, specify the application server to which this policy applies. You can specify the server as a hostname or an IP/netmask pair. You may also include a port.
If you select Domain Authentication from the Application list, enter your domain controller server addresses into the Resource field. You can add multiple domain controller servers if more than one is available.
When enabling auto-policy for any client application for PSAM, avoid entering *.* in the resource list since the access control policies are not restricted to that particular application. This may result in other resources being accessed through client applications for which the access control policies are not defined.
3.From the Action list, select Allow to enable access to the specified server or Deny to block access to the specified server.
4.Click Add.
5.Click Save and Continue.
6.In the Roles tab, select the roles to which the resource profile applies and click Add.
The selected roles inherit the autopolicy created by the resource profile. If it is not already enabled, the system also automatically enables the SAM option in the Users > User Roles > Select Role > General > Overview page of the admin console for all of the roles you select.
7.Click Save Changes.
Creating PSAM Destination Network Resource Profiles
When you create a PSAM destination network resource profile, the PSAM client intercepts requests from processes running on the client to internal hosts.
When destinations (using either IP address or hostnames) are configured on the system, all DNS and NetBIOS names are resolved through the system.
To create a PSAM destination network resource profile:
1.In the admin console, choose Users > Resource Profiles > SAM > PSAM Destinations.
2.Click New Profile.
3.Enter a unique name and optionally a description for the resource profile.
4.In the PSAM Destinations section, specify which servers you want to secure using PSAM and click Add. You can specify the servers as hostname or IP/netmask pairs. You may also include a port.
5.Select the Create an access control policy allowing SAM access to this server check box to enable access to the server specified in the previous step (enabled by default).
6.Click Save and Continue.
7.In the Roles tab, select the roles to which the resource profile applies and click Add.
The selected roles inherit the autopolicy created by the resource profile. If it is not already enabled, the system also automatically enables the SAM option in the Users > User Roles > Role Name > General > Overview page of the admin console for all of the roles you select.
Specifying Applications and Servers for PSAM to Secure
Information in this section is provided for backwards compatibility. We recommend that you secure traffic using PSAM resource profiles instead, since they provide a simpler, more unified configuration method.
Use the Applications tab to specify applications and servers for which PSAM secures traffic. When PSAM downloads to a client PC, it contains the information you configure on the Applications tab for the role. After a user launches the Secure Application Manager, PSAM intercepts requests from client applications to servers in your internal network and requests from processes running on the client to internal hosts. You define these resources on the Applications tab by configuring two lists:
•PSAM supported applications list-This list contains applications for which you want PSAM to secure client/server traffic between the client and the system.
•PSAM allowed servers list-This list contains hosts for which you want PSAM to secure client/server traffic between the client and the system.
To specify applications for which PSAM secures client/server traffic between the client and the system:
1.In the admin console, choose Users > User Roles > Select Role> SAM > Applications.
2.Click Add Application.
3.Enter the name of the application and, optionally, a description. This information displays in the Client Application Sessions section of the end-user home page.
4.From the Type list, choose one of the following options:
•Standard-If you select this option, choose one the following applications from the Application Parameters section:
•Citrix-When you select this option, PSAM intermediates traffic from Citrix applications.
•Lotus Notes-When you select this option, PSAM intermediates traffic from the Lotus Notes fat client application.
•Microsoft Outlook/Exchange-When you select this option, PSAM intermediates traffic from the Microsoft Outlook application.
•NetBIOS file browsing-When you select this option, PSAM intercepts NetBIOS name lookups in the TDI drivers on port 137.
Note that in order to access a share using PSAM with NetBIOS, you need to explicitly specify the server's NetBIOS name (alphanumeric string up to 15 characters) in two places: on the Add Server page and in a SAM resource policy. (Wildcards are currently not supported.) Alternatively, you can enable the Auto-allow application servers option on the SAM > Options tab, and then the system automatically creates a SAM resource policy that allows access to this server.
•Custom-Select this option to specify a custom client/server application. Then:
•In the Filename field, specify the name of the file's executable file.
•Optionally specify the file's path and MD5 hash of the executable file. If you enter an MD5 hash value, PSAM verifies that the checksum value of the executable matches this value. If the values do not match, PSAM notifies the user that the identity of the application could not be verified and does not forward connections from the application to the system.
5.Click Save Changes or Save + New.
6.Configure a PSAM resource policy to specify to which enterprise resources (based on IP address/port combination) the system may send the application.
Specifying Servers for PSAM to Secure
To specify servers for which PSAM secures client/server traffic between the client and the system:
1.In the admin console, choose Users > User Roles > Select Role > SAM > Applications.
2.Click Add Server.
3.Enter the name of the server and, optionally, a description.
4.Specify the server's hostname (the wild cards '*' or '?' are accepted) or an IP/netmask pair. Specify multiple ports for a host as separate entries.
5.Click Save Changes or Save + New.
6.Configure a PSAM resource policy to specify to which enterprise resources (based on IP address/port combination) the system may send a server request.
Alternatively, you can enable the Auto-allow application servers option on the SAM > Options tab, and then the system automatically creates a SAM resource policy that allows access to the specified server. Note that you need to enable this option before specifying the application or server; otherwise, you need to create a SAM resource policy.
Specifying Applications that Need to Bypass PSAM
The PSAM client comes pre-configured with a list of "passthrough" applications bypass PSAM. The PSAM client does not secure traffic for these applications. In addition to bypassing these predefined applications, you may also specify additional applications that should bypass PSAM.
PSAM does not bypass applications on Pocket PCs and other handheld devices.
To specify applications for PSAM to secure:
1.In the admin console, choose Users > User Roles > Select Role > SAM > Applications.
2.Click Add Bypass Application. The New Bypass Application page displays.
3.Name the application and provide a description (optional).
4.Provide the file name (required).
5.Enter the absolute path to the application (optional).
6.Select Save Changes to add the bypass application to the list or Save + New to save the bypass application and create another bypass application.
Default Bypass Applications
The PSAM client is preconfigured to bypass PSAM processing for the following applications:
•apache.exe
•apache*
•licadmin.exe
•vni.exe
•lmgrd.exe
•TNSLSNR.EXE
•ORACLE.EXE
•Agntsrvc.exe
•ONRSD.EXE
•Pagntsrv.exe
•ENCSVC.EXE
•Agntsvc.exe
•EiSQLW.exe
•Sqlservr.exe
•Sqlmangr.exe
•inetinfo.EXE
•xstart.exe
•idsd.exe
•dsTermServ.exe
•dsCitrixProxy.exe
•dsNcService.exe
•dsNetworkConnect.exe
Specifying Role-Level PSAM Options
To specify PSAM options at the role level:
1.In the admin console, choose Users > User Roles > Select Role > SAM > Options.
2.If it is not already enabled, select the Windows SAM option at the top of the page.
3.Under Secure Application Manager options, configure the following options:
•Auto-launch Secure Application Manager-If you enable this option, the system automatically launches the Secure Application Manager when a user signs in. If you do not select this option, users must manually start the Secure Application Manager from the Client Applications Sessions section of the end-user home page.
Although you configure the Secure Application Manager to automatically launch when users sign into the device, users can override this setting through the Preferences > Applications page of the end-user console. If you or the end user disables PSAM from automatically launching, users need to manually start the Secure Application Manager by clicking its link on the home page.
•Auto-allow application servers-If you enable this option, the system automatically creates a SAM resource policy that allows access to the server specified in the PSAM application and server lists.
You may not see the Auto-allow option if you are using a new installation or if an administrator hides the option.
4.Under Windows SAM Options, configure the following options:
•Auto-uninstall Secure Application Manager-Select this option to automatically uninstall the Secure Application Manager after users sign off.
•Prompt for username and password for intranet sites-Select this option to require users to enter their sign-in credentials before connecting to sites on your internal network. This option changes Internet Explorer's intranet zone setting so that Internet Explorer prompts the user for network sign-in credentials whenever the user wants to access an intranet site.
•Auto-upgrade Secure Application Manager-Select this option to automatically download the Secure Application Manager to a client machine when the version of Secure Application Manager on the system is newer than the version installed on the client. If you select this option, note the following:
•The user must have Administrator privileges in order for the system to automatically install Secure Application Manager on the client.
•If a user uninstalls Secure Application Manager and then signs in to the system for which the Auto-upgrade Secure Application Manager option is not enabled, the user no longer has access to Secure Application Manager.
•Resolve only hostnames with domain suffixes in the device DNS domains-If this option is configured, PSAM filters DNS requests (FQDNs) and sends to the system only those DNS requests that have a domain suffix in the list of DNS Domains configured on the Network Overview page. This option is limited to resolution of FQDNs only. No filtering is applied to short names and NetBIOS requests.
•Session start script and Session end script-If you want to run a batch, application, or Win32 service file when the PSAM session starts or ends, enter the name and path for the file. For example, if you want to terminate an application and then restart it, you may use PSKILL.exe (a third-party utility that terminates processes on local or remote systems).
If you enable the Session start script option or Session end script option, note the following:
•You must either install the specified file on your end-user's computers or specify a path on an accessible network directory.
•To ensure that the system can locate a file on different platforms, you can use Windows variables, such as in a path such as %WINDIR%\system32\log.
•The file must invoke the PSAM launcher using the appropriate command-line options.
5.Click Save Changes.
Specifying Application Servers that Users Can Access
Information in this section is provided for backwards compatibility. We recommend that you secure traffic using PSAM resource profiles instead, since they provide a simpler, more unified configuration method.
When you enable the Secure Application Manager access feature for a role, you need to create resource policies that specify which application servers a user may access. These policies apply to both the Java version and Windows version of the Secure Application Manager (JSAM and PSAM, respectively). When a user makes a request to an application server, the system evaluates the SAM resource policies. If the system matches a user's request to a resource listed in a SAM policy, the system performs the action specified for the resource.
When writing a SAM resource policy, you need to supply key information:
•Resources-A resource policy must specify one or more resources to which the policy applies. When writing a SAM policy, you need to specify application servers to which a user may connect.
•Roles-A resource policy must specify the roles to which it applies. When a user makes a request, the system determines what policies apply to the role and then evaluates those policies that correspond to the request. SAM resource policies apply to users' requests made through either version, JSAM or PSAM.
•Actions-A Secure Application Manager resource policy either allows or denies access to an application server.
You can create resource policies through the standard interface (as described in this section) or through resource profiles (recommended method).
The engine that evaluates resource policies requires that the resources listed in a policy's Resources list follow a canonical format.
To write a Secure Application Manager resource policy:
1.In the admin console, choose Users > Resource Policies > SAM > Access.
2.On the Secure Application Manager Policies page, click New Policy.
3.Enter a name to label this policy (required) and a description of the policy (optional).
4.In the Resources section, specify the application servers to which this policy applies.
5.In the Roles section, specify:
•Policy applies to ALL roles-Choose this option to apply this policy to all users.
•Policy applies to SELECTED roles-Choose this option to apply this policy only to users who are mapped to roles in the Selected roles list. Make sure to add roles to this list from the Available roles list.
•Policy applies to all roles OTHER THAN those selected below-Choose this option to apply this policy to all users except for those who map to the roles in the Selected roles list. Make sure to add roles to this list from the Available roles list.
6.In the Action section, specify:
•Allow socket access-Choose this option to grant access to the application servers specified in the Resources list.
•Deny socket access-Choose this option to deny access to the application servers specified in the Resources list.
•Use Detailed Rules-Choose this option to specify one or more detailed rules for this policy.
7.Click Save Changes.
8.On the Secure Application Manager Policies page, order the policies according to how you want to evaluate them. Keep in mind that once the system matches the resource requested by the user to a resource in a policy's (or a detailed rule's) Resource list, it performs the specified action and stops processing policies.
Specifying Resource Level PSAM Options
Use the Options tab to specify the SAM resource option to match IP addresses to hostnames specified as resources in your SAM resource policies. When you enable this option, the system looks up IP addresses corresponding to each hostname specified in a SAM resource policy. When a user tries to access a server by specifying an IP address rather than the hostname, the system compares the IP to its cached list of IP addresses to determine if a hostname matches an IP. If there is a match, then the system accepts the match as a policy match and applies the action specified for the resource policy.
When you enable this option, the system compiles a list of hostnames specified in the Resources field of each SAM resource policy. The system then applies the option to this comprehensive list of hostnames.
This option does not apply to hostnames that include wildcards and parameters.
To specify the SAM resource option:
1.In the admin console, choose Users > Resource Policies > SAM > Options.
2.Select IP based matching for Hostname based policy resources. This option looks up the IP address corresponding to each hostname specified in a Secure Application Manager resource policy. When a user tries to access a server by specifying an IP address rather than the hostname, the system compares the IP to its cached list of IP addresses to determine if a hostname matches an IP. If there is a match, then the system accepts the match as a policy match and applies the action specified for the resource policy.
3.Click Save Changes.
JSAM Overview
The Java version of the Secure Application Manager provides support for static TCP port client/server applications, including enhanced support for Microsoft MAPI, Lotus Notes, and Citrix NFuse. JSAM also provides NetBIOS support, which enables users to map drives to specified protected resources.
JSAM works well in many network configurations but does not support dynamic port TCP-based client/server applications, server-initiated connections, or UDP traffic.
regedit.exe is required for some JSAM functionality. If regedit.exe is disabled, automatic host mapping and the NetBIOS and Outlook/Exchange applications will not work properly.
For information about the operating systems, Web browsers, and JVMs on which Pulse Secure supports JSAM, see the Supported Platforms Guide.
Task Summary: Configuring JSAM
This topic provides high-level JSAM configuration steps. These steps do not account for preliminary system configuration steps such as specifying the system's network identity or adding user IDs.
To configure JSAM:
1.Create resource profiles that enable access to client/server applications, create supporting autopolicies as necessary, and assign the policies to user roles using settings in the Users > Resource Profiles> SAM pages of the admin console.
We recommend that you use resource profiles to configure JSAM (as described above). However, if you do not want to use resource profiles, you can configure JSAM using role and resource policy settings in the following pages of the admin console instead:
•Enable access to JSAM at the role-level using settings in the Users > User Roles > Select Role > General > Overview page of the admin console.
•Specify which client/server applications JSAM should intermediate using settings in the Users > User Roles > SAM > Applications page of the admin console.
•Specify which application servers' users can access through JSAM using settings in the Users > Resource Policies > SAM > Access page of the admin console.
2.After enabling access to client/server applications using JSAM resource profiles or roles and resource policies, you can modify general role and resource options in the following pages of the admin console:
•(Optional) Configure role-level options such as whether the system should automatically launch JSAM using settings in the Users > User Roles > SAM > Options page of the admin console.
•(Optional) Control IP based hostname matching at the resource level using settings in the Users > Resource Policies > SAM > Access page of the admin console.
3.If you want to enable or disable client-side logging for JSAM, configure the appropriate options through the System > Configuration > Security > Client-side Logs tab of the admin console.
4.If you have multiple internal domains, such as company-a.com and company-b.com, add DNS domains to the system using settings in the System > Network > Overview page of the admin console so that names such as app1.company-a.com and app2.company-b.com resolve correctly.
5.If a remote user's PC is set up to use a Web proxy in Internet Explorer, configure the client machine to bypass the proxy server when the user launches applications that need to connect to the Secure Application Manager.
6.Enable JSAM to associate IP loopback addresses with application servers on specific ports either by enabling JSAM to edit the hosts file on your users' systems or by creating an external DNS to route client application traffic to the JSAM applet.
Using JSAM for Client/Server Communications
JSAM provides secure port forwarding by directing client application traffic to the JSAM applet running on a client machine. To the client application running on the local machine, JSAM appears as the application server. To the application server in your network, the system appears as the client application.
The below figure illustrates the interaction between a client application and its server via Connect Secure. (This figure assumes that the user specified a localhost IP address as the server in the client application.)
The following figure depicts the Java Secure Application Manager:
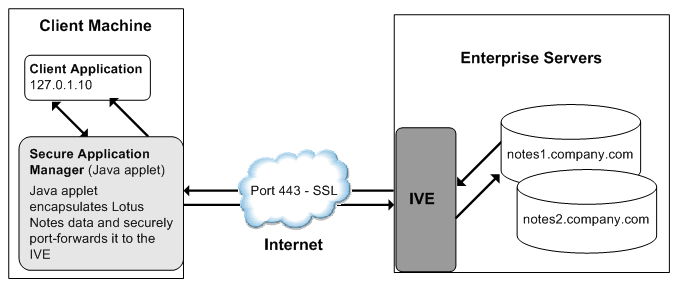
1.The user starts a client application listed in the Client Application Sessions section of the end-user home page. The application resolves the remote server to localhost.
2.The client application connects to JSAM running on the user's machine and starts sending requests.
3.JSAM encapsulates and forwards all client requests to the system over SSL.
4.The system unencapsulates the client data and forwards it to the specified application server.
5.The application server responds with data to the system.
6.The system encapsulates and forwards the response from the application server to JSAM over SSL.
7.JSAM unencapsulates the application server data and forwards it to the client application.
A status indicator on the JSAM window shows the current state of JSAM. If green, JSAM is working correctly. If red, JSAM is unable to send/receive requests to/from the system.
The JSAM window updates the status indicator only when traffic is passed through JSAM. If no traffic is passed through JSAM, the status indicator remains in its current state. For example, if there is a network outage or if the user's session times out, the status indicator remains green even though it cannot send/receive requests to/from the system.
- If a remote user's PC is set up to use a Web proxy in Internet Explorer, you must configure the client machine to bypass the proxy server when the user launches applications that need to connect to the Secure Application Manager.
- JSAM allocates 20-30 MB of RAM when running (the exact amount of memory depends on the Java Virtual Machine (JVM) used) and, if caching is enabled, may leave a .jar file on the client machine. For more information about files left by JSAM on client machines, see the Client-side Changes Guide on the Pulse Secure Global Support Center (PSGSC) Center.
- Users may experience problems waiting for the Secure Application Manager to fully load if they enable pop-up blockers through their Web browsers. This problem occurs because a pop-up window alerting users to accept the Secure Application Manager plug-in may appear in the background (behind the Web browser window) where users cannot see it.
- When launching applications through JSAM, Pulse Secure supports configuration of 1200 unique IP/port combinations on Windows and Mac and 800 unique IP/port combinations on Linux. Note that this limit is based on IP/port combinations, not applications (which may listen on more than one IP address and port). Pulse Secure determined these numbers by testing on Windows machines using default JRE memory settings.
Assigning IP Loopback Addresses to Servers
For JSAM to function, it must listen on loopback addresses for client requests to network application servers. The system assigns these unique IP loopback address to each application server that you specify for a given port. For example, if you specify:
app1.mycompany.com, app2.mycompany.com. app3.mycompany.com,...
for a single port, the system assigns a unique IP loopback address to each application:
127.0.1.10, 127.0.1.11, 127.0.1.12,...
When the system installs JSAM on a user's machine, JSAM listens on the loopback addresses (on the corresponding client port specified for the application server) for client requests to network application servers. You can configure the system to dynamically assign these loopback addresses, or you can configure static loopback addresses yourself through the admin console.
You must enable these associations between IP loopback addresses and applications servers on a specific port in one of two ways:
•Allow the system to edit the hosts file on the client system with IP loopback assignments. The system makes a copy of the current hosts file and then creates a new hosts file with the IP loopback assignments. When the user ends the session, the system deletes the new hosts file and restores the original hosts file.
If the client system shuts down unexpectedly, the hosts file still points the client to loopback addresses for outside connections. Settings in the hosts file are returned to their original state when the client system reboots.
Users must have the proper privileges on their machines in order for the system to edit the hosts file.
•Create an external DNS to route client application traffic to the JSAM applet.
Using Static Loopback Addresses
Using an external DNS server with dynamic loopback addresses requires an administrator to update the DNS settings each time the JSAM application configuration changes. On the other hand, configuring an external DNS server using static loopback addresses provides administrators with the highest degree of configuration control. For example, consider the following IP loopback assignments:
app1.mycompany.com - 127.0.1.10
app2.mycompany.com - 127.0.1.11
app3.mycompany.com - 127.0.1.12
If you configure an external DNS server using dynamic loopback address assignments and you delete the first application server, the address assignments change:
app2.mycompany.com - 127.0.1.10
app3.mycompany.com - 127.0.1.11
With static IP loopback addresses in an external DNS, deleting the first application server does not affect the IP loopback assignments for the remaining application servers:
app2.mycompany.com - 127.0.1.11
app3.mycompany.com - 127.0.1.12
You can assign static IP loopback addresses when creating a JSAM custom resource profile through the Users > Resource Profiles > SAM > Client Applications page of the admin console or when enabling JSAM applications through the Users > User Roles > Select Role > SAM > Applications page of the admin console.
If you assign a static IP loopback address while creating a new application, the system checks the address for conflicts against other configured applications in the same role. If another application uses the same address, the system displays an error message prompting you to enter a different IP address.
Static IP loopback addresses apply only to application servers configured by an administrator. The system assigns dynamic IP loopback addresses for user-defined application servers. If the administrator does not assign an IP loopback address to an application server, the system assigns a dynamic address.
IP Loopback Address Considerations When Merging Roles
•IP Loopback Address Considerations When Merging Roles
•If two or more roles map to the same application and each mapping contains a different static IP loopback address, all of the static IP loopback addresses remain unchanged.
•If two or more roles map to the same application and only one role uses a static IP loopback address, JSAM uses only the static IP loopback address and binds to only one statically defined socket on the client.
•If two or more roles map to the same application using dynamic IP loopback addresses, only one dynamic IP loopback address is used. The application listener binds to only one dynamically assigned socket on the client.
•If you use the same hostname in multiple roles, either use the same static IP loopback address, or dynamic addresses for all the applications.
•If you use different hostnames associated with the same loopback address and port combination, JSAM cannot distinguish between the two different hosts at the back-end and, hence, cannot accurately direct IP traffic bound for those hosts.
Resolving Hostnames to Localhost
For JSAM to successfully intermediate traffic, a client application on the user's machine needs to resolve the application server to the client localhost. This process enables JSAM to capture and securely port forward the data intended for the application server via Connect Secure. JSAM can perform automatic host-mapping, in which it edits the client's hosts file, to map application servers to localhost. (You can enable automatic host-mapping through the Users > User Roles > Select Role > SAM > Options page of the admin console.)
In order for JSAM to edit a user's hosts file, the user must have the appropriate authority on the client machine:
•Windows users using the FAT file system may belong to any user group. For Exchange MAPI support, however, users must have at least Power User privileges on their machines.
•Windows users using the NTFS file system must have Administrator privileges on their machines.
•Linux (RedHat) users must launch the browser that will launch JSAM as root.
•Macintosh users must supply the Administrator password when prompted by JSAM.
•If users do not have the appropriate privileges on their machines, JSAM cannot automatically edit the hosts file, preventing hostname resolution to localhost.
Alternatives for users who do not have the appropriate privileges are:
•You configure your external DNS server to resolve application servers to localhost. If you configure your external DNS server to use a localhost address instead of the application server hostname, remote users need to configure the order in which their machine searches DNS servers to start with the corporate DNS.
•You relax the permissions on the etc directory and the etc\hosts file to enable JSAM to make the necessary modifications.
•Users configure a client application to use the localhost address assigned by the system where they typically specify the application server hostname in the client application.
Configuring a PC that Connects Through a Proxy Web Server
If a remote user's PC is set up to use a Web proxy in Internet Explorer, you must configure the client machine to bypass the proxy server and contact the Secure Application Manager instead.
To configure a PC that connects to the system through a Web proxy in Internet Explorer:
1.From the Internet Explorer Tools menu, choose Internet Options.
2.On the Connections tab, click the LAN Settings button.
3.Under Proxy server, click the Advanced button.
4.Under Exceptions, enter the addresses for which you do not want to use a proxy server. Enter all addresses (hostnames and localhost) that the client application uses when connecting through the Secure Application Manager. For example:
If your application server is app1.company.com, enter the following exceptions:
app1;app1.company.com;127.0.0.1
If your Exchange Server is exchange.company.com, enter the following exceptions:
exchange;exchange.company.com;127.0.0.1
Connect Secure clients parse Internet Explorer's static proxy exception list. We support most exceptions that Internet Explorer supports with the following limitations:
•For IP address exception, we support n.*.*.*, n.n.*.*, n.n.n.*. For example, 10.*.*.*, 10.10.*.*, 10.10.10.*, or 10.10.10.10. We do not support 10* or 10.*.10.* even though Internet Explorer may support them.
•For string expression, we support specific strings such as my.company.net,or a wild card at front of the string, for example, *.my.company.net or *.company.net. We do not support *.company.*, *.company*, *.company.*.com, *.net, *.com and so forth.
Determining the Assigned Loopback Address
Users cannot modify the corporate DNS server for applications they add for port forwarding. If you allow users to specify applications for JSAM to proxy, users need to configure a client application to use the localhost address assigned by the system where they typically enter the server hostname.
The Details pane of the JSAM browser window displays the loopback IP address assigned by the system along with the port specified by the user. To determine what IP address the system assigns to an application specified through the Client Applications page, a user must restart the Secure Application Manager after adding the application. The loopback address assigned to the application appears on the Details pane of the Secure Application Manager browser window.
In the client application, the user needs to enter the system-assigned loopback address as the application server. For example, if a user wants to access a telnet server behind your corporate firewall, the user needs to follow these steps:
1.In the Client Application Sessions section of the end-user home page, click the Item Properties icon, then click Add Application
2.On the Add Application page, specify:
•The server's fully qualified domain name or IP address in the Remote Server field, such as terminalserver.pulsesecure.net.
•The port on which JSAM should listen for client traffic to the server in the Client Port field, such as 3389.
•The port on which the remote server should listen for traffic from the client application (JSAM) in the Server Port field, such as 3389.
3.Click Add to save the information.
4.Close the Secure Application Manager browser window.
5.In the Client Application Sessions section of the end-user home page, click Start to restart the Secure Application Manager.
6.In the Secure Application Manager browser window, click Details.
7.On the Details tab, look at which loopback address is assigned to the remote server, such as 127.0.1.18.
8.In the client application, such as Remote Desktop Connection, specify the loopback address in the configuration field for the server. This field appears in different places for different applications. Users may enter this information through a setup wizard or other configuration dialog.
Configuring External DNS Servers and User Machines
Client applications must resolve server hostnames to JSAM, which proxies data between a client and a server. On Windows PCs, server hostnames are stored in the hosts file. To intercept data using JSAM, the server names in the hosts file need to resolve to the local machine (localhost) so that the system can intermediate the traffic. The recommended process for mapping application servers to a user's local PC is to enable the automatic host-mapping option, which enables the system to automatically modify the PC hosts file to point application servers to the localhost for secure port forwarding.
For the system to perform automatic host-mapping, however, PC users must have the proper privileges on their machines. If your PC users do not have these privileges, you must ensure that your internal application server names resolve externally to a PC's localhost by adding entries to your external Internet-facing DNS server such as:
127.0.0.1 app1.company-a.com
127.0.0.1 app2.company-b.com
127.0.0.1 exchange1.company-a.com
127.0.0.1 exchange1.company-b.com
If the client application uses an unqualified name for the application server, users need to specify DNS suffixes so that the PC can attach the suffix and contact your external DNS server for name resolution. For example, an MS Outlook client typically has an unqualified name for an MS Exchange server. In order for the qualified name to resolve to 127.0.0.1, users need to specify the appropriate DNS suffixes on their PCs. Adding domain names does not affect other operations on the PC, including use of the client application from within the enterprise.
To configure a user PC with DNS suffixes (Windows 2000):
1.From the Windows Start menu, choose Settings > Network and Dial-up Connections > Local Area Connection and then choose Properties.
2.Select Internet Protocol (TCP/IP) and then click Properties.
3.Click Advanced and then click the DNS tab.
4.Click Append these DNS suffixes and then click Add.
5.Add your enterprise's internal domains as additional DNS suffixes.
JSAM Linux and Macintosh Support
Linux users do not have access to ports below 1024 unless they are signed into their machines as root. Macintosh users do not have access to ports below 1024 unless they supply the Administrator password when prompted by JSAM. To support applications that run on privileged ports (ports below 1024), such as a telnet application:
•Users may launch the browser that will launch JSAM as root.
•You or the user may specify a client port number equal to or greater than port 1024 when enabling client applications.
For example, if you specify 2041 for the client port and 23 for the server port for a telnet application, the command to run the application is:
telnet loopbackIP 2041
where loopbackIP is the loopback IP address assigned to the application server by the system. JSAM listens on port 2041 for traffic from the telnet application and forwards it to the system. The system then forwards the traffic to port 23 on the destination server.
Due to the design of the Sun JVM code, Macintosh users cannot relaunch JSAM within the same Safari user session. In order to re-launch JSAM, the user must exit Safari and then launch JSAM again.
Standard Application Support: MS Outlook
Remote users can use the Microsoft Outlook client on their PCs to access e-mail, their calendars, and other Outlook features through the system. Versions of MS Outlook currently supported are MS Outlook 2000 and MS Outlook 2002. This ability does not require changes to the Outlook client and does not require a network layer connection, such as VPN.
Refer to the Supported Platforms Document for details on operating system support and dependencies. See Pulse Connect Secure Client-Side Changes Installation Reference for details about registry changes made by JSAM.
Also, note that the system does not support Outlook through SVW, since Outlook applications require HKLM registry key changes.
In order for this feature to work for remote users, the network settings of the user's PC must resolve the name of the Exchange Servers embedded in the Outlook client to the local PC (127.0.0.1, the default localhost IP address). We recommend that you configure the system to automatically resolve Exchange server hostnames to the localhost by temporarily updating the hosts file on a client computer through the automatic host-mapping option.
Client/Server Communication Using JSAM
The below figure describes the interactions between the Outlook client and an Exchange Server via Connect Secure. The following figure assumes that the system is configured to perform automatic host-mapping.
The following figure depicts the Java Secure Application Manager and Enhanced MS Exchange Support:
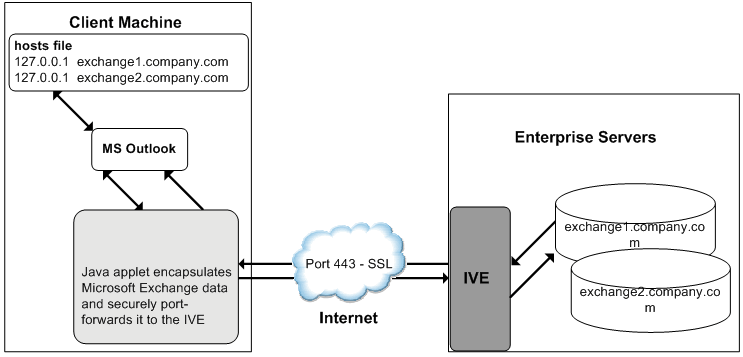
1.The user starts the MS Outlook client. Outlook tries to contact the Exchange Server exchange1.yourcompany.com. The system resolves the Exchange Server hostname to 127.0.0.1 (localhost) through temporary changes to the hosts file.
2.Outlook connects to the Secure Application Manager running on the user's PC and then starts sending requests for e-mail.
3.The Secure Application Manager encapsulates and forwards all the requests from the Outlook client to the system over SSL.
4.The system unencapsulates the client data and looks in the MAPI request to find the target Exchange Server. The request is then forwarded to the target server.
5.Each request in the MAPI protocol encodes the target server for the request. When MAPI requests arrive from the Secure Application Manager, the system looks in each of them and dispatches them to the appropriate target server. This process works transparently even if there are multiple Exchange Servers.
6.The Exchange Server responds to the system with e-mail data.
7.The system encapsulates and forwards the response from the Exchange Server to the Secure Application Manager over SSL.
8.The Secure Application Manager unencapsulates the information sent from the system and forwards the normal MAPI response from the Exchange Server to the Outlook client.
Standard Application Support: Lotus Notes
Remote users can use the Lotus Notes client on their PCs to access e-mail, their calendars, and other features through the system. This ability does not require a network layer connection, such as a VPN.
See the Supported Platforms Document for details on operating system support and dependencies.
Client/Server Communication Using JSAM
In order for this feature to work for remote users, they need to configure the Lotus Notes client to use "localhost" as their location setting (that is, their Home Location, Remote Location, or Travel Location setting). The Secure Application Manager then picks up connections requested by the Lotus Notes client. Figure 132 describes the interactions between the Lotus Notes client and a Lotus Notes Server via Connect Secure.
The following figure depicts the Java Secure Application Manager and Enhanced Lotus Notes Support:
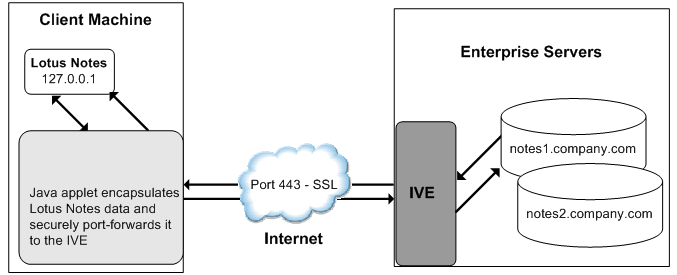
The above figure shows the Lotus Notes client location value to be configured to the localhost.
The user starts the Lotus Notes client with the location setting. The client uses the HTTP Tunnel proxy setting for its location setting. Note that you must set the HTTP Tunnel proxy setting to use localhost (or 127.0.0.1) as the proxy address and 1352 as the proxy port.
1.The Lotus Notes client connects to the Secure Application Manager and starts sending requests for e-mail.
2.The Secure Application Manager encapsulates and forwards requests from the Lotus Notes client to the system over SSL.
3.The system unencapsulates the client data and looks in the Lotus Notes request to find the target Lotus Notes Server. The request is then forwarded to the target server.
Each request in the Lotus Notes protocol encodes the target server for the request. When Lotus Notes requests arrive from the application proxy, the system obtains the target server information from the requests and dispatches the requests to the appropriate target server. Thus, this feature works transparently even if there are multiple Lotus Notes Servers accessed by a single user. Note that you must create JSAM ACLs on the system that enable access to these target servers.
4.The Lotus Notes Server responds with e-mail data to the system.
5.The system encapsulates and forwards the response from the Lotus Notes Server to the Secure Application Manager over SSL.
6.The Secure Application Manager unencapsulates the information sent from the system and forwards the normal response from the Lotus Notes Server to the Lotus Notes client.
Configuring the Lotus Notes Client
Before a remote user can connect from Lotus Notes to a Lotus Notes Server through the system, the user must edit the Lotus Notes client to set a Location document Proxy field to the PC's localhost port. The Location document edited should be the one used for remote access, such as the Remote Location or Travel Location setting. Setting the Proxy field to the PC's localhost port enables the system to connect to multiple Lotus Notes Servers, including those set up as pass-through servers.
You should use the following configuration in these cases:
•JSAM is configured to use Lotus Notes as a standard application.
•The Lotus Notes client can connect to multiple Lotus Notes servers.
To configure a Lotus Notes client for use with the system:
1.From the Lotus Notes client, choose File > Mobile > Locations.
2.Select the Location used for remote access and then click Edit Location.
3.In the Basics tab, click the Proxy icon.
4.In the Proxy Server Configuration box, enter 127.0.0.1:1352 in the HTTP Tunnel field.
5.Click OK.
Standard Application Support: Citrix Web Interface for MetaFrame (NFuse Classic)
Remote users can use the Citrix Web Interface for MetaFrame server to access a variety of applications via Connect Secure. This process does not require any alterations to the user permissions on the client.
After a user browses to a Citrix Web Interface for MetaFrame server and selects an application, the server sends an ICA file to the client. When the system rewrites the ICA file, it replaces hostnames and IP addresses with pre-provisioned loopback IP addresses. The ICA client then sends application requests to one of the loopback IP addresses. The Secure Application Manager encapsulates the data and sends it to the system. The system unencapsulates the data and sends it to the appropriate MetaFrame server using port 1494 or 2598 (depending on the client)
- The system supports several mechanisms for intermediating traffic between a Citrix server and client, including the Terminal Services, JSAM, PSAM, VPN Tunneling, and hosted Java applets features.
- JSAM does not automatically launch when Embedded Applications are set to "Auto" in the Citrix Web Interface for MetaFrame console. In these cases, we recommend that you configure JSAM to automatically launch after the user signs into the device. Otherwise, end users must manually launch JSAM before using Citrix Web Interface for MetaFrame.
- If a user attempts to use the server discovery feature and then attempts to use application discovery, the application discovery process fails. To resolve this particular situation, shut down and restart Citrix Program neighborhood.
- The system serves as an alternative to deploying the Citrix Secure Gateway (CSG).
- To use the applet-mode of the Java client, make sure to enable Java applet support on the Users > User Roles > Role Name > Web > Options page of the admin console.
- If you set the Network Protocol setting in the Citrix Program Neighborhood client to TCP/IP, the system does not support the application through JSAM since the TCP/IP setting produces UDP traffic.
Enabling Citrix Published Applications on the Citrix Native Client
When enabling Citrix published applications on the Citrix native client through the system, you must complete the following steps:
1.Specify custom application on JSAM to port forward.
2.Configure the Citrix metaframe server for published applications.
3.Configure the Citrix client for published applications.
- These instructions assume that you are not using the Citrix Web Interface for Citrix Presentation Server (formerly known as Nfuse server).
- These instructions do not cover how to configure the standard Citrix application option. (For standard Citrix application instructions, use settings in the Users > Resource Profiles > Web > Web Applications/Pages page of the admin console.) You can enable both the standard Citrix application and the custom Citrix application-these settings do not impact each other.
- The system supports several mechanisms for intermediating traffic between a Citrix server and client, including the Terminal Services, JSAM, PSAM, VPN Tunneling, and hosted Java applets features.
Specifying Custom Applications on JSAM to Port Forward
When configuring JSAM to work with published applications, you must open two port-ports 80 and 1494. Each opened port creates a connection through JSAM to the Citrix Metaframe server.
To specify published applications for JSAM to port forward:
1.Add a custom application through JSAM. When adding the custom application, keep the following settings in mind:
•Server name-For published applications, you must enter the Metaframe server's fully qualified DNS name, not its IP address.
•Server port-For published applications, enter 80 and 1494. (Create one entry for port 80 and another for port 1494.) If you have multiple Metaframe servers, you must configure all of them on the same ports.
•Client port-For published applications, enter 80 and 1494. (Create one entry for port 80 and another for port 1494.)
2.If you have multiple internal domains, such as company-a.com and company-b.com, add DNS domains to the system using settings in the System > Network > Overview page of the admin console so that names such as app1.company-a.com and app2.company-b.com resolve correctly.
3.If a remote user's PC is set up to use a Web proxy in Internet Explorer, configure the client machine to bypass the proxy server when the user launches applications that need to connect to the Secure Application Manager.
4.Enable JSAM to associate IP loopback addresses with application servers on specific ports either by enabling JSAM to edit the hosts file on your users' systems or by creating an external DNS to route client application traffic to the JSAM applet.
Configuring the Citrix Metaframe Server for Published Applications
When enabling Citrix published applications through the system, you must enable the XML service DNS address resolution on the metaframe server. The following instructions describe how to do this on Metaframe XP.
To configure the Citrix metaframe server to work with the system:
1.Open the Citrix Management Console.
2.Right-click on the name of your server farm and click Properties.
3.Select the MetaFrame Settings tab.
4.Select the Enable XML Service DNS address resolution check box.
5.Click OK.
Configuring the Citrix Client for Published Applications
When enabling Citrix published applications through the system, you must create an ICA connection on each Citrix client using the instructions that follow.
To configure the Citrix client to work with the system:
1.Open the Citrix Program Neighborhood and choose the Add ICA Connection option.
2.In the Add New ICA Connection wizard, select the connection type that your computer uses to communicate.
3.In the next screen:
1.Enter a description of the new ICA Connection.
2.Select TCP/IP + HTTP as the network protocol.
3.Select Published Application.
4.Click Server Location, and then:
4. Deselect the Use Default check box.
1.Click Add in the Locate Server or Published Application dialog box.
2.Confirm that HTTP/HTTPS is selected from the Network Protocol list.
3.Enter the metaframe server DNS in the Add Server Location Address dialog box.
4.Enter 80 in the port field.
5.Click OK in the Add Server Location Address dialog box and the Locate Server or Published Application dialog box.
6.Select an application from the Published Application list.
5. Enter information in the remaining wizard screens as prompted.
Enabling Citrix Secure Gateways
When enabling Citrix secure gateways (CSGs) through the system, you must:
1.Disable Citrix NFuse as a standard application through the Users > Resource Profiles > Web > Web Applications/Pages page of the admin console.
You cannot enable the Citrix NFuse standard application and Citrix Secure Gateways (CSGs) custom applications through JSAM on the same device.
The system supports several mechanisms for intermediating traffic between a Citrix server and client, including the Terminal Services, JSAM, PSAM, VPN Tunneling, and hosted Java applets features.
2.Specify applications for JSAM to port forward by adding a custom application through JSAM. When adding the custom application, keep the following settings in mind:
•Server name-For CSGs, you must enter the Citrix secure gateway server's fully qualified DNS name, not its IP address.
•Server port-For CSGs, enter 443. If you have multiple Citrix secure gateway servers, you must configure all of them on the same port.
•Client port-For CSGs, enter 443. (Create one entry for port 80 and another for port 443.)
3.If you have multiple internal domains, such as company-a.com and company-b.com, add DNS domains to the system using settings in the System > Network > Overview page of the admin console so that names such as app1.company-a.com and app2.company-b.com resolve correctly.
4.If a remote user's PC is set up to use a Web proxy in Internet Explorer, configure the client machine to bypass the proxy server when the user launches applications that need to connect to the Secure Application Manager.
5.Enable JSAM to associate IP loopback addresses with application servers on specific ports either by enabling JSAM to edit the hosts file on your users' systems or by creating an external DNS to route client application traffic to the JSAM applet.
6.Setup your Citrix Secure Gateway and confirm that it works on your desktop.
7.Add a bookmark to the end-users' home page that points to the list of Citrix secure gateway servers and use the Selective Rewrite feature to turn off rewriting for the URL.
Or, if you do not want to create a bookmark through the system, simply instruct users to access the URL using their Web browser's address bar instead of the system address bar.
Creating a JSAM Application Resource Profile
JSAM resource profiles configure JSAM to secure traffic to a client/server application. When you create a JSAM application resource profile, the JSAM client tunnels network traffic generated by the specified client applications to servers in your internal network.
When creating JSAM resource profiles, note that the resource profiles do not contain bookmarks. Therefore, end users will not see a link for the configured application in the end-user interface. To access the applications and servers that JSAM intermediates, users must first launch JSAM and then launch the specified application using standard methods (such as the Windows Start menu or a desktop icon).
Also note that when you enable JSAM or PSAM through rewriting autopolicies for Web resource profiles, the system automatically creates JSAM or PSAM autopolicies for you. You can only view these SAM policies through the appropriate Web resource profile-not through the SAM resource profile pages of the admin console.
To create a JSAM application resource profile:
1.In the admin console, choose Users > Resource Profiles > SAM > Client Applications.
2.Click New Profile.
3.From the Type list, choose JSAM.
4.From the Application list, select one of the following options.
•Custom-Select this option to intermediate traffic to a custom application. Then:
•In the Server name field, enter the name or IP address of the remote server. If you are using automatic host mapping, enter the server as it is known to the application. If you enter an IP address, note that end users must connect to JSAM using that IP address in order to connect to the specified server.
•In the Server Port field, enter the port on which the remote server listens for client connections. For example, to forward Telnet traffic from a remote machine, specify port 23 for both the client port (on which JSAM listens) and the server port (on which the Telnet server listens).
To disable the registry change made by JSAM and restore the original copy of the etc/hosts file, users must uninstall the JSAM client using settings in the Preferences > Applications page of the end-user console. To re-enable the change, they need to reboot.
You can also use the restore system settings script. However, the restore system settings script cannot restore the hosts file successfully if you log in as a different user from the one that originally launched JSAM.
•In the Client Loopback IP field, provide a static loopback address. If you do not provide a static IP loopback address, the system assigns an IP loopback address dynamically.
When configuring an external DNS, do not use IP loopback addresses in the 127.0.2.x range because the system reserves IP loopback addresses in that range for use with Citrix NFuse.
If you want to modify a static loopback address for a JSAM application server configured on multiple ports, you must delete all applications referring to this application server and re-enter these applications with the new static loopback address.
•In the Client Port field, enter the port on which JSAM should listen for client application connections. Typically, the local port value is the same value as the server port; the local port value usually only differs for Linux or Macintosh non-root users who want to add applications for port forwarding that use ports under 1024.
You may configure more than one application on a single port, such as app1.mycompany.com, app2.mycompany.com, app3.mycompany.com. Either you assign a static loopback address or the system assigns a dynamic loopback address (127.0.1.10, 127.0.1.11, 127.0.1.12) to each application. JSAM then listens on these multiple loopback addresses on the specified port. For example, when there is traffic on 127.0.1.12 on the specified port, the system forwards the traffic to the app3.mycompany.com destination host.
5.Click Add.
6.Select the Allow JSAM to dynamically select an available port if the specified client port is in use check box if JSAM is listening for multiple hosts on the same port and you want JSAM to select an available port when the client port you specify is taken. The client application must allow you to specify the port number for the connection in order to use this option.
7.Select the Create an access control policy allowing SAM access to these servers check box to enable access to the list of servers specified in the Server column (enabled by default).
•Lotus Notes - Select this option to intermediate traffic from the Lotus Notes fat client application. Then, in the Autopolicy: SAM Access Control section, create a policy that allows or denies users access to the Lotus Notes server:
•If it is not already enabled, select the Autopolicy: SAM Access Control check box.
•In the Resource field, specify the application server to which this policy applies. You can specify the server as a fully-qualified hostname or an IP/netmask pair. For example, if the fully-qualified hostname is notes1.yourcompany.com, add notes1.yourcompany.com and notes1 to the Resource field.
•From the Action list, select Allow to enable access to the specified server or Deny to block access to the specified server.
•Click Add.
If you select the Lotus Notes option, or you configure the Lotus Notes client to connect to multiple Lotus Notes servers, you should configure the Lotus Notes client appropriately to work with Connect Secure.
You can only use JSAM to configure access to one Lotus Notes application per user role.
•Microsoft Outlook - Select this option to intermediate traffic from the Microsoft Outlook application. Then:
•Enter the hostname for each MS Exchange server in the Servers field. For example, if the fully-qualified hostname is exchange1.yourcompany.com, add exchange1.yourcompany.com to the Servers field.
You must enter the full name of the servers in this field since the system creates direct one-to-one mappings between the servers you enter here and IP addresses in the etc/hosts file. For more information about registry changes made by JSAM, see the Client-side Changes Guide on the Pulse Secure Global Support Center (PSGSC) Center.
The system does not support Outlook through SVW, since Outlook applications require HKLM registry key changes.
•Select the Create an access control policy allowing SAM access to this server check box to enable access to the server specified in the previous step (enabled by default).
You can only use JSAM to configure access to one Microsoft Outlook application per user role.
•NetBIOS file browsing - Select this option to tunnel NetBIOS traffic through JSAM. Then:
•Enter the fully-qualified hostname for your application servers in the Servers field.
You must enter the full name of the servers in this field since the system creates direct one-to-one mappings between the servers you enter here and IP addresses in the etc/hosts file. For more information about registry changes made by JSAM, see the Client-side Changes Guide on the Pulse Secure Global Support Center (PSGSC) Center.
If you want to enable drive mapping on a Windows client machine, use the standard NetBIOS file browsing option. When you do, JSAM automatically modifies the registry to disable port 445 on Windows machines, which forces Windows to use port 137, 138, or 139 for drive-mapping. Windows users need to reboot one time to enable the registry change to take effect.
•Select the Create an access control policy allowing SAM access to this server check box to enable access to the server specified in the previous step (enabled by default).
You can only use JSAM to configure NetBIOS file browsing once per user role.
The system does not support NetBIOS file browsing through SVW, since NetBIOS requires HKLM registry key changes.
1.Enter a unique name and optionally a description for the resource profile. The system displays this information in the Client Application Sessions section of the end-user home page.
2.Click Save and Continue.
3.In the Roles tab, select the roles to which the resource profile applies and click Add.
The selected roles inherit the autopolicy created by the resource profile. If it is not already enabled, the system also automatically enables the SAM option in the Users > User Roles > Role Name > General > Overview page of the admin console for all of the roles you select.
4.Click Save Changes.
Specifying Applications for JSAM to Secure
Information in this section is provided for backwards compatibility. We recommend that you secure traffic using JSAM resource profiles instead, since they provide a simpler, more unified configuration method.
To specify applications for JSAM to secure:
1.In the admin console, choose Users > User Roles > Select Role > SAM > Applications.
2.Select Add Application.
3.Enter the name of the application and, optionally, a description. This information displays in the Client Application Sessions section of the end-user home page.
4.Choose either:
•Standard application - Select Citrix NFuse, Lotus Notes, or Microsoft Outlook/Exchange.
The system does not support the standard JSAM applications Outlook and Netbios file browsing through SVW, since these applications require registry key changes. However, the system does support the Citrix and Lotus Notes JSAM standard applications through SVW.
If you select the Lotus Notes option, or you configure the Lotus Notes client to connect to multiple Lotus Notes servers, you should configure the Lotus Notes client appropriately to work with Connect Secure.
The system supports several mechanisms for intermediating traffic to the Lotus Notes, Microsoft Outlook, and Citrix applications.
•Custom application -
1.In the Server name field, enter the DNS name of the server or the server IP address. If entering the DNS name, enter name of the remote server as it is known to the application if you are using automatic host mapping.
2.Enter the server name.
3.In the Server Port field, enter the port on which the remote server listens for client connections.
For example, to forward Telnet traffic from a remote machine, specify port 23 for both the client port (on which JSAM listens) and the server port (on which the Telnet server listens).
To disable the registry change made by JSAM and restore the original copy of the etc/hosts file, users must uninstall the JSAM client using settings in the Preferences > Applications page of the end-user console. To re-enable the change, they need to reboot.
You can also use the restore system settings script. However, the restore system settings script cannot restore the hosts file successfully if you log in as a different user from the one that originally launched JSAM.
4.In the Client Loopback IP field, provide a static loopback address. If you do not provide a static IP loopback address, the system assigns an IP loopback address dynamically.
When configuring an external DNS, do not use IP loopback addresses in the 127.0.2.x range because the system reserves IP loopback addresses in that range for use with Citrix NFuse.
If you want to modify a static loopback address for a JSAM application server configured on multiple ports, you must delete all applications referring to this application server and re-enter these applications with the new static loopback address.
5.In the Client Port field, enter the port on which JSAM should listen for client application connections.
Typically, the local port value is the same value as the server port; the local port value usually only differs for Linux or Macintosh non-root users who want to add applications for port forwarding that use ports under 1024.
You may configure more than one application on a single port, such as app1.mycompany.com, app2.mycompany.com, app3.mycompany.com. Either you assign a static loopback address or the system assigns a dynamic loopback address (127.0.1.10, 127.0.1.11, 127.0.1.12) to each application. JSAM then listens on these multiple loopback addresses on the specified port. For example, when there is traffic on 127.0.1.12 on the specified port, the system forwards the traffic to the app3.mycompany.com destination host.
6.Select the Allow Secure Application Manager to dynamically select an available port ... check box if JSAM is listening for multiple hosts on the same port and you want JSAM to select an available port when the client port you specify is taken. The client application must allow you to specify the port number for the connection in order to use this option.
7.Click Add.
5. If a remote user's PC is set up to use a Web proxy in Internet Explorer, configure the client machine to bypass the proxy server when the user launches applications that need to connect to the Secure Application Manager.
6. Add DNS domains to the system if you have multiple internal domains, such as company-a.com and company-b.com, so that names such as app1.company-a.com and app2.company-b.com resolve correctly:
•In the admin console, choose System > Network > Overview
•Under DNS Name Resolution, add a comma-separated list of domains in the to DNS Domains field.
•Click Save Changes.
Specifying Role Level JSAM Options
To specify JSAM options at the role level:
1.In the admin console, choose Users > User Roles > Select Role > SAM > Options.
2.Under Secure Application Manager options, select the options to enable for users:
•Auto-launch Secure Application Manager - Select this option to automatically launches the Secure Application Manager when a user signs in. If you do not select this option, users must manually start the Secure Application Manager from the Client Applications Sessions section of the end-user home page.
Although you configure the Secure Application Manager to automatically launch when users sign into the system, users can override this setting through the Preferences > Applications page of the end-user console. If disabled from automatically launching, users need to manually start the Secure Application Manager by clicking its link on the home page.
•Auto-uninstall Secure Application Manager - Select this option to automatically uninstall the Secure Application Manager after users sign off.
•Auto-allow application servers - Select this option to automatically creates a SAM resource policy that allows access to the server specified in the PSAM application and server lists and the JSAM application list.
You may not see the Auto-allow option if you are using a new installation or if an administrator hides the option.
3.Under Java SAM Options, select the options to enable for users:
•User can add applications - If enabled, users can add applications. For users to add applications, they need to know the application server DNS name and client/server ports.
When you enable this option, users can set up port forwarding to any host or port in your enterprise. Before providing users with the ability to add applications, please verify that this feature is consistent with your security practices. If a user adds an application, the application remains available to the user even if you later change disable the feature.
•Automatic host-mapping - If enabled, the Secure Application Manager edits the Windows PC hosts file and replaces entries of Windows application servers with localhost. These entries are changed back to the original data when a user closes the Secure Application Manager.
For the Java version of the Secure Application Manager to work, the client application needs to connect to the local PC on which the Secure Application Manager is running as the application server. The recommended process for mapping application servers to a user's local PC is to enable automatic host-mapping, which enables the system to automatically modify the PC's hosts file to point application servers to the PC's localhost for secure port forwarding. Alternatively, you can configure your external DNS server.
•Skip web-proxy registry check - If enabled, JSAM does not check a user's registry for a Web proxy. Some users do not have permissions to look at their registries, so if JSAM tries to look at their registries, then users see an error that they do not have permission. This option ensures that users do not see this message.
•Auto-close JSAM window on sign-out - If enabled, JSAM automatically closes when a user signs out of the device by clicking Sign Out in the browser window. JSAM continues to run if the user simply closes the browser window.
4.Click Save Changes.
Automatically Launching JSAM
Use the Launch JSAM tab to write a Web resource policy that specifies a URL for which the system automatically launches JSAM on the client. The system launches JSAM in two scenarios:
•When a user enters the URL in the Address field of the home page.
•When a user clicks a Web bookmark (configured by an administrator) on the home page to the URL.
This feature is useful if you enable applications that require JSAM but don't want to require users to run JSAM unnecessarily. This feature requires, however, that users access the URL through the home page. If users enter the URL in a browser Address field, the system does not serve the request.
The system provides tight integration with Citrix. If you specify Citrix as a standard JSAM application, the system automatically launches JSAM when a user selects an ICA file even if the URL is not configured as a resource policy.
To write a Launch JSAM resource policy:
1.In the admin console, choose Users > Resource Policies > Web.
2.If your administrator view is not already configured to show Launch JSAM policies, make the following modifications:
•Click the Customize button in the upper right corner of the page.
•Select the Launch JSAM check box.
•Click OK.
3.Select the Launch JSAM tab.
4.On the JSAM Autolaunch Policies page, click New Policy.
5.Enter a name to label this policy (required) and a description of the policy (optional).
6.In the Resources section, specify the URLs to which this policy applies.
The resource policies configured for the JSAM auto launch policy must be a specific URL and not include wildcards. The URL should specify the entry point of the web application for which JSAM tunneling is needed.
7.In the Roles section, specify:
•Policy applies to ALL roles - Choose this option to apply this policy to all users.
•Policy applies to SELECTED roles - Choose this option to apply this policy only to users who are mapped to roles in the Selected roles list. Make sure to add roles to this list from the Available roles list.
•Policy applies to all roles OTHER THAN those selected below - Choose this option to apply this policy to all users except for those who map to the roles in the Selected roles list. Make sure to add roles to this list from the Available roles list.
8.In the Action section, specify:
•Launch JSAM for this URL - The system downloads the Java Secure Application Manager to the client and then serves the requested URL.
•JSAM launches automatically for the specified URL only if a user enters the URL or selects a bookmark to the URL on the home page (Browsing > Bookmarks). The bookmasrk does not launch the application that is configured through JSAM, but launches JSAM itself.
•Don't Launch JSAM for this URL - The system does not download the Java Secure Application Manager to the client for the requested URL. This option is useful if you want to temporarily disable JSAM auto-launching for the specified URLs.
•Use Detailed Rules - To specify one or more detailed rules for this policy.
9.Click Save Changes.
Specifying Application Servers that Users Can Access
Information in this topic is provided for backwards compatibility. We recommend that you secure traffic using JSAM resource profiles instead, since they provide a simpler, more unified configuration method. Refer to the Specifying Application Servers that Users Can Access section in PSAM for more details.
Specifying Resource Level JSAM Options
Use the Options tab to specify the SAM resource option to match IP addresses to hostnames specified as resources in your SAM resource policies. When you enable this option, the system looks up IP addresses corresponding to each hostname specified in a SAM resource policy. When a user tries to access a server by specifying an IP address rather than the hostname, the system compares the IP to its cached list of IP addresses to determine if a hostname matches an IP. If there is a match, then the system accepts the match as a policy match and applies the action specified for the resource policy.
When you enable this option, the system compiles a list of hostnames specified in the Resources field of each SAM resource policy. The system then applies the option to this comprehensive list of hostnames.
This option does not apply to hostnames that include wildcards and parameters.
To specify the SAM resource option:
1.In the admin console, choose Users > Resource Policies > SAM > Options.
2.Select IP based matching for Hostname based policy resources. When you select this option, the system looks up the IP address corresponding to each hostname specified in a Secure Application Manager resource policy. When a user tries to access a server by specifying an IP address rather than the hostname, the system compares the IP to its cached list of IP addresses to determine if a hostname matches an IP. If there is a match, then the system accepts the match as a policy match and applies the action specified for the resource policy.
3.Click Save Changes.