Troubleshooting Tools
Using the Admin Console Troubleshooting Tools
You can use the admin console troubleshooting tools to investigate user access issues and system issues. The following tools are available through the Maintenance > Troubleshooting pages:
•Policy tracing - Diagnose user access issues.
•Simulation - Connect Secure only. Diagnose user access issues.
•Session recording - Connect Secure only. Work with Pulse Secure Global Support Center (PSGSC) to diagnose user access issues.
•Debug logs - Work with Pulse Secure Global Support Center to diagnose system issues.
•tcpdump - Sniff packet headers to diagnose networking issues.
•Network troubleshooting commands - Use standard network commands, such as ping, traceroute, NSlookup, and other commands to diagnose networking issues.
•Kerberos debugging - Diagnose issues with Kerberos communication.
•System snapshots - Work with Pulse Secure Global Support Center to reproduce and diagnose system issues.
•Remote debugging - Enable Pulse Secure Global Support Center to access your system directly to help you diagnose system issues.
If the admin console is unavailable, you can use the serial port console to perform some troubleshooting operations, such as use ping and traceroute commands, view logs, create system snapshots, and perform configuration rollbacks and factory resets.
Using Policy Tracing
It is common to encounter a situation where the system denies a user access to the network or to resources, and the user logs a trouble ticket. You can use the policy tracing utility and log to determine whether the system is working as expected and properly restricting access, or whether the user configuration or policy configuration needs to be updated to enable access in the user's case.
To create a policy trace log:
1.Select Troubleshooting > User Sessions > Policy Tracing to display the configuration page.
Policy Tracing Configuration Page shows the policy tracing configuration page for Pulse Connect Secure.
Policy Tracing Configuration Page
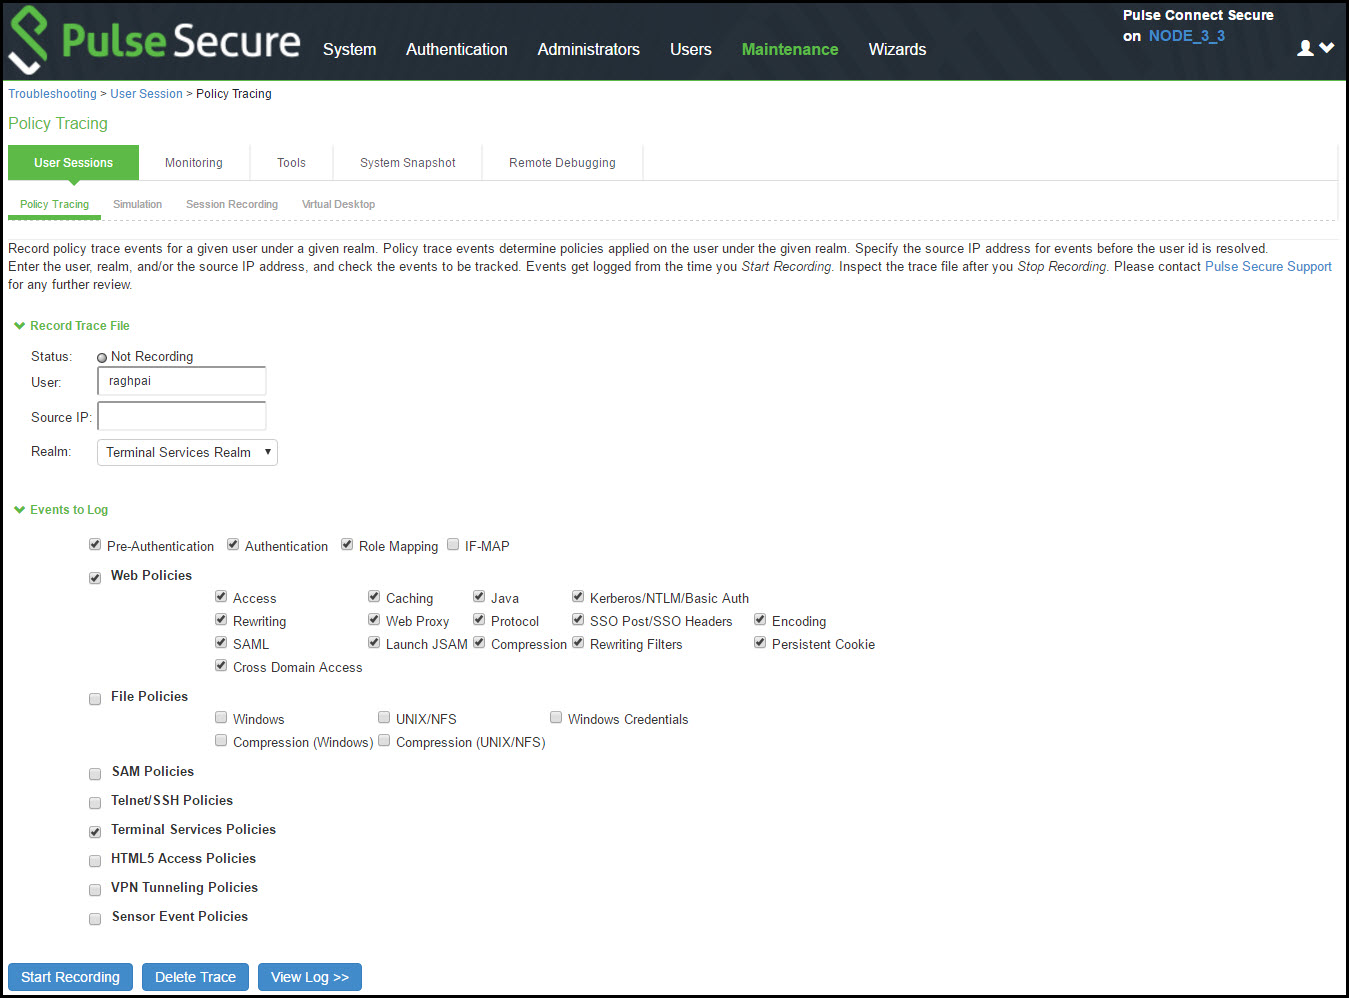
2.Complete the configuration as described in the following table
The following table lists the Policy Trace Configuration Guidelines:
|
Settings |
Guidelines |
|
Record Trace File |
|
|
User |
Specify the username to trace. If you are tracing anonymous access, you can use the asterisks wildcard character (*) because you might not know the internal username the system assigns to the next anonymous session. |
|
Source IP |
Specify the source IP address if you know it. If you are able to provide the source IP address, the policy trace log can include events that occur before the user ID is entered into the system. |
|
Realm |
Select the realm to trace. |
|
Events to Log |
|
|
Pre-Authentication |
Logs events related to evaluation of realm rules. |
|
Authentication |
Logs events related to authentication. |
|
Role Mapping |
Logs events related to role mapping. |
|
Web Policies |
Logs events related to web policies. |
|
File Policies |
Logs events related to file policies. |
|
SAM Policies |
Logs events related to SAM policies. |
|
Telnet/SSH Policies |
Logs events related to Telnet/SSH policies. |
|
Terminal Services Policies |
Logs events related to terminal services. |
|
VPN Tunneling Policies |
Logs events related to VPN tunneling. |
|
Sensor Event Policies |
Logs events related to sensor policies |
3..Click Start Recording.
Policy Tracing Page During Recording shows the policy tracing page with the recording indicator.
Policy Tracing Page During Recording

1.Initiate the action you want to trace, such as a user sign in.
2.Click View Log to display the policy trace results log.
3.Click Stop Recording when you have enough information.
Policy Tracing Results Page shows the page with policy trace results.
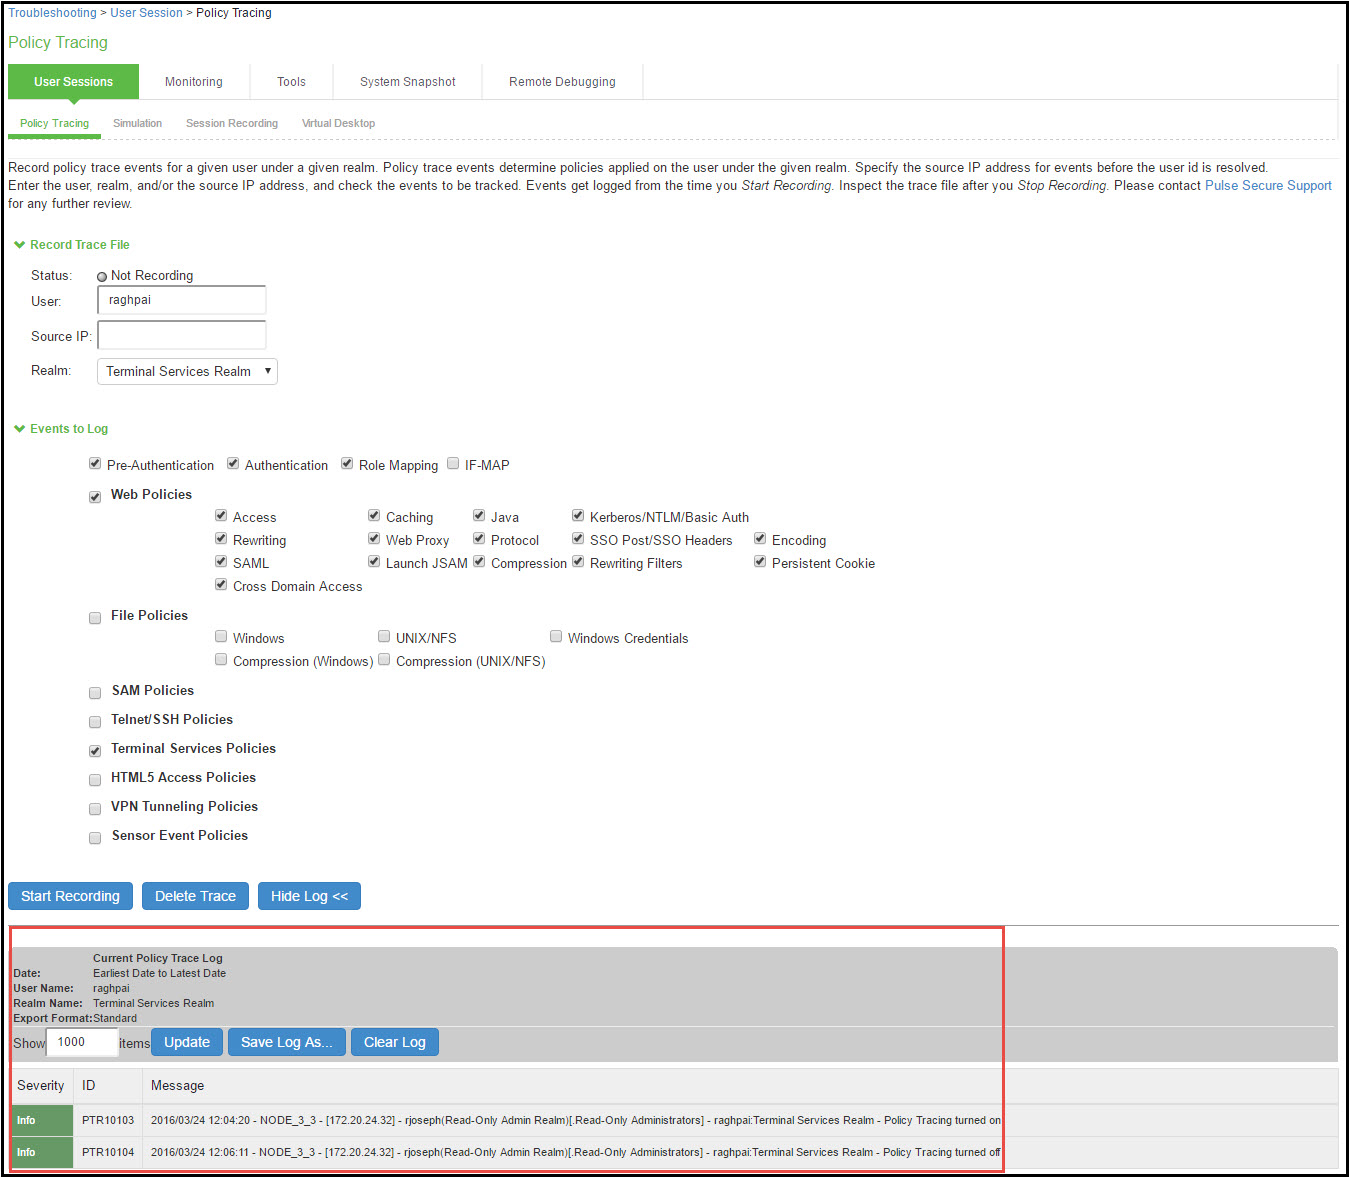
The following table describes options for managing the policy trace results log file.
The following table lists the Post-Trace Options:
|
Control |
Guidelines |
|
Delete Trace |
Under Events to Log, click Delete Trace to clear the results displayed on this page. |
|
Update |
Specify a number of rows to display and click Update to change the number of rows that are displayed. |
|
Save Log As |
Click this button to save the trace results log to a file. This is useful particularly when you are working with the Pulse Secure Global Support Center (PSGSC) to troubleshoot a case. |
|
Clear Log |
Click this button to clear the log file from the system. |
Using the Simulation Utility
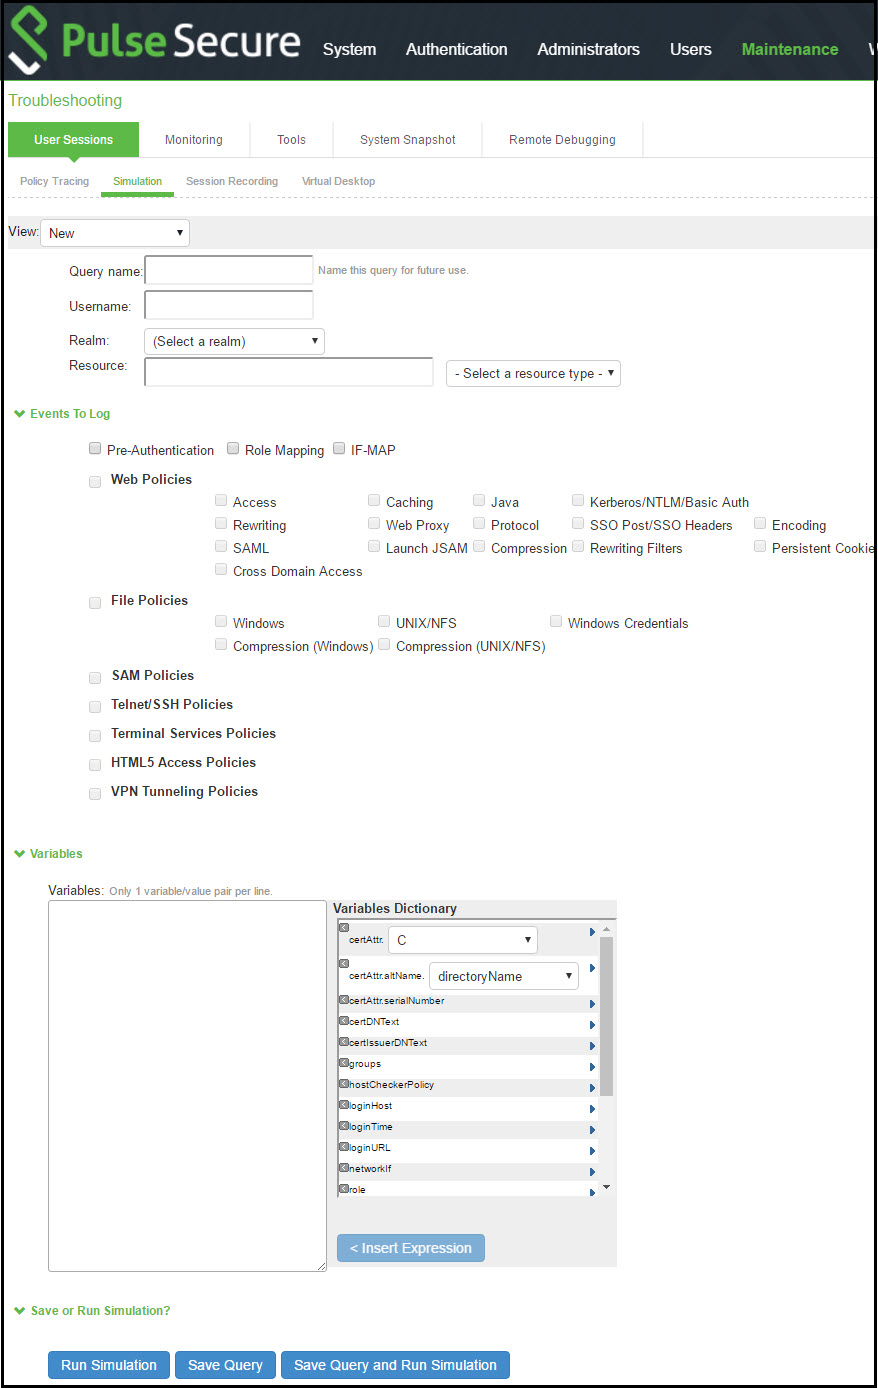
Connect Secure allows you to troubleshoot problems by simulating the events causing the problem. Using the Maintenance > Troubleshooting > User Sessions> Simulation page, you can create virtual user sessions without requiring actual end users to sign in to the device and recreate their problems. In addition, you can also use the Simulation tab to test new authentication and authorization policies before using them in a production environment.
To use the simulator, you must specify which events you want to simulate (for example, you can create a virtual session in which "John Doe" signs into the "Users" realm at 6:00 AM from an Internet Explorer browser). Then, you must specify which events you want to record and log in the simulation. You can log three major types of events to the simulation log:
•Pre-Authentication - The system events that are captured will not include any other system related events. Events are merely used as a filtering mechanism to reduce the number of logs and highlight the problem.
•Role Mapping - The system events that are captured will not include any other system related events. Events are merely used as a filtering mechanism to reduce the number of logs and highlight the problem.
•Resource Policies - The system events that are captured will not include any other system related events. Events are merely used as a filtering mechanism to reduce the number of logs and highlight the problem.
To simulate a user session:
1.In the admin console, choose Maintenance > Troubleshooting > User Sessions > Simulation.
Simulation Configuration Page shows the configuration page for Pulse Connect Secure.
2.In the Query Name field, enter a name for the query.
3.In the Username field, enter the username of the user whose experience you want to simulate. Note that you may use a wildcard character (*) in place of a username. For example, if your users are signing into an anonymous server, you may want to use the wildcard character (*) since you cannot know the internal username that the system will assign to the user.
4.From the Realm drop-down menu, select the realm of the user whose experience you want to simulate.
5.If you want to determine whether to apply a specific type of resource policy to a user's session, enter the specific resource you want to simulate in the Resource field and select a policy type from the Resource drop-down list. Then:
•If you want to determine whether a user can successfully sign in to the device, select the Pre-Authentication check box.
•If you want to determine whether a user can successfully map to a specific role, select the Role Mapping check box. Note that this option controls whether role mapping results are logged to the simulator log, not whether to run role mapping rules. The system always runs role mapping rules, even if you do not select this check box.
•Specify the types of policies you want to log using the check boxes in the Events to Log section.
For example, if you want to test whether a user can access the Yahoo web site, enter "http://www.yahoo.com" in the Resource field, select Web from the drop-down list, and select the Access check box in the Events to Log section.
6.In the Variables section, use a combination of text and variables to create a custom expression that reflects the exact same values as in the real session of the user who is facing a problem. For example, if you want to create a session in which the user signs in to the device at 6:00 AM, enter "time = 6:00 AM" in the Variables field. For complete instructions on how to create a custom expression. You may also view the syntax for a given variable by clicking the arrow next to it in the Variables Dictionary.
If you fail to create a custom expression that includes the virtual user's IP address, the system uses your current IP address instead. Also note that if you use the role variable to specify the role of the virtual user (for example, role="Users"), the system ignores results from role mapping rules and assigns the virtual user to the role(s) you specify.
7.Choose one of the following options:
•Run Simulation-Runs the specified simulation and creates an on-screen log file.
•Save Query-Saves the query.
•Save Query and Run Simulation-Runs the specified simulation and also saves it for later use.
8.After running the simulation, choose Save Log As to save the simulation results to a text file.
Using the Session Recording Utility
You can use the Session Recording utility to record a trace file that lists a user's actions when accessing a resource or connecting to a client/server application. You do this to troubleshoot issues users might report regarding the Web access or client access.
When you start recording a trace file, the system signs out the specified user and then starts recording all user actions after the user signs in again and is authenticated. Note that the system notifies the user after authentication that user actions are being recorded.
To record a trace file:
1.In the admin console, choose Maintenance > Troubleshooting > User Sessions >Session Recording.
Session Recording shows the session recording page.
2.Enter the username of the user whose session you want to record.
3.Select the Web (DSRecord) check box to record the user's web session and then select the Ignore browser cache check box if you want to ignore cached copies of the problem web site, which the system would not otherwise record as a part of the trace file (optional).
4.Select the Client/Server (for JCP) check box to record Java Communication Protocol client/server application sessions (optional).
5.Click Start Recording. The system signs out the user.
6.Instruct the user to sign in again and browse to the problem web site or connect to the client/server application.
7.Click Stop Recording.
8.Download the trace file(s) from the Current Trace File section:
•Click the DSRecord Log link to download the Web trace file.
•Click the JCP or NCP Client-Side Log link to download the client/server application trace file.
9.E-mail the file(s) to Pulse Secure Support for review.

Using the Debug Log
The Pulse Secure Global Support Center (PSGSC) might direct you to create a debug log to assist them in helping you debug an issue with the system. The debug log is used only by Pulse Secure Global Support Center.
To use debug logging:
1.Select Troubleshooting > Monitoring > Debug Log to display the configuration page.
Debug Logging Configuration Page - Pulse Connect Secure shows the configuration page for Pulse Connect Secure.
2.Complete the configuration as described in Table.
3.Click Save Changes. When you save changes with Debug Logging On selected, the system begins generating debug log entries.
4.Initiate the action you want to debug, such as a user sign in. You can reset the debug log file to restart debug logging if it takes you too long to initiate the action.
5.Click Save Debug Log to save the debug log to a file that you can send to Pulse Secure Global Support Center. You can clear the log after you have saved it to a file.
6.Unselect Debug Logging On and click Save Changes to turn off debug logging.
Debug Logging Configuration Page - Pulse Connect Secure
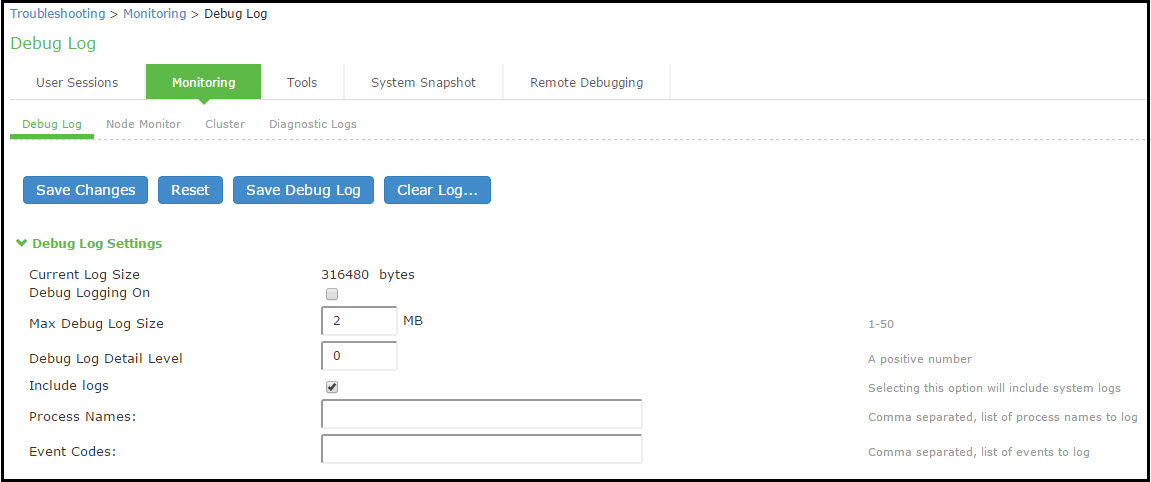
The following table lists the Debug Log Configuration Guidelines:
|
Settings |
Guidelines |
|
Displays the size of the current log file. If it is large, use the controls to save, reset, or clear the log file. |
|
|
Debug Logging On |
Select to turn on debug logging. |
|
Debug Log Size |
Specify a maximum debug log file size. The default is 2 MB. The maximum is 250 MB. |
|
Debug Log Detail Level |
Specify the debug log detail level. Obtain this from Pulse Secure Global Support Center. |
|
Include logs |
Select this option to include system logs in the debug log file. Recommended. |
|
Process Names |
Specify the process name. Obtain this from Pulse Secure Global Support Center. |
|
Event Codes |
Specify the event code. Obtain this from Pulse Secure Global Support Center. |
Using the tcpdump Utility
You can run the tcpdump utility from the admin console.
To use tcpdump:
1.Select Troubleshooting > Tools > TCP Dump to display the configuration page.
TCP Dump Configuration Page - Pulse Connect Secure shows the configuration page for Pulse Connect Secure.
2.Complete the configuration as described in Table.
3.Click Start Sniffing to start the tcpdump process.
4.Initiate the action you want to debug, such as a user sign in.
5.Click Stop Sniffing to write the tcpdump output to the screen.
6.Click Get to save the output to a file, or click Delete to clear the output.
TCP Dump Configuration Page - Pulse Connect Secure

The following table lists the Debug Log Configuration Guidelines:
|
Settings |
Guidelines |
|
|
Displays whether the utility is stopped or running. |
||
|
Interface |
Select the ports on which to sniff. |
|
|
VLAN Port |
Select the VLAN port. |
|
|
Promiscuous mode |
Select a promiscuous mode option. |
|
|
Filter |
Specify a filter expression. For information about TCP dump filter expressions, see the UNIX man page. |
|
|
Example |
Result |
|
|
tcp port 80 |
Sniffs packets on TCP port 80. |
|
|
port 80 |
Sniffs packets on TCP or UDP port 80. |
|
|
ip |
Sniffs the IP protocol. |
|
|
tcp |
Sniffs the TCP protocol. |
|
|
dst #.#.#.# |
Sniffs the destination IP address specified, where #.#.#.# is a valid IP address. |
|
|
src #.#.#.# |
Sniffs the source IP address specified, where #.#.#.# is a valid IP address. |
|
|
port 80 or port 443 |
Sniffs on port 80 or port 443. |
|
|
src #.#.#.# and dst #.#.#.# |
Sniffs the source and destination IP addresses or hosts specified, where each #.#.#.# represents a valid IP address. |
|
|
tcp port 80 or port 443 and dst #.#.#.# and src #.#.#.# |
This example shows how to specify multiple parameters to create a filter that sniffs on TCP port 80, or on TCP or UDP port 443, and on the destination and source ports, where each #.#.#.# represents a valid IP address. |
|
Using the Samba Diagnostic Log
The Samba diagnostic log utility allows you to view trace and debug the samba troubleshooting messages on the new AD authentication server. When samba diagnostic logging is enabled, the internal logs related to AD authentication server is generated.
Observe the following guidelines:
•Diagnostic logging affects system performance.
•Must be used only when the admin UI error messages, event logs and admin logs are not very useful.
•Enabling/Disabling samba logs will restart certain modules and user logins may fail during the restart.
•The default debug log setting will generate minimal logs. Enabling debug log with event AAA or AAA::samba along with this feature can generate more logs based on the debug log level.
•Enabling samba logs will cause logs to be generated from all configured AD authentication servers. Logs from multiple AD servers are interleaved and can be identified by the header in each line of the logs.
To use samba diagnostic logging:
1.Select Troubleshooting > Monitoring > Diagnostic Logs to display the configuration page.
Samba Diagnostic Logging Configuration Page - Pulse Connect Secure shows the configuration page.
2.Complete the configuration as described in Table.
3.Click Save Changes. When you save changes with Samba Diagnostic Logging On selected, the system begins generating diagnostic log entries.
4.Initiate the action you want to debug, such as a user sign in.
5.Manage the resulting log:
•Click Save Log to save the log files in a zipped format.
•Click Clear Log to remove previous logs and start diagnostic logging with a fresh file.
•Click Save And Clear Log to save the diagnostic log to a file that you can send to Pulse Secure Global Support Center. The existing logs in the device will be cleared after saving.
6.Unselect Samba Diagnostic Logging On and click Save Changes to turn off diagnostic logging.
Samba Diagnostic Logging Configuration Page - Pulse Connect Secure
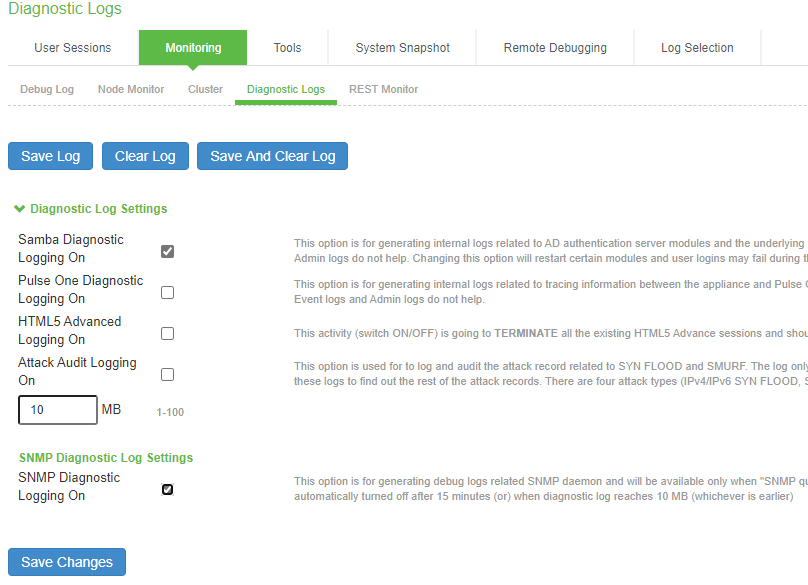
The following table lists the Samba Debug Log Configuration Guidelines:
|
Settings |
Guidelines |
|
Select this option to generate logs related to AD server. |
|
|
Max Diagnostic Log Size |
Specify a maximum log file size between 1 to 100 MB. Default log size is 10 MB. |
Using the SNMP Diagnostic Log
This SNMP diagnostic log utility is used for generating debug logs related SNMP daemon. This utility is available only when the SNMP Queries and SNMP Traps options are enabled in the System > Log/Monitoring > SNMP page.
This option will be automatically turned off after 15 minutes (or) when diagnostic log reaches 10 MB (whichever is earlier).
To use SNMP diagnostic logging:
1.Select Troubleshooting > Monitoring > Diagnostic Logs to display the configuration page.
Samba Diagnostic Logging Configuration Page - Pulse Connect Secure shows the configuration page.
2.In the SNMP Diagnostics Log Settings section, select the SNMP Diagnostic Logging On check box.
3.Click Save Changes.
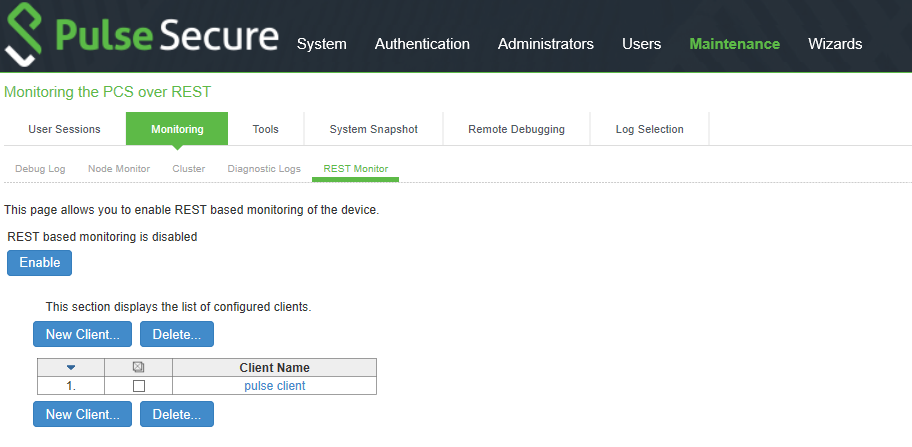
Using the REST Monitor
With the REST Monitoring tool, administrator can enable REST based monitoring of the PCS device. When client makes REST call using HAWK authentication and credentials, PCS sends the information about CPU, memory and load average.
To enable / disable REST monitoring:
1.Select Troubleshooting > Monitoring > REST Monitor to display the configuration page.
Figure shows the configuration page for Monitoring PCS over REST.
2.Click Enable to activate REST monitoring.
3.Click New Client to add client.
4.In the Create Client page displayed, enter a unique Client Name to identify the client and applicable Password.
5.Click Save Changes.
6.To modify a client name, click the corresponding client name link.
7.To delete a client, select the corresponding check box and click Delete.
8.To disable monitoring, click Disable.
When REST monitoring is enabled or disabled, the information is logged under Admin logs.
REST Monitoring Configuration Page
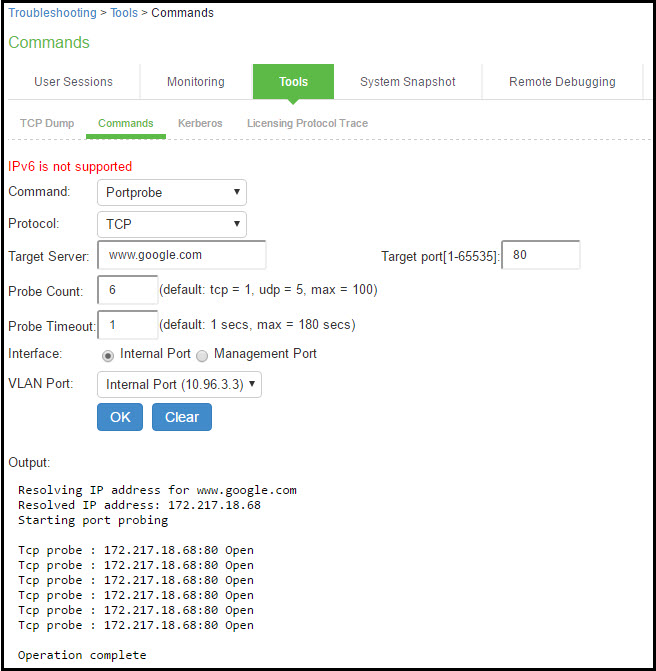
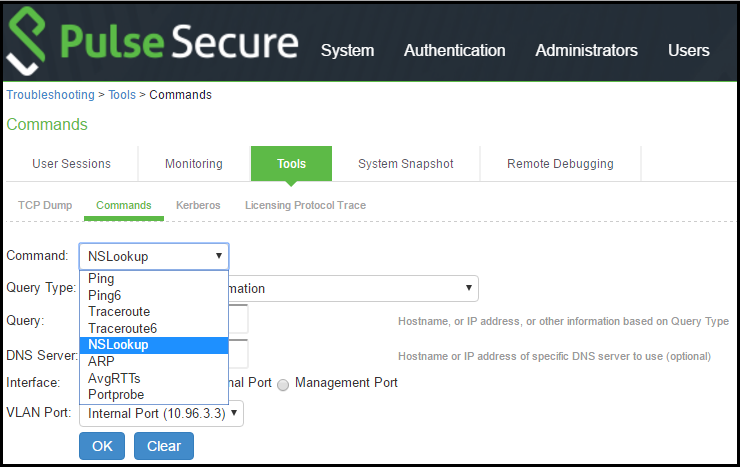
Using Network Troubleshooting Commands
You can run common network troubleshooting commands such as arp, ping, ping6, traceroute, traceroute6, NSlookup, and AvgRTTs from the admin console. You can use these connectivity tools to see the network path from the system to a specified server. If a client can ping or traceroute to the access system, and the access system can ping the target server, any remote users should be able to access the server through the access system.
To run network troubleshooting commands:
1.Select Troubleshooting > Tools > TCP Commands to display the configuration page.
Network Troubleshooting Commands Configuration Page - Pulse Connect Secure shows the configuration page for Pulse Connect Secure.
2.Complete the configuration as described in Table.
3.Click OK to run the command and write the output to the screen.
4.Click Clear to clear the output.
Network Troubleshooting Commands Configuration Page - Pulse Connect Secure

The following table lists the Network Troubleshooting Commands Configuration Guidelines:
|
Settings |
Guidelines |
|
Select a network troubleshooting command: Ping/Ping6-Use the ping command to verify that the system can connect to other systems on the network. In the event of a network failure between the local and remote nodes, you do not receive a reply from a pinged device. In that case, contact your LAN administrator for help. The ping command sends packets to a server and returns the server response, typically a set of statistics including the target server's IP address, the time spent sending packets and receiving the response, and other data. You can ping unicast or multicast addresses, and you must include the target server name in the request. Select ping to ping an IPv4 address or hostname. Select ping6 to ping an IPv6 address or hostname. Traceroute/Traceroute6-Use the traceroute command to discover the path that a packet takes from Connect Secure to another host. Traceroute sends a packet to a destination server and receives an ICMP TIME_EXCEEDED response from each gateway along its path. The TIME_EXCEEDED responses and other data are recorded and displayed in the output, showing the path of the packet round-trip. Select traceroute to target an IPv4 address or hostname. Select traceroute6 to target an IPv6 address or hostname. NSLookup-Use NSlookup to get detailed information about a name server on the network. You can query on several different types of information, including a server's IP address, alias IP address, start-of-authority record, mail exchange record, user information, well-known services information, and other types of information. ARP-Use the arp command to map IP network addresses to the hardware addresses. The Address Resolution Protocol (ARP) allows you to resolve hardware addresses. To resolve the address of a server in your network, a system sends information about its unique identifier to a server process executed on a server in the intranet. The server process then returns the required address to the client process. AvgRTTs-Use AvgRTTs to display the average round-trip time (RTT) to the localhost. Portprobe-Display the Transmission Control Protocol (TCP) or the User Datagram Protocol (UDP) port status (open or closed). |
|
|
Target server |
Specify the IP address or hostname for the target server. |
|
Interface |
Select the interface from which to send the command. |
|
VLAN Port |
Select the VLAN through which the connectivity needs to be checked. |
|
Output |
Displays command output. |
Troubleshooting TCP and UDP Port Status
|
Problem |
Description: The system makes several connections to back-end servers using various port numbers. If communication between the system and the back-end servers stops, it can be difficult to determine the source of the problem. |
|
Solution |
You can use the Portprobe command to display the Transmission Control Protocol (TCP) or the User Datagram Protocol (UDP) port status (open or closed). |
Only the system internal ports, management port and internal VLAN ports support the Portprobe command.
A TCP port can be closed under two conditions:
•The system sends a connection request to the back-end server port and the back-end server closes the connection (sends an RST packet).
•The connection request times out because the back-end server is not found, or the back-end server is too busy to respond to the connection request.
If either of these conditions occurs, the system sends a ping command to the back-end server. If the ping command is successful, the back-end server is considered reachable, but the back-end server port is closed. If the ping command fails, the back-end server is considered unreachable.
For UDP ports, the system sends a UDP datagram with a ping to the back-end server port. If the back-end server responds with Internet Control Message Protocol (ICMP) port unreachable or ICMP unreachable, the back-end port is considered unreachable. If the back-end server responds with ICMP host unreachable then the back-end server is considered unreachable.
To troubleshoot the TCP or UDP port:
1.Select Maintenance > Troubleshooting > Tools > Commands.
2.Select the Portprobe command.
3.Select either TCP or UDP.
4.Enter the target server and port number. You can enter an IP address, hostname or FQDN for the target server.
5.Enter the probe count. This is the number of times the system attempts to communicate with the back-end server port. The default for TCP is one; the default for UDP is five.
6.Enter the probe timeout. This is the number of seconds the system waits for a response from the back-end server port.
7.Select either the internal port or the management port. If the management port is not configured, it is not displayed.
8.If using an internal port, select the internal VLAN port from the list.
9.Click OK.
Successful TCP Port Probe show an example of a successful and an unsuccessful port probe.
Unsuccessful UDP Port Probe
Running NSLookup to Test Name Server Connectivity
To run NSLookup to test name server connectivity:
1.In the admin console, choose Maintenance > Troubleshooting >Tools > Commands.
Network Troubleshooting Commands Configuration Page - Pulse Connect Secure shows the configuration page for Pulse Connect Secure.
2.From the Command list, select NSLookup.
3.Select the type of query to use from the Query Type drop down menu.
4.Enter the query, which is a hostname, an IP address, or other information, depending on your selection of query type.
5.Enter the DNS server name or IP address.
6.Enter other options.
7.Click OK to run the command.
Network Troubleshooting Commands Configuration Page - Pulse Connect Secure
Using the Kerberos Debugging Utility
You can run the Kerberos debugging utility from the admin console. The utility checks the DNS infrastructure for validity of the Kerberos realms and defined credentials.
To use the Kerberos debugging utility:
1.Select Maintenance > Troubleshooting > Tools > Kerberos to display the configuration page.
Kerberos Debugging Utility Configuration Page shows the configuration page.
2.Complete the configuration as described in Table.
3.Click Run to start the debugging process.
4.Click Get to save the output to a file, or click Delete to clear the output.
Kerberos Debugging Utility Configuration Page

The following table lists the Kerberos Debugging Utility Configuration Guidelines:
|
Settings |
Guidelines |
|
Select this option to list all tickets. Specify the username and the realm name. |
|
|
Clear All Tickets |
Select this option to remove all tickets. Specify the username and realm name. |
|
Probe Kerberos DNS Setup |
Select this option to display the configuration elements for the Kerberos DNS test. Specify the realm name and the fully qualified domain name. |
|
Verify Credential |
Select this option to verify the Kerberos ticket is valid. Specify the following: Kerberos Client Server Client Realm Server Realm (Optional) Client KDC Server KDC (Optional) Password For example, if you use Kerberos to verify the username and password provided by the user, this option verifies the credentials it obtains to make sure they belong to a trusted KDB site. |
|
Verify Constrained Delegation Credential |
Select this option to verify the Constrained Delegation ticket is valid. Specify the following: Kerberos Client Delegation Account Server Client Realm Server Realm (Optional) Client KDC Server KDC (Optional) Password |
|
List Tickets from Device Sessions |
Select this option to list all tickets from device sessions. Specify the following: Username |
|
Clear All Tickets from Device Sessions |
Select this option to clear all tickets from device sessions. Specify the following: Username |
|
Output |
Displays results of the probe, for example:
|
Using System Snapshots
A snapshot of the system state captures details that can help Pulse Secure Global Support Center (PSGSC) diagnose system performance problems. The system stores up to ten snapshots, which are packaged into an encrypted "dump" file that you can download and then e-mail to Pulse Secure Global Support Center.
To create and manage system snapshots:
1.Select Maintenance > Troubleshooting > System Snapshot to display the configuration page.
System Snapshot Configuration Page - Pulse Connect Secure shows the configuration page for Pulse Connect Secure.
2.Complete the configuration and actions as described in Table.
System Snapshot Configuration Page - Pulse Connect Secure
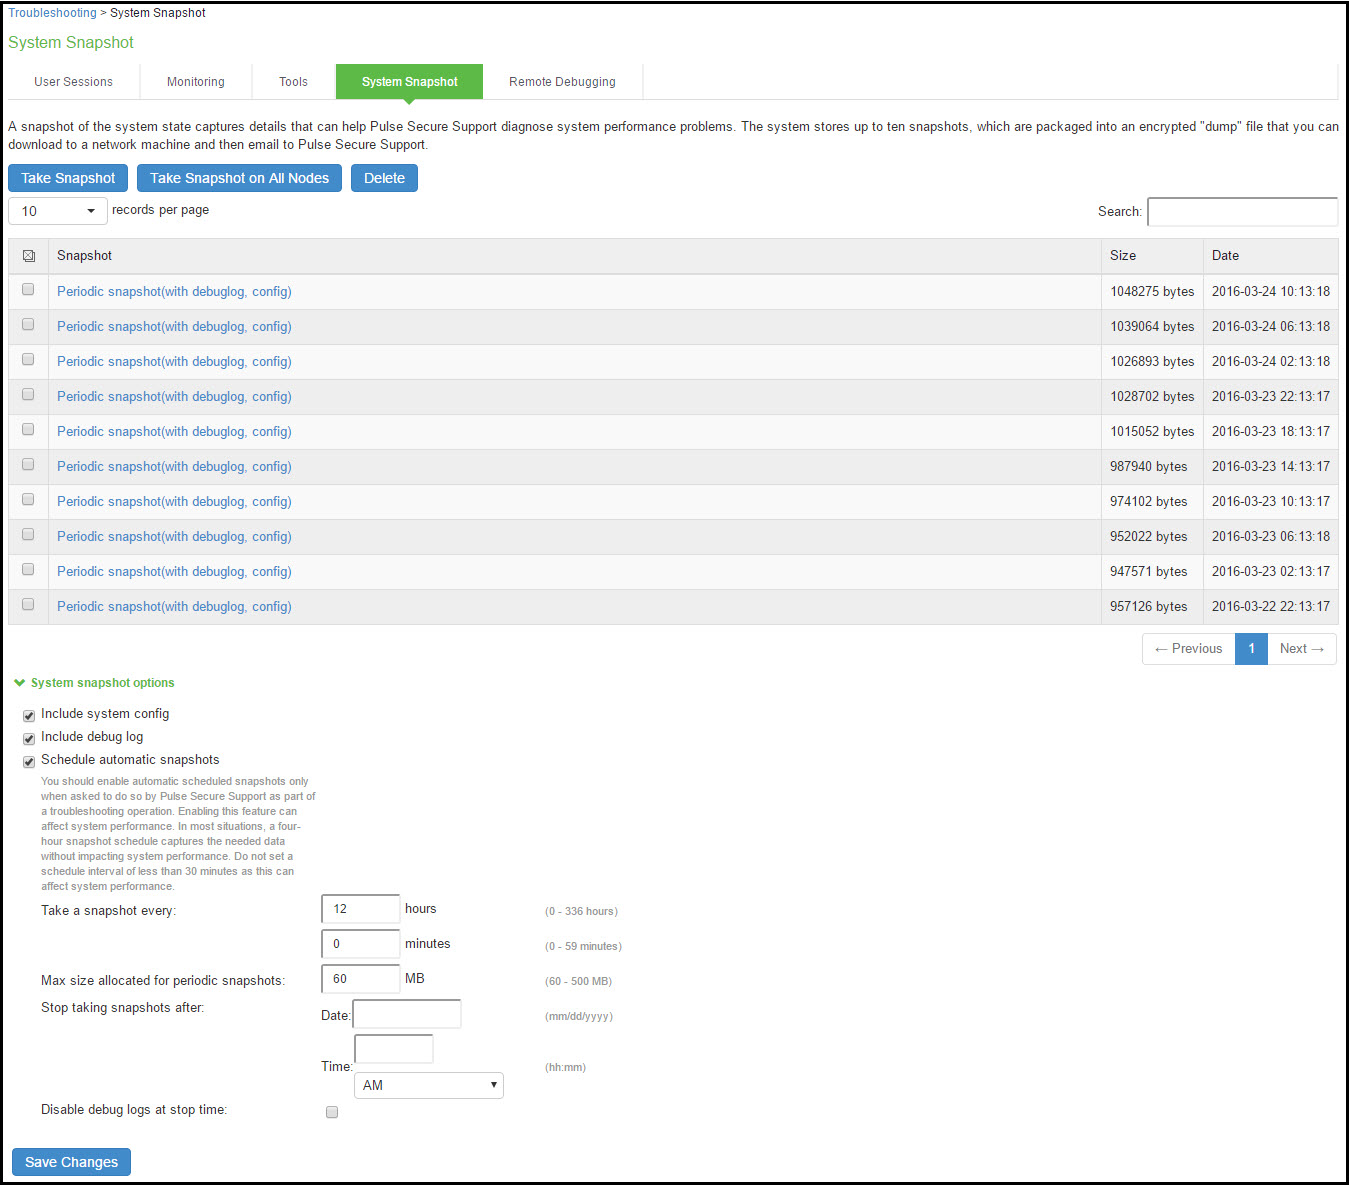
The following table lists the System Snapshot Configuration Guidelines:
|
Settings |
Guidelines |
|
Include the system configuration file in the snapshot. |
|
|
Include debug log |
Include debug logs (if any). |
|
Schedule Automatic Snapshots |
Enable automatic scheduled snapshots only when asked to do so by Pulse Secure Support as part of a troubleshooting operation. Enabling this feature can affect system performance. In most situations, a four-hour snapshot schedule captures the needed data without impacting system performance. Do not set a schedule interval of less than 30 minutes as this can affect system performance |
|
Frequency-Specify a frequency in hours and minutes. |
|
|
Maximum size-Specify a maximum file size. |
|
|
Stop taking snapshots-Specify a date and time to stop the automatic snapshot job. |
|
|
Disable debug logs at stop time-Specify that you also want to turn off debug logging when you stop the automatic snapshot job. |
|
|
Save |
Save the configuration. |
|
Take Snapshot |
Generate a snapshot now. |
|
Delete |
Delete a snapshot file. |
Using Remote Debugging
Remote debugging allows Pulse Secure Global Support Center (PSGSC) to directly access this system over a secure connection. You should enable this feature only if you have been requested to do so by Pulse Secure Global Support Center in response to an issue that you have reported.
To enable remote debugging:
1.Select Maintenance > Troubleshooting > Remote Debugging to display the configuration page.
Remote Debugging Configuration Page - Pulse Connect Secure shows the configuration page for Pulse Connect Secure.
2.Complete the configuration and actions as described in Table.
Remote Debugging Configuration Page - Pulse Connect Secure

The following table lists the Remote Debugging Configuration and Action Guidelines:
|
Settings |
Guidelines |
|
Displays whether remote debugging is enabled or disabled. |
|
|
Debugging Code |
Specify a code as instructed by Pulse Secure Global Support Center. |
|
Connect to |
Specify the fully qualified domain name as instructed by Pulse Secure Global Support Center. |
|
Enable Debugging |
Click this option to allow remote debugging. |
Using Log Selection
The various system logs and troubleshooting logs that help in investigating user access issues and system issues can be configured and accessed from the Log Selection page.
To configure system logs and troubleshooting logs:
1.Select Maintenance > Troubleshooting > Log Selection to display the Log Selection page.
Log Selection Page shows the Log Selection page.
2.Complete the configuration and actions as described in Table.
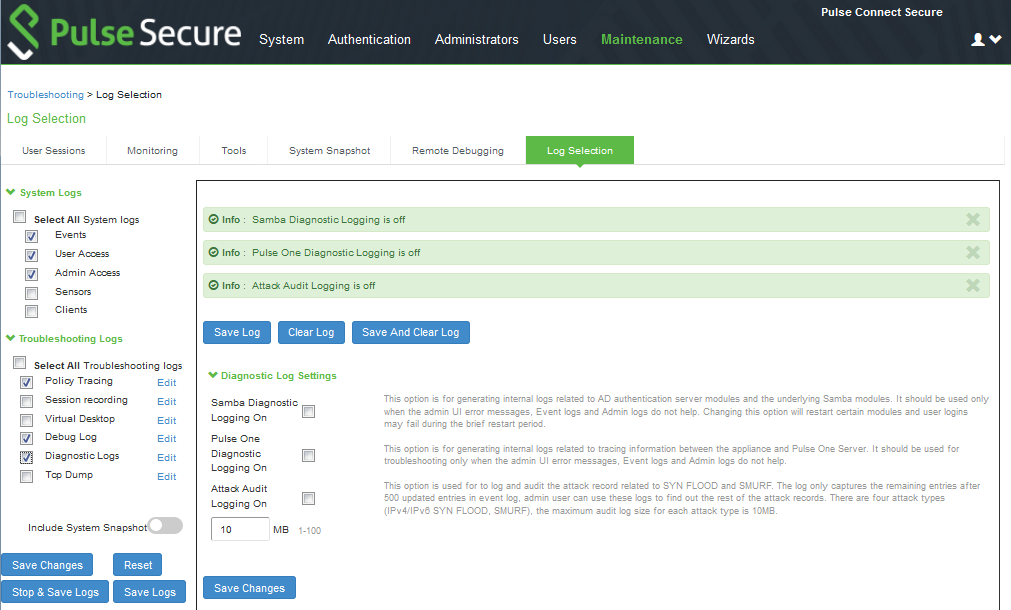
The following table lists the Log Selection Configuration Guidelines:
|
Settings |
Guidelines |
|
Select All System Logs |
Select this check box to capture all system logs. To choose specific log, select individual system log from the list. |
|
Troubleshooting Logs |
|
|
Select All Troubleshooting Logs |
Select this check box to capture all troubleshooting logs. To choose specific log, select individual troubleshooting log from the list. |
|
Edit log settings |
To configure the settings of individual logs, click the corresponding Edit link. Complete the configuration and click Save Changes. |
|
Stop and Save Logs |
Stops the services used for the log collection and archives all the selected logs and then prompts to download the archive file. |
|
Save Logs |
Archives all the selected logs and prompts to download it as a bundle. |