User Roles
User Roles Overview
A user role is an entity that defines user session parameters (session settings and options), personalization settings (user interface customization and bookmarks), and enabled access features (Web, file, secure application manager, VPN tunneling, Secure Email, enterprise onboarding Telnet/SSH, Terminal Services, meeting,e-mail access, virtual desktops, HTML5 access, and Pulse Secure client). A user role does not specify resource access control or other resource-based options for an individual request. For example, a user role may define whether or not a user can perform Web browsing. However, the individual Web resources that a user may access are defined by the Web resource policies that you configure separately.
The access management framework supports two types of user roles:
•Administrators - An administrator role specifies management functions and session properties for administrators who map to the role. You can customize an administrator role by selecting the feature sets and user roles that members of the administrator role are allowed to view and manage. You can create and configure administrator roles through the Delegated Admin Roles page. Click Administrators > Admin Roles in the admin console.
•Users - A user role is an entity that defines user session parameters, personalization settings, and enabled access features. You can customize a user role by enabling specific access features, defining Web, application, and session bookmarks, and configuring session settings for the enabled access features. You can create and configure user roles through the Roles page. Click Users > User Roles in the admin console.
User roles are an integral part of the access management framework, and therefore are available on all Connect Secure products. However, you can only access features through a user role if you are licensed for the feature.
User Role Evaluation
The role mapping engine determines a user's session role, or combined permissions valid for a user session, as illustrated in the following figure. A detailed description of each step follows the diagram.
The following figure depicts the Security Checks Performed by Connect Secure to Create a Session Role:
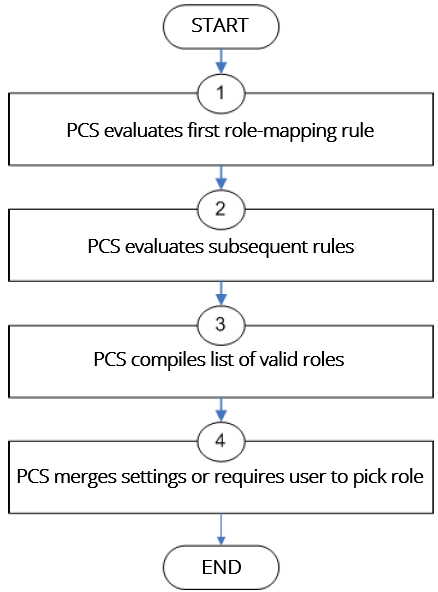
The system performs the following security checks to create a session role:
1.The system begins rule evaluation with the first rule on the Role Mapping tab of the authentication realm to which the user successfully signs in. During the evaluation, the system determines if the user meets the rule conditions. If so, then:
•The system adds the corresponding roles to a list of "eligible roles" available to the user.
•The system considers whether or not the "stop on match" feature is configured. If so, then the engine jumps to step 5.
2.The system evaluates the next rule on the authentication realm's Role Mapping tab according to the process in Step 1 and repeats this process for each subsequent rule. When the system evaluates all role mapping rules, it compiles a comprehensive list of eligible roles.
3.The system evaluates the definition for each role in the eligibility list to determine if the user complies with any role restrictions. The system then uses this information to compile a list of valid roles, whose requirements the user also meets.
If the list of valid roles contains only one role, then the system assigns the user to that role. Otherwise, the system continues the evaluation process.
4.The system evaluates the setting specified on the Role Mapping tab for users who are assigned to more than one role:
•Merge settings for all assigned roles - If you choose this option, then the system performs a permissive merge of all the valid user roles to determine the overall (net) session role for a user session.
•User must select from among assigned roles - If you choose this option, then the system presents a list of eligible roles to an authenticated user. The user must select a role from the list, and the assigns the user to that role for the duration of the user session.
•User must select the sets of merged roles assigned by each rule - If you choose this option, the system presents a list of eligible rules to an authenticated user (that is, rules whose conditions the user has met). The user must select a rule from the list, and the system performs a permissive merge of all the roles that map to that rule.
If you use automatic (time-based) dynamic policy evaluation or you perform a manual policy evaluation, the system repeats the role evaluation process described in this section.
Permissive Merge Guidelines
A permissive merge is a merge of two or more roles that combines enabled features and settings following these guidelines:
•Any enabled access feature in one role takes precedence over the same feature set disabled in another role. For example, if a user maps to two roles, one of which disables Meetings while the other role enables Meetings, the system allows the user to use Meetings for that session.
•In the case of Secure Application Manager, the system enables the version corresponding to the first role that enables this feature. Furthermore, the system merges the settings from all the roles that correspond to the selected version.
If you are using Pulse Secure client, then Pulse Secure is always enabled as the default client.
•In the case of user interface options, the system applies the settings that correspond to the user's first role.
•In the case of session timeouts, the system applies the greatest value from all of the roles to the user's session.
•If more than one role enables the Roaming Session feature, the system merges the netmasks to formulate a greater netmask for the session.
•When merging two roles that a user is mapped to-one in which bookmarks open in a new window and one in which bookmarks open in the same window-the merged role opens bookmarks in the same window.
•When merging two roles in which the first role disables the browsing toolbar and the second role enables either the framed or standard toolbar, the merged role uses the settings from the second role and displays the specified browsing toolbar.
•The merged role uses the highest value listed for each HTTP Connection Timeout. Click Users > User Roles > Select Role > Web > Options then click View advanced options.
•Merging of conflicting VPN Route Precedence Options is discouraged. But if it is done, the order of precedence is Allow Local Subnet Access, then Tunnel Routes and then Endpoint Routes.
Configuration of User Roles
To create a user role:
1.In the admin console, choose Users > User Roles.
2.Click New Role and then enter a name and optionally a description. This name appears in the list of Roles on the Roles page.
Once you have created a role, you can click the role's name to begin configuring it using the instructions in the following sections.
When you delete a role, the personal bookmarks, SAM settings, and other settings may not be removed. Therefore, if you add a new role with the same name, any users added to that new role may acquire the old bookmarks and settings. In general, the system enforces referential integrity rules and does not allow you to delete any objects if they are referenced elsewhere. For example, if a role is used in any of the realm's role mapping rules, then the system rejects the deletion of the role unless you modify or delete the mapping rules.
When you create individual user accounts, you must add the users through the appropriate authentication server (not the role). Or for instructions on how to create users on third-party servers, see the documentation that comes with that product.
Configuring General Role Options
Click Overview at the top of the General tab to edit a role's name and description, toggle session and user interface options on and off, and enable access features. When you enable an access feature, make sure to create corresponding resource policies.
To manage general role settings and options:
1.In the admin console, click Users > User Roles > Role Name > General > Overview.
2.Revise the name and description and then click Save Changes (optional).
3.Under Options, select the role-specific options that you want to enable for the role.
The system uses default settings for newly created roles or when you do not select role-specific options.
Role-specific options include:
•VLAN/Source IP - Select this option to apply the role settings configured on the General > VLAN/Source IP page.
•Session Options - Select this option to apply the role settings in the General > Session Options page to the role.
•UI Options - Select this option to apply the role settings in the General > UI Options page to the role.
•Pulse Secure - Select this option to download the desktop Pulse Secure client to Windows and MAC OS X users.
4.Under Access features, select the features you want to enable for the role. Options include:
•Web - intermediate Web URLs through the Content Intermediation Engine.
•Files (Windows or UNIX/NFS version) - resource profile that controls access to resources on Windows server shares or UNIX servers.
•Secure Application Manager (Windows version or Java version) - provides secure, application-level remote access to enterprise servers from client applications.
•Telnet/SSH - connects to internal server hosts in the clear using Telnet protocols or to communicate over an encrypted Secure Shell (SSH) session through a web-based terminal session emulation.
•Terminal Services - enable terminal emulation sessions on a Windows terminal server, Citrix NFuse server, or Citrix Metaframe server.
•Meetings - securely schedule and hold online meetings between both system users and non-system users.
•VPN Tunneling - provides secure, SSL-based network-level remote access to all enterprise application resources using the system.
•Secure Mail - enables automatic synchronization with an Exchange server (ActiveSync) and e-mail encryption for iOS devices that have the Pulse Secure client.
•Enterprise Onboarding - allows users to securely access enterprise network resources with almost any device. Wi-Fi, VPN, certificate, and Secure Mail profiles can be defined for enterprise resources and downloaded to a device during onboarding, depending on the device type.
5.Click Save Changes to apply the settings to the role.
Role Restrictions
Click Restrictions at the top of the General tab to specify access management options for the role. The system considers these restrictions when determining whether or not to map a user to the role. The system does not map users to this role unless they meet the specified restrictions.
You may configure any number of access management options for the role. If a user does not conform to all of the restrictions, the system does not map the user to the role.
To specify access management options for the role:
1.In the admin console, click Users > User Roles > Role Name > General > Restrictions.
2.Click the tab corresponding to the option you want to configure for the role, and then configure it.
Specifying Role-Based Source IP Aliases
Click VLAN/Source IP at the top of the General to define role-based source IP aliases. If you want to direct traffic to specific sites based on roles, you can define a source IP alias for each role. You use these aliases to configure virtual ports you define for the internal interface source IP address. A back-end device can then direct end user traffic based on these aliases, as long as you configure the back-end device, such as a firewall, to expect the aliases in place of the internal interface source IP address. This capability enables you to direct various end users to defined sites based on their roles, even though all of the end user traffic has the same internal interface source IP address.
You must define virtual ports to take advantage of the role-based source IP aliases.
To specify a source IP alias for the role:
1.In the admin console, click Users > User Roles > Role Name > General General > VLAN/Source IP.
2.Select the VLAN you want to use from the VLAN list, if you have defined VLAN ports on your system.
If you have not defined VLAN ports, the option defaults to the Internal Port IP address.
3.Select a source IP address from the list.
4.Click Save Changes to apply the settings to the role.
If an end user is mapped to multiple roles and the system merges roles, the system associates the source IP address configured for the first role in the list with the merged role.
You can specify the same source IP address for multiple roles. You cannot specify multiple source IP addresses for one role.
Specifying Role Session Options
Use the Session tab to specify session time limits, roaming capabilities, session and password persistency, request follow-through options, and idle timeout application activity. Select the Session Options check box on the Overview tab to enable these settings for the role.
To configure general session options:
1.In the admin GUI, click User > User Roles > RoleName > General > Session Options.
2.Configure session options, as described in Table.
3.Save the configuration.
The following table lists Session Options
|
Option |
Guidelines |
|
For Idle Timeout, specify the number of minutes a non-administrative user session may remain idle before ending. The minimum is five minutes. The default idle session limit is 10 minutes, which means that if a user's session is inactive for 10 minutes, the system ends the user session and logs the event in the system log (unless you enable session timeout warnings described later). For Max. Session Length, specify the number of minutes an active non-administrative user session may remain open before ending. The minimum is six minutes. The default time limit for a user session is 60 minutes, after which the system ends the user session and logs the event in the system log. During an end user session, prior to the expiration of the maximum session length, the system prompts the user to reenter authentication credentials, which avoids the problem of terminating the user session without warning. For Reminder Time, specify when the system should prompt non-administrative users, warning them of an impending session or idle timeout. Specify the number of minutes before the timeout is reached. Optionally, select Use Session/Idle timeout values sent by the primary Radius authentication Server to override the idle timeout and session length specified above. If the received values are below the minimums (5 minutes for the idle timeout and 6 minutes for the session length), the minimum values are used. Optionally, select Enable Session Extension to allow users to extend the session beyond the maximum session length. If this feature is enabled, users will be reauthenticated and extend their current session without interruption. We recommend the difference between Idle Timeout and Reminder Time be greater than two minutes. This ensures that the reminder pop-up window appears at the correct time. |
|
|
Enable session timeout warning |
Enable to notify non-administrative users when they are about to reach a session or idle timeout limit. These warnings prompt users to take the appropriate action when they are close to exceeding their session limits or idle timeouts, helping them save any in-progress form data that would otherwise be lost. Users approaching the idle timeout limit are prompted to reactivate their session. Users approaching the session time limit are prompted to save data. Optionally, select Display sign-in page on max session time out to display a new browser sign-in page to the end user when their session times out. This option only appears when you choose to enable the session timeout warning. If you do not select the Enable session timeout warning option, the system only displays expiration messages to users. It does not give them the option to extend their sessions. Instead, users need to access the sign-in page and authenticate into a new session. The Enable session timeout warning option only applies to expiration messages displayed by the end user's browser, not by other clients such as PSAM or VPN Tunneling. |
|
Roaming session |
Select one of the following options: Enabled - Enables unlimited roaming sessions. An unlimited roaming session allows mobile users (laptop users) with dynamic IP addresses to sign in to the device from one location and continue working from another. Disable this feature to prevent users from accessing a previously established session from a new source IP address. This helps protect against an attack spoofing a user's session, provided the hacker was able to obtain a valid user's session cookie. If you enable unlimited session roaming, a session is maintained within an IPv4 network, within an IPv6 network, or from IPv4 to IPv6 and vice versa. Limit to subnet - Limits the roaming session to the local subnet, specified by netmask for IPv4 subnets and prefix length for IPv6 subnets. Users may sign in from one IP address and continue using their sessions with another IP address as long as the new IP address is within the same subnet. If you configure limited session roaming, you can specify IPv4 or IPv6 subnets within which the session is maintained. However, with limited session roaming, you cannot allow sessions to roam from IPv4 to IPv6 networks, or vice versa. Disabled - Disables roaming user sessions for users mapped to this role. Users who sign in from one IP address may not continue an active session from another IP address; user sessions are tied to the initial source IP address. |
|
Persistent session |
By default, the session cookie is flushed from the browser's memory when the browser is closed. The session length is determined by both the idle timeout value and maximum session length value that you specify for the role. The session does not terminate when a user closes the browser; a session only terminates when a user signs out of the device. Enable the persistent session option to write the session cookie to the client hard disk so that the user's credentials are saved for the duration of the session. Assume persistent session is enabled and a user starts a VPN Tunneling session from a browser. Later, the user quits the browser application. The next time the user opens a new browser window and logs in to the same device, the user is not prompted to enter his or her credentials again. (Macintosh only) Persistent session applies only for browser login as stated earlier. If you start VPN Tunneling from the standalone launcher (by opening NetworkConnect.dmg) and later open a new browser and log in to that same device, you are prompted to reenter your credentials. If you enable the Persistent session option and a user closes the browser window without signing out, any user can open another instance of the same browser to access the device without submitting valid credentials, posing a potential security risk. We recommend that you enable this feature only for roles whose members need access to applications that require system credentials and that you make sure these users understand the importance of signing out of the device when they are finished. |
|
Remove Browser Session Cookie |
Enable to remove the session cookie and logs users out of their Web session once the client component launches, enhancing security for your VPN Tunneling, PSAM and Pulse session. Disable to retain the session cookie and keep users logged in to their Web session once the client component starts. Because browser cookies are plain text files, they are susceptible to malicious attacks. The Remove Browser Session Cookie option removes the session cookie, making your VPN Tunneling, PSAM and Pulse Secure client sessions more secure. When enabled, users are logged out of their Web session once the client component (for example, Pulse Secure client) launches. Users are logged out of their Web session regardless of whether the client component launches successfully or not. If the client component does not successfully launch, users can restart their Web session and try launching their client component again. This option also prevents any client component from launching a browser through the client. The Remove Browser Session Cookie removes only the session cookie. It does not remove non-system cookies or other any other cookie. |
|
HTTP Only Device Cookie |
Enable to set a HTTP only cookie along with DSID. This cookie cannot be read with the help of scripts and protects against XSS attacks and cookie stealing. This cookie along with DSID will be used to restore a user session. |
|
Persistent password caching |
Enable to allow cached passwords to persist across sessions for a role. The system supports Windows NT LAN Manager (NTLM) authentication protocol and HTTP Basic Authentication and supports servers that are set up to accept both NTLM and anonymous sign-in. The system caches NTLM and HTTP Basic Authentication passwords provided by users so that the users are not repeatedly prompted to enter the same credentials used to sign in to the server or another resource in the NT domain. By default, the system flushes cached passwords when a user signs out. A user can delete cached passwords through the Advanced Preferences page. After the end user logs in to the device, click Preferences and then click the Advanced tab. |
|
Browser request follow-through |
Enable to allow the system to complete a user request made after an expired user session after the user reauthenticates. |
|
Idle timeout application activity |
Enable to ignore activities initiated by Web applications (such as polling for e-mails) when determining whether a session is active. If you disable this option, periodic pinging or other application activity may prevent an idle timeout. |
|
Upload Logs |
Enable to allow the user to transmit (upload) client logs to the system. Use the System > Log/Monitoring > Client Logs > Settings page to completely enable client-side logs for the user. |
Customizing the Welcome Page
Click UI Options at the top of the General tab to specify customized settings for the welcome page and the browsing toolbar for users mapped to this role. The welcome page (or home page) is the Web interface presented to authenticated users.
Click Overview at the top of the General tab, and then select the UI Options check box to enable custom settings for the role; otherwise, the system uses the default settings.
Personalization settings include the sign-in page, page header, page footer, and whether or not to display the browsing toolbar. If the user maps to more than one role, then the system displays the user interface corresponding to the first role to which a user is mapped.
To customize the welcome page for role users:
1.Click Users > User Roles > RoleName > General > UI Options.
2.Under Header, specify a custom logo and alternate background color for the header area of the welcome page (optional):
•Click Browse and locate your custom image file. The new logo appears in the Current appearance box only after you save your changes.
You can only specify a JPEG or GIF file for a custom logo image. Other graphics formats are not displayed properly in the JSAM status window on some OS platforms.
•Type the hexadecimal number for the background color or click the Color Palette icon and pick the desired color. The Current appearance box updates immediately.
3.Under Sub-headers, select new background and text colors (optional):
•Type the hexadecimal number for the Background color or click the Color Palette icon and pick the desired color. The Current appearance box updates immediately.
•Type the hexadecimal number for the Text color or click the Color Palette icon and pick the desired color. The Current appearance box updates immediately.
4.Under Start page, specify the start page that you want users to see after they sign in and when they click the Home icon on the toolbar:
•Bookmarks page - Select this option to display the standard Bookmarks page.
•Meetings page - Select this option to display the standard meetings page.
•Custom page - Select this option to display a custom start page and then specify the URL to the page. The system rewrites the URL and creates an access control rule to allow users access to the URL. (Note that users can also enter the custom URL in the Browse field on the toolbar.) The system evaluates the access control rule after all other policies, which means another policy could deny access to the URL.
•Also allow access to directories below this url - Select this option to allow users access to subdirectories of the custom-page URL. For example, if you specify http://www.domain.com/, users can also access http://www.domain.com/dept/.
5.Under Bookmarks Panel Arrangement, arrange the panels as you want to display them on the user's bookmarks page:
1.To select the name of a panel, click in the Left Column or Right Column list.
2.To position a panel above or below the other panels, click Move Up or Move Down.
3.To move a panel to the other side of the user's bookmarks page, click Move > or < Move.
NOTE: The system displays all panels under Bookmarks Panel Arrangement for all licensed features regardless of whether or not you enable the corresponding feature for the role.
The maximum number of combined bookmarks a role can have is approximately 500. If a role has more than 500 bookmarks, some operations (for example, delete role, duplicate role) may not work correctly. The workaround is to split a role with a large number of bookmarks into multiple roles.
4.Under Help Page, select options to control the Help page that appears when users click the Help button on the toolbar:
5.Disable help link - Select this option to prevent users from displaying Help by removing the Help button from the toolbar.
6.Standard help page - Select this option to display the standard end-user Help.
7.Custom help page - Select this option to display a custom Help page. Specify the URL to the custom help page, and then provide an optional width and height for the help page's window. The system rewrites the URL and creates an access control rule to allow users access to the URL. (Note that users can also enter the custom URL in the Browse field on the toolbar.) The system evaluates the access control rule after all other policies, which means another policy could deny access to the URL. (Note that when you choose this option, the system disables the Tips link next to the Browse field.)
8.Also allow access to directories below this url - Select this option to allow users access to subdirectories of the custom help page URL. For example, if you specify http://www.domain.com/help, users can also access http://www.domain.com/help/pdf/.
9.Under User Toolbar, select options for the toolbar on the Bookmarks page and other secure gateway pages:
10.Home - Select this option to display the Home icon on the Bookmarks page and other secure gateway pages.
11.Preferences - Select this option to display the Preferences button.
12.Session Counter - Select this option to display a time value on the user toolbar that indicates the maximum remaining time allowed in the user's current session. Note that a period of user inactivity could also end the current session before this maximum time expires.
13.Client Application Sessions - Select this option to display the Client Apps button on the user toolbar. Users can click this button to display the Client Application Sessions page where they can start client applications such as VPN Tunneling or Secure Application Manager. If you do not select this option, the system displays the Client Application Sessions panel on the Bookmarks page.
14.Under Browsing toolbar, select options for the toolbar that users see when browsing pages not located on the system, such as external web sites:
15.Show the browsing toolbar - Select this option to display the browsing toolbar.
16.Toolbar type - Select the type of browsing toolbar you want to display:
•Standard - This toolbar can be moved to the top left or top right side of the browser window. Users can also collapse and expand the toolbar. When collapsed, the toolbar displays the custom logo only. The toolbar's default state is expanded and on the top right side of the browser window.
•Framed - This toolbar remains fixed in a framed header section at the top of the page.
We recommend that you do not use the top variable when working with a frame set because after the system intermediates the page, top might reference a different frame than you intend. This change might make the framed toolbar disappear or could cause your intermediated application to work erratically or incorrectly. See Content Intermediation Engine Developer Guide,
17.Toolbar logo and Toolbar logo (mobile) - Specify a custom logo (such as your company's logo) that you want to display on the standard and framed toolbars by browsing to the image file (optional). When the user clicks the logo, the page you specify for the Logo links to option appears. The current logo for the browsing toolbar appears next to these options.
18.Logo links to - Select an option to link the browsing toolbar logo to a page that appears when users click the logo:
•Bookmarks page - Links the logo to the Bookmarks page.
•Start Page" settings - Links the logo to the custom start page you specified under the Start Page section. In the welcome message of the sign in page, the admin can now include hyperlinks with VMWare-View custom protocol (vmware-view://). Therefore the set of allowed hyperlinks are now vmware-view, http, https, mailto, ftp.
•Custom URL - Links the logo to the URL you enter in the associated text box (optional). This resource must be accessible to the system. The system rewrites the URL and creates an access control rule to allow users access to the URL. (Note that users can also enter the custom URL in the Browse field on the toolbar.) The system evaluates the access control rule after all other policies, which means another policy could deny access to the URL.
•Also allow access to directories below this url - Select this option to allow users access to subdirectories of the custom URL.
19.Specify the items you want to display in the browsing toolbar:
•Enable "Home" link - Select this option to display the Home Page button, which is linked to the Bookmarks page.
•Enable "Add Bookmark" link - Select this option to display the Bookmark this Page button.
•Enable "Bookmark Favorites" link - Select this option to display the Bookmark Favorites button. When the user clicks this button, the system displays a list of the bookmarks that the user specified as favorites on the Add Web Bookmark page of the secure gateway.
•Display Session Counter - Select this option to display a time value on the browsing toolbar that indicates the maximum remaining time allowed in the user's current session. Note that a period of user inactivity could also end the current session before this maximum time expires.
•Enable "Help" link - Select this option to display the Help button, which is linked to the Help page you specify for under Help page.
If you click Users > User Roles > Role Name> Web > Options and clear the User can add bookmarks check box, then the system does not display the Bookmark this Page and Bookmark Favorites buttons on the browsing toolbar even if you select the Enable "Add Bookmark" link and Enable "Bookmark Favorites" link options.
•Use Iframe in Toolbar - Select this option if you are having problems with using iframes with JavaScript rewriting and with the Firefox web browser. This option resolves interoperability problems with the above.
20.Under Personalized greeting, specify a greeting and notification message on the Bookmarks page (optional):
21.Enabled - Select this option to display the personalized greeting. The system displays the username if the full name is not configured.
22.Show notification message - Select this option and enter a message in the associated text box (optional). The message appears at the top of the Bookmarks page after you save changes and the user refreshes that page. You may format text and add links using the following HTML tags: <i>, <b>, <br>, <font> and <a href>. However, the system does not rewrite links on the sign-in page (because the user has not yet authenticated), so you should only point to external sites. Links to sites behind a firewall will fail. You may also use Connect Secure system variables and attributes in this field.
The length of the personalized greeting cannot exceed 12K, or 12288 characters.
If you use unsupported HTML tags in your custom message, the system may display the end user's home page incorrectly.
23.Under Other, specify whether or not you want the copyright notice and label shown in the footer (optional). This setting applies only to those users whose license permits disabling the copyright notice. For more information about this feature, call Pulse Secure Support.
24.Click Save Changes. The changes take effect immediately, but current user browser sessions may need to be refreshed to see the changes.
25.Click Restore Factory Defaults to reset all user-interface options back to factory defaults (optional).
Optimized Interface for the Apple iPad
The system is optimized for a number of platforms, including the Apple iPad. This optimization includes:
•Login pages - includes the login and logout pages as well as intermediate pages that appear after the user enters their credentials on the sign-in page and before the Home page appears. The following is a list of these customized login pages:
•Cancel.thtml
•Defender.thtml
•ExceededConcurrent.thtml
•GeneratePin.thtml
•GraceLoginUsed.thtml
•LoginPage.thtml
•Logout.thtml
•NewPin.thtml
•NextToken.thtml
•PasswordChange.thtml
•PasswordExpiration.thtml
•SelectRole.thtml
•ShowSystemPin.thtml
•SigninNotifPostAuth.thtml
•SigninNotifPreAuth.thtml
•SM-NewPinSelect.thtml
•SM-NewPinSystem.thtml
•SM-NewUserPin.thtml
•SM-NextToken.thtml
•SSL.thtml
•confirmation.thtml
•confirmation_opensessions.thtml
•user_unknown.thtml
•Home page - This home page displays the welcome panel and any applicable notification messages as well as the Web Bookmark panel, the File Bookmark (or Files) panel, the VPN and Preferences button.
•Web Bookmark pages - Located on the home page, the Web Bookmark panel lists each individual bookmarks and allows user to tap and browse the bookmark destination page. To edit bookmarks, tap the Edit button on the panel header and the Edit Bookmark page appears. On this page, user can edit individual bookmarks, reorder bookmarks, and delete bookmarks. Editing is limited to user-created bookmarks.
•File Bookmark pages - Located on the home page, the File Bookmark panel lists each individual bookmarks. To edit bookmarks, tap the Edit button on the panel header and the Edit File Bookmark page will be displayed. On this page, user can edit individual bookmarks, reorder bookmarks, and delete bookmarks. Editing is limited to user-created file bookmarks.
•Preferences page - Located the home page is a Preferences button. When tapped, it displays the Preferences setting page, containing configuration options for changing username, delete cookies, delete session cookies and delete passwords.
•Error pages - Error pages that can be seen while using the features made available on the iPad are customized.
•Company logos - Most pages display a company logo. These pages are capable of displaying custom logos if uploaded from the admin GUI.
The following table lists the supported configurable options on the Apple iPad:
|
Custom User Interface Options |
Supported |
|
Header Logo Image |
Yes |
|
Header Background Color |
No |
|
Sub-Header Background Color |
No |
|
Sub-Header Text Color |
No |
|
Start Page Message (Welcome message) |
Yes |
|
Bookmark Panel Arrangement |
No |
|
Enable/Disable Help Link |
Yes |
|
Window Size of Help Page |
No |
|
Show/Hide Preferences Toolbar |
No |
|
Show/Hide Session Counter |
Yes |
|
Browsing Toolbar Items |
Yes |
|
Post-Auth Sign-In Notification |
Yes |
|
Personalized Greetings |
Yes |
|
Show Copyright Notice in Footer |
No |
Defining Default Options for User Roles
You can define default options for all user roles, just as you can for delegated administrator roles. Default values are used for newly created roles or for roles where the session or UI option check boxes are not selected in the User > User Roles > UserName > General > Overview window.
The default options include, but are not limited to:
•Session Options
•Session lifetime - Define the idle timeout, maximum session length, and reminder time in minutes.
•Enable session timeout warning - Determine whether to display warning and login page.
•Roaming Session - Define level of mobility access.
•Persistent Session - Define state across browser instances.
•Persistent password caching - Define password state across sessions.
•Browser request follow-through - Define response to browser session expiration.
•Idle timeout application activity - Define system response to application session activity.
•UI Options
•Header - Define the logo and background color.
•Sub-headers - Define the background and text color.
•Start page - Define which page appears after the user logs in.
•Bookmarks Panel Arrangement - Define the panels that appear on the user's bookmark page.
•Help Page - Display standard or custom help.
•User Toolbar - Define the links that appear on a user's home page.
•Browsing toolbar - Define the links that appear when a user is browsing an external web site.
•Personalized Greeting - Display user's name and notification message on the user's welcome page.
•Bookmarks Panel Arrangement Other - Show copyright notice.
Defining Default Options for User Roles
To define the default options for all user roles:
1.Select Users > User Roles.
2.Click Default Options.
3.Modify settings in the Session Options, UI Options, and Custom Messages tabs.
4.Click Save Changes. These become the new defaults for all new user roles.
If you do not want user roles to see the copyright notice, you can also clear the Show copyright notice and "Secured by Pulse Secure" label in footers check box for user roles, in general. That way, all subsequent roles you create do not allow the notice to appear on the end user UI.
Customizing Messages
You can customize basic messages that may be displayed to your end users when they sign in to the device. You can change the message text, and you can add internationalized versions of the messages in Chinese (Simplified), Chinese (Traditional), French, German, Japanese, Korean, and Spanish, in addition to English.
To customize messages:
1.Select Users > User Roles.
2.Click Default Options.
3.Select the Custom Messages tab.
4.Select the language to use from the menu.
5.Enter your text in the Custom Message box, below the default message you want to override.
6.Click Save Changes.
7.Repeat the process to create messages in additional languages.
Customizing UI Views for User Roles
You can use customization options on the Roles page to quickly view the settings that are associated with a specific role or set of roles. For instance, you can view all of the user roles and any Web bookmarks that you have associated with them. Additionally, you can use these customized views to easily link to the bookmarks and other configuration settings associated with a role.
To view a sub-set of data on the Roles page:
1.Click Users > User Roles.
2.Select an option from the View list at the top of the page. Table 5 describes these options.
3.Select one of the following options from the For list:
•All roles - Displays the selected bookmarks for all user roles.
•Selected roles - Displays the selected bookmarks for the user roles you choose. If you select this option, select one or more of the check boxes in the Role list.
4.Click Update.
The following table lists the View Menu Options
|
Option |
Description |
|
Enabled Settings |
Displays a graph outlining the remote access mechanisms and general options that you have enabled for the specified roles. Also displays links (the check marks) that you can use to access the corresponding remote access and general option configuration pages. |
|
Restrictions |
Displays Host Checker and Cache Cleaner restrictions that you have enabled for the specified roles. Also displays links you can use to access the corresponding Host Checker and Cache Cleaner configuration pages. |
|
Meetings |
Displays Pulse Collaboration settings that you have configured for the specified roles. Also displays links you can use to access the corresponding Pulse Collaboration configuration pages. |
|
VPN Tunneling |
Displays VPN Tunneling settings that you have configured for the specified roles. Also displays links you can use to access the corresponding VPN Tunneling configuration pages. |
|
Role Mapping Rule & Realms |
Displays the assigned authentication realms, role mapping rule conditions, and permissive merge settings for the specified roles. Also displays links you can use to access the corresponding realm and role mapping configuration pages. |
|
Bookmarks: All |
Displays the names and types of all of the bookmarks that you have enabled for the specified roles. Also displays links you can use to access the corresponding bookmark configuration pages. (Note that if you created a bookmark through a resource profile, the link appears in the Resource column. Otherwise, the link appears in the Bookmark column.) |
|
Bookmarks: Web |
Displays the Web bookmarks that you have enabled for the specified roles. Also displays links you can use to access the corresponding bookmark configuration pages. (Note that if you created a bookmark through a resource profile, the link appears in the Resource column. Otherwise, the link appears in the Web Bookmark column.) |
|
Bookmarks: Files (Windows) |
Displays the Windows File bookmarks that you have enabled for the specified roles. Also displays links you can use to access the corresponding bookmark configuration pages. (Note that if you created a bookmark through a resource profile, the link appears in the Resource column. Otherwise, the link appears in the Windows File Bookmark column.) |
|
Bookmarks: Files (UNIX) |
Displays the UNIX/NFS File bookmarks that you have enabled for the specified roles. Also displays links you can use to access the corresponding bookmark configuration pages. (Note that if you created a bookmark through a resource profile, the link appears in the Resource column. Otherwise, the link appears in the UNIX File Bookmark column.) |
|
Bookmarks: Telnet |
Displays the Telnet/SSH bookmarks that you have enabled for the specified roles. Also displays links you can use to access the corresponding bookmark configuration pages. (Note that if you created a bookmark through a resource profile, the link appears in the Resource column. Otherwise, the link appears in the Telnet/SSH Session column.) |
|
Bookmarks: Terminal Services |
Displays the Terminal Services bookmarks that you have enabled for the specified roles. Also displays links you can use to access the corresponding bookmark configuration pages. (Note that if you created a bookmark through a resource profile, the link appears in the Resource column. Otherwise, the link appears in the Terminal Services Session column.) |
|
ACL Resource Policies: All |
Displays the resource policies that are associated with the specified roles. Includes the type, name, description, action, and resources for each policy. Also displays links you can use to access the corresponding policy configuration pages. |
|
ACL Resource Policies: Web |
Displays the Web resource policies that are associated with the specified roles. Includes the type, name, description, action, and resources for each policy. Also displays links you can use to access the corresponding policy configuration pages. |
|
ACL Resource Policies: Files (Windows) |
Displays the Windows file resource policies that are associated with the specified roles. Includes the type, name, description, action, and resources for each policy. Also displays links you can use to access the corresponding policy configuration pages. |
|
ACL Resource Policies: Files (UNIX) |
Displays the UNIX file resource policies that are associated with the specified roles. Includes the type, name, description, action, and resources for each policy. Also displays links you can use to access the corresponding policy configuration pages. |
|
ACL Resource Policies: SAM |
Displays the JSAM and PSAM resource policies that are associated with the specified roles. Includes the type, name, description, action, and resources for each policy. Also displays links you can use to access the corresponding policy configuration pages. |
|
ACL Resource Policies: Telnet |
Displays the Telnet/SSH resource policies that are associated with the specified roles. Includes the type, name, description, action, and resources for each policy. Also displays links you can use to access the corresponding policy configuration pages. |
|
ACL Resource Policies: Terminal Services |
Displays the Terminal Services resource policies that are associated with the specified roles. Includes the type, name, description, action, and resources for each policy. Also displays links you can use to access the corresponding policy configuration pages. |
|
ACL Resource Policies: VPN Tunneling |
Displays the VPN Tunneling resource policies that are associated with the specified roles. Includes the type, name, description, action, and resources for each policy. Also displays links you can use to access the corresponding policy configuration pages. |
|
Resource Profiles: All |
Displays the resource profiles that are associated with the specified roles. Includes the type, name, bookmarks, and supporting policies for each profile. Also displays links you can use to access the corresponding resource profile configuration pages. |
|
Resource Profiles: Web Applications |
Displays the Web application resource profiles that are associated with the specified roles. Includes the name, bookmarks, and supporting policies for each profile. Also displays links you can use to access the corresponding resource profile configuration pages. |
|
Resource Profiles: Web Hosted Java Applets |
Displays the hosted Java applet resource profiles that are associated with the specified roles. Includes the name, bookmarks, and supporting policies for each profile. Also displays links you can use to access the corresponding resource profile configuration pages. |
|
Resource Profiles: Files (Windows) |
Displays the Windows file resource profiles that are associated with the specified roles. Includes the name, bookmarks, and supporting policies for each profile. Also displays links you can use to access the corresponding resource profile configuration pages. |
|
Resource Profiles: Files (UNIX) |
Displays the UNIX file resource profiles that are associated with the specified roles. Includes the name, bookmarks, and supporting policies for each profile. Also displays links you can use to access the corresponding resource profile configuration pages. |
|
Resource Profiles: SAM Client Applications |
Displays the JSAM and PSAM application resource profiles that are associated with the specified roles. Includes the name, bookmarks, and supporting policies for each profile. Also displays links you can use to access the corresponding resource profile configuration pages. |
|
Resource Profiles: SAM PSAM destinations |
Displays the PSAM destination resource profiles that are associated with the specified roles. Includes the name, bookmarks, and supporting policies for each profile. Also displays links you can use to access the corresponding resource profile configuration pages. |
|
Resource Profiles: Telnet/SSH |
Displays the Telnet/SSH resource profiles that are associated with the specified roles. Includes the name, bookmarks, and supporting policies for each profile. Also displays links you can use to access the corresponding resource profile configuration pages. |
|
Resource Profiles: Terminal Services |
Displays the Terminal Services resource profiles that are associated with the specified roles. Includes the name, bookmarks, and supporting policies for each profile. Also displays links you can use to access the corresponding resource profile configuration pages. |