Step 1: Installing the Hardware
The PSA Series and MAG Series appliances chassis can be mounted in a rack for secure storage and use.
For unpacking instructions, mounting instructions, and precautions, refer to the appliance’s Hardware Guides at: https://www.pulsesecure.net/techpubs/pulse-appliances.
Next, connect the included cables and power on the PSA Series appliances following these steps:
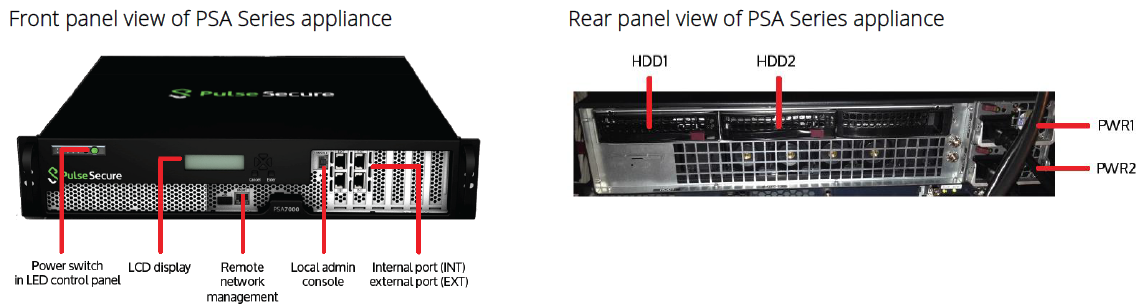
1.On the front panel:
•Connect an Ethernet cable from one of the Ethernet ports on the device to a Gigabit switch port set to 1000BaseTX. DO NOT use auto-select on either port. Once you apply power to the device, the port uses two LEDs to indicate the connection status.
•Connect a laptop or external monitor and keyboard to the appliance.
2.On the rear panel, plug the power cord into the AC receptacle. There is no on/off switch on Pulse Policy Secure. Once you plug the power cord into the AC receptacle, Pulse Policy Secure powers up.
Hardware installation is complete after you rack-mount the appliance and connect the power, network, and serial cables. The next step is to connect to the appliance’s serial console as described in Home .
Device Status LED Behavior
Startup takes approximately one minute to complete. If you want to turn the device off and on again, we recommend you wait a few seconds between shutting it down and powering it back up.
There are three device status LEDs located on the front panel:
•Power
•Hard disk access
•Information/Fault
Table lists the name, color, status, and description of each device status LED.
|
Name |
Color |
State |
Description |
|---|---|---|---|
|
POWER |
Green |
Off |
Device is not receiving power |
|
|
|
On Steady |
Device is receiving power |
|
HARD DISK ACCESS |
Yellow |
Off |
Hard disk is idle |
|
|
|
Blinking |
Hard disk is being accessed |
|
FAULT |
Red |
Off |
Device is operating normally |
|
|
|
Slow blinking |
Power supply fault |
|
|
|
Fast blinking |
Fan failure |
|
|
|
Solid |
Thermal failure |