Configuring Aruba WLC
Configuring Aruba WLC for PPS Guest Self-Registration
This sections explains the steps to configure Aruba WLC for deploying PPS GUAM and ‘Guest Self-Registration’ feature. This section provides examples of how to configure the Aruba WLC. For more information, see Aruba documentation.
Configuration required on Aruba WLC for Campus Only mode
WLAN Configuration for Campus Only mode
1.Login to Aruba WLC. Select Configuration > Wizards > WLAN/LAN Wizard. The Welcome to the WLAN/LAN Configuration Wizard appears
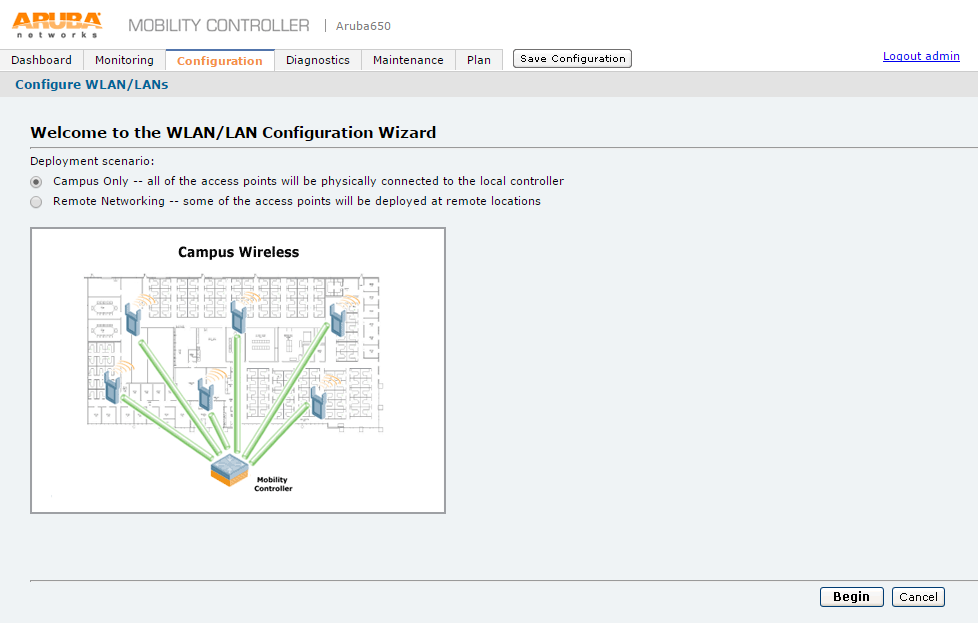
2.Select Campus Only option and click Begin. The Specify Group to Configure screen appears
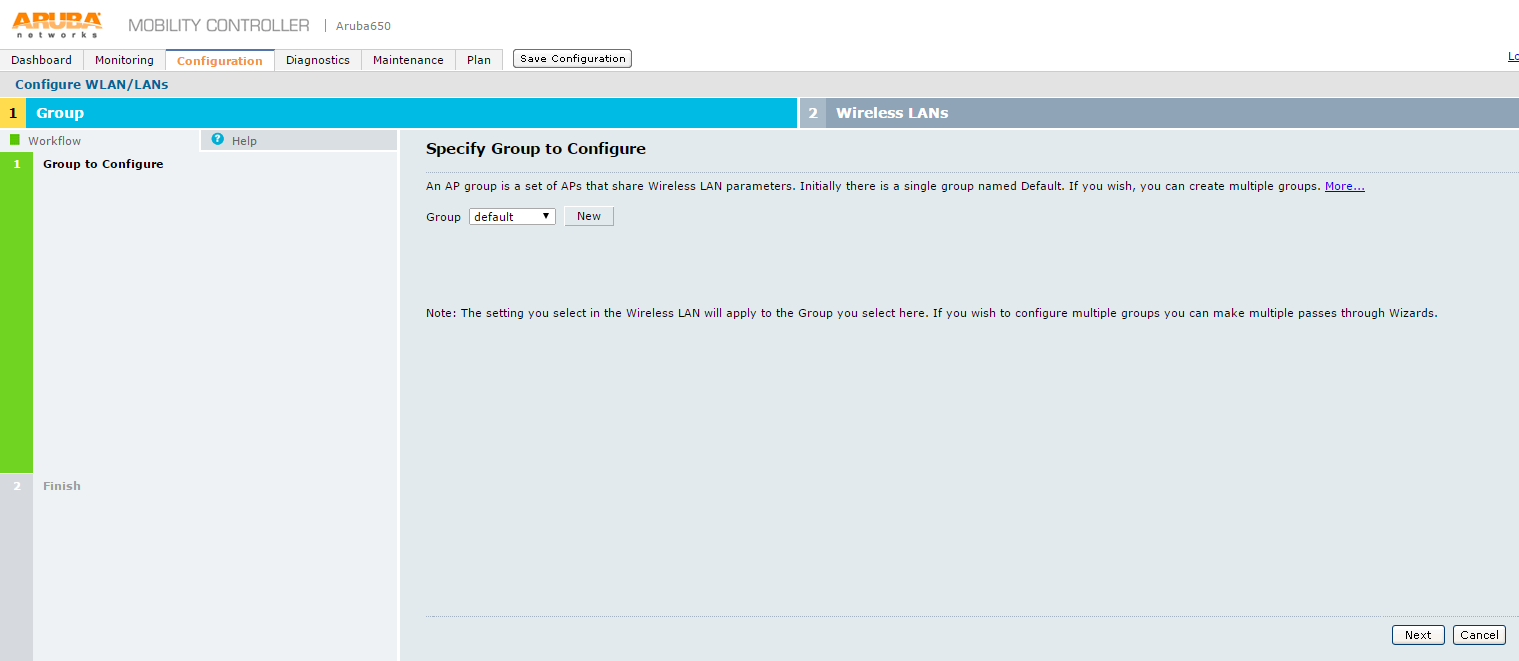
3.On Specify Group to Configure screen select an existing AP group or create a new AP group and click Next. The Ready to Configure Wireless LANs for Group screen appears.
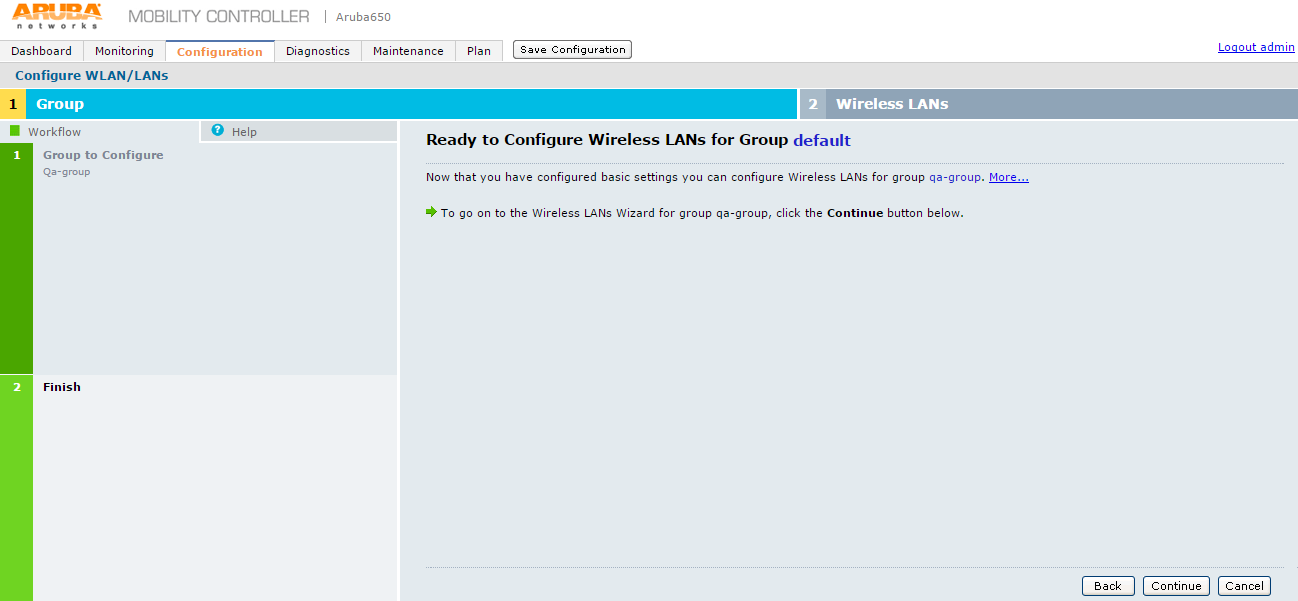
4.Click Continue button. The Specify Wireless LAN (WLAN) for Group default screen appears
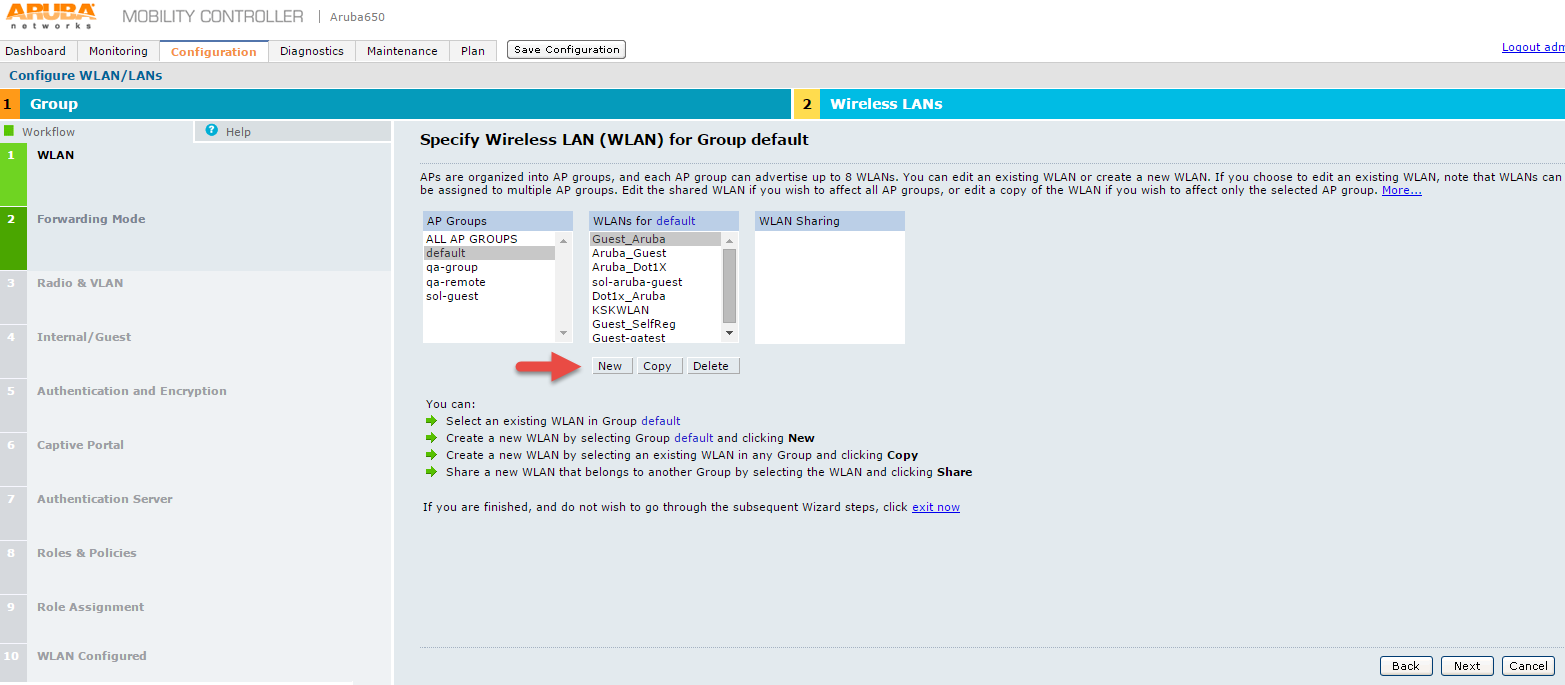
5.On Specify Wireless LAN (WLAN) for Group default screen, select a group from the AP Groups list.
6.In the WLANS for list select an existing WLAN, or
7.Click New to create a new WLAN
8.Click Next.
9.The Specify Forwarding Mode for Guest_Aruba in Group default screen appears
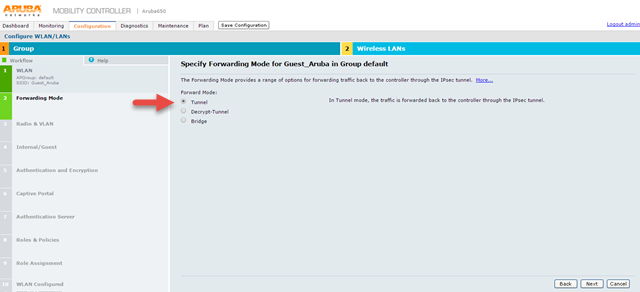
10.On Specify Forwarding Mode for Guest_Aruba in Group default screen, under Forward Mode, select Tunnel option and click Next. The Specify Radio Type and VLAN for Guest_Aruba in Group default screen appears.
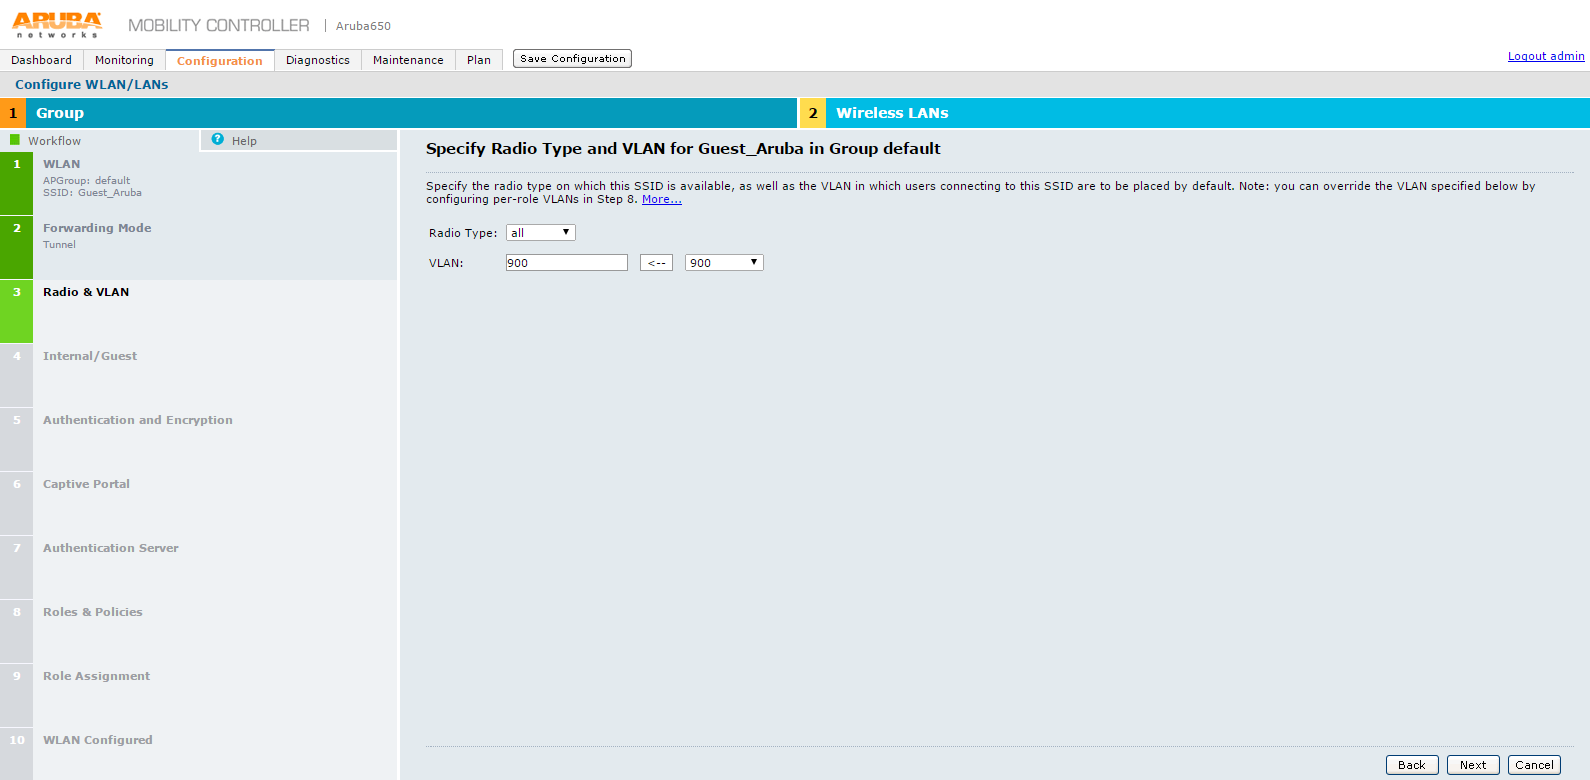
11.On Specify Radio Type and VLAN for Guest_Aruba in Group default screen select:
•Radio Type - Select ‘all’ from the drop-down list
•VLAN - Select required options from the drop-down list and click the arrow button to include in the VLAN box.
12.Click Next.
13.The Specify whether WLAN is for Internal or Guest use for Guest_Aruba in Group default screen appears
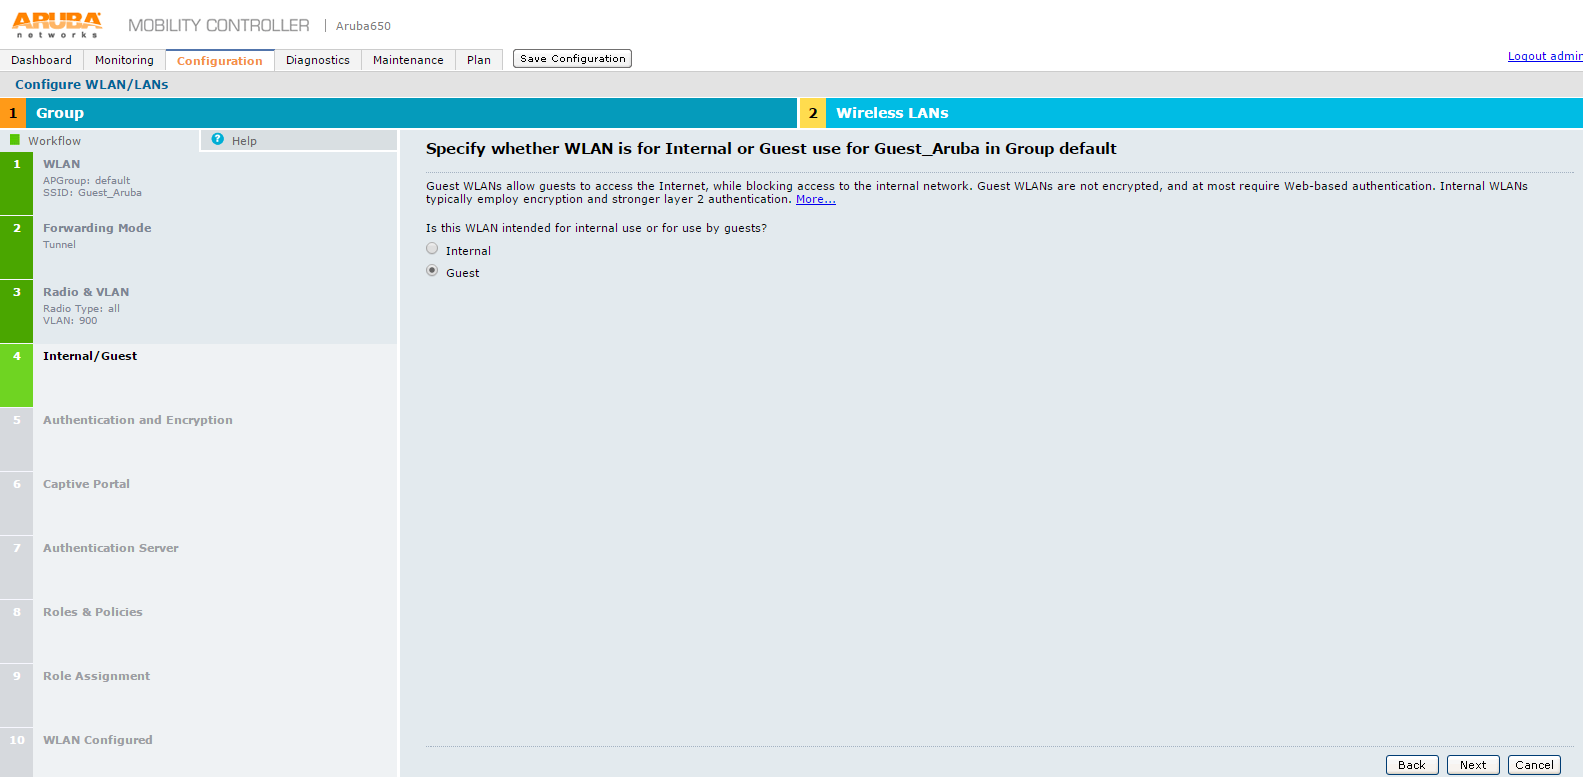
14.Specify whether WLAN is for Internal or Guest use for Guest_Aruba in Group default screen specify the purpose of the WLAN. Select Guest option for WLAN use and click Next.
15.The Specify Authentication and Encryption for Guest_Aruba in Group default screen appears.
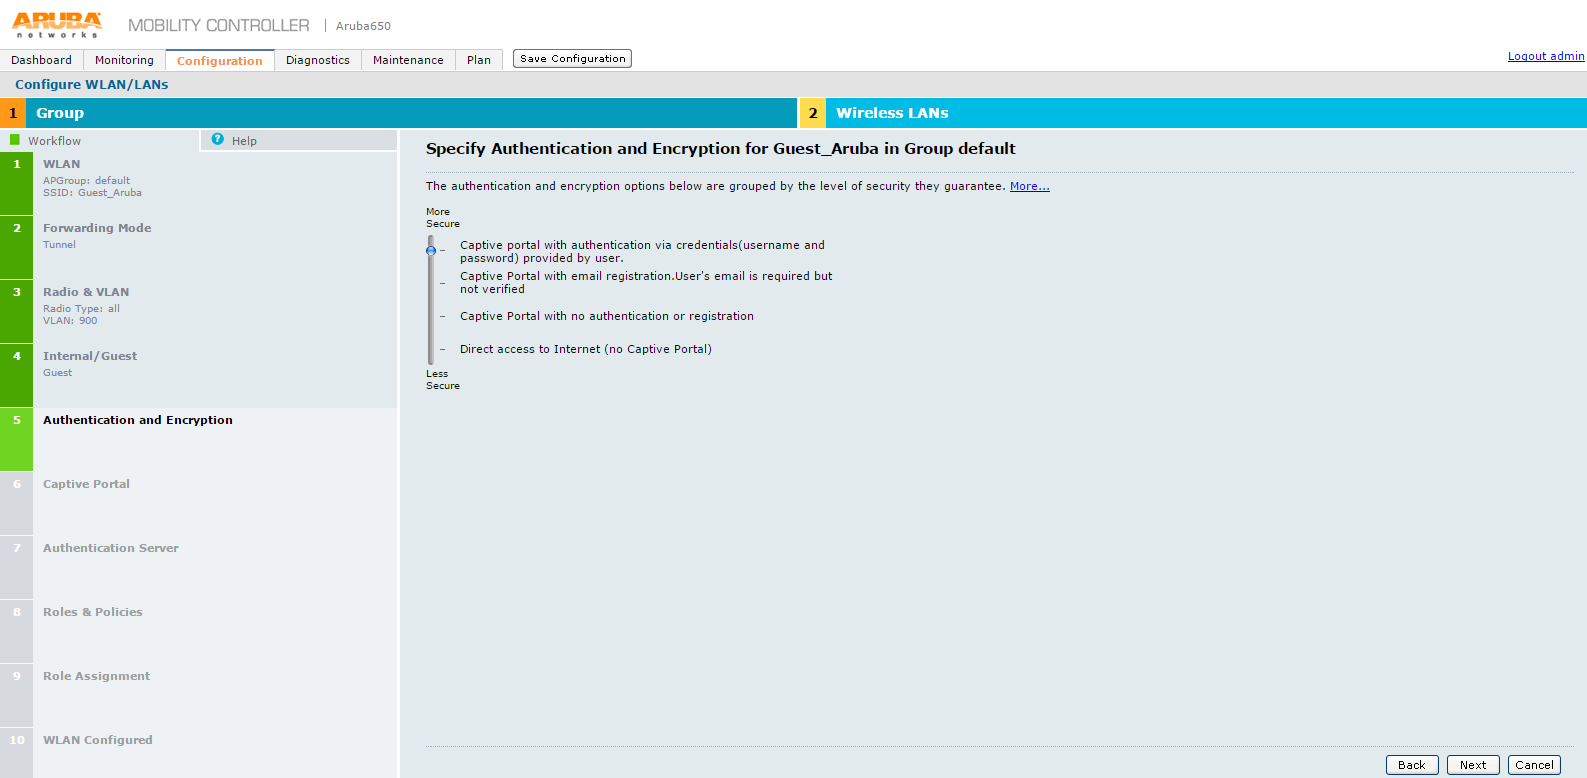
16.On Specify Authentication and Encryption for Guest_Aruba in Group default screen move the slider to Captive portal with authentication via credentials option and click Next. The Specify Captive Portal Options for Guest_Aruba in Group default screen appears.

17.Specify Captive Portal Options for Guest_Aruba in Group default screen, click Next.
18.The Specify Authentication Server for Guest_Aruba in Group default screen appears.
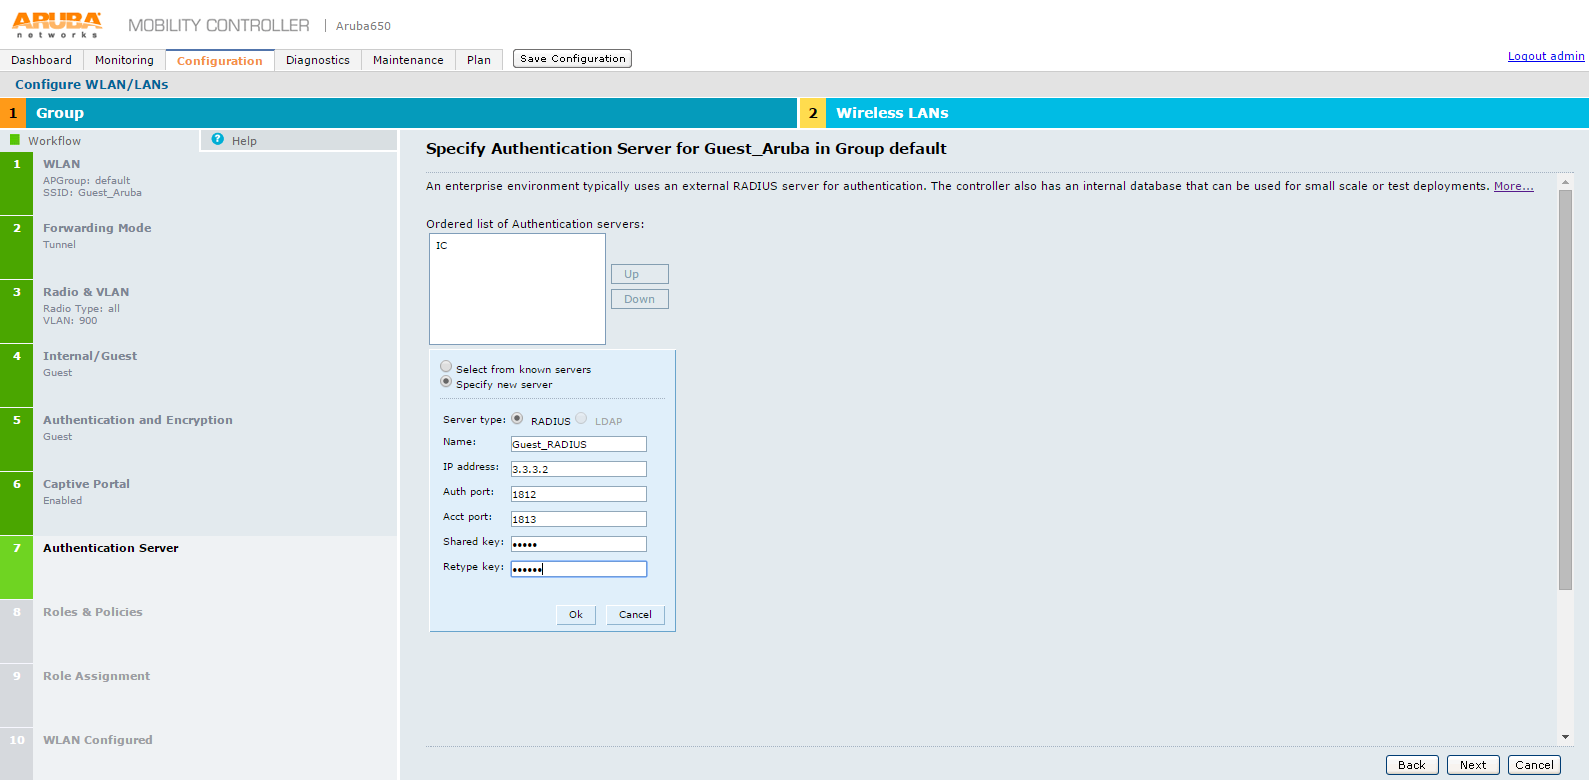
19.On Specify Authentication Server for Guest_Aruba in Group default screen, specify PPS server as the authentication server and click Next.
20.The Specify Roles & Policies for Guest_Aruba in Group default screen appears.
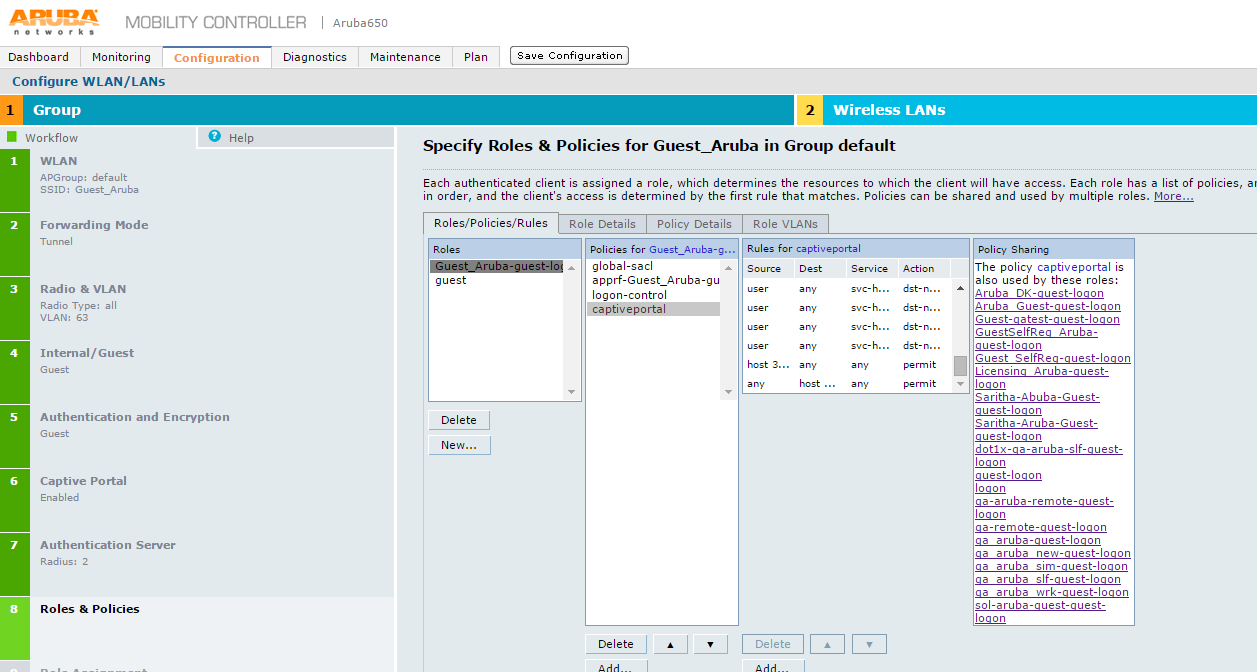
21.On Specify Roles & Policies for Guest_Aruba in Group default screen, configure the roles and click Next. The Configure Role Assignment for Guest_Aruba in Group default screen appears.
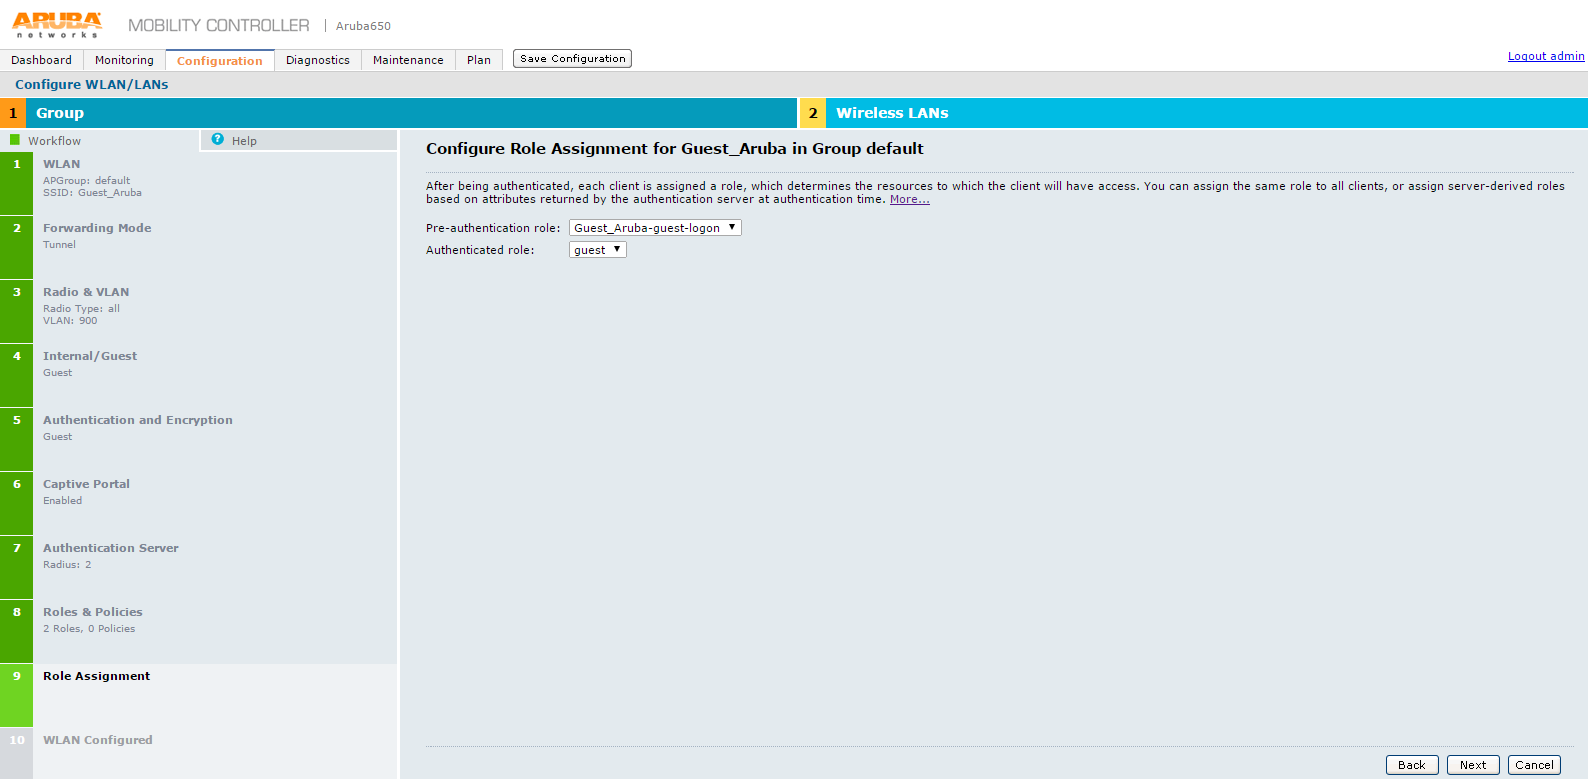
22.On Configure Role Assignment for Guest_Aruba in Group default screen, click Next.
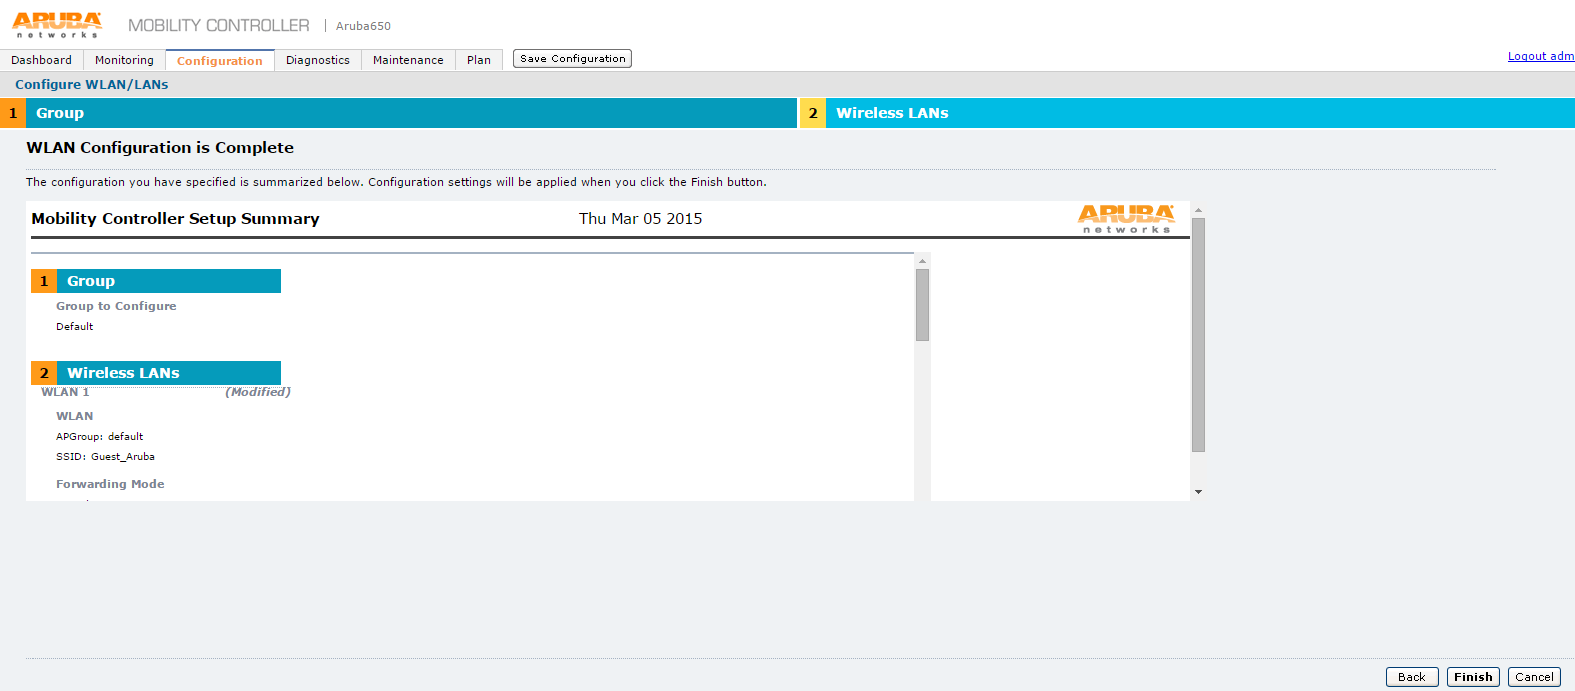
23.The WLAN Configuration is Complete screen appears.
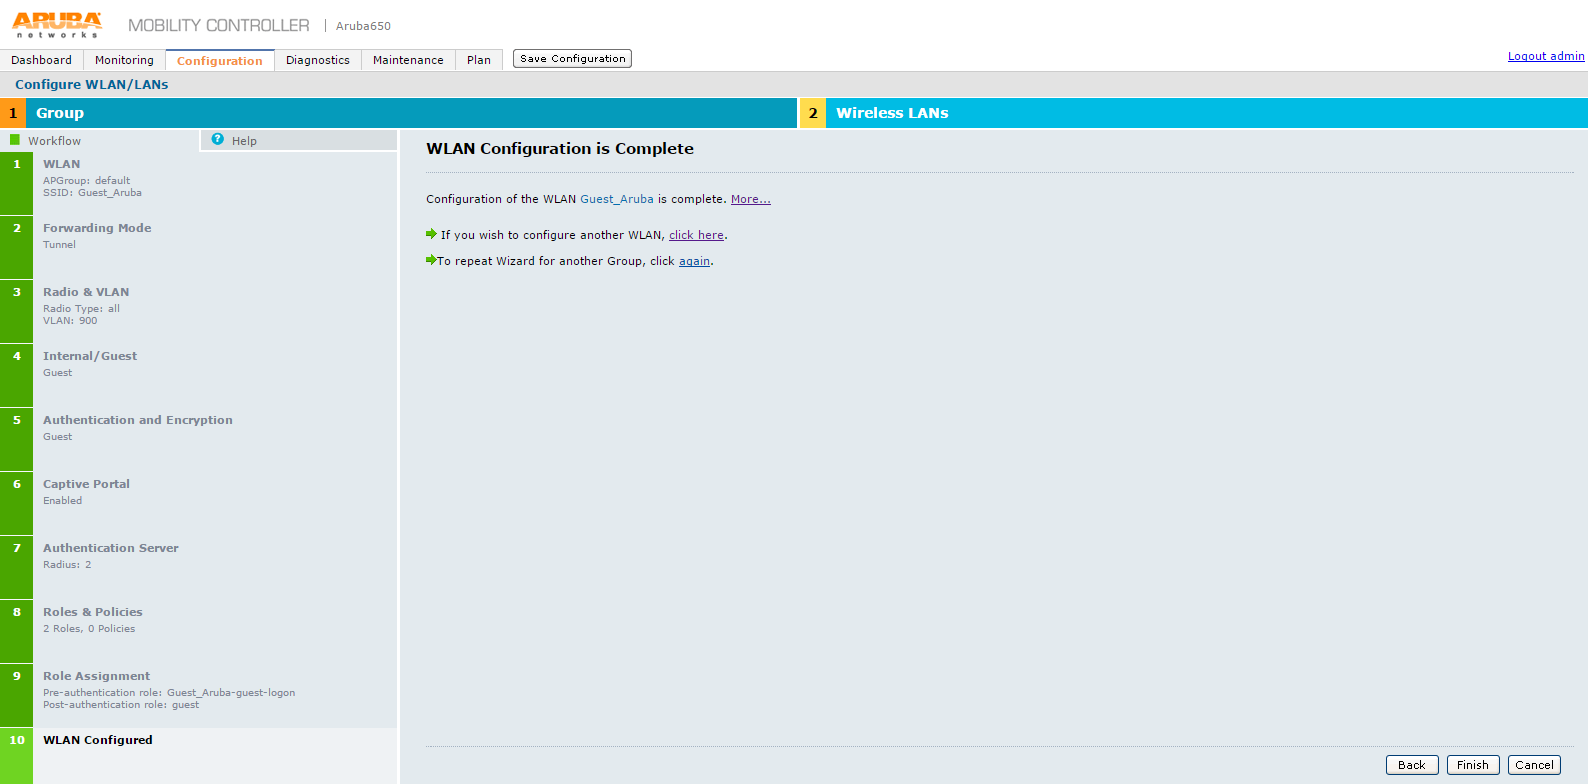
24.Click Finish to complete the configuration.
25.The WLAN Configuration is Complete screen appears displaying the summary of the configuration.
26.Click Finish.
27.The Controller Has Been Configured screen appears.
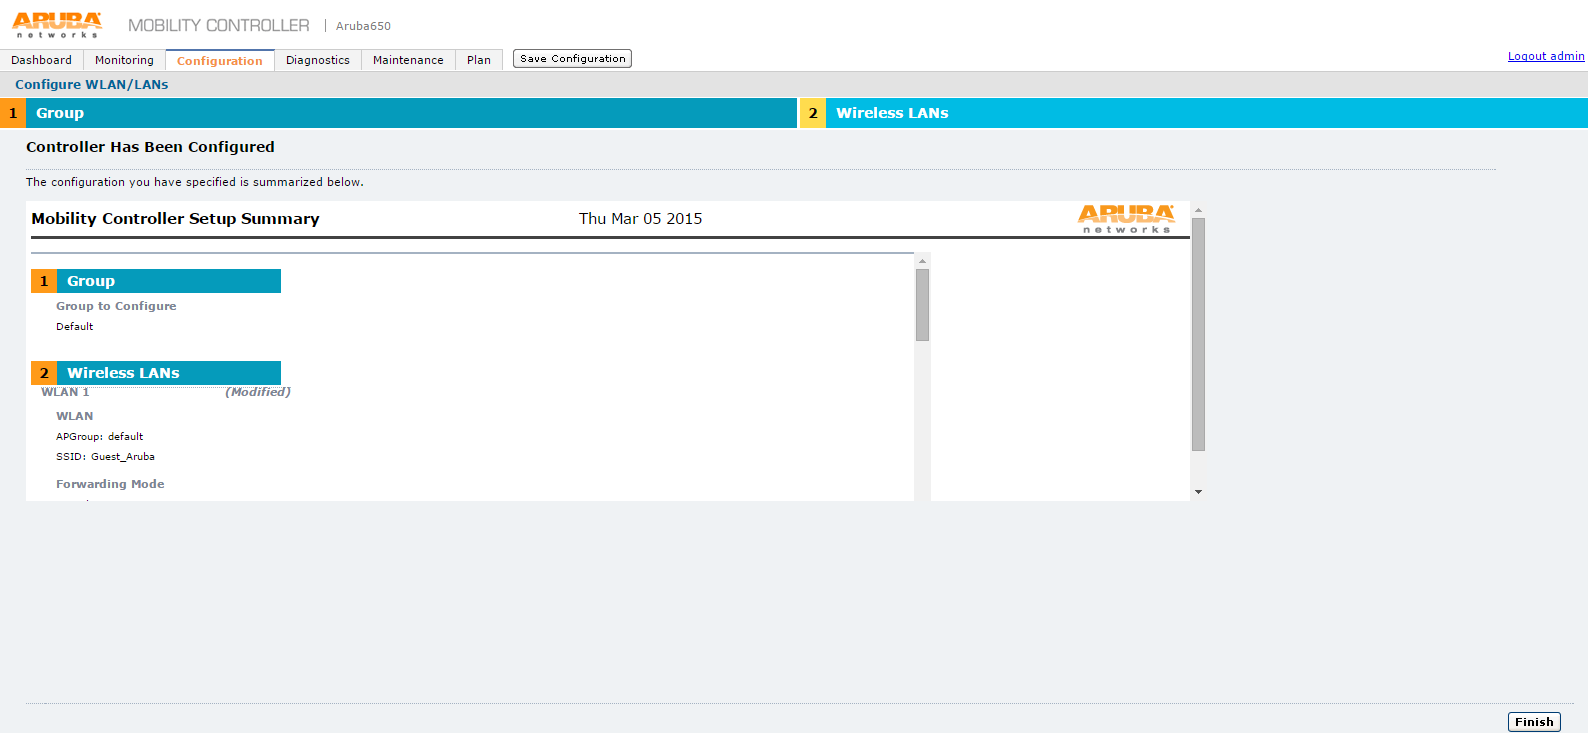
28.Click Finish.
29.The system refreshes and takes you to the Configuration tab.
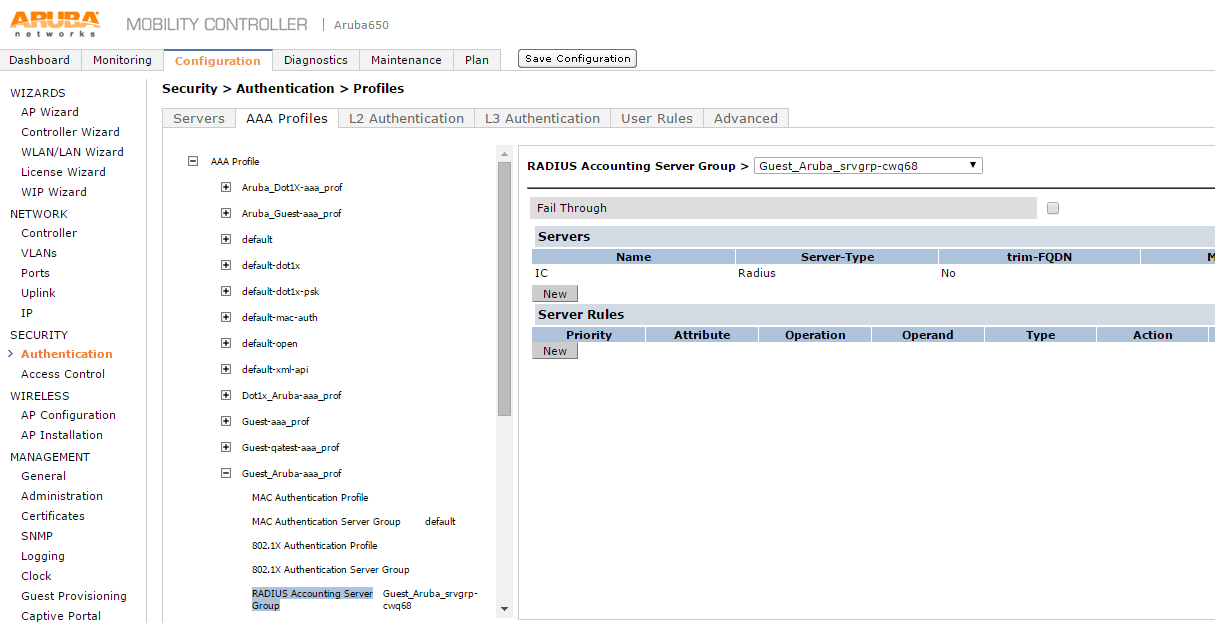
30.Select Security > Authentication > AAA Profiles and click on RADIUS Accounting Server Group.
31.Select an appropriate server group for RADIUS Accounting Server Group.
External Captive Portal Configuration
1.In Aruba WLC select Configuration > Security > Authentication > L3 authentication.
2.The L3 authentication screen appears.
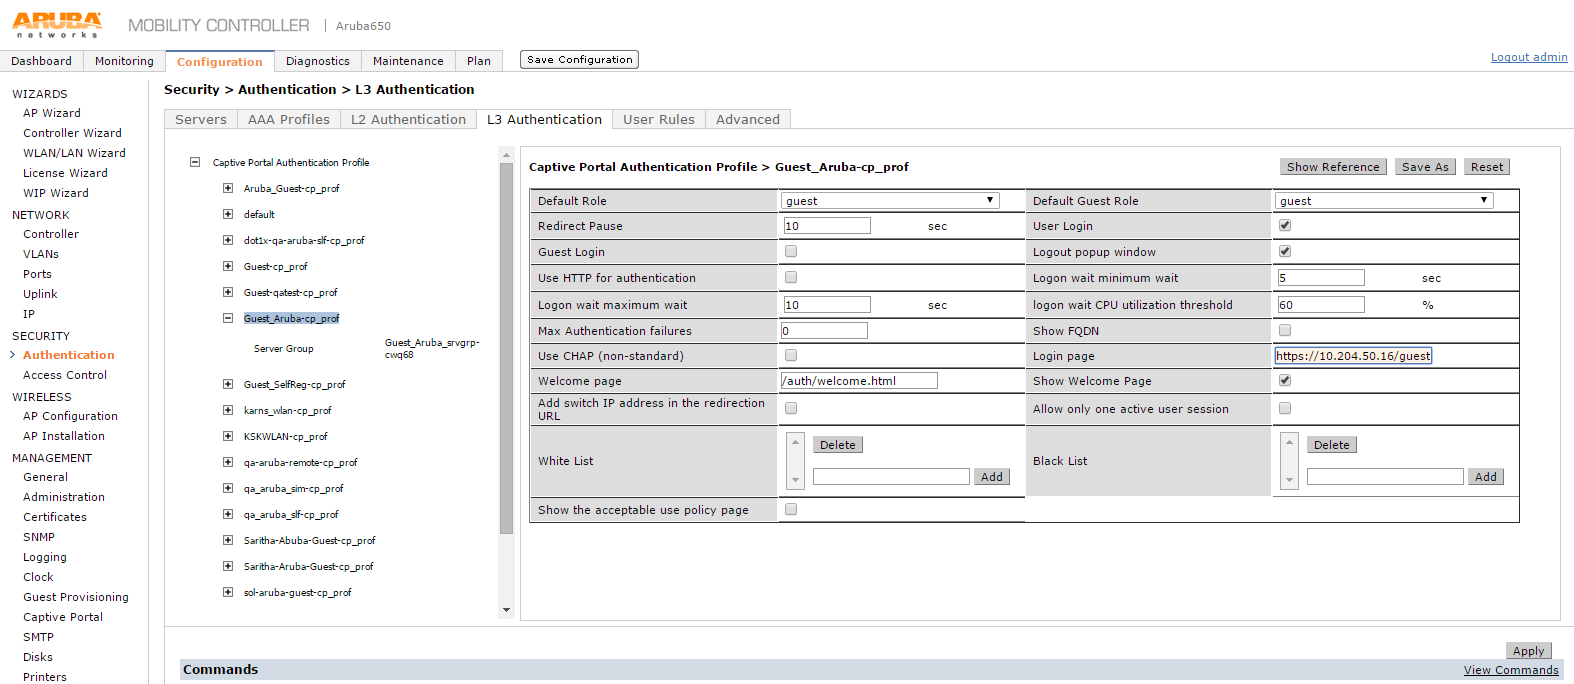
3.Click Captive Portal Authentication Profile. The list expands. Select the corresponding profile of the above configured WLAN.
4.Select the check box Add switch IP address in the redirection URL.
5.In the Login page box enter the PPS guest access URL that is configured as part of PPS configuration.
6.Click Apply to save the configuration.
RFC 3576 server configuration
1.In Aruba WLC go to Configuration > Security > Authentication > Servers tab.
A list of configured servers is displayed.
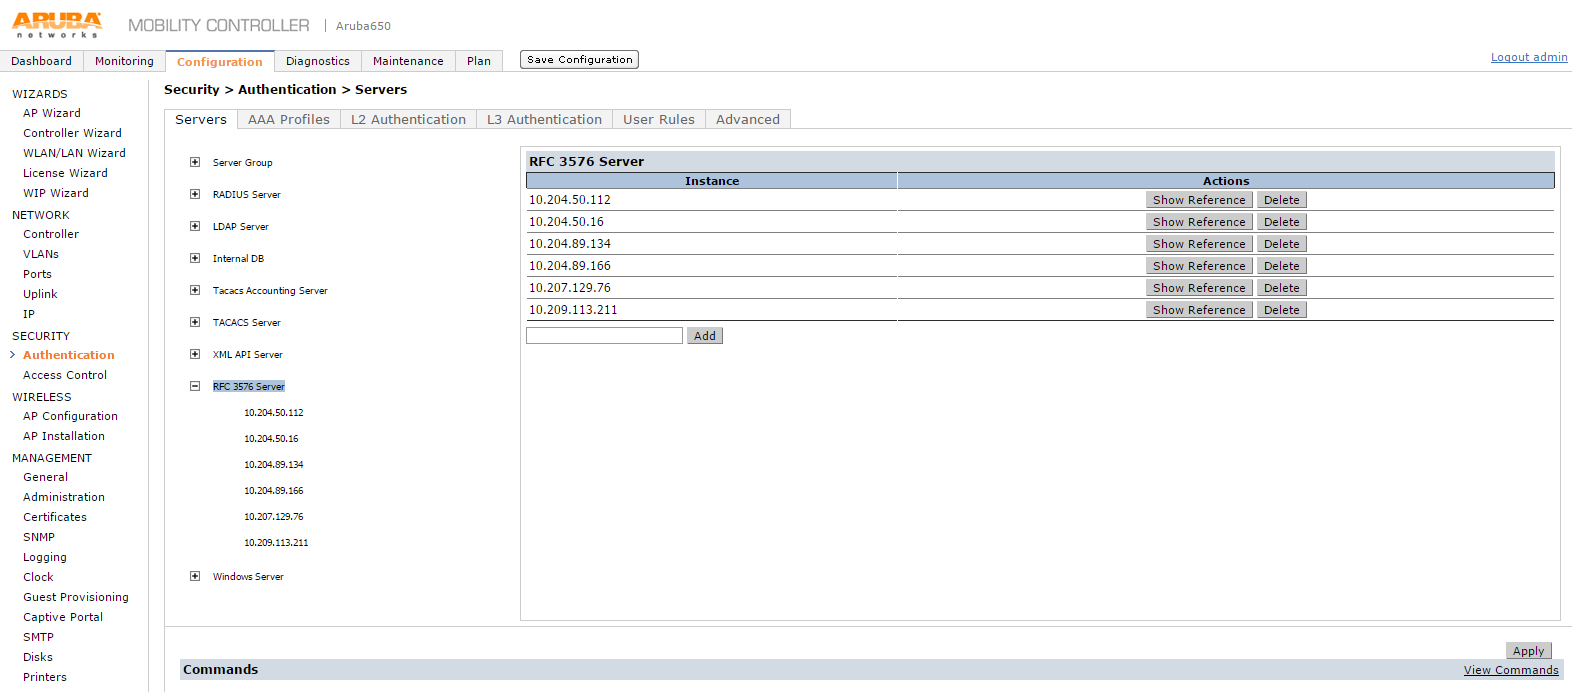
2.Click the RFC 3576 Server and add PPS as RFC 3576 server, for supporting disconnect messages.
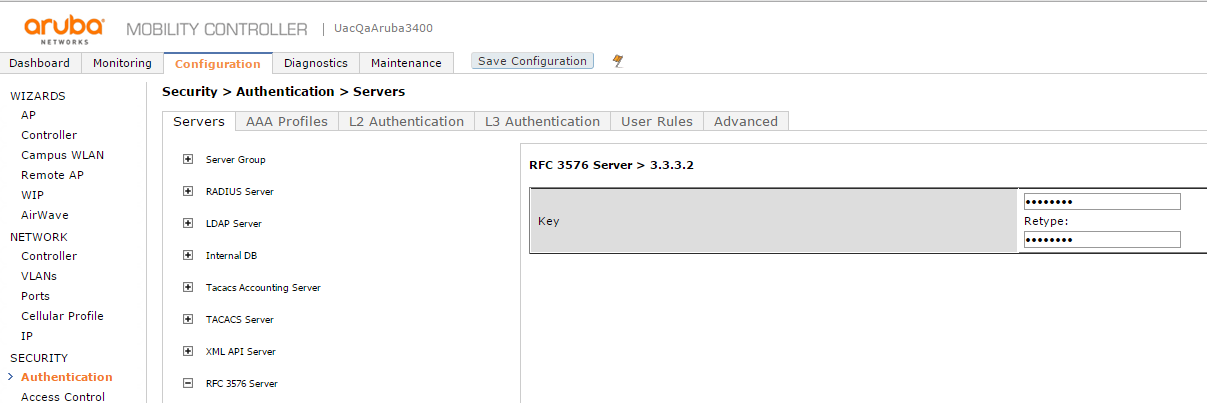
3.Click on the RFC server that is newly created to provide the key.
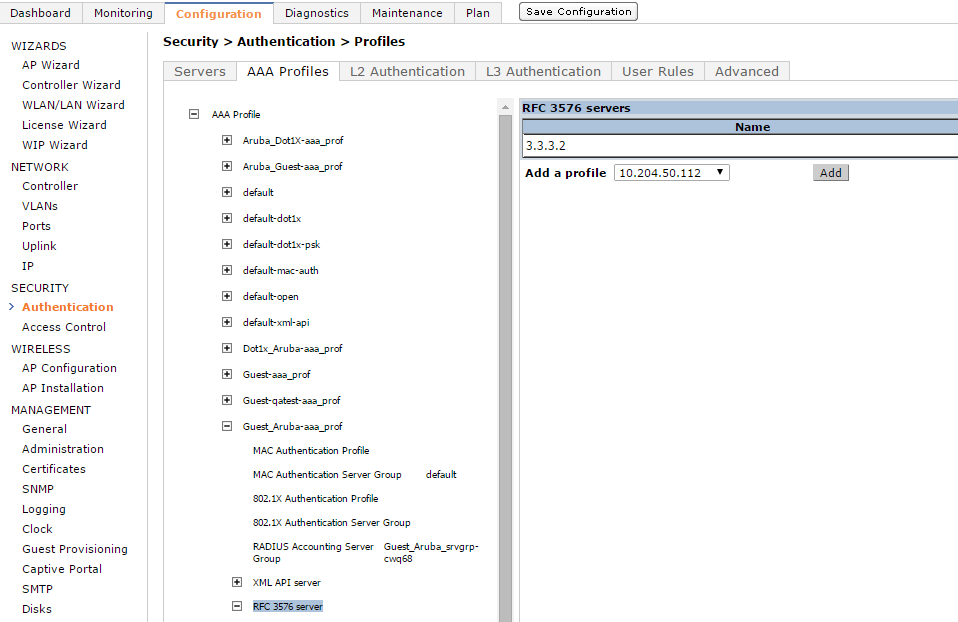
4.Select Security > Authentication > AAA Profiles. Go to AAA profile and click on RFC 3576 server. Add the server that is newly created in step1.
WLAN Configuration for Remote Networking mode on Aruba WLC
1.Login to Aruba WLC. Select Configuration > Wizards >WLAN/LAN Wizard. The Welcome to the WLAN/LAN Configuration Wizard screen appears.
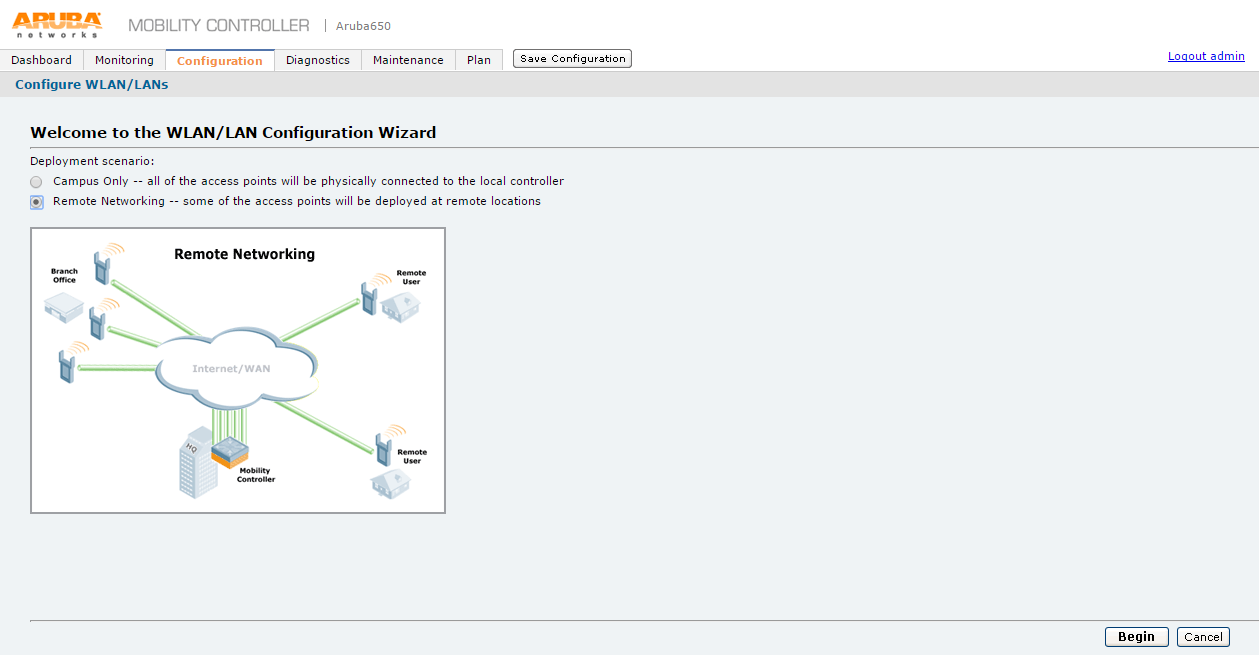
2.Select Remote Networking option and click Begin.
3.The Specify Group to Configure screen appears.
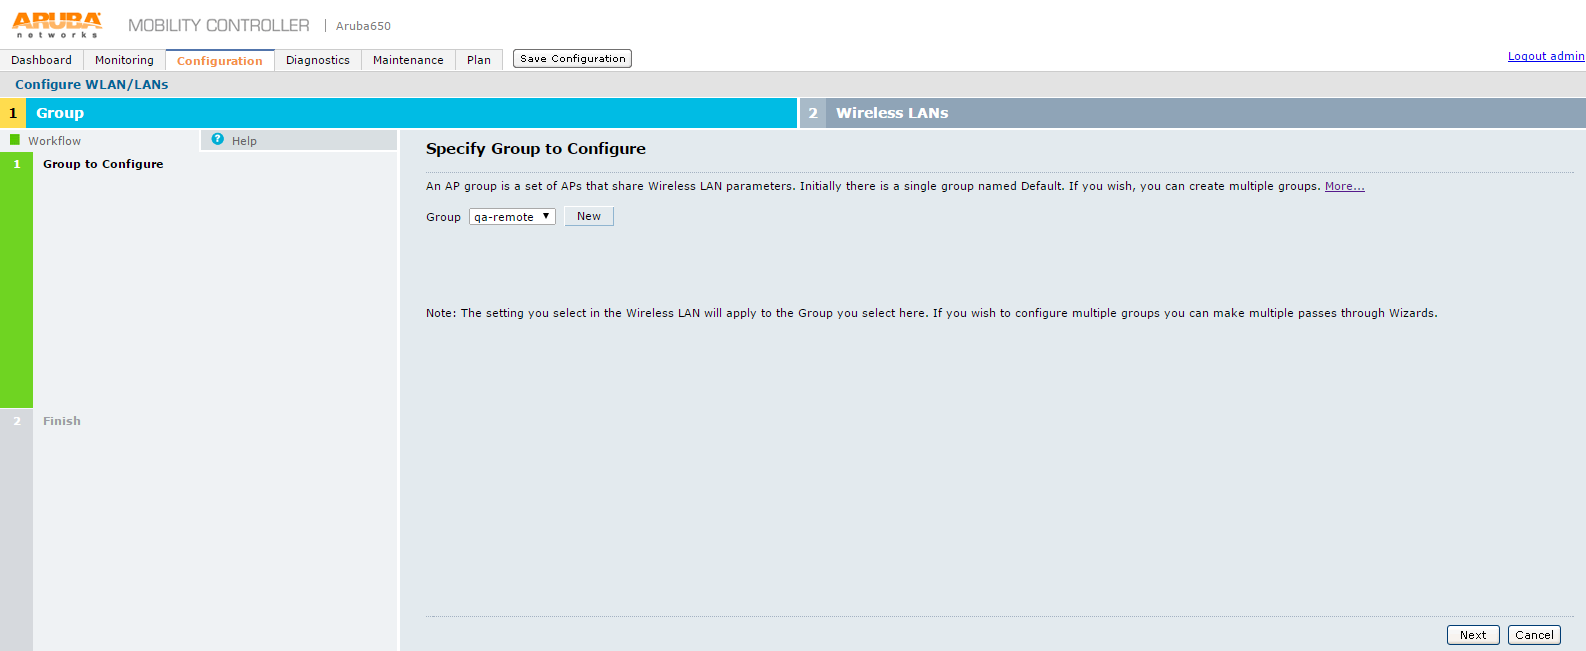
4.On Specify Group to Configure screen, select an AP group and click Next.
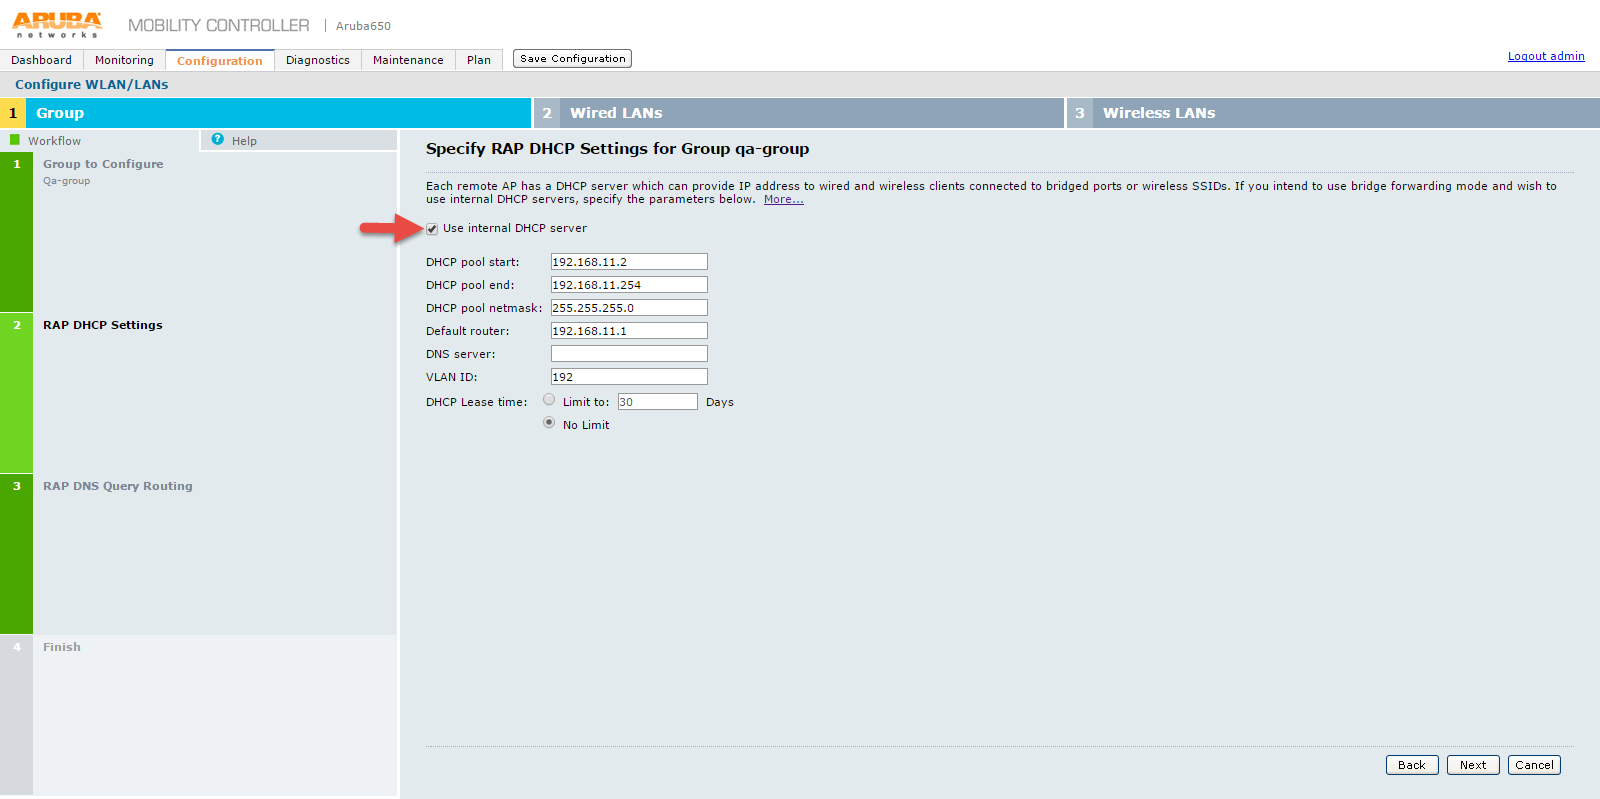
5.On Specify RAP DHCP settings for Group qa-group screen, configure:
•DHCP pool start
•DHCP pool end
•DHCP pool netmask
•Default router
•DNS server
•VLAN ID
•DHCP Lease time – Select the required option and set the limit.
6.Click Next.
The Specify RAP DNS Query Routing for Groups qa-group appears.
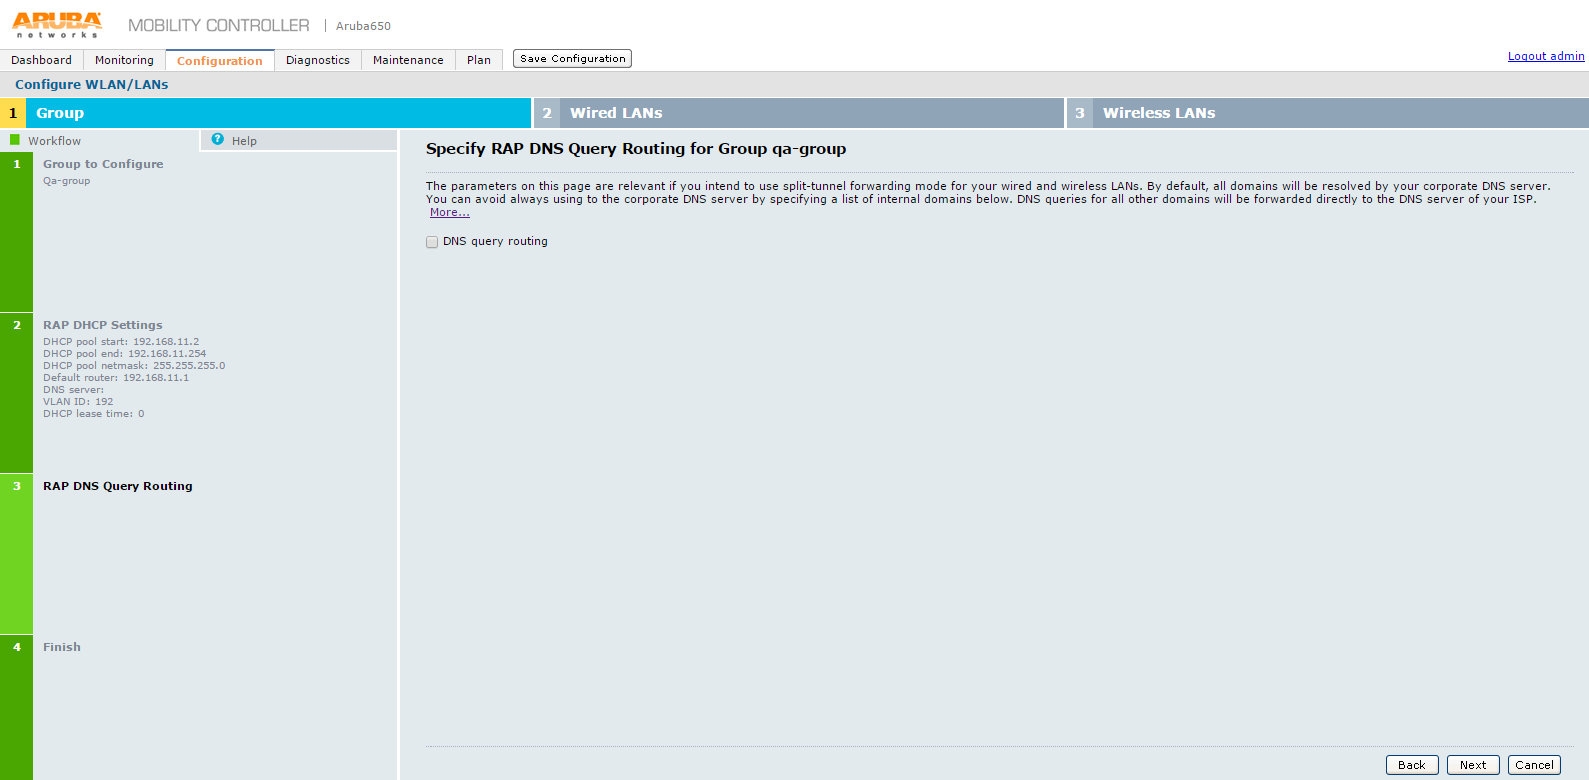
7.On the Specify RAP DNS Query Routing for Groups qa-group screen click Next.
8.The Ready to Configure Wired LANs, and Wireless LANs for Group screen appears.
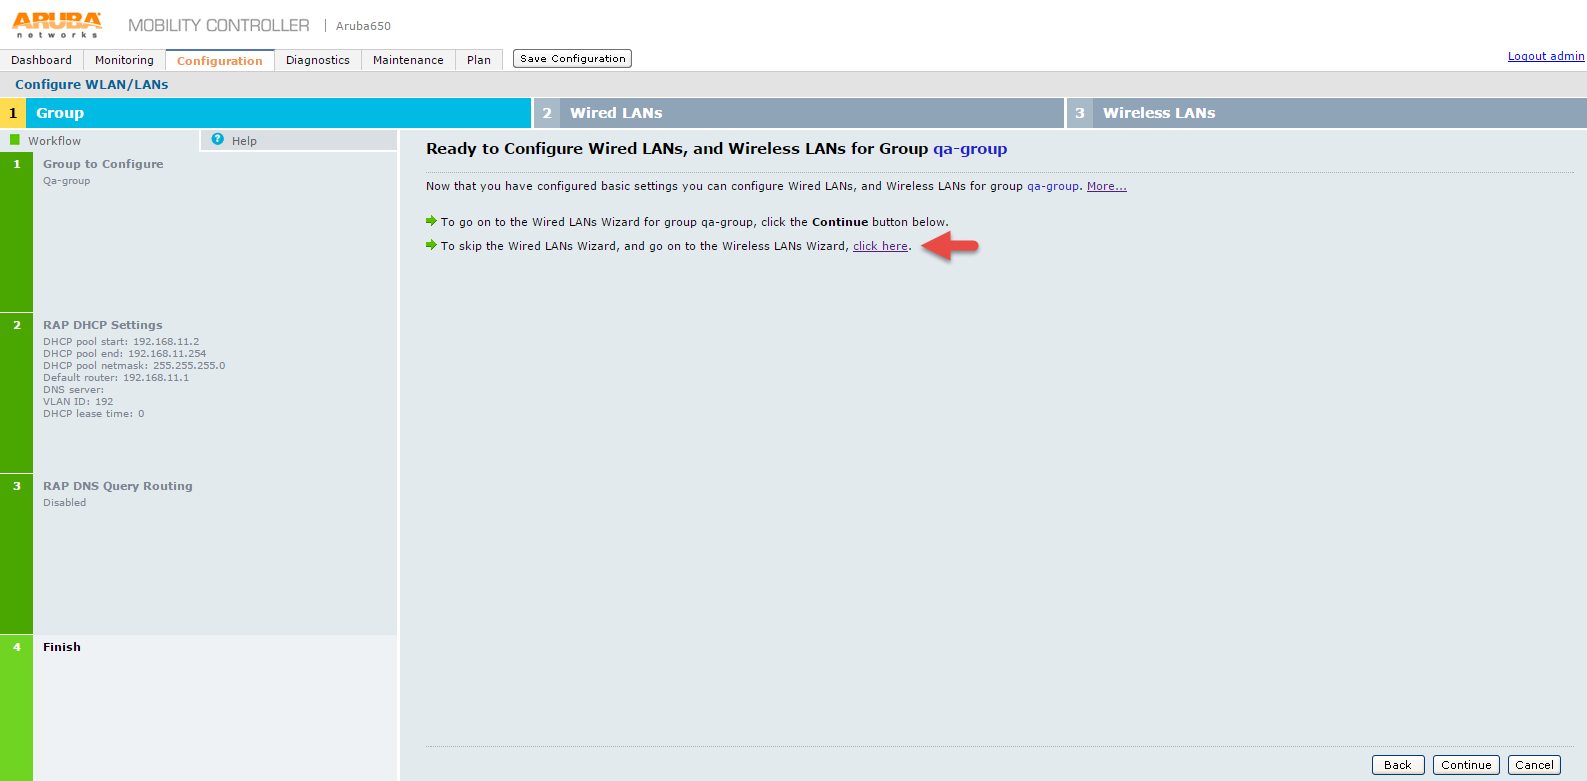
9.On Ready to Configure Wired LANs, and Wireless LANs for Group screen, click Wireless LANs Wizard link.
•Follow the Step 4 to step 18 of Campus Only mode to complete Wireless WLAN configuration.
•Follow External Captive Portal Configuration of Campus Only mode to configure Captive Portal for Remote Networking mode.
•Follow RFC 3576 server configuration of Campus Only mode to configure PPS as RFC 3576 server.
Configuring Aruba WLC in campus only mode using CLI
To configure Aruba WLC for Guest Access in campus only mode via command-line interface, access the CLI in config mode and issue the following commands.
Configuring RADIUS server:
aaa authentication-server radius <RADIUS-profile-name>
host <PPS ip-address>
key <password>
Configuring Server Group:
aaa server-group <server-group-name>
auth-server <RADIUS-profile-name>
Configuring AAA profile:
aaa profile <AAA-profile-name>
Configuring SSID profile:
wlan ssid-profile <ssid-profie-name>
essid <ssid-name>
ssid-enable
no hide-ssid
opmode opensystem
Configuring Captive portal:
aaa authentication captive-portal <CP-profile-name>
login-page <PPS-guest-URL>
switchip-in-redirection-url
server-group <server-group-name>
user-logon
no guest_logon
default-role guest
Creating a User-role:
user-role <Role-Name>
captive-portal <CP-profile-name>
access-list session logon-control
access-list session captiveportal
Attaching initial-role to AAA profile:
aaa profile <AAA-profile-name>
initial-role <role-name>
Configuring Firewall policy rules for PPS: ip access-list session captiveportal
host <PPS-IP> any permit position 1
any host <PPS-IP> any permit position 2
Configuring Virtual-AP and associating SSID profile:
wlan virtual-ap <vap-profile-name>
forward-mode tunnel
vlan <vlan-id>
ssid-profile <ssid-profile-name>
aaa-profile <AAA-profile-name>
Configuring AP group and associating Virtual-AP profile:
ap-group default
# If it is another ap-group, give as required.
virtual-ap <vap-profile-name>
Configuring RFC-3576 server:
aaa rfc-3576-server <PPS-IP>
key <password>
Attaching RFC-3576 server to AAA profile:
aaa profile <aaa-profile-name>
rfc-3576-server <PPS-IP>
Attaching RADIUS accounting server group to AAA profile:
aaa profile <aaa-profile-name>
radius-accounting <server-group-name>
Configuring Aruba WLC in Remote Networking mode using CLI
To configure Aruba WLC for Guest Access in Remote Networking mode via command-line interface, access the CLI in config mode and issue the following commands.
Configuring RADIUS server:
aaa authentication-server radius <RADIUS-profile-name>
host <PPS ip-address>
key <password>
Configuring Server Group:
aaa server-group <server-group-name>
auth-server <RADIUS-profile-name>
Configuring AAA Profile:
aaa profile <AAA-profile-name>
Configuring SSID Profile:
wlan ssid-profile <ssid-profie-name>
essid <ssid-name>
ssid-enable
no hide-ssid
opmode opensystem
Configuring Captive Portal:
aaa authentication captive-portal <CP-profile-name>
login-page <PPS-guest-URL>
switchip-in-redirection-url
server-group <server-group-name>
user-logon
no guest_logon
default-role guest
Creating a User-role:
user-role <Role-Name>
captive-portal <CP-profile-name>
access-list session logon-control
access-list session captiveportal
Attaching initial-role to AAA profile:
aaa profile <AAA-profile-name>
initial-role <role-name>
Configuring Firewall policy rules for PPS:
ip access-list session captiveportal
host <PPS-IP> any any permit position 1
any host <PPS-IP> any permit position 2
Configuring Virtual-AP and associating SSID profile:
wlan virtual-ap <vap-profile-name>
forward-mode tunnel
vlan <vlan-id>
ssid-profile <ssid-profile-name>
aaa-profile <AAA-profile-name>
Configuring DHCP server on Remote AP:
ap system-profile <name>
rap-dhcp-default-router <ipaddr>
rap-dhcp-dns-server <ipaddr>
rap-dhcp-lease <days>
rap-dhcp-pool-start <ipaddr>
rap-dhcp-pool-end <ipaddr>
rap-dhcp-pool-netmask <netmask>
rap-dhcp-server-vlan <vlan>
Configuring AP group and associating Virtual-AP profile:
ap-group default
# If it is another ap-group, give as required.
virtual-ap <vap-profile-name>
ap-system-profile <name>
Configuring RFC-3576 server:
aaa rfc-3576-server <PPS-IP>
key <password>
Attaching RFC-3576 server to AAA profile:
aaa profile <aaa-profile-name>
rfc-3576-server <PPS-IP>
Attaching RADIUS accounting server group to AAA profile:
aaa profile <aaa-profile-name>
radius-accounting <server-group-name>