Configuring PPS using Initial Setup Wizard
This section covers the configuration using initial setup wizard.
You can launch the initial setup wizard using:
•Select Wizards > Initial Wizard > Configure
•Select Wizards > Initial Wizard > Configuration Summary
The configuration summary page shows the configured/ not configured use cases and the corresponding details. It is recommended to configure the use cases using the configuration summary page.
Figure shows the configuration summary page for a fresh installation.

Basic Settings
Configuring System Date and Time
The time synchronization between PPS and another component is very critical. You can easily configure the system date and time using the initial setup wizard. The system date and time can be configured manually or you can configure a network time protocol (NTP) server. It is recommended to use a public NTP server for time synchronization.
To set the system date and time:
1.Select Wizards > Initial Setup > Configure.
2.Select the deployment use case.
3.Select your time zone. Selecting the appropriate time zone enables the system to automatically adjust the time for Daylight Saving Time changes.
•Use NTP Server- Enter the fully qualified domain name or IP address for the NTP server.
•Set Time Manually- Enter the date (MM/DD/YY) and time. You can click Get from Browser to automatically populate the Date and Time.
4.Click Set Date and Time.
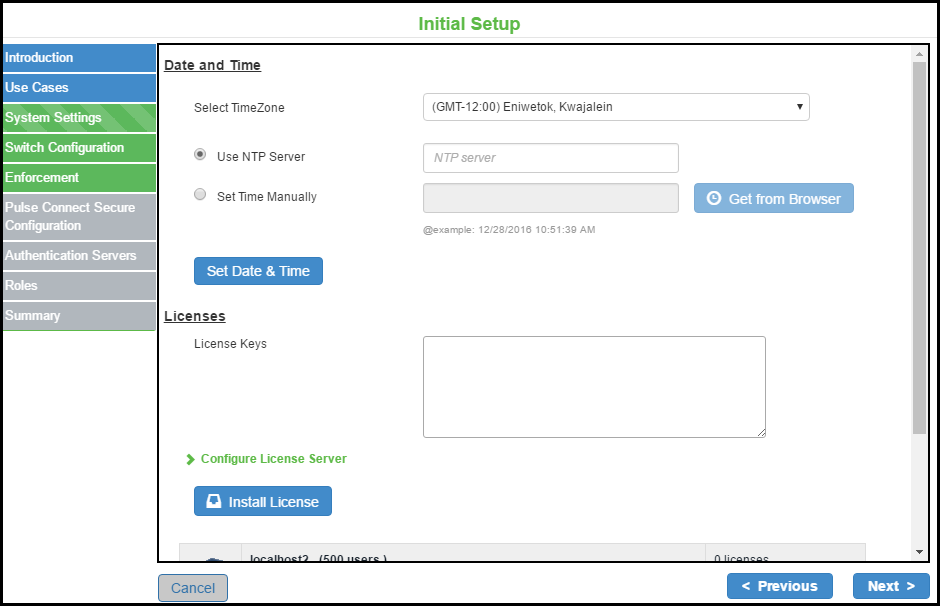
Configuring License
The license can be applied in 2 ways:
•Manually by entering the license key
•License Server
To apply the license manually:
1.Enter the license keys obtained through license key generation.
2.Click Install License.

To configure through the license server:
1.Enter IP address or hostname of license server.
2.Enter a unique ID for the client. This ID is used to communicate and verify the client with the license server.
3.Select the network to communicate with the license server from the Preferred Network menu. The available options are internal (default), external, and management.
4.Select the Verify SSL Certificate check box if you want the client to verify the server's SSL certificate when establishing communication with it.

Configuring Profiling for Network Visibility
Pulse Secure Profiler dynamically identifies and classifies endpoints across managed and unmanaged endpoint devices, so
that access to network and resources can be controlled based on the type of the device. It also helps you to get visibility so that necessary security policies for corporate access, BYOD, and guest access can be enforced.
To enable profiling on your network:
1.Select Enable Profiling to get visibility of devices in the network.

2.Configure system date and time. See Configuring System Date and Time
3.Configure license. See Configuring License
4.You can add an SNMP device manually through Add New Switch configuration or automatically discover SNMP devices through Device Discovery.
5.To discover SNMP v2 devices:
•Select the SNMP version as v2
•Enter the IP address/range and community string.

6.To discover SNMP v3 devices:
•Enter the IP address/range
•Select the SNMP version as v3
•Select the desired Authentication protocol and Privacy protocol.
•Enter the Authentication password and Privacy password.
•Click the search icon.

7.To add a new switch:
•Enter the name and IP address of the switch
•Select the Make/Model of the switch
•Under SNMP configuration, select the SNMP version- v2/v3
•For SNMP v2, enter the read community string.
•For SNMPv3, enter the authentication password, privacy password and select the authentication protocol and privacy protocol.
•Click Save.

8.Click Next.
9.Select Browse and upload the fingerprint database downloaded from the Pulse Secure portal.
10.Select the DHCP sniffing mode that is whether to run the DHCP sniffing on DHCP helper (Internal Port) or RSPAN (External Port).
11.Under WMI configuration, specify WMI profiler user name and password to fetch endpoint information from remote desktops running Microsoft Windows. The WMI profiler collects granular OS level information such as accurate OS version and patch level.
12.Add one or more subnets that can be included or excluded for fingerprinting devices using Nmap target scans. Nmap target scan is only performed on valid IP addresses in the subnet.
13.Enter the subnet details and Click Add.

Configuring Layer 2 Enforcement
The following enforcements are supported for the devices connecting to the network.
•802.1X
•MAC Authentication
•SNMP
Before you begin:
As a best practice, it is recommended to configure Profiling as a first step so that all the network devices are discovered. You can then launch the wizard to configure the enforcement policies on the discovered devices.
To configure enforcement and authentication mechanism:
1.Select Enable enforcement and authentication mechanism for the devices connecting to the network.
Profiling is enabled by default when you enable enforcement and authentication.

2.Configure basic settings. See Basic Settings.
3.Configure the switch. Complete the configurations as described in table.
|
Discover Switches |
|
|
SNMP v2 |
•Enter the IP address/range and community string. •Enter the IP address/range •Select the desired Authentication protocol and Privacy protocol. •Enter the Authentication password and Privacy password. •Click the search icon. |
|
SNMP v3 |
|
|
Add New Switch |
|
|
Name |
Enter a name to label the RADIUS client. You can assign any name to a RADIUS client entry, use the device's SSID or IPv4/IPv6 address to avoid confusion. |
|
IP Address |
Enter the IPv4/IPv6 address of the switch. |
|
Make/Model |
Select the make/model of the switch vendor. The make/model selection tells PPS which dictionary of RADIUS attributes to use when communicating with this client. |
|
RADIUS Client Configuration |
|
|
IP Address Range |
Enter the number of IP addresses in the IP address range for the switch/WLC, starting with the address you specified for IP Address. You can specify a range up to a maximum of 32,768 addresses. |
|
Shared Secret |
Enter the RADIUS shared secret. A RADIUS shared secret is a case-sensitive password used to validate communications between PPS and switch. |
|
SNMP Configuration |
|
|
SNMP Version |
•Select the SNMP version (v2/v3). •For SNMP v2, enter the read community string. •For SNMPv3, enter the authentication password, privacy password and select the authentication protocol and privacy protocol. •Select Use for enforcement to use the SNMP device for SNMP enforcement. |


4.Configure the enforcement for devices, which includes laptops, smart phones, VOIP phones, and unmanaged devices.
If profiling is enabled the device platform types are automatically enabled.
|
Device Type |
Platforms |
Authentication Type |
Additional Support |
|
Laptops |
•Windows •MAC •Linux |
•802.1X •SNMP |
Host Checker |
|
Smart phones |
•Android •iOS |
802.1X |
NA |
|
VOIP phones |
NA |
•802.1X •MAC |
NA |
|
Unmanaged devices |
NA |
MAC |
NA |
5.Enter the SSID for 802.1X. Use comma as a delimiter for entering multiple SSID's.

Importing Configurations from Pulse Connect Secure
Importing Configurations from Pulse Connect Secure
The existing configurations in PCS can be imported to PPS for quickly configuring the PPS device.
The following configurations can be imported from PCS:
•Authentication servers
•Role names
•Host Checker compliance policies
To import the PCS device configurations to PPS device:
1.Select Fetch configuration details from another Pulse Connect Secure server.
2.Enter the PCS sign-in URL.
3.Enter the admin username.
4.Enter the password
5.Enter the realm information.
6.Click Fetch. The list of imported authentication servers, roles, and Host Checker compliance policies are displayed.
If you try to import the configuration multiple times. The configurations will be overwritten with the newer configuration.

Authentication Server
Authentication server is used for authentication and verifying group membership. It validates the user credentials and then provides the required access. It also maps users to roles based on either Light Weight Directory Access protocol (LDAP) or Active Directory (AD) group information. The initial setup wizard supports AD and LDAP authentication servers for user authentication. LDAP is supported for device authentication based on MAC address.
To add the authentication server:
1.Select the Server Type (AD/LDAP).

2.For Active Directory, enter the server name, user credentials, Kerberos realm, and domain. You can click Test to verify the configuration.

3.For LDAP, enter the server name, LDAP server type (Generic, AD, iPlanet, Novell eDirectory, Profiler), connection type, filter, admin DN, base DN, unique variable for filtering, group member attribute, and group base DN.

4.Configure the required authentication server for user authentication and machine authentication.
Roles
A user role defines user session parameters (session settings and options) and personalization settings (user interface customization).
You can reuse the roles imported from PCS and then configure the VLAN and group information.
To add a role name:
1.Enter the role name and VLAN information.
2.Select the AD group or LDAP group.
If the AD or LDAP group information is not available you must add the group information manually.
3.Click Add (+) icon.
4.Enter the remediation role and the VLAN information.
5.Enter the role name and the VLAN information for unmanaged devices.

Compliance Check
PPS offers a variety of endpoint host checks to ensure compliance, including predefined checks for third-party endpoint security software including anti-virus, firewall, anti-malware/anti-spyware applications.
You can reuse the compliance policies from PCS.
To configure PPS for endpoint compliance:
1.Enter the rule name.
2.Select the platform type- Windows, Linux, MAC.
3.Select the rule type.
Antivirus, Firewall, and Process policies are supported for Windows and MAC platforms. Process policy is supported for Linux platform.
4.To enable remediation action, select Enable Remediation Action.
5.Click + Add.

Configuring Guest Authentication
Guest access feature on PPS enables guest users to access the network through a self-registration process. The guest users self-register for network access from their device. Upon successful registration, the guest users are notified with the user credentials and other details through SMS or email.
To configure guest authentication:
1.Select Wizards > Initial Setup > Configuration Summary.
2.Select Enable guest access for providing access to guest users.

3.Enter the VLAN information for the guest user.

4.(Optional) Select Create Guest Administrator Account and enter the username and password.
5.(Optional) Select Enable Self Registration.
The SMTP and SMS configuration settings must be configured to enable guest users to create user accounts on their own.
6.(Optional) Select Send Email to Guest Users and then enter the IP address or host name of the SMTP server, email address, and log in credentials of the SMTP server.
7.(Optional) Select Send SMS to Guest Users and then select the SMS gateway type, gateway URL, SMS gateway log in credentials, API ID, and the mobile number of the guest user.
8.Configure the switch as described in table.
|
Add New Switch |
|
|---|---|
| Name | Enter a name to label the RADIUS client. You can assign any name to a RADIUS client entry, use the device's SSID or IPv4/IPv6 address to avoid confusion. |
| IP Address | Enter the IPv4/IPv6 address of the switch. |
| Make/Model | Select the make/model of the switch vendor. The make/model selection tells PPS which dictionary of RADIUS attributes to use when communicating with this client. |
|
RADIUS Client Configuration |
|
| IP Address Range | Enter the number of IP addresses in the IP address range for the switch/WLC, starting with the address you specified for IP Address. You can specify a range up to a maximum of 32,768 addresses. |
| Shared Secret | Enter the RADIUS shared secret. A RADIUS shared secret is a case-sensitive password used to validate communications between PPS and switch. |
