IoT Access
IoT Policy Provisioning
This chapter provides an overview of IoT device enforcement using SRX/PAN firewall.
Overview
As we increasingly connect devices to the Internet, new opportunities to exploit potential security vulnerabilities grow. Any unknown devices including IoT devices could serve as entry points for cyberattack by allowing malicious individuals to re-program a device or cause it to malfunction. The IoT devices are being added to corporate networks with or without the knowledge of IT administrator and they may communicate using the corporate IP network. These devices may have limited security controls leaving them open to be used as an attack vector. To improve security posture of IoT devices in corporate network, visibility and Role Based Access Control play a key role. Hence, it’s extremely important to detect and classify what’s there on the network.
PPS along with Profiler enables you to secure and manage access to IoT devices. It allows you to configure IoT Access Policy based on discovered or profiled device category. It also allows you to dynamically configure resource access policies for newly discovered devices and map user's role-based access to specific category and manufacturer or profile group of IoT devices.
Benefits
The IoT Policy Provisioning Page enables you to quickly configure IoT policy provisioning and provides the following benefits:
•Discover and profile IoT devices using Profiler. Profiler enables you to continuously monitor the network and discover new devices such as security cameras, sensors, Industrial IoT devices (IIoT), medical sensors, and so on.
•PPS provides IoT access control using the IoT Access Policies, which are created automatically based on profiled or newly discovered device information from Profiler.
•Reduce IoT/IIoT machine downtime by allowing authorised users to get a role-based access to specific IoT/IIoT device for troubleshooting/maintenance.
•Automatic access control for the newly discovered IoT devices.
Deployments
The below network diagram depicts how PPS, Profiler, and SRX/PAN Firewall can be deployed to protect access to IoT devices. For example, the manufacturing domain consists of different IoT devices to monitor and control the manufacturing process. The industrial IoT devices are separated and controlled behind the firewall. PPS enables you to define IoT Access Policy using the Profiler attributes (category and manufacturer or profile group) and provides secure and seamless access to IoT devices for authorized users.
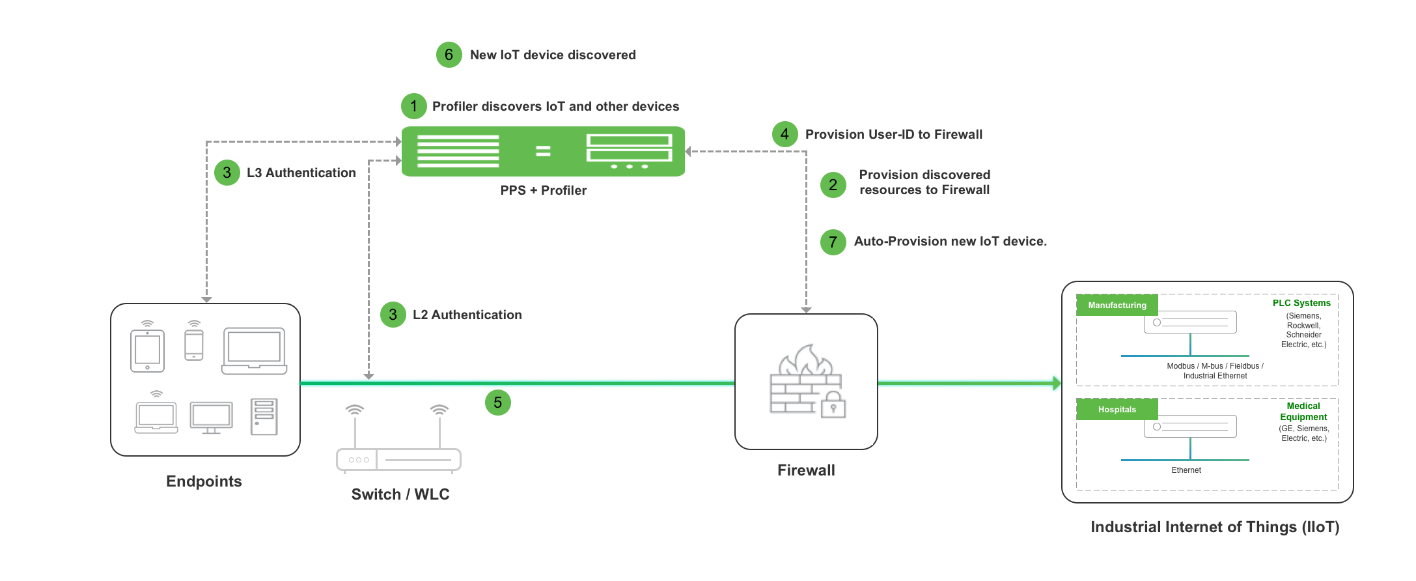
The workflow is described below:
1.A local Profiler configured on PPS discovers devices including IoT devices connected to corporate network.
2.PPS leverages the list of IoT devices discovered using Profiler and based on device category and manufacturer or profile group and it enforces or controls the access to IoT devices protected by the firewall.
3.User authenticates to PPS and endpoint compliance is evaluated. The user session is created on PPS and appropriate role is assigned based on the compliance check and user ID.
4.User Identity details (AuthTable) are provisioned to firewall.
5.User tries to access IoT devices protected by firewall. Authorised users (based on roles) are allowed to access IoT devices. Access to IoT devices by unauthorised users is blocked.
6.A new IoT device is added to the corporate network and same is discovered by Profiler.
7.IoT Access Policy for the newly discovered IoT device is automatically pushed to SRX/PAN firewall.
Only Local Profiler is currently supported.
The Administrator can group the discovered devices based on any Profiler attributes. For more information see, Configuring Profiler Groups.
Configuring IoT Policy Provisioning
This section covers the procedure for configuring IoT Policy Provisioning on PPS.
Pre-Requisite
IoT Policy Provisioning requires Profiler feature. You must install the Profiler license on PPS to enable it.
Summary of Configuration
A high-level overview of the configuration steps needed to set up IoT Policy Provisioning is shown below.
Step 1: Configure Profiler
Step 2: Configure SRX/PAN Enforcer
Step 3: Configuring IoT Access Policy
Step 3.1: Viewing Devices in Enforcer Policy Report
Step 3.2:Configuring IoT Access Policy using Juniper SRX Firewall
Step 4: Configuring Additional Device Category/Profile Groups
Basic Configurations
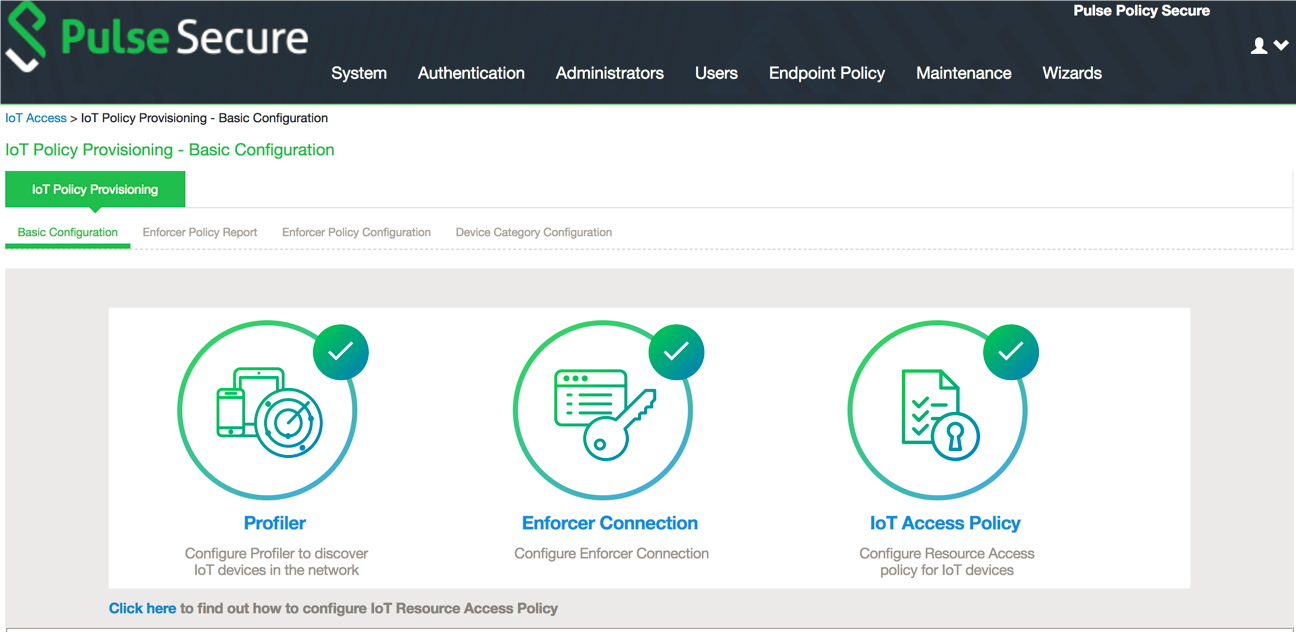
•The basic configuration page enables you to configure Profiler to discover IoT devices in the network,
•Enforcer to push the user identity information to PPS, and IoT Access Policy for IoT devices.
To launch the configuration page:
1.Select Endpoint Policy > IoT Access > IoT Policy Provisioning.
2.Click Basic Configuration.
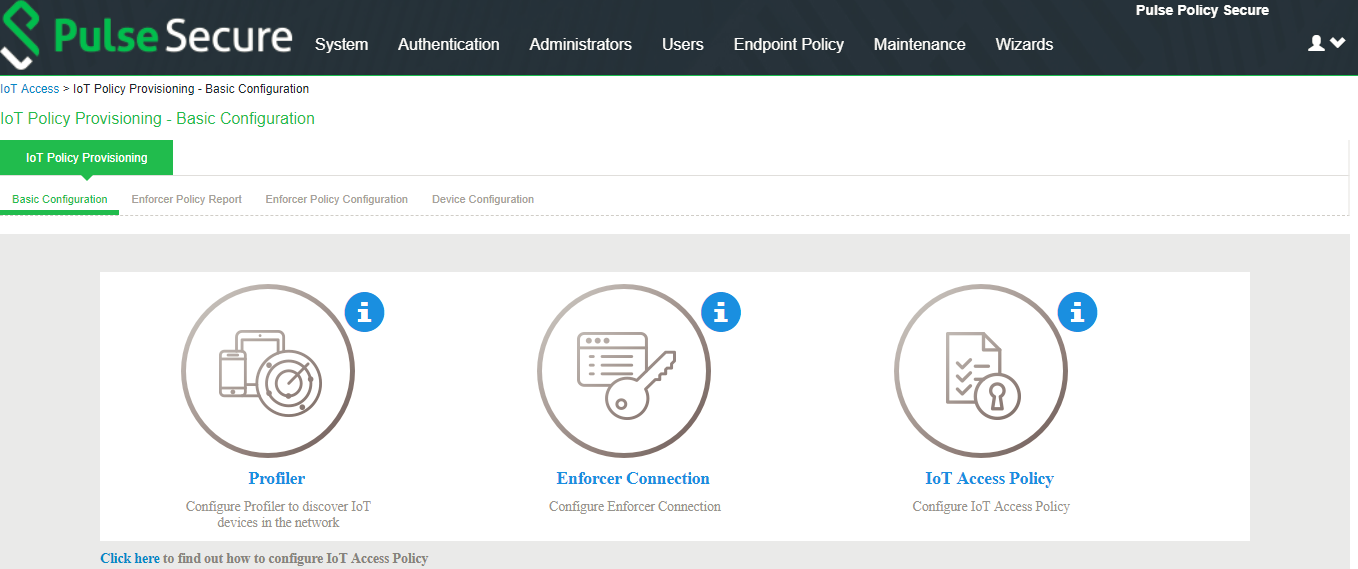
If PPS is already configured with Profiler and Enforcer. The configurations will be reused.
3. Configure the Profiler used to discover the IoT devices in the network. Click Profiler and configure the local Profiler. See Profiler Deployment Guide for complete configuration.
•The icons in the configuration page indicate the status of configuration.
•Green Tick mark refers that this section is configured correctly.
•If the configuration section is in grey color, it indicates that the section is not configured.
•Information icon refers that this section has to be configured.
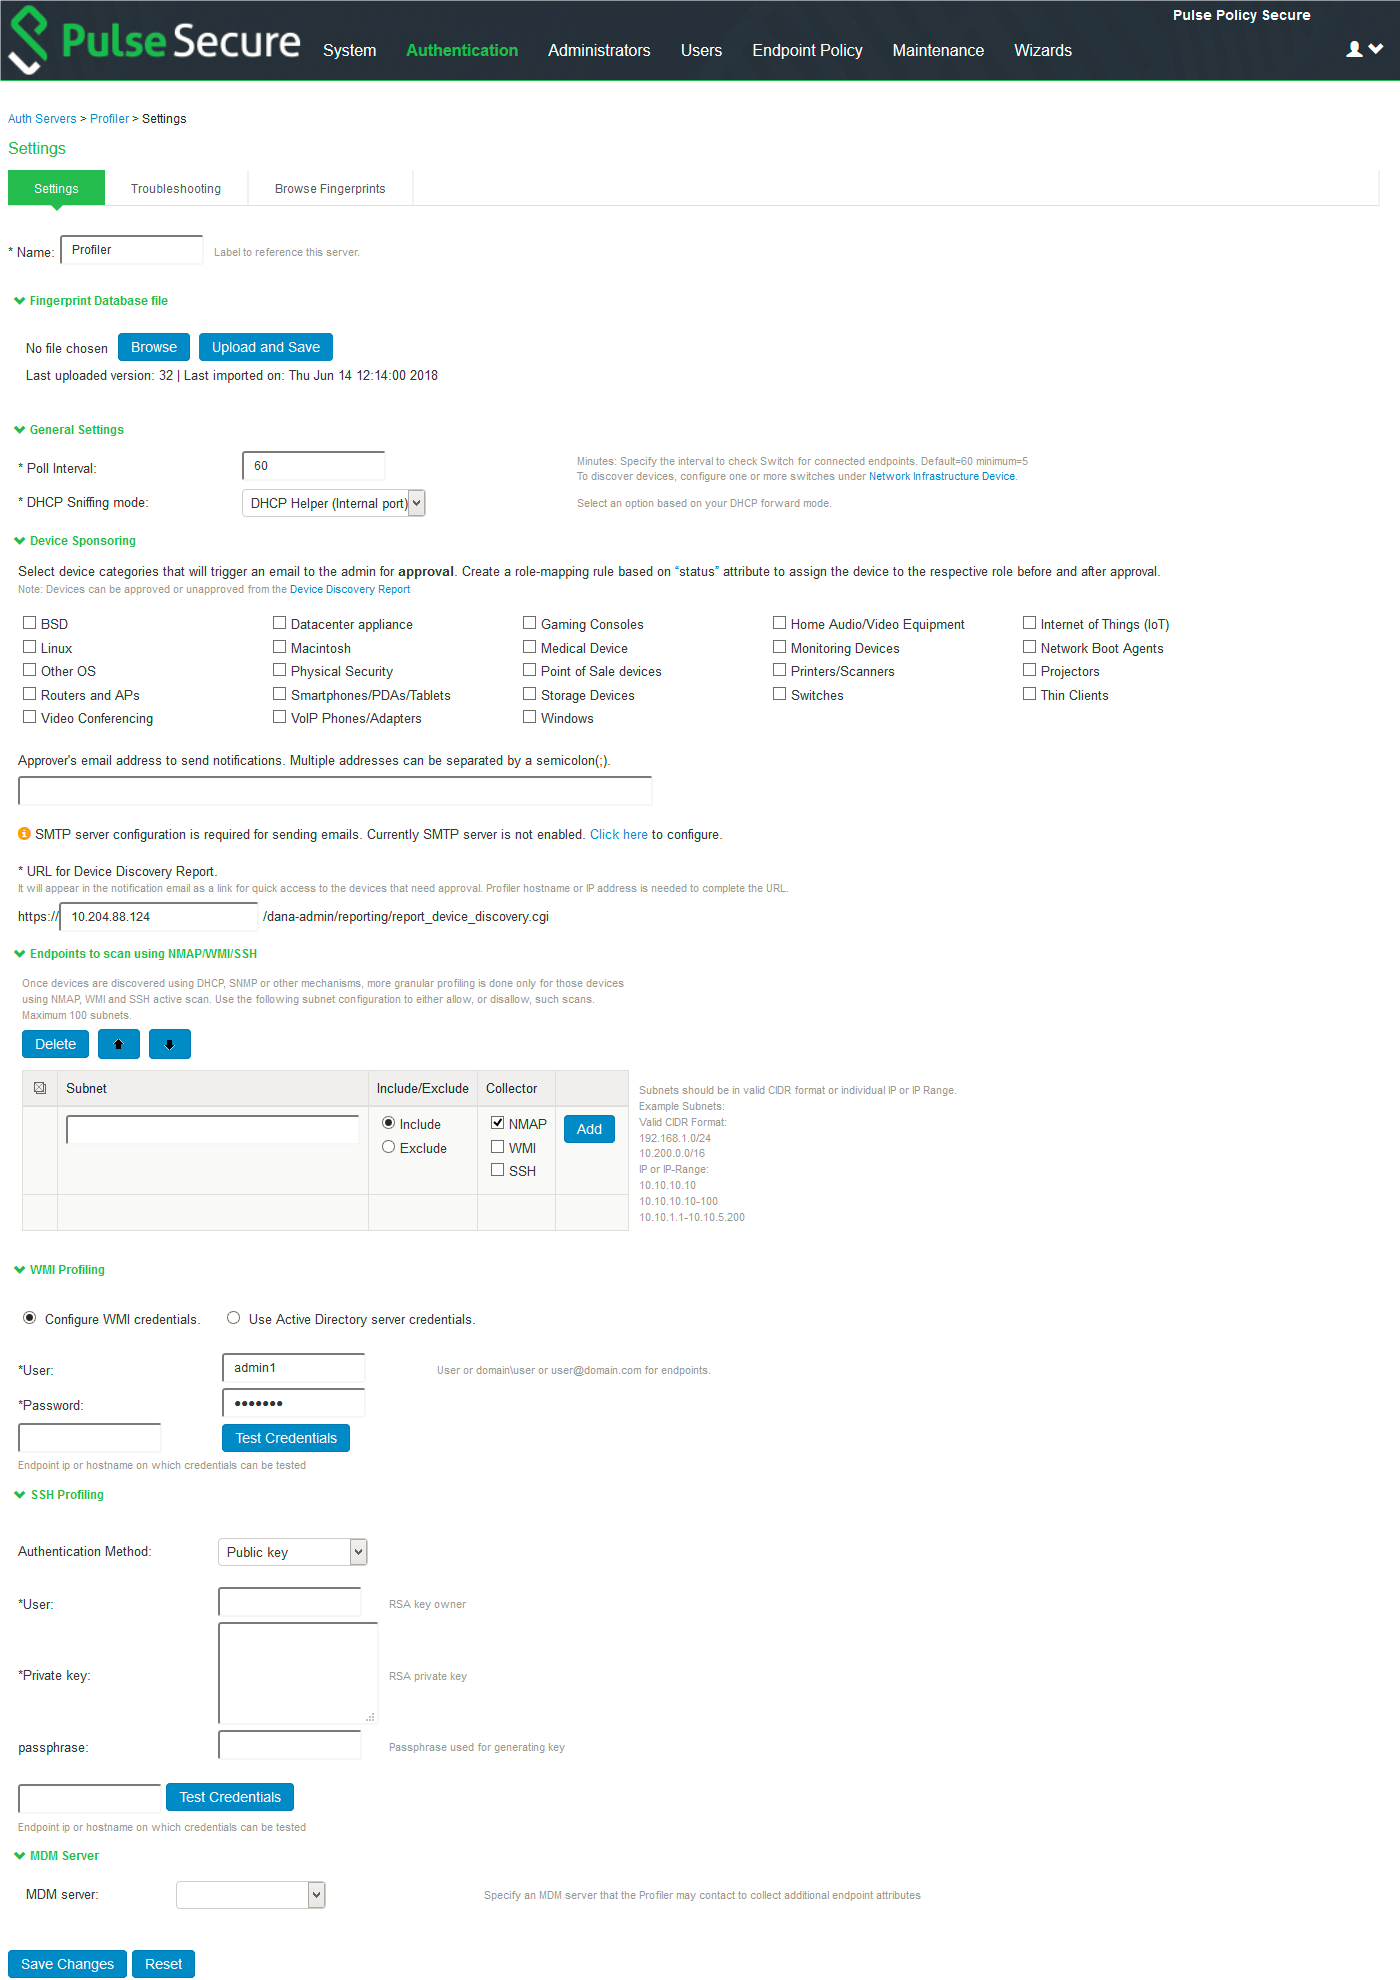
4.Configure the SRX/PAN Enforcer. Click Enforcer Connection and add SRX/PAN as a New Enforcer.
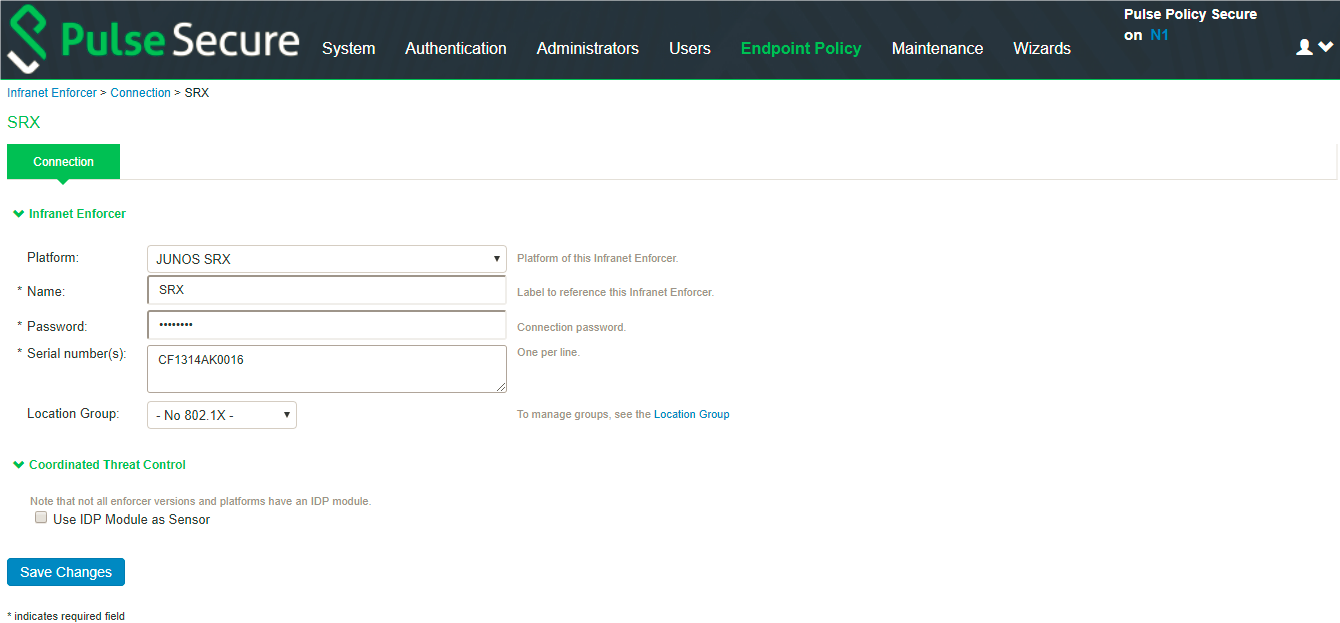
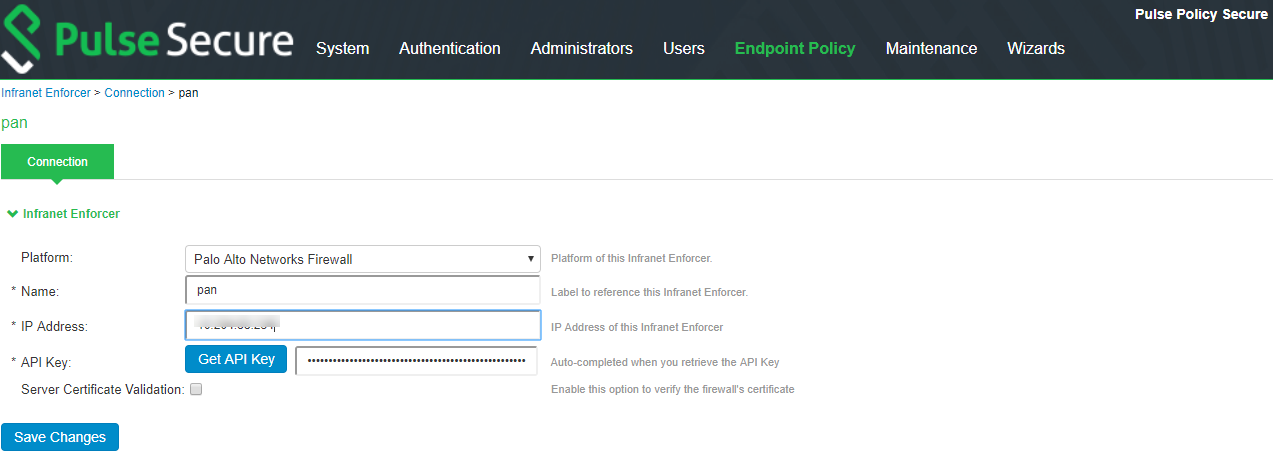
Once the configuration is complete and successful, the Administrator can see the configuration status as shown in figure.
Configuring IoT Access Policy
Viewing Devices in Enforcer Policy Report
This page provides details of discovered and connected IoT device's and firewall policies applied for IoT devices. You can view details such as total number of IoT devices, number of IoT devices enforced, number of IoT devices not enforced, and IoT device manufacturers.
To view the enforcer policy report:
1.Select Endpoint Policy > IoT Access > IoT Policy Provisioning.
2.Click Enforcer Policy Report.
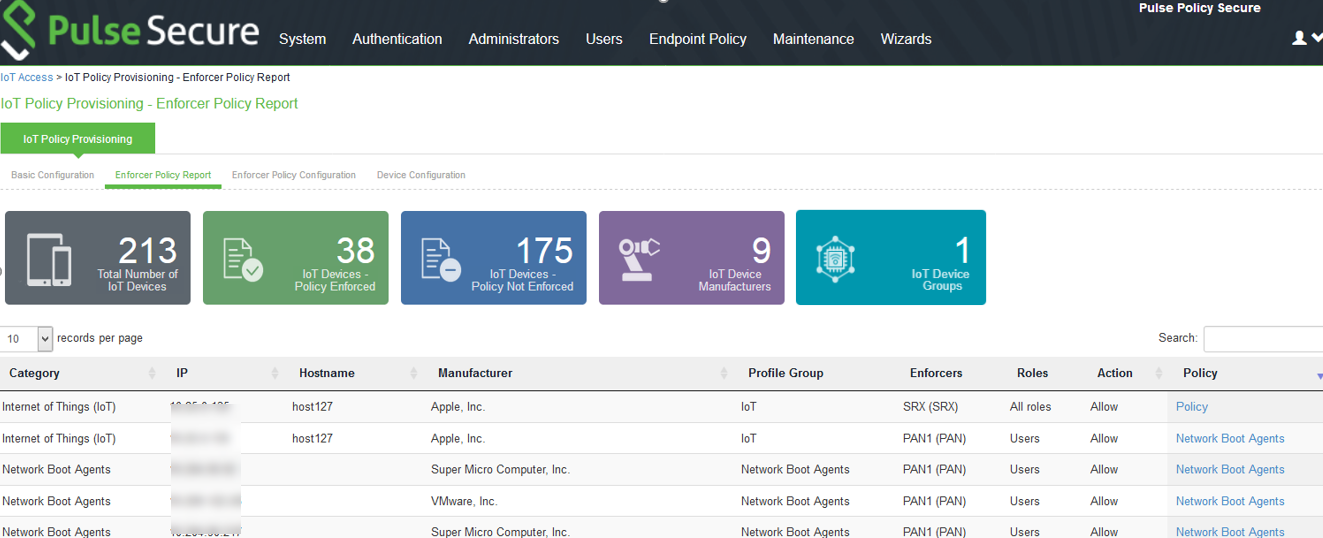
Configuring IoT Access Policy using Juniper SRX Firewall
The IoT access policy specifies which users are allowed or denied access to a set of protected resources. You can specify which users you want to allow or deny by choosing the roles for each IoT Access Policy. The IoT Access Policy page enables you to configure the policy based on device details using Profiler device attributes, such as device category and manufacturer or profile group.
When the network Administrator selects category and manufacturer or profile group information under device details the IP addresses of the corresponding discovered devices get automatically updated under Resources. Hence the Administrator can seamlessly create IoT Access Policy of profiled devices based on device category, device manufacturer attributes, or Profiler group. If the Administrator wants to have granular control over the IoT devices, further control can be achieved by providing specific port and protocol. The specified port and protocol configuration is applied to all the discovered devices of the selected category and manufacturers.
To configure IoT access policy:
1.Select Endpoint Policy > IoT Access > IoT Policy Provisioning > Enforcer Policy Configuration.
2.Click New Policy.
3.Enter the Policy name.
4.Enter a description.
5.Under Infranet Enforcer, select the Platform as Junos SRX.
6.Under Device Details, specify whether the policy should be applied based on device category and manufacturer or Profile group.
•Category and manufacturer
•Specify the category from the drop-down list. The values in the drop-down list is populated based on the Device category configuration (IoT Access > IoT Policy Provisioning - Device Configuration).
•Select the Device manufacturer from the Available Device Manufacturers.
•Specify the protocol (TCP/UDP/ICMP) and Port/Range to be applied to the discovered devices.
•Profile Group
•Configure the Profiler Group (IoT Access > IoT Policy Provisioning - Device Configuration). To configure Profiler Groups, Configuring Profiler Groups.
•Select the Profile Group from the Available Profile Groups.
•Specify the protocol (TCP/UDP/ICMP) and Port/Range to be applied to the discovered devices.
Port ranges must be configured in dash-separated, comma-delimited, ascending, and non-overlapping order. Multiple port ranges must be separated by a comma. For example, the following examples show the delimiters that are used to enter port ranges:(80, 443, 1-1024, 1-100, 500-600).
The Port/Range entered will be applied to all the discovered devices. If you want to enter different port values, you can edit the port value under Resources table.
•Select Auto-Update Newly Discovered Devices to automatically add IoT Access Policy for the newly discovered devices from the selected category and manufacturer or Profile Group.
For example, If a policy is created for IoT device category with manufacturer or Profile Group with Auto-Update Newly Discovered Devices enabled then for any new IoT device discovered with the selected manufacturer, a IoT Access Policy is automatically added to firewall. If port and protocol are specified in the “Device Details” panel, the policy for the newly discovered devices is applied for specified port and protocol.
7.Under Resources, the IoT devices will be auto populated using the Device details configuration described earlier. If the administrator wants to apply policies on different ports for different discovered devices, the port configuration can be edited. If the Admin selects multiple protocol (for example, TCP and UDP) then the device entries appear twice with protocol information in the Resources table. The Admin can choose whether to push the policies for the selected resource based on the IP address, Protocol, and Port information to enforcer by enabling/disabling the checkbox in the resources table.
8.Select the desired Roles for which the policy applies. For example, IoT Administrator.
9.Under Actions, select whether to allow access or deny access.
10.Click Save Changes.
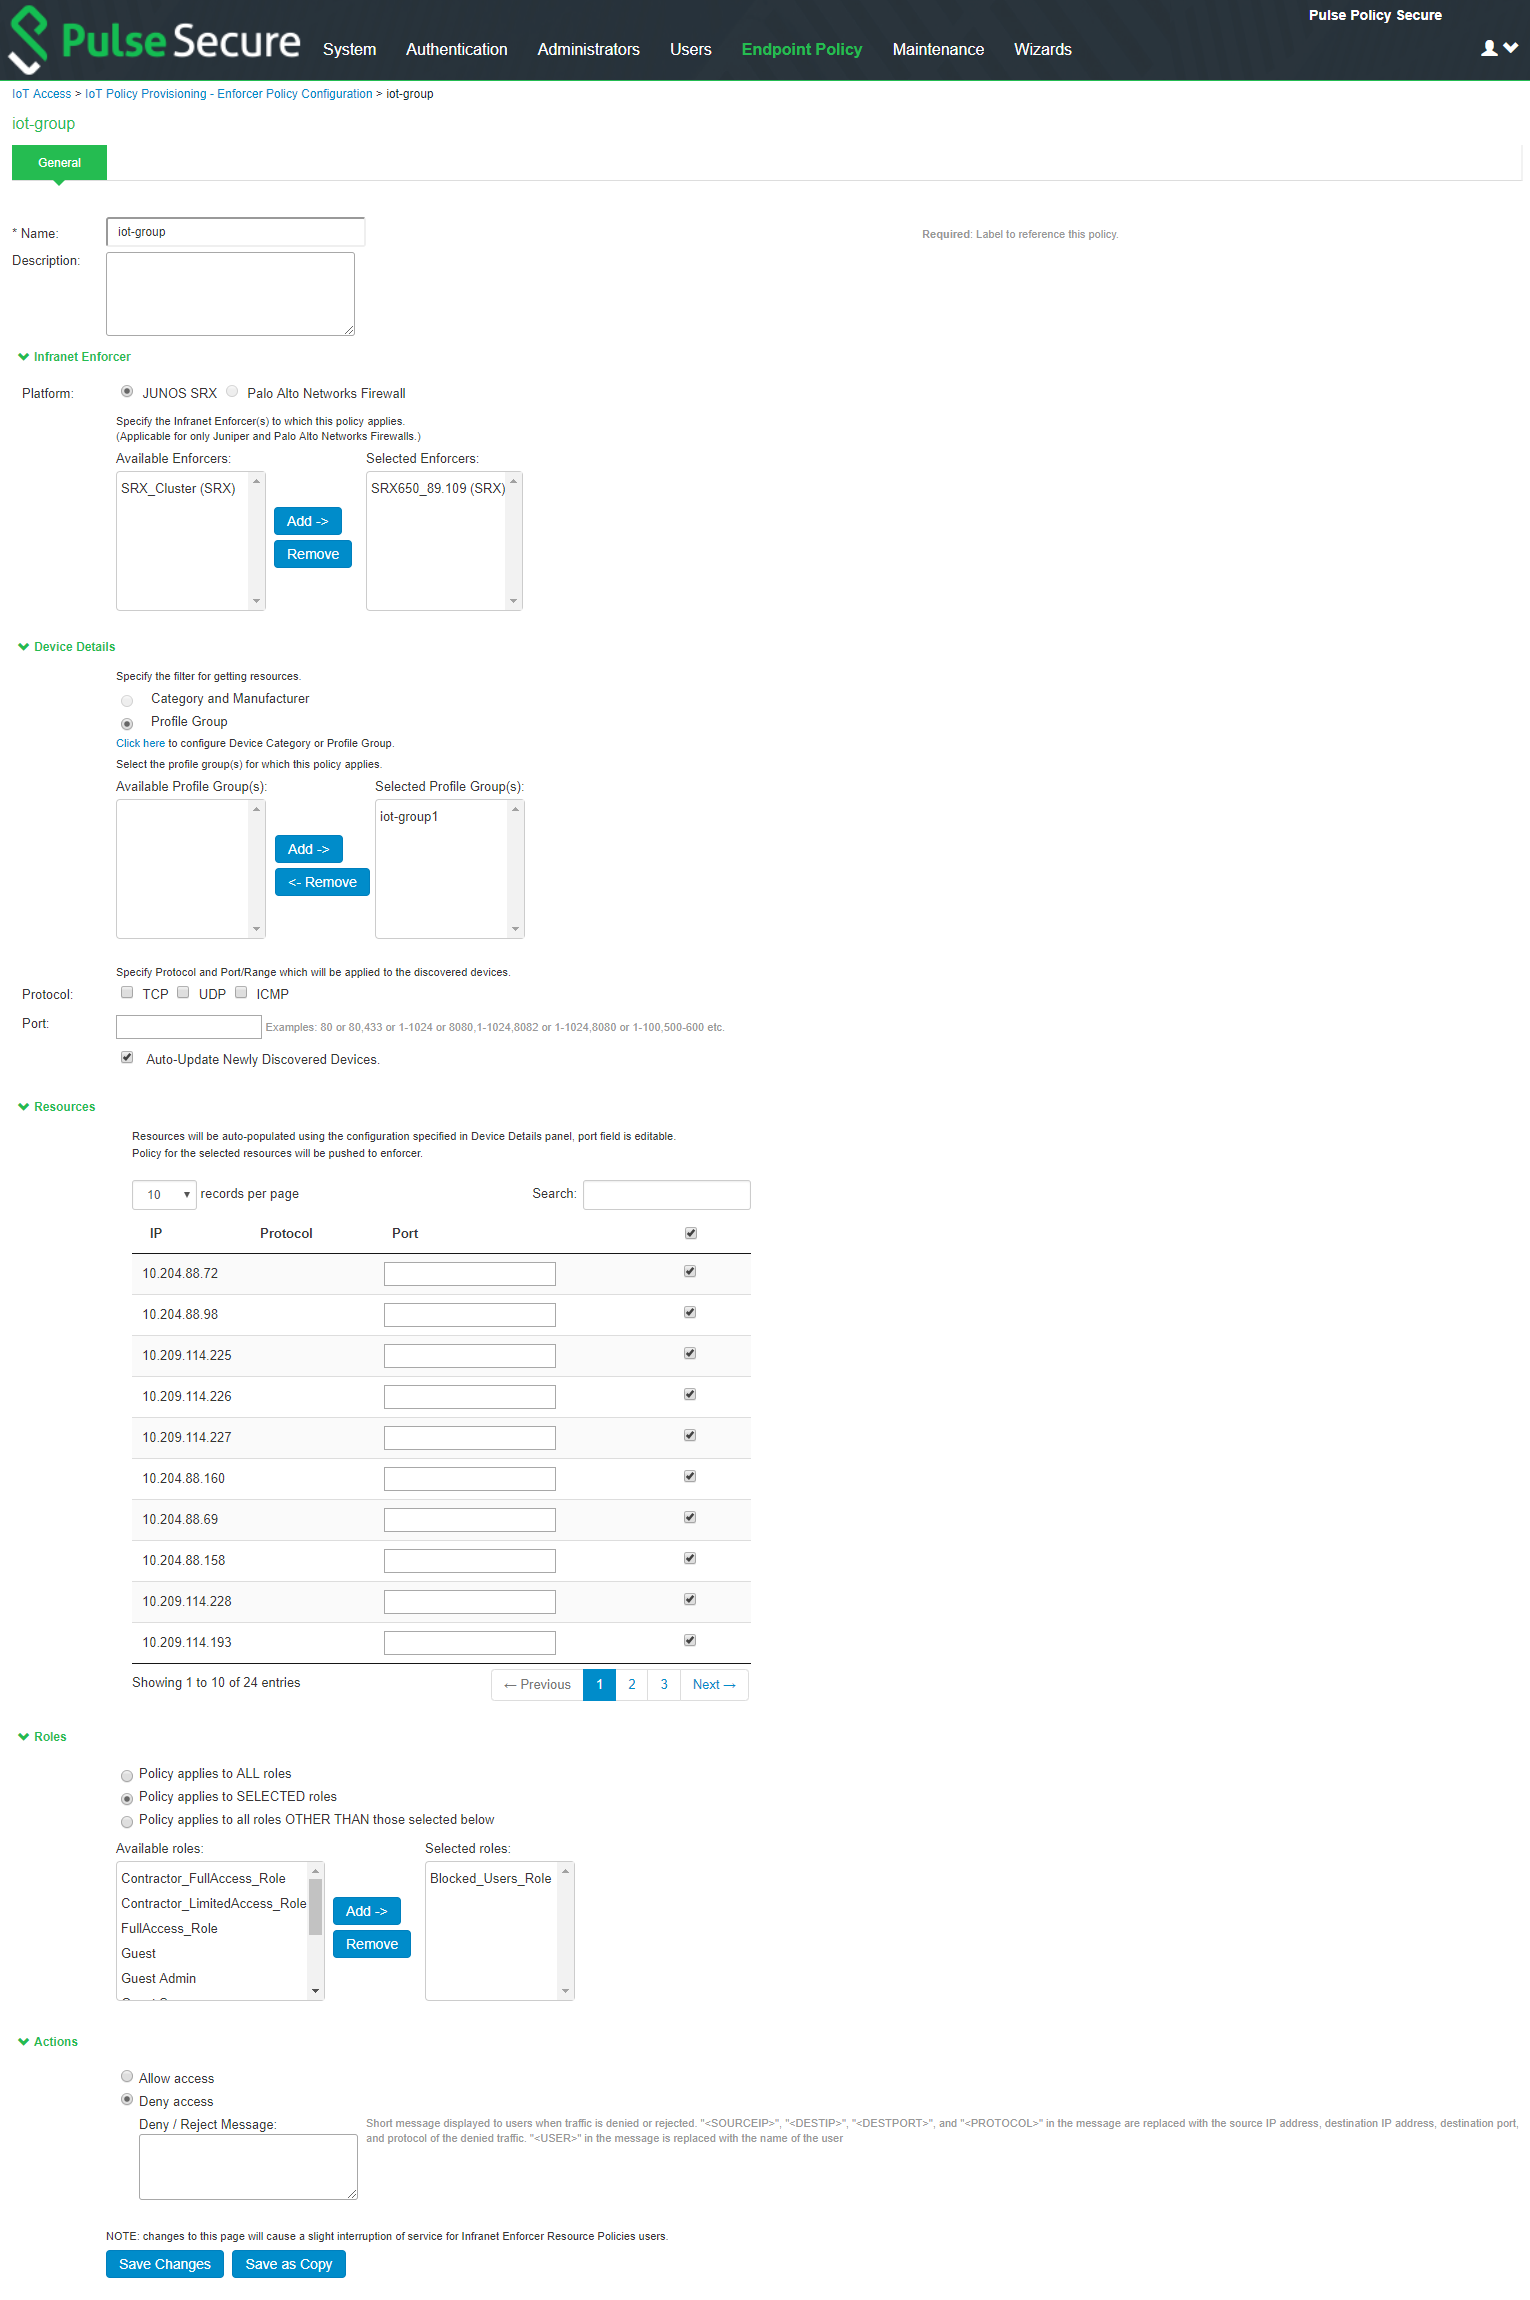
Once the policy is successfully added, it can be viewed as shown in figure.
The Device Details panel is only available when IoT Access Policy is created using IoT Policy Provisioning > Enforcer Policy Configuration.
Configuring IoT Access Policy using Palo Alto Networks Firewall
The IoT access policy specifies which users are allowed or denied access to a set of protected resources. You can specify which users you want to allow or deny by choosing the roles for each IoT Access Policy. The IoT Access Policy page enables you to configure the policy based on device details using Profiler device attributes, such as device category and device manufacturer or Profile Group.
When the network Administrator selects category and manufacturer or Profile Group information under device details the IP addresses of the corresponding discovered devices get automatically updated under Resources. Hence the Administrator can seamlessly create IoT Access Policy of profiled devices based on device category, device manufacturer attributes, or Profiler group. If the Administrator wants to have granular control over the IoT devices, further control can be achieved by providing specific port and protocol. The specified port and protocol configuration is applied to all the discovered devices of the selected category and manufacturers.
To configure IoT access policy:
1.Select Endpoint Policy > IoT Access > IoT Policy Provisioning > Enforcer Policy Configuration.
2.Click New Policy.
3.Enter the Policy name.
4.Enter a description.
5.Under Infranet Enforcer, select the Platform as Palo Alto Networks Firewall.
6.Under Security Zones, specify the firewall security zones (source zone/destination zone) for the policy. Multiple zones can be specified with comma separated values. If zones are not specified, then it applies to all zones.
7.Under Service, select any to allow all TCP and UDP ports (default) or select the service to specify the TCP or UDP port or port range. The policy port and protocol configuration remains same for all the resources.
8.Under Device Details, specify whether the policy should be applied based on device category and manufacturer or Profile group.
•Category and manufacturer
•Specify the category from the drop-down list. The values in the drop-down list is populated based on the Device category configuration (IoT Access > IoT Policy Provisioning - Device Configuration).
•Select the Device manufacturer from the Available Device Manufacturers.
•Specify the protocol (TCP/UDP) and Port/Range to be applied to the discovered devices.
•Profile Group
•Configure the Profiler Group (IoT Access > IoT Policy Provisioning - Device Configuration). To configure Profiler Groups, see Configuring Profiler Groups.
•Select the Profile Group from the Available Profile Groups.
•Specify the protocol (TCP/UDP) and Port/Range to be applied to the discovered devices.
Port ranges must be configured in dash-separated, comma-delimited, ascending, and non-overlapping order. Multiple port ranges must be separated by a comma. For example, the following examples show the delimiters that are used to enter port ranges:(80, 443, 1-1024, 1-100, 500-600).
The Port/Range entered will be applied to all the discovered devices.
•Select Auto-Update Newly Discovered Devices to automatically add IoT Access Policy for the newly discovered devices from the selected category and manufacturer or Profile Group.
For example, If a policy is created for IoT device category with manufacturer or Profile Group with Auto-Update Newly Discovered Devices enabled then for any new IoT device discovered with the selected manufacturer, a IoT Access Policy is automatically added to firewall. If port and protocol are specified in the "Device Details" panel, the policy for the newly discovered devices is applied for specified port and protocol.
9.Under Resources, the IoT devices will be auto populated using the Device details configuration described earlier. If the administrator wants to apply policies on different ports and protocols for different discovered devices, the port configuration can be edited. If the Admin selects multiple protocol (for example, TCP and UDP) then the device entries appear twice with protocol information in the Resources table. The Admin can choose whether to push the policies for the selected resource based on the IP address, Protocol, and Port information to enforcer by enabling/disabling the checkbox in the resources table.
10.Select the desired Roles for which the policy applies. For example, IoT Administrator.
11.Under Actions, select whether to allow access or deny access.
12.Click Save Changes.

Once the policy is successfully added, it can be viewed as shown in figure.
Resource Access Policy and IoT Policy Provisioning with Palo Alto Network’s Firewall works only with default Virtual System “vsys1” and default device name “localhost.localdomain” configuration.
Configuring Additional Device Category/Profile Groups
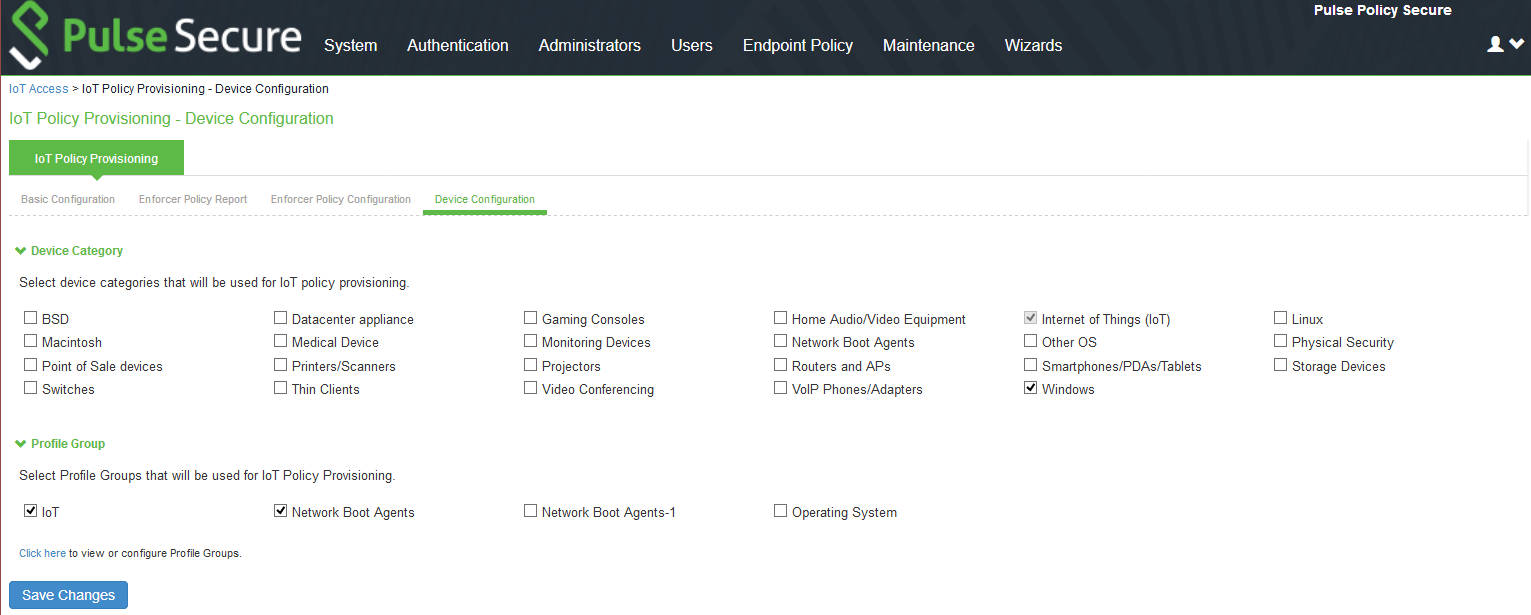
•The Internet Of Things (IoT) device category is selected by default and hence it is visible by default on IoT policy enforcer report and Policy Configuration page. However, If the Administrator wants to use IoT Policy Provisioning feature for other Profiler supported categories such as Video Conferencing Devices, Printers/Scanners, Medical device, Storage device and so on additional categories can be configured on this page.
•Under Profile Groups, Admin can select the groups that should be used with IoT Policy Provisioning feature. Only the selected Profile Groups are shown while creating IoT access policy using Profile Groups. If none of the Profile Groups are selected in Device Configuration tab then no groups are shown in IoT access policy. To create IoT access policy using Profile Groups, the same needs to be selected in the Device Configuration tab.
Configuring Profiler Groups
Administrator can create different Profile Groups by using different Profiler attributes (for example, group all IoT devices with manufacturer Schneider Electric and Operating System Linux) and combine discovered devices in a group. If an Admin wants to provision IoT Access policy using attributes other than Category and Manufacturer, a Profile Group can be created to group discovered devices and then IoT Policy Provisioning feature can be used for the resources belonging to Profile Group.
To configure Profiler Groups:
1.Select the Profiler server under Authentication > Auth. Servers.
2.Select Profile Groups tab, select the New Profile Group.
3.Enter the Group Name and Rule. The rules can be written with device attributes and suggested operators can be chosen from the list.
4.As an optional step, emails also can be configured which results in notifications for any group related changes.
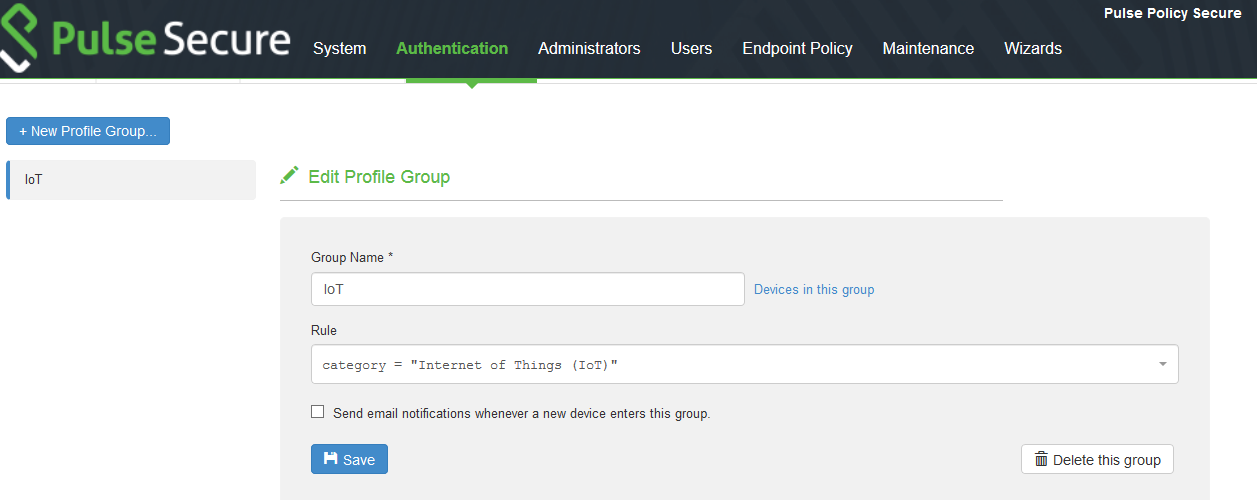
5.Click Save Changes.
