Using a SiteMinder Server
This topic describes integration with the SiteMinder server.
SiteMinder Server Overview
This section describes support for using PPS with the SiteMinder server.
Understanding SiteMinder Server
CA SiteMinder server is an authentication and authorization server.
When you configure the Pulse Secure access management framework to authenticate users with a SiteMinder policy server, the system passes the user’s credentials to SiteMinder during authentication. Once SiteMinder receives the credentials, it may use standard username and password authentication, RSA Authentication Manager SecurID tokens, or client-side certificates to authenticate the credentials.
The system also passes a protected resource URL to SiteMinder during authentication to determine which SiteMinder realm it should use to authenticate the user. When the system passes the protected resource URL, SiteMinder authorizes the user’s URL against the realm that is associated with the resource and allows the user to seamlessly access any resources whose protection levels are equal to or less than the URL that was passed.
Feature Support
The Pulse Secure access management framework supports the following SiteMinder features:
Single Sign-on Using SMSESSION Cookies
The Pulse Secure access management framework enables single sign-on (SSO) to SiteMinder-protected resources using SMSESSION cookies. An SMSESSION cookie is a security token that encapsulates SiteMinder session information. Depending on your configuration, either the SiteMinder Web agent or the system creates an SMSESSION cookie and then posts the cookie to the following locations so the user does not have to reauthenticate to access additional resources.
•Pulse Secure access management framework-If the user tries to access a SiteMinder resource within the session (for example, from the system file browsing page), the system passes its cached SMSESSION cookie to the Web agent for authentication.
•The user’s Web browser-If the user tries to access a SiteMinder resource from outside the session (for example, when using a protected resource on a standard agent), SiteMinder uses the cached SMSESSION cookie stored in the user’s Web browser to authenticate/authorize the user.
Automatic Sign-In
If you enable the Automatic Sign-In option, the system can use an SMSESSION cookie generated by another agent to enable single sign-on from a SiteMinder resource. When a user accesses the system sign-in page with an SMSESSION cookie, the system verifies the SMSESSION cookie. Upon successful verification, the system establishes a session for the user. You can use the following authentication mechanisms when you enable automatic sign-in through the system:
•Custom agent-The system authenticates the user against the policy server and generates a SMSESSION cookie. When you select this option, you can enable SSO on other SiteMinder agents that use the same policy server. To enable SSO on these agents, update each of them to accept third-party cookies. If you select this option and the user enters his system session with an SMSESSION cookie, the system attempts automatic sign-in when the user enters the session.
•HTML form post-The system posts credentials to a standard Web agent that you have already configured. The Web agent then creates SMSESSION cookies. If you select this option, you cannot use SecurID New Pin and Next Token modes or client-side certificate authentication. If you select this option and the user enters his session with an SMSESSION cookie, the system attempts automatic sign-in when the user enters the session.
•Delegated authentication-The system delegates authentication to a standard agent. If this option is enabled, the system tries to determine the FCC URL associated with the protected resource. The system then redirects the user to the FCC URL with the system sign-in URL as the target. Upon successful authentication, the user is redirected back to the system with an SMSESSION cookie and the system does an automatic sign-in for the user.
Authentication Schemes
The Pulse Secure access management framework works with the following types of SiteMinder authentication schemes:
•Basic username and password authentication—The user’s name and password are passed to the SiteMinder policy server. The policy server authenticates them to another server for authentication.
•RSA Authentication Manager SecurID token authentication—The SiteMinder policy server authenticates users based on a username and password generated by an RSA Authentication Manager SecurID token.
•Client-side certificate authentication—The SiteMinder policy server authenticates users based on their client-side certificate credentials. If you choose this authentication method, the Web browser displays a list of client certificates from which users can select. If you choose to authenticate users with this method, you must import the client certificate through the System > Certificates > Trusted Client CAs tab.
Interoperability Requirements and Limitations
The following requirements and limitations apply:
•The Automatic Sign-in feature is not supported for administrator roles. This feature is only available for end users.
•If you use the Authenticate using custom agent option, update all other Web agents to accept the device generated cookie, and apply a software patch to all other Web agents.
•Pulse Policy Secure(PPS) supports SiteMinder server version 6.0, version 5.5, and version 12.0. If you run older agents than the supported agents, you might experience cookie validation problems, including crossed log entries and intermittent user timeouts.
•You can choose which SiteMinder server version you want to support when you create a server instance. You can choose version 5.5, which supports both versions 5.5 and 6.0, or you can choose version 6.0, which supports only version 6.0, or version 12.0. There is no difference in the SiteMinder authentication server functionality based on which version you select. This option only controls the version of the SDK to use. We recommend you match the compatibility mode with the version of the policy server.
•When you use SiteMinder to authenticate, the primary and backup policy servers must run the same SiteMinder server software version. A mixed deployment (where the primary server runs a different server software version than the backup) is not supported.
•SiteMinder does not store the IP address in the SMSESSION cookie, and therefore cannot pass it to the system.
•SiteMinder sends the SMSESSION cookie to the system as a persistent cookie. To maximize security, the system resets the persistent cookie as a session cookie once authentication is complete.
•When you use SiteMinder to authenticate, the Pulse Secure access management framework disregards any system session and idle timeouts and uses session and idle timeouts set through the SiteMinder realm instead.
•When you use SiteMinder to authenticate, users must access the system using a fully qualified domain name. This is because the SiteMinder SMSESSION cookie is only sent for the domain for which it is configured. If users access the system using an IP address, they might receive an authentication failure and will be prompted to authenticate again.
•You can update all your standard Web agents to the appropriate SiteMinder Agent Quarterly Maintenance Release (QMR) to accept the cookies. If you are running SiteMinder version 5 Web agents, use the QMR5 hot fix. The system is compatible with version 5.x and later SiteMinder agents. Older versions of SiteMinder agents are susceptible to cookie validation failures.
•You can set the Accept Third Party Cookie attribute (AcceptTPCookie) to yes in the Web agent’s configuration file (webagent.conf) or to 1 in the Windows Registry for the IIS Web server. The location of the attribute depends on the SiteMinder version and Web server you are using. Refer to the documentation provided with your SiteMinder server.
Configuring the Back-End SiteMinder Server
The following sections do not give complete SiteMinder configuration instructions—they are only intended to help you make SiteMinder work with the Pulse Secure access management framework. For in-depth SiteMinder configuration information, refer to the documentation provided with your SiteMinder policy server.
Configuring the SiteMinder Agent
A SiteMinder agent filters user requests to enforce access controls. For instance, when a user requests a protected resource, the agent prompts the user for credentials based on an authentication scheme and sends the credentials to a SiteMinder policy server. A Web agent is simply an agent that works with a Web server. When configuring SiteMinder to work with the Pulse Secure access management framework, you must configure the system as a Web agent in most cases.
If you select the Delegate authentication to a standard agent option, you must set the following options in the agent configuration object of the standard Web agent to host the FCC URL:
•<FCCCompatMode=no>
To configure the system as a Web agent on the SiteMinder policy server:
1.In the SiteMinder Administration interface, click the System tab.
2.Right-click Agents and select Create Agent.
3.Enter a name for the Web agent and a description. You must enter this name when creating a SiteMinder realm.
4.Select the Support 5.x agents option for compatibility with the system.
5.Under Agent Type, select SiteMinder and then select Web Agent from the list. This setting is required for compatibility with the system.
6.Under IP Address or Hostname, enter the name or IP address of the system.
7.In the Shared Secret box, enter and confirm a secret for the Web agent. Note that you must enter this secret when configuring the system.
8.Click OK.
Configuring the Authentication Scheme
Within SiteMinder, an authentication scheme is a way to collect user credentials and determine the identity of a user. You may create different authentication schemes and associate different protection levels with each. For example, you may create two schemes—one that authenticates users based solely on the users’ client-side certificates and provides them a low protection level, and a second that uses RSA Authentication Manager SecurID token authentication and provides users a higher protection level.
To configure a SiteMinder authentication scheme:
1.In the SiteMinder Administration interface, select the System tab. Right-click Authentication Schemes and select Create Authentication Scheme.
2.Enter a name for the scheme and (optionally) a description. You must enter this name when configuring the SiteMinder realm.
3.Under Authentication Scheme, select one of the following options:
•HTML Form Template
•SecurID HTML Form Template-If you are using SecurID authentication, you must choose SecurID HTML Form Template (instead of SecurID Template). Choosing this option enables the Policy Server to send ACE sign-in failure codes.
•X509 Client Cert Template
•X509 Client Cert and Basic Authentication
- You must select HTML Form Template to handle reauthentication.
- If you select X509 Client Cert Template or X509 Client Cert and Basic Authentication, you must import the certificate through System > Certificates > Trusted Client CAs.
4.Enter a protection level for the scheme. Note that this protection level carries over to the SiteMinder realm that you associate with this scheme.
5.Select Password Policies Enabled for this Authentication Scheme if you want to reauthenticate users who request resources with a higher protection level than they are authorized to access.
6.Select Scheme Setup tab, and enter the options required by your authentication scheme type.
7.If you want the system to reauthenticate users who request resources with a higher protection level than they are authorized to access, you must enter the following settings:
•Under Server Name, enter the hostname (for example, sales.yourcompany.net).
•Select the Use SSL Connection check box.
•Under Target, enter the sign-in URL defined plus the parameter “ive=1” (for example, /highproturl?ive=1). The system must have a sign-in policy that uses */highproturl as the sign-in URL and only uses the corresponding SiteMinder authentication realm.
•Clear the Allow Form Authentication Scheme to Save Credentials check box.
•Leave Additional Attribute List empty.
8.Click OK.
If you change a SiteMinder authentication scheme on the policy server, you must flush the cache using the Flush Cache option on the Advanced tab.
Configuring the SiteMinder Domain
Within SiteMinder, a policy domain is a logical grouping of resources associated with one or more user directories. Policy domains contain realms, responses, and policies. When configuring the Pulse Secure access management framework to work with SiteMinder, you must give user access to a SiteMinder resource within a realm, and then group the realm into a domain.
To configure a SiteMinder domain
1.Select the System tab, right-click Domains and select Create Domain, or click Domains and select an existing SiteMinder domain.
2.Add a realm to the domain.
Configuring the SiteMinder Realm
Within SiteMinder, a realm is a cluster of resources within a policy domain grouped together according to security requirements. When configuring SiteMinder to work with the Pulse Secure access management framework, you must define realms to determine which resources the users might access.
To configure a SiteMinder Realm:
1.In the SiteMinder Administration interface, In the SiteMinder Administration interface, select the Domains tab.
2.Expand the domain that you created.
3.Right-click Realms and select Create Realm.
4.In the Agent field, select the Web agent that you created.
5.In the Resource Filter field, enter a protected resource. This resource inherits the protection level specified in the corresponding authentication scheme.
6.For the default protection level, enter /ive-authentication. You must enter this resource when configuring the system. If you use sign-in policies with nondefault URLs such as */nete or */cert, you must have corresponding resource filters in the SiteMinder configuration.
7.From the Authentication Schemes list, select the scheme that you created.
8.Click OK.
Configuring a Rule or Response Pair to Pass Usernames
Within SiteMinder, you can use rules to trigger responses during authentication or authorization. A response passes DN attributes, static text, or customized active responses from the SiteMinder policy server to a SiteMinder agent. When you configure SiteMinder to work with the Pulse Secure access management framework, you must create a rule that triggers when a user successfully authenticates. Then, you must create a corresponding response that passes the user’s username to the system Web agent.
To create a new rule:
1.Select the Domain tab.
2.Expand the domain that you created and then expand Realms.
3.Right-click the realm that you created and select Create Rule under Realm.
4.Enter a name and (optionally) description for the rule.
5.Under Action, select Authentication Events and then select OnAuthAccept from the drop down list.
6.Select Enabled.
7.Click OK.
To create a new response:
1.Expand the domain that you created.
2.Right-click Responses and select Create Response.
3.Enter a name and (optionally) a description for the response.
4.Select SiteMinder and then select the Web agent.
5.Click Create.
6.From the Attribute list, select WebAgent-HTTP-Header-Variable.
7.Under Attribute Kind, select Static.
8.Under Variable Name, enter IVEUSERNAME.
9.Under Variable Value, enter a username.
10.Click OK.
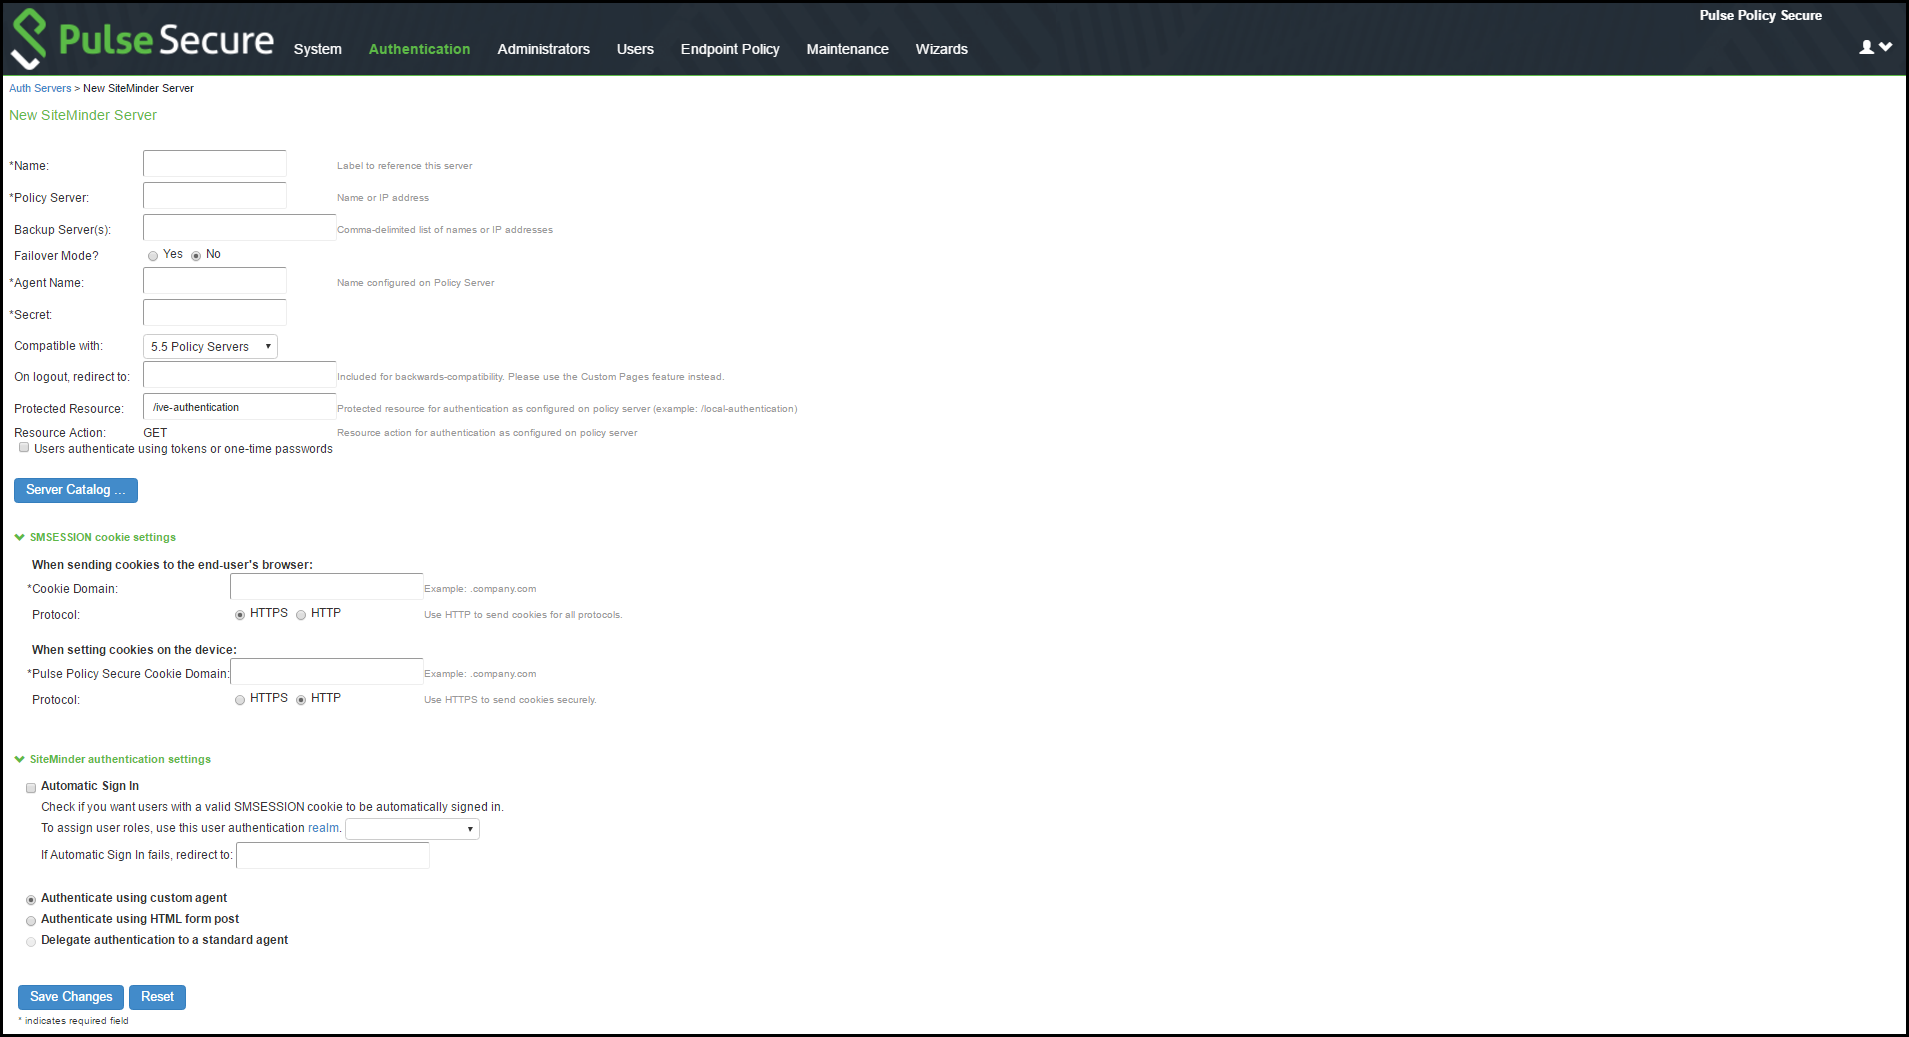
Configuring Authentication with a SiteMinder Server
To configure authentication with SiteMinder server:
1.Select Authentication > Auth.Servers.
2.Select SiteMinder Server and click New Server to display the configuration page.
3.Complete the configuration as described in table.
4.Save the configuration.
5.After you have saved the configuration, the page that is redisplayed includes an Advanced tab.
6.Click the Advanced tab to display the configuration page.
7.Complete the configuration as described in table.
8.Save the configuration.
|
Settings |
Guidelines |
|
Poll Interval (seconds) |
Specify the interval at which the system polls the SiteMinder policy server to check for a new key. |
|
Max. Connections |
Control the maximum number of simultaneous connections that the system is allowed to make to the policy server. The default setting is 20. |
|
Max. Requests/ Agent |
Control the maximum number of requests that the policy server connection handles before the system ends the connection. If necessary, tune to increase performance. The default setting is 1000. |
|
Idle Timeout (minutes) |
Control the maximum number of minutes a connection to the policy server may remain idle (the connection is not handling requests) before the system ends the connection. The default setting of “none” indicates no time limit. |
|
Authorize while Authenticating |
Specify that the system should look up user attributes on the policy server immediately after authentication to determine if the user is truly authenticated. For example, if your SiteMinder server authenticates users based on an LDAP server setting, you can select this option to indicate that the system should authenticate users through the SiteMinder server and then authorize them through the LDAP server before granting them access. If the user fails authentication or authorization, the user is redirected to the page configured on the policy server. |
|
Enable Session Grace Period |
Eliminate the overhead of verifying a user’s SMSESSION cookie each time the user requests the same resource by indicating that the system should consider the cookie valid for a certain period. If you do not select this option, the system checks the user’s SMSESSION cookie on each request. Note that the value entered here does not affect session or idle timeout checking. |
|
Validate cookie every N seconds (seconds) |
Specify the time for the system to eliminate the overhead of verifying a user’s SMSESSION cookie each time the user requests the same resource by indicating that the system should consider the cookie valid for a certain period. |
|
Ignore Query Data |
Specify that the system does not cache the query parameter in its URLs. Therefore, if a user requests the same resource as is specified in the cached URL, the request should not fail. |
|
Accounting Port |
Specify that the value entered in this field must match the accounting port value entered through the Policy Server Management Console in the Web UI. By default, this field matches the policy server’s default setting of 44441. |
|
Authentication Port |
Specify that the value entered in this field must match the authentication port value entered through the Policy Server Management Console. By default, this field matches the policy server’s default setting of 44442. |
|
Authorization Port |
Specifies that the value entered in this field must match the authorization port value entered through the Policy Server Management Console. By default, this field matches the policy server’s default setting of 44443. |
|
Agent Configuration Settings |
|
|
Overlook Session for Methods |
Compare the request method to the methods listed in this parameter. If a match is found, Web Agent does not create a new or update an existing SMSESSION cookie, nor will it make any updates to the cookie provider for that request. You can enter multiple methods; use a comma to separate method names. If Overlook Session for Methods parameter is set but not Overlook Session for URLs, then all requests that match the methods defined in this parameter are processed (SMSESSION cookie creation/update is blocked). If both Overlook Session for Methods and Overlook Session for URLsparameters are set, both the method and the URL of the request are matched before proceeding. Then, all URLs with specified methods are processed (SMSESSION cookie creation/update is blocked). |
|
Overlook Session for URLs |
Compare the request URL to the URLs listed in this parameter. If a match is found, Web Agent does not create a new or update an existing SMSESSION cookie, nor will it make any updates to the cookie provider for that request. Specify a relative URL. For example: If the URL is http://fqdn.host/MyDocuments/index.html, enter /MyDocuments/index.html If Overlook Session for URLs is set but not Overlook Session for Methods, then all requests, regardless of the methods, matching the URLs defined in this parameter are processed (SMSESSION cookie creation/update is blocked). If both Overlook Session for Methods and Overlook Session for URLsparameters are defined, both the method and the URL of the request are matched before proceeding. Then, all URLs with specified methods are processed (SMSESSION cookie creation/update is blocked). |
|
SiteMinder caching |
|
|
Flush Cache |
Select this option to delete the resource cache, which caches resource authorization information for 10 minutes. |
Displaying the User Accounts Table
To display user accounts:
1.Click the link for the authentication server you want to manage.
2.Click the Users tab to display the user accounts table.
The user accounts table includes entries for the accounts that have been created. The Last Sign-in Statistic column shows the last successful sign-in date and time for each user, the user’s IP address, and the agent or browser type and version.
Use the controls to search for users and manage user accounts:
•To search for a specific user, enter a username in the Show users named box and click Update.
You can use an asterisk (*) as a wildcard, where * represents any number of zero or more characters. For example, to search for all usernames that contain the letters jo, enter *jo*. The search is case-sensitive. To display the entire list of accounts again, type * or delete the field’s contents and click Update.
•To limit the number of users displayed on the page, enter a number in the Show N users box and click Update.
•To terminate the user session and delete the account, select the check box next to the user account record and click Delete.