Alert-Based Admission Control with Fortinet Products
This chapter describes how to integrate FortiAnalyzer and FortiGate Firewall products with PPS to support Alert-based admission control in your network.
Overview of Alert-Based Admission Control with Fortinet Products
Pulse Policy Secure (PPS) integration with network security devices provide user access control based on the threats identified by the network security devices.
The network security device provides detection of threats based on the intrusion prevention system. This helps in detecting unknown threats, and also reduces the number of false alarms.
The network security device uses the syslog events mechanism to notify the other devices regarding the network threats. PPS also supports dynamically changing the access to the user based on the information received from the network security device.
The admission control user flow is described below:
1.The user connects to PPS through the Switch (or Wireless LAN Controller).
2.The user session is created on the PPS.
3.The user details are pushed to the Switch for enforcing user access.
4.The FortiGate Firewall monitors the user traffic.
5.The FortiAnalyzer generates the syslog messages for the user.
6.The syslog message is sent to PPS if any suspicious traffic or activity is detected from the user.
7.PPS processes the received syslog message and, based on the configured policies, actions are taken.
8.New/Updated details are pushed to Switch for updating the enforcement of the user.
The enforcement of the user is also updated on the FortiGate Firewall.
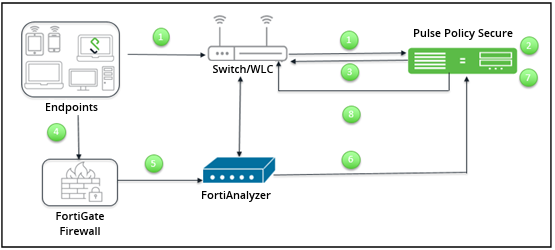
For example, a user is connected to PPS and wants to access protected resource which is behind FortiGate Firewall. Users get access to the resource, and when the firewall detects a threat from the user, the firewall sends a syslog message and user is removed from the network.
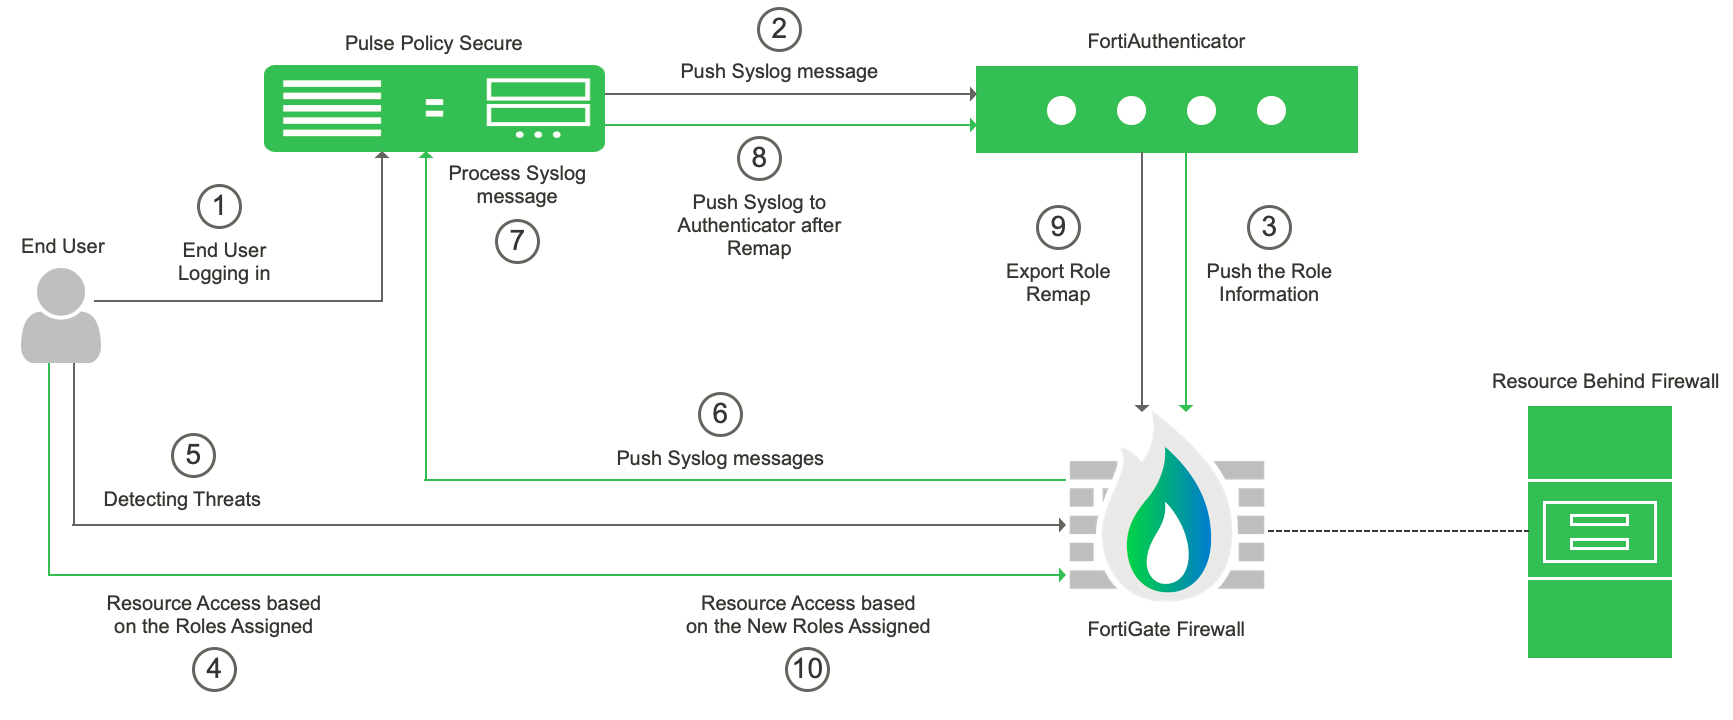
The dynamic identity enforcement using admission control user flow is described below:
1.The user connects to PPS through the Switch (or Wireless LAN Controller). User is authenticated on PPS after validating the HC policy.
2.The syslog sessions are exported to FortiAuthenticator.
3.Identity information is parsed from the Syslog message and is used to create an IP to username mapping within FortiAuthenticator. This information is shared with FortiGate firewall in the form of a Fortinet Single Sign-On (FSSO) record.
4.The firewall uses this information to either allow or block traffic based on the configured policy
5.FortiGate Firewall Monitors the end user flow and activity and detects attacks/malicious activity at the end user session
6.FortiGate Firewall/Analyser sends a syslog message to PPS for any suspicious traffic or activity detected from end user.
7.PPS process the received syslog message and based on the configured policies, action will be taken for the end user session.
8.PPS exports New Roles to the FortiAuthenticator.
9.The firewall changes users Role based on the information received from Authenticator.
10.User gets access to the protected resources based on the new role assigned.
Summary of Configuration
To prepare your network to use alert-based access control using Pulse Policy Secure, FortiAuthenticator, FortiAnalyzer and FortiGate Firewall, perform the following tasks:
•Configuring Network Security Devices with PPS
•Configuring an Admission Control Template
•Configuring Admission Control Policies
•Configuring the Admission Control Client
•Configuring FortiGate Firewall
Configuring Network Security Devices with PPS
The network security devices are configured with PPS for admission access control. A high-level overview of the configuration steps needed to set up and run the integration is described below:
•The Administrator configures the required syslog clients on the PPS Admin UI. Each network security device acts as a syslog client on which syslog forwarding is enabled, and PPS receives the forwarded syslog messages.
•The Administrator then configures a set of policies that define what actions are to be taken on user sessions, based on the data in the threat events.
•The user defined templates are used to map the data and the predefined variables. The predefined variables in the template are Rule Name, Source IP Address, Source User, and Severity.
•The templates for parsing the syslog messages from Fortinet Firewall/Analyzer are available by default. The administrators can also add customised templates for integrating with other network security devices.
This section covers the following topics:
•Configuring an Admission Control Template
•Configuring Admission Control Policies
•Configuring the Admission Control Client
Configuring an Admission Control Template
The admission control template provides a list of possible events that can be received from the network security device, along with a regular expression to parse the message. The template also provides possible actions that can be taken for an event.
Only the admission control policy defines the actions to be taken on receipt of an event. The admission control template only provides possible events and possible actions for that event.
To view and add the admission control templates:
1.Select Endpoint Policy > Admission Control > Templates.
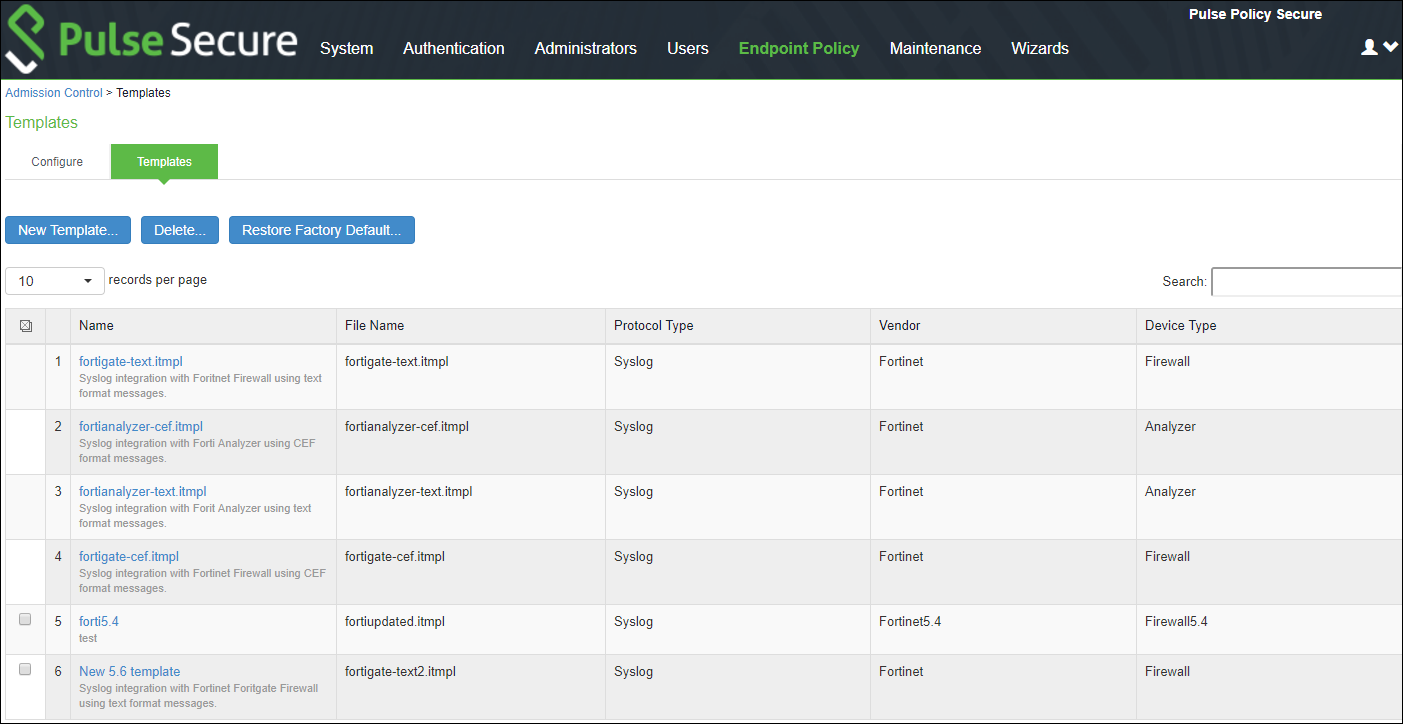
2.Click New Template.
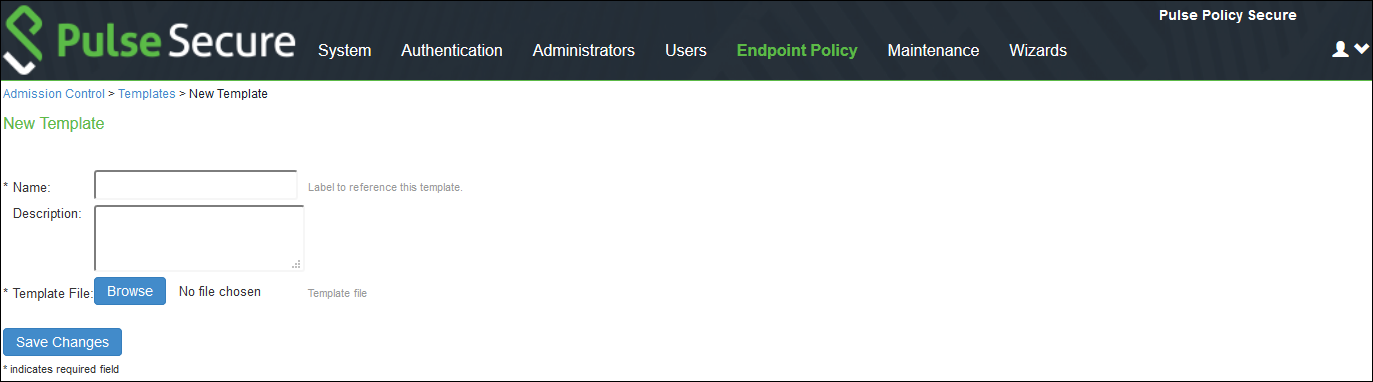
3.Enter the template Name.
4.Enter a template Description.
5.Click Browse and select the template file.
6.Click Save Changes.
Configuring Admission Control Policies
The admission control policies define the actions that are performed on PPS for user sessions. The actions are based on the specific threat event information received from the network security device.
To view and add the new integration policy:
1.Select Endpoint Policy > Admission Control > Policies.
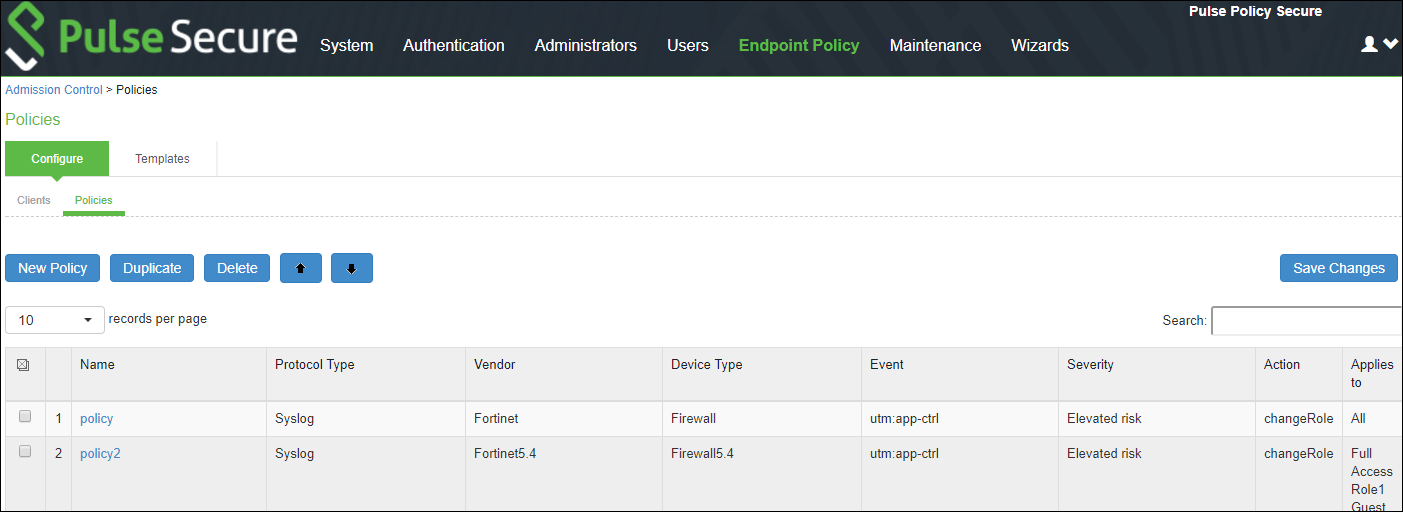
2.Click New Policy.
3.Enter the policy name.
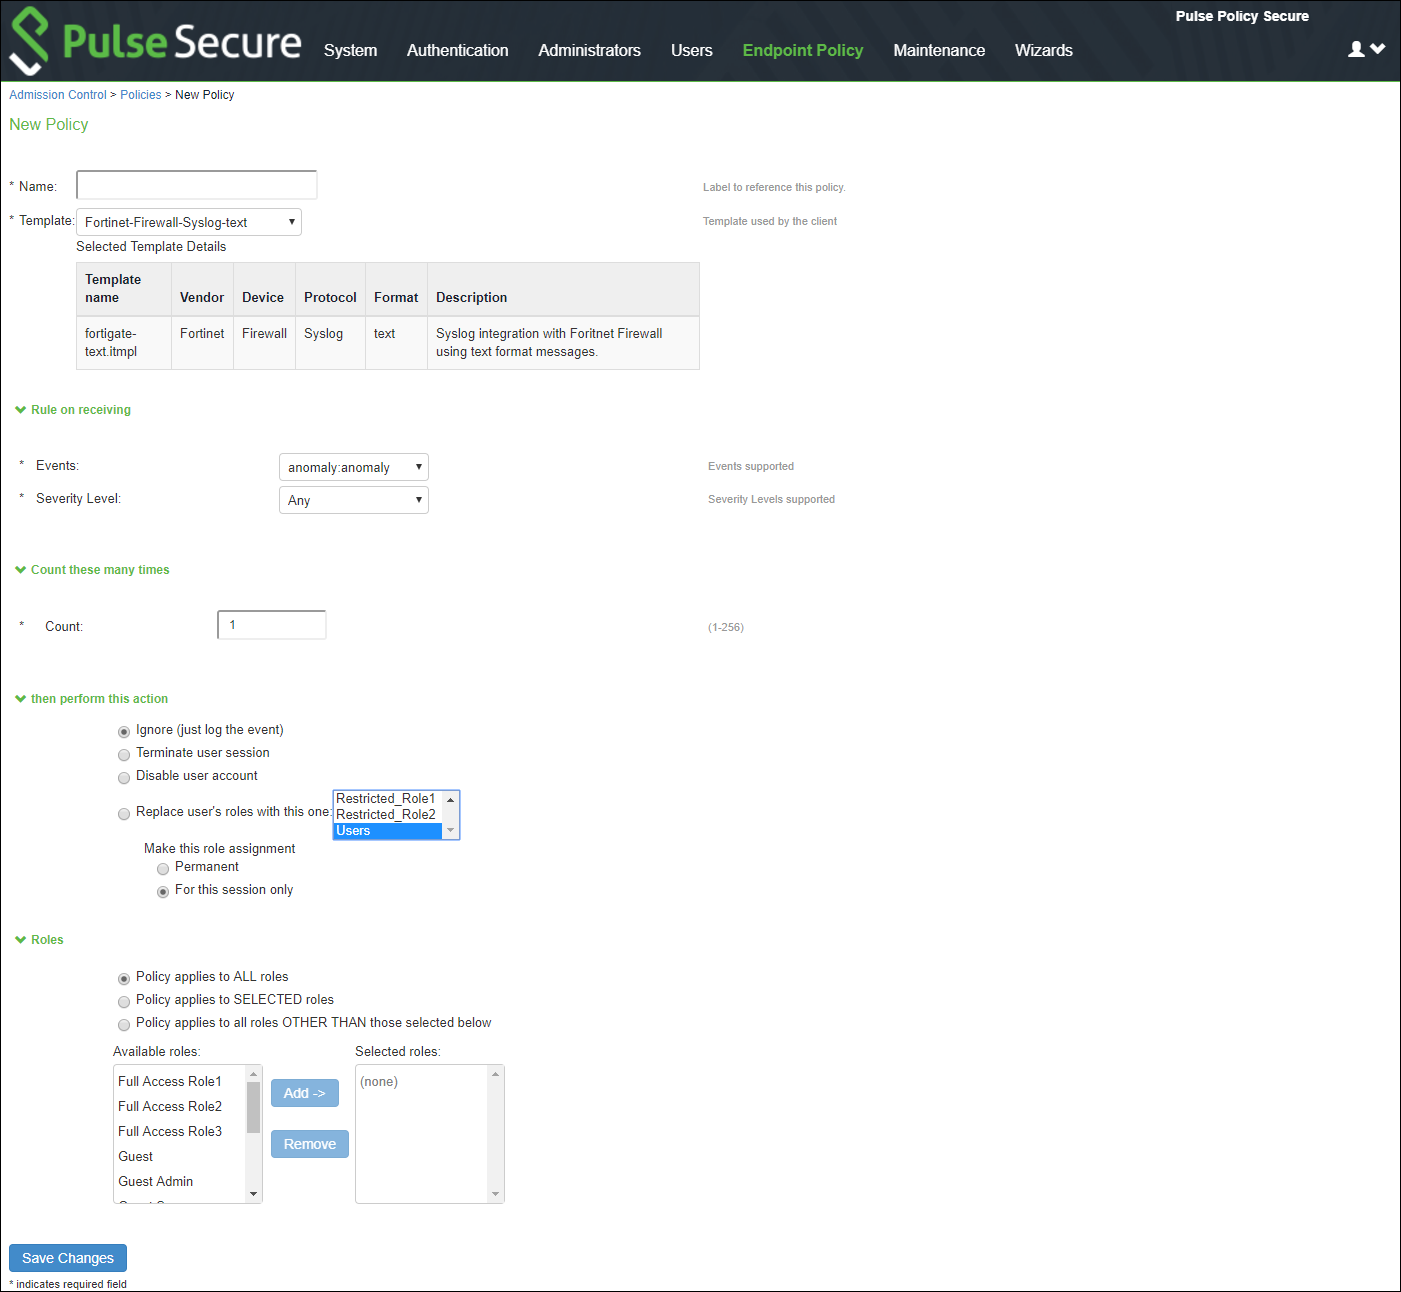
4.Select the template used by the client. The following templates are available by default for Fortinet:
•Fortinet-Analyzer-Syslog-CEF
•Fortinet-Analyzer-Syslog-text
•Fortinet-Firewall-Syslog-CEF
•Fortinet-Firewall-Syslog-text
5.Under Rule on Receiving, select the event type and the severity level. The event types and the severity level are based on the selected template.
6.Under Count these many times, enter a number between 1-256.
7.Under Then perform this action, select the desired action.
•Ignore (log the event): Received syslog event details are logged on the PPS and no specific action is taken.
•Terminate user session: Terminates the user session on the PPS for the received messages.
•Disable user account: Terminates the user session and disables the user on the PPS for the received messages.
•Replace user role with this role: Changes the roles assigned to the user on PPS so that restriction/privileges for the user can be changed.
You must specify whether to apply the role assignment permanently or only for the session.
8.Under Roles, specify:
•Policy applies to ALL roles: Applies the policy to all users.
•Policy applies to SELECTED roles: Applies this policy only to users who are mapped to roles in the Selected roles list. You must add roles to this list from the Available roles list.
•Policy applies to all roles OTHER THAN those selected below: Applies this policy to all users except for those who map to the roles in the Selected roles list. You must add roles to this list from the Available roles list.
9.Click Save Changes.
Configuring the Admission Control Client
The admission control clients are the network security devices on which the syslog forwarding is enabled. The messages are received by the syslog server module running on PPS.
You must add either the FortiGate Firewall or the FortiAnalyzer as separate clients on PPS to enable it to receive the required threat information through syslogs.
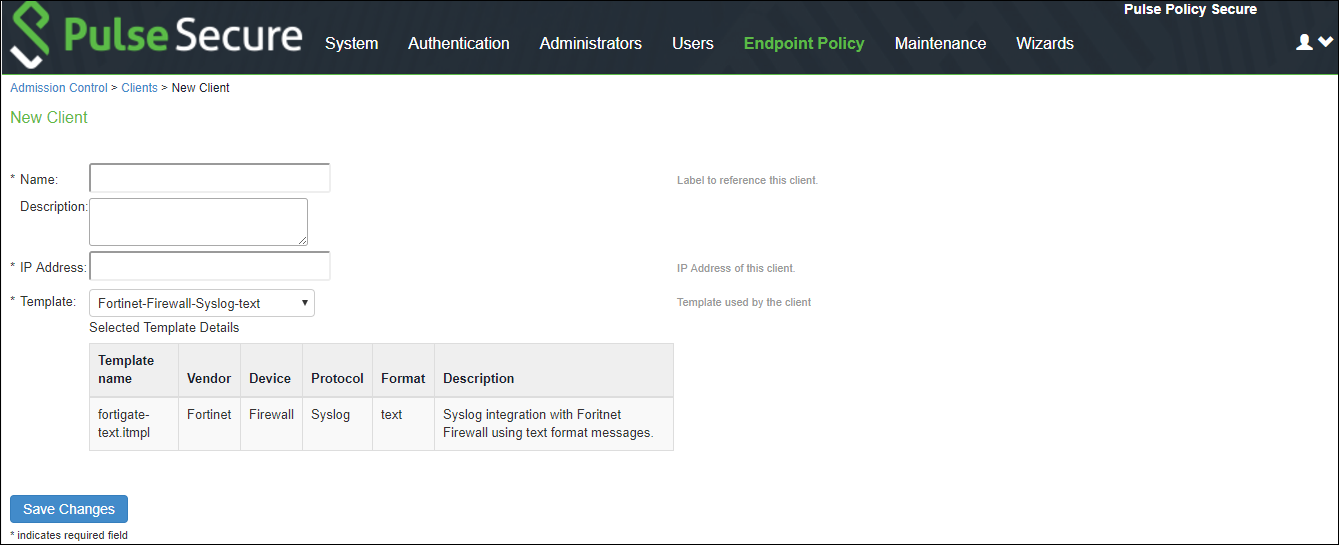
To add a client:
1.Select Endpoint Policy > Admission Control > Clients.
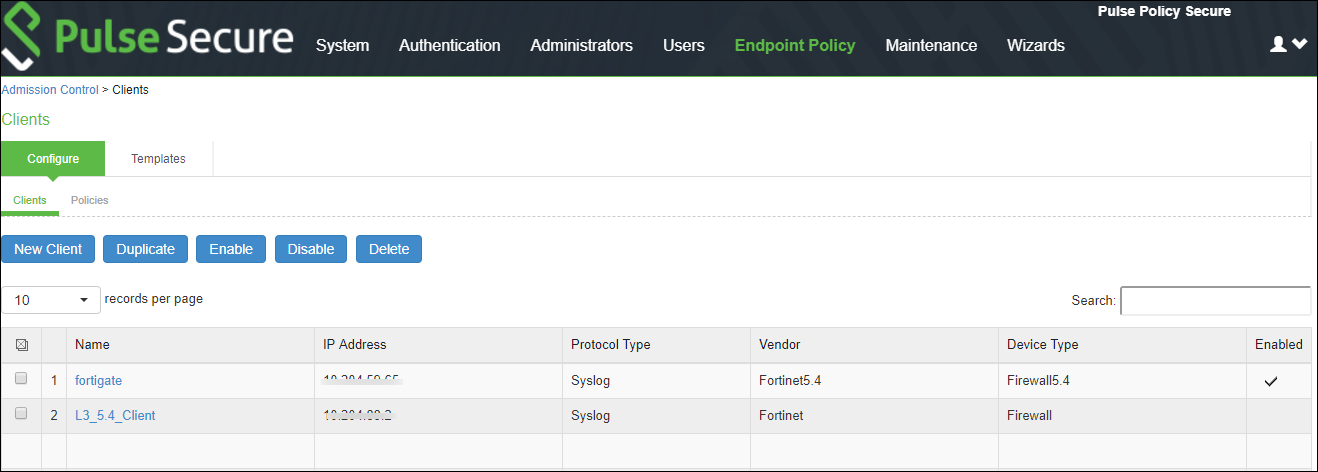
2.Click New Client.
3.Enter the Name of the client that will be added in the PPS.
4.Enter a Description.
5.Enter the IP Address of the client.
6.Select the Template for the client.
•Fortinet-Analyzer-Syslog-CEF
•Fortinet-Analyzer-Syslog-text
•Fortinet-Firewall-Syslog-CEF
•Fortinet-Firewall-Syslog-text
7.Click Save Changes.
Configuring FortiGate Firewall
Once you have added the FortiGate Firewall as a syslog client on PPS (see, the PPS must be added as a syslog server on the FortiGate Firewall.
To configure FortiGate Firewall:
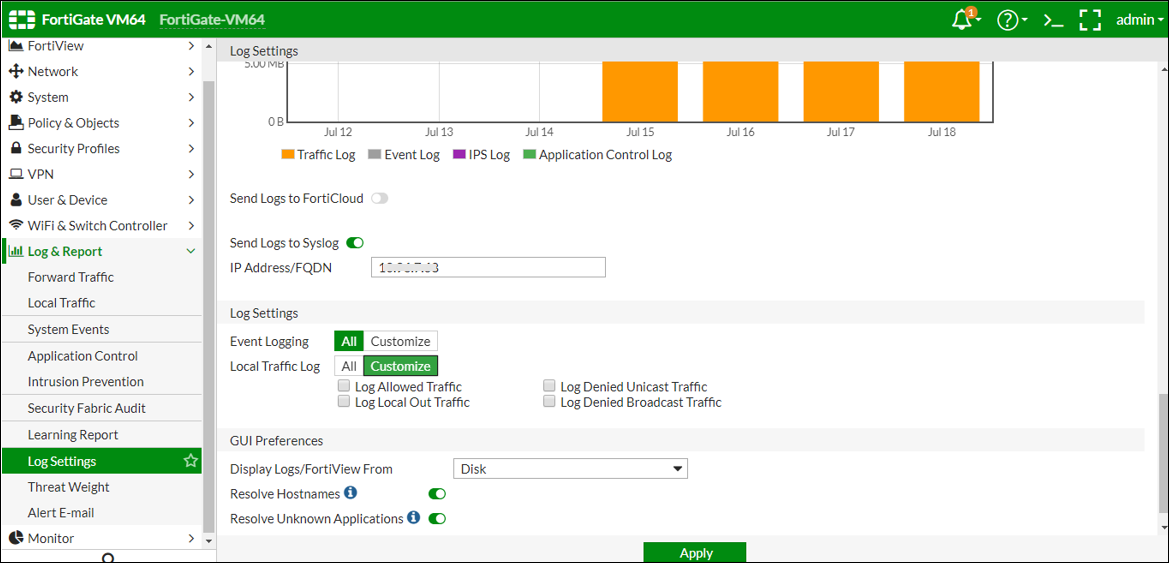
1.Select Log & Report > Log Settings.
2.Enable Send Logs to Syslog.
3.Enter the IP Address/FQDN of the PPS device and click Apply. The PPS is added as a syslog server.
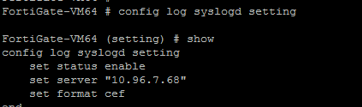
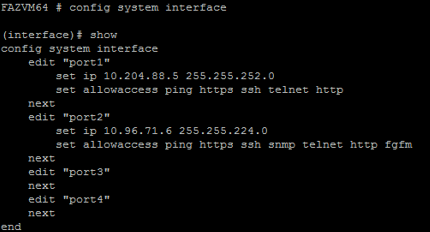
4.The default syslog format is text. You must use the following Command-Line user Interface (CLI) to change the format to CEF.
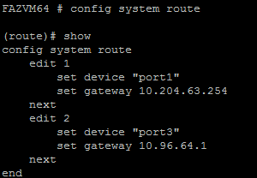
5.To access the firewall, you must configure the firewall management interface settings from the CLI.
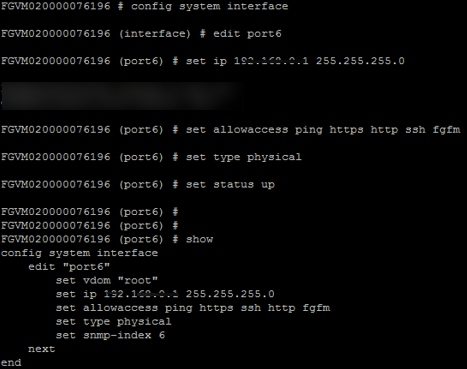
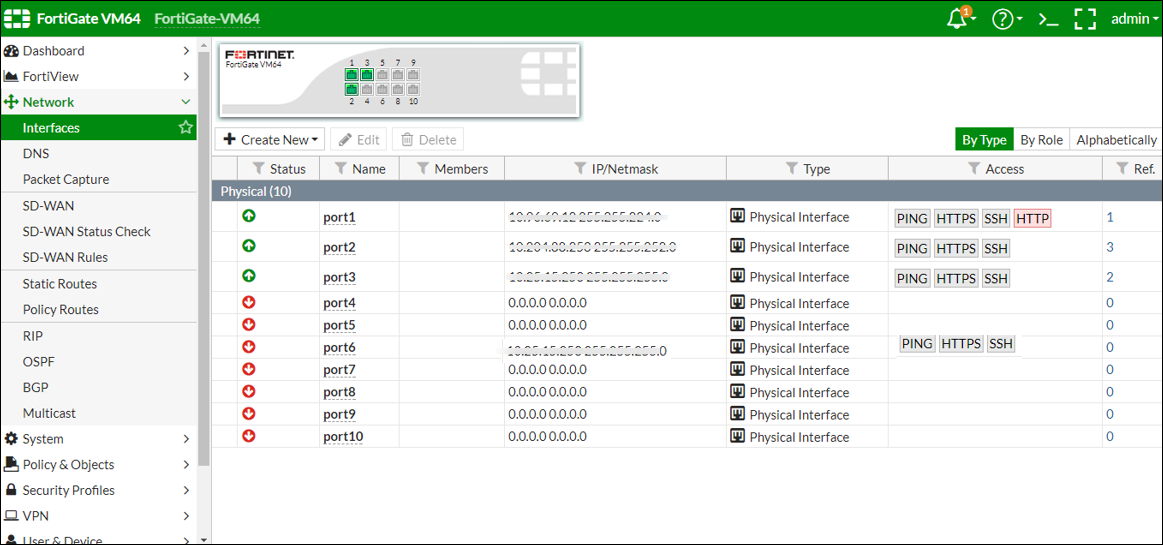
6.Under Interfaces, configure the trust and untrust zones.
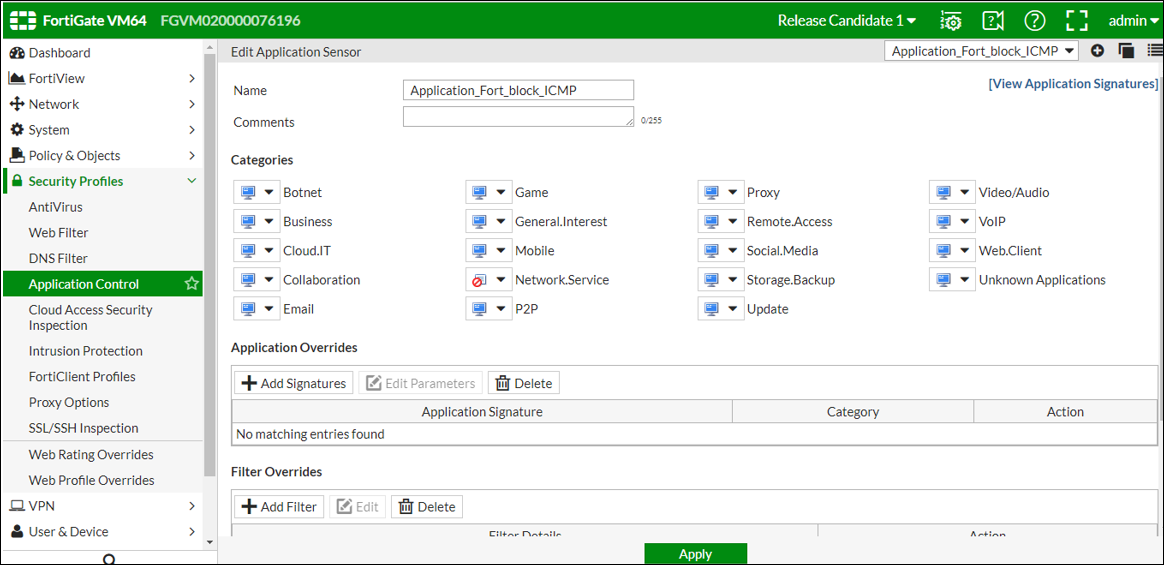
7.Under Security Profiles > Application Control, create a security profile.
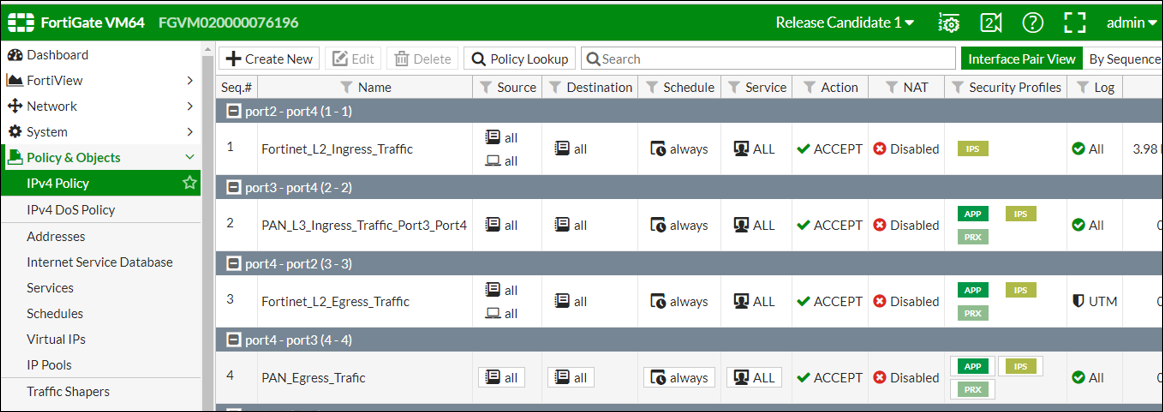
8.Under Policy & Objects, apply policies to desired port.
Configuring FortiAnalyzer
Once you have added the FortiAnalyzer as a syslog client on PPS (see, the PPS must be added as a syslog server on the FortiAnalyzer.
1.Configure the FortiAnalyzer management interface using its Command-Line user Interface (CLI).
1.On the FortiGate Firewall, under Log & Report, enable Send Logs to FortiAnalyzer/FortiManager to forward the syslog message to FortiAnalyzer. Enter the IP Address of the FortiAnalyzer.
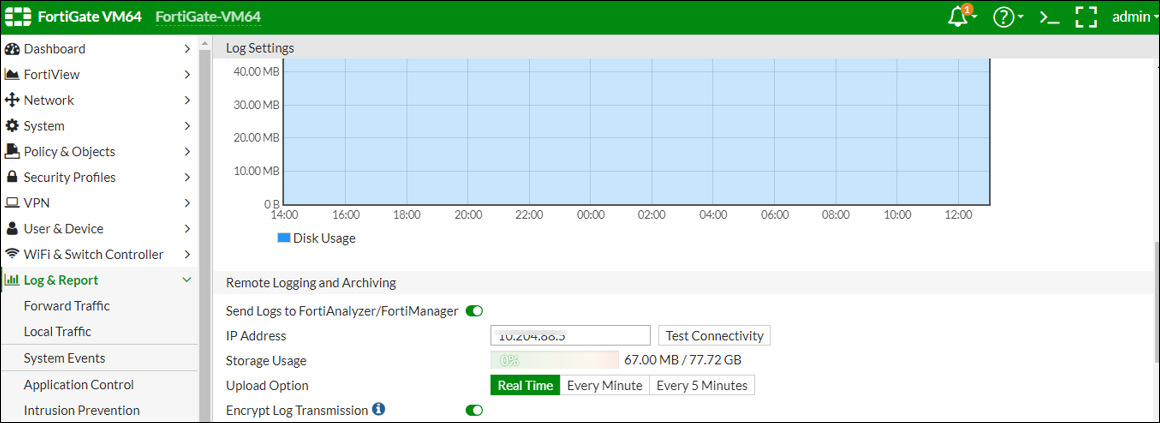
On FortiGate Firewall, ensure you have configured the security policy’s network trust, untrust zone and apply the policy to desired ports.
2.Under FortiAnalyzer > Device Manager, click Add Device to add the FortiGate Firewall.

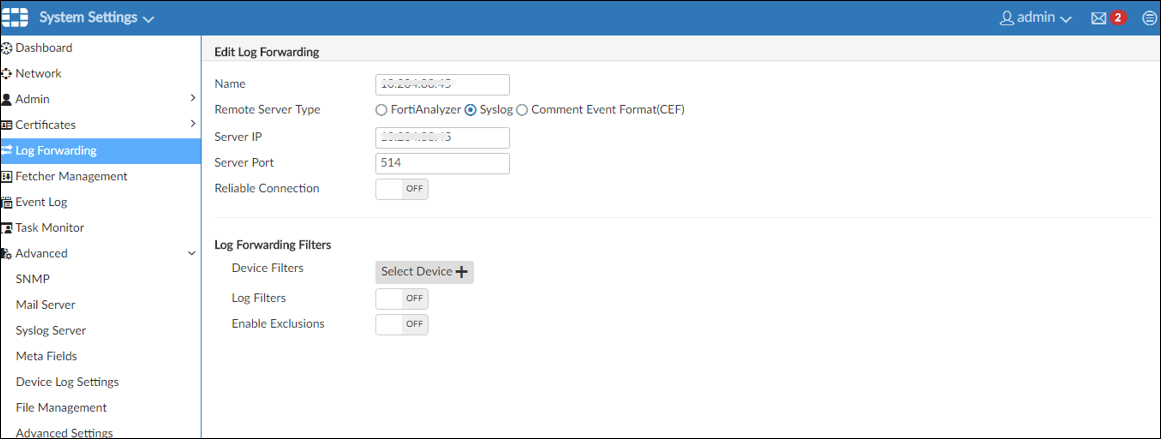
3.Under System Settings > Log Forwarding > Edit Log Forwarding, enter the IP address of the PPS device for log forwarding.
4.Under System Settings > Advanced > Syslog Server, enter the IP address of PPS device.

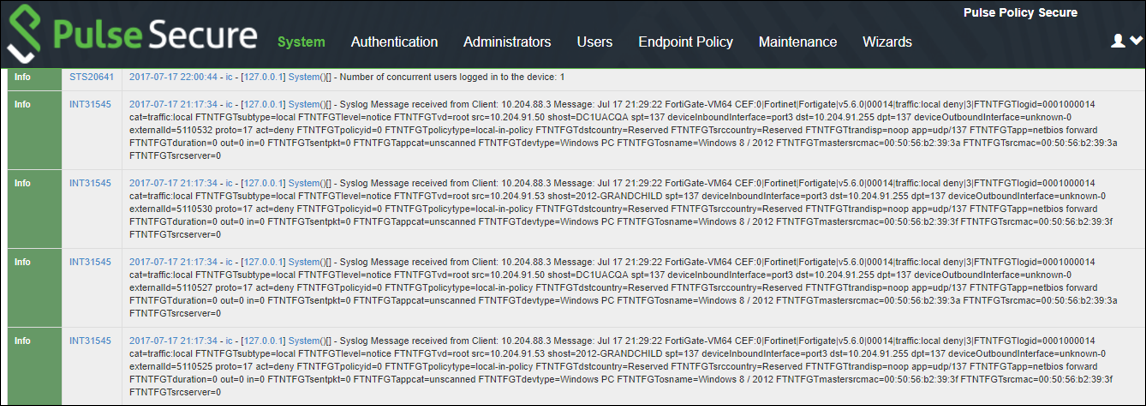
Confirming Syslog Forwarding
When the network security device detects a threat, the syslogs are forwarded to PPS. To verify the event logs have been received on PPS, select System > Log/Monitoring > Events > Log.