Configuring IBM QRadar
Adding Root/Intermediate CA Certificate
To add Root/Intermediate CA certificate:
1.Perform an SSH connection to the IBM QRadar as Root User or with equivalent user privilege.
2.Copy the intermediate/Root CA certificate to /etc/pki/ca-trust/source/anchors.
3.Run the command update-ca-trust.
If the user fails to Add Root/CA intermediate certificate before installing Pulse Secure Alert Add-On, the following additional steps needs to be performed.
# Find the Pulse Secure Alert Add-on app process ID.
[root@ibm-qradar-qa anchors]# /opt/qradar/support/recon ps
App-ID Name Managed Host ID Workload ID Service Name AB Container Name CDEGH Port IJKL
1252 Pulse Secure 53 apps qapp-1252 ++ qapp-1252 +++++ 5000 ++++
[root@ibm-qradar-qa anchors]# docker container ls
CONTAINER ID IMAGE COMMAND CREATED STATUS PORTS NAMES
a116cd36dbf1 console.localdeployment:5000/qapp/1252:1.0.0-20210222111523 "sh /start_container…" 17 minutes ago Up 17 minutes 0.0.0.0:32771->5000/tcp qapp-1252-zwgv1DhV
# Copy the CA certificate (pps.pem)to below mentioned location.
root@ibm-qradar-qa anchors]# docker cp pps.pem a116cd36dbf1:/etc/pki/ca-trust/source/anchors
# Connect to the Pulse Secure Alert Add-on app Console.
root@ibm-qradar-qa anchors]# /opt/qradar/support/recon connect 1252
# Update the CA trust.
update-ca-trust
Install Pulse Policy Secure Alert Add-On for IBM QRadar
Download the PulseSecureAppForQRadar.zip file from Pulse Secure software downloads location and install them onto your IBM QRadar server. You can also download and install the Pulse Secure app from IBM X-Force exchange site.
To configure the Pulse Policy Secure App:
1.Log into IBM QRadar as an Admin user.
2.In the IBM QRadar Dashboard, select the Admin tab.
3.Select Extension Management.
4.In the Extensions Management window, click Add and select the app archive that you want to upload to the console
5.Click Browse and upload the Pulse-Secure.zip file to install the Pulse Secure App for IBM QRadar.
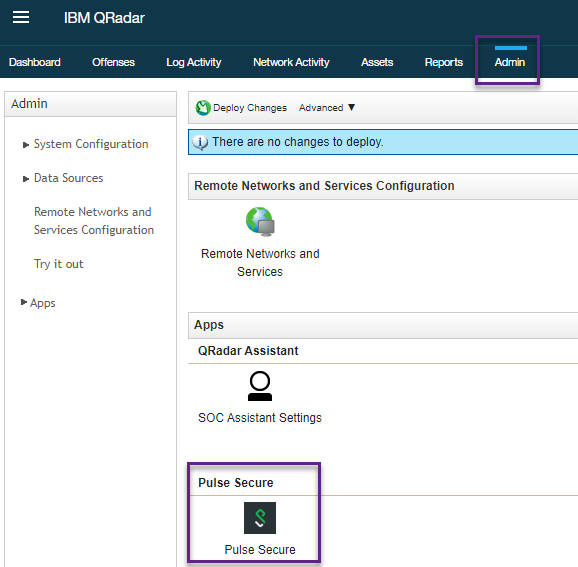
6.After installation, Pulse Secure App for IBM QRadar appears in the App section.
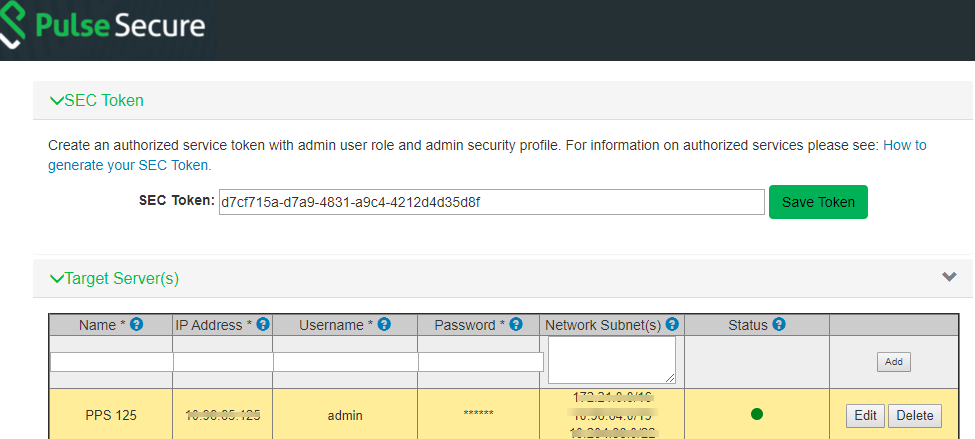
7.Select Authorized Services, and then select Add Authorized Service and follow the wizard to create authorized service.
8.Copy the Authentication Token.
9.Select the Pulse Secure Icon, paste or enter the authentication token and Save.
10.Enter the name, PPS IP address, user name, network subnet to send offenses/action. Click Add.
11.Click Save.
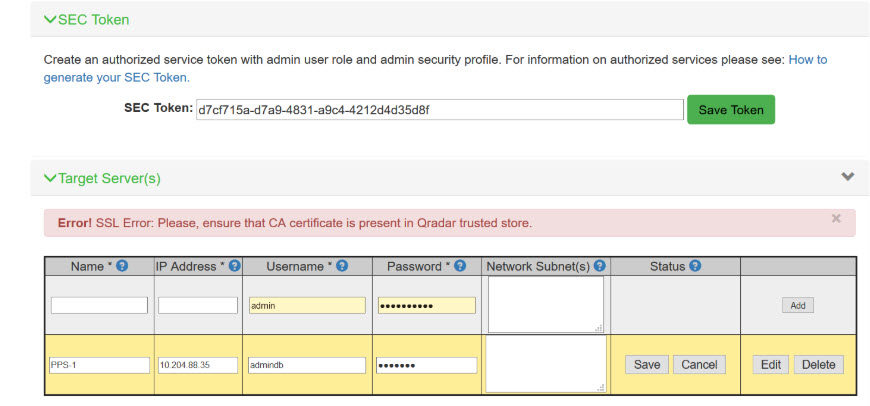
If the user gets the SSL error "Please ensure that CA certificate is present in QRadar trusted store" follow the steps mentioned in Adding Root/Intermediate CA Certificate .
Sending Offense information to PPS
To send the offense information to PPS:
1.Login to the IBM QRadar console and click Offenses.
2.In the left pane, select All Offenses. The full list of offenses is displayed.
3.Double-click on an offense. The Offense detail page opens. The Relevance, Severity and Credibility values are listed in the right corner.
•High Credibility and (High) Severity events – By default the last offense credibility is set to 8, 9, and 10.
•Medium Credibility and (Medium) Severity events - By default the last offense credibility is set to 4, 5, 6, and 7.
•Low Credibility and (Low) Severity events - By default the last offense credibility is set to 1, 2, and 3
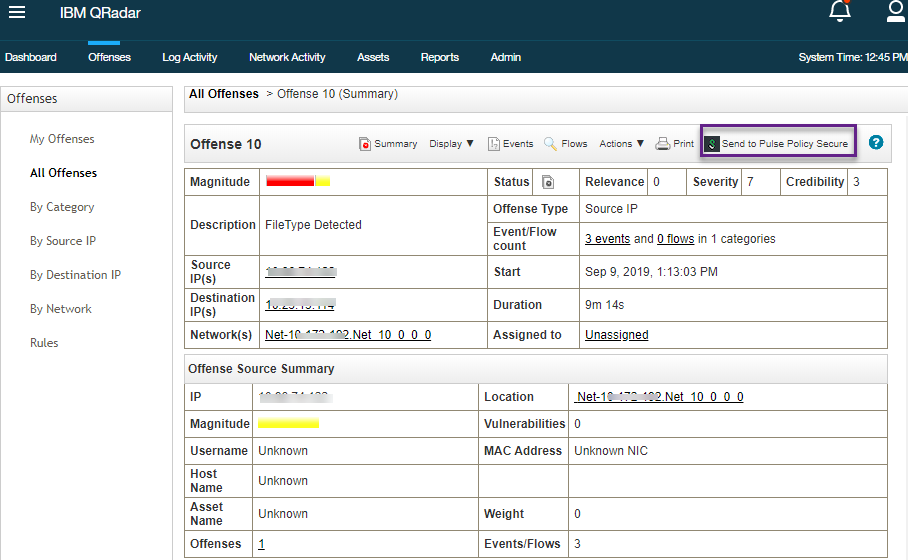
4.Click Send to Pulse Policy Secure. The Success or Failure message is displayed based on the action.
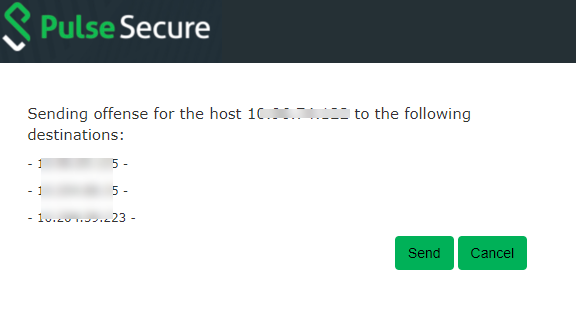
Pulse Secure App supports only four types of offenses: Source/Destination IP address, Source/Destination MAC address.
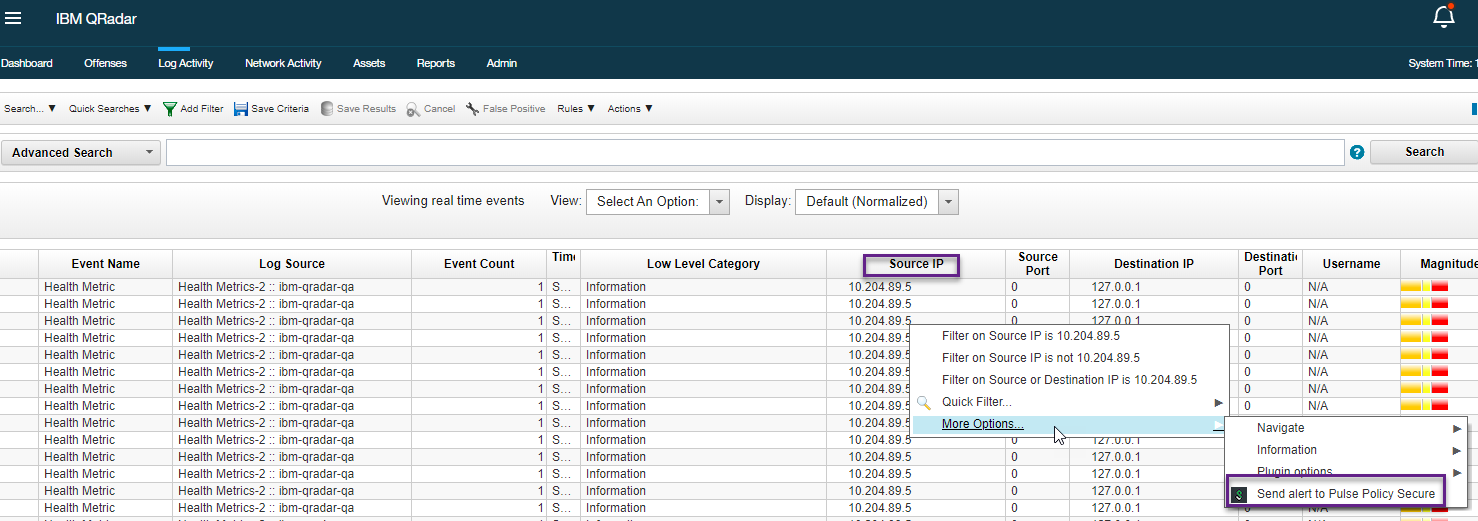
Alert Action Based on Source IP/MAC Address
SIEM provides live streaming of the processed events and flows. SIEM admin live monitors these log and network activity. Expert SIEM admin can identify the malicious host by monitoring these data. Pulse Secure application provides an option for the SIEM admin to take action for such host based on IP Address even if these are not listed under alerts.
1.Click Log Activity/Network Activity in IBM QRadar console.
2.Under Source IP column select the host by IP address or MAC address.
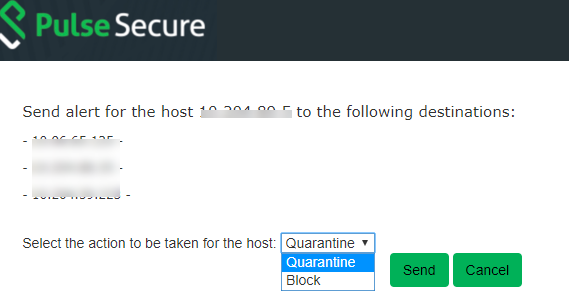
3.Click Send alert to Pulse Policy Secure.
4.On the new page, SIEM user needs to decide the action and the PPS server IP.
5.Click Send.
For more information on IBM QRadar configuration, see IBM QRadar documentation.