Configuring IPS with SRX Firewall
The IPS connects with the SRX device over an SSL connection. To enable the connection between the two devices, you must specify the password and serial number of the SRX firewall. The SRX firewall initiates the connection to IPS. IPS presents its SSL server certificate to the SRX device. Optionally, you can configure the SRX device to verify the certificate and to specify constraints with which IPS must comply.
The SRX device and IPS perform mutual authentication with the proprietary JUEP-MAUTH challenge-response authentication based on the password configured. For security reasons, the password is not included in the message sent to IPS. After the SSL handshake, all further communication between the IPS device and the SRX device occurs over the SSL connection. The SRX device acts as a client and the IPS device as server.
Configuring SRX Infranet Enforcer in IPS
To configure a SRX Firewall Infranet Enforcer in IPS:
-
Select Endpoint Policy > Infranet Enforcer.

-
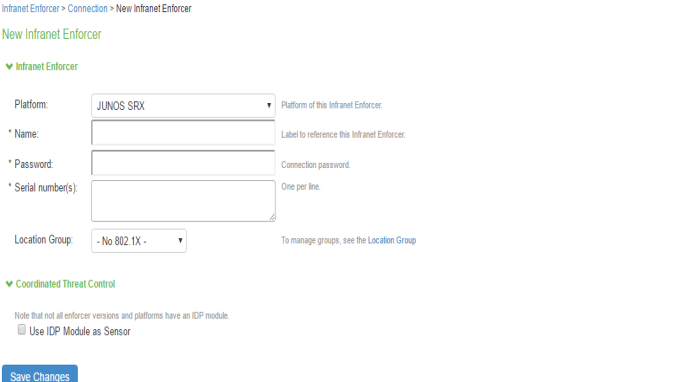
Click New Infranet Enforcer and select Junos SRX Firewall in the Platform drop down.

-
Enter the name of the Infranet Enforcer in the Name box.
-
Enter the password for the SRX enforcer.
-
Enter the serial number of the Junos SRX Enforcer. You can view the serial number on the SRX device using the command: user@host show chassis hardware
-
Ensure that the server certificate for IPS is configured for the interface to which the SRX device is connecting.
-
Click Save Changes. You must create security policies on the SRX device for traffic enforcement.
Configuring Auth Table Mapping Policies
An auth table consists of username, a set of roles, and IP address of the wired adapter, wireless adapter, or virtual adapter of the user device. Using SRX series firewall you can dynamically create auth table entries when a user tries to access the protected resource. An auth table mapping policy specifies which enforcer device can be used for each user role. These policies prevent the IPS from creating unnecessary auth table entries on all connected enforcer devices.
IPS's default configuration includes only one default auth table mapping policy. When the default auth table mapping policy is enabled, IPS pushes one auth table entry for each authenticated user to all SRX firewalls configured as Infranet Enforcers in IPS.
To configure auth table mapping policies:
-
Select Endpoint Policy > Infranet Enforcer > Auth Table Mapping.
-
Select the default auth table mapping policy called Default Policy and click Delete.
On the New Policy page:
-
For Name, enter a name to label this auth table mapping policy.
-
(Optional) For Description, enter a description.
-
In the Enforcer section, specify the Infranet Enforcer device(s) to which you want to apply this auth table mapping policy.
-
In the Roles section, specify:
-
Policy applies to ALL roles-To apply this auth table mapping policy to all users.
-
Policy applies to SELECTED roles-To apply this auth table mapping policy only to users who are mapped to roles in the Selected roles list. Be sure to add roles to this list from the Available roles list.
-
Policy applies to all roles OTHER THAN those selected below-To apply this auth table mapping policy to all users except for those who map to the roles in the Selected roles list. Be sure to add roles to this list from the Available roles list.
-
-
In the Action section, specify auth table mapping rules for the specified Infranet Enforcer device:
-
Always Provision Auth Table-To automatically provision auth table entries for chosen roles on the specified Infranet Enforcer.
-
Provision Auth Table as Needed-To provision auth table entries only when a user with a chosen role attempts to access a resource behind the specified Infranet Enforcer.
-
Never Provision Auth Table-To prevent chosen roles from accessing resources behind the specified Infranet Enforcer.
-
Make sure you delete the Default Policy if you configure any of your own auth table mapping policies. IPS includes this default auth table mapping policy that allows all source IP endpoints to use all Infranet Enforcer devices.
-
-
If you created a vsys on a ScreenOS Enforcer, enter the ID of the vsys in the vsys text box. To view the enforcers or vsys that are associated with each policy, select Infranet Enforcer > Auth Table Mapping.
-
Click Save Changes.
For more information on dynamic authentication table, see Configuring Dynamic Auth Table Policies
Configuring Resource Access Policy
A resource access policy specifies which users are allowed or denied access to a set of protected resources. You can specify which users you want to allow or deny by choosing the roles for each resource access policy.
To configure Infranet Enforcer resource access policies:
-
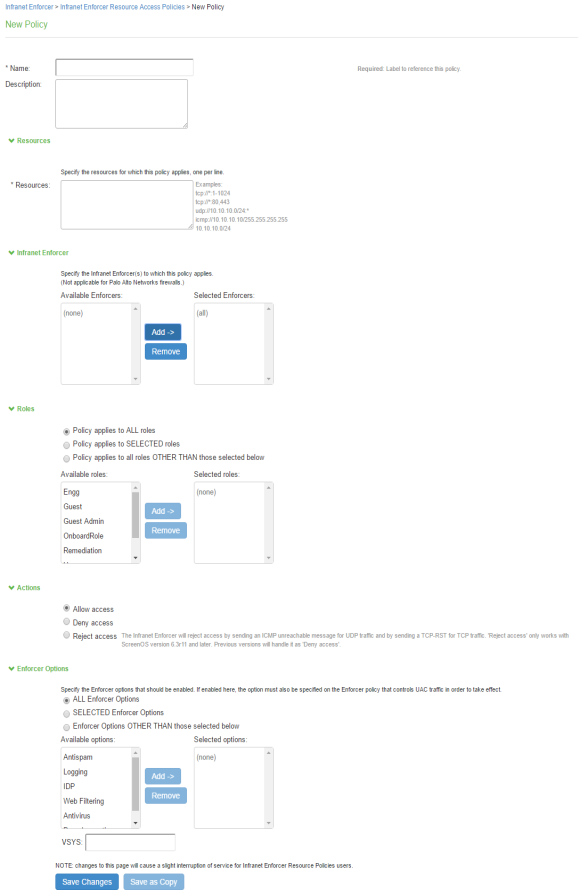
Select Endpoint Policy > Infranet Enforcer > Resource Access Policy and click New Policy.

-
On the New Policy page:
-
For Name, enter a name to label this Infranet Enforcer resource access policy.
-
(Optional) For Description, enter a description.
-
For Resources, specify the protocol, IP address, network mask, and port of each resource (or range of addresses) for which this Infranet Enforcer resource access policy applies, one per line. Do not insert any spaces in your entries, or the policy may not be applied correctly.
You cannot specify a host name in a resource access policy. You can specify only an IP address. You can use TCP, UDP, or ICMP.
-
-
Under Infranet Enforcer, specify the Infranet Enforcer to which this policy applies by using Add.
-
Specify one of the following in the Roles section:
-
Policy applies to ALL roles-To apply this Infranet Enforcer resource access policy to all users.
-
Policy applies to SELECTED roles-To apply this Infranet Enforcer resource access policy only to users who are mapped to roles in the Selected roles list. You must add roles to this list from the Available roles list.
-
Policy applies to all roles other than those selected below- To apply this Infranet Enforcer resource access policy to all users except those who map to the roles in the Selected roles list. You must add roles to this list from the Available roles list.
-
-
In the Action section, specify whether you want to use this Infranet Enforcer resource access policy to allow or deny access to the specified resources.
If you select deny, a text box is displayed that allows you to customize a deny message for users.
With ScreenOS Enforcer Release 6.3 r13 or later, you can also select Reject Access. The customized deny message is available with the reject action.
The reject action is designed for clients that hang for a long period while waiting for connection initiations that the firewall is blocking. With the deny action, the Enforcer drops traffic in accordance with the IPS policy, but does not send back reject information. The policy action of "reject" denies the traffic and sends a TCP RST to the traffic originator for TCP traffic, or ICMP unreachable for UDP traffic. In earlier versions of ScreenOS and on the Junos Enforcer, the selection of reject results in a deny action.
To record deny actions in the User Access Log, select the Infranet Enforcer Deny Messages check box on the Log/monitoring > User Access > Settings page. The log records the user, source IP, destination IP, protocol, and destination port.
-
For ScreenOS Enforcers, in the ScreenOS Options section, use the option buttons to select the policy options that you want to apply to selected roles. Use the Add and Remove buttons to specify antispam, logging, IDP, web filtering, antivirus, and deep inspection.
-
By default, all policy options are enabled. To enforce the policies, you must create corresponding policies on the ScreenOS Enforcer. If IPS is upgraded from a previous version, all ScreenOS options are enabled for the resource access policies that were available prior to the upgrade.
-
If you have created a vsys on a ScreenOS Enforcer, enter the ID of the vsys in the VSYS text box, if applicable. The Infranet Enforcer > Resource Access Policy page displays the Enforcers and/or vsys that are associated with each policy.