Configuring Certificate Verification and Transaction Export over TLS
Introduction
Once you have Services Director, a Traffic Manager and the Splunk system successfully communicating, you can add transaction export over TLS and certificate verification at various points.
Setting TLS Server Certificates on the Splunk System Endpoints
Establishing TLS server certificates on the Splunk system's endpoints requires three tasks:
•Obtaining a Signed Server Certificate.
•Configuring SSL on the Search Endpoint.
•Configuring SSL on the Collection Endpoint.
Obtaining a Signed Server Certificate
You must obtain a set of keys and certificates signed by a CA. These replace the generic certificates installed by default when deploying a Splunk system.
Guidance on how such a set of keys and certificates might be prepared (without using a commercial Certificate Authority) is provided by Splunk in the following pages:
•http://docs.splunk.com/Documentation/Splunk/7.0.2/Security/Howtoself-signcertificates
This document includes a step-by-step guide to generating a root CA key/certificate pair, then a server key and a server certificate signed by that CA.
•http://docs.splunk.com/Documentation/Splunk/7.0.2/Security/HowtoprepareyoursignedcertificatesforSplunk
This document includes a step-by-step guide on how to chain together the server certificate/key and the CA certificate created earlier, to create a server certificate chain.
Once you have a set of certificates and keys, these need to be referenced in the configuration files for the Splunk system, and (in the case of the CA certificate) in Services Director.
Configuring SSL on the Search Endpoint
To secure the search endpoint, a Splunk configuration file needs to be amended to reference the generated keys/certificates.
You currently cannot perform this configuration via the Splunk system's GUI or CLI.
1.Log into the Splunk server.
2.Edit the $SPLUNK_HOME/etc/system/local/server.conf file using a text editor, creating the file if necessary.
On Linux, $SPLUNK_HOME will normally be equivalent to /opt/splunk. It may not be defined as an environment variable, so the fully-qualified filepath may be necessary.
3.Cut/paste the following content into the file, replacing the referenced file paths/names and certificate password as required:
[sslConfig]
sslPassword = $1$D5PA3wWpcA==
<<---- (encoded version of certificate password - see note below on passwords)
serverCert = $SPLUNK_HOME/etc/auth/mycerts/myNewServerCertificate.pem
<<---- (server certificate chain file)
caCertFile = $SPLUNK_HOME/etc/auth/mycerts/myCACertificate.pem
<<---- (CA certificate)
When editing server.conf, the sslPassword can be entered in plain text. When the Splunk server next restarts, it will encode the password into the format shown in the example above.
4.Once this change has been made, the Splunk system can be restarted using:
$SPLUNK_HOME/bin/splunk restart
Alternatively, you can continue to the next section to also configure the collection endpoint, see Configuring SSL on the Collection Endpoint.
Configuring SSL on the Collection Endpoint
To secure collection endpoints, a Splunk configuration file needs to be amended to reference the generated certificates.
You currently cannot perform this configuration via the Splunk system's GUI or CLI.
1.Log into the Splunk server.
2.Edit the $SPLUNK_HOME/etc/system/local/inputs.conf file using a text editor, creating the file if necessary.
On Linux, $SPLUNK_HOME will normally be equivalent to /opt/splunk. It may not be defined as an environment variable, so the fully-qualified filepath may be necessary.
3.Cut/paste the following content into the file, replacing the referenced file paths/names and certificate password as required:
[splunktcp-ssl:5000]
<<---- (the number is the port used for the transaction export collector endpoint)
disabled = 0
[SSL]
serverCert = $SPLUNK_HOME/etc/auth/mycerts/myNewServerCertificate.pem
<<---- (server certificate chain file)
sslPassword = $1$S9aGnlDlcA==
<<---- (encoded version of certificate password - see note below on passwords)
When editing inputs.conf, the sslPassword can be entered in plain text. When the Splunk system next restarts, it will encode the password into the format shown in the example above.
4.Restart the Splunk server using:
$SPLUNK_HOME/bin/splunk restart
Setting Up Transaction Data Export over TLS and TLS Verification
This procedure assumes you already have a collection endpoint with operational transaction data import settings, and which uses unverified TLS.
GUI
1.Access your Services Director VA from a browser, using its Service Endpoint IP Address.
2.Log in as the administration user. The Home page appears.
3.Click the Catalogs menu, and then click Analytics > Analytics Endpoints.
The Analytics Endpoints page appears. For example:
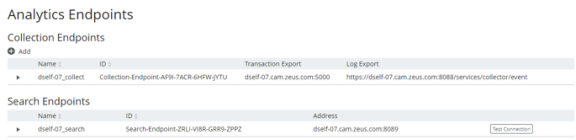
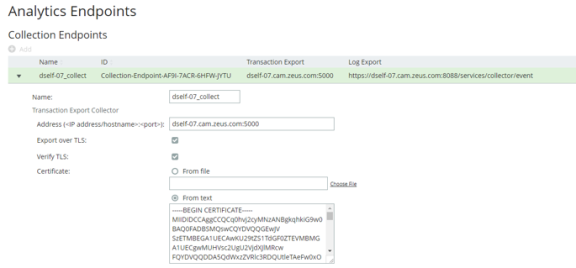
4.Expand the collection endpoint that you wish to secure (in this example, dself-07_collect):
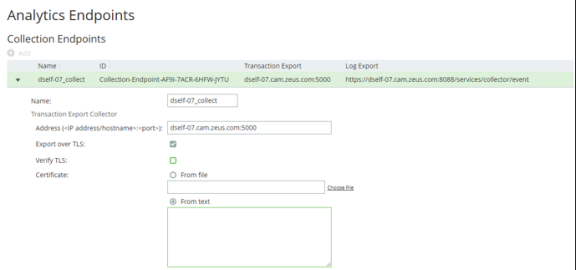
5.In the Transaction Export Collector section, paste the PEM contents of the CA certificate file into the Certificate > From text field.
For example, the contents of the myCACertificate.pem file from the Configuring SSL on the search endpoint section, see Configuring SSL on the Search Endpoint.
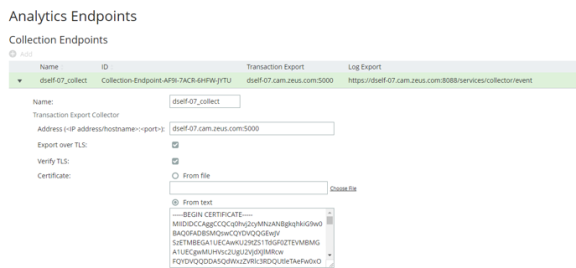
6.Select the Verify TLS checkbox.
7.Click Apply.
Setting Up Log Data Export TLS Verification
This procedure assumes you already have a collection endpoint with operational transaction data import settings, and which uses unverified TLS.
GUI
1.Access your Services Director VA from a browser, using its Service Endpoint IP Address.
2.Log in as the administration user. The Home page appears.
3.Click the Catalogs menu, and then click Analytics > Analytics Endpoints.
The Analytics Endpoints page appears. For example:
4.Expand the collection endpoint that you wish to secure (in this example, dself-07_collect):
5.In the Log Export Collector section, paste the PEM contents of the CA certificate file into the Certificate > From text field.
For example, the contents of the myCACertificate.pem file from the Configuring SSL on the Collection Endpoint section above, see Configuring SSL on the Collection Endpoint.
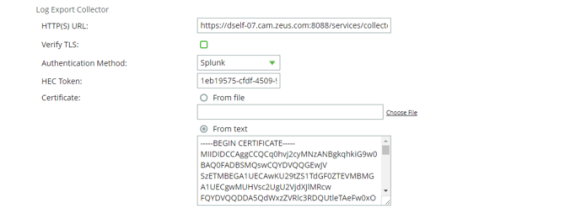
6.Check the Verify TLS checkbox.
7.Click Apply.
Setting Up Search Endpoint TLS Verification
This procedure assumes you already have a search endpoint with operational transaction data import settings, and which uses unverified TLS.
GUI
1.Access your Services Director VA from a browser, using its Service Endpoint IP Address.
2.Log in as the administration user. The Home page appears.
3.Click the Catalogs menu, and then click Analytics > Analytics Endpoints.
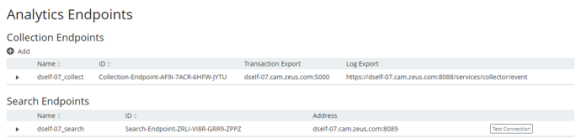
The Analytics Endpoints page appears. For example:
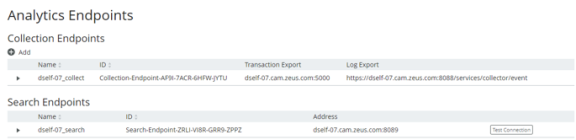
4.Expand the search endpoint you wish to secure (in this example, dself-07_search):
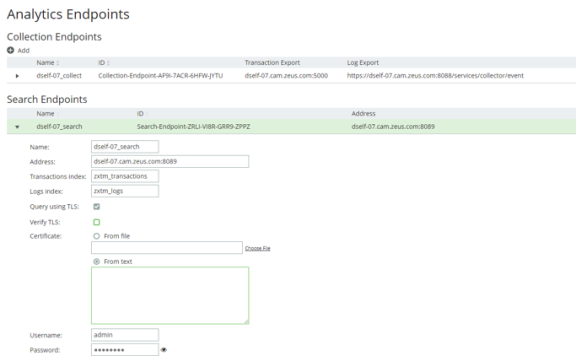
5.Paste the PEM contents of the CA certificate file into the Certificate > From text field.
For example, the contents of the myCACertificate.pem file from Configuring SSL on the Search Endpoint.
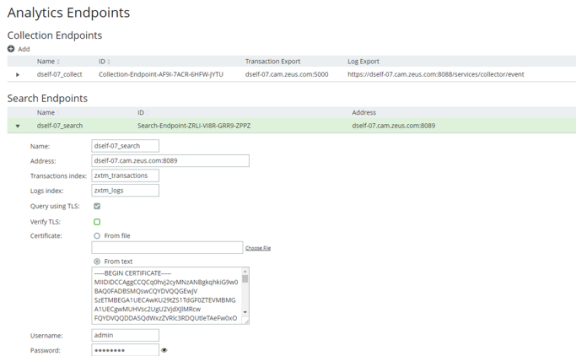
6.Check the Verify TLS checkbox.
7.Click Apply.
8.(Optional) Click the Test Connection button to ensure the search endpoint is responsive as configured.