Creating a Traffic IP Group
To create a new Traffic IP group, click Services > Traffic IP Groups. Use this page to view and edit your existing Traffic IP groups, and to create new Traffic IP groups.
Decide whether you want to create a Traffic IP group based on Elastic IP addresses or private IP addresses. To create a Traffic IP group using an Elastic IP address, you must first allocate a new Elastic IP address to your AWS account.
Allocating a New Elastic IP Address
This section does not apply to Traffic IP groups based on private IP addresses.
You manage the Elastic IP addresses allocated to your EC2 account using the “Manage Elastic IPs” section in the Traffic IP Groups page. You can use allocated Elastic IP addresses in your Traffic IP groups.

For EC2-Classic, you must have at least one Traffic Manager in your cluster that is not already part of an existing Traffic IP group, as a Traffic Manager cannot be a member of more than one Traffic IP group. This restriction does not apply to VPC configurations.
To allocate an elastic IP address to your account
1.Click Allocate new Elastic IP.
2.Select whether you need to allocate the address for use with EC2-Classic or VPC instances.
Addresses allocated for use with EC2-Classic instances are not available to VPC instances, and vice versa.
3.Since allocating an Elastic IP address might incur a charge, click the Confirm check box to confirm this action.
The new Elastic IP address appears in the table.
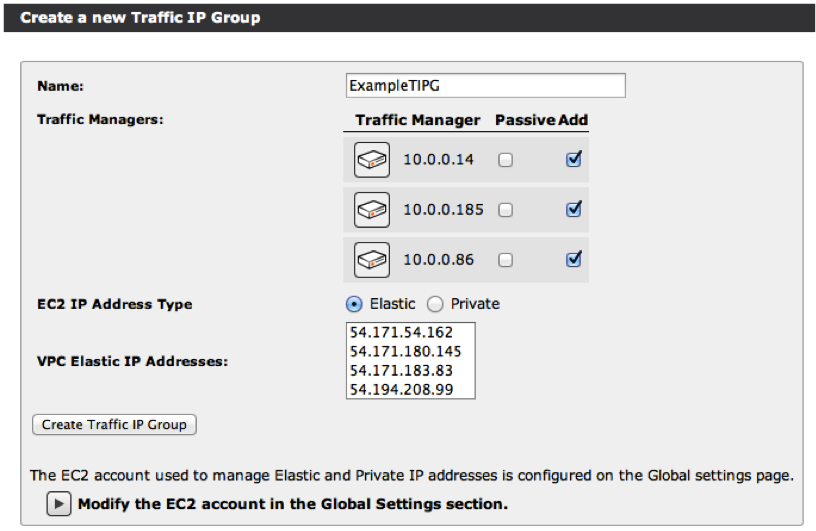
Creating a Traffic IP Group
To create a new Traffic IP group using an EC2 based Traffic Manager, use the "Create a new Traffic IP Group" section.
Clusters outside of a VPC can use only Elastic IP addresses in a Traffic IP group. In these circumstances, EC2 IP Address Type is not shown.
To create a Traffic IP group and associate it with an Elastic or private IP address
1.Enter a group name and select the Traffic Managers you want to include as members of the group.
2.If your Traffic Manager cluster resides in a VPC, choose whether to create the Traffic IP group based on either Elastic IP addresses or private IP addresses.
This step is not applicable to clusters based outside of a VPC; in which case, the only option is Elastic IP addresses.
3.Enter the following information based on whether you are using Elastic IP addresses or private IP addresses:
•For Elastic IP addresses, choose one or more Elastic IP addresses from the list.
•For private IP Addresses, type one or more private IP addresses into the text box.
For Elastic IP addresses on VPC-based instances, you must have a free secondary private IP address raised (that is, an address not currently associated with an Elastic IP address or without a virtual server bound specifically to it) before they can be joined to a Traffic IP group.
For Traffic IP groups based on Elastic IP addresses, Ivanti recommends that a VPC-based Traffic Manager has the same number of spare secondary private IP addresses as there are Elastic IP addresses in the Traffic IP groups to which the Traffic Manager belongs.
For example, if your Traffic Manager is part of two Traffic IP groups, each containing two Elastic IP addresses, the Traffic Manager should have four spare secondary private IP addresses so that all Elastic IP addresses can move to it at the same time.
The Traffic (Elastic) IP is raised using this secondary Private IP on the default network interface. The primary Private IP is used for Traffic Manager administration and multi-site cluster management support and is not available for this purpose.
4.Click Create Traffic IP Group to create the new group.
(EC2-Classic only) If the Traffic Manager you are currently logged into is part of the new Traffic IP group, the Traffic IP address may be raised. This causes the Admin UI address to change. If the Admin UI address changes, you are redirected and connected to the new Admin UI address as soon as the address is available. You may see a certificate warning from the new address. Receiving this warning is normal and you can ignore it. (For more information, see the Connecting to the Admin UI).
Disabling a Traffic IP Group
You can disable a Traffic IP group using the Enabled setting on the edit page for that group. You can temporarily disable a group if it is not currently required but may be required in the future.
You cannot release an Elastic IP address assigned to a disabled Traffic IP group. You also cannot lower a private IP address that has been assigned to a disabled Traffic IP group. Furthermore, for EC2-Classic, Traffic Managers in a disabled Traffic IP group remain assigned to that group and cannot be assigned to another group.
(EC2-Classic only) If the Traffic Manager you are currently logged into is hosting the Traffic IP address associated with the group you are disabling, your connection to the Admin UI is dropped. This connection is then unavailable for several minutes while Amazon allocates a new public IP address. For this reason, change Traffic IP group settings from the Admin UI of a machine that is not a member of the group you are changing.
Releasing an Elastic IP Address
To release an Elastic IP address
1.Make sure the Elastic IP address is not associated with a Traffic IP group. If this is the case, first delete the Traffic IP group. It t may take a few seconds for the Traffic Manager hosting the IP address to release the address.
2.Click the Release IP check box next to each IP address to be released.
3.Click Confirm.
4.Click Release Selected Elastic IPs to complete the action.
Assigning Elastic IP Addresses to Specific Network Cards
The Traffic Manager allows you to use multiple network cards with your Traffic IP groups on an instance running inside a VPC. By increasing your Traffic Manager network connections, a greater degree of fault tolerance is provided.
For Traffic Manager software variants running inside a Linux virtual machine, use only those Linux AMIs that automatically support, and can configure, multiple network cards. Refer to your support provider for further information.
To assign Elastic IPs to specific network cards
1.To assign the network cards for your Elastic IP associations, click Services > Traffic IP Groups to display the EC2 Traffic IP Network Cards page.
2.Select the network card you want to use.
3.Click Update Public ENIs. The next EC2 Traffic IP Network Cards page appears.
4.Select the network card you want to use.
5.Click Add.
About Configuring Multiple Network Cards
For each of your Elastic IP (Traffic IP) addresses, you can specify more than one network card for the Traffic Manager to use. However, select only those network cards in a subnet that has access to the Internet (that is, your public subnets).
Ivanti recommends that you make changes to the network cards you are using at a time of least disruption to your services.
For EC2 appliance variants, the Traffic Manager automatically configures the card settings (such as routes, IP addresses, and routing rules). To add or remove secondary private IP addresses, use the System > Networking page.
For software instances running on an EC2 virtual machine, the Traffic Manager does not maintain or configure the network cards it uses.
If you do not specify a network card for your Elastic IP addresses, the Traffic Manager uses the default network card.
The Traffic Manager only uses secondary private IP addresses to associate with the Elastic IP. For this reason, make sure you have enough secondary private IP addresses available on the network cards you intend to use.